Introduction to react-router-dom: setting up your first routes
The react-router-dom library lets you set and navigate through different routes inside your SPA. In this tutorial you'll learn how to use react-router-dom to configure your React application's routing


Websites built with Javascript frameworks/libraries like Vue and React JS are Single Page Apps. This means that all the elements on the website are done on a single index.html page. But these frameworks have a way of making a page have nested URL routes even though it is built on a single page. These routes make the page easier to navigate with the back and forward buttons of a browser and break the web app into parts.

React JS as a Single Page App library doesn’t include built-in routing capabilities as Angular does; it needs a library called react-router-dom to do this. Now, that library has been in use for a long time, but with a new version (v6) released, a lot of things have been changed in how the library is used.
In this tutorial, we will go over the react-router-dom version 6 library and see how to perform many routing tasks. At the end of this tutorial, you should know how react-router-dom v6 works and how to use it to create navigation links, pass states through links, redirect pages, create nested pages, protect routes, and so on.
How to get started with react-router-dom?
For a quick setup of a React Application, I recommend starting a new React project at https://stackblitz.com. However, here’s a guide on installing React JS on your local machine. After that setup, if we are working locally, we must add the react-router-dom library. (On Stackblitz, just install the package as a dependency.)
npm install react-router-dom@6The @6 specifies that we are installing version 6 into our project. After the dependency/library is installed, we start our React project.
npm startWith everything working, we are ready to move over to the next stage.
Setting up the Router
The first thing we will do on our website is to create a component encompassing all the different routes we will have in our app. This component must be placed at the highest level of the App component. So, open up the project in a code editor and navigate to src/App.js.
import React from "react";
import { BrowserRouter } from "react-router-dom";

function App() {
  return (
    <BrowserRouter>
    </BrowseRouter>
  );
}

export default App;
In this file, we imported the BrowserRouter component, and then we used it to wrap other things in our App.js. Other types of routers have different purposes, but the docs recommend BrowserRouter for web apps.
And now, inside this BrowserRouter component, other components and hooks from react-router-dom can work.
Creating Navigation links
Let’s create a Header on our website before creating the navigation links.
import React from "react";
import {BrowserRouter} from "react-router-dom";

function App() {
  return (
    <BrowserRouter>
      <header>
        <h1>Hello World</h1>
      </header>
    </BrowseRouter>
  );
}

export default App;
We will create some navigation links that will point to some routes inside our App.js. These routes are created inside the App.js because we want them to be visible on every page. To do that, we must import the NavLink component. This is a link component (similar to the <a> tag) that knows whether or not it is “active”, meaning it can highlight itself if the current page is the page it routes to.
In our src/App.js:
import React from "react";
import { BrowserRouter, NavLink } from "react-router-dom";
function App() {
return (
<BrowserRouter>
<header>
<h1>Hello World</h1>
</header>
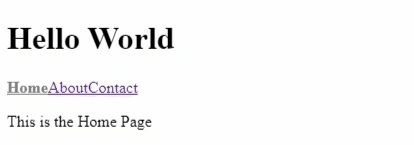
<nav>
<NavLink to="">Home</NavLink>
</nav>
</BrowserRouter>
);
}
export default App;
And we should have the picture below on display.
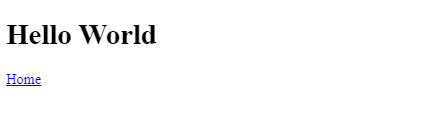
Now, we have a component that points us to the route / whenever we click on it. The to prop shows the Navlink where to go.
We will create some more navigation links using the NavLink component.
import React from 'react';
import { BrowserRouter, NavLink } from 'react-router-dom';

function App() {
  return (
    <BrowserRouter>
      <header>
        <h1>Hello World</h1>
      </header>
      <nav>
        <NavLink to="">Home</NavLink>
        <NavLink to="about">About</NavLink>
        <NavLink to="contact">Contact</NavLink>
      </nav>
    </BrowserRouter>
  );
}

export default App;
And now, we will have this displayed.
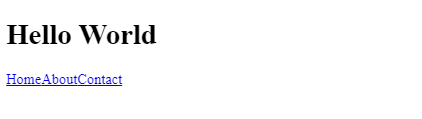
These links lead to the routes /home, /about, and /contact. And whenever they are clicked, the URL of the webpage changes accordingly.
Highlighting the current link - Adding the Active Class
The “active” class merely highlights a link when the page is currently where the link points to.
To add it, we first need to define a class that will contain all the styles of our active NavLink.
The style class will be defined inside our style.css file.
src/style.css
.nav-active {
  color: grey;
  font-weight: bold;
}
And then, we make sure we import our CSS file into our App.js (change the export default on all files).
After that, inside our App.js, we create a string containing the class’s name and write a conditional statement that adds the class name whenever it is active.
This is possible thanks to the isActive boolean we get on our callback function.
src/App.js
import React from 'react';
import './style.css'
import { BrowserRouter, NavLink } from 'react-router-dom';

export default function App() {
  let activeClassName = "nav-active";
  return (
    <BrowserRouter>
      <header>
        <h1>Hello World</h1>
      </header>
      <nav>
        <NavLink to="" className={({ isActive }) => isActive ? activeClassName : undefined}>Home</NavLink>
        <NavLink to="about" className={({ isActive }) => isActive ? activeClassName : undefined}>About</NavLink>
        <NavLink to="contact" className={({ isActive }) => isActive ? activeClassName : undefined}>Contact</NavLink>
      </nav>
    </BrowserRouter>
  );
}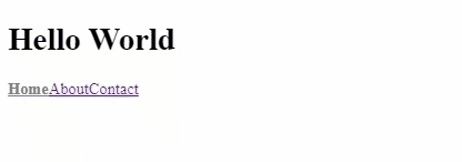
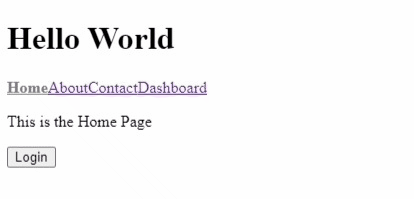
As we can see, the styles are applied to the links when clicked.
Creating a navigation with the router - Adding Pages to the Routes
The next step is to understand how to create new pages and link them, somehow, to the routes we defined.
For this, we need to create a folder called pages inside our src folder and create the following files (our pages):
Home.jsAbout.jsContact.jsError.js
After Creating the pages, we will add some content to them.
/src/pages/Home.js
import React from 'react';

function Home(){
  return (
    <div>
      <p>This is the Home Page</p>
    </div>
  )
}

export default Home;
/src/pages/About.js
import React from 'react';

function About(){
  return (
    <div>
      <p>This is the About Page</p>
    </div>
  )
}

export default About;
/src/pages/Contact.js
import React from 'react';

function Contact(){
  return (
    <div>
      <p>This is the Contact Page</p>
    </div>
  )
}

export default Contact;
/src/pages/Error.js
import React from 'react';

function Error(){
  return (
    <div>
      <p>This is the Error Page</p>
    </div>
  )
}

export default Home;
The Error page was created so that routes that don’t match any of the above-defined routes are assigned the Error Page (essentially, this is going to be our custom 404 error page).
Now, the next thing to do is to “link” these components (our pages) to the routes, so that when we click on a link to a particular route, the right component is shown.
First of all, we need to import a component from react-router-dom called Routes.
The Routes component will contain all the different possible routes that can be displayed on that particular segment of a page,
and it can be looked at as an array of Routes.
/src/App.js
import React from 'react';
import './style.css'
import { BrowserRouter, NavLink, Routes } from 'react-router-dom';

export default function App() {
  let activeClassName = "nav-active";
  return (
    <BrowserRouter>
      <header>
        <h1>Hello World</h1>
      </header>
      <nav>
        <NavLink to="" className={({ isActive }) => isActive && activeClassName}>Home</NavLink>
        <NavLink to="about" className={({ isActive }) => isActive && activeClassName}>About</NavLink>
        <NavLink to="contact" className={({ isActive }) => isActive && activeClassName}>Contact</NavLink>
      </nav>
      <Routes>

      </Routes>
    </BrowserRouter>
  );
}
To define individual Routes that can be possibly displayed in the Routes component, we use another component called Route.
The Route component accepts two props.
path: This is the URL the link will navigate us to. This prop is similar to thetoprop of theNavLinkcomponent.element: This contains the element that will be rendered when the page navigates to that route.
/src/App.js
import React from 'react';
import './style.css'
import Home from './pages/Home'
import About from './pages/About'
import Contact from './pages/Contact'
import Error from './pages/Error'
import { BrowserRouter, NavLink, Routes, Route } from 'react-router-dom';

export default function App() {
  let activeClassName = "nav-active";
  return (
    <BrowserRouter>
      <header>
        <h1>Hello World</h1>
      </header>
      <nav>
        <NavLink to="" className={({ isActive }) => isActive && activeClassName}>Home</NavLink>
        <NavLink to="about" className={({ isActive }) => isActive && activeClassName}>About</NavLink>
        <NavLink to="contact" className={({ isActive }) => isActive && activeClassName}>Contact</NavLink>
      </nav>
      <Routes>
        <Route path="/" element={<Home/>} />
        <Route path="about" element={<About/>} />
        <Route path="contact" element={<Contact/>} />
        <Route path="*" element={<Error/>} />
      </Routes>
    </BrowserRouter>
  );
}
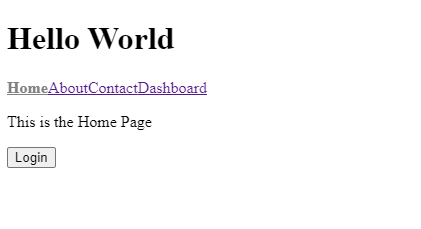
After creating the Routes, the nav links should lead to the pages they are designated to.
Adding links with react-router-dom
The way to create regular links with react-router-dom is by using the Link component.
NOTE: Link component is very similar to the NavLink component. The only difference is that NavLink knows when it is active while Link does not.
We will import it into the component/page we want to use it.
For example, we will create a Link inside our Contact page that points to the home page.
/src/pages/Contact.js
import React from 'react';
import { Link } from 'react-router-dom';

function Contact(){
  return (
    <div>
      <p>This is the Contact page</p>
      <Link to="/">Back to Home</Link>
    </div>
  )
}

export default Contact;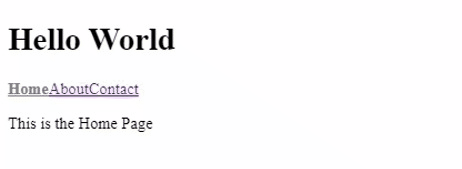
NOTE: To link to pages, use a ”/”, which shows that we are navigating to the base route.
To navigate to other base route pages, we use a / and the name, e.g. /contact, /about, etc.
Open Source Session Replay
OpenReplay is an open-source, session replay suite that lets you see what users do on your web app, helping you troubleshoot issues faster. OpenReplay is self-hosted for full control over your data.

Start enjoying your debugging experience - start using OpenReplay for free.
Redirecting to another Page
Suppose we created a Dashboard link that will redirect us to the home page when we click it (silly example, I know, but keep reading).
There are two ways to do this in react-router-dom v6.
- Using the
Navigatecomponent - Using the
useNavigatehook
Using the Navigate component
The Navigate element changes the current location of the page whenever rendered. The way to use the Navigate element is to
- import the
Navigatecomponent fromreact-router-dom. - Add a
toprop that points to the location the page is to redirect to.
Adding the dashboard to a nav link in src/App.js
import React from 'react';
import './style.css'
import Home from './pages/Home'
import About from './pages/About'
import Contact from './pages/Contact'
import Error from './pages/Error'
import { BrowserRouter, NavLink, Routes, Route, Navigate } from 'react-router-dom';

export default function App() {
  let activeClassName = "nav-active";
  return (
    <BrowserRouter>
      <header>
        <h1>Hello World</h1>
      </header>
      <nav>
        <NavLink to="" className={({ isActive }) => isActive && activeClassName}>Home</NavLink>
        <NavLink to="about" className={({ isActive }) => isActive && activeClassName}>About</NavLink>
        <NavLink to="contact" className={({ isActive }) => isActive && activeClassName}>Contact</NavLink>
        <NavLink to="dashboard">Dashboard</NavLink>
      </nav>
      <Routes>
        <Route path="/" element={<Home/>} />
        <Route path="about" element={<About/>} />
        <Route path="contact" element={<Contact/>} />
        <Route path="dashboard" element={<Navigate to="/" />} />
        <Route path="*" element={<Error/>} />
      </Routes>
    </BrowserRouter>
  );
}
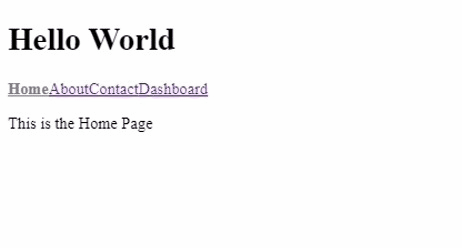
And now, whenever we click on the dashboard link, it takes us back to the home page because instead of rendering a component we’re using the Navigate component.
Using the useNavigate hook
The useNavigate hook can also be used to redirect pages. Suppose we have a button on our About page that redirects us to the homepage. We will:
- import the
useNavigatehook - define a variable called
navigatewith the result of executing theuseNavigatehook. - call the
navigatefunction and give the path to be redirected to as a parameter
/src/pages/About.js
import React from 'react';
import { useNavigate } from 'react-router-dom';
function About(){
let navigate = useNavigate();
return (
<div>
<p>This is the About Page</p>
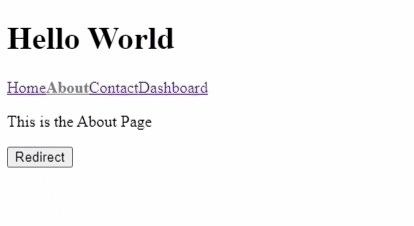
<button onClick={()=> navigate("/")}>Redirect</button>
</div>
)
}
export default About;And we should have this:
This method is more straightforward than using a component, and it also gives you more flexibility at the time of implementation to decide how and when you’d perform the redirection.
Sharing States with the Router
If you need to share states between components while using react-router-dom, there are three ways to achieve this:
- Using the
Linkcomponent - Using the
Navigatecomponent - Using the
useNavigatehook
Using the Link component
You can share information (state) with the page you’re liking to using the Link component.
In the following exampole, we will pass data from our Contact page to our Home page.
/src/pages/Contact.js
import React from 'react';
import { Link } from 'react-router-dom';

function Contact(){
  return (
    <div>
      <p>This is the Contact page</p>
      {/* Pass in any Values you want to save in state, inside the state prop */}
      <Link to="/" state={"From Contact Page"}>Back to Home</Link>
    </div>
  )
}

export default Contact;
And now, to access the state, we use another hook called useLocation inside the page receiving the information (Home Page for this example).
This hook will expose us to the value inside the state variable.
/src/pages/Home.js
import React from 'react';
import { useLocation } from 'react-router-dom'

function Home(){
  let location = useLocation();
  return (
    <div>
      <p>This is the Home Page</p>
      { location.state && <p>From Dashboard</p>}
    </div>
  )
}

export default Home;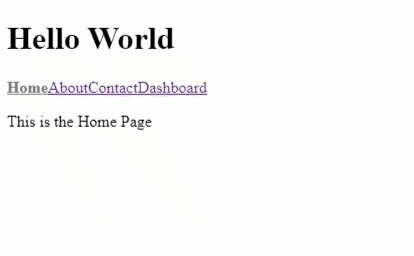
Using the Navigate component
The Navigate component can also pass state data with react-router-dom.
This is done by giving the component a state prop that contains the value we want to share.
For example, our Dashboard link redirects to our Home Page using the Navigate component.
With the following change, we will pass a state value into the Navigate component, which we can then get and display on the Home page using the useLocation hook, just like before.
/src/App.js
...

<Route path="dashboard" element={<Navigate to="/" state={"From Dashboard"}/>} />

...
/src/pages/Home.js
import React from 'react';
import { useLocation } from 'react-router-dom'

function Home(){
  let location = useLocation();
  return (
    <div>
      <p>This is the Home Page</p>
      { location.state && <p>From Dashboard</p>}
    </div>
  )
}

export default Home;
Using the useNavigate hook
The function navigate(), which we called when learning how to redirect pages using the useNavigate hook, accepts two parameters: to and an object that contains a state.
We will make the Redirect button carry a state to the home page.
/src/pages/About.js
import React from 'react';
import { useNavigate } from 'react-router-dom';

function About(){
  let navigate = useNavigate();
  return (
    <div>
      <p>This is the About Page</p>
      <button onClick={()=> navigate("/", { state: "From the About Page"})}>Redirect</button>
    </div>
  )
}

export default About;
And again, to read the state, we use the state property of the location object return from calling useLocation.
/src/pages/Home.js
import React from 'react';
import { useLocation } from 'react-router-dom'

function Home(){
  let location = useLocation();
  return (
    <div>
      <p>This is the Home Page</p>
      { location.state && <p>From the About Page</p>}
    </div>
  )
}

export default Home;
How to protect routes using react-router-dom?
Sometimes in our routing system, we might not want users to visit a particular page if they are not authenticated. We can stop users from accessing these pages by protecting the routes.
Setting up a simple Auth System
Let’s say we want to protect the Dashboard, and make sure only authorized users can access that URL.
For that, we’ll first create the functions that will handle the log-in and log-out logic. Whatever you do there (either checking for a hardcoded pair of credentials, or a social log-in), you’l
have to end the flow by calling setLoggedIn with a true if the log-in attempt was successful or with false otherwise.
For this example, we’ll ignore the log-in logic, and we’ll focus on the imported functions instead.
/src/App.js
...
let [loggedIn, setLoggedIn] = useState(null);
function handleLogin(){
  setLoggedIn(true);
}
function handleLogout(){
    setloggedin(false);
}
...
<Route path="/" element={<Home login={handleLogin} />} />
...
Now, we have a function that logs a user in, and a function that logs a user out, and we have passed that function as a prop to the Home component.
The next thing to do is create a login button on the home page.
/src/pages/Home.js
import React from 'react';
import { useLocation } from 'react-router-dom';

function Home({ login }) {
  let location = useLocation();
  return (
    <div>
      <p>This is the Home Page</p>
      <button onClick={login}>Login</button>
      {/* {location.state && <p>From the About Page</p>} */}
    </div>
  );
}

export default Home;
So, the user is automatically logged in whenever he clicks Login.
Creating a Dashboard Page
This will be the page where the user will be redirected whenever logged in. We will create a new /Dashboard.js file inside the pages folder and then add the following code.
/src/pages/Dashboard.js
import React from 'react';

function Dasboard({ logout}){
  return (
    <div>
      <p>Welcome User </p>
      <button onClick={logout}>Logout</button>

    </div>
  )
}

export default Dashboard;
Protecting the Dashboard Page
To protect the Dashboard page, we will write a conditional statement on the route of the dashboard.
Remember, this is the route that prior to this was redirecting the user to the home page. Now you can add the necessary code
to make it redirect to the right destination.
/src/App.js
...
import Dashboard from './pages/Dashboard'
...
<Route
    path="/"
    element={
      loggedIn ?
      <Navigate to="/dashboard"/> :
      <Home login={handleLogin} />}
/>
<Route
  path="dashboard"
  element={
    loggedIn ?
    <Dashboard logout={handleLogout}/> :
    <Navigate to="/" state="From Dashboard" />}
/>
The first Route is checking whether the user is logged-in, if they are, then redirect to the /dasdhboard, otherwise render the Home component.
The second Route takes care of rendering the dashboard only if the user is logged-in, otherwise it’ll redirect back to the homepage.
This will prevent the user from accessing the route if the user is not logged in. But once the user is logged in, the route is now accessible. Finally, let us redirect to the dashboard whenever the user clicks the Login button.
/src/pages/Home.js
import React from 'react';
import { useNavigate } from 'react-router-dom';

function Home({ login }) {
  let navigate = useNavigate();
  return (
    <div>
      <p>This is the Home Page</p>
      <button onClick={()=>{
        login();
        navigate('/dashboard')
      }}>
        Login
      </button>
      {/* {location.state && <p>From the About Page</p>} */}
    </div>
  );
}

export default Home;
Remember, this code only works because we’re simplifying the log in process. If you’re trying to use this, you’ll want to check the returned value of the login function to understand
if the credencials were correct.
And now, we should have a fully working simple Auth system and protected Dashboard route.
Adding Nested Routes with react-router-dom
We are going to create a /dashboard/settings route which means we will have the settings route inside the dashboard route.
/src/App.js
...
<Route
  path="dashboard"
  element={
    loggedIn ?
    <Dashboard logout={handleLogout}/> :
    <Navigate to="/" state="From Dashboard" />}
>
  <Route path="settings" element={<p>This is the nested Settings route</p>}/>
</Route>
...
The nested Route component creates a /settings inside /dashboard. But for this to work, we must import the Outlet component into our Dashboard.js.
This new component, the Outlet is the one getting replaced by the nested route content. Wherever you put it, that’s where the nested route will be rendered.
/src/pages/Dashboard.js
import React from 'react';
import { Outlet, Link } from 'react-router-dom';

function Dasboard({ logout }){
  return (
    <div>
      <p>Welcome User </p>
      <Link to="settings">Settings</Link>
      <Outlet/>
      <button onClick={logout}>Logout</button>
    </div>
  )
}

export default Dashboard;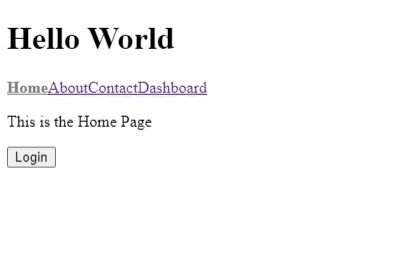
Reading URL parameters with react-router-dom using the useParams hook
useParams is a react-router-dom hook with access to a URL parameter value. We will create a Profile.js page that will grab whatever id we give the URL and display it on the page.
/src/pages/Profile.js
import React from 'react';
import { useParams } from 'react-router-dom';

function Profile(){
  let { userId } = useParams();
  return (
    <div>
      <p>The id of this user is { userId }</p>
    </div>
  )
}

export default Profile;
/src/App.js
import Profile from './pages/Profile'
...
<Route path="profile">
  <Route path=":userId" element={<Profile/>}/>
</Route>
And now, whenever we navigate to /profile/1 (Note: The id can be any value), we have this displayed:

Conclusion
react-router-dom v6 is a library with many features, and we have gone over the basics of how the library works. We have learned
- Creating navigation links
- Adding pages to routes
- Creating normal links
- Redirecting pages
- Protecting routes and a lot more!
With this, you should comfortably know how to use the react-router-dom library version 6.
The source code of all the operations performed in this tutorial can be found here on Stackblitz. https://stackblitz.com/edit/react-kunxgu
References
-
Official React Router Documentation: https://reactrouter.com/