Setting up Google AdMob Ads with React Native


Google Admob allows developers and app owners to monetize their applications with app advertising and earn revenue from traffic on the app. This functionality has been one of the best methods through which developers and app owners can generate revenue from their applications while the users use the app.
In this tutorial, I will extensively review the setup of Google Admob in a React Native project. I will demonstrate with a simple application, and the same process can be applied to any React Native project. As for the complete source code of this tutorial, you can find it on my GitHub repo.
A Google account is required to follow along. Also, you should have basic knowledge of React Native, have completed the React Native environmental setup on your computer, and have your Android and iOS emulators well configured as they will be handy for testing the project. If you still need to complete the necessary setup, kindly follow this link, and you will find a step-by-step guide to setting it up.
First Steps
In this tutorial, I will cover OpenAds, Banner Ads, Interstitial Ads, and Rewarded Ads. To dwell solely on this purpose, I have created a simple app demo that you will need to clone as I apply these setups on the demo app. This demo app consists of navigation set up using React Navigation. I won’t be going over how to use React Navigation but if you want to learn more about it, click here to visit their blog.
Moving on, it’s time you clone the demo app for this project. The demo application for this project is up on my GitHub repo. Click here to find it. To clone this repo to your computer, run the command below in your terminal.
git clone https://github.com/championuz/RNAdmobDemo.gitAfter that, you must download the necessary node modules and iOS dependencies. The commands to download these are below.
#Install Node Modules
npm install

# Navigate to the ios folder and Install iOS dependencies
cd ios && pod install

#Navigate back to the Project root folder
cd ..
You should build this project on your emulators to ensure it’s working. The commands for that are below:
#Run on Android Emulator
npx react-native run-android

#Run on iOS Simulator
npx react-native run-ios
Once you’ve completed this step, your Android and iOS emulators show up like so:

Google Admob Set up
The next step for this project is to set up a Google Admob account. This account will grant us access to configure Google ads to show up in our application. I will use test ids for this tutorial, but in production, you should use live ids.
Click here to visit the Google Admob website and create your account. While signing up, you will have to agree to some terms, and your account will be set up. Once that’s done, you should have your dashboard show up like this:

Next, you need to create an application. For this tutorial, I will create two applications, an Android application and an iOS application. This will produce a unique app_id for the Android apps and a unique one for the iOS apps, and they will be used to configure the React Native project.
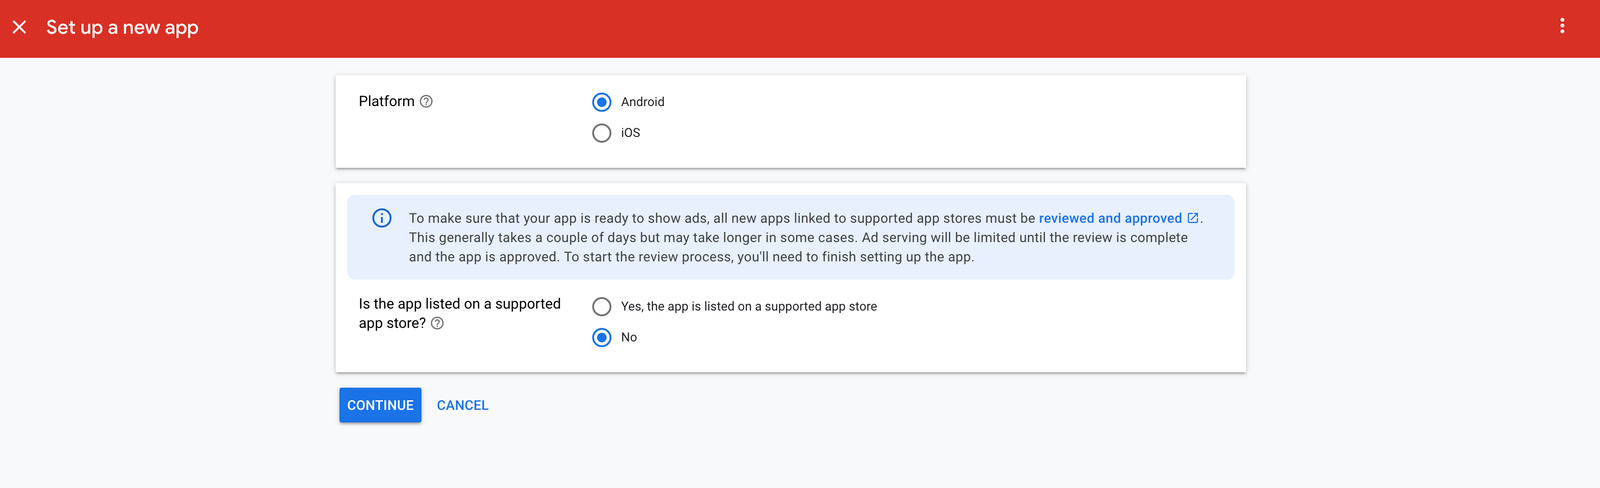
To create an application, click on “Apps” and “Add App” from the items on the left sidebar. Now, for the platform, I will select Android and no because this project isn’t live on any app store, then “continue”.
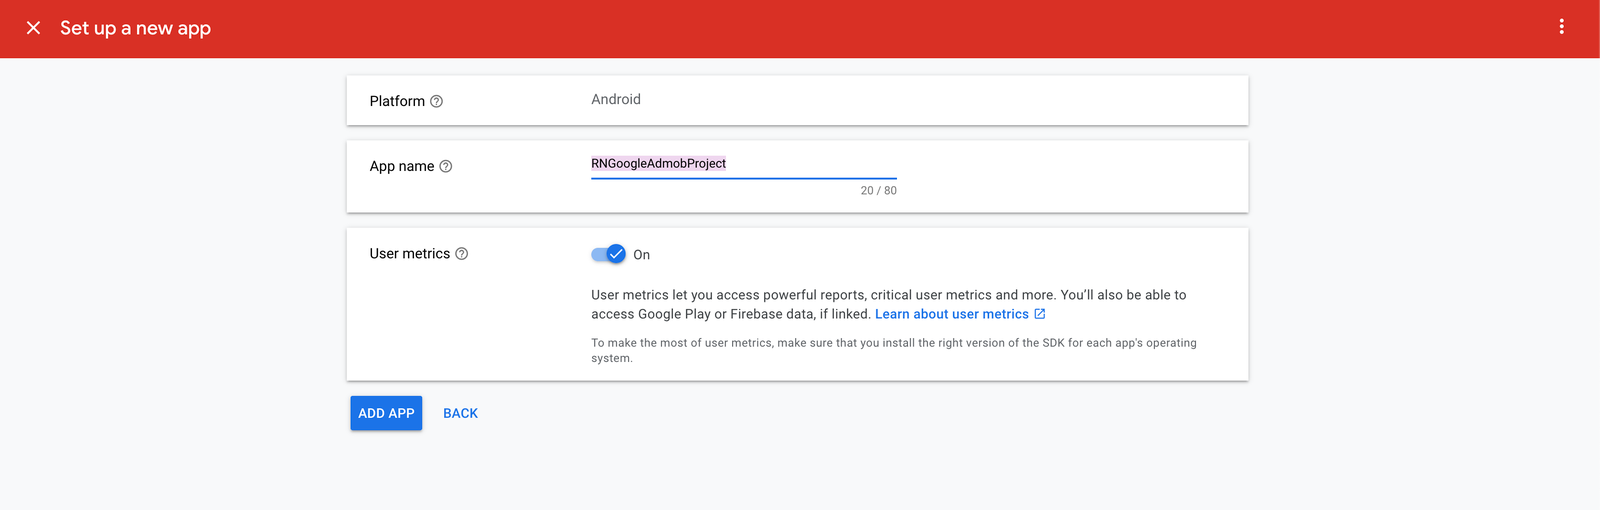
Now, you will need to add the project name, and for this tutorial, I am using RNGoogleAdmobProject; you can give yours any name. Although I selected use metrics, I won’t use them in this application. Finally, click “Add App” to complete the process.
I will repeat the process, but this time, the platform should be iOS if you will be building for iOS. The sequence is the same. You can view all your applications by clicking on “Apps” on the sidebar and “View All Apps”. If you applied the above correctly, you should have two applications showing up, Android and iOS, like this:
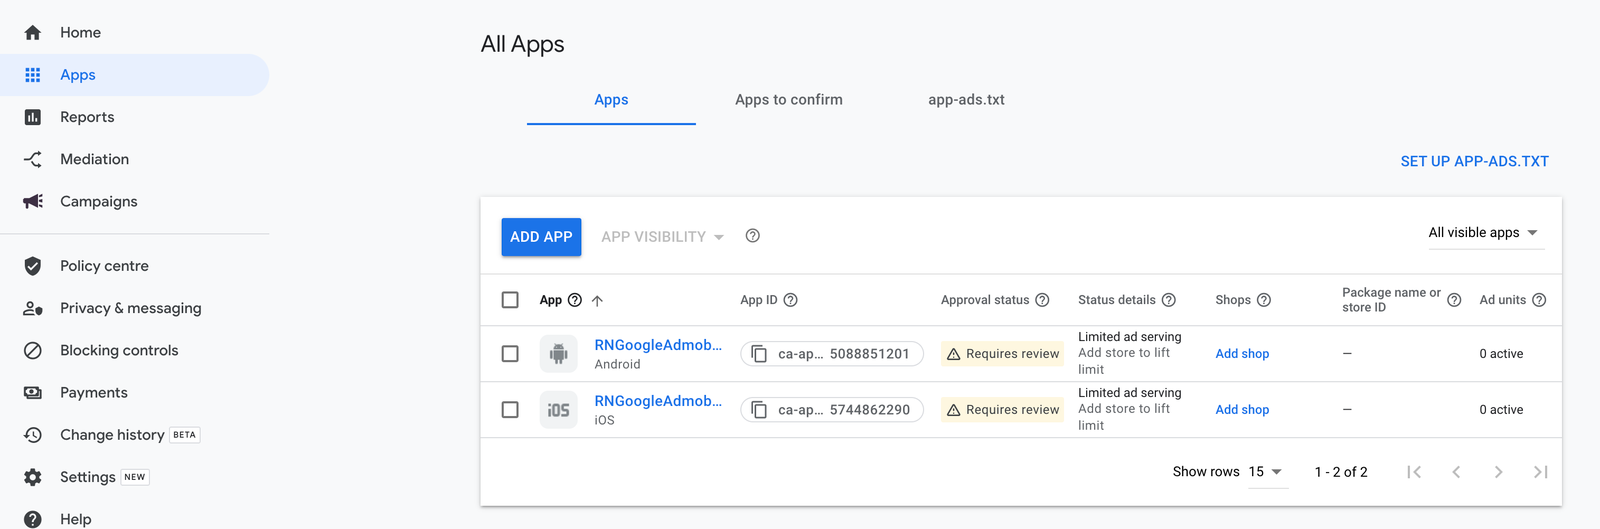
The unique App ID is right there and is essential as we are transcending into the application properly.
Google Admob in React Native App
At this point, we have created a Google Admob account and set up our application. Now, we will be making ads show in the React Native application. The dependency I will be using in this to have this work is the react-native-google-mobile-ads. This library helps simplify the setup and makes it quite straightforward to have Google serve ads to your Android and iOS applications.
However, the minimum requirement for Ads to show on your iOS application is that you must be using Xcode 13 and upwards.
To install this library, open your terminal, and in the project root folder, run the command below:
npm i react-native-google-mobile-adsAfter this, before rebuilding your project, open your app.json file and add the code below:
{
...
"react-native-google-mobile-ads": {
    "android_app_id": "ca-app-pub-xxxxxxxx~xxxxxxxx",
    "ios_app_id": "ca-app-pub-xxxxxxxx~xxxxxxxx"
  }
}
In the app.json file, you should replace the blanked-out code with the Android and iOS app ids from the Google Admob dashboard. Remember that you will click on “Apps” then “View All Apps” you should land on a screen where your App ID is displayed. Carefully click to copy the App ID and replace it accordingly in the app.json file. After this, navigate to the iOS folder, run pod install, and then rebuild your Android and iOS projects.
Session Replay for Developers
Uncover frustrations, understand bugs and fix slowdowns like never before with OpenReplay — an open-source session replay tool for developers. Self-host it in minutes, and have complete control over your customer data. Check our GitHub repo and join the thousands of developers in our community.
Setting up Banner Ads
The first ad implementation will be the Banner ads. Banner ads are graphical advertisements that appear within an app, usually at the top or bottom of the screen. These ads are typically smaller than other types of advertisements and are designed not to disrupt the user experience. They can be either static or animated and come in different sizes. Users who click on a banner ad will be directed to the advertiser’s website or landing page.
In this project, this ad will be placed on the home screen. To implement this, navigate to the home screen and first, import the GAMBannerAd, BannerAdSize, and TestIds from the react-native-mobile-ads library like so:
import { GAMBannerAd, BannerAdSize, TestIds } from 'react-native-google-mobile-ads';Next, in the HomeScreen component, I will insert the GAMBannerAd component, and the props I will include in this component will be sizes, adUnitId, and requestOptions.
<GAMBannerAd
    unitId={TestIds.BANNER}
    sizes={[BannerAdSize.FULL_BANNER]}
    requestOptions={{
      requestNonPersonalizedAdsOnly: true,
    }}
  />
The unitid prop specifies the unique identifier for the ad unit, which is used to identify the ad placement within the app. The sizes prop specifies the size of the banner ad, and the requestOptions prop allows you to specify additional options for the ad request, such as requesting non-personalized ads.
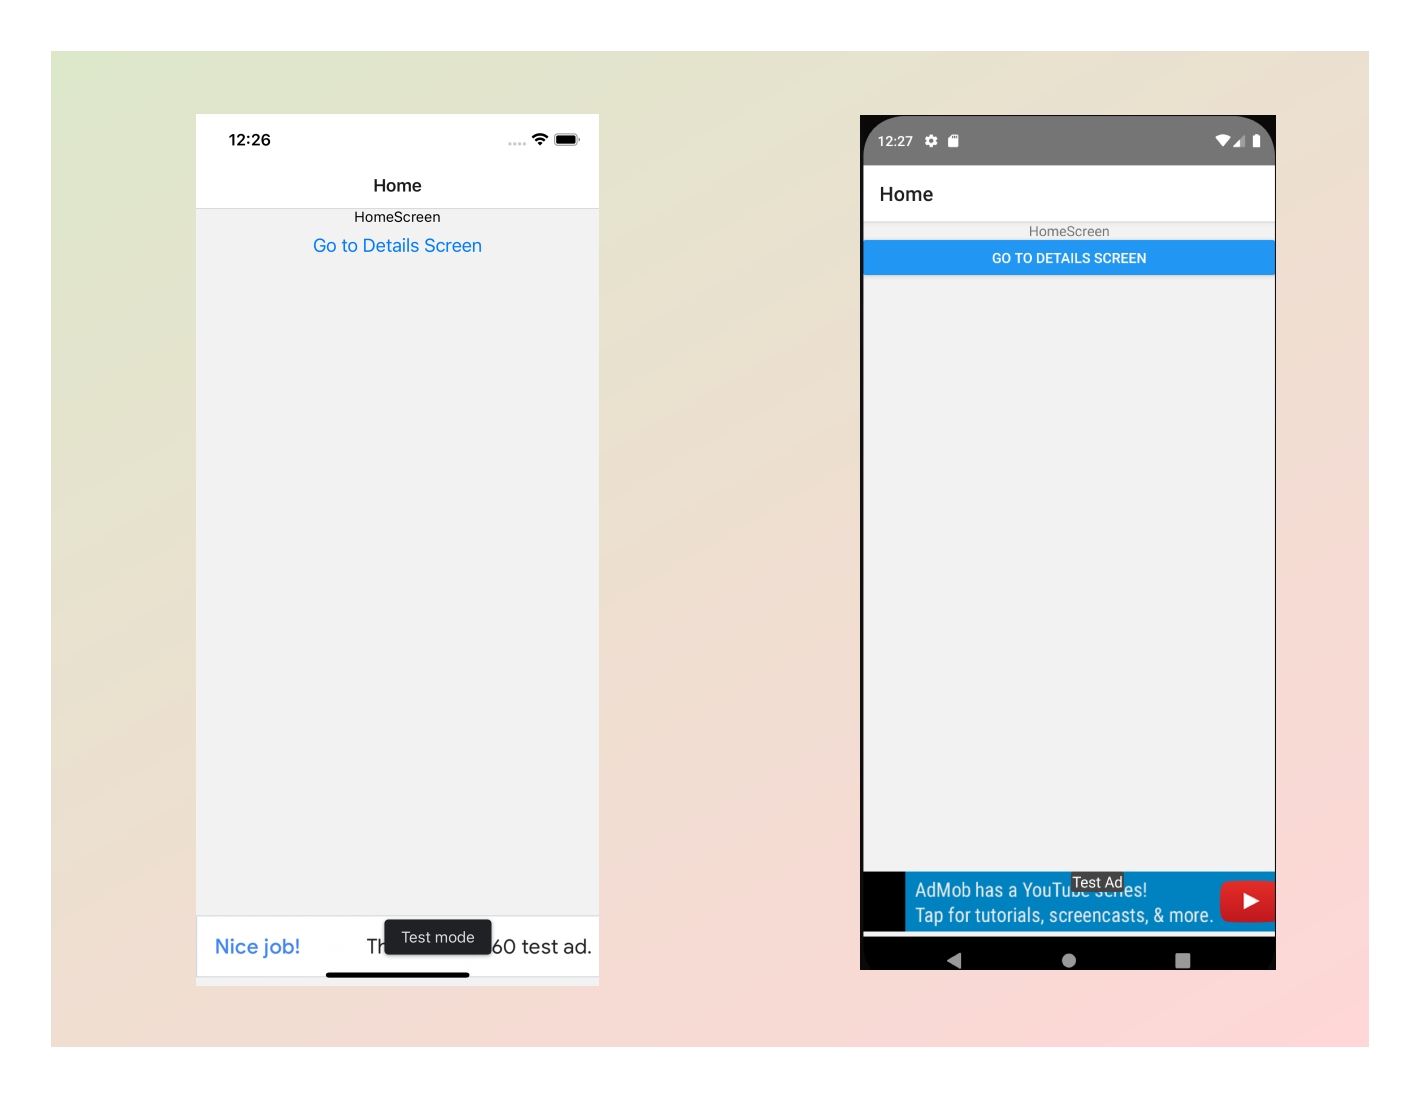
Once this is inserted as shown, you should have your Android and iOS emulators showing test banner ads like:
Setting up Interstitial Ads
Next, I will implement interstitial ads. Interstitial ads are full-screen advertisements displayed at natural transition points within an app, such as between activities or when transitioning from one screen to another. They are designed to be more intrusive and attention-grabbing than banner ads, as they take up the entire screen and require the user to either close the ad or take some other action before they can continue using the app.
This ad will be implemented in the Details screen, and it will be shown when transitioning from the Home screen to the Details screen. Usually, Interstitial ads, App Open Ads, and Rewarded Ads have to be loaded before they are shown; therefore, I will set a timeout delay of 20 seconds before the interstitial ad should go off as it should have been loaded up by then.
Now, in the Details screen, insert the import statement below at the top of the page.
import { InterstitialAd, TestIds, AdEventType } from 'react-native-google-mobile-ads';Next, I will create the interstitial ad within the Details component with the createForAdRequest function. The code is below:
const interstitial = InterstitialAd.createForAdRequest(TestIds.INTERSTITIAL, {
    requestNonPersonalizedAdsOnly: true,
    keywords: ['fashion', 'clothing'],
  });
In the above code, the adUnitId is a test interstitial id; then, the options object allows you to specify additional options for the ad request, such as requesting non-personalized ads only and adding keywords to the ad. In this case, the options object includes the requestNonPersonalizedAdsOnly property, which tells the AdMob network to only show non-personalized ads, and the keywords property, which is an array of keywords that are associated with the ad. Note that this keywords property plays a very important role in the conversion and earnings your app can get you; hence it’s important the keywords you input here are related to your app or what your app is used for. The keywords used here are experimental.
Next, I will declare this interstitial ad to load immediately after this screen (Details screen in this case) is opened, and after 20 seconds, the ad should show. I am doing this using the useEffect hook. Here’s the code:
useEffect(() => {
interstitial.load();
setTimeout(() => {
interstitial.show()
}, 20000);
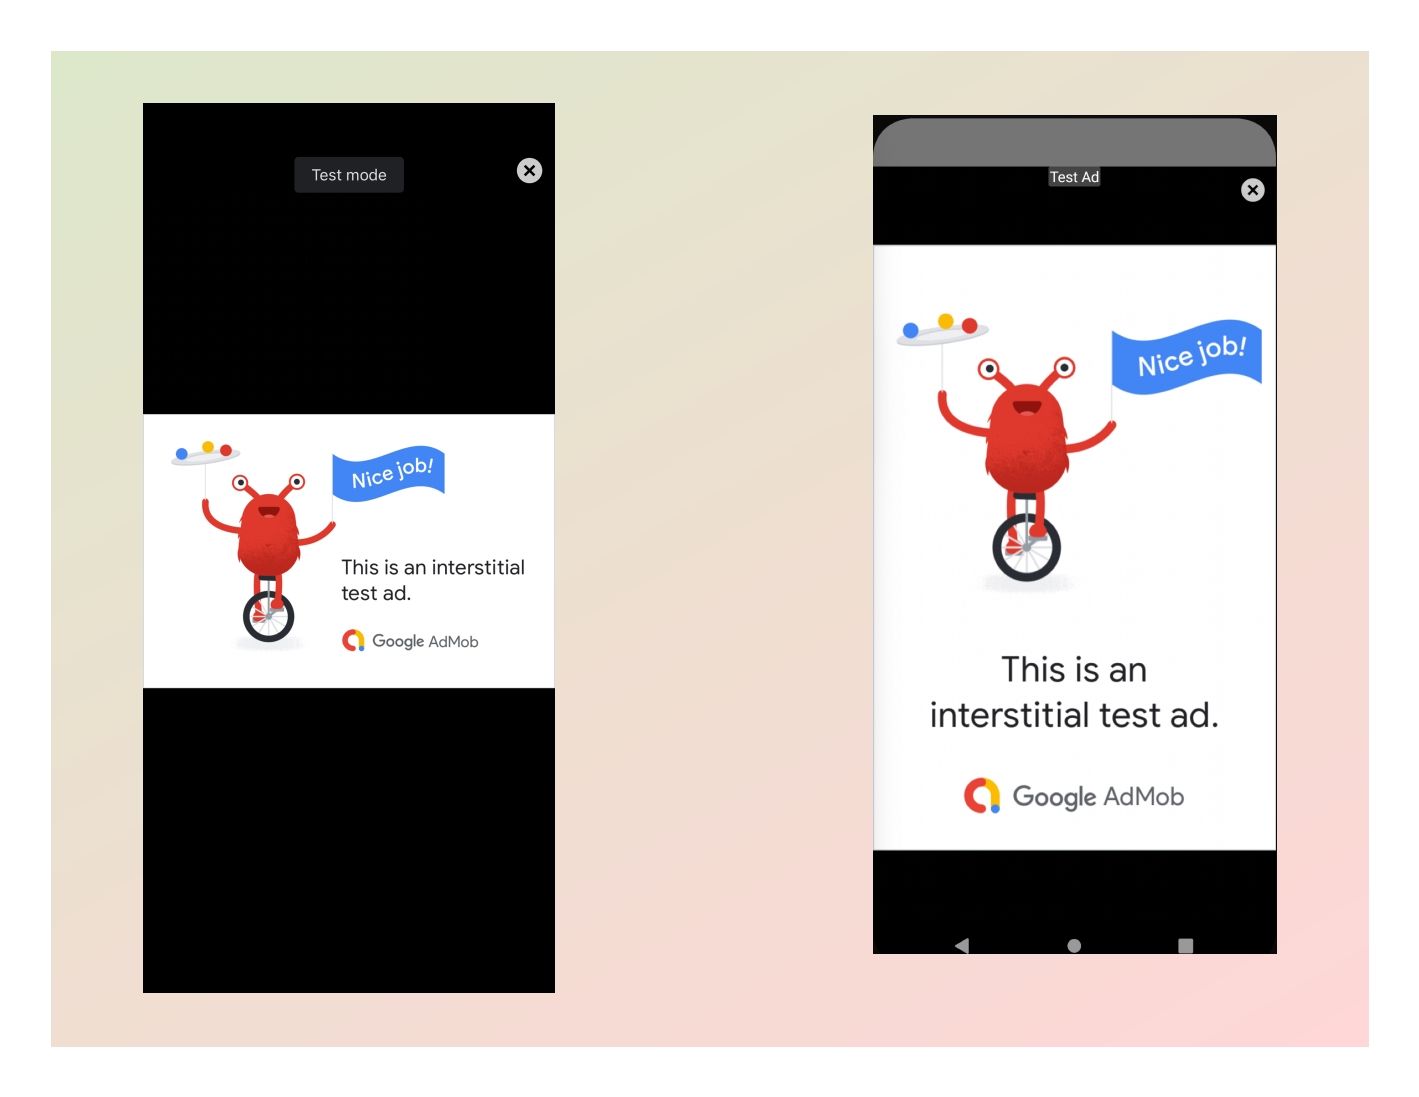
}, []);After adding this, your Android and iOS emulators should show up like this:
Working with Interstitial ads, you can implement EventListeners that can listen to certain events and trigger some actions accordingly. For instance, instead of having the ad show up after 20 seconds, you can set it to show after it has been loaded. You will find more about how that works here.
Setting up App Open Ads
Have you heard of app open ads before? They’re a type of ad that appears when an app is launched or brought to the foreground. These ads are typically displayed on the app’s loading screen and can be closed by the user at any time.
For this to be fired when your app is opened, you must have a preloaded ad on the entry screen. This will be set up in the LoadingScreen, which is the entry screen of this project.
As always, the first line of code to be inserted will be the import statement. The code is below:
import { AppOpenAd, TestIds } from 'react-native-google-mobile-ads';Next, create the App Open Ad using the createForAdRequest function. Here’s the code:
const appOpenAd = AppOpenAd.createForAdRequest(TestIds.APP_OPEN, {
    requestNonPersonalizedAdsOnly: true,
    keywords: ['fashion', 'clothing'],
  });
Next, within the useEffect in the LoadingScreen, I want to request to load the AppOpenAd and also show it after 10 seconds, the same amount of time the loading screen will navigate to the home screen. The code is below:
useEffect(() => {
#👇Add this below
appOpenAd.load();
setTimeout(() => {
navigation.replace("Home");
#👇Add this below
appOpenAd.show();
}, 10000);
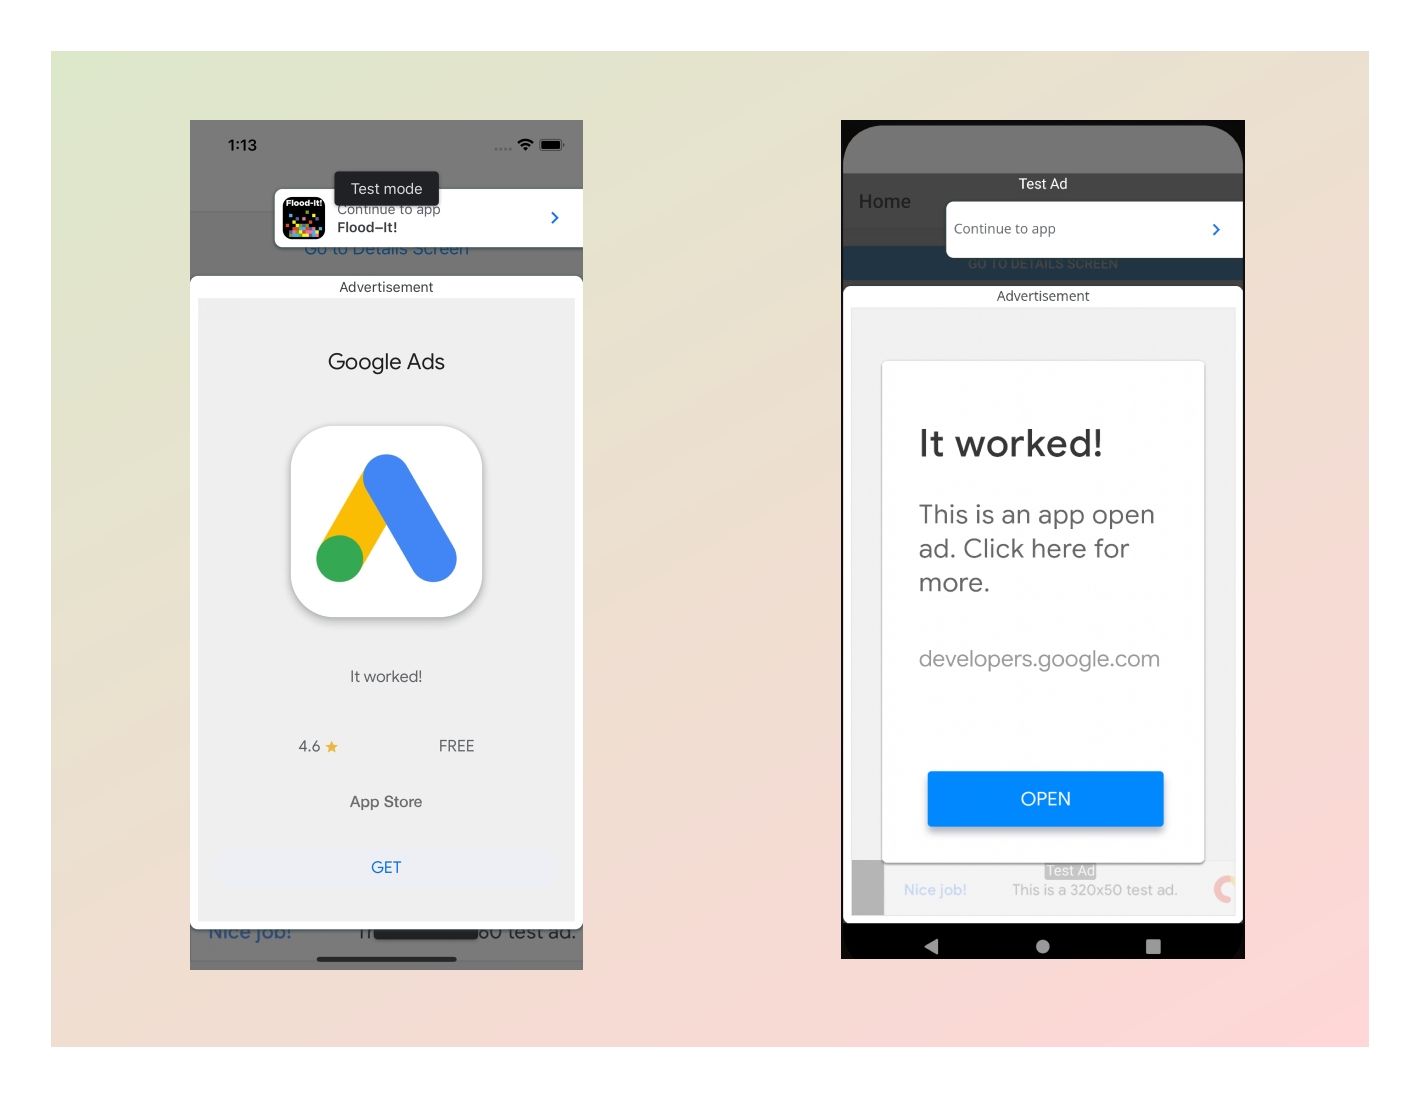
}, []);Once you have added this, try relaunching the application on your emulators, and you should see them show up like this:
Setting up Rewarded/Video Ads
Finally, for this tutorial, let’s set up and display Rewarded/Video Ads in this React Native project. Rewarded ads are a type of full-screen advertisement that appears over the interface of an app and can be closed by the user.
They are often used to reward users after they have filled out a form, watched a video, or performed and completed an action. The content of a rewarded ad is typically controlled through the AdMob dashboard. Rewarded ads are often used in mobile games and other apps to offer users in-game currency or other rewards in exchange for completing stipulated actions.
In this tutorial, rewarded ads will be displayed when the “Display Rewarded Ads” button is clicked on the home screen.
Now, navigate to the home screen, and in the home screen update your import statement with the following:
import { RewardedAd, GAMBannerAd, BannerAdSize, TestIds } from 'react-native-google-mobile-ads';Next, within the HomeScreen component, I will create the rewarded ads using the createForAdrequest function. Then, I will start loading the Rewarded Ad using the useEffect hook.
const rewarded = RewardedAd.createForAdRequest(TestIds.GAM_REWARDED, {
  requestNonPersonalizedAdsOnly: true,
  keywords: ['fashion', 'clothing'],
});

useEffect(() => {
  rewarded.load()
}, []);
Now I will assign the rewarded.show() to the “Display Rewarded Ad” button, so the rewarded ads go off the moment the button is clicked.
<Button
onPress={()=> rewarded.show()}
title= "Display Rewarded Ads"
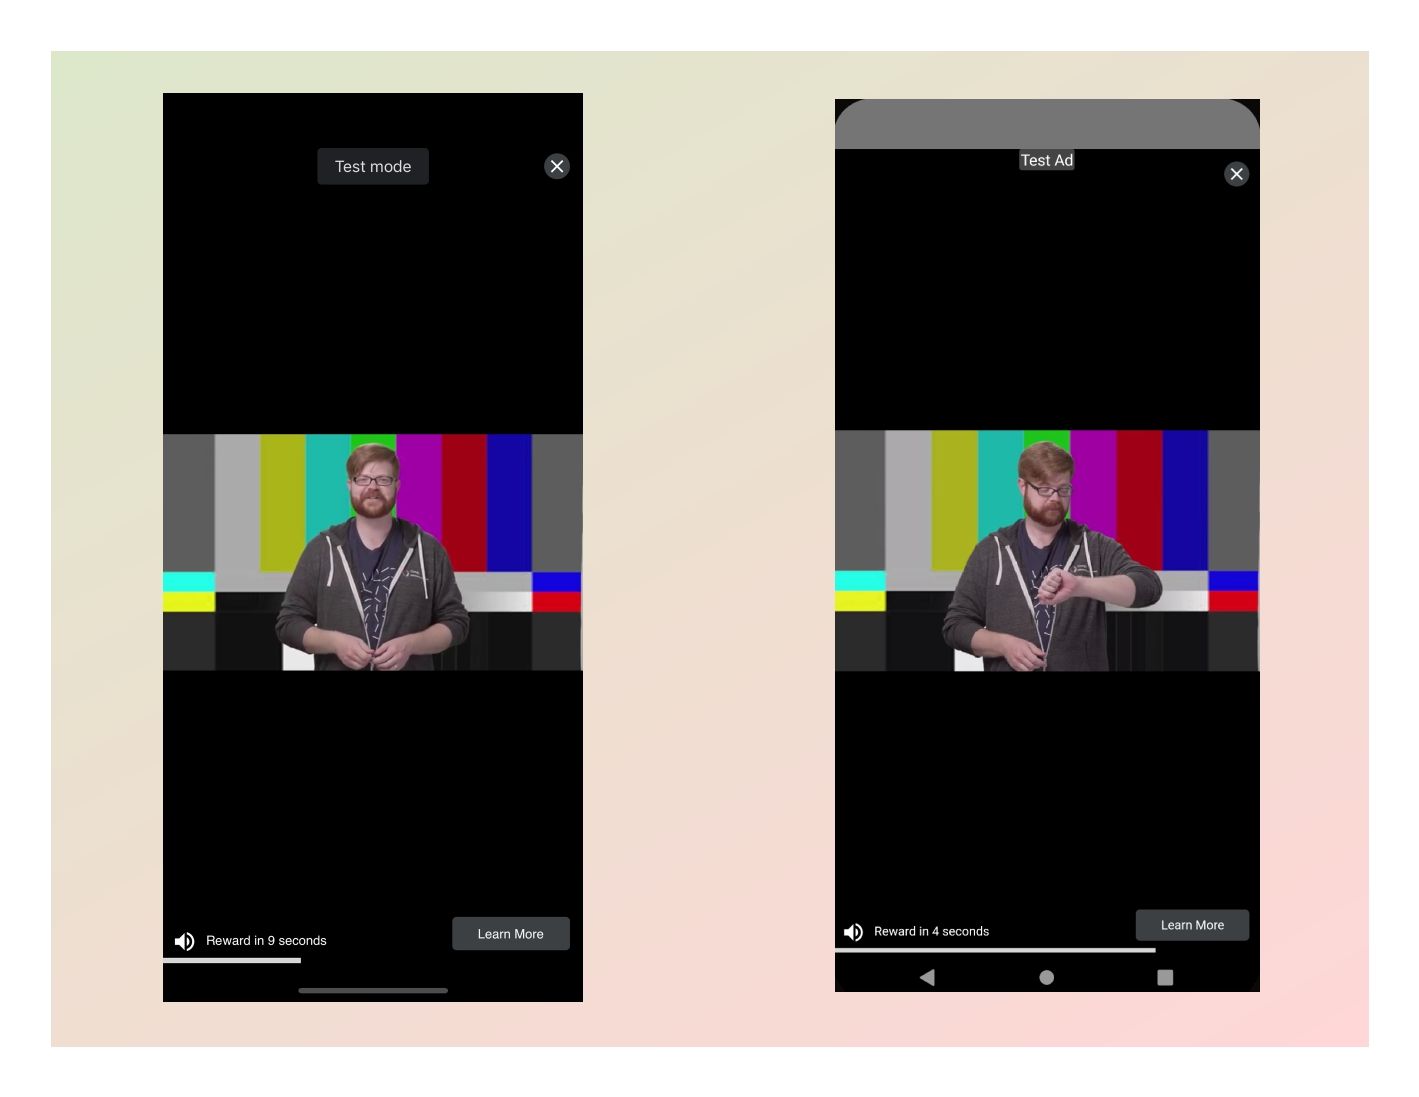
/>After adding all this, click on the button, and your Rewarded Ad should show up like this:
Conclusion
Your app can be configured to generate revenue for you which is made possible by Google Admob. Now, with what React Native Google Mobile Ads has put in place, this tutorial is just what you need as you set up Google Ads in your React Native project. Do well to reach out if you face any challenges while implementing this tutorial. Also, the completed project is right in my GitHub repo.
Gain Debugging Superpowers
Unleash the power of session replay to reproduce bugs and track user frustrations. Get complete visibility into your frontend with OpenReplay, the most advanced open-source session replay tool for developers.