
Shadow DOM: the ultimate guide


Shadow DOM is a technique to isolate and maintain an element’s CSS, HTML, and document tree in a separate subtree. Shadow DOM allows us to create “shadows” of elements that are self-contained trees with their styles, attributes, and child nodes. We don’t have to directly style and manipulate the DOM to create these “shadows,” but we can use Shadow DOM instead. We may add custom CSS properties and classes and custom HTML attributes without polluting the global scope or breaking other elements on our page. Do you want to know more? To understand the Shadow DOM, you must know at least the basics of HTML, CSS, and JavaScript, including DOM manipulation. Let’s get started!
DOM and Shadow DOM
Before we go on with Shadow DOM, let’s refresh our minds on DOM and what it does. We know DOM to be a tree-like structure of the HTML element, which allows us to add, remove and modify the elements present in the HTML document. We have seen how DOM manipulation has helped us create dynamic and responsive user interactive webpages, bringing our contents to life. Good! So what exactly is Shadow DOM? And of what use is it? Put on your seat belt and get ready, because this will be a very exciting ride.
The Shadow DOM is very similar to the DOM. Just like we use the DOM to create and modify HTML elements, so is the Shadow DOM. So what is the difference between the DOM and the Shadow DOM? The difference is in their behavior and how we use them.
The Shadow DOM is an internal representation of the markup, which is not rendered on the page. It allows the encapsulation of HTML tags, styles, and behaviors within a single sub-tree of the DOM tree. This means that Shadow DOM is used to create reusable components or widgets that don’t affect any other part of the page. Confused? Let’s delve further.
Shadow DOM is a fully functional, self-contained, and isolated subtree inside an element used for styling and interacting with an element’s children. Let’s break that down.
- Fully functional - The Shadow DOM has its own CSS rules that are not applied outside the subtree and its own JavaScript behavior.
- Self-contained - Shadow DOM is separate from the context in which it’s embedded. So, the HTML and CSS inside the Shadow DOM don’t affect the parent document outside the element defined by the Shadow DOM.
- Isolated - The Shadow DOM and the element it’s attached to don’t interact with each other unless we make a specific request between the two.
The Shadow DOM is an independent subtree of the document tree, with its root in the document’s. Shadow DOM allows developers to add their styles and scripts without impacting the rest of the page or site. It simply provides a way to encapsulate styling so that it doesn’t leak out of components and affect other parts of your site or app. The Shadow DOM API plays a huge role in this, and it helps to attach the separate hidden DOM to an element.
Here is a graphical representation showing the DOM and the Shadow DOM. In the image below, the shadow host is seen in the DOM tree with other elements, but the shadow elements are not seen because they are hidden. But behind the Shadow DOM lies the hidden part, which includes the shadow root and other shadow elements.
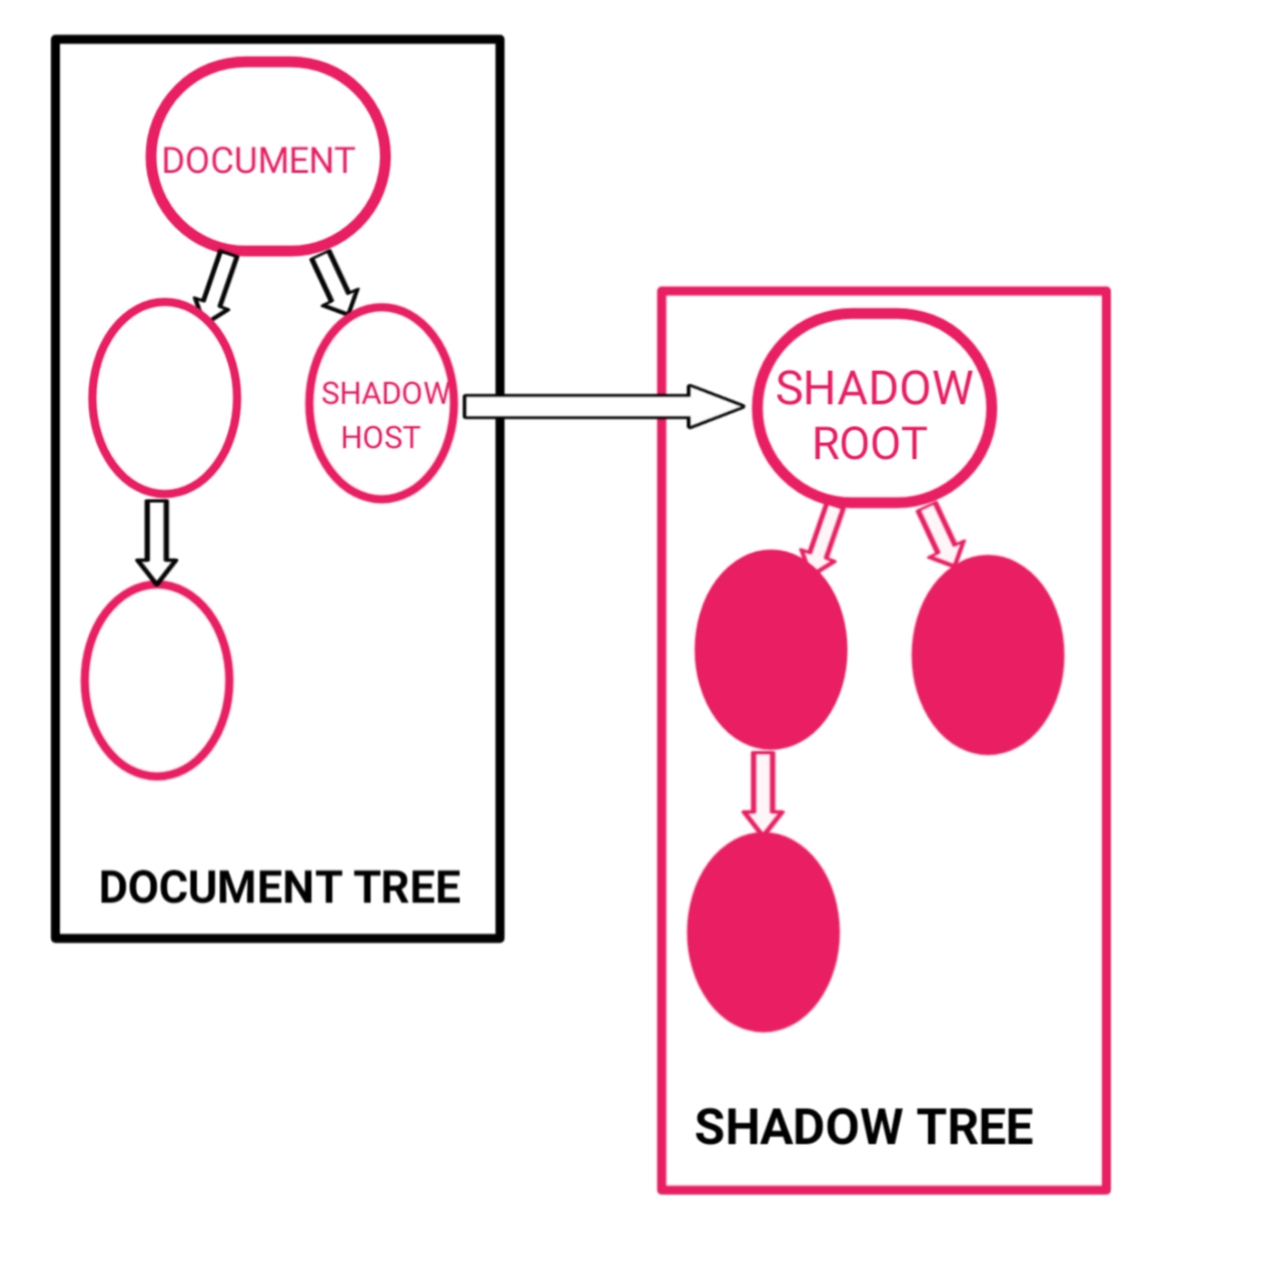
Here is another illustration, showing that the Shadow DOM is just a sub-tree of the DOM. Just like the image above, this also shows that in the entire DOM tree, the Shadow DOM and its shadow elements are actually present in the DOM but are not brought to the limelight for everyone to see, and they are placed in the dark. (In the shadow!)

The Shadow DOM technique is not something new. For example, the HTML5 audio and video element uses the Shadow DOM technique. Let’s demonstrate it.
We create an audio tag first:
<audio width="300" height="32" src="audio/song.m4a" autoplay="autoplay" controls="controls">
   Shadow DOM demonstration
</audio>
If we check the console, we will see only the audio elements.
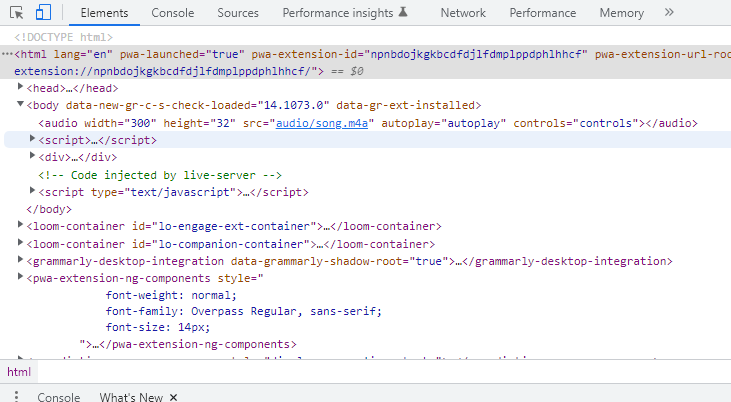
The shadow root and the shadow elements are hidden in the image above. So to see the shadow tree with its elements, we have to activate the Shadow DOM visibility. How do we do that?
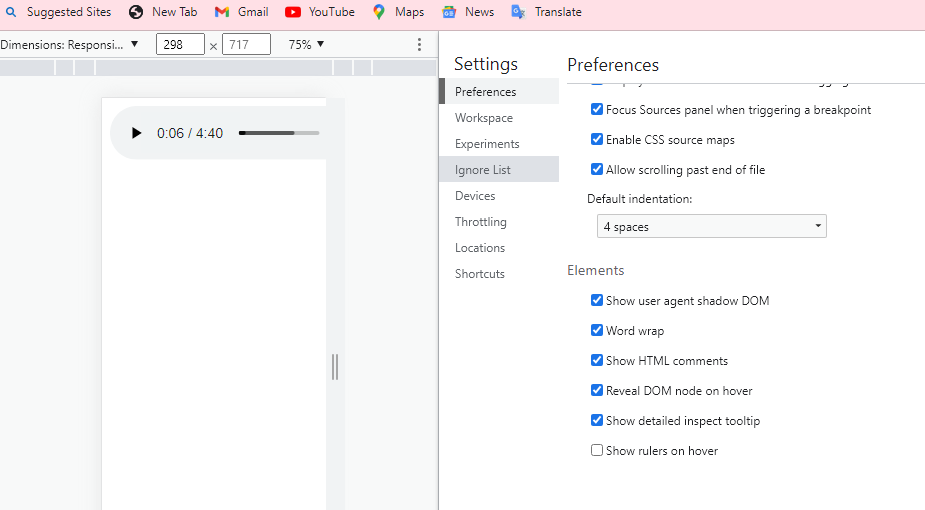
We go to the developer’s tools to activate Shadow DOM visibility by clicking on show user agent Shadow DOM.
Then, we go ahead and view our audio element with its hidden properties and attributes:
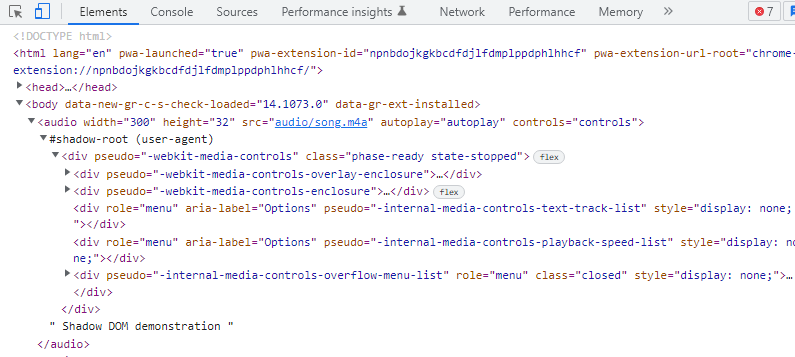
As we can see, the audio element has other hidden elements. These elements are placed in the Shadow DOM.
Open Source Session Replay
OpenReplay is an open-source, session replay suite that lets you see what users do on your web app, helping you troubleshoot issues faster. OpenReplay is self-hosted for full control over your data.

Start enjoying your debugging experience - start using OpenReplay for free.
Why use the Shadow DOM, and how?
Shadow DOM is separate from the rest of the page’s code, making it a distinct DOM tree with its own nodes only seen by the code contained within it. Shadow DOM’s advantages include modularity, encapsulation, and code reusability. We might use Shadow DOM to maintain our code, separated from other parts of our code. We can also use Shadow DOM to create reusable components and reuse them on multiple pages of our website or app. Third-party or malicious code may be injected into our pages by exploiting our code, which may be safeguarded with Shadow DOM. Shadow DOM is an excellent option for hybrid and desktop applications.
The browser has made it available, so we don’t need to install any special package to start working with the Shadow DOM. Shadow DOM is available with all major browsers, such as Chrome, Safari, Firefox, Edge, etc.
Let’s have some terminology:
- Shadow tree- This is the DOM tree present inside the Shadow DOM
- Shadow root- This is the root node of the shadow tree.
- Shadow host- This is the node to which the Shadow DOM is attached.
The browser shadow tree, which is isolated from other elements on the DOM, generates the Shadow DOM. The shadow tree has its host element, known as the shadow host, with a root element known as the shadow root. We attach elements to the shadow root. The elements attached to the shadow roots include the header element, the section element, the aside element, the span element, and several others.
We can attach elements to the shadow root using the attachShadow() method. First, we create or retrieve the HTML element we want to attach to the shadow tree:
<script>
    const el = document.createElement('div')
</script>
Next, we use attachShadow() to select if we want the mode close or open. If open, we will be able to modify to inner elements from the outside; else, we won’t be able to modify the inner element from the outside:
<script>
    const shadowRoot = el.attachShadow({mode: 'open'});
</script>
Once opened, we can start adding elements to the shadow tree:
<script>
    shadowRoot.innerHTML = "<h1> This is a Shadow DOM</h1>"
</script>
Then, we attach the newly created Shadow element to an element in the DOM:
<script>
    const container=document.querySelector('body');
    container.appendChild(el)
</script>
This will give us the output shown below:
How do we style the Shadow DOM? We style it by using the CSS style attribute. Let’s demonstrate it below:
<script>
  const el = document.createElement("div");
  const shadowRoot = el.attachShadow({ mode: "open" });
  shadowRoot.innerHTML = `
    <style>
    h1 {
      color: yellow;
    }
    </style>
    <h1>This Shadow DOM has a text color of yellow</h1>
    `;

  const container = document.querySelector("body");
  container.appendChild(el);
</script>
Conclusion
Once you have created a Shadow DOM for your element or component, you can safely add custom CSS properties and classes and custom HTML attributes without worrying about polluting the global scope or breaking other elements on your page. Now that you’re familiar with Shadow DOM, you can use it to create self-contained components and modules that are easier to maintain and extend, and avoid polluting the global scope. Next time someone asks you what Shadow DOM is, you’ll know exactly what they’re talking about.
A TIP FROM THE EDITOR: For more aspects of modern CSS, don’t miss our Understanding CSS positioning and Modern CSS selectors articles.