

Nobody wants to write long pieces of CSS code, so Emmet is an exciting proposition to help you shorten development times. This article will discuss its basic abbreviations for CSS properties, how to install and set up, grouping elements, and improving CSS productivity.

Discover how at OpenReplay.com.
Introduction
Gone are the days of writing lengthy CSS code; with Emmet, you can work smarter, not harder. Emmet emerges as a game-changer, revolutionizing how CSS is written and empowering developers to create beautiful websites efficiently. It is a toolkit made to boost productivity and improve the workflow of web developers. It allows you to write HTML and CSS code more quickly and easily using abbreviations and shortcuts. It boosts productivity by decreasing the time and effort to write CSS code while keeping high-quality results.
As you progress in your development journey, Emmet reveals techniques that take web styling to new heights. Imagine performing mathematical calculations right within your CSS properties. It enables you to create adaptive designs effortlessly and supports flexible units like percentages and viewports. This flexibility allows you to create websites that adjust to various screen sizes and devices.
Basic Emmet Abbreviations for CSS Properties
Whether you are writing simple styles or complex layouts and animations, Emmet’s shorthand notations allow you to focus more on your ideas and less on repetitive codiLet’s look into some of the basic Emmet abbreviations for commonly used CSS properties:
Margin and Padding:
m: Short formargin. For example,m10representsmargin: 10px;.p: Short forpadding. Usingp20will givepadding: 20px;.- You can also specify individual margins and paddings using combinations like
mtformargin-top,prforpadding-right,mbformargin-bottom, and so on.
Width and Height:
w: It represents thewidthproperty. For instance,w200is the same aswidth: 200px;.h: Corresponds to theheightproperty. Usingh300will produceheight: 300px;.
Font Size and Color:
fs: It is short forfont-size. For example,fs16representsfont-size: 16px;.c: It represents thecolorproperty. Usingc#f00will givecolor: #f00;.
Background and Border:
bg: It represents thebackgroundproperty. For instance,bg#f1f1f1is equivalent tobackground: #f1f1f1;.b: It is short for border. Usingb1px solid #cccwill give usborder: 1px solid #ccc;.
Positioning:
pos: Represents thepositionproperty. For example,posrwill produceposition: relative;.top,right,bottom,left: Abbreviations for respective positioning properties.
Display:
d: It stands fordisplay. For instance,dibmeansdisplay: inline-block;.df: Abbreviation fordisplay: flex;, anddgfordisplay: grid;.
Flexbox and Grid:
ai: Short foralign-items. For example,aicsrepresentsalign-items: center;.jc: Representsjustify-content. Usingjcsbwill producejustify-content: space-between;.flex: Abbreviation fordisplay: flex;.flexwill generatedisplay: flex;.
Text Properties:
lh: Short forline-height. Usinglh1.6will produceline-height: 1.6;.ls: Representsletter-spacing. For example,ls1pxis equivalent toletter-spacing: 1px;.fw: Short forfont-weight. Usingfw700will givefont-weight: 700;.
Border Radius and Box Shadow:
br: Representsborder-radius. For instance,br5pxis equivalent toborder-radius: 5px;.bs: Short forbox-shadow. Usingbs2px 2px 5px #888will give usbox-shadow: 2px 2px 5px #888;.
Transitions and Animations:
trans: Representstransition. Usingtransall 0.3s easewill producetransition: all 0.3s ease;.anim: Short foranimation. For example,animspin 2s infiniterepresentsanimation: spin 2s infinite;.
Z-Index and Overflow:
zi: It is short for z-index. For instance,zi10is equivalent toz-index: 10;.ov: Will represents overflow. Usingovhwill produceoverflow: hidden;.
Getting Started with Emmet for CSS
To get started with the Emmet for CSS, you will need to install the Emmet plugin for your favorite text editor. Firstly, make sure you have a code editor that supports Emmet. Many popular editors like Visual Studio Code, Sublime Text, and Atom come equipped with built-in Emmet support. If you’re unsure whether your editor has Emmet installed, you can quickly check by looking for the Emmet icon or accessing the extension settings.
Installing and Setting Up Emmet
To install the Emmet plug for your text editor, you can follow these steps:
- Go to the Emmet website and download the plugin for the your text editor.
- Once you have downloaded the plugin, install it according to the instructions provided by the Emmet website.
- Once the plugin is you can start using Emmet abbreviations in your text editor.
To use an abbreviation, simply start typing it in your HTML or CSS file and press the Tab key. Voilà! Emmet automatically expands the abbreviation into the entire CSS property.
Set Up the HTML Structure:
Create a new HTML file; in this example let’s build a responsive landing page with a header, navigation bar, and primary content section and footer:
header>nav+main+footerUsing header>nav+main+footer, you generate the basic structure with a header, followed by a navigation bar, main content area, and a footer.
Adding Styles:
Next, let’s style the header section. Assume you want to give it a background color and a fixed height:
header.bg-primary.h100pxHere, bg-primary applies a primary background color, and h100px sets the header’s height to 100 pixels.
Now, let’s style the navigation bar. Assume you want to give it a background color, padding and make it a flex container:
nav.bg-dark.p10.df.aic.jcsbbg-dark sets a dark background color, p10 adds a padding of 10 pixels, df applies display: flex;, and aic and jcsb center the navigation items and provide space between them.
For the main content, let’s create a two-column layout with flexible units for responsiveness:
main.dfg
  .sidebar.w30p
  .content.flex-1
dfg sets display: grid; for the main content..sidebar.w30p creates a sidebar with 30% width. .content.flex-1 gives the main content area a flexible width that occupies the remaining space.
Finally, let’s style the footer by giving it a background color and setting it to stick to the bottom of the page:
footer.bg-dark.fixed-bottombg-dark sets a dark background color, and fixed-bottom ensures the footer stays fixed at the bottom of the viewport.
Output:
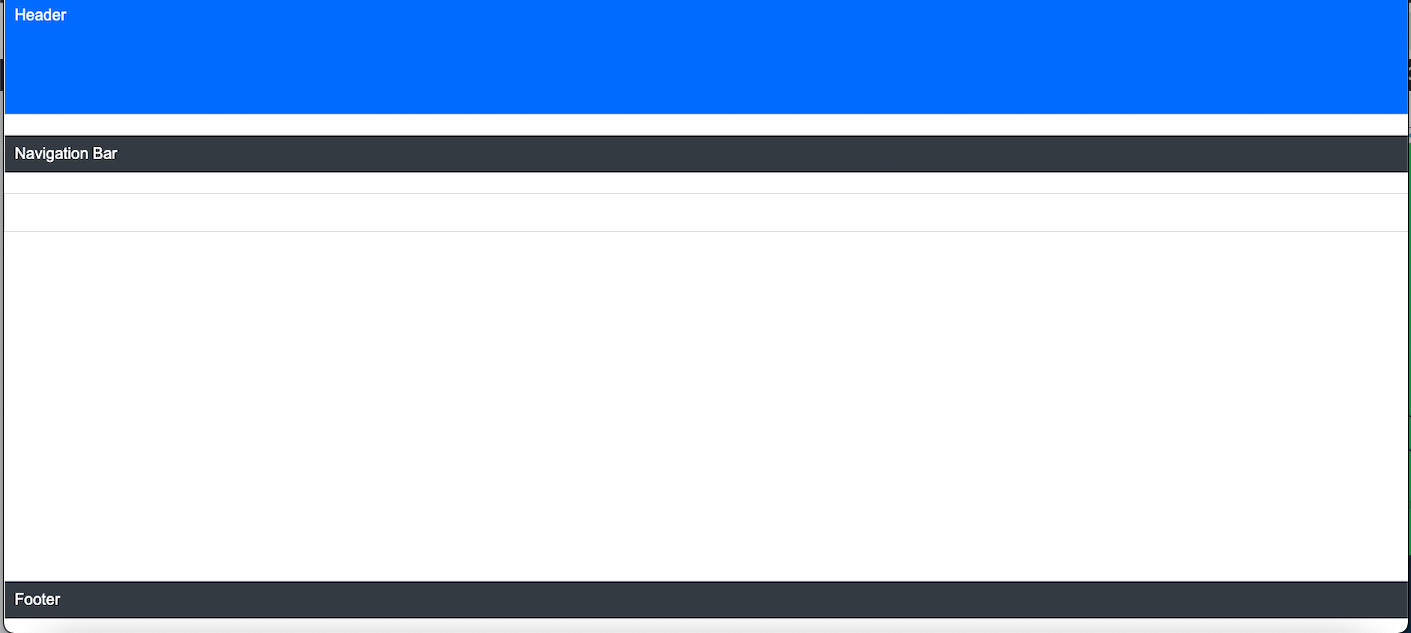
This is just a basic example. You can further customize your responsive layout using advanced techniques, nesting, and conditional attributes provided by Emmet.
Grouping Elements with Emmet
Grouping elements with Emmet allows you to define groups of related elements and apply CSS properties to them. Before grouping, you should identify the elements you want to target collectively. These could be elements within the same container, section of a layout, or any element sharing a similar styling.
To group elements in Emmet, use parentheses () to wrap the element you want to combine. Then, you apply the CSS properties directly after closing the parentheses. For instance:
ul>(li>a{Link $})*5Here, an unordered list(ul) was created with five list items (li). Each list item has an anchor tag (a) with placeholder text “Link 1,” “Link 2,” and so on. By wrapping the ul>(li>a{Link $})*5 expression in parentheses, we group all the list items under the unordered list.
You can also apply CSS properties to the entire group now that you have grouped the entire elements.
ul>(li>a{Link $})*5{Menu Item $}By adding {Menu Item $ after the *5, you have assigned the same “Menu Item 1”, and so on, to all anchor tags within the list.
Additionally, you can nest groups within each other, which helps in creating complex layouts with ease. For example:
header>nav>(ul>li*3>a{Link $})*2A header was created in the example above, containing a navigation bar(nav). The navigation bar, in turn, contains an unordered list (ul) with three list items (li), each of them contains an anchor tag (a) with a placeholder text “Link 1”, “Link 2,” and “Link 3.” By nesting the ul>li*3>a{Link $} within the parentheses, all the list items and anchor tags under the navigation bar were grouped. Once you’ve created nested groups, you can apply CSS properties to each level.
Advanced Emmet Techniques for CSS
Emmet also has some advanced techniques. It allows you to perform simple mathematical calculations directly within CSS properties.
div{Width $*100px}Here, multiple div elements were created. By using the $ symbol as a placeholder and multiplying it by 100px, Emmet automatically calculates and sets the width of each element, thereby creating a layout with different width values for each div element.
You can use the + character to add an attribute to an element. For example:
div.container+pThe code above will generate the following:
div{
    class: container;
}
p{
}
It also allows you create conditional attributes and values
a[title|href="https://example.com"]Here, you created an anchor element with a conditional attribute title. If the title attribute is not specified, Emmet will automatically populate it with the value from the href attribute.
Another example of how you can use Emmet to write advanced CSS code:
// Use abbreviations to generate CSS selectors
div.my-class {
  background-color: $my-color;
}

// Use variables to store frequently used CSS values
$my-color: #ff0000;

// Use loops to generate multiple CSS rules
for $i from 1 to 10 {
  div.item#{$i} {
    width: 100px;
    height: 100px;
  }
}
This code will create a div element with the class my-class and set the background color to the value of the variable $my-color. It will also create 10 div elements with the class item and set the width and height of each element to 100px.
Here are some more advanced Emmet techniques for CSS:
.class#id- This snippet will generate a CSS class selector with the specified class and ID names.[attr="value"]- It will generate a CSS attribute selector with the specified attribute name and value.*{property:value}- It will generate a CSS declaration with the specified property and value.@{variable}- It will insert the value of the specified variable into the CSS code.
Benefits of Emmet
Let’s look at some ways Emmet can improve CSS productivity:
-
Emmet’s shorthand notations enable lightning-fast generation of both HTML structures and corresponding CSS properties. It means you can create complex layouts, forms, and components with just a few keystrokes, drastically reducing the time spent on manual coding. Take your time to learn the Emmet syntax, it can be a bit daunting at first, but it is worth it to learn. Once you know the syntax, you can use it to quickly create HTML and CSS code.
-
Its intuitive abbreviations map directly to CSS properties, making it easy to remember and use.
-
With the time saved by using Emmet, you can dedicate more energy to refining your designs and experimenting with creative concepts.
-
Emmet’s approachable syntax and user-friendly interface mean developers of all skill levels can benefit from its features. Beginners can quickly grasp its concepts, while experts can harness its power for more complex projects.
-
Its settings can be customized to suit your preferred coding style and editor environment.
-
Emmet is supported by numerous integrated development environments (IDEs) and text editors, making it accessible and versatile across different coding environments.
Conclusion
Emmet is a tool that helps web developers write CSS code more easily and efficiently. It uses a user-friendly approach with shorthand notations that make it easy for developers of all levels to create complex HTML structures and apply CSS properties. Emmet can help you save time and effort by reducing the need for repetitive coding. Whether you are a seasoned developer or a beginner, Emmet can help you simplify your coding journey.
Truly understand users experience
See every user interaction, feel every frustration and track all hesitations with OpenReplay — the open-source digital experience platform. It can be self-hosted in minutes, giving you complete control over your customer data.
Star on GitHub12k