State Machines for JavaScript Developers - How to Use Them in Your Apps

What is a state machine?
A finite state machine is a mathematical model of computation, often used to design algorithms. It describes the behaviour of a system, which is defined in one single state at a time from a finite number of possible states.
For example, in a game, a character can have 4 possible states: idle, walk, run, and jump. The character cannot be in 2 states at the same time. The initial state is idle. From this state, the character can transition to walk, run or jump depending on the input received.
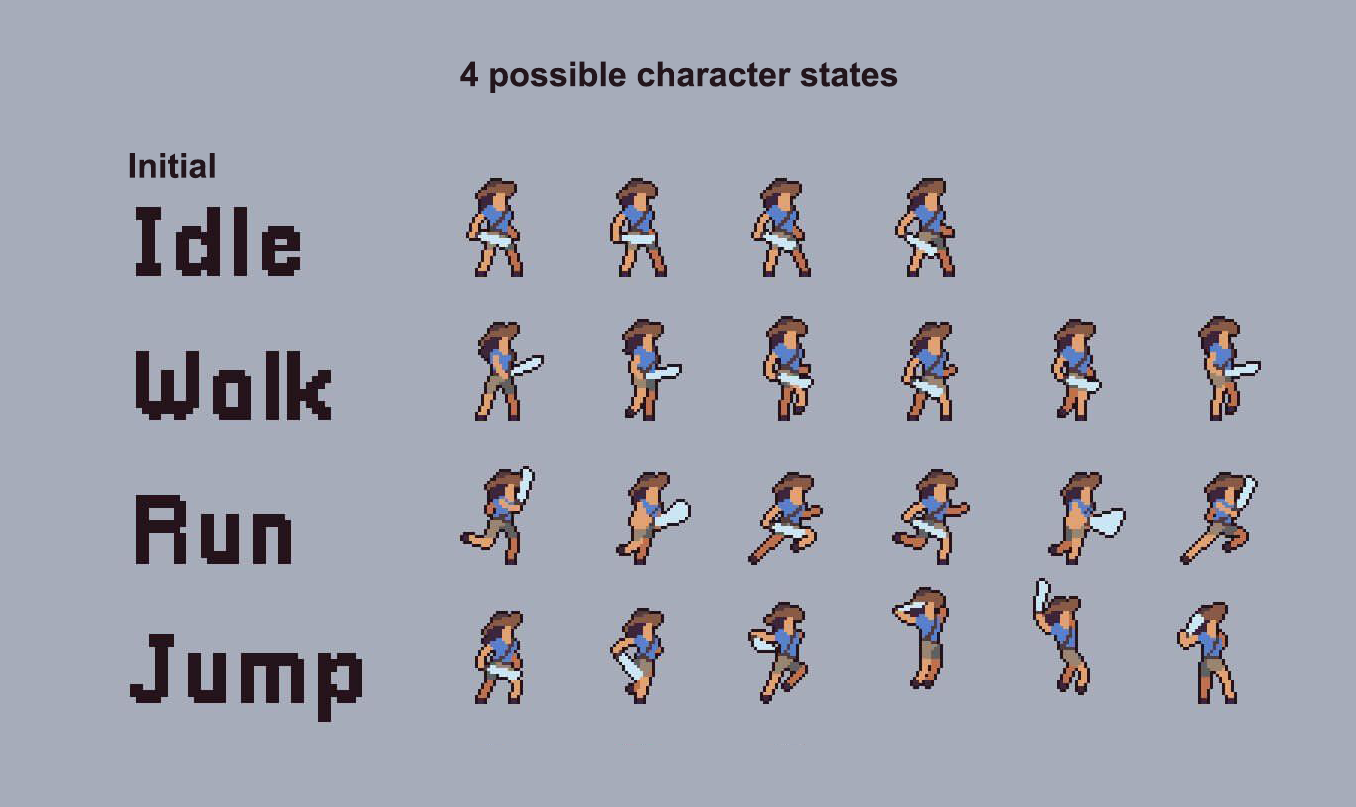
Once an input is received, only then the state can change and produce the corresponding output. Let’s say in this example, we choose to walk. When the state changes in response to our input, walk becomes our new current state and the character will show its walking animation as the output.
Why state machines?
At this point, you are probably wondering what are the advantages to implement state machines. The benefits of state machines can be seen from our example earlier:
-
There are finite possible states which can make your app predictable in terms of state logic: implementing what and how one state can change to another and its expected output. This also keeps your app less prone to unintended side effects or bugs.
-
Testing also becomes relatively easy to manage due to the finite number of states, events and outputs.
-
There are also state machine visualizer tools online to help easily create and visualize the state logic for your app.

Implementing State Machines
Now that we have learned a little more about finite state machines, let’s take a look at how we can implement a simple one in a typical app.
Introducing XState, an easy-to-use library to create, visualize and execute finite state machines. In this example, let’s create a state machine for our game character mentioned earlier.
Step 1: Install and Import XState
First, we must install the library into our app.
npm install xstateThen, we can import createMachine to create our first character machine as follows:
import { createMachine } from 'xstate';

const characterMachine = createMachine({ ... });
Step 2: Design and Create Machine
Using XState’s Visualizer, we can determine how our state machine behaves, how it is transitioned from one state to another, and the output of each state.
For the sake of simplicity, here is the visualization of our character state machine:
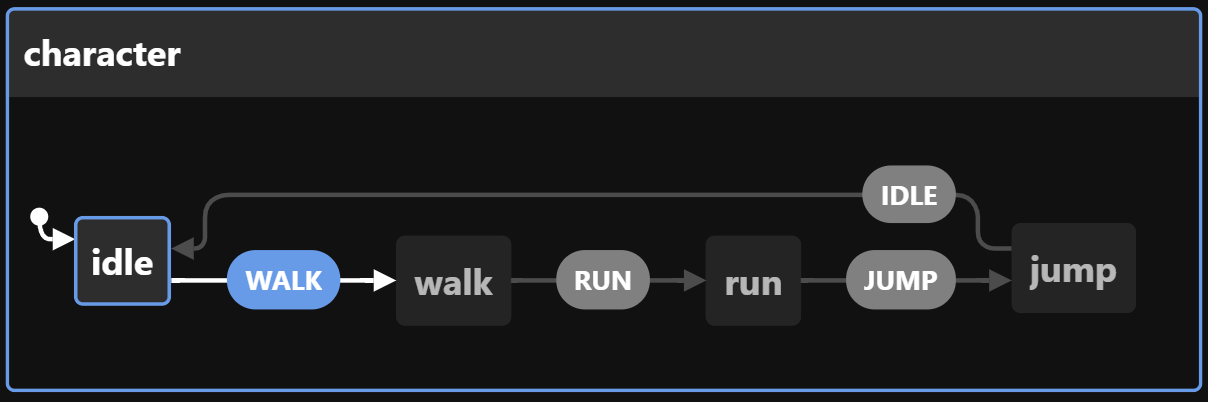
From this diagram, we can see that our character starts at the idle state. When a ‘WALK’ transition occurs, the character then goes to its walk state, and so on.
Our createMachine function will look like:
const characterMachine = createMachine({
  id: 'character', // identify our machine
  initial: 'idle', //our initial state
  states: {
    idle: {
      on: {
        // transition WALK changes state to 'walk'
        WALK: {target: 'walk'}
      }
    },
    walk: {
      on: {
        RUN: {target: 'run'}
      }
    },
    run: {
      on: {
        JUMP: {target: 'jump'}
      }
    },
    jump: {
      on: {
        IDLE: {target: 'idle'}
      }
    }
  }
});
Let’s walk through this code slowly. The initial property value is our idle state, as illustrated in the visualizer. Under states, we have our 4 states: idle, walk, run and jump.
In each child state, we have the on property, which includes state transition objects that defines the target state. For example, under idle, its on property describes that the ‘WALK’ transition would change the state to walk.
Open Source Session Replay
OpenReplay is an open-source, session replay suite that lets you see what users do on your web app, helping you troubleshoot issues faster. OpenReplay is self-hosted for full control over your data.

Start enjoying your debugging experience - start using OpenReplay for free.
Step 3: Define Actions
We have now a machine that can only be at one state at a time, can accept an input and transitions to the next target state. But what’s the use of creating this machine when there’s no output or result that happens from changing states?
By adding an action property under each child state’s transition, we can dispatch actions to execute certain output when the machine is on the particular transition of that state.
In our characterMachine, we would like the character’s animation to switch between the 4 states. So we should have actions in each state transition object like so:
 states: {
    idle: {
      on: {
        WALK: {
          target:'walk',
          actions: 'setAnimation' //string representing action
        }
      }
    },
The action setAnimation can be defined in the actions object, which we will pass as a 2nd argument in our createMachine function:
const characterMachine = createMachine({
  id: 'character',
  initial: 'idle',
  states: {...}
},
{
// action object
  actions: {
    //our setAnimation action defined here
    setAnimation: (context, event) => {
      // possible values of "event": {type: WALK}, {type: RUN}, {type: JUMP}, {type: IDLE}
      console.log(event);

      //some logic to change animation below
    }
  }
});
As seen in the code above, our action takes in 2 parameters: context and event. You can read more about context here. In this example, we only need to know the event object.
The event object simply contains a type property with the value of the event. Knowing this, the setAnimation action can change the character to the correct animation. So if a WALK event is passed, our action executes a walking animation and the same goes for the other events.
Our final machine should look as follows:
const characterMachine = createMachine({
  id: 'character',
  initial: 'idle',
  states: {
    idle: {
      on: {
        WALK: {
          target:'walk',
          actions: 'setAnimation'
        }
      }
    },
    walk: {
      on: {
        RUN: {
          target:'run',
          actions: 'setAnimation'
        }
      }
    },
    run: {
      on: {
        JUMP:{
          target:'jump',
          actions: 'setAnimation'
        }
      }
    },
    jump: {
      on: {
        IDLE:{
          target: 'idle',
          actions: 'setAnimation'
        }
      }
    }
  }
},
{
  actions: {
    setAnimation: (context, event) => {
      console.log(event);
      //some logic to change animation below
    }
  }
});
Step 4: Run Machine
To run our machine, we first need to import the interpret function. Let’s go back and add that in our import statement.
import { createMachine, interpret /*add me*/} from "xstate";Next, below our createMachine, we initialize a charService to interpret and run our characterMachine.
const charService = interpret(characterMachine);This creates a service to run our machine. Now, we can simply start the service with:
// start the service
charService.start();
Step 5: Send Events
There it is! Our very first machine running. There are many ways in which we can trigger events to go from one state to another. For example, we can use the send method to send the event.
charService.send({type: 'WALK'});Perhaps we want the character to transition to its walk state when the player presses the “A” key:
document.addEventListener('keydown', e=>{
   // if player pressed the "A" key, send the WALK event
  if (e.keyCode == 65) {
       charService.send({type: 'WALK'});
  }
})
Conclusion
In this article, we’ve learned the basics about state machines: what it is, its characteristics, benefits to use it and how to implement it using XState.
I hope learning the concept behind state machines can help you better design algorithms and state logic for your apps. Thanks for reading! As always, feel free to like and share if the article has been helpful.
Till next time, cheers!
Images
-
craftpix.net