State Management in Next.js with Redux Toolkit
Use Redux Toolkit and Next Redux Wrapper to easily handle state


State management is an essential concept in modern web application development. It is how an application’s components load, store, and share data.
Redux is a library that helps developers keep track of changes in a complex application. It uses “actions” and “reducers” to update the state of your app and a “store” to save the current state. This makes it easier to build and maintain large apps and to fix any problems that come up.
Redux Toolkit is a collection of pre-built tools, functions, and structures that make it easier to work with Redux. You can use these tools and solutions as a starting point and customize them to fit your needs. Its features include automatic immutable updates and a streamlined way to define reducers. It helps you write code that’s efficient and easy to update.
Next Redux Wrapper is a library that makes it easier to use Redux with a Next.js app. It provides tools and helpers that ensure your Redux store works well with Next.js’s server-side rendering.
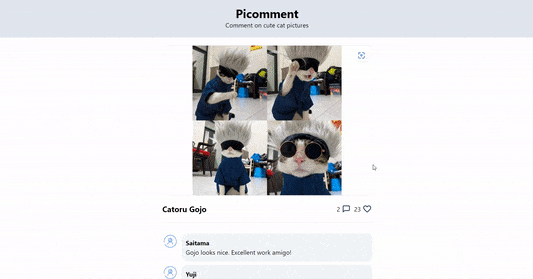
In this article, you will learn how to manage the state in your Next.js application using Redux Toolkit and Next Redux Wrapper. You will implement react-redux, @reduxjs/toolkit, and next-redux-wrapper to update the state of an app’s comment section. This is how your app will look like:
The complete demo is available on CodeSandbox, and its source code is on GitHub.
Generate a repo from the starter template
Click here to generate the starter files for this project based on an existing template repo:
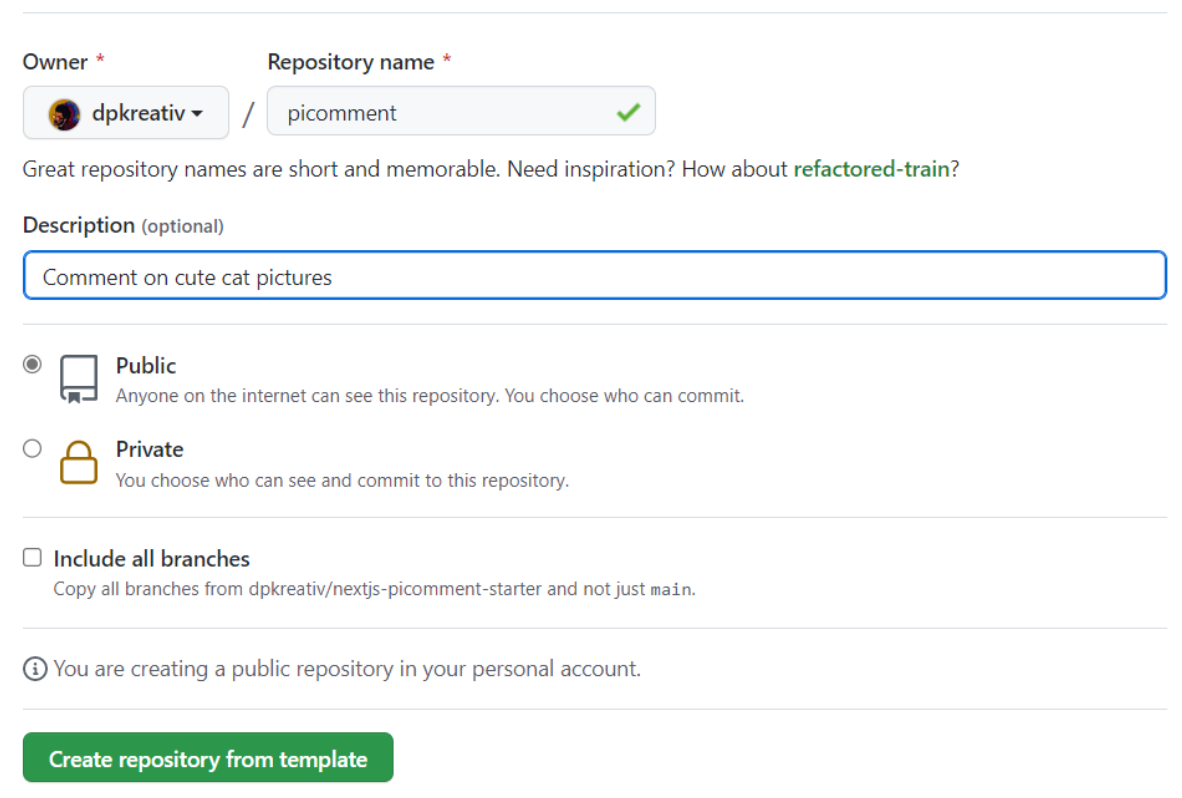
After successfully generating the repo, copy its Git URL:
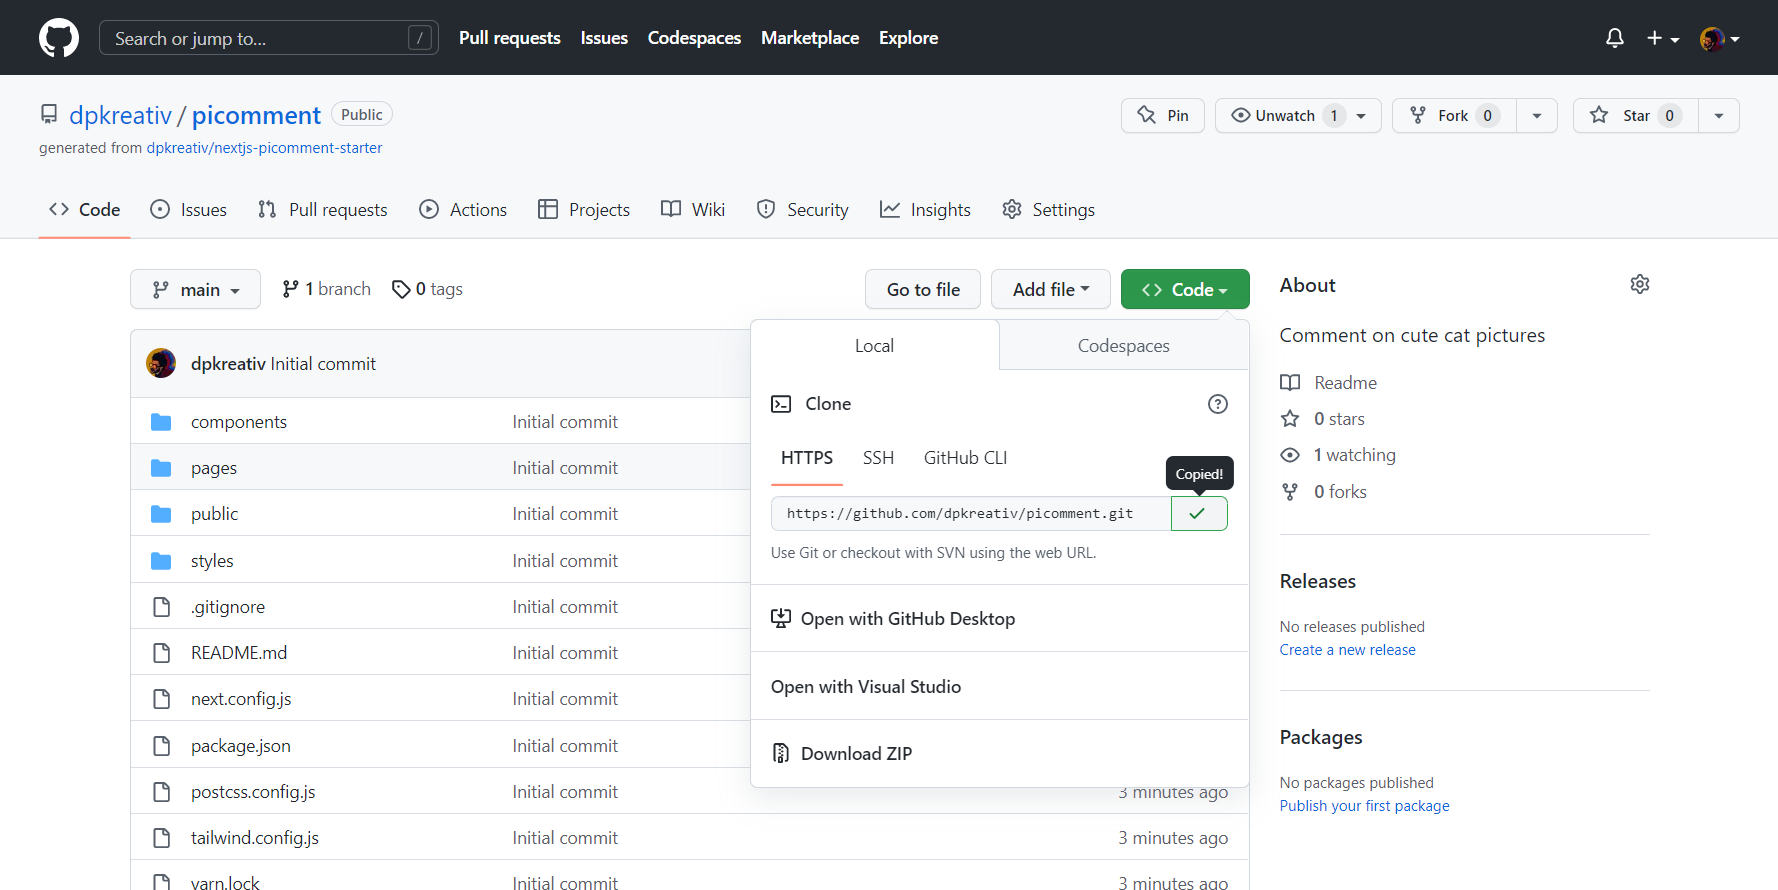
In your PC’s terminal, navigate into your preferred directory and run the command below to clone the project:
git clone <repo-git-url>After successfully cloning the project, install dependencies by running the command below in your project’s terminal:
yarn
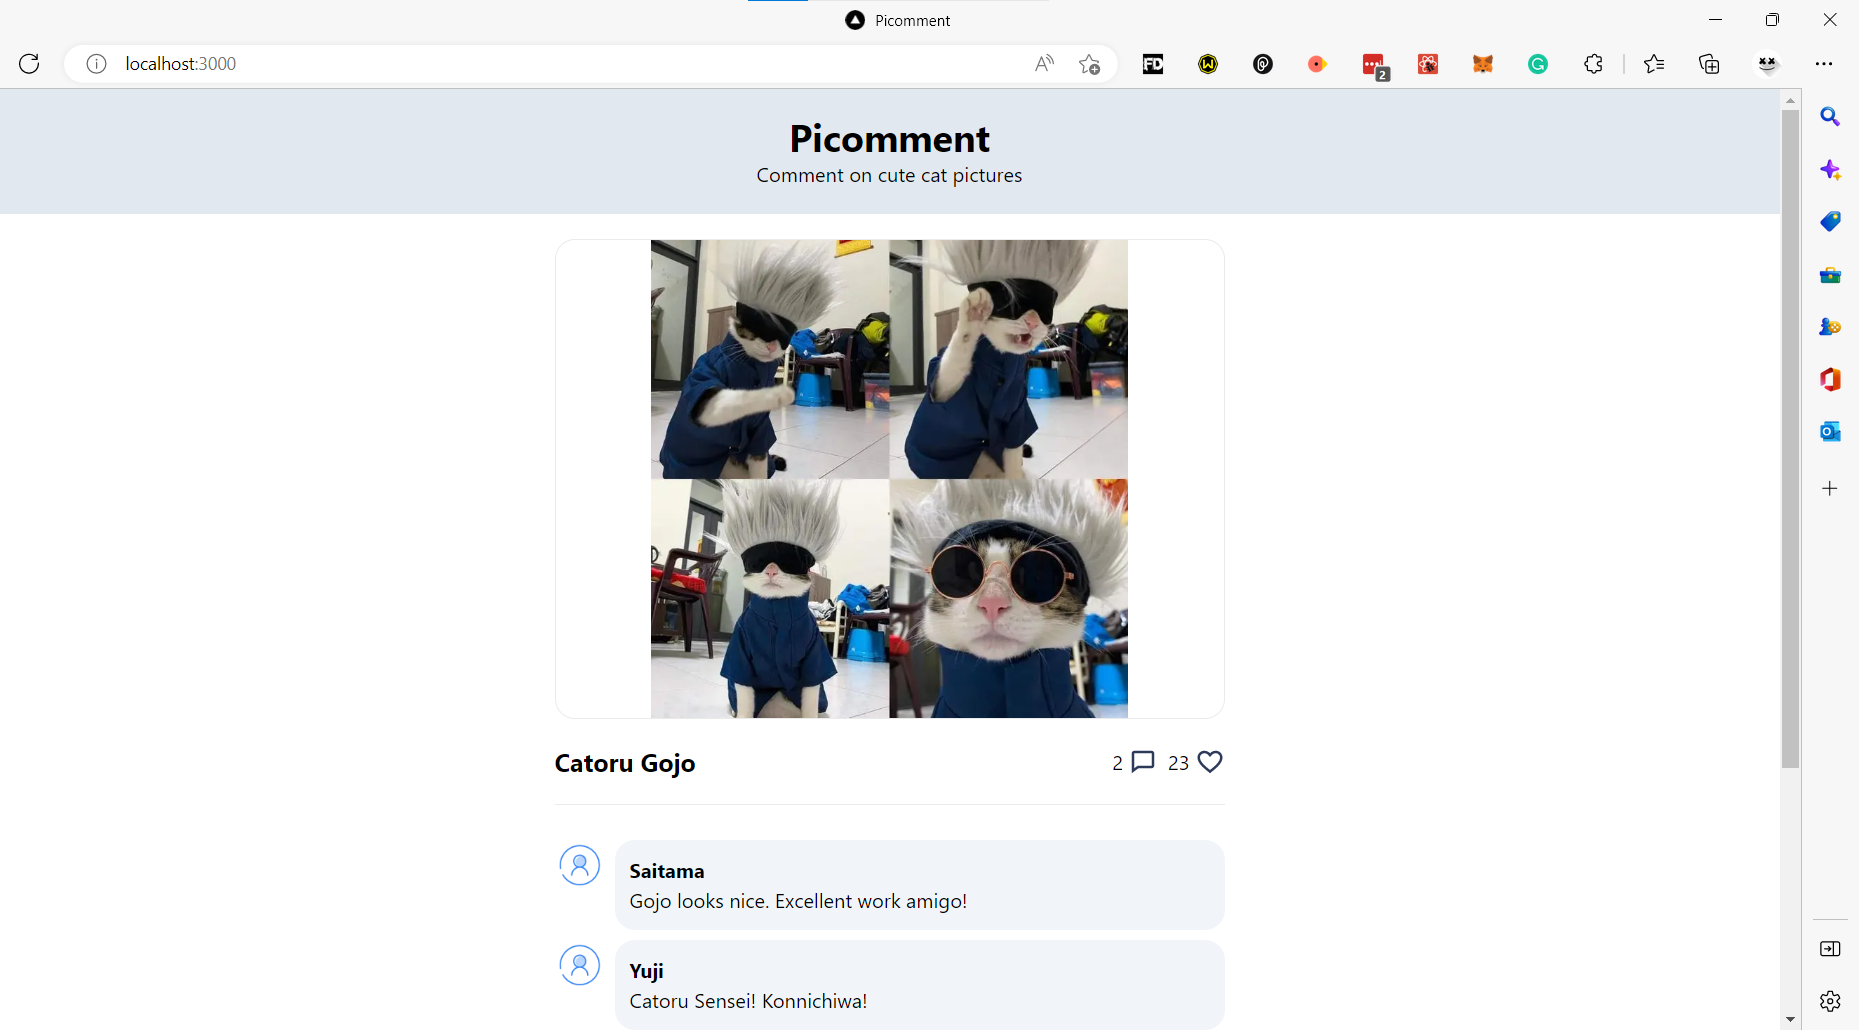
# or npm install. But for this demo, yarn is preferred.On completion, run yarn dev in your project’s terminal and navigate to [localhost:3000](http://localhost:3000) on your preferred browser to see the starter UI:
Create a Redux store
Run the command below in your project’s terminal to install these three packages:
yarn add @reduxjs/toolkit react-redux next-redux-wrapperAfter successfully installing the required packages, open the project in your preferred code editor and create a store folder with a store.js file.
Update this file with the code below:
import { configureStore } from '@reduxjs/toolkit';
import { createWrapper } from 'next-redux-wrapper';

const makeStore = () =>
  configureStore({
    reducer: {},
    devTools: true,
  });

export const wrapper = createWrapper(makeStore);
Here, you did the following:
- Imported
configureStorefrom@reduxjs/toolkitandcreateWrapperfromnext-redux-wrapper - Defined a
makeStorefunction that usesconfigureStoreto create a new Redux store. Thereducerobject will contain any reducer functions we create for this project - Exported a
wrapperobject, which contains an instance ofcreateWrapperthat takesmakeStoreas its parameter. Thiswrapperobject will be used to integrate the Redux store with your Next.js application.
When your user loads the app for the first time, the wrapper creates a server-side store using makeStore, which contains the state of your app. As your user updates the app, the state changes first on the server side, and next-redux-wrapper pushes those updates to the client side.
Session Replay for Developers
Uncover frustrations, understand bugs and fix slowdowns like never before with OpenReplay — an open-source session replay tool for developers. Self-host it in minutes, and have complete control over your customer data. Check our GitHub repo and join the thousands of developers in our community.
Implement Redux store
In your project, navigate to the pages/_app.js file and update it with the code below:
import { Provider } from 'react-redux';
import { wrapper } from '../store/store';
import '../styles/globals.css';

function MyApp({ Component, ...rest }) {
  const { store, props } = wrapper.useWrappedStore(rest);
  const { pageProps } = props;
  return (
    <Provider store={store}>
      <Component {...pageProps} />
    </Provider>
  );
}

export default MyApp;
Here, your MyApp function returns a <Component /> nested in a <Provider> from react-redux.
This <Provider> holds your redux store, obtained from the wrapper you created earlier using the useWrappedStore hook.
Setting Up Redux Toolkit Slices
According to the documentation, a slice is a collection of Redux reducer logic and actions for a single feature in your app, typically defined together in a single file.
In Redux Toolkit, the createSlice function takes in three parameters:
- The name of your slice
- Its initial state
- A
reducersobject containing all the reducers you want to perform on that slice.
It then automatically generates an action to match each of the slice’s reducers, eliminating the need to manually create actions for each reducer.
In your store folder, create a slices folder that contains a commentSlice.js file, and update it with the code below:
import { createSlice } from '@reduxjs/toolkit';
import { HYDRATE } from 'next-redux-wrapper';

const initialState = {
  value: [
    {
      comment: 'Gojo looks nice. Excellent work amigo!',
      username: 'Saitama',
    },
    {
      comment: 'Catoru Sensei! Konnichiwa!',
      username: 'Yuji',
    },
  ],
};

export const commentSlice = createSlice({
  name: 'comments',
  initialState,
  reducers: {
    // Action to add comment
    addComment: (state, action) => {
      state.value = [...state.value, action.payload];
    },

    // Special reducer for hydrating the state
    extraReducers: {
      [HYDRATE]: (state, action) => {
        return {
          ...state,
          ...action.payload.comments,
        };
      },
    },
  },
});

export const { addComment } = commentSlice.actions;
export const selectComments = (state) => state.comments.value;
export default commentSlice.reducer;
Here, you set the initial state of your comments, created a commentSlice, and set an addComment reducer.
You also used the HYDRATE function in next-redux-wrapper to ensure that the state on the server side matches the client side of your app.
You then exported your addComment action, selectComments, which contains your state, and your commentSlice.reducer by default.
Set up Authentication Slice
Similar to the Comment Slice you created earlier, the Authentication Slice will contain your app’s initial authentication state, some reducers to update the state, and extra reducers to hydrate it using next-redux-wrapper.
In your slices folder, create an authSlice.js file and update it with the code below:
import { createSlice } from '@reduxjs/toolkit';
import { HYDRATE } from 'next-redux-wrapper';

const initialState = {
  authState: false,
  authUser: ",
};

export const authSlice = createSlice({
  name: 'auth',
  initialState,
  reducers: {
    setAuthState(state, action) {
      state.authState = action.payload;
    },
    setAuthUser(state, action) {
      state.authUser = action.payload;
    },

    extraReducers: {
      [HYDRATE]: (state, action) => {
        return {
          ...state,
          ...action.payload.auth,
        };
      },
    },
  },
});

export const { setAuthState, setAuthUser } = authSlice.actions;
export const selectAuthState = (state) => state.auth.authState;
export const selectAuthUser = (state) => state.auth.authUser;
export default authSlice.reducer;
Here, your initial authState is false to indicate that the user has not logged in, and authUser is an empty string.
You then exported setAuthState and setAuthUser as actions, selectAuthState and selectAuthUser to hold authentication data, and authSlice.reducer by default.
Update Redux Store with Slices
In your store folder, update store.js with the code below:
import { configureStore } from '@reduxjs/toolkit';
import { createWrapper } from 'next-redux-wrapper';
import { authSlice } from './slices/authSlice';
import { commentSlice } from './slices/commentSlice';

const makeStore = () =>
  configureStore({
    reducer: {
      [authSlice.name]: authSlice.reducer,
      [commentSlice.name]: commentSlice.reducer,
    },
    devTools: true,
  });

export const wrapper = createWrapper(makeStore);
You imported the slices to your main store and set their reducers in configureStore().
Updating State with useSelector and useDispatch
React-Redux provides two useful hooks for handling state in functional components: useSelector() and useDispatch().
The useSelector() hook lets a React component access data from a Redux store. It takes a selector function and returns its current value.
On the other hand, useDispatch() provides access to the Redux dispatch function. This allows a React component to dispatch actions to the Redux store. It is typically used to update the store in response to user interactions or other events in the component.
Set Up Authentication
In this app, users need to create a username before adding comments.
In your code editor, open Login.js located at components/ui/organisms/ and update it with the code below:
import { useDispatch } from 'react-redux';
import Button from '../atoms/Button';
import Input from '../atoms/Input';

export default function Login() {
  const dispatch = useDispatch();

  function handleLogin(e) {
    e.preventDefault();
    dispatch(setAuthState(true));
    dispatch(setAuthUser(e.target.user.value));
  }

  return (
    <form className="flex space-x-2" onSubmit={handleLogin}>
      <div className="input-box">
        <Input id={`user`} type={`text`} placeholder={`Set username`} />
      </div>
      <Button type={`submit`}>login</Button>
    </form>
  );
}
In the code above, you updated the state of your authentication slice with useDispatch(), setting it to true and saving the user’s name too.
Navigate to pages/index.js and update it with the code below:
import Head from 'next/head';
import HomeLayout from '../components/layouts/HomeLayout';
import Comment from '../components/ui/molecules/Comment';
import Hero from '../components/ui/organisms/Hero';
import NewComment from '../components/ui/organisms/NewComment';
import Login from '../components/ui/organisms/Login';
import { Comments } from '../components/assets/Comments';
import { useSelector } from 'react-redux'; // updated
import { selectAuthState } from '../store/slices/authSlice'; //updated

export default function Home() {
  const authState = useSelector(selectAuthState); // updated
  const comments = Comments.value;

  return (
    <div>
      <Head>
        <title>Picomment</title>
        <meta name= "description" content= "Drop comments on cute cat pictures"/>
        <link rel="icon" href="/favicon.ico" />
      </Head>

      <HomeLayout>
        {/* Hero Section */}
        <Hero
          imageSrc={`/images/cute-cat.jpg`}
          imageAlt={`Gojo Cat`}
          imageTitle={`Catoru Gojo`}
        />

        {/* Comment Section */}
        <section className="py-5">
          {comments.map((obj, idx) => (
            <Comment key={idx} comment={obj.comment} username={obj.username} />
          ))}
        </section>

        {/* Input Section - updated */}
        {authState ? <NewComment /> : <Login />}
      </HomeLayout>
    </div>
  );
}
Here, you implemented useSelector, which takes selectAuthState from authSlice.js as its parameter.
The value of your useSelector is stored in an authState variable and conditionally displays a <NewComment /> when it’s true or <Login /> when it’s false.
Add New Comments
Open NewComment.js located at components/ui/organisms/ and update it with the code below:
import { useDispatch, useSelector } from 'react-redux'; //updated
import { selectAuthUser } from '../../../store/slices/authSlice'; // updated
import { addComment } from '../../../store/slices/commentSlice'; // updated
import Avatar from '../atoms/Avatar';
import Button from '../atoms/Button';
import Input from '../atoms/Input';

export default function NewComment() {
  const dispatch = useDispatch(); // updated
  const user = useSelector(selectAuthUser); // updated

  // Updated function
  function handleNewComment(e) {
    e.preventDefault();
    dispatch(
      addComment({
        comment: e.target.comment.value,
        username: user,
      })
    );
    e.target.comment.value = '';
  }

  return (
    <section>
      <form
        className="flex space-x-2 items-center h-full"
        onSubmit={handleNewComment}
      >
        <Avatar />
        <div className="input-box">
          <Input
            id={`comment`}
            type={`text`}
            placeholder={`${user}'s comment`}
          />
        </div>
        <Button type={`submit`}>send</Button>
      </form>
      <div className="py-2">
        {/* Logout button - updated */}
        <Button onClick={() => dispatch(setAuthState(false))}>logout</Button>
      </div>
    </section>
  );
}
Here, you imported useSelector and useDispatch from React-Redux and got the current name of the user with selectAuthUser.
You then updated the handleNewComment function to add a comment with the user’s name.
The logout button sets authentication to false, which disables the comment input and displays the login input.
Display Comments
In your pages/index.js, update the comments variable in your Home function with the code below:
const comments = useSelector(selectComments);Also, remember to import selectComments from your commentSlice.js file:
import { selectComments } from '../store/slices/commentSlice';In your browser, open [localhost:3000](http://localhost:3000) to view the app and interact with it:
Conclusion
In this article, you learned how to implement Redux Toolkit and Next Redux Wrapper in a Next.js project.
Redux Toolkit provides a simple and powerful toolset for working with Redux, and next-redux-wrapper makes it easy to integrate Redux with Next.js. Together, these libraries provide a powerful and flexible solution for managing the state in a Next.js application.
A TIP FROM THE EDITOR: For more on Redux Toolkit, don’t miss reading Building a shopping cart in React with Redux Toolkit and Redux Persist.
Gain Debugging Superpowers
Unleash the power of session replay to reproduce bugs and track user frustrations. Get complete visibility into your frontend with OpenReplay, the most advanced open-source session replay tool for developers.