State Management in React with Hookstate
An interesting library for managing state in all React apps.


Managing the state of a medium-sized application as a React Developer can be difficult. It is relatively simple to pass state from one component to another when developing small-scale applications. When the application’s scale changes, it becomes inconvenient because you have to prop drill to access the state in another component.
Hookstate is a state management library solely based on React state hook. It is simple to implement, quick, straightforward, and extensible. No boilerplate is required, and it can also be used in Next.js applications.
In this article, we’ll look at how to use this library, one of the most user-friendly React state management libraries. You must have a basic understanding of React, React Hooks, Chakra-UI, and Axios to follow along.
Getting started with Hookstate
In this section, we’ll use the code block below to create a React application:
npx create-react-app react-hookstate
cd react-hookstate
To install the required libraries, use either of the following code blocks:
npm install --save @hookstate/core @chakra-ui/react @emotion/react @emotion/styled framer-motion axios
or
yarn add @hookstate/core @chakra-ui/react @emotion/react @emotion/styled framer-motion axiosLocal state
In general, using the local state in a React application is recommended when a state is used by a parent component, its children, or just the parent. It is recommended to use a global state when multiple components share a state, and every component in the application has access to the state in this way.
To show how Hookstate handles state locally, we will leverage useHookstate.
import React from "react";
import { useHookstate } from "@hookstate/core";
import { Box, Button, Flex, Text } from "@chakra-ui/react";
const App = () => {
const state = useHookstate(0);
return (
<Box
display="flex"
flexDirection="column"
justifyContent="center"
alignItems="center"
maxW="1440px"
minH="100vh"
m="auto"
>
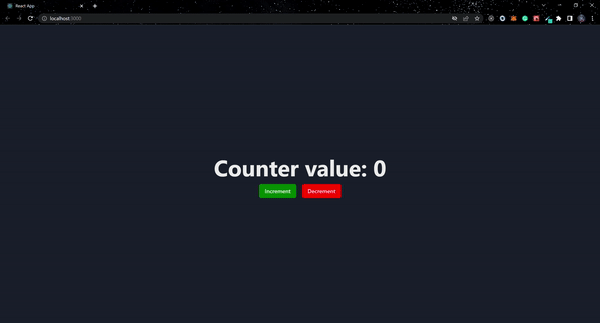
<Text textAlign="center" fontWeight="700" fontSize={{base: "32px", md: "64px"}}>
Counter value: {state.get()}{" "}
</Text>
<Flex gap={4}>
<Button onClick={() => state.set((p) => p + 1)} bg="green" color="#fff">Increment</Button>
<Button onClick={() => state.set((p) => p - 1)} bg="red" color="#fff">Decrement</Button>
</Flex>
</Box>
);
};
export default App;The code above shows a counter application and how we used useHookstate. After assigning useHookstate to the variable state, we set the default value to 0 and used set and get methods provided by useHookstate. The set method is used to mutate the state, while the get method retrieves the state’s value.
Global state
In this section, we will look at how to manage the state in an application at the global level. As in the previous section, the state will be global this time and accessible from anywhere in the application.
Create a new directory in src/store/index.js and paste the code block below into it:
import { hookstate, useHookstate } from "@hookstate/core";

const initialState = hookstate({
  count: 0,
});

export const useGlobalState = () => {
  const state = useHookstate(initialState);

  return {
    getCount: () => state.count.value,
    increment: () => {
      state.count.set((count) => count + 1);
    },
    decrement: () => {
      state.count.set((count) => count - 1);
    },
  };
};
In the preceding code block, we declared the application’s initialState using hookState, which has an object containing count, with the value set to 0.
Following that, we created a custom hook called useGlobalstate and passed the argument initialState to useHookstate. We have three functions in the return block that read and modify the state.
To access the state globally, we must first modify the App.js component.
import React from "react";
import { Box, Button, Flex, Text } from "@chakra-ui/react";
import { useGlobalState } from "./store";

const App = () => {
  const state = useGlobalState();

  const increment =()=> {
    state.increment()
  }

  const decrement =()=> {
    state.decrement()
  }

  return (
    <Box
      display="flex"
      flexDirection="column"
      justifyContent="center"
      alignItems="center"
      maxW="1440px"
      minH="100vh"
      m="auto"
    >
      <Text textAlign="center" fontWeight="700" fontSize={{base: "32px", md: "64px"}}>
        Counter value: {state.getCount()}{" "}
      </Text>
      <Flex gap={4}>
        <Button onClick={() => increment()} bg="green" color="#fff">Increment</Button>
        <Button onClick={() => decrement()} bg="red" color="#fff">Decrement</Button>
      </Flex>
    </Box>
  );
};

export default App;
We now have access to the global state via useGlobalState, the custom hook imported from src/store/index.js, which we set to a variable called state in the updated App.js component. We now have global access to read and mutate state.

In general, using the local state in a React application is recommended when a state is used by a parent component, its children, or just the parent. It is recommended to use a global state when multiple components share a state. Every component in the application has access to the state in this way.
Global State with CRUD functionality
In this section, we will create a CRUD application. This will show a real-world example of how to manage the state of an application.
We will be creating a simple blog application. The first approach will be to create the application’s state and the functions to mutate it.
Add the following code block to the src/store/index file.
import { hookstate, useHookstate } from "@hookstate/core";

const initialState = hookstate({
  blog: [],
});

export const useGlobalState = () => {
  const state = useHookstate(initialState);

  return {
    getCountBlog: () => state.blog.length,
    addBlog: (blog) => {
      state.blog.merge([blog]);
    },
    updateBlog: (id, blog) => {
      state.blog.set((b) =>
        b.map((blogs) => {
          if (blogs.id === id) {
            blogs.content = blog.content;
          }
          return blogs;
        })
      );
    },
    deleteBlog: (id) => {
      state.blog.set((blogs) => blogs.filter((blog) => blog.id !== id));
    },
    fetchBlogs: () => state.blog,
  };
};
We created five distinct functions for the application in the above code block. These functions can read and modify the state. The addBlog function, for example, uses the merge API from Hookstate, which, like set, partially updates the application’s existing state.
We will create the same functions in App.js as in src/store/index.
import React, { useEffect, useState } from "react";
import {
Box,
Button,
Card,
CardBody,
CardFooter,
Flex,
Image,
Input,
Stack,
Text,
} from "@chakra-ui/react";
import { useGlobalState } from "./store";
const App = () => {
const state = useGlobalState();
const [data, setData] = useState([]);
const [content, setContent] = useState("");
const [edit, setEdit] = useState(false);
const [updateId, setUpdateId] = useState(0);
const fetchBlog = () => {
setData(state.fetchBlogs());
};
useEffect(() => {
fetchBlog();
// eslint-disable-next-line react-hooks/exhaustive-deps
}, []);
const addBlog = () => {
const blog = {
id: state.getCountBlog() + 1,
content: content,
};
state.addBlog(blog);
setContent("");
};
const updateBlog = (id) => {
const blog = {
id,
content,
};
state.updateBlog(id, blog);
setContent("");
setUpdateId(0);
setEdit(false);
};
const deleteBlog = (id) => {
state.deleteBlog(id);
};
return (
<Box
display="flex"
flexDirection="column"
justifyContent="flex-start"
alignItems="center"
maxW="1440px"
minH="100vh"
m="auto"
>
<Box
width={{ base: "auto", md: "700px" }}
minH="100vh"
mt="0rem"
bg={{ base: "transparent", md: "blackAlpha.400" }}
p={8}
>
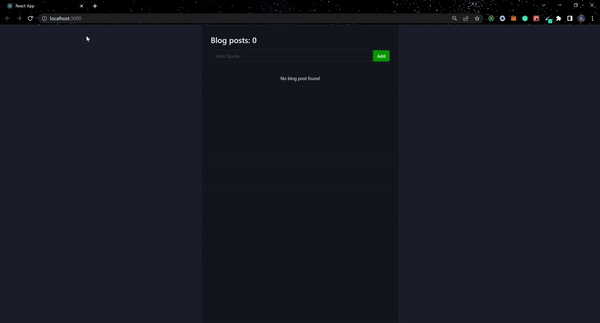
<Text fontSize="28px" fontWeight="600" mb={4}>
Blog posts: {state.getCountBlog()}
</Text>
<Flex>
<Input
name="content"
value={content}
onChange={(e) => setContent(e.target.value)}
errorBorderColor="crimson"
placeholder="Enter Quote"
borderInlineEndRadius={0}
/>
{edit ? (
<Button
onClick={() => updateBlog(updateId)}
borderInlineStartRadius={0}
bg="green"
color="#fff"
>
Update
</Button>
) : (
<Button onClick={addBlog} borderInlineStartRadius={0} bg="green" color="#fff">
Add
</Button>
)}
</Flex>
<Box my={8}>
{data.length < 1 && (
<Text py={4} textAlign="center">
No blog post found
</Text>
)}
{data &&
data.map((item, index) => (
<Card
key={index}
direction={{ base: "column", sm: "row" }}
overflow="hidden"
variant="outline"
my={4}
>
<Image
objectFit="cover"
maxW={{ base: "100%", sm: "200px" }}
src="https://images.unsplash.com/photo-1667489022797-ab608913feeb?ixlib=rb-4.0.3&ixid=MnwxMjA3fDB8MHxlZGl0b3JpYWwtZmVlZHw5fHx8ZW58MHx8fHw%3D&auto=format&fit=crop&w=800&q=60"
alt="Caffe Latte"
/>
<Stack w="full">
<CardBody>
<Text fontSize="24px" fontWeight="600" py="2">
{item.get(item).content}
</Text>
</CardBody>
<CardFooter display="flex" justifyContent="flex-end" gap={4}>
<Button
onClick={() => {
setContent(item.get(item).content);
setEdit(true);
setUpdateId(item.get(item).id);
}}
bg="blue"
color="#fff"
>
Edit
</Button>
<Button
onClick={() => deleteBlog(item.get(item).id)}
bg="red"
color="#fff"
>
Delete
</Button>
</CardFooter>
</Stack>
</Card>
))}
</Box>
</Box>
</Box>
);
};
export default App;We created named functions in the preceding code block and passed the functions from the global state into each. Simply use item.get(item).content or item.value.content to display a value in Hookstate.
Session Replay for Developers
Uncover frustrations, understand bugs and fix slowdowns like never before with OpenReplay — an open-source session replay tool for developers. Self-host it in minutes, and have complete control over your customer data. Check our GitHub repo and join the thousands of developers in our community.
Asynchronous state
Hookstate handles asynchronous data easily, performing API calls until it is resolved. The asynchronous data can be stored globally and accessed from the store from anywhere in your application.
We’ll use the code block below to create an asynchronous state that will fetch a list of users from an API and display the results in the App.js component.
import { hookstate, useHookstate } from "@hookstate/core";
import axios from "axios";

const initialState = hookstate(
  {
    loading: false,
    users: [],
  }
);

export const useGlobalState = () => {
  const state = useHookstate(initialState);
  const resourcePath = "https://jsonplaceholder.typicode.com/users";

  return {
    loading: () => state.loading,
    getUsers: async () => {
    await axios.get(resourcePath).then((r) => state.users.set(r.data));
    state.loading.set(true)
    },
    fetchUsers: () => state.users,
  };
};
We added users to the application’s initial state and set the value to an empty array using the code block above. The array will contain a list of all users retrieved from the API. We also added the state loading, which has a default value of false.
Following that, three functions that can read and modify state were created. The loading function reads the loading state; getUsers must be handled as a promise to access the state. fetchUsers simply returns the current state of users.
import React, { useEffect, useState } from "react";
import {
Box,
Card,
CardBody,
CardFooter,
Image,
Stack,
Text,
} from "@chakra-ui/react";
import { useGlobalState } from "./store";
const App = () => {
const state = useGlobalState();
const [user, setUser] = useState([]);
useEffect(() => {
state.getUsers();
// eslint-disable-next-line react-hooks/exhaustive-deps
}, []);
useEffect(() => {
if (state.loading().value === true) {
setUser(state.fetchUsers());
}
}, [state]);
return (
<Box
display="flex"
flexDirection="column"
justifyContent="flex-start"
alignItems="center"
maxW="1440px"
minH="100vh"
m="auto"
>
<Box
width={{ base: "auto", md: "700px" }}
minH="100vh"
mt="0rem"
bg={{ base: "transparent", md: "blackAlpha.400" }}
p={8}
>
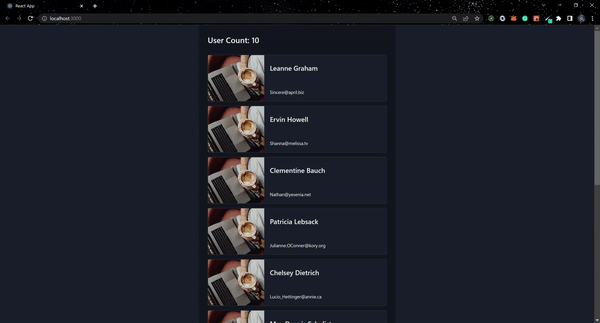
<Text fontSize="28px" fontWeight="600" mb={4}>
User Count: {user.length}
</Text>
<Box my={8}>
{user.length < 1 && (
<Text py={4} textAlign="center">
No user post found
</Text>
)}
{user &&
user.map((item, index) => (
<Card
key={index}
direction={{ base: "column", sm: "row" }}
overflow="hidden"
variant="outline"
my={4}
>
<Image
objectFit="cover"
maxW={{ base: "100%", sm: "200px" }}
src="https://images.unsplash.com/photo-1667489022797-ab608913feeb?ixlib=rb-4.0.3&ixid=MnwxMjA3fDB8MHxlZGl0b3JpYWwtZmVlZHw5fHx8ZW58MHx8fHw%3D&auto=format&fit=crop&w=800&q=60"
alt="Caffe Latte"
/>
<Stack w="full">
<CardBody>
<Text fontSize="24px" fontWeight="600" py="2">
{item.value.name}
</Text>
</CardBody>
<CardFooter
display="flex"
justifyContent="flex-start"
gap={4}
>
<Text>{item.value.email}</Text>
</CardFooter>
</Stack>
</Card>
))}
</Box>
</Box>
</Box>
);
};
export default App;As before, we must initialize the getUsers function from the global state and load the data into users before successfully retrieving the users list with fetchUsers only when loading is set to true. Next, we map the data from the user state and use item.value.name and item.value.email to get the value of each item.
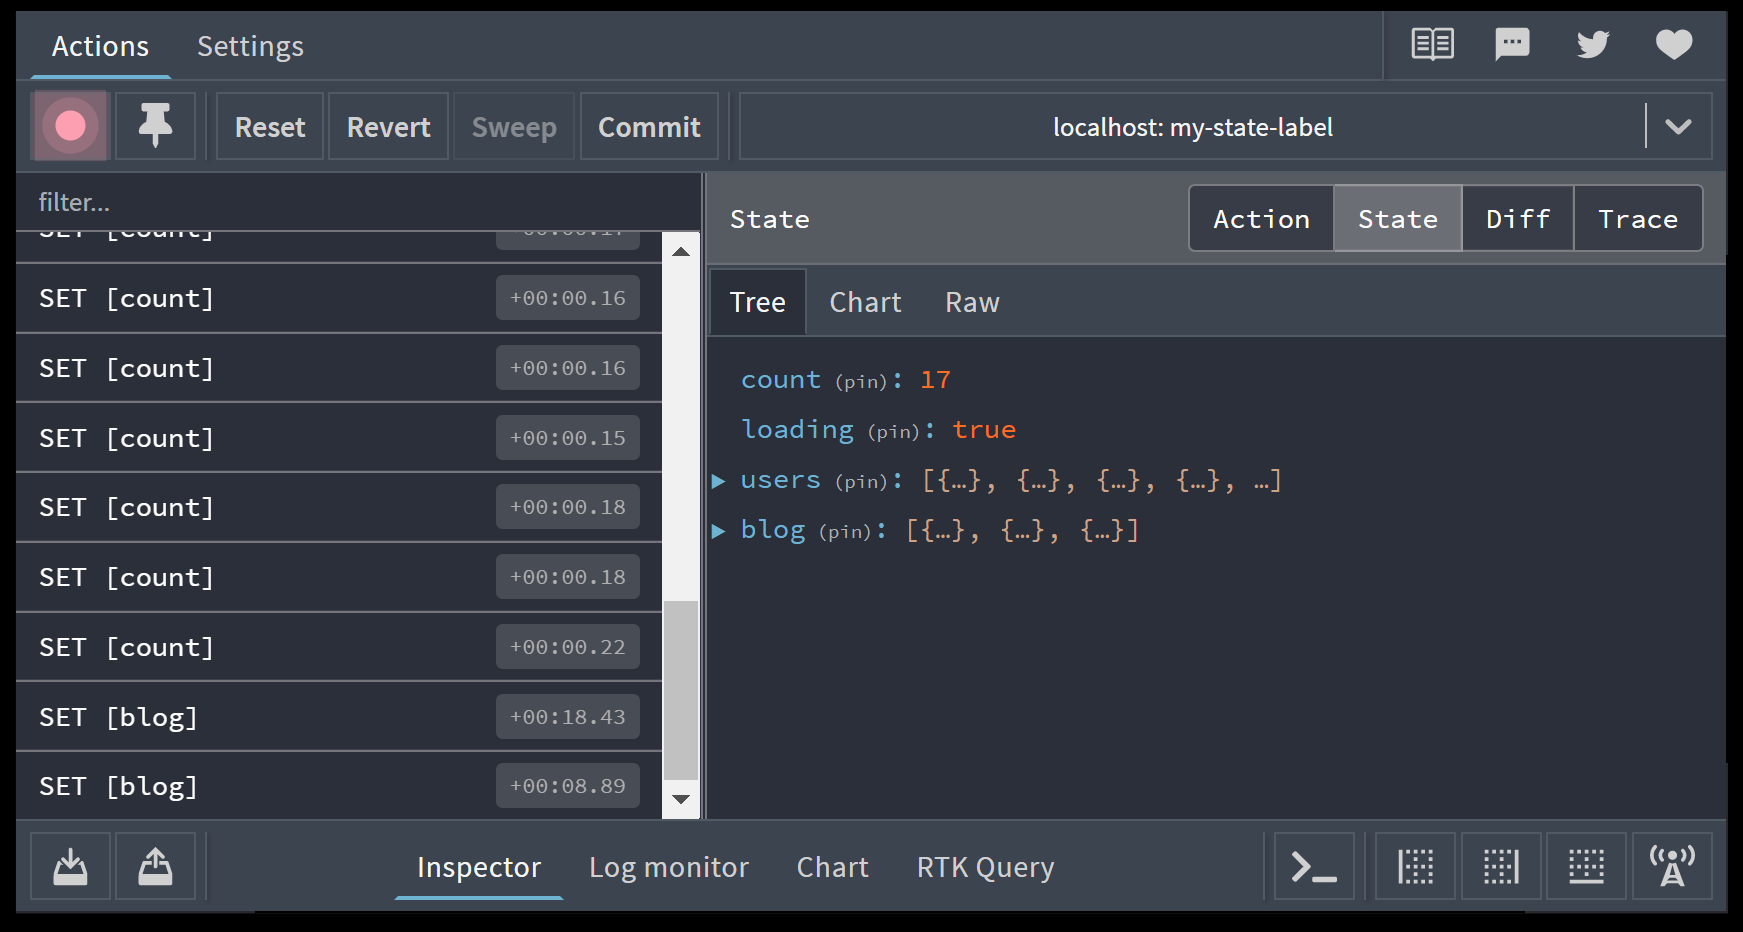
Dev tools
Using dev tools, you can inspect the state of your application in Hookstate. It has the simplest configuration known; all that is required is to pass a second argument to hookstate or useHookstate as shown in the code below. This has no adverse effects on your application in production.
...
import { devtools } from "@hookstate/devtools";

const initialState = hookstate(
  {
    loading: false,
    users: [],
  },
  devtools({ key: "my-state-label" })
);
...
Conclusion
The Hookstate library is one of the simplest state management libraries to integrate into your application. The library has more to offer, and it has excellent developer experience. To learn more about Hookstate, go to the official docs. Access the source code and live version of the project used in this article.
Gain Debugging Superpowers
Unleash the power of session replay to reproduce bugs and track user frustrations. Get complete visibility into your frontend with OpenReplay, the most advanced open-source session replay tool for developers.