
Input to apps is traditionally done using the mouse or the keyboard, but currently, speech input is becoming increasingly used. In this tutorial, we will build a Goal Tracker application in Next.js, with voice-enabled features through Alan AI voice command integration.
What is Alan AI, and why use it?
Alan AI is a voice AI platform that allows users to add in-app voice assistants or chatbots to create and manage interactions between an application and its users through voice onboarding. Alan AI can be easily integrated into web-based and mobile applications and has cross-platform support. It is developer-friendly, using a simple user interface and IDE to create voice interactions. Alan AI features can be used in chat applications for voice typing, handling customer support feedback, providing feedback and help, etc.
Alan AI offers two primary features: Voice platform and Dialogue design.
-
Voice platform: This is an integration provided by Alan AI, which uses “human language” to interact with the user. For this, the developer does not need to set up any speech recognition components; Alan handles that. All the developer is required to do is to set up the dialogue patterns and integrate Alan AI into the application with the correct SDK, be it a web application, mobile or cross-platform application. The dialogue pattern will contain keywords Alan AI should listen for and possible responses or commands that should be executed upon getting the user feedback.
-
Dialogue design: This involves writing voice scripts that will depict the conversation between the user and Alan’s AI voice features. Dialogue design can be made to follow a conversational pattern, and attempt to cover all possible paths users may take while conversing with the AI. It should cover all phrases and voice commands that users can use in the application. In dialogue design, user voice commands can be written, and feedback for when these commands have been carried out can also be specified. Some users might say a command differently, and the developer might not always be able to cover all occurrences. For instance, a command “open phonebook” might be defined, but a particular user says “access phonebook” instead. Alan AI solves this problem by evaluating the user’s input, looking for keywords, and choosing the best option from the available options in the dialogue design script.
Other interesting features include:
-
Alan AI allows the developer to add slots to voice commands. These slots can contain user voice inputs stored as variables and be passed to the application for use. With this, the application can fully interact with the user and carry out commands based on the user’s wants.
-
Alan AI allows for data-sharing between the application and the voice script. With this, data can required by the voice assistant or application can be communicated and used as required.
-
Alan SDKs supports cover a wide range of development platforms: Web, IOS, Android, React Native, Apache Cordova, Ionic, and Flutter.
-
Alan AI is easy to integrate. Upon adding the required SDK, a voice assistant button is provided by Alan AI for easy usage. Command scripts are written in simple statements.
We will create a goals-oriented project for this; first, we’ll discuss the project itself, and then we’ll get into integrating speech.
Setting up our project
In this tutorial, we will be using Next.js as our React framework, TailwindCSS for styling, and, obviously, Alan AI for speech recognition. We can install all of these with the following commands:
npx create-next-app goaltracker
cd goaltracker
npm install @alan-ai/alan-sdk-web --save
npm install -D tailwindcss postcss autoprefixer
npx tailwindcss init -p
Set up the tailwind.config.js file to have jsx support as shown below:
module.exports = {
  content: [
    "./pages/**/*.{js,ts,jsx,tsx}",
    "./components/**/*.{js,ts,jsx,tsx}",
  ],
  theme: {
    extend: {},
  },
  plugins: [],
}
Finally, add the style rule directives to global.css:
@tailwind base;
@tailwind components;
@tailwind utilities;
Developing the front end
To get started, we will make the following modifications to index.js:
import React from "react"
import Goaltracker from "./components/Goaltracker"
export default function Home() {
  return (
    <div>
      <Goaltracker/>
    </div>
  )
}
Then, we will create a component folder in the “pages” directory called components. Within this folder, create a new file Goaltracker.js and add the following code to it:
import { React, useState, useMemo, useEffect } from "react";
const Goaltracker = () => {
  const [visible, setVisible] = useState(false);
  let goalarray = useMemo(() => {
    return [
      ["Be an Athlete", ["dance", "run", "jump"]],
      ["Get good grades", ["read", "study", "attend classes"]],
    ]
  }, [])
  const [goals, setGoals] = useState(goalarray);
  const [text, setText] = useState("");
  const [tasks, setTasks] = useState("");
  const createGoal=()=>{}
  const addTask=()=>{}
  return (
    <div className="">
      <div className=" w-full flex items-center flex-col pt-3">
        <h1 className=" text-3xl font-medium">Goaltracker</h1>
        <button
          // toggle add new task
          className=" px-6 py-2 text-white bg-blue-600 rounded-sm z-10 mt-3"
          onClick={() => {
            setVisible(!visible);
          }}
        >
          {visible ? "Close" : "Add new Goal"}
        </button>
      </div>
      <div className=" h-full relative flex w-full flex-col items-center pt-12">
        {/* goals display */}
        {goals &&
          goals.map((goal, index) => {
            return (
              <div className=" w-1/2 px-5 py-2 shadow-md mb-8" key={index}>
                <h1 className="text-2xl font-medium">{goal[0]}</h1>
                <div className="">
                  {goal[1].map((task, index) => {
                    return (
                      <div
                        className="flex items-center justify-between px-4 py-2"
                        key={index}
                      >
                        <p className="text-xl font-medium">{task}</p>
                        <input type="checkbox" />
                      </div>
                    );
                  })}
                </div>
              </div>
            );
          })}
      </div>
      {visible ? (
        // Add new task window
        <div className="absolute top-0 h-full w-full flex items-center justify-center backdrop-blur-md">
          <div className=" bg-white shadow-md py-3 px-5">
            <h2 className="font-bold">Create new Goal</h2>
            <input
              placeholder="Enter goals"
              value={text}
              onChange={(e) => {
                setText(e.target.value);
              }}
              className=" border-2 border-blue-600 w-5/6 my-4 px-2 py-2 rounded-md"
            />
            <p>Enter set of task to be accomplished to achieve set goal</p>
            <div className="flex gap-2 justify-center items-center">
              <input
                placeholder="Enter task"
                value={tasks}
                onChange={(e) => {
                  setTasks(e.target.value);
                }}
                className=" border-2 border-blue-600 w-5/6 my-4 px-2 py-2 rounded-md"
              />
              <button
                className=" px-6 py-2 text-white bg-blue-600 rounded-sm w-32"
                onClick={()=>{addTask()}}
              >
                Add task
              </button>
            </div>
            <button
              className=" px-6 py-2 text-white bg-blue-600 rounded-sm"
              onClick={()=>{createGoal()}}
            >
              > Create Goal
            </button>
          </div>
        </div>
      ) : null}
    </div>
  );
};
export default Goaltracker;
The code above has a button that opens a display window to add goals. The goals (stored in the state array goals) are mapped through, and the resulting goals and tasks are returned. We also have two functions, createGoal and addTasks, which we will use to add new goals to our array. Later in this tutorial, we will add a feature to input goals and tasks using Alan AI.
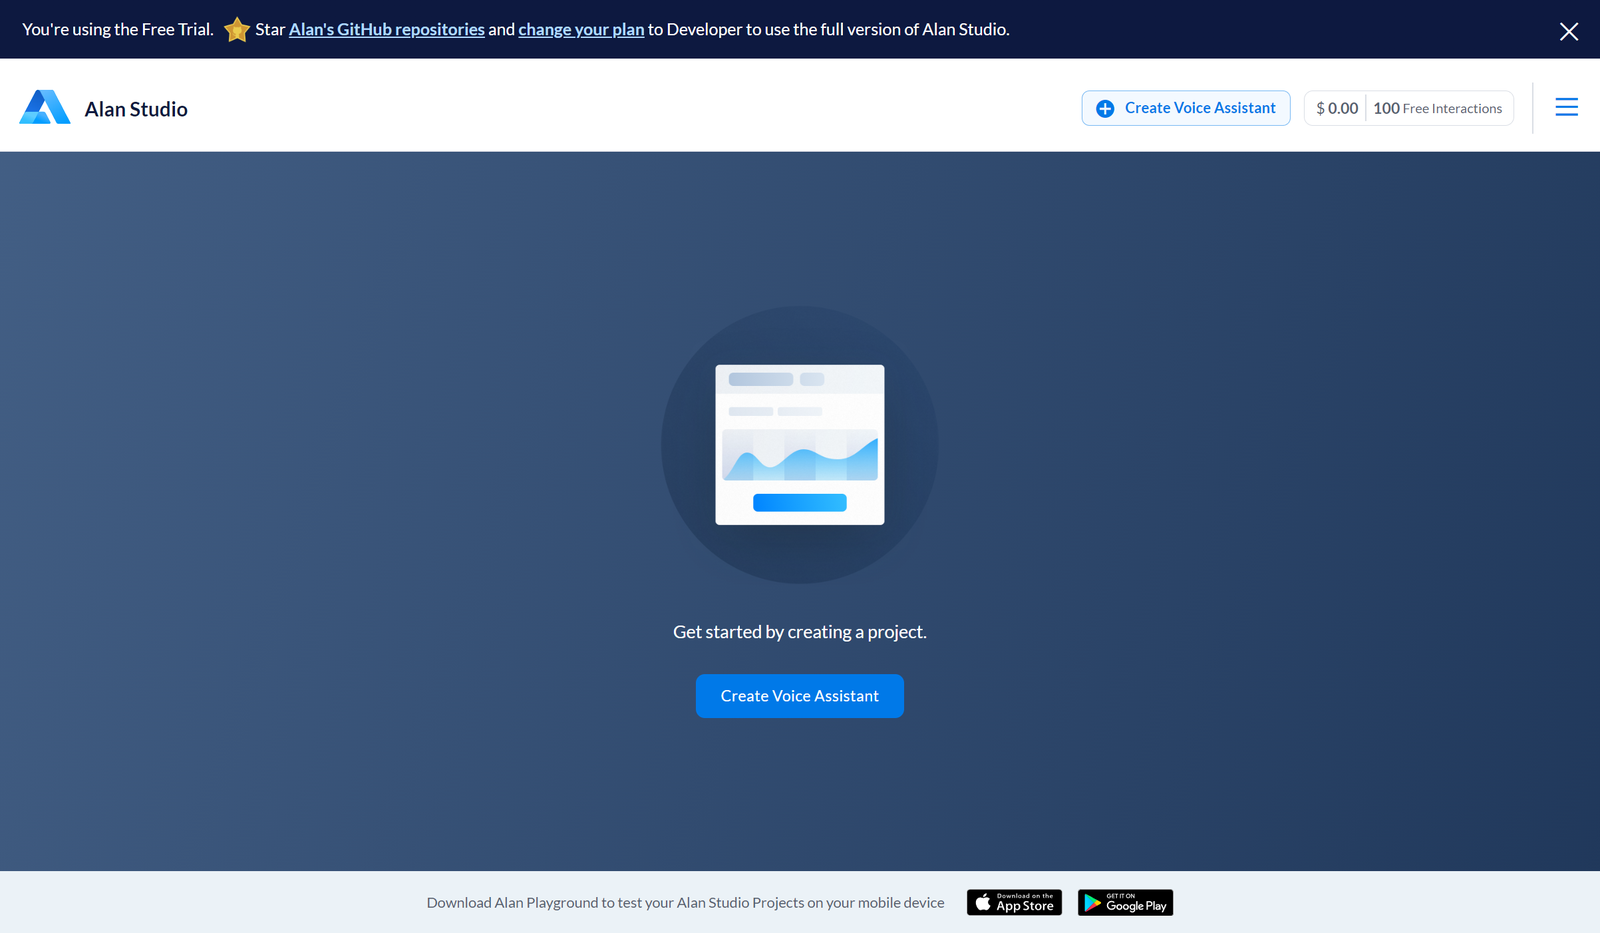
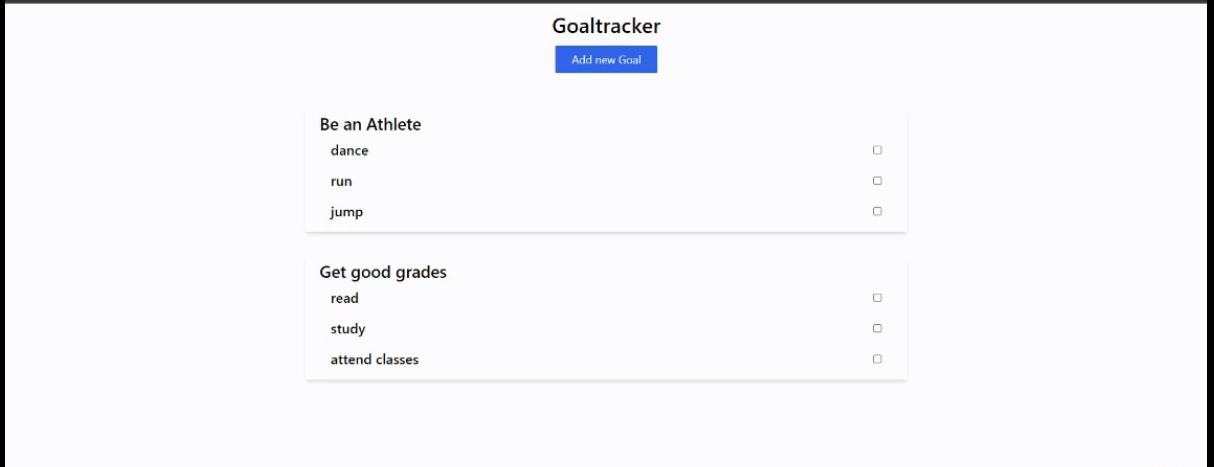
If we run the application with the npm run dev command, we get a result similar to the image below.

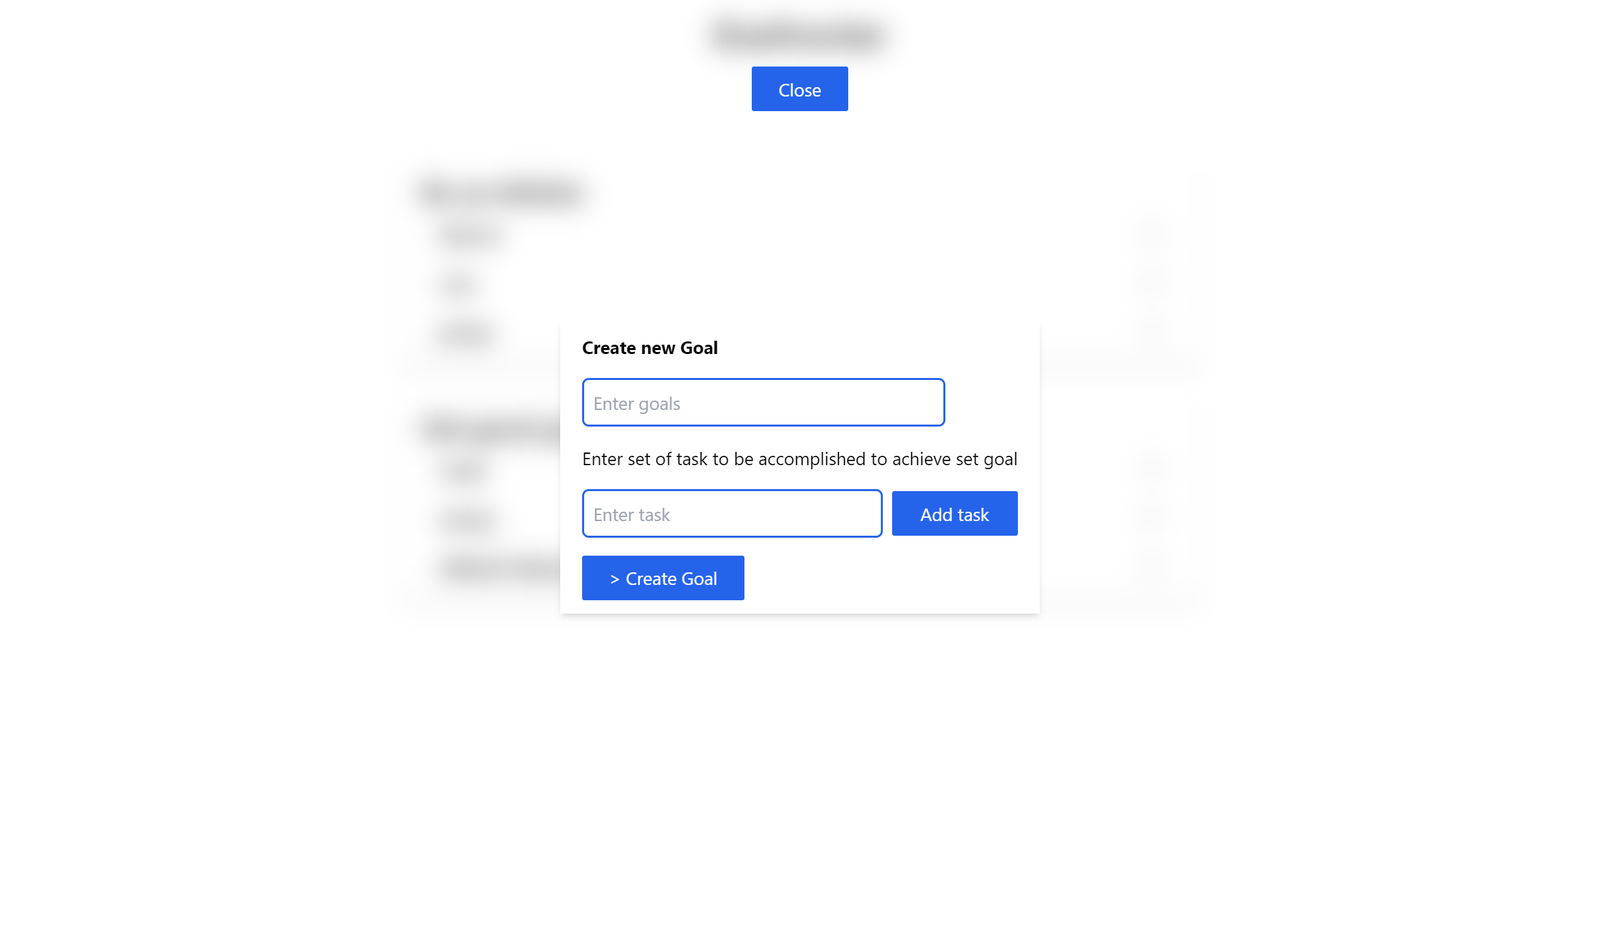
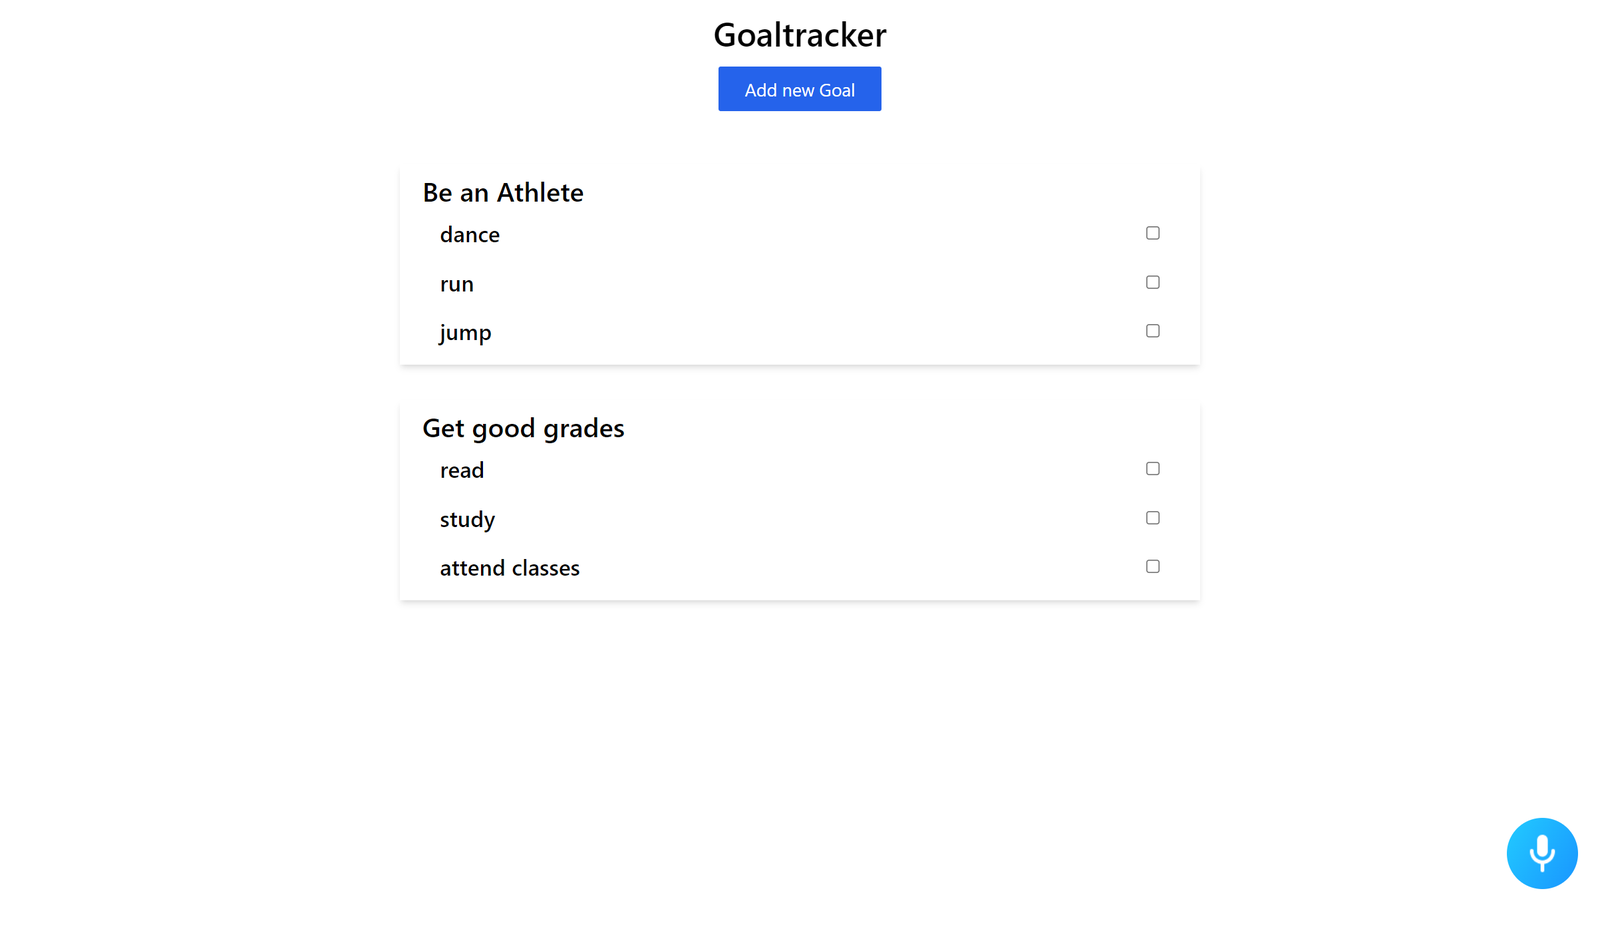
When we click the Add new Goal button, the following window appears:
Creating new Goals
To create new goals, we will modify the addTask and createGoal functions.
const [getTasks, assignTasks] = useState([]);

const createGoal = () => {
  setGoals([...goals, [text, getTasks]]);
  setText("");
  assignTasks([]);
};

const addTask = () => {
  assignTasks([...getTasks, tasks]);
  setTasks("");
};
Here, we add the tasks to an array getTasks and clear the task field so new tasks can be input. The createGoal function spreads the previous goals in the array, and appends the new goal with the array of tasks.
Checking off Completed Tasks
We can use the checkbox to remove completed tasks from the list until the goal is completed. In the input of type checkbox we will make the following modifications to achieve this:
<input
  type="checkbox"
  onChange={() => {
    const newGoals = goal[1].filter((task) => {
      return task !== goal\[1\][index2];
    });
    const array = goals;
    array\[index\][1] = newGoals;
    setGoals([...array]);
  }}
/>
In the code above, any time a task is checked, the array is filtered, and that item is removed. The state is then updated with the new task array, and the component re-renders to reflect this. Also, when the tasks have been completed, we will return a goal completed statement instead of the goal.
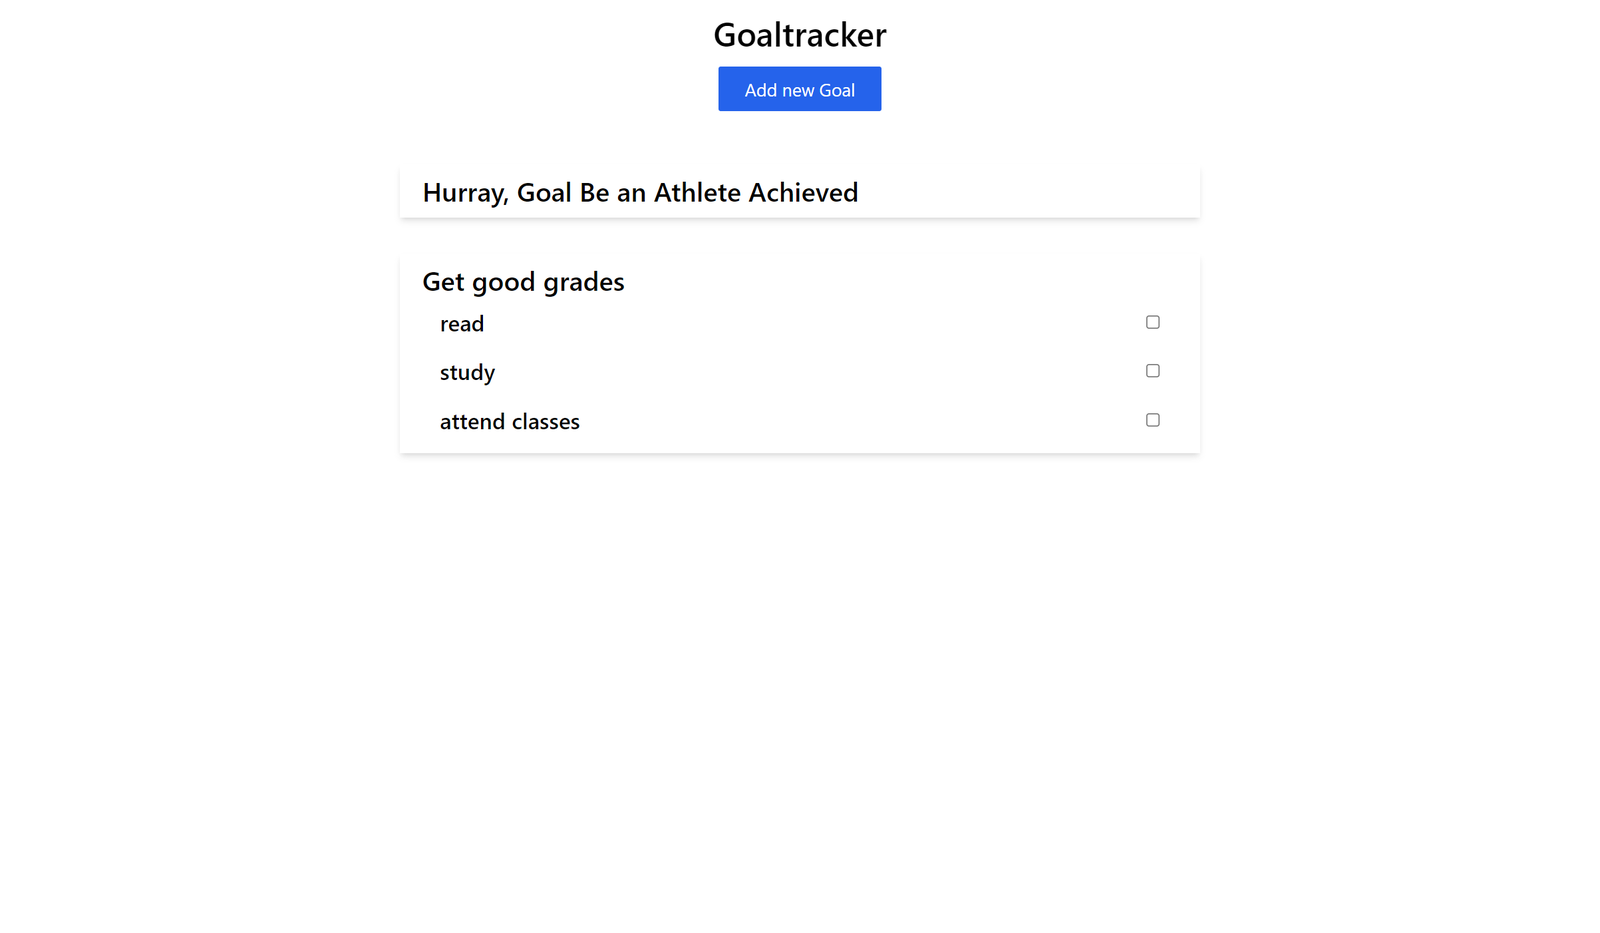
<h1 className="text-2xl font-medium">{goal[1].length >0? goal[0]: `Hurray, Goal ${goal[0]} Achieved`}</h1>When we complete a goal, we get a result similar to the image below:
We have written the basic code for our goals app; let’s now get into integrating Alan AI.
Open Source Session Replay
OpenReplay is an open-source, session replay suite that lets you see what users do on your web app, helping you troubleshoot issues faster. OpenReplay is self-hosted for full control over your data.

Start enjoying your debugging experience - start using OpenReplay for free.
Integrating Alan AI voice features
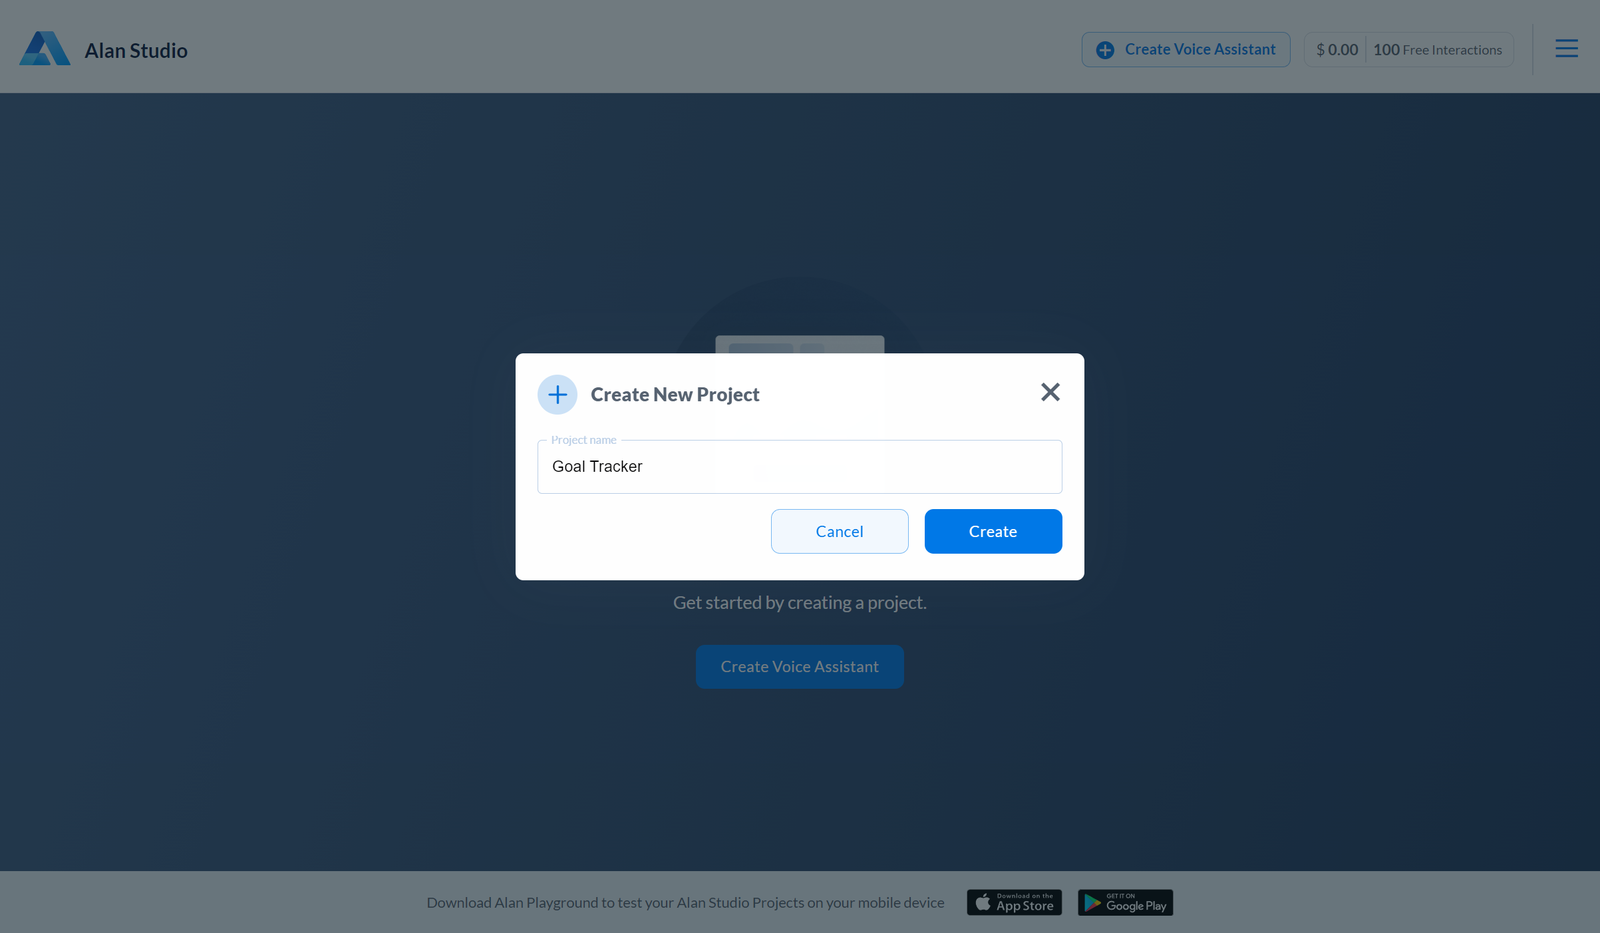
To add the Alan AI voice feature, navigate your browser to the Alan web page and create a new user account. On the dashboard, click on the Create Voice Assistant button.
Select Empty project from the list and enter the project’s name.
After creating the project, select integrations on the dashboard, and copy the Alan SDK key. Now, we will add an import and use Alan AI in the Goaltracker.js file within the useEffect hook as shown below:
//...
  useEffect(() => {
    const alanBtn = require("@alan-ai/alan-sdk-web");
    alanBtn({
      key: "YOUR ALAN SDK KEY",
      onCommand: (commandData) => {
      },
      rootEl: document.getElementById("alan-btn"),
    });
  }, []);
This sets up Alan AI in our application, and a mic icon appears on the screen.
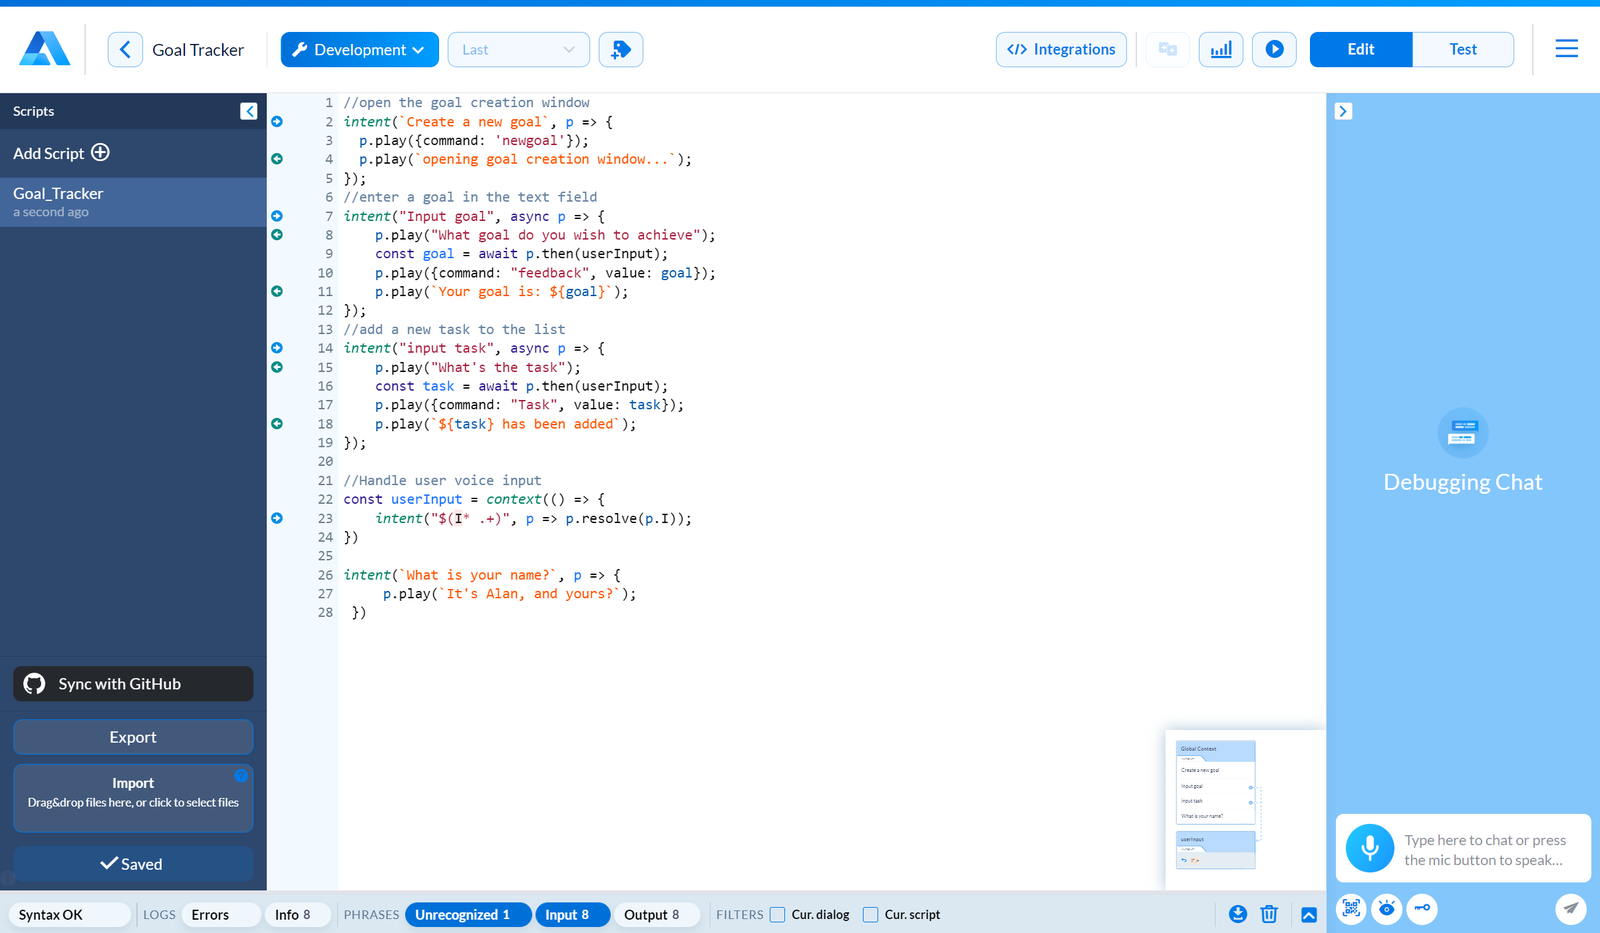
To use Alan AI, we need to specify the keywords and the commands that will be executed. To specify the keywords, we will define these in the application voice script as shown in the image below:
//open the goal creation window
intent(`Create a new goal`, p => {
  p.play({command: 'newgoal'});
  p.play(`opening goal creation window...`);
});
//enter a goal in the text field
intent("Input goal", async p => {
    p.play("What goal do you wish to achieve");
    const goal = await p.then(userInput);
    p.play({command: "feedback", value: goal});
    p.play(`Your goal is: ${goal}`);
});
//add a new task to the list
intent("input task", async p => {
    p.play("What's the task");
    const task = await p.then(userInput);
    p.play({command: "Task", value: task});
    p.play(`${task} has been added`);
});

//Handle user voice input
const userInput = context(() => {
    intent("$(I* .+)", p => p.resolve(p.I));
})

intent(`What is your name?`, p => {
      p.play(`It's Alan, and yours?`);
  })
Here, the intent refers to the voice input Alan AI listens for. If the input matches the intent, the corresponding block will be executed. P.play defines what Alan AI should execute when the input matches the intent. A simple string in P.play means that Alan AI will read out the string as feedback to the user input. The command keyword is used to reference commands to be executed in the application. For example, in the code above, when the user says “Create a new goal”, the command “new goal” will be executed by the application, and Alan AI also replies with the feedback “opening goal creation window”.
We can also define functions to take in user inputs to pass them as slots in a command. Here, userInput is a function to access the voice input from users, and this voice input can be passed along with the command as a property to the application.
Here, we have added three voice scripts. These voice scripts will handle opening the goal creation window, getting a goal or task from the user, and passing it to the application, which then places it in the required fields. This will help us fill in the goal and task fields via voice interactions. To access this command and the values from the user input, add the following to the onCommand property of alanBtn:
onCommand: (commandData) => {
      if (commandData.command === "newgoal") {
        getCommands();
      }
      if (commandData.command === "feedback") {
        setCommandGoal(commandData["value"]);
      }

      if (commandData.command === "Task") {
        createTask(commandData["value"])
      }
    },
Here, command.Data.command is a condition used to check the command passed to the application by Alan AI and execute the correct block when the condition returns true. Also, commandData[""] is used to access the slot property, which contains user inputs sent to the application. We will check the command that is passed by the voice intent and execute the right actions via the following functions:
const getCommands = () => {
  setVisible(!visible);
};
const setCommandGoal = (a) => {
  setText(a.value);
};
const createTask = (a) => {
  setTasks(a.value);
}
The first function will make the goal creation window visible. In contrast, the other two functions fill out the goals and tasks fields with the user input provided by Alan AI. Now, if we run our application, we can use the voice features with the defined intents, and it executes the corresponding commands. This is demonstrated in the video below.
Conclusion
Voice Features make it easier to fill out user forms and facilitate communication between an application and its user. Alan AI provides an easy way to enhance any app with speech recognition, so I’d recommend trying it out.
The entire source code used in this tutorial can be found here.