The Developer Experience -- Efficient Development in React
How to get the best DX when working with React


Ensuring a positive DX in front-end development is paramount. This article delves into the world of React, exploring the tools and strategies that contribute to an efficient and enjoyable development process. Get ready to elevate your front-end game!

Discover how at OpenReplay.com.
In React, the Development Experience (DX) encompasses the overall ease, efficiency, and satisfaction developers derive from working with the framework. It involves a combination of tools, practices, and conventions to streamline the development process, reduce friction, and enhance the joy of building applications. A positive DX in React involves having intuitive APIs, robust documentation, helpful error messages, and a supportive ecosystem of libraries and tools. It’s essentially about making the developer’s journey as smooth and enjoyable as possible, fostering productivity and creativity in the front-end development.
Importance of a Positive DX
A positive DX is more than just making developers happy (although that’s important, too!). Imagine a world where building software feels like sculpting with clay, not wrestling with clunky tools. That’s the power of good DX. Some of the importance of a good DX includes:
- Faster Onboarding: A welcoming and efficient onboarding process ensures new developers can quickly understand the project, tools, and coding standards. This results in faster integration into the team and quicker contributions to projects.
- Innovation and Creativity: When developers are not bogged down by cumbersome processes or unclear documentation, they can be more innovative and creative. A positive DX sparks inspiration and allows for the exploration of novel ideas.
- Quality Code and Fewer Bugs: Developers working in a positive DX environment are more likely to produce high-quality code. Clear documentation and effective tools contribute to code accuracy, reducing the likelihood of bugs and errors.
- Adoption of New Technologies: Developers in an environment with a positive DX are more open to adopting new technologies and tools. This agility is crucial in a rapidly evolving tech landscape, allowing the team to stay ahead of the curve.
- Customer Satisfaction: Ultimately, a positive DX translates to better software products. The smoother the development process, the more likely it is to deliver products that meet or exceed customer expectations, contributing to overall customer satisfaction.
- Cost-Efficiency: Streamlined processes and increased productivity result in cost efficiencies. Developers spend less time navigating challenges and more time delivering value, reducing the overall cost of development projects.
A positive DX not only boosts individual developer satisfaction but also has far-reaching implications for project success. Efficient development workflows lead to faster delivery, reduced bugs, and, ultimately, a better product.
Setting Up the Development Environment
Setting up the development environment is critical in ensuring a smooth and efficient React DX. In this section, we’ll delve deeper into the considerations for choosing the right code editor, and we’ll explore the essential extensions and plugins that can significantly enhance your workflow.
Choosing the Right Code Editor for React Development
The choice of a code editor plays a pivotal role in a developer’s daily work. Regarding React development, several code editors are well-suited for the task. Among the popular ones are Visual Studio Code (VS Code), Atom, and Sublime Text.
- Visual Studio Code: VS Code has gained widespread popularity among React developers due to its rich feature set, seamless integration with Git, and vast extension ecosystem. Its IntelliSense feature, which provides intelligent code completion, particularly benefits React developers dealing with complex component structures.
- Atom: Atom is an open-source, hackable text editor that’s highly customizable. With its user-friendly interface and strong community support, Atom is an excellent choice for React developers who appreciate flexibility and ease of use.
- Sublime Text: Known for its speed and simplicity, Sublime Text is a lightweight yet powerful code editor. It offers a minimalist interface and a wide range of keyboard shortcuts, making it a favorite among developers who prioritize efficiency.
Ultimately, choosing a code editor is subjective, and developers may experiment with multiple editors to find the one that best aligns with their preferences and workflow.
Essential Extensions and Plugins
Once you’ve selected a code editor, the next step is to enhance its functionality by incorporating essential extensions and plugins. These additional tools can significantly improve productivity and streamline React development. Some popular VS Code Extensions for React Development:
- ESLint: Ensure consistent code quality by using ESLint to enforce coding standards and catch potential errors during development.
- Prettier: Maintain code formatting consistency across your project with Prettier, a code formatter that can be seamlessly integrated into your workflow.
- npm IntelliSense: Simplify your dependency management with this extension, which provides auto-completion for npm modules as you type. This can save time and reduce errors when importing external packages into your React project.
- Auto Import: Simplify the import process by automatically adding import statements as you create new components or reference external modules.
- Jest: If you’re using Jest for testing, this extension provides helpful tools for running and debugging Jest tests directly within VS Code.
These extensions and plugins cater to various aspects of React development, from debugging and version control to improving code readability and efficiency.
Debugging Tools
Effective debugging is a skill that can significantly enhance the DX. Let’s explore two indispensable tools – React DevTools and Browser Developer Tools – that empower developers to identify and resolve issues in React applications.
Introduction to React DevTools for Component Inspection
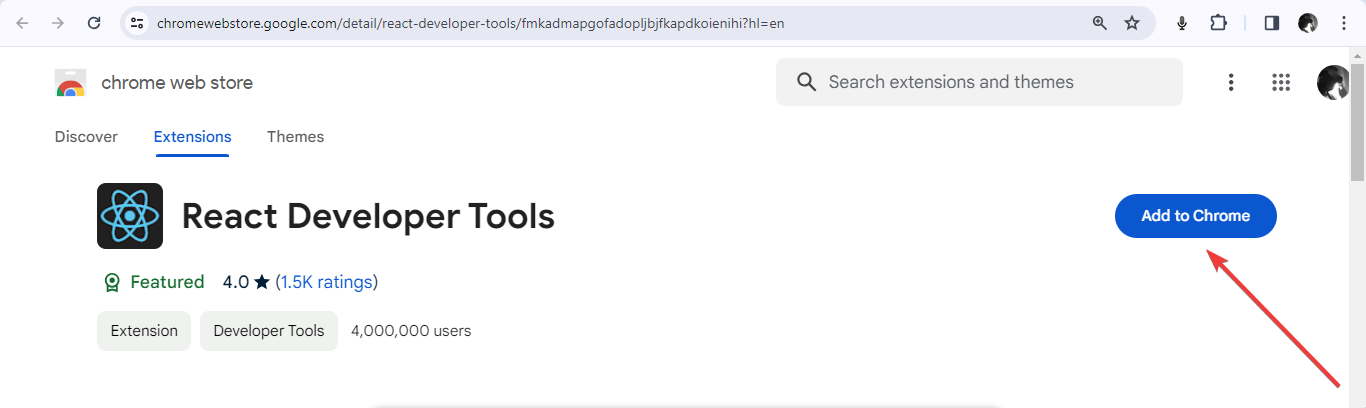
React DevTools is a browser extension that is a robust ally for React developers. It provides a dedicated tab in the browser’s developer tools, offering a comprehensive suite of features for inspecting and debugging React components. Installing React DevTools is a straightforward process. For Google Chrome:
- Open the React DevTools Chrome Web Store page.
- Click on the “Add to Chrome” button.
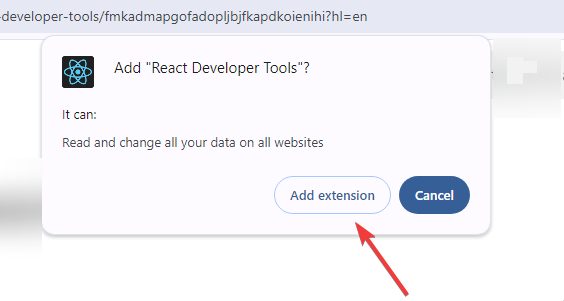
-
A confirmation pop-up will appear. Click on “Add Extension” to install React DevTools.
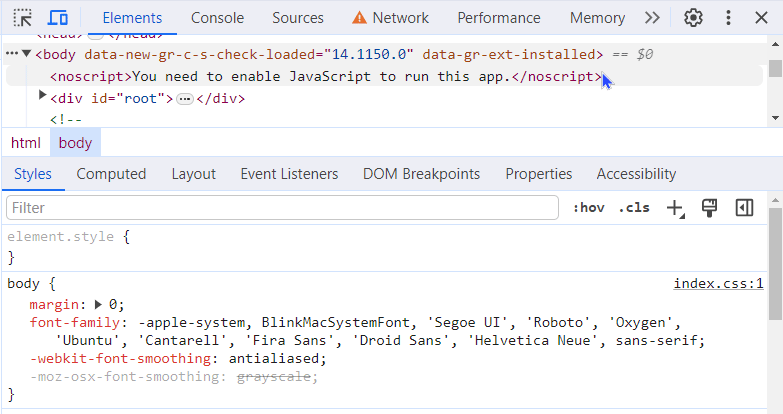
-
The React DevTools integrate with Browser DevTools and gives you extra features you can use on any website or web application created with React once installed. You will spot the components and profiler feature in the
Visit this link to install the React DevTools extension on Mozilla Firefox and this link for Edge
Key functionalities include:
- Component Tree Inspection: Visualize the hierarchy of React components, making it easy to understand the structure of your application.
- Props and State Exploration: Dive into the props and state of each component, facilitating the identification of data flow and potential issues.
- Component Highlighting: Dynamically highlight components on the page, aiding in visually inspecting the rendered UI.
- Time-Travel Debugging: Navigate through the application’s state changes over time, enabling developers to trace the source of bugs more effectively.
How to Utilize Browser Developer Tools for Debugging React Applications
Beyond React DevTools, browser developer tools offer a set of features for debugging React applications. Here’s how to leverage these tools effectively:
- Console Logging: Utilize
console.log()statements strategically within your React components to output information and debug messages. The browser’s console provides a real-time log of these outputs. - Inspecting Elements: Use the browser’s built-in element inspector to examine the HTML and React components rendered on the page. This can help identify issues related to styling or improper rendering.
- Network Tab: Investigate network requests to ensure data is fetched and transmitted correctly. This is crucial for debugging issues related to API calls and data fetching.
- Source Tab: Set breakpoints and step through your JavaScript code in the browser’s source tab. This allows you to track the flow of execution and identify problematic sections.
- Performance Profiling: Use performance profiling tools to analyze the runtime performance of your React application. Identify bottlenecks and optimize your code for better efficiency.
Mastering React DevTools and browser developer tools is paramount for effective debugging in React development. These tools provide insights into the inner workings of your application, enabling you to diagnose and resolve issues efficiently. By incorporating these practices into your development workflow, you’ll be well-equipped to tackle challenges and ensure the smooth functioning of your React applications.
Documentation and Code Comments
In React development, the practices of writing comprehensive documentation and strategic code commenting play a pivotal role in fostering understanding, collaboration, and maintainability. Let’s explore these aspects in greater detail, emphasizing their significance and introducing tools to streamline the documentation process.
Writing Effective Documentation for React Projects
Documentation is the backbone of any project, offering insights into its architecture, functionality, and best practices. In React projects, effective documentation should encompass the following:
- Component Documentation: Provide clear and concise explanations for each React component. Detail their purpose, expected props, and usage examples.
- Installation and Setup Guides: Include step-by-step guides on setting up the development environment, installing dependencies, and running the project. This aids developers, especially newcomers, in quickly getting started.
- Usage Examples: Showcase practical examples of how to use different features or components within your React application. This helps developers understand real-world implementations.
- API Reference: Document APIs, functions, and utilities comprehensively, specifying parameters, return values, and usage guidelines. This ensures clarity on how different parts of the codebase interact.
- Contributing Guidelines: If your project is open-source, articulate clear guidelines for contributors. Include information on coding standards, the contribution process, and specific workflows.
Well-documented projects facilitate collaboration, ease onboarding, and contribute to the overall longevity of the codebase.
Importance of Code Comments and Maintaining Code Readability
Code comments are invaluable in elucidating your code’s intent, logic, and nuances. Here’s why they are crucial in React development:
- Clarifying Intent: Comments provide insights into why certain decisions were made, helping developers understand the rationale behind specific code blocks.
- Navigating Complexity: React applications can become complex as they grow. Comments act as signposts, guiding developers through intricate components or business logic.
- Assisting Debugging: In scenarios where bugs arise, well-placed comments can offer hints or explanations that expedite the debugging process.
- Team Collaboration: Code comments foster collaboration by ensuring multiple developers can work on the same codebase seamlessly. They provide context that transcends individual knowledge.
Maintaining code readability is equally vital. Adopt consistent coding styles, adhere to established conventions, and use meaningful variable and function names. This makes the codebase more accessible and understandable to all team members.
Tools for Generating and Managing Documentation
To streamline the documentation process, consider leveraging documentation generation tools. Some notable options are:
- JSDoc: JSDoc is a markup language that uses comments to document JavaScript code. It supports a variety of annotations, allowing you to generate API documentation directly from your code.
- Better Comments: Better Comments is a fantastic Visual Studio Code extension that helps you create more organized and visually appealing comments in your code. It adds colorization to different comments to make them stand out, improving code readability.
- react-docgen: is a tool commonly used in the React ecosystem to automatically extract and generate documentation from React component files. It parses the React components’ source code. It extracts information about props, methods, and other relevant details, creating documentation that can be utilized for reference or generated as part of your project’s documentation site.
- Docz: Docz is a documentation generator specifically designed for React projects. It allows you to write documentation alongside your components, seamlessly integrating code and documentation.
By integrating these tools into your workflow, you can automate the documentation process and ensure that it remains up-to-date as your React project evolves.
Code Styling and Formatting
Maintaining a consistent and visually appealing codebase is crucial for collaboration and readability. This is where tools like ESLint and Prettier come into play, acting as stalwarts for enforcing coding standards and ensuring uniform code styling across your React projects. Let’s explore how these tools can seamlessly integrate into your React projects, fostering a unified and visually appealing code styling.
Enforcing Coding Standards with ESLint and Prettier
ESLint is a powerful linting tool that helps identify and fix problems in your code. It enables you to enforce coding standards and best practices, catching potential issues before they become problems. To install ESLint for your React project, run the command on the terminal of your project’s directory.
npm install eslintPrettier is a code formatter that enforces a consistent coding style across your project. It helps eliminate debates about code style by automatically formatting code according to predefined rules. It supports many languages and easily integrates with most editors. To install prettier for your React project, Run the command on the terminal of your project’s directory.
npm install prettierAlternatively, install the prettier extension on the VS code using the following steps:
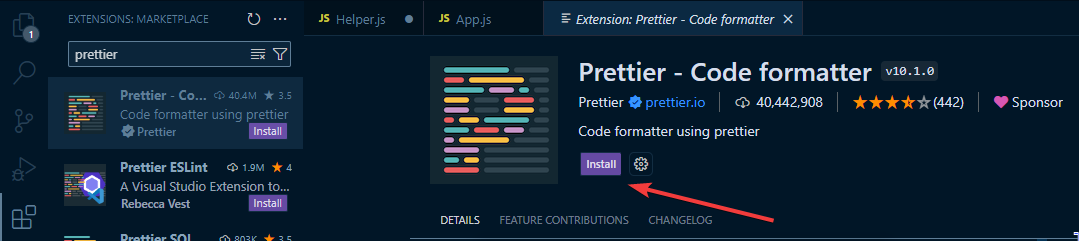
- Open Visual Studio Code
- Go to Extensions: Access the Extensions view by clicking on the Extensions icon in the Activity Bar on the side of the window or by using the keyboard shortcut
Ctrl+Shift+X(Windows/Linux) orCmd+Shift+X(Mac). - Search for Prettier: Search for “Prettier” in the Extensions view. You should see an extension named “Prettier - Code formatter” by Prettier.
- Install Prettier: Click on the “Install” button next to the Prettier extension to install it.
Code Styling Rules for Consistency
Configuring code styling rules provides a roadmap for maintaining a uniform and aesthetically pleasing codebase. Some of these rules include:
- Indentation: Decide the preferred number of spaces or tabs for indentation.
- Quotes: Choose between single or double quotes for string representation.
- Semicolons: Determine whether to use or omit semicolons at the end of statements.
- Line Length: Set a limit for the maximum number of characters per line.
- Brace Style: Choose different styles for placing braces in functions and control structures.
AI Tools in React Development
The world of React development is embracing the power of Artificial Intelligence (AI). AI tools are emerging as game-changers, boosting developer productivity, improving code quality, and unlocking new possibilities for creating smarter, more engaging applications. Let’s dive into how AI enhances the developer experience in React development and explore some exciting examples of AI tools you can leverage in your projects.
How AI Enhances the Developer Experience
Developers need all the help they can get to stay productive, creative, and efficient. This is where AI enters the scene, not as a replacement but as a powerful ally, transforming the developer experience in several key ways:
- Code Autocompletion and Generation: AI-powered tools like Codeium and Ghostwriter can predict your next lines of code, reducing time spent typing and searching for boilerplate.
- Error Detection and Prevention: AI algorithms can analyze your code and suggest potential bugs or vulnerabilities, leading to cleaner and more robust applications.
- Data-Driven Insights: AI tools can analyze user interactions and behavior, providing valuable insights to inform your development decisions and optimize your UI/UX.
- Personalized Testing and Optimization: AI can automate testing processes, customize testing based on user behavior, and suggest A/B testing solutions for continuous improvement.
- Creative Inspiration and Assistance: AI-powered tools can help you brainstorm ideas, design user interfaces, and generate content, sparking a new wave of creative collaboration between humans and machines.
It’s an exciting time for front-end engineers as developers can unlock a new era of productivity, creativity, and innovation, transforming the way we build and interact with software in the future.
Examples of AI tools in React development
Several AI tools and technologies can be integrated in React development to enhance various aspects of the development lifecycle. A good example is TabNine.
TabNine is an AI-driven code autocompletion tool that significantly enhances the coding experience in various programming languages, including React. It uses a machine learning model to analyze code patterns, context, and the developer’s coding style, providing intelligent and context-aware suggestions.
Features of TabNine:
- Context-Aware Autocompletion: TabNine goes beyond traditional autocompletion by understanding the context in which code is being written. It suggests entire lines or blocks of code based on the existing code and the current task.
- Multi-Line Suggestions: Unlike typical autocompletion tools focusing on single-line suggestions, TabNine can suggest multi-line code snippets, making it especially useful for completing functions, loops, or conditional statements.
- Learning from Your Code Style: TabNine learns from your coding style and adapts its suggestions over time. It considers your specific coding patterns, variable naming conventions, and frequently used code structures to provide more personalized and relevant suggestions.
- Support for Numerous Languages: TabNine supports a wide range of programming languages, making it versatile for developers working on projects with multiple technologies.
How to Use TabNine in Visual Studio Code:
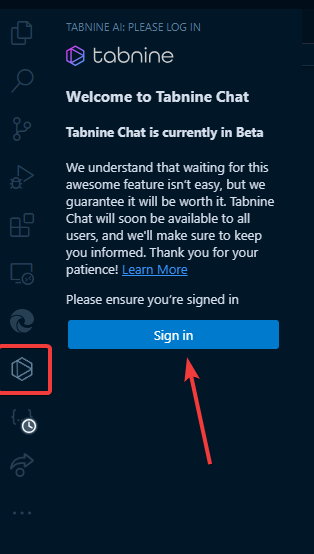
- Open the editor and go to Extensions (Ctrl+Shift+X). Search for “TabNine” and install the extension provided by TabNine Pte. Ltd. This quick process integrates TabNine, enhancing your coding experience with intelligent autocompletion.
- After the installation phase, sign in to continue.
- TabNine provides automatic code suggestions based on context. Use the Tab key or arrow keys to accept suggestions. You can also manually trigger completions with keyboard shortcuts. This streamlines your coding process for a more efficient workflow.
- Also, users can use Tabnine to explain, test, or document code blocks.

Some other useful AI tools to take note of include:
- Codeium: This free AI-powered toolkit provides context-aware autocomplete for React components, reducing the need for boilerplate and documentation lookup.
- Blackbox AI Code: Blackbox AI is an AI coding assistant that helps developers by providing real-time code completion, documentation, and debugging suggestions. Blackbox AI is also integrated with various developer tools, making it easy to use within your existing workflow.
- Code GPT: CodeGPT extension is your pair-programming partner, helping you code more efficiently. It offers AI chat assistance, auto-completion, code explanation, error-checking, and more. This extension also enables using various AI models from different providers, enhancing your coding experience.
Incorporating these AI tools into your React development workflow saves time and empowers developers to focus on creative problem-solving rather than repetitive tasks.
Monitoring and Error Tracking
Effective error monitoring and tracking are pivotal for maintaining robust and reliable React applications. This involves setting up specialized tools to detect and analyze runtime errors and implementing strategies to promptly handle and resolve these issues.
Error Tracking Tools for React Applications
Errors are inevitable in software development, especially in dynamic front-end applications like React. But leaving them undetected or unresolved can lead to a frustrating user experience and damage your app’s reputation.
- Sentry: Sentry is a battle-tested error-tracking tool that seamlessly integrates with React. It captures and reports errors in real-time, providing a detailed breakdown of the error context, stack trace, and affected users. Sentry’s intuitive dashboard empowers developers to triage and resolve issues promptly.
- Rollbar: Rollbar is a versatile error-tracking solution that excels in monitoring React applications. With features like error grouping, real-time notifications, and integrations with popular development tools, Rollbar streamlines identifying and fixing errors.
- Bugsnag: Bugsnag specializes in tracking and monitoring errors in real-time, offering insights into the impact of each error on your React application. It provides actionable data, such as affected user sessions and detailed error reports, enabling a targeted and efficient resolution process. To integrate Bugsnag with React, follow this guide.
Strategies for Handling and Resolving Runtime Errors:
- Error Boundary Components: Catch errors within a component and display a fallback UI.
- Logging and Reporting: Log errors with relevant information when errors occur.
- User Feedback: Implement user-friendly error messages to provide clear information to end-users when errors occur. Also, encourage users to report errors and consider integrating feedback mechanisms in your application.
- Version Control and Rollbacks: Use version control to revert to previous stable versions if needed.
- Collaborative Debugging: Foster a collaborative debugging culture within your team.
A proactive approach to error handling and monitoring not only improves the stability of your application but also enhances the overall DX by reducing the time spent on debugging and troubleshooting.
Collaboration and Communication
Effective communication and collaboration are essential for any development team’s success. Here are some strategies to make your team work together seamlessly.
Efficient Communication Within Development Teams
- Use Team Communication Tools: Leverage dedicated team communication platforms like Slack, Microsoft Teams, or Discord. Create channels for specific topics or projects to streamline discussions.
- Regular Standup Meetings: Conduct regular standup meetings, whether daily or weekly, to keep everyone on the same page. Discuss progress, challenges, and upcoming tasks.
- Clear Documentation: Maintain clear and updated documentation for projects. This includes README files and inline code comments. This ensures that team members can understand and contribute to the codebase efficiently.
- Collaborative Decision-Making: Encourage open discussions and involve team members in decision-making processes.
Collaborative Coding Tools
Collaborative coding tools play a vital role in enhancing team productivity and communication.
VS Code Live Share: VS Code Live Share enables real-time collaborative coding. Team members can share their development environment, allowing others to view and even edit code simultaneously. Here’s a step-by-step guide on how to use VS Code Live Share for collaboration:
- Make sure you have Visual Studio Code installed on your machine. You can download it from Visual Studio Code’s official website.
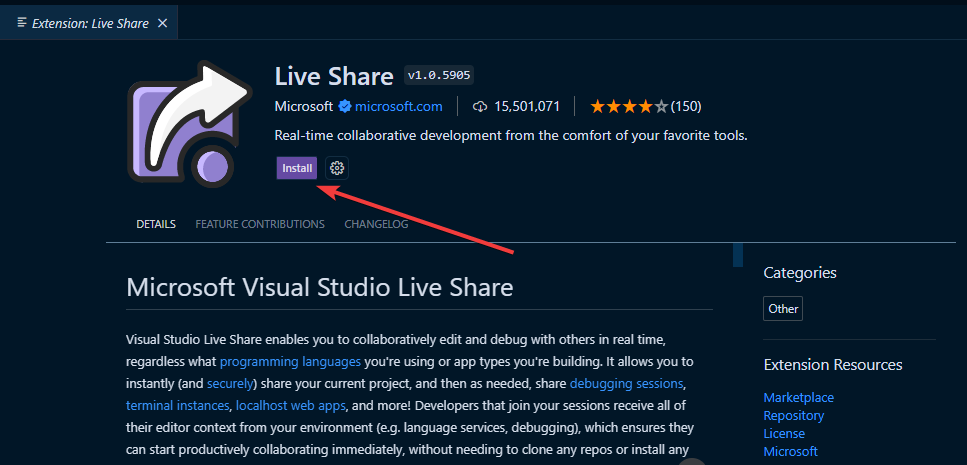
- To enable Visual Studio Live Share for collaborative coding in Visual Studio Code, open the application, go to Extensions (Ctrl+Shift+X), search for “Live Share,” and install the Microsoft-provided extension.
- After installing the extension, log into your GitHub account and click on the Live Share icon in the Activity Bar.
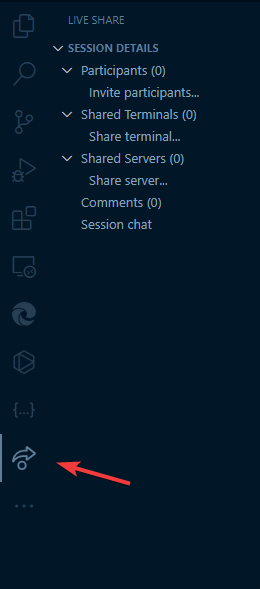
- To start a collaborative coding session, click “Invite participants,” and you’ll get a shareable link. Share this link via Slack, email, or your preferred tool to invite collaborators for real-time coding and editing in Visual Studio Code.
- To join a live session, collaborators can click the shared link to join the Live Share session. They’ll be prompted to install the Live Share extension if they haven’t already.
Other notable tools include:
- CodeSandbox Live: Shares live sandboxes for collaborative web development, ideal for experimenting and prototyping quickly.
- Repl.it: Offers real-time collaborative coding in various languages, great for teaching or hackathons.
- Version Control Systems: Use Git and platforms like GitHub to track code changes, manage different versions, and collaborate on features seamlessly.
The choice of a collaborative coding tool depends on your team’s preferences, workflow, and the specific requirements of your projects. Exploring these options can greatly improve the efficiency and collaboration within your development team.
Conclusion
A smooth DX in React is achieved through a thoughtful combination of essential tools and strategic practices. From setting up a robust development to effective collaboration and error tracking, each aspect plays a crucial role in enhancing productivity and code quality.
To developers, I encourage you to dive into these practices, explore new tools, and seamlessly integrate them into your workflow. The continuous pursuit of improvement not only refines your skills but also contributes to the success of your projects and team collaborations. Remember, the journey is as rewarding as the destination.
Gain Debugging Superpowers
Unleash the power of session replay to reproduce bugs, track slowdowns and uncover frustrations in your app. Get complete visibility into your frontend with OpenReplay — the most advanced open-source session replay tool for developers.
Star on GitHub12k