Three plugins to Convert your Figma Designs into Code
Go easily from design to code with these plugins


Designing user interfaces in Figma is an essential part of the application design process. However, manually converting the created designs into code can be time-consuming and error-prone. Luckily, there are plugins available that make this transition effortless, and this article will explore the top three plugins that automate the design-to-code process, saving time and ensuring accuracy.

Discover how at OpenReplay.com.
Figma plugins are powerful extensions that seamlessly blend into your Figma design world, boosting its powers and making your creative journey smoother. They’re like extra hands for designers and developers, giving you cool features that Figma doesn’t have on its own. With the help of these plugins, you can automate boring tasks, create design elements with a snap, get design tips, and even link up with outside services – all to make your design and development life easier.
What’s cool is that these plugins are created by fellow designers and developers in the Figma community. And guess what? Installing and managing them is as easy as A-B-C within your Figma interface. This whole plugin thing makes Figma super adaptable, so it can fit just about any design project you throw at it.
Now, speaking of some of these awesome plugins like Figma-to-HTML, TeleportHQ, and Locofy- they’re like the superheroes of the Figma world. They’ve got special powers to supercharge your abilities. They help you work faster and get your creative juices flowing. And the best part? There are thousands of these plugins, and each plugin specializes in a specific area, empowering designers and developers to tackle a wide range of tasks within the Figma environment, whether you’re focusing on code production, prototyping, accessibility, or responsive design.
At the end of this tutorial, readers will understand the benefits of Figma for application development. They can build and ship applications from Figma designs 10X faster and seamlessly, like a pro, by using these plugins. To do this, we’ll examine their features and benefits and provide step-by-step guides with examples.
Importance of first converting designs to code with these plugins
In today’s world, there is more than one way to build a site, either by utilizing no-code tools like Webflow or WordPress or even employing AI-driven platforms like Wix.com to generate a site. As the digital realm continues to evolve, Figma has already established itself as a well-structured platform where designers take their time to create components and essential assets for the development phase. So, the question arises: Why should developers embark on the daunting task of reconstructing these components in their code from scratch? The forthcoming segments of this tutorial will shed light on how several plugins can streamline this process:
- Saving You Time: As a developer, you can significantly accelerate the conversion of designs into code by considering these plugins. Say goodbye to the hours spent tediously translating design elements into code manually. Instead, entrust this task to the AI’s magic wand, freeing you to allocate your valuable time to more pressing tasks.
- Enhancing Your Accuracy: The automated nature of these plugins minimizes the possibility of human error throughout the design-to-code translation process, resulting in more precise representations of the Figma design in the final code.
- Unleashing Flexibility: These plugins empower developers to focus on the more complex and custom aspects of development while leaving the AI to handle the fundamental aspects of design-to-code translation.
- Maintaining Consistency: The plugins preserve consistency across the design and code. Elements such as spacing, typography, and alignment are upheld, resulting in a polished and cohesive end product that brings a smile to your designer’s face.
- Embracing Modern Tools: By using these plugins, developers can easily learn and adopt modern implementation practices and new frameworks without the need to delve into every intricate detail. This practice makes staying up-to-date with the latest design trends and technologies in the tech space a breeze.
- Supporting Various Frameworks: Some Figma plugins, like TeleportHQ, generate code for multiple frameworks, including React and Vue. This flexibility enables developers to choose the framework that best suits their project and is more convenient for them.
Working with pre-existing music web UI as a case study
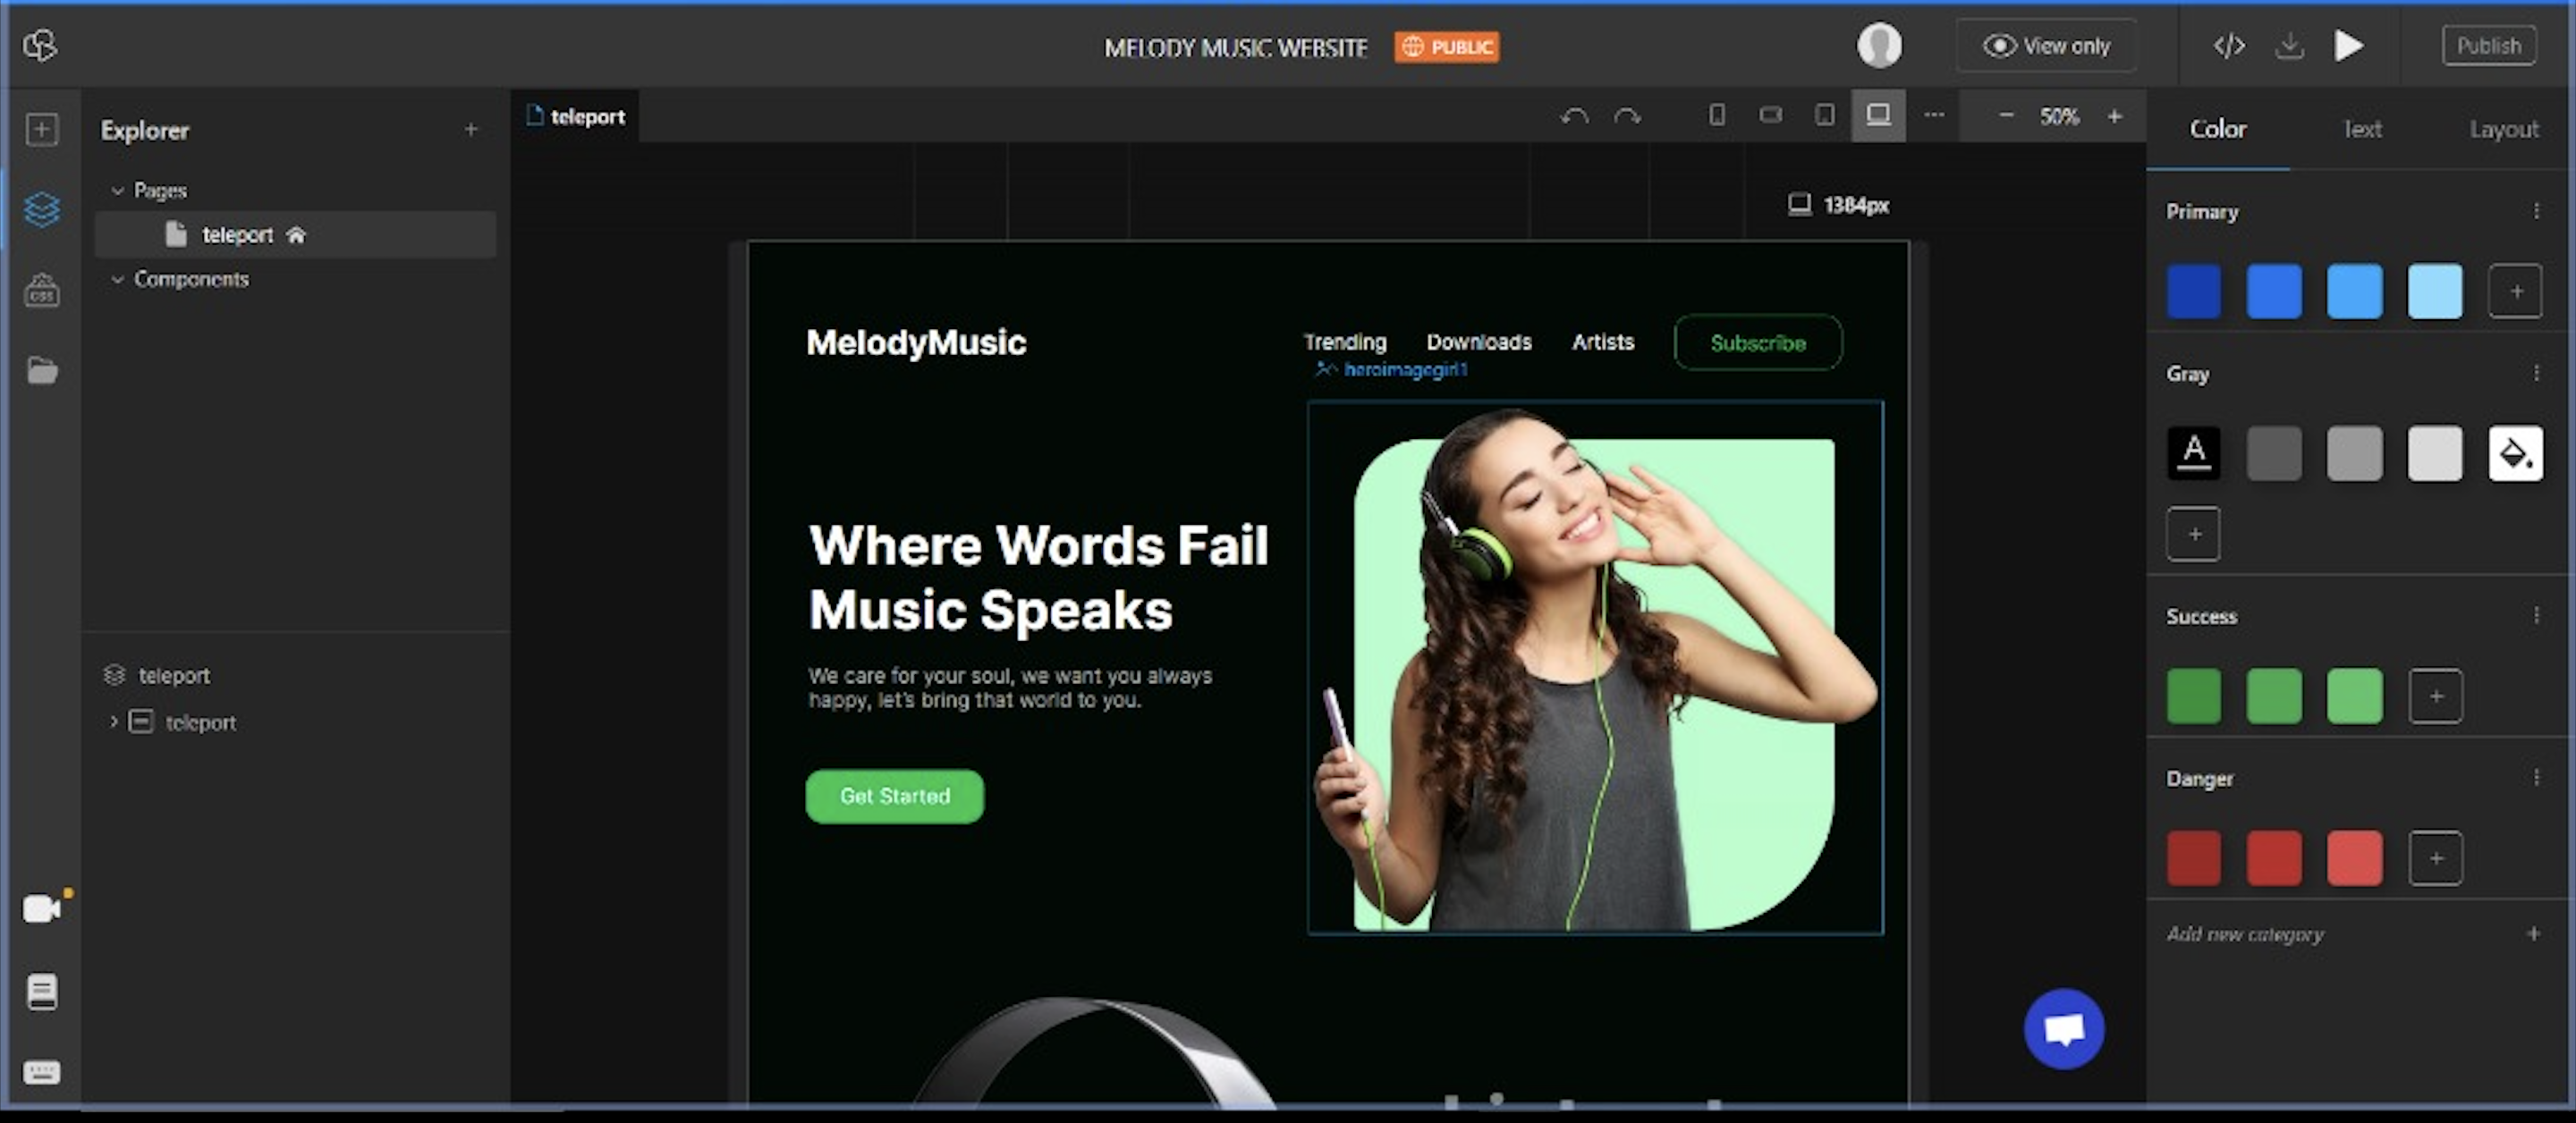
The image below represents an existing Figma music web design, which serves as our canvas for demonstrating the transformative power of Figma plugins in converting user interface elements into actual lines of code, a concept we will explore further in this article. To actively participate and follow along, you can access the Figma design by clicking on this link.
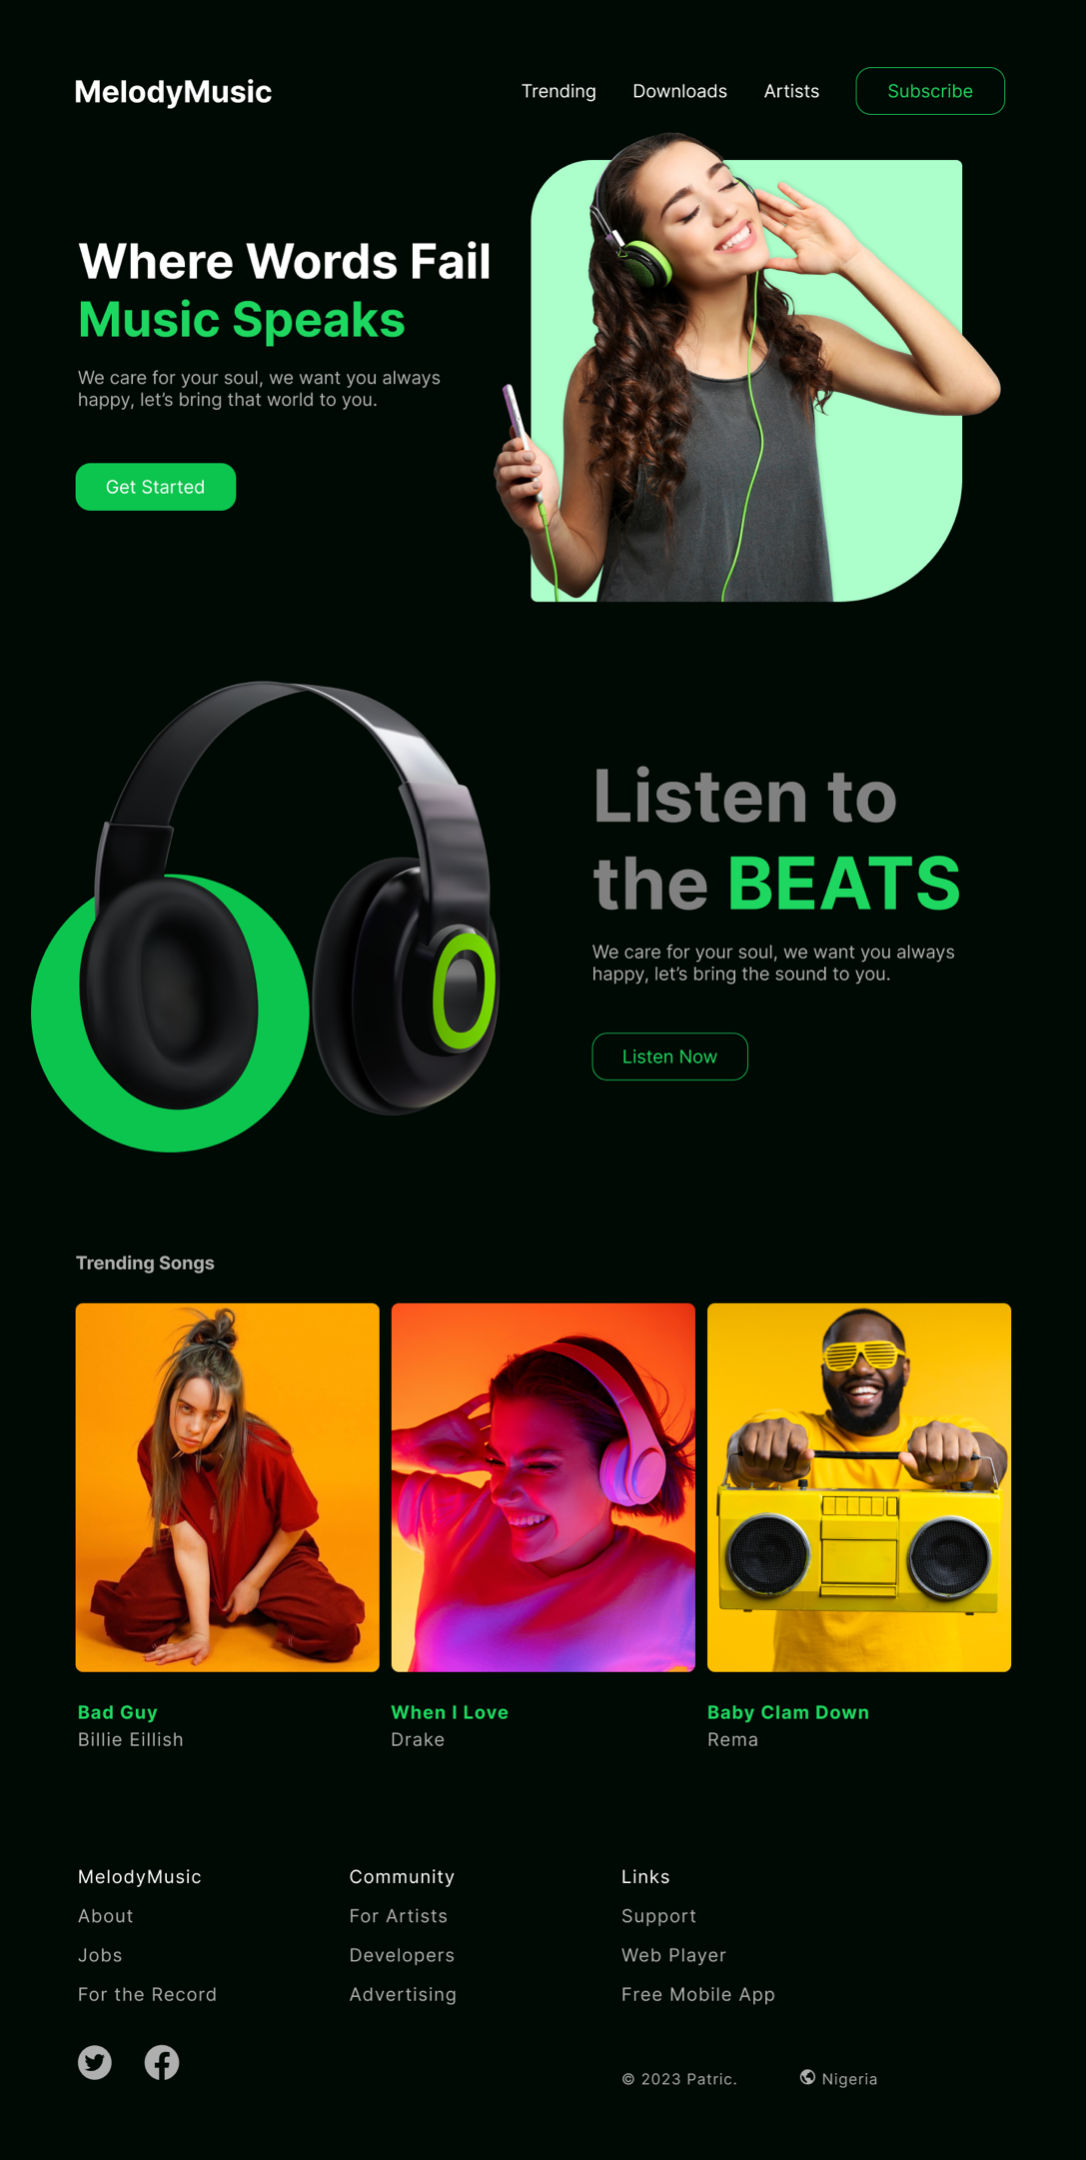
The music website design we’re highlighting here combines a modern look with big, easy-to-read text and vibrant, attention-grabbing colors. Its main goal is to give users a simple and enjoyable way to find the latest trendy songs, check out the most popular artists, and easily move around the website using a handy footer section at the bottom with links to social media for easy interaction.
Before we dive into the process, it’s essential to remember a critical aspect: for these plugins to effectively generate precise code, your Figma design must adhere to a set of best practices. These practices encompass:
- Proper Naming Mechanism: Every design element should be appropriately named based on its functionality. This also facilitates better communication between designers and developers.
- Creating Reusable Components: This saves time for both designers and developers and ensures consistency across your design layouts, especially if you are working on a large-scale design system.
- Using Groups and Auto-Layout When Necessary: This enhances the organization and responsiveness of your designs.
- Make Your Design Responsive: Responsive designs appear and function correctly on various devices and screen sizes, which is crucial for user accessibility.
Various plugins have different requirements, but some, like Locofy, simplify the process using AI. However, not all plugins provide this level of guidance. This variation in plugin capabilities can frustrate developers, but it’s a common learning curve. Even experienced developers have faced it and eventually mastered effective plugin usage.
Components of the Music Web Application
To ensure reusability and consistency, create design components when you spot recurring elements across multiple screens. In our current design, buttons and card shapes are frequently used styles.
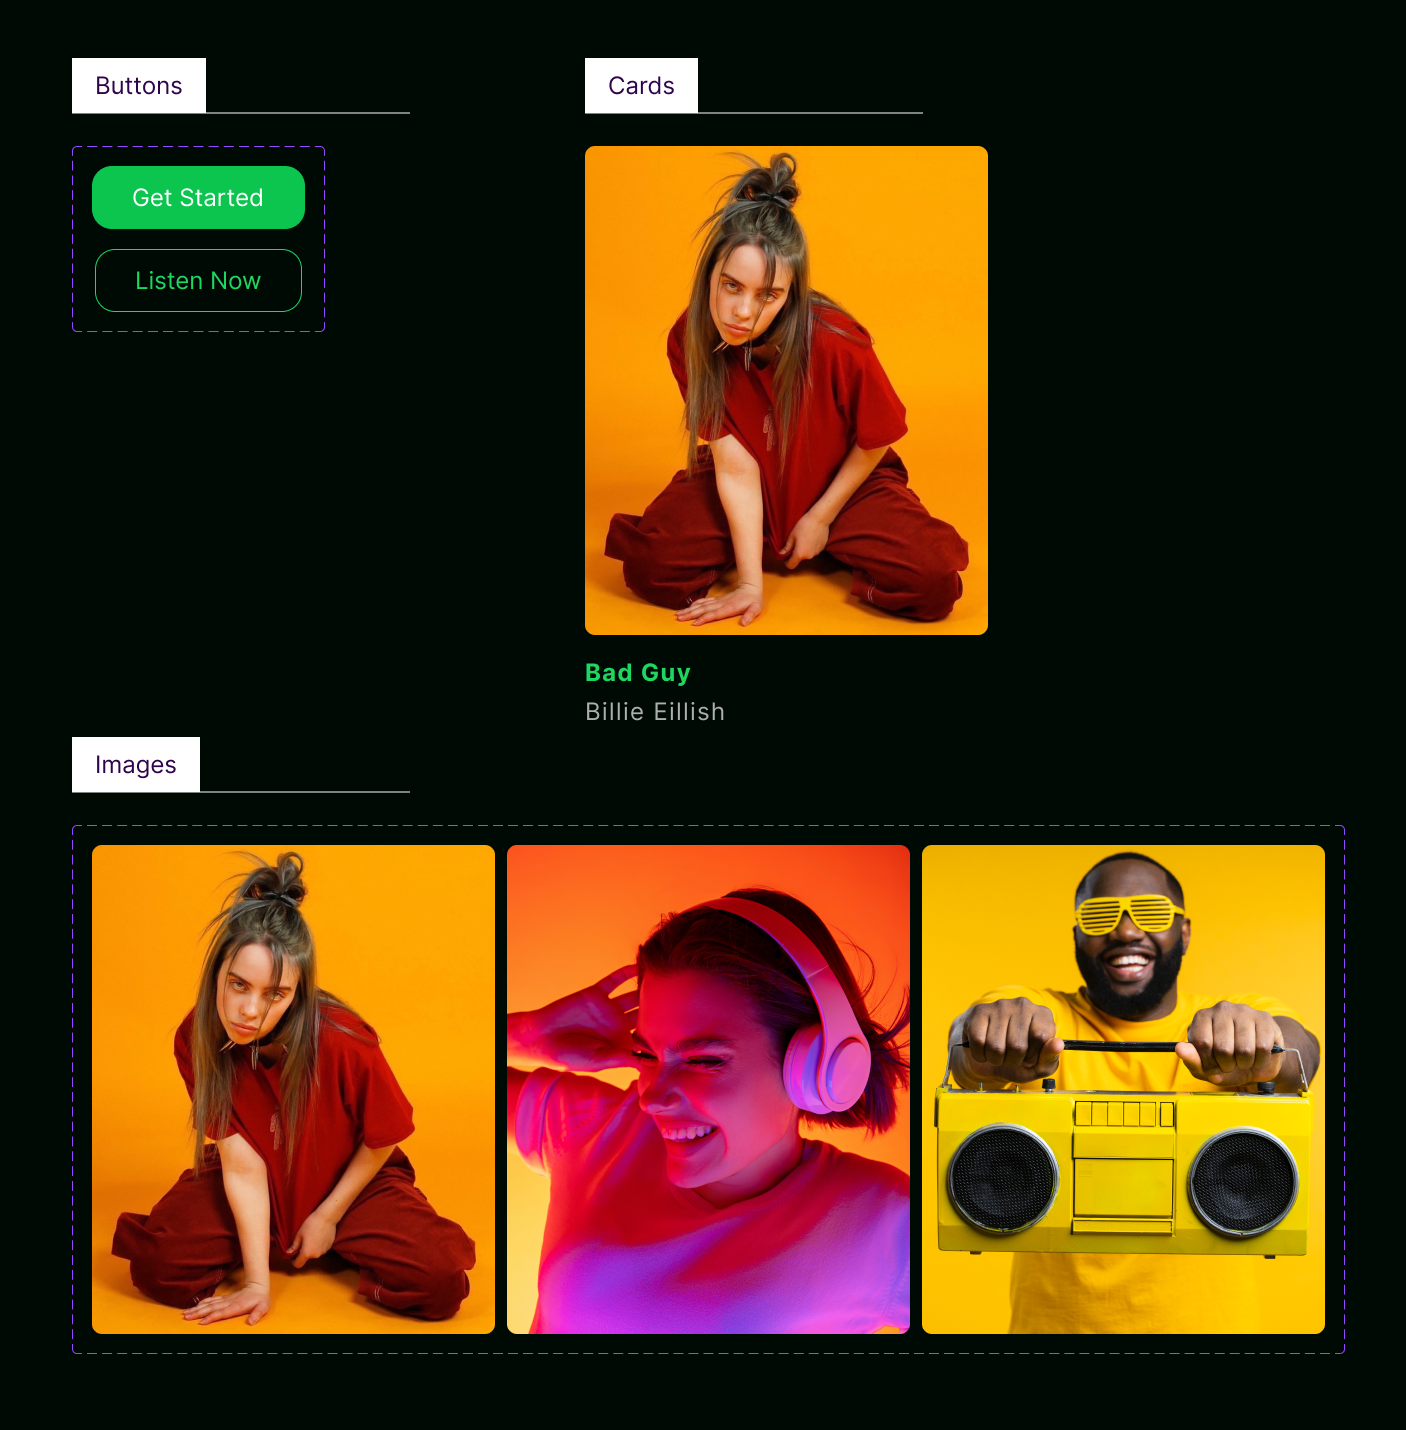
It’s worth noting that the plugins we’re about to introduce can convert Figma’s components and sections into code snippets. This enables the creation of reusable code components across various project sections, enhancing your development workflow.
Here, you’ll find all the necessary resources and tools to help you follow along, practice, and gain a deeper understanding of how to make the most of these plugins.
- To view and access the Figma UI design above, check here
- For Locofy, check here
- For TeleportHQ, check here
- For Figma to HTML, check here
In the next sections, I will show you how these plugins make it easy to turn your Figma designs into code. In today’s fast-paced world, you can boost your productivity effortlessly with the help of AI. These tools will make your tasks as simple as they can be.
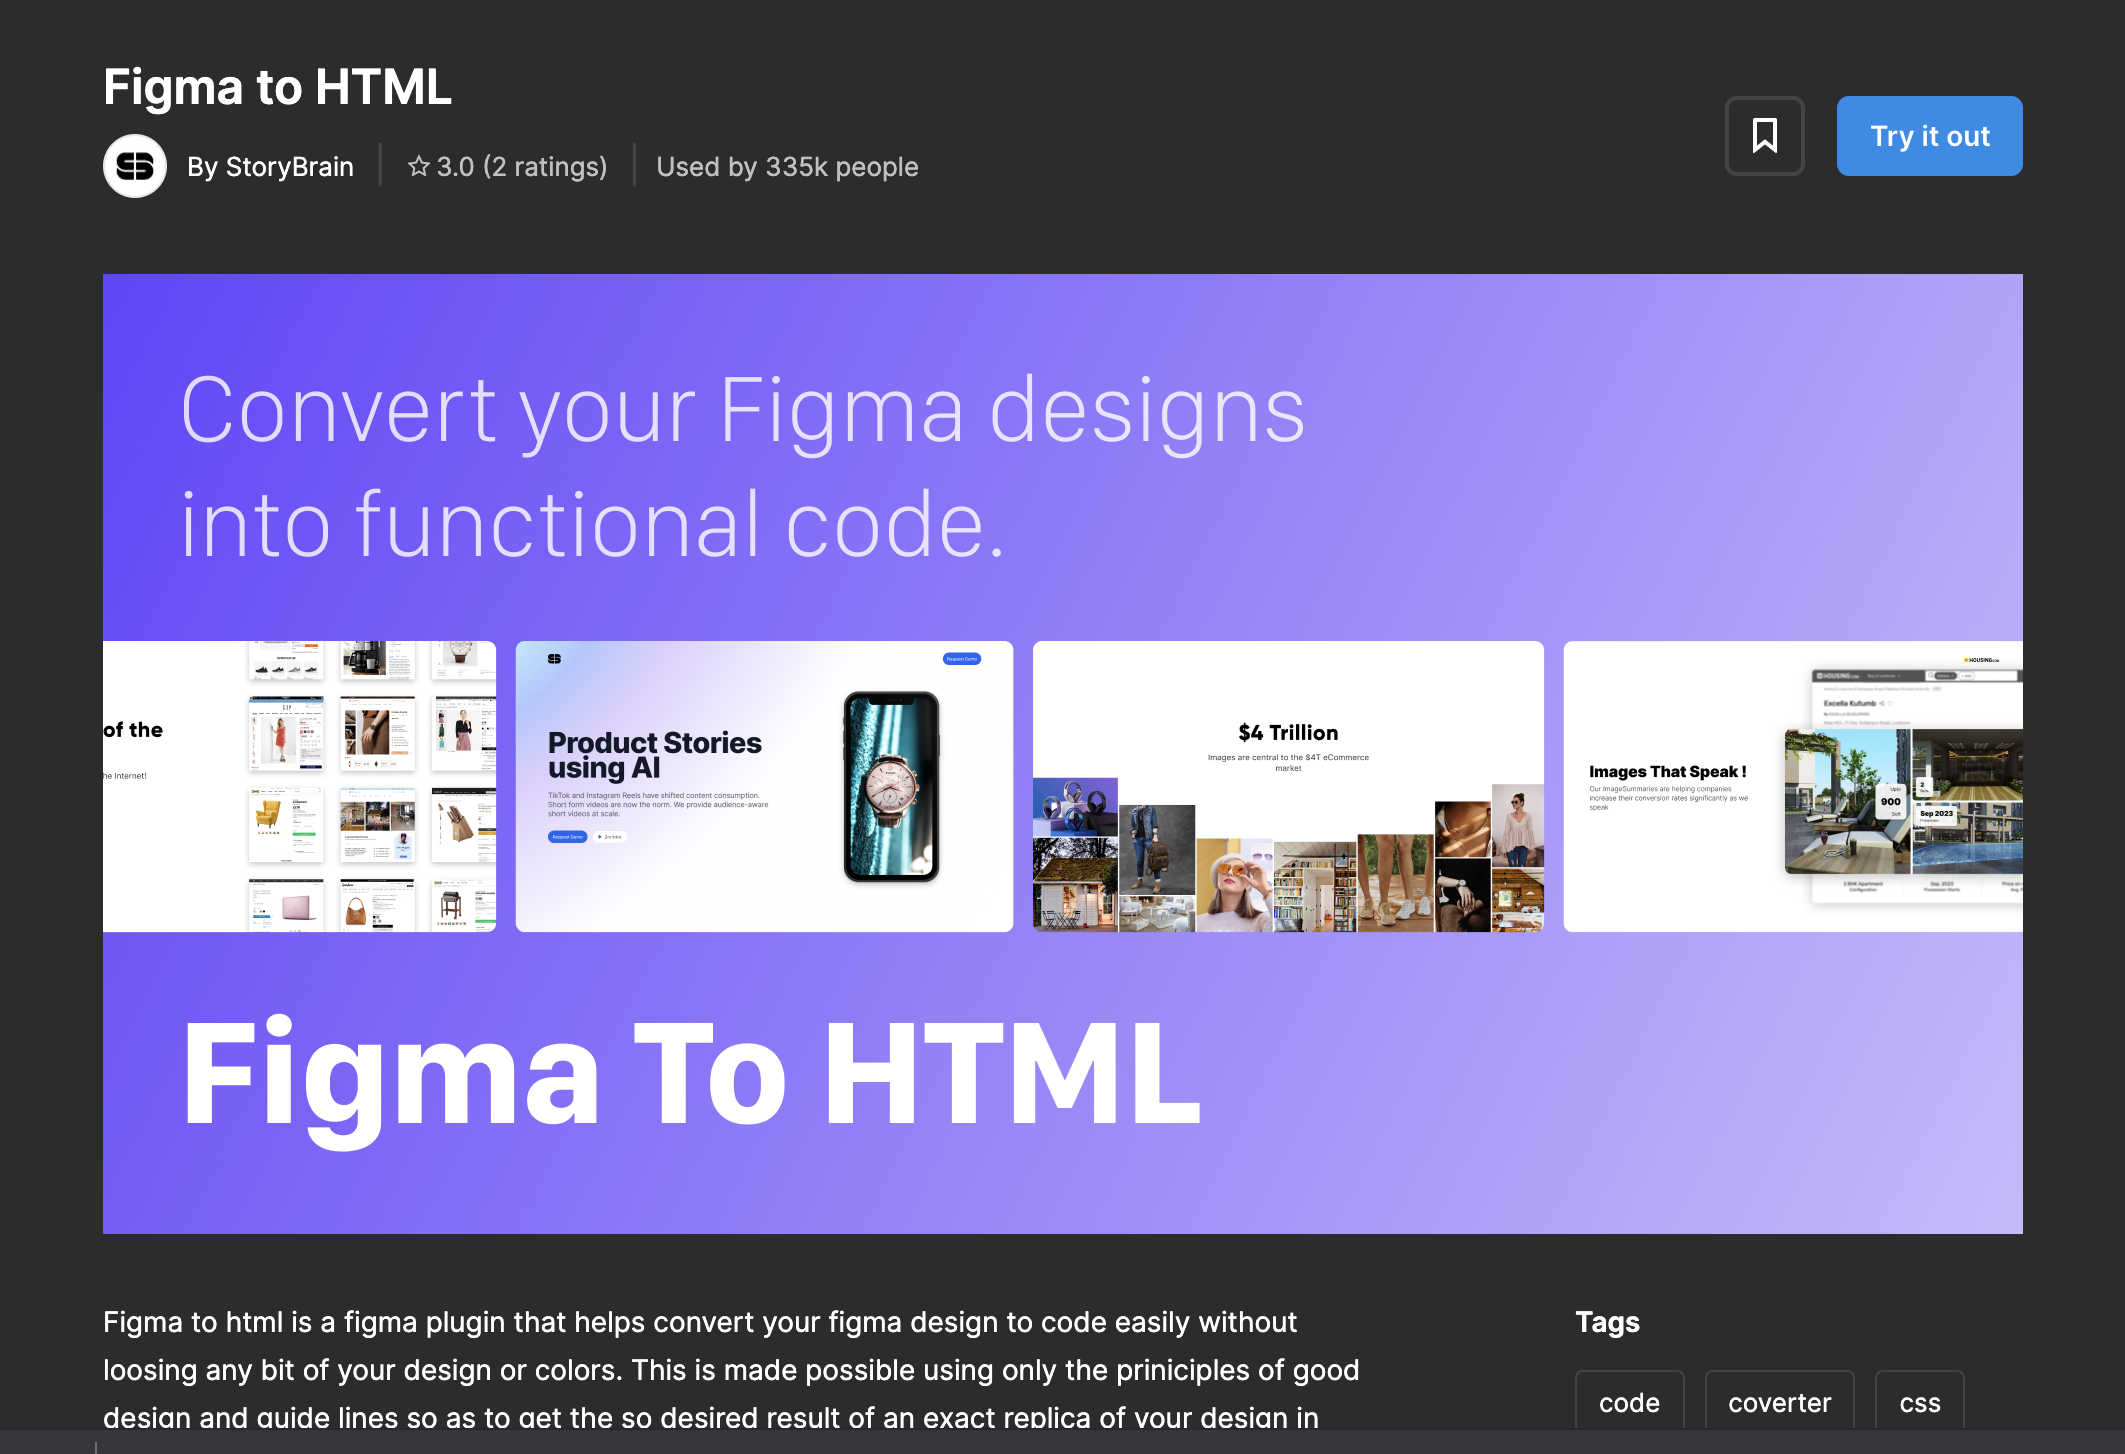
Figma to HTML
You’re probably no stranger to this highly-praised plugin within the Figma community. It lives up to its name by effortlessly converting simple designs into HTML and CSS code while retaining every detail of your design’s intricate structure, color palette, and style elements. What truly distinguishes the Figma-to-HTML plugin is its simple, user-friendly interface, ensuring accessibility for users of all skill levels. Nevertheless, it’s worth emphasizing that this plugin shines brightest when dealing with uncomplicated design structures—those without masking, gradients, or complex layouts.
The current version of Figma to HTML has the following limitations:
- Limited to desktop view for responsive design
- Does not support background and layer blur
- Masking is not yet available
- GIFs are not supported
- Component Overrides are not included
- Lacks a proper naming mechanism for HTML and CSS code; uses Chords like v604_61 for tags and .v604_57 for classes.
Steps to convert the design to code
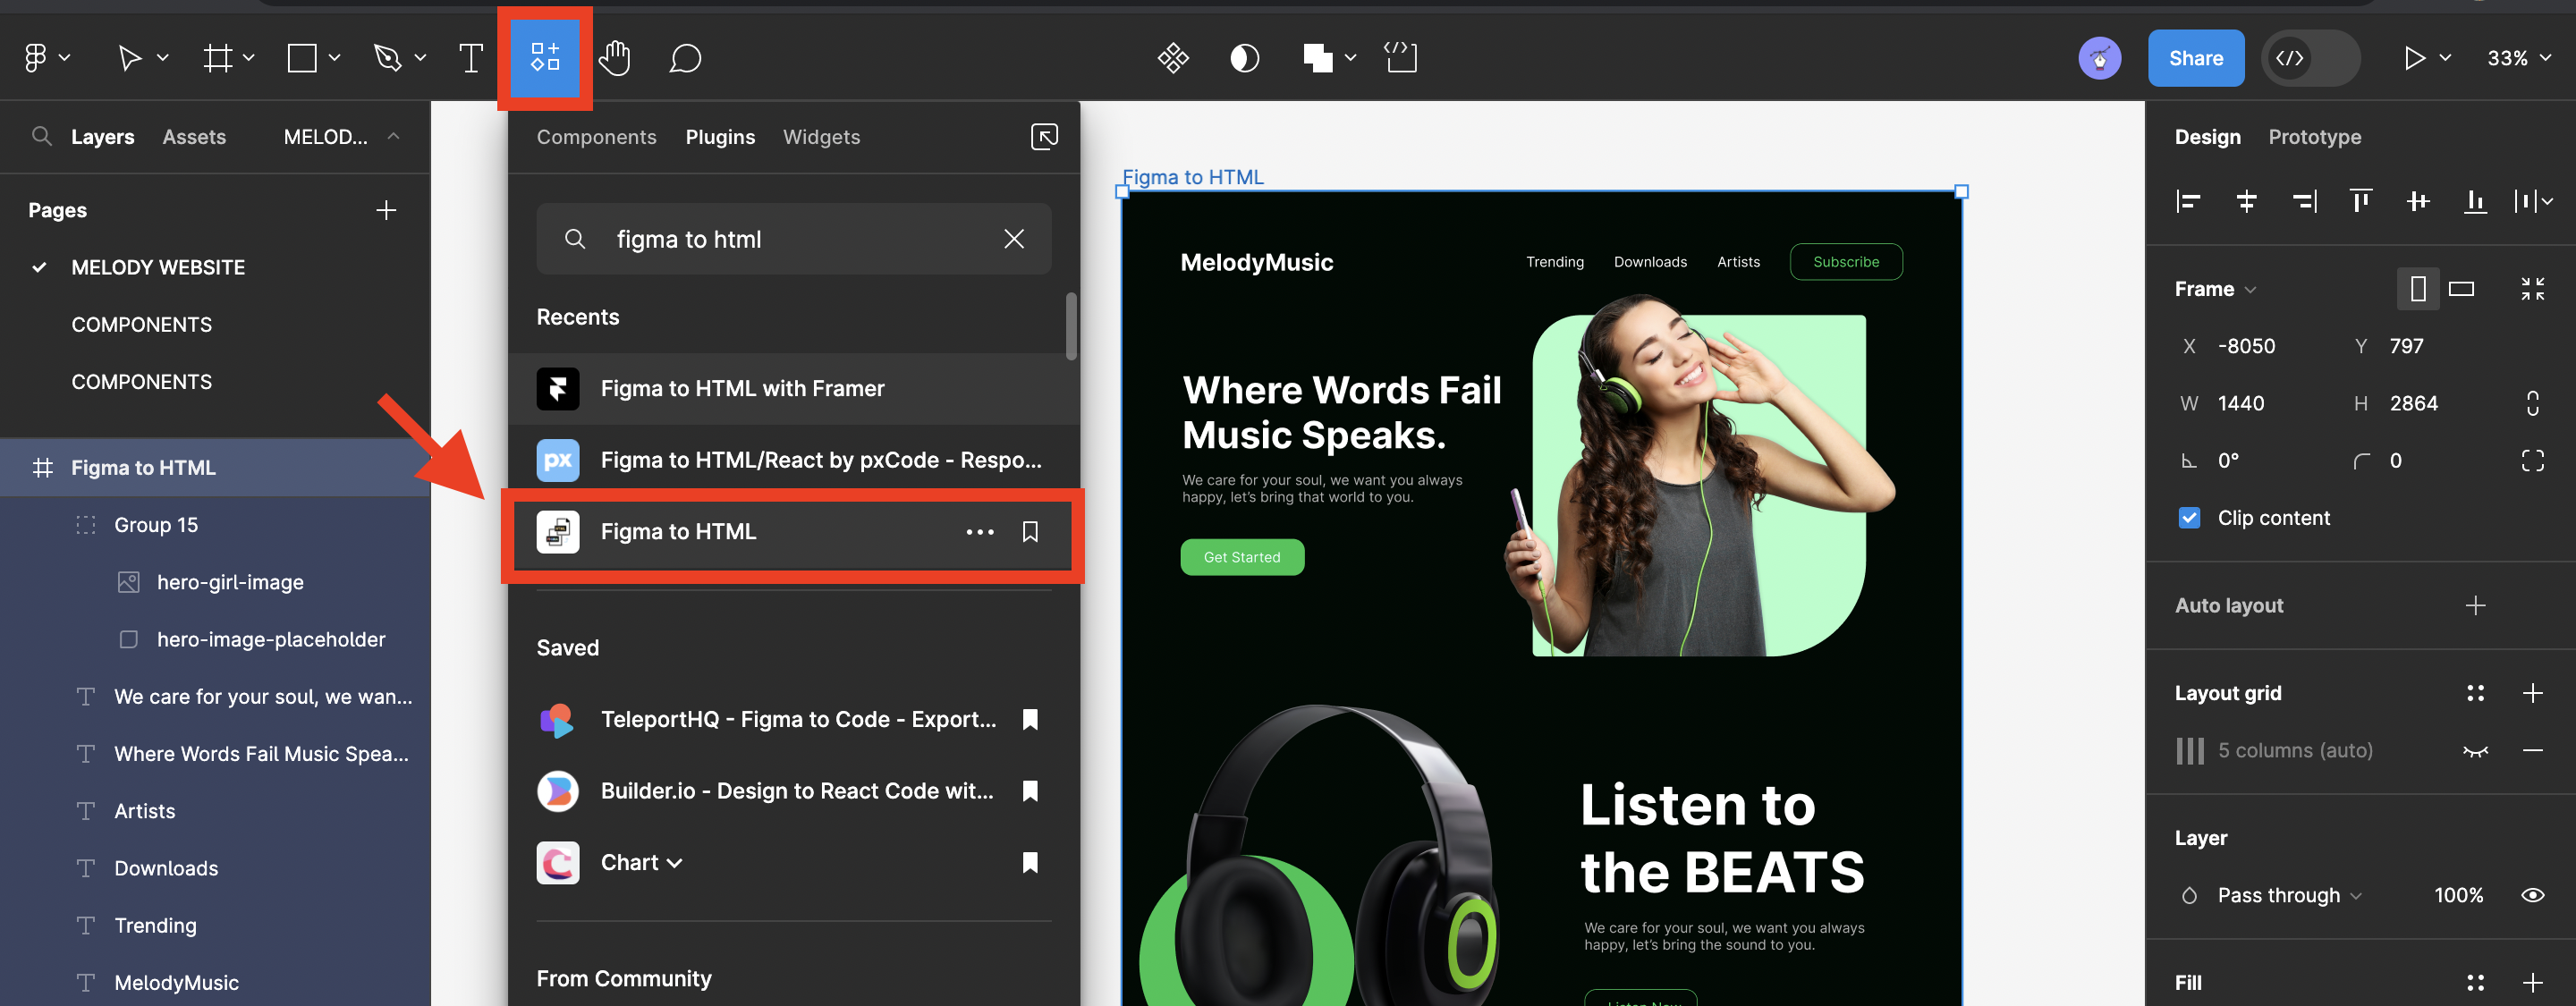
-
Begin by accessing the toolbar and navigating to the Resources tab. In this section, which is usually located under the plugin category, you will want to initiate a search for the Figma to HTML.
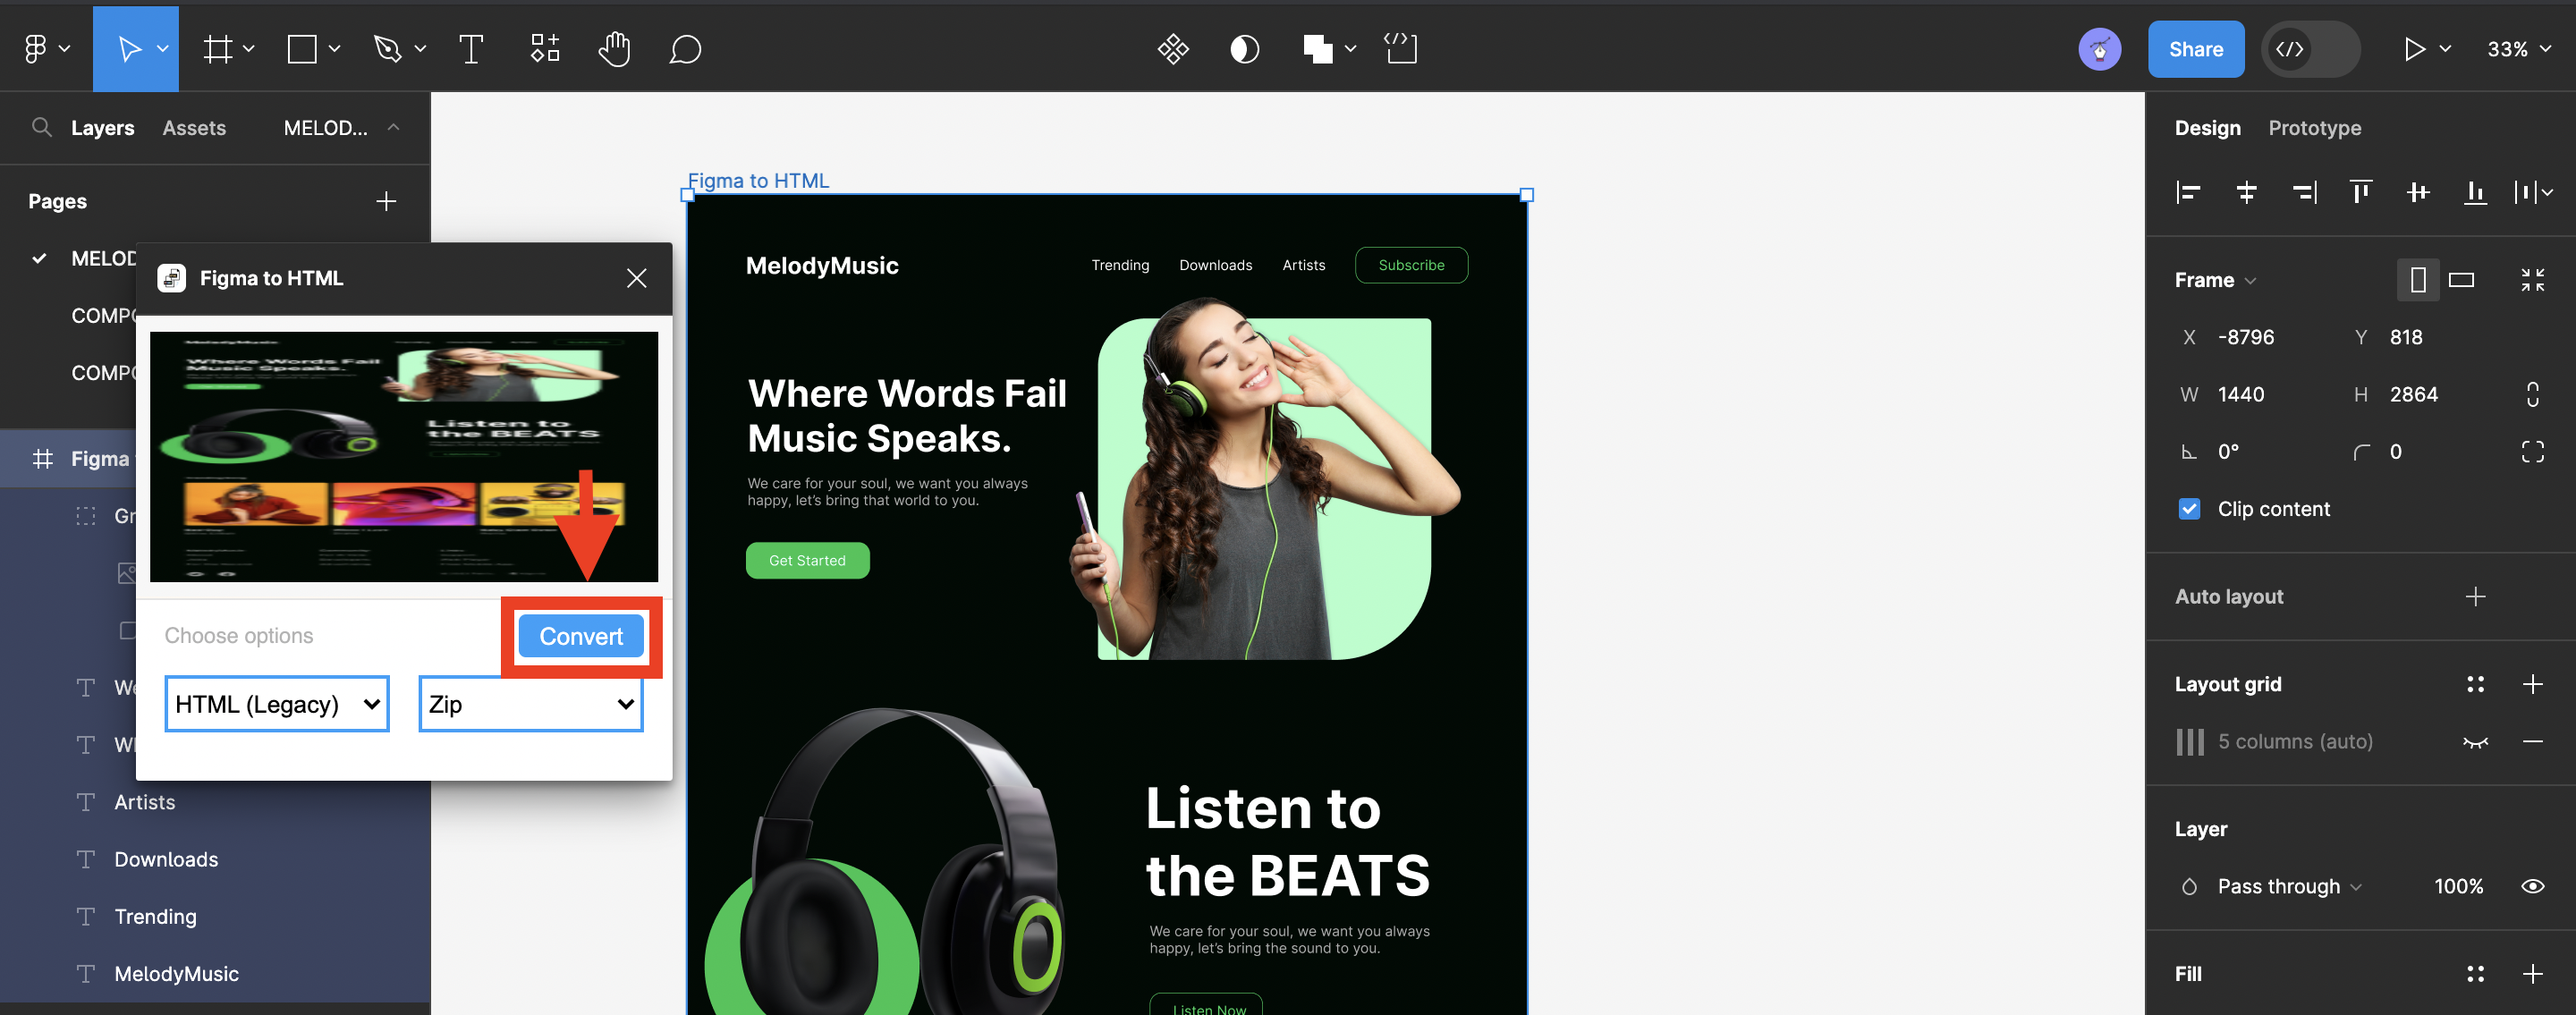
-
Run the plugin by clicking on it. A small modal window will appear; from the options provided within, select HTML (Legacy). After making this selection, verify the preview screen above the form - it should now display your chosen frame. If everything appears as expected, you can click on convert to download the design code zip file on your system.
Conversion to HTML and CSS code
By clicking the convert button on the plugin interface and downloading the zip file, you’ve already transformed your code into HTML and CSS. Now, all that remains is to unzip the downloaded file, which contains the HTML, CSS, and an image file. Afterward, open the main file using VScode to access your reusable code.
To utilize your icons/images in your Figma design, simply:
- Switch to developer mode and access them from the Asset panel.
- Manually download the icons in SVG format.
- Insert the downloaded SVG icons into your downloaded file.
<!DOCTYPE html>
<html>
  <head>
    <link
      href="https://fonts.googleapis.com/css?family=Inter&display=swap"
      rel="stylesheet"
    />
    <link href="./css/main.css" rel="stylesheet" />
    <title>Document</title>
  </head>
  <body>
  <div class="v604_57">
    <span class="v604_61">MelodyMusic</span><span class="v604_62">Trending</span><span class="v604_63">Downloads</span><span class="v604_64">Artists</span><span class="v604_74">Where Words Fail Music Speaks.</span><span class="v604_75">We care for your soul, we want you always happy, let’s bring that world
      to you.</span>
    <div class="v744_672"></div>
    <span class="v604_83">Listen to the BEATS</span><span class="v604_84">We care for your soul, we want you always happy, let’s bring the sound
      to you.</span>
    <div class="v619_7"><span class="v604_59">Trending Song</span></div>
    <span class="v604_96">Bad Guy</span><span class="v604_93">Billie Eillish</span><span class="v604_97">When I Love</span><span class="v604_94">Drake</span>
    <div class="v610_243">
      <div class="v604_88"></div>
      <div class="v604_89"></div>
      <div class="v604_90"></div>
    </div>
* {
  box-sizing: border-box;
}
body {
  font-size: 14px;
}
.v604_57 {
  width: 100%;
  height: 2864px;
  background: rgba(0, 9, 3, 1);
  opacity: 1;
  position: absolute;
  top: 0px;
  left: 0px;
  overflow: hidden;
}
.v604_61 {
  width: 264px;
  color: rgba(255, 255, 255, 1);
  position: absolute;
  top: 96px;
  left: 100px;
  font-family: Inter;
  font-weight: Bold;
  font-size: 40px;
  opacity: 1;
  text-align: left;
}
.v604_62 {
  width: 100px;
  color: rgba(255, 255, 255, 1);
  position: absolute;
  top: 106px;
  left: 693px;
  font-family: Inter;
  font-weight: Regular;
  font-size: 24px;
  opacity: 1;
  text-align: left;
}
Here is the final result.
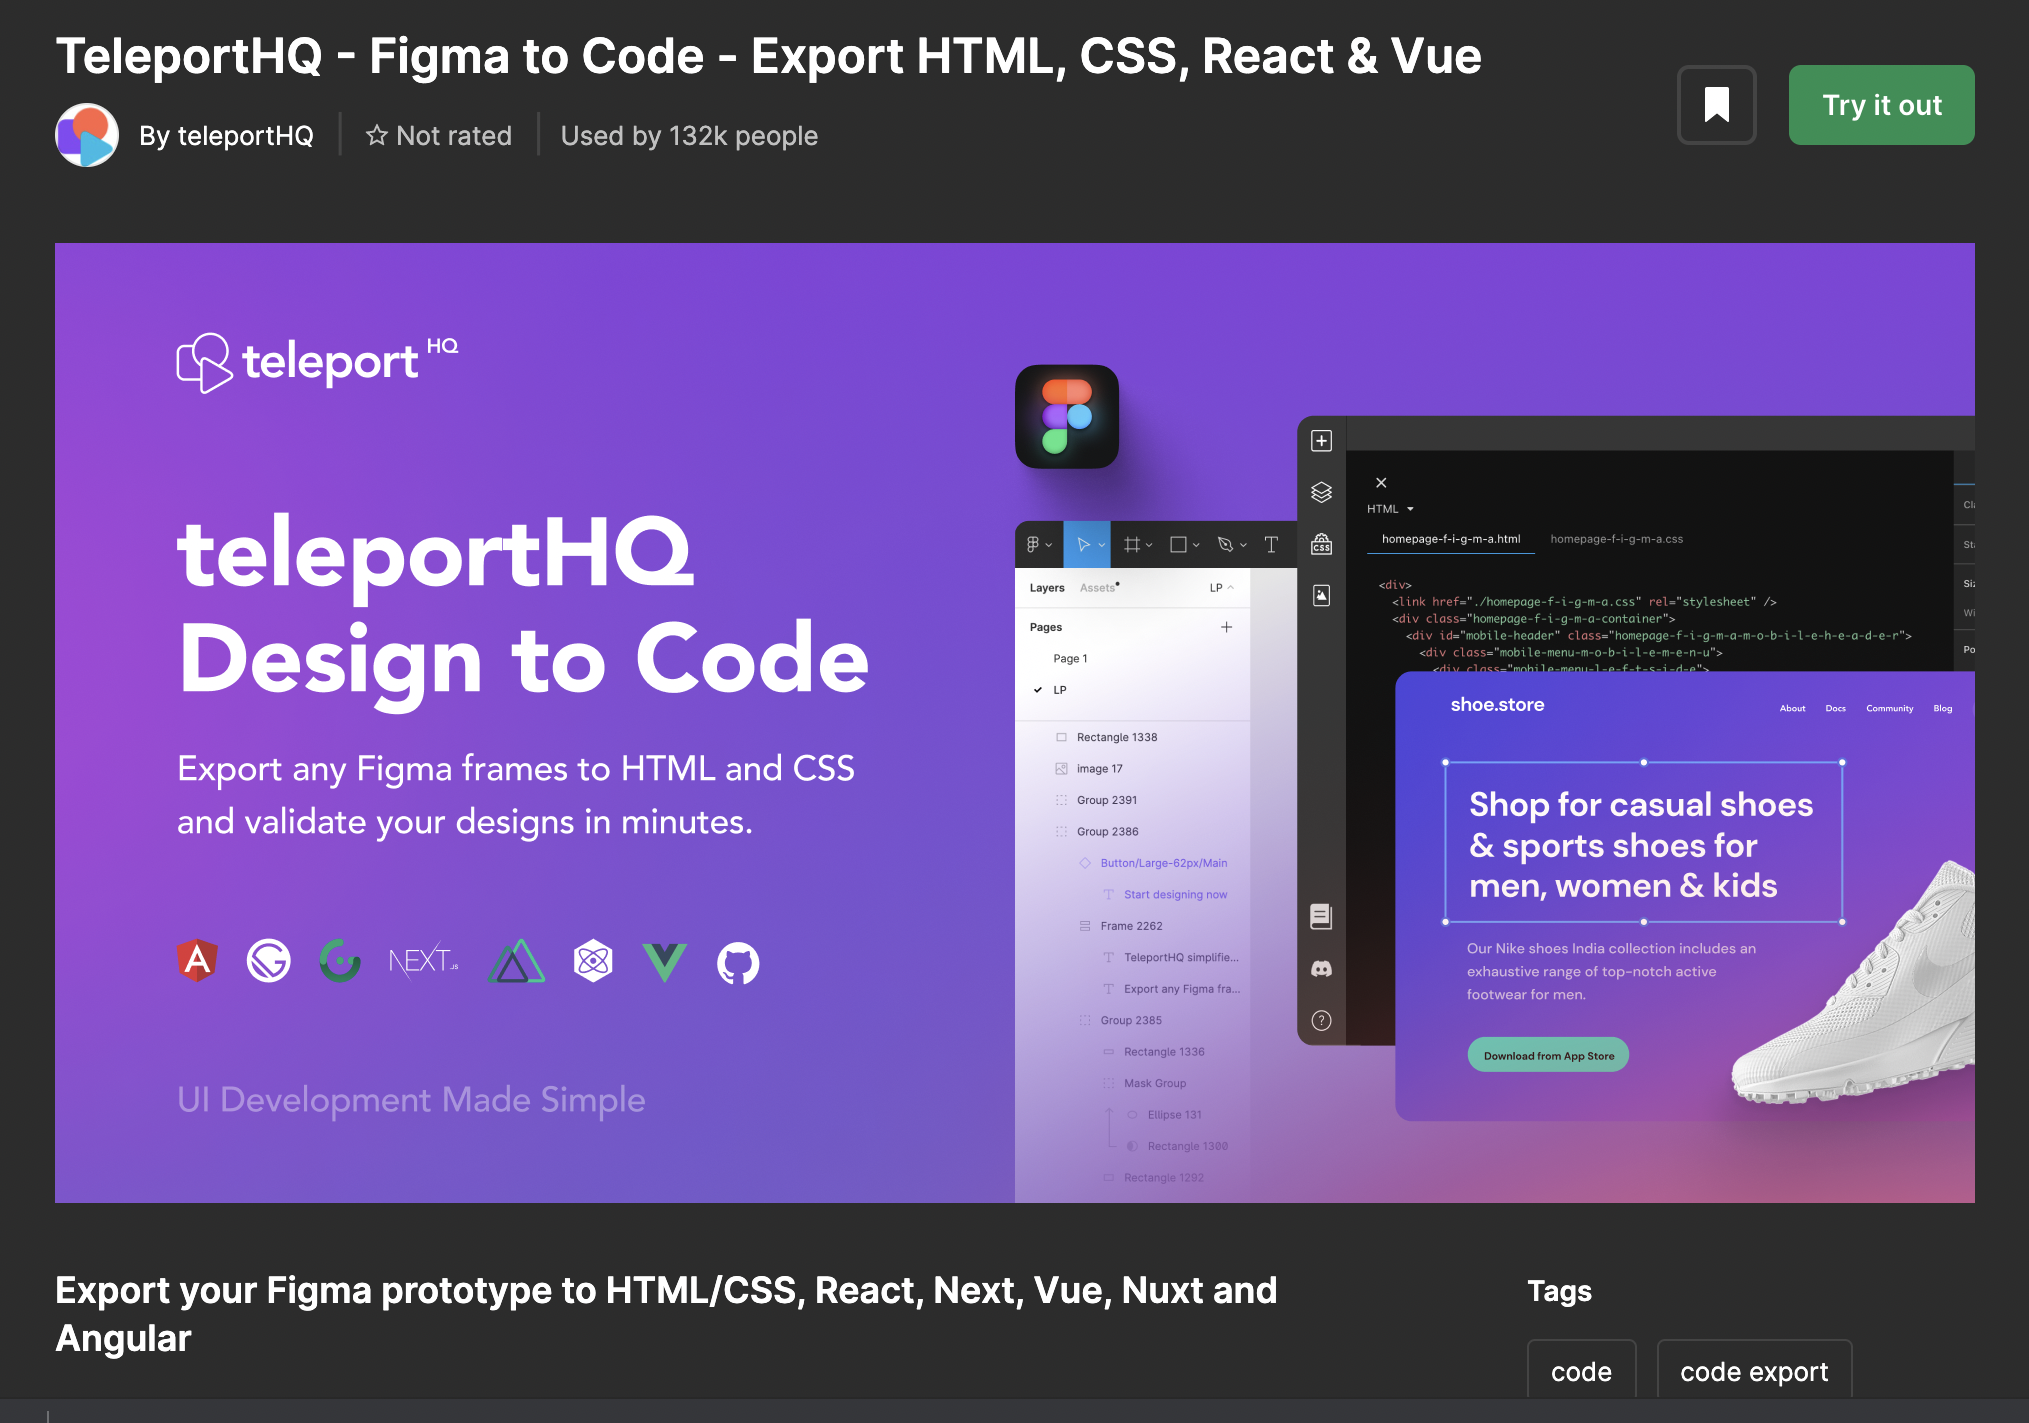
TeleportHQ
Teleport is a versatile no-code website builder that makes crafting visually stunning static websites a breeze. Its well-organized editor simplifies the entire process. The ideal workflow begins in Figma, where the Teleport plugin assists you in transforming all the design layers into auto-layout, creating a perfect desktop layout for you.
Once your Figma design masterpiece is ready, you can effortlessly transition it into the Teleport editor, all thanks to its Figma plugin, ‘TeleportHQ-Figma to Code.’ This plugin enables you to effortlessly export your design from Figma.
When your Figma design is exported to the Teleport dashboard and then into the editor, TeleportHQ takes it further by allowing you to generate code in nine different JavaScript frameworks, including React, Vue, Nuxt, Next, Gatsby, and more. Additionally, with the assistance of the Teleport editor, you have the flexibility to fine-tune your imported Figma design, ensuring its responsiveness across all screen sizes.
There are some limitations. All layer elements must be in auto-layout. Also, the current version of the TeleportHQ design to code does not currently provide support for:
- Background and layer blur
- Masking
- Gif
- Component Overrides
Steps to convert the design to code
-
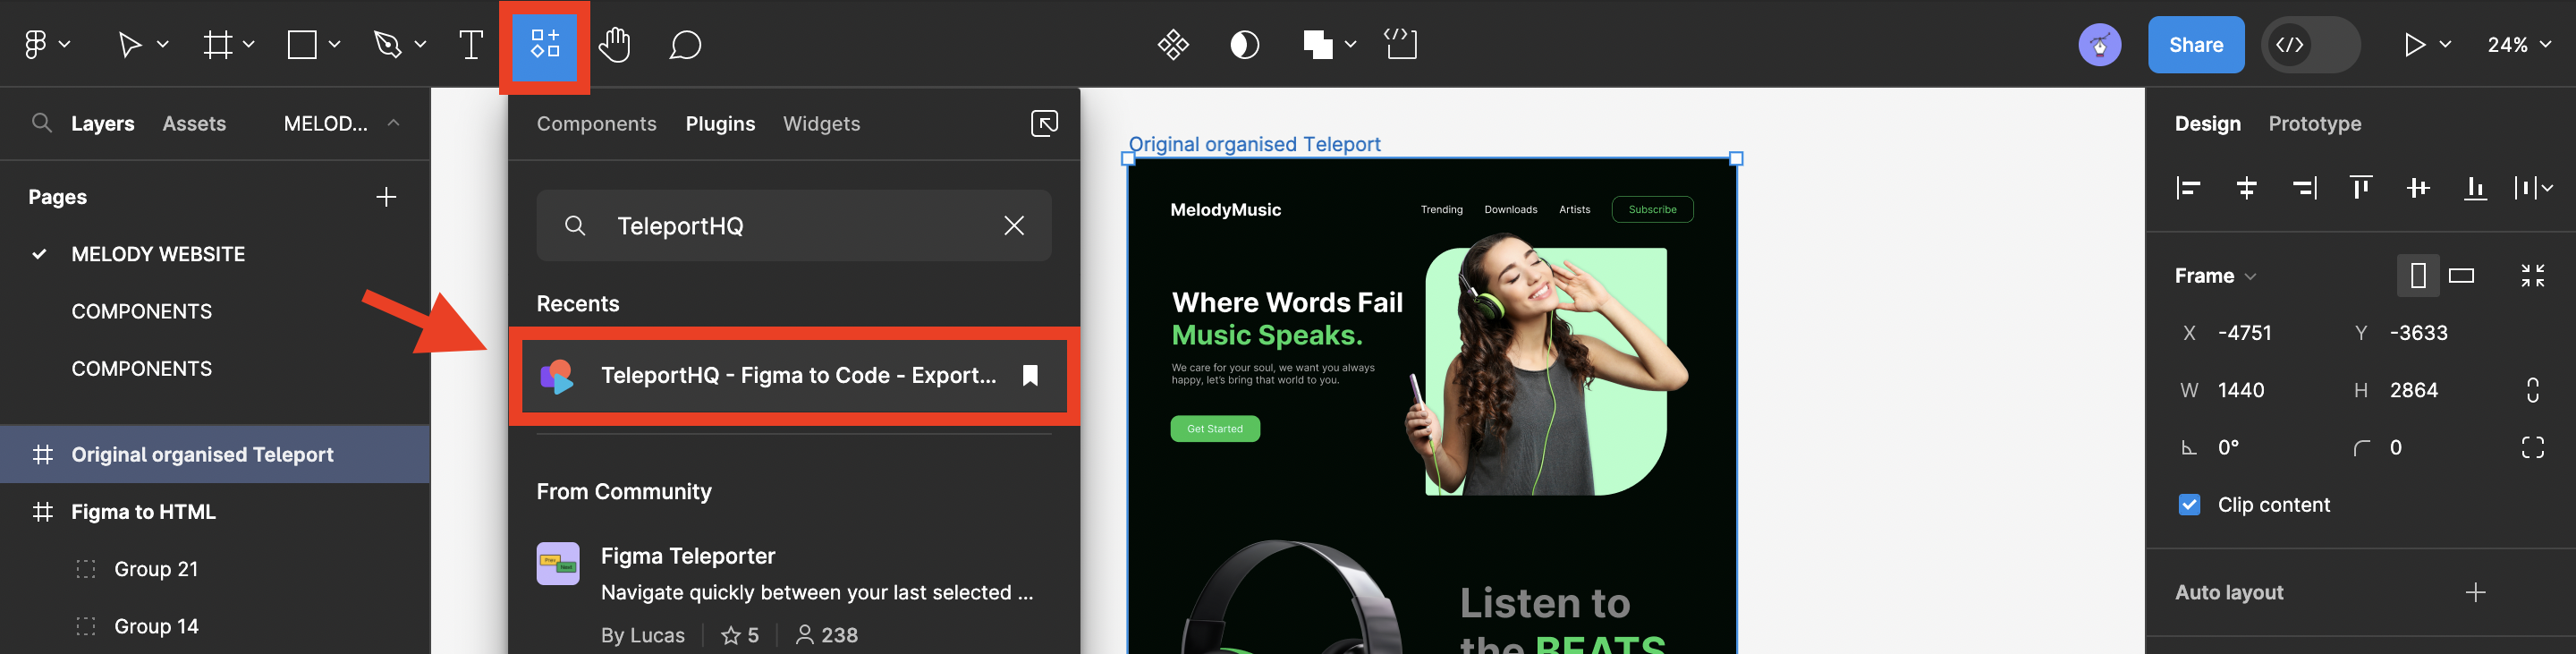
Begin by accessing the toolbar and navigating to the Resources tab. In this section, which is usually located under the plugin category, you will want to initiate a search for the TeleportHQ tool.
-
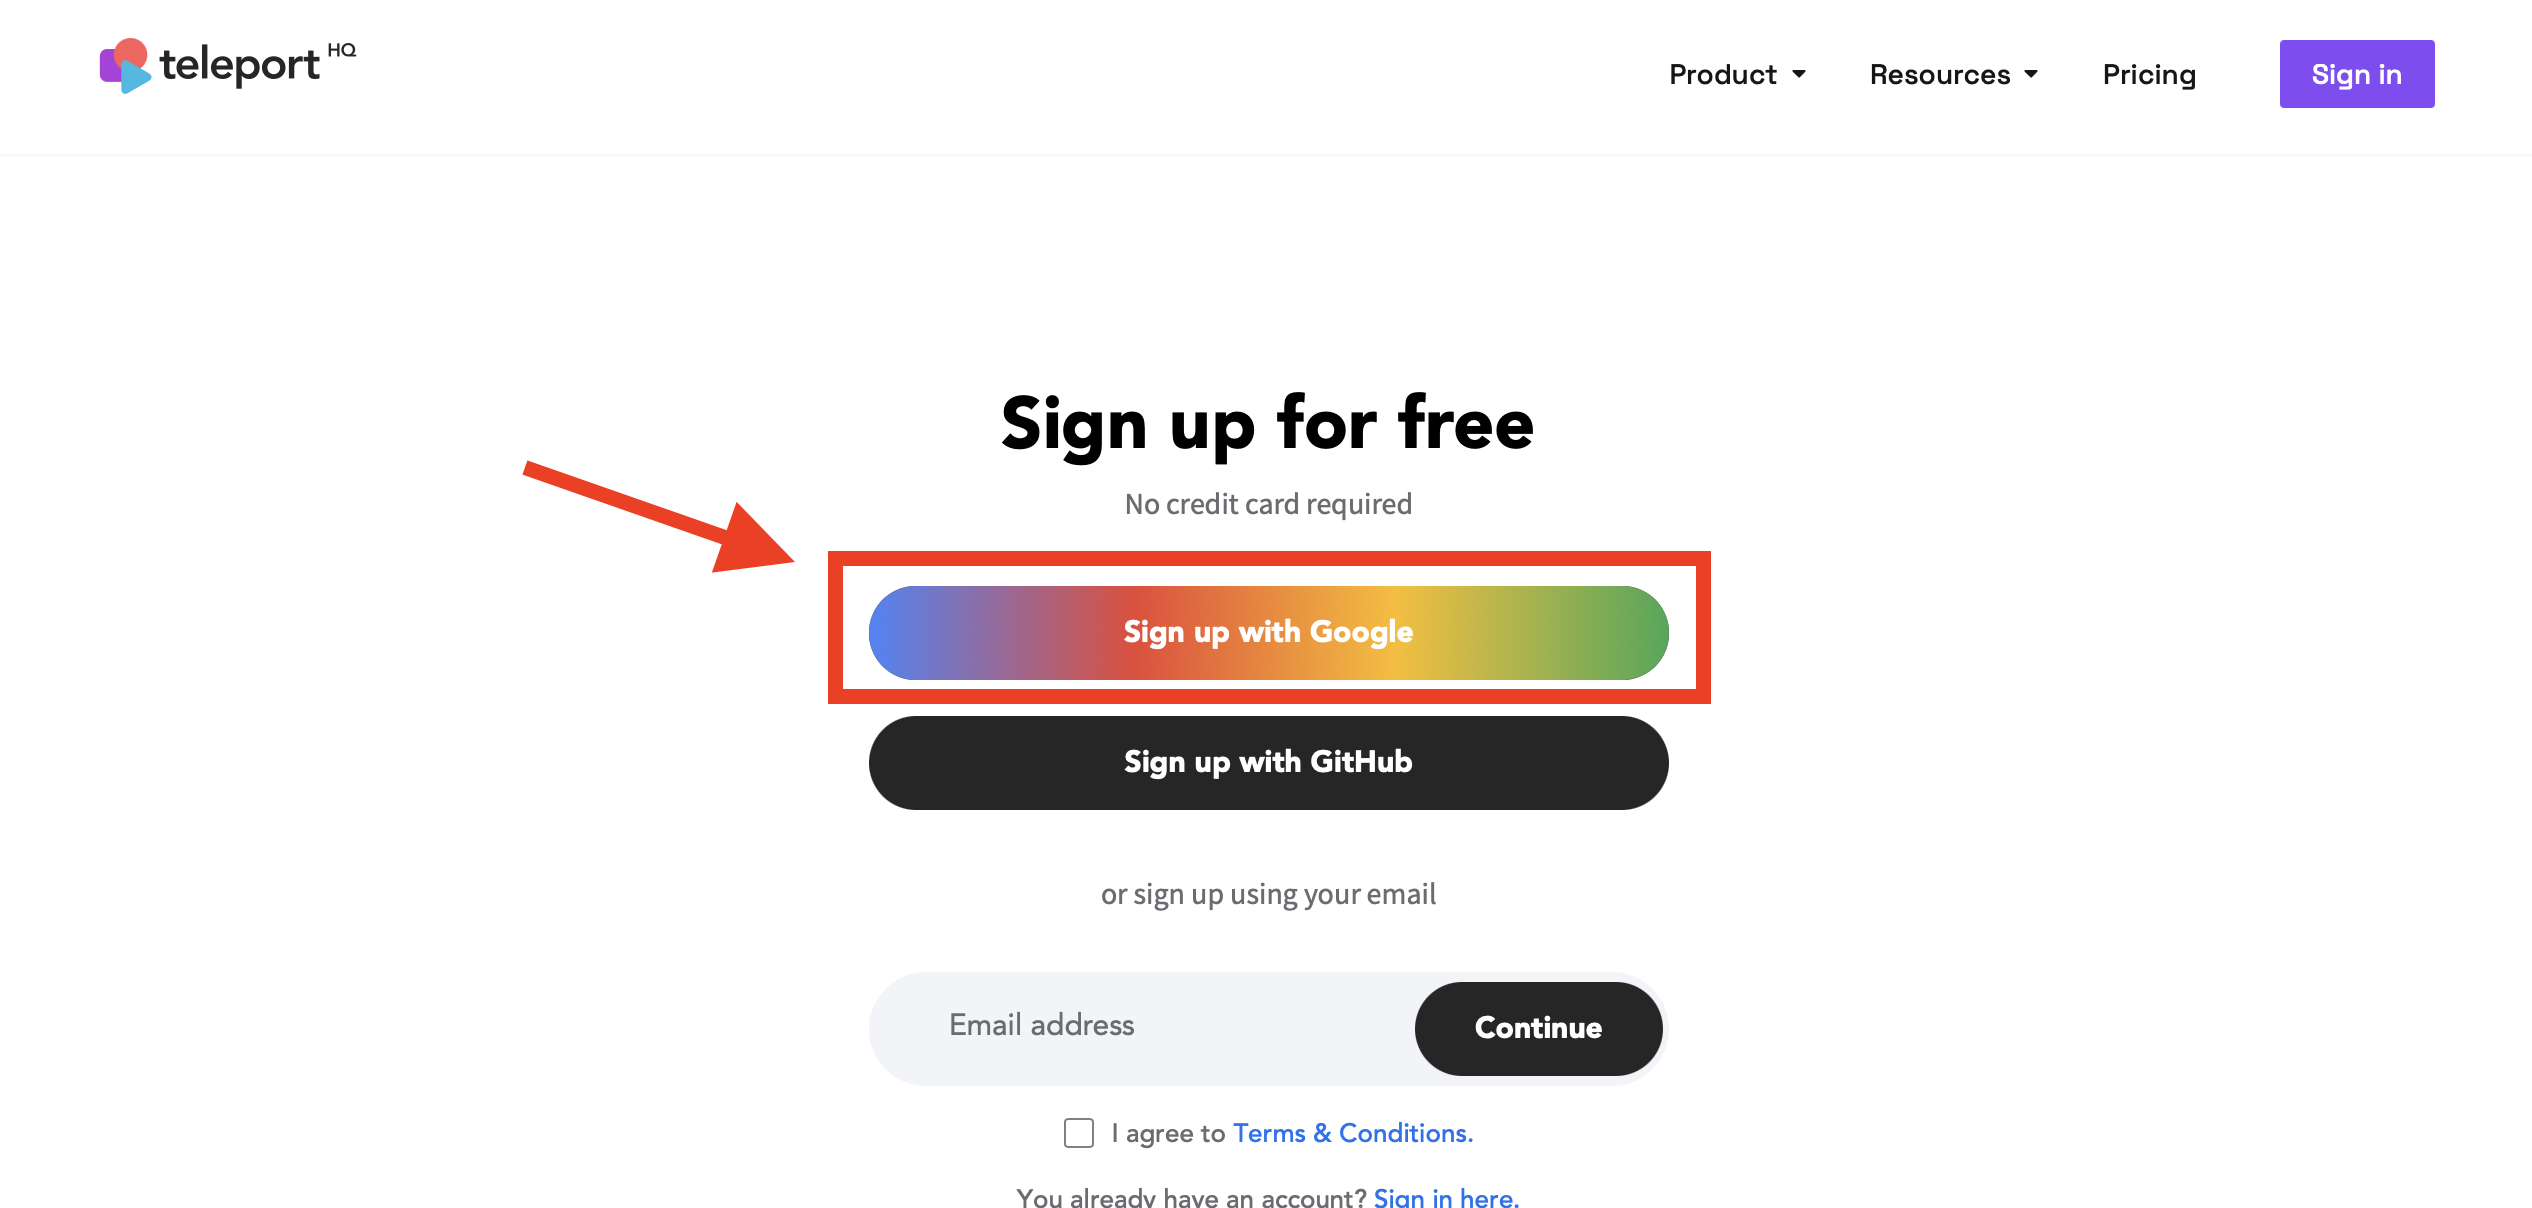
Run the plugin, and you’ll be directed to a page where you can easily create a free TeleportHQ account using your Gmail credentials.
-
After connecting your account, a dashboard will be created for you, but leave the dashboard for now; we will get to it later in this tutorial. Return to your Figma canvas, where the Teleport plugin will assist in organizing and perfecting your design elements with auto-layout guidance.
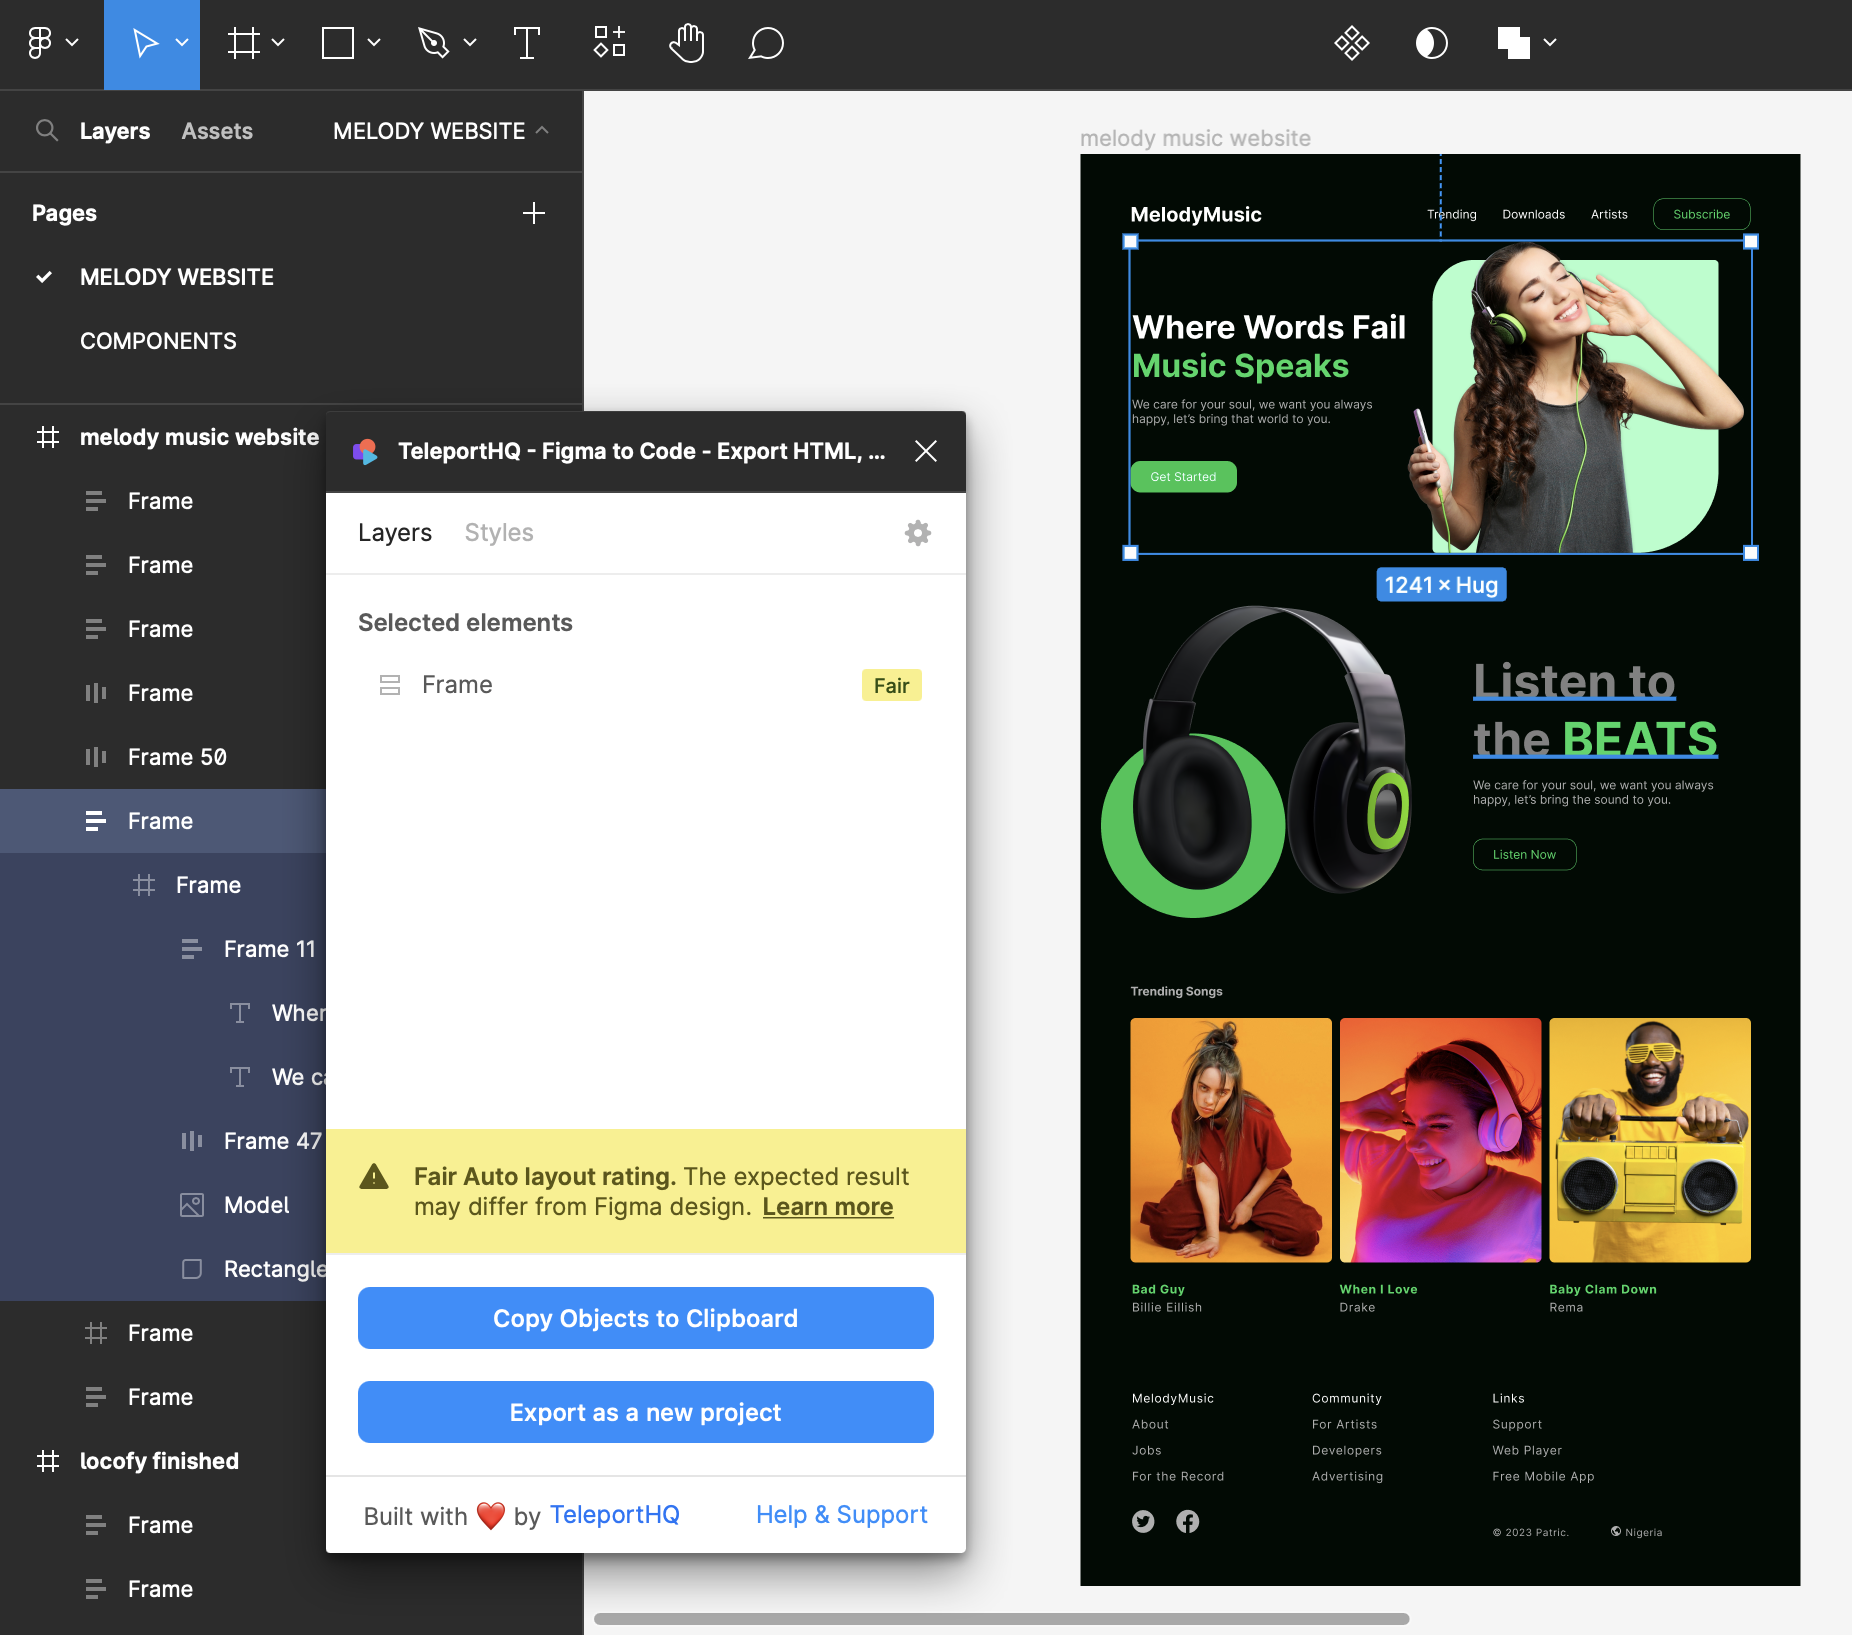
-
Once auto-layout has been correctly applied to all layers, the main frame will display an Excellent rating. You can then click Export as a new project, which will copy all your layers and take you to the TeleportHQ dashboard.

-
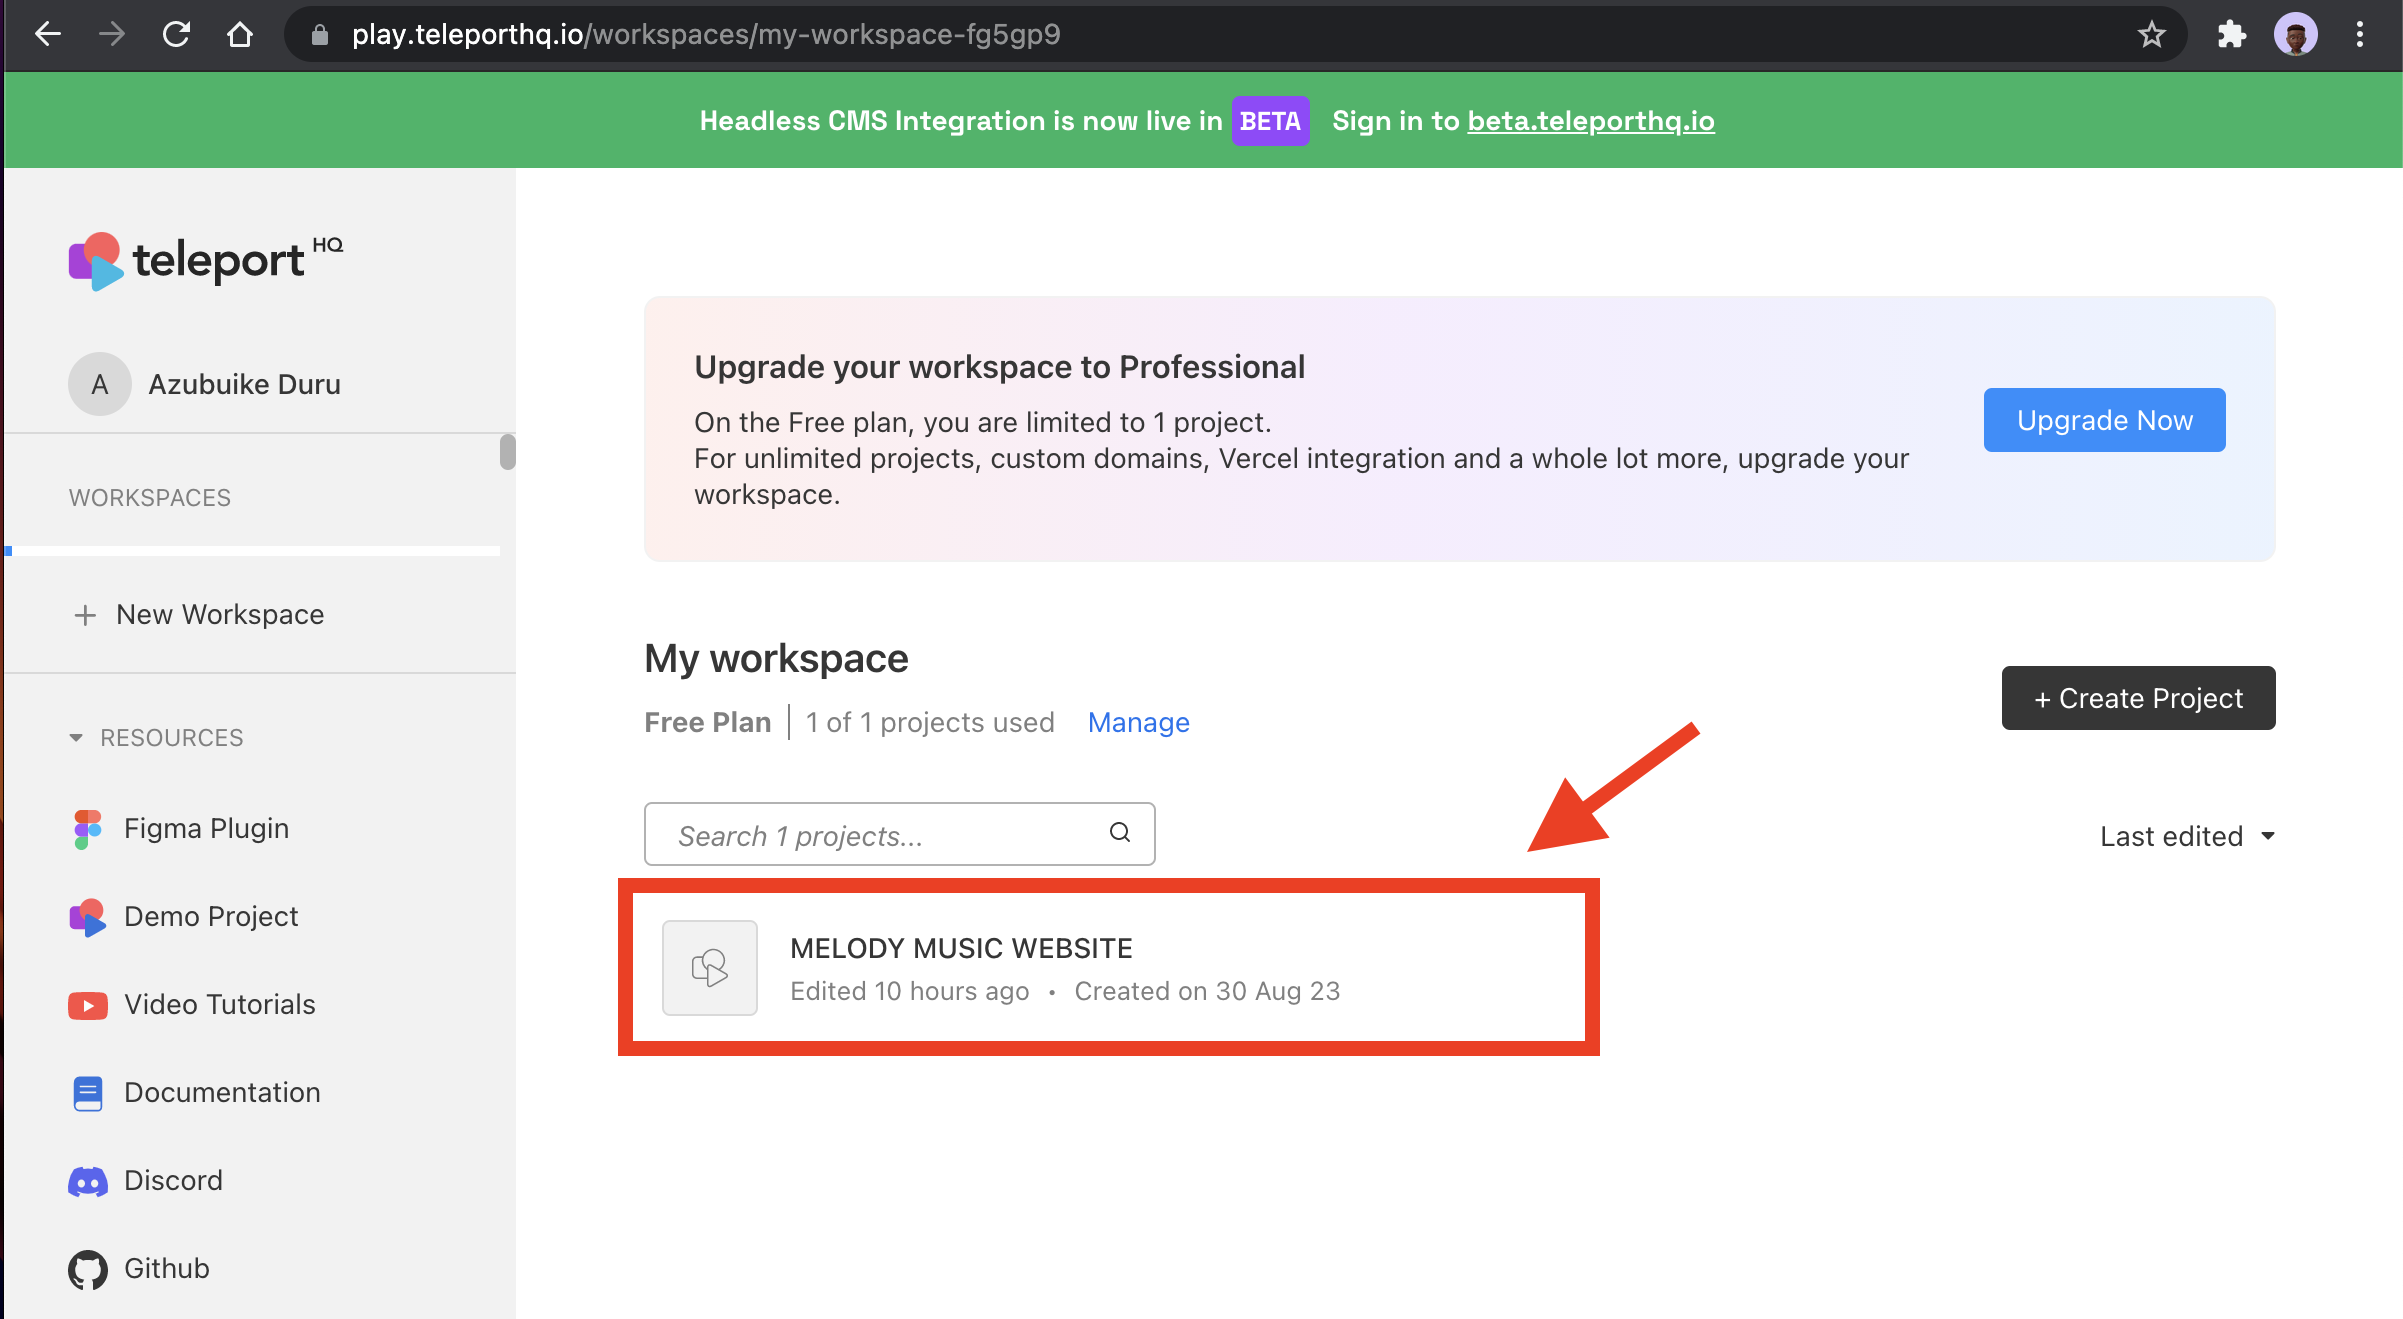
TeleportHQ allows you to create only one free project we just exported from Figma; you can proceed to the teleportHQ editor by clicking on your created project on the dashboard.
Conversion to HTML, React, and Vue code
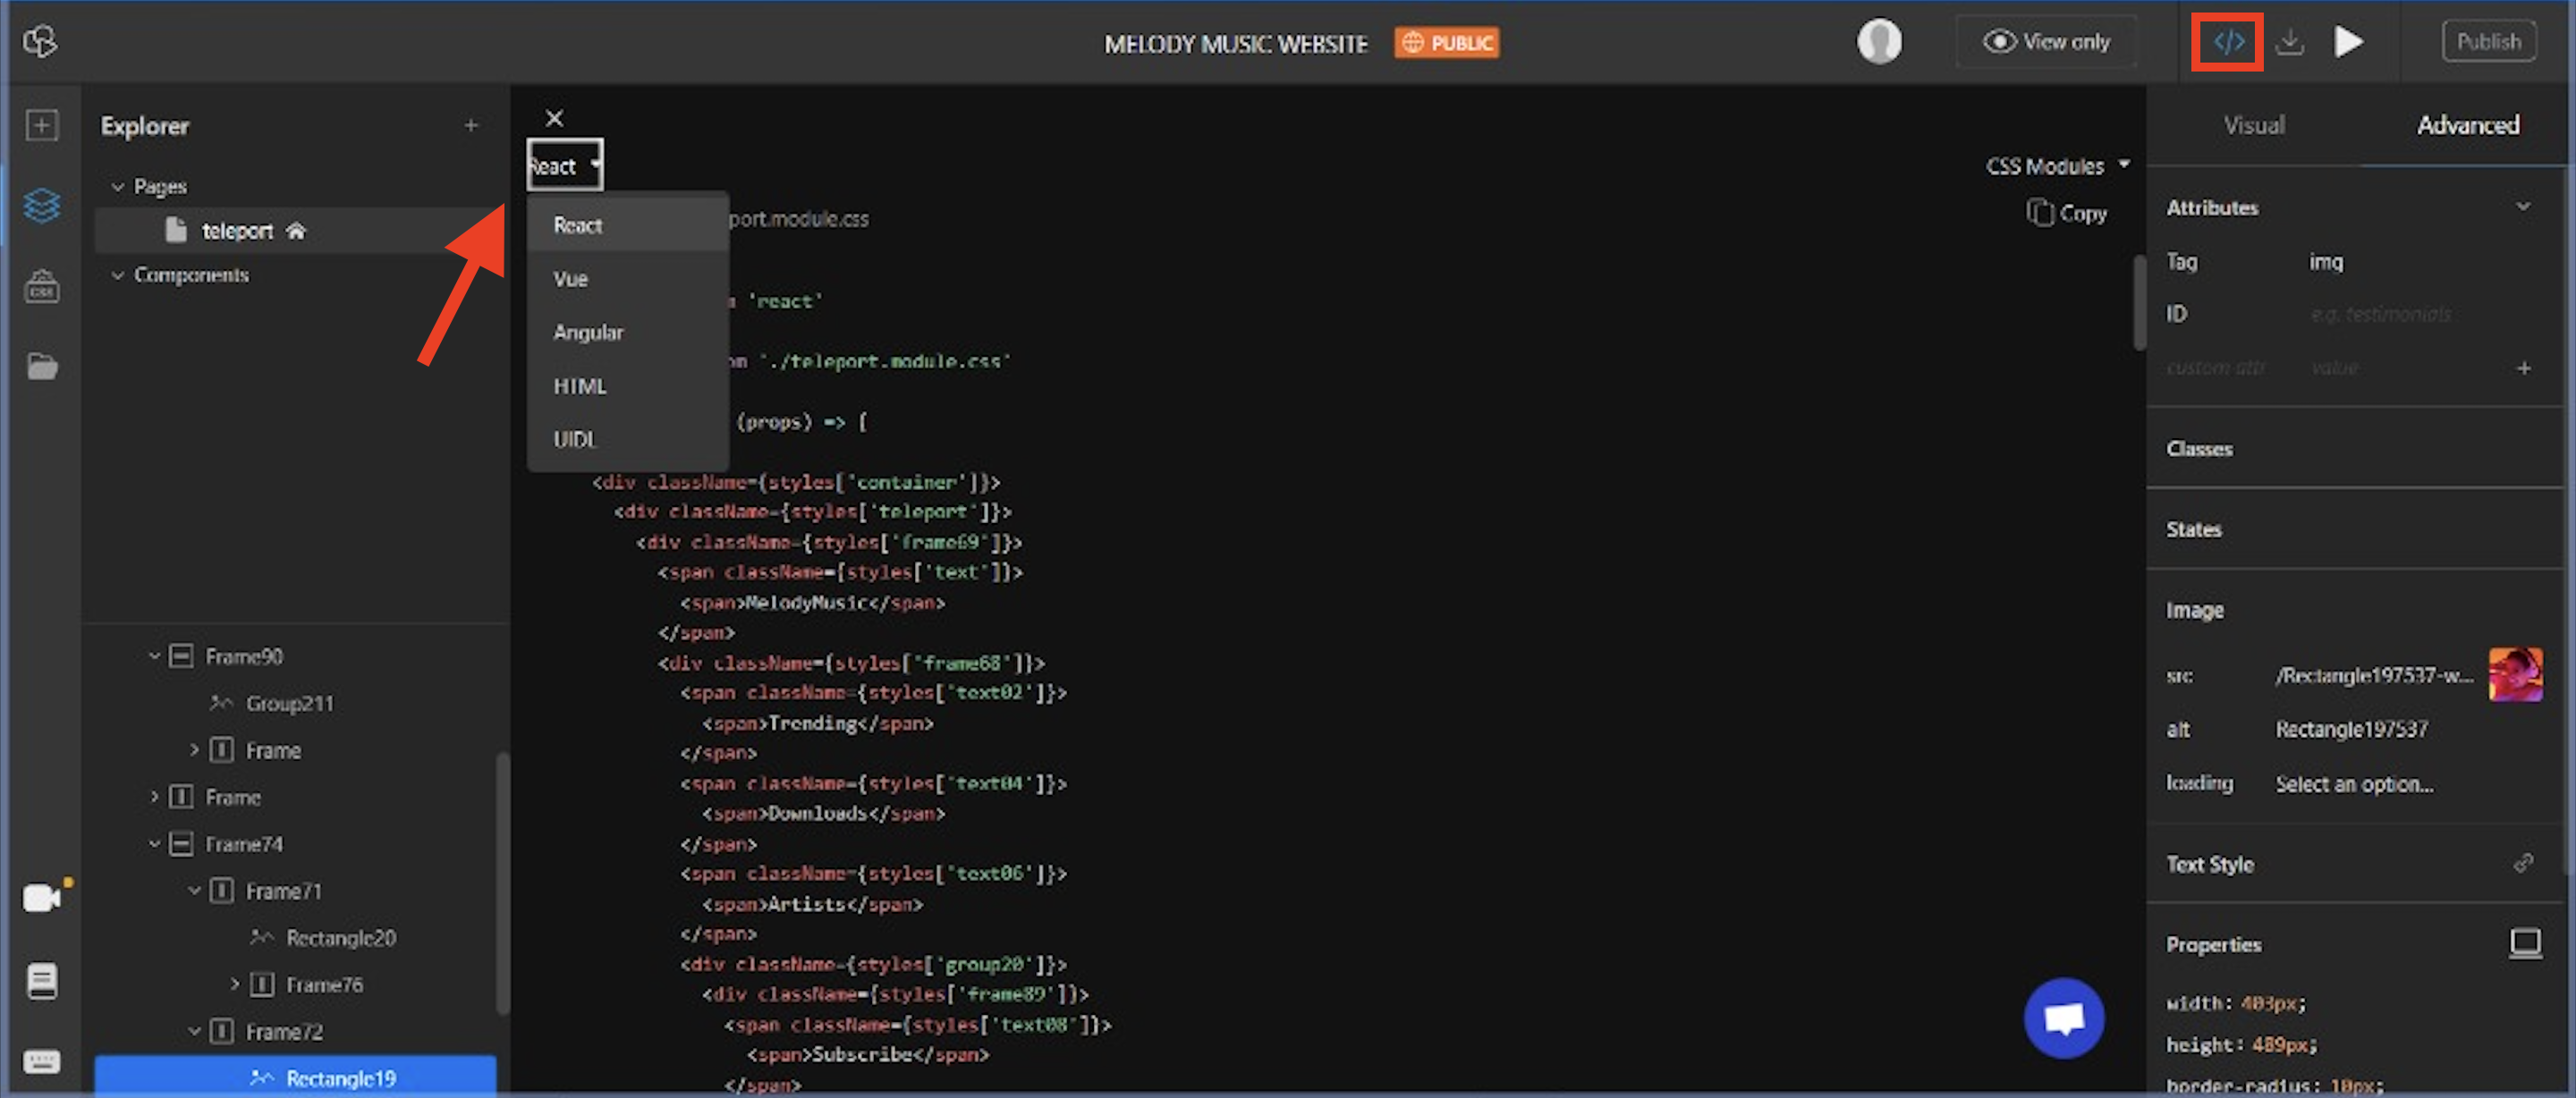
When you arrive at the teleportHQ editor, which resembles the image below, you will have the ability to make your design responsive across various screens, such as mobile and tablet. Additionally, you can preview how it will appear before copying your code.
To access your preferred JavaScript framework code, simply click on the Dev Mode option at the top-right corner and choose the JavaScript framework you would like to convert your design to.
<div>
  <link href="./teleport.css" rel="stylesheet" />
  <div class="teleport-container">
    <div class="teleport-teleport">
      <div class="teleport-frame69">
        <span class="teleport-text"><span>MelodyMusic</span></span>
        <div class="teleport-frame68">
          <span class="teleport-text02"><span>Trending</span></span>
          <span class="teleport-text04"><span>Downloads</span></span>
          <span class="teleport-text06"><span>Artists</span></span>
          <div class="teleport-group20">
            <div class="teleport-frame89">
              <span class="teleport-text08"><span>Subscribe</span></span>
            </div>
          </div>
        </div>
      </div>
      <div class="teleport-frame92">
        <div class="teleport-frame70">
          <div class="teleport-frame11">
            <span class="teleport-text10">
              <span class="teleport-text11">
                <span>Where Words Fail</span>
import React from 'react'

import styles from './teleport.module.css'

const Teleport = (props) => {
  return (
    <div className={styles['container']}>
      <div className={styles['teleport']}>
        <div className={styles['frame69']}>
          <span className={styles['text']}>
            <span>MelodyMusic</span>
          </span>
          <div className={styles['frame68']}>
            <span className={styles['text02']}>
              <span>Trending</span>
            </span>
            <span className={styles['text04']}>
              <span>Downloads</span>
            </span>
            <span className={styles['text06']}>
              <span>Artists</span>
            </span>
            <div className={styles['group20']}>
              <div className={styles['frame89']}>
                <span className={styles['text08']}>
                  <span>Subscribe</span>
                </span>
              </div>
            </div>
          </div>
        </div>

  )
}
export default Teleport<template>
<div class="teleport-container">
<div class="teleport-teleport">
<div class="teleport-frame69">
<span class="teleport-text"><span>MelodyMusic</span></span>
<div class="teleport-frame68">
<span class="teleport-text02">
</div>
</div>
</template>Here is the final result.
3. Locofy
Locofy stands out as a remarkable design-to-code plugin with few limitations. It excels in transforming your UI designs into readily usable code for both mobile and web applications. Among the three plugins I mentioned, I consider it the most advanced, thanks to its comprehensive Figma design emulation and built-in AI capabilities that ensure your design adheres to best practices before generating its reusable code.

Locofy can generate codes for HTML/CSS, Taiwind, and LocoAI can assist with a step-to-step guide for easy design transformation.
Steps to convert the design to code
-
Begin by accessing the toolbar and navigating to the Resources tab. In this section, which is usually located under the plugin category, you will want to initiate a search for the Locofy tool.
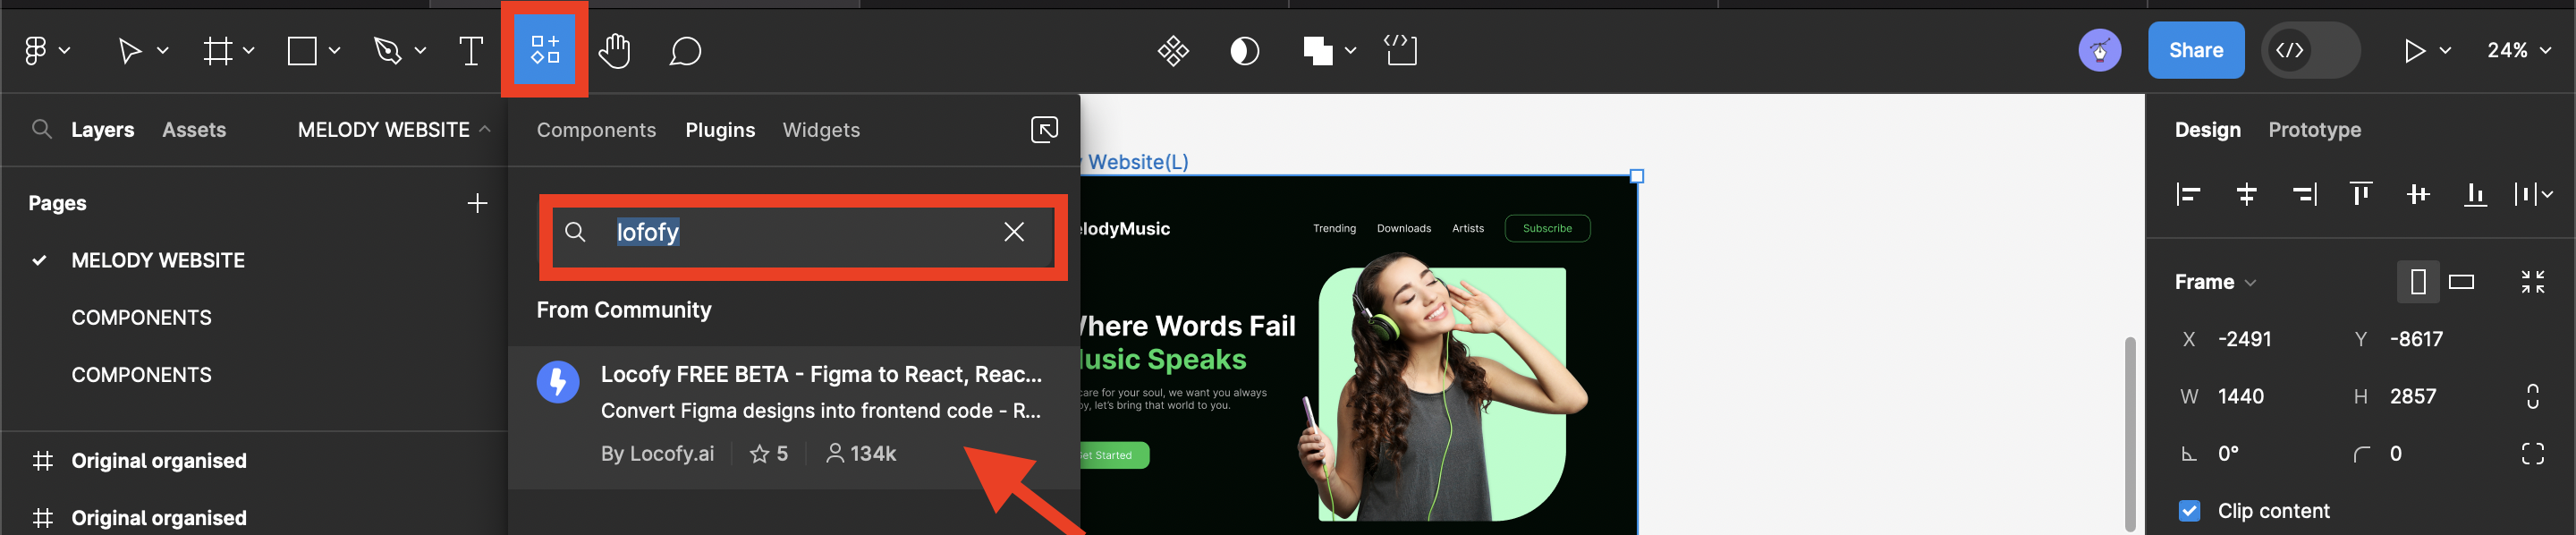
-
Run the plugin and proceed to Create a free Locofy account using your Gmail credentials.
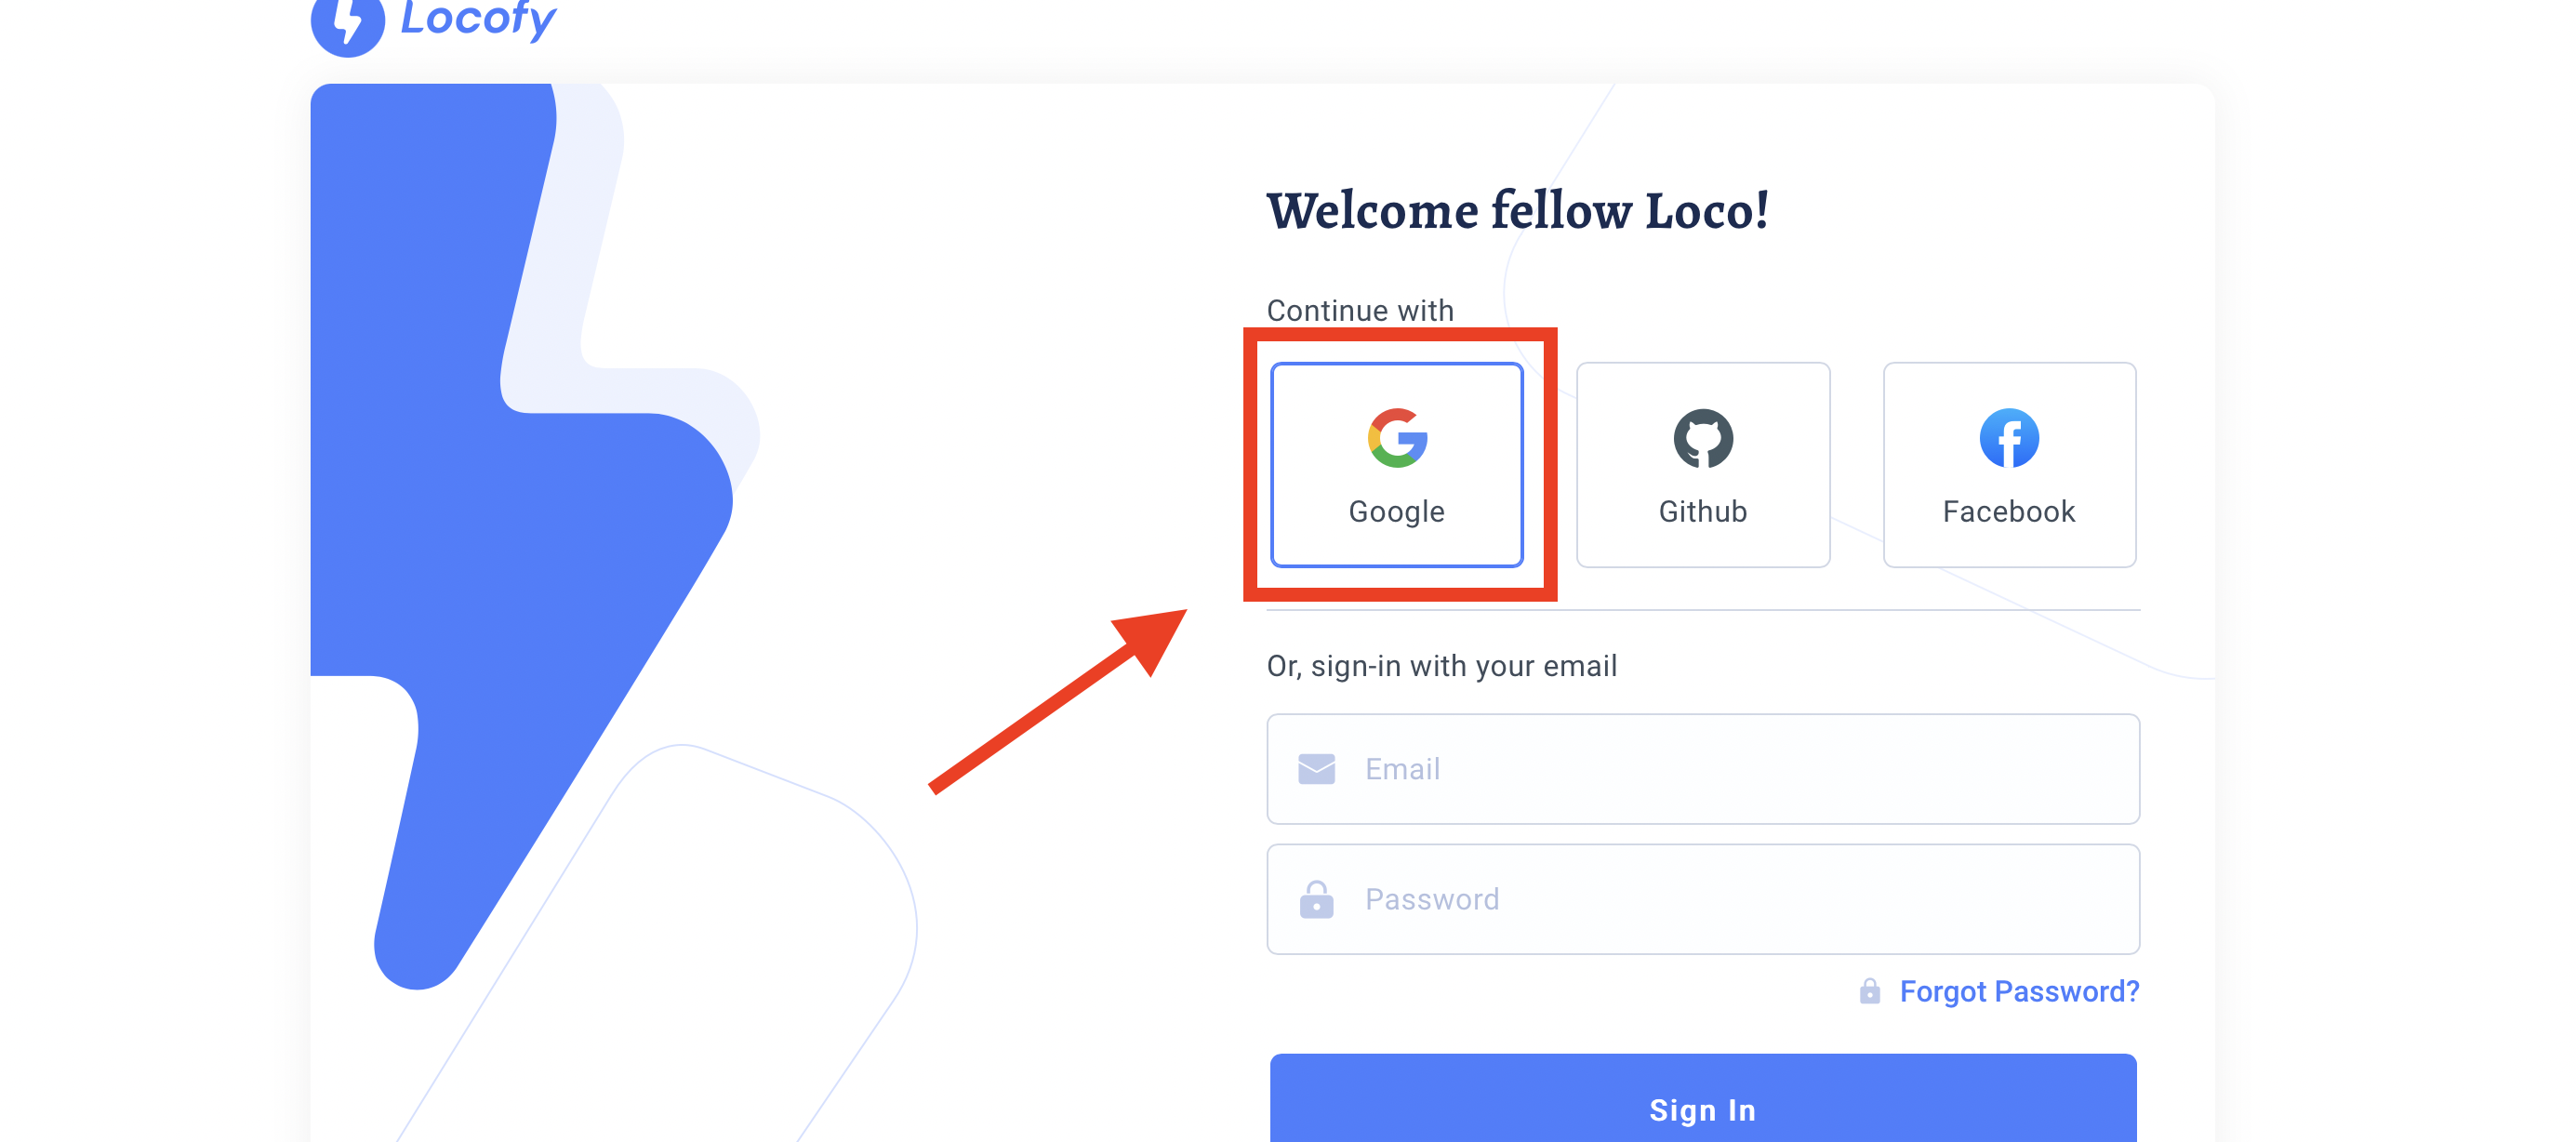
-
Once you’re finished, head back to your Figma design canvas. There, you’ll be welcomed by the Locofy AI interface, which will provide you with step-by-step guidance on refining and enhancing your design.
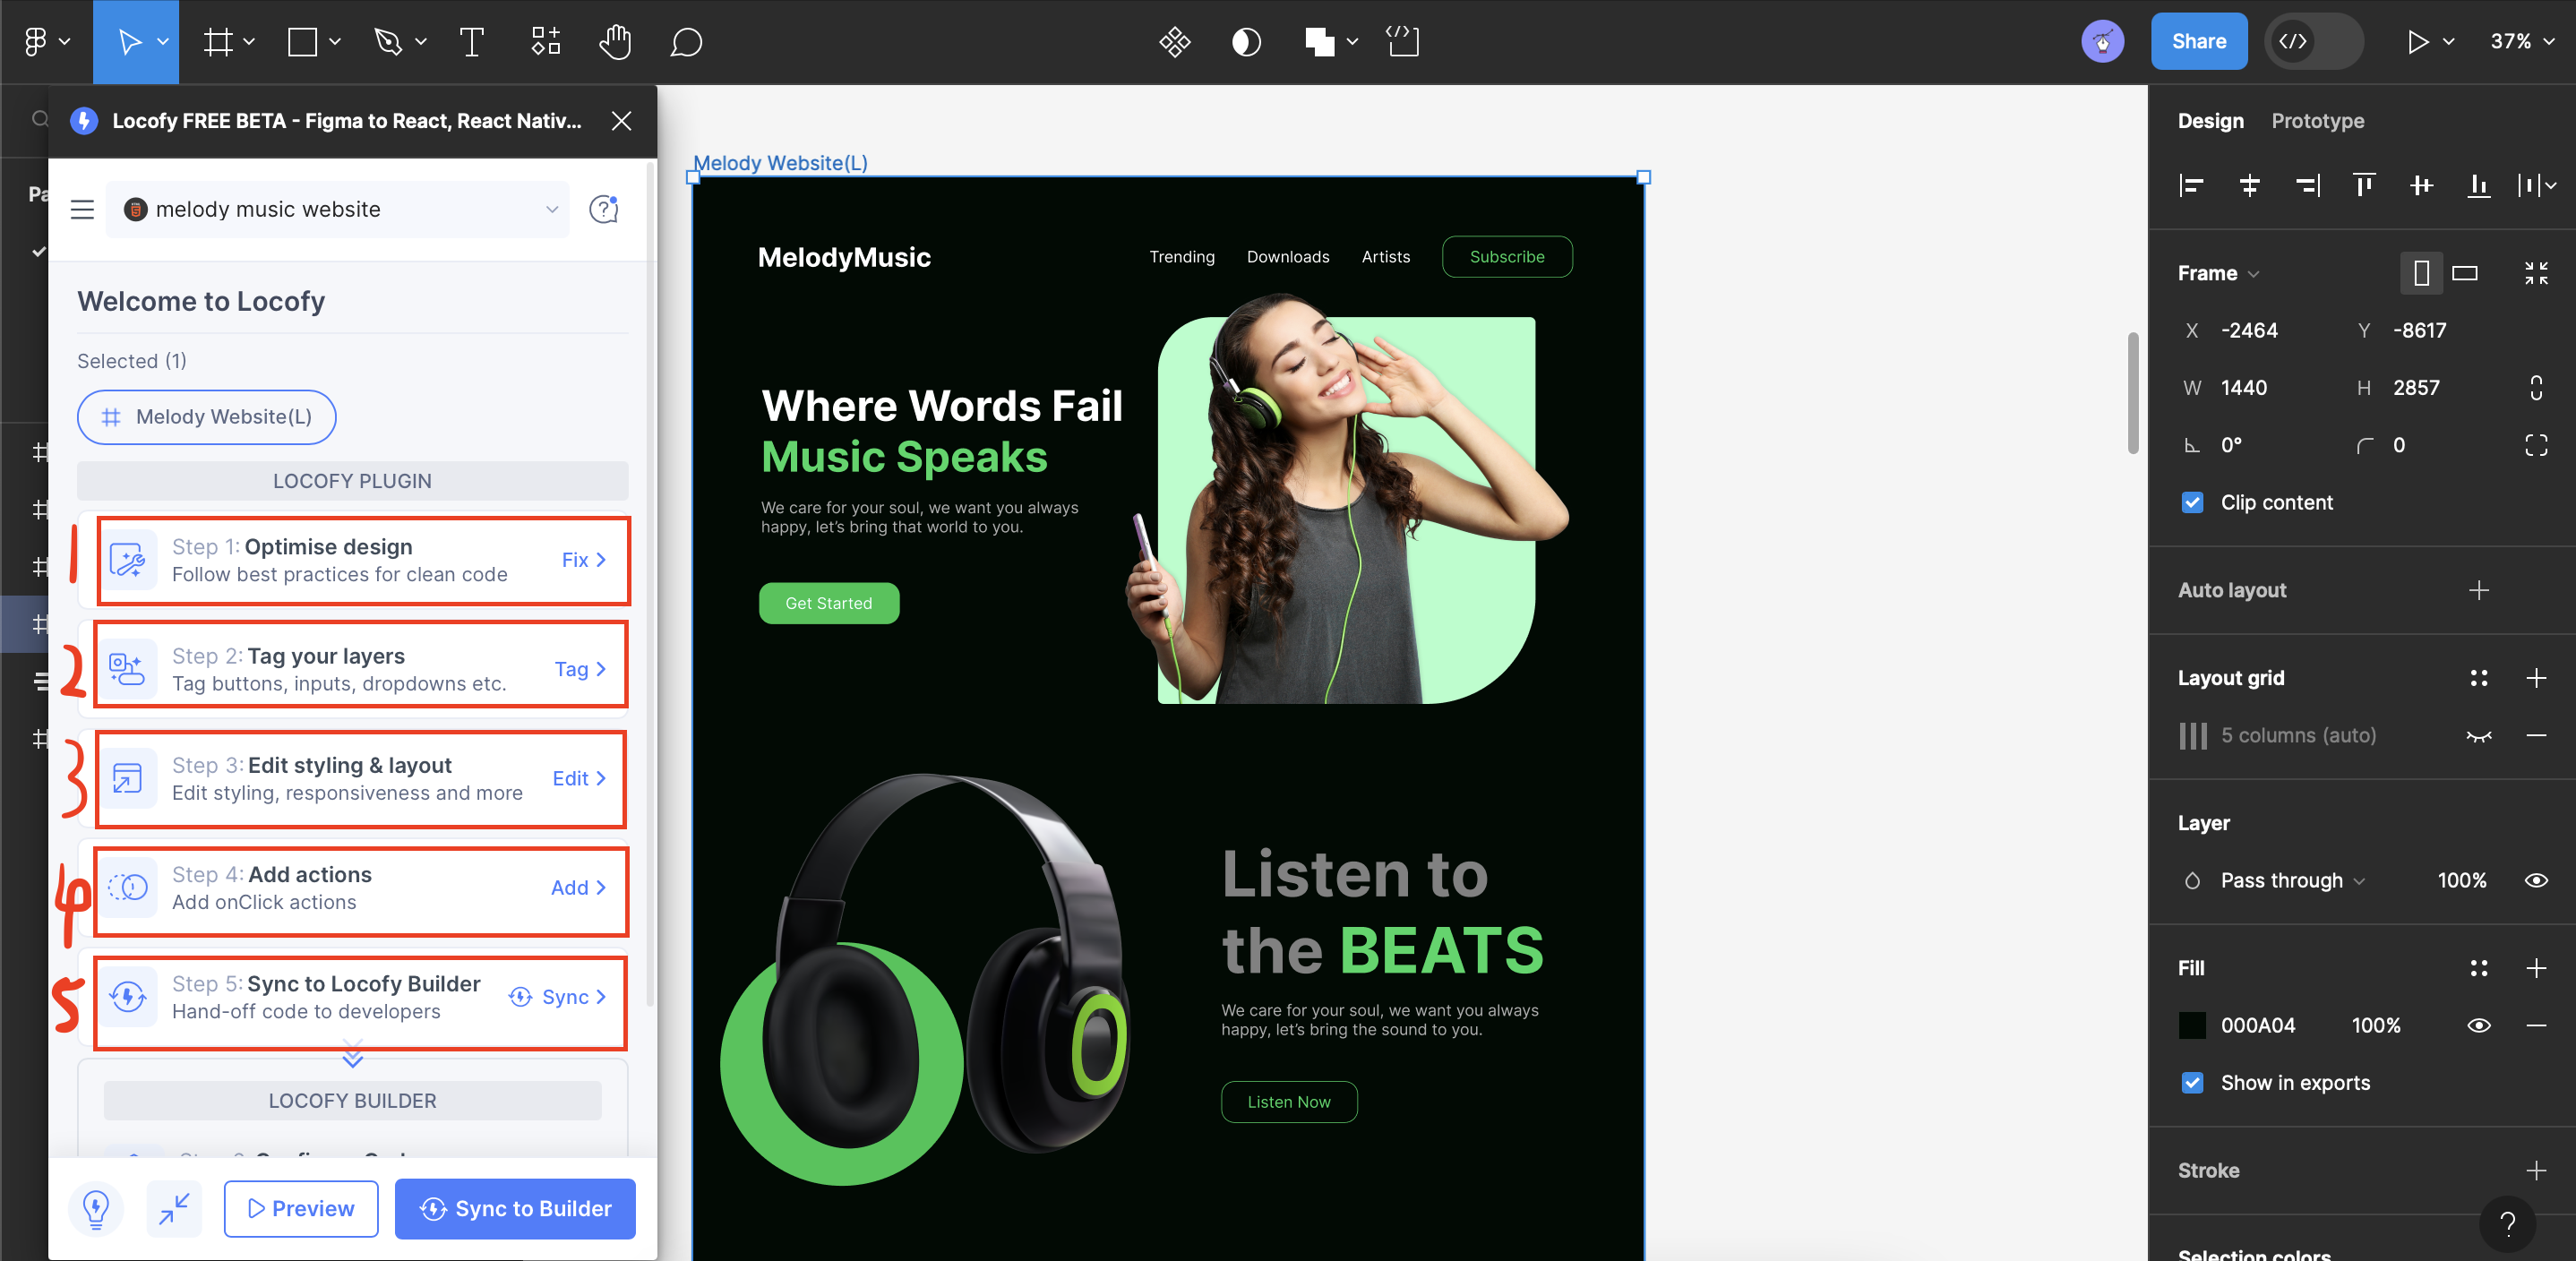
- Step 1: Optimize Design: In this initial step, you can streamline your design effortlessly. By simply opening and clicking on Fix All, LocoAI will automatically refine your design to adhere to best practices. This includes tasks like removing unnecessary groupings to achieve a cleaner and more polished design.
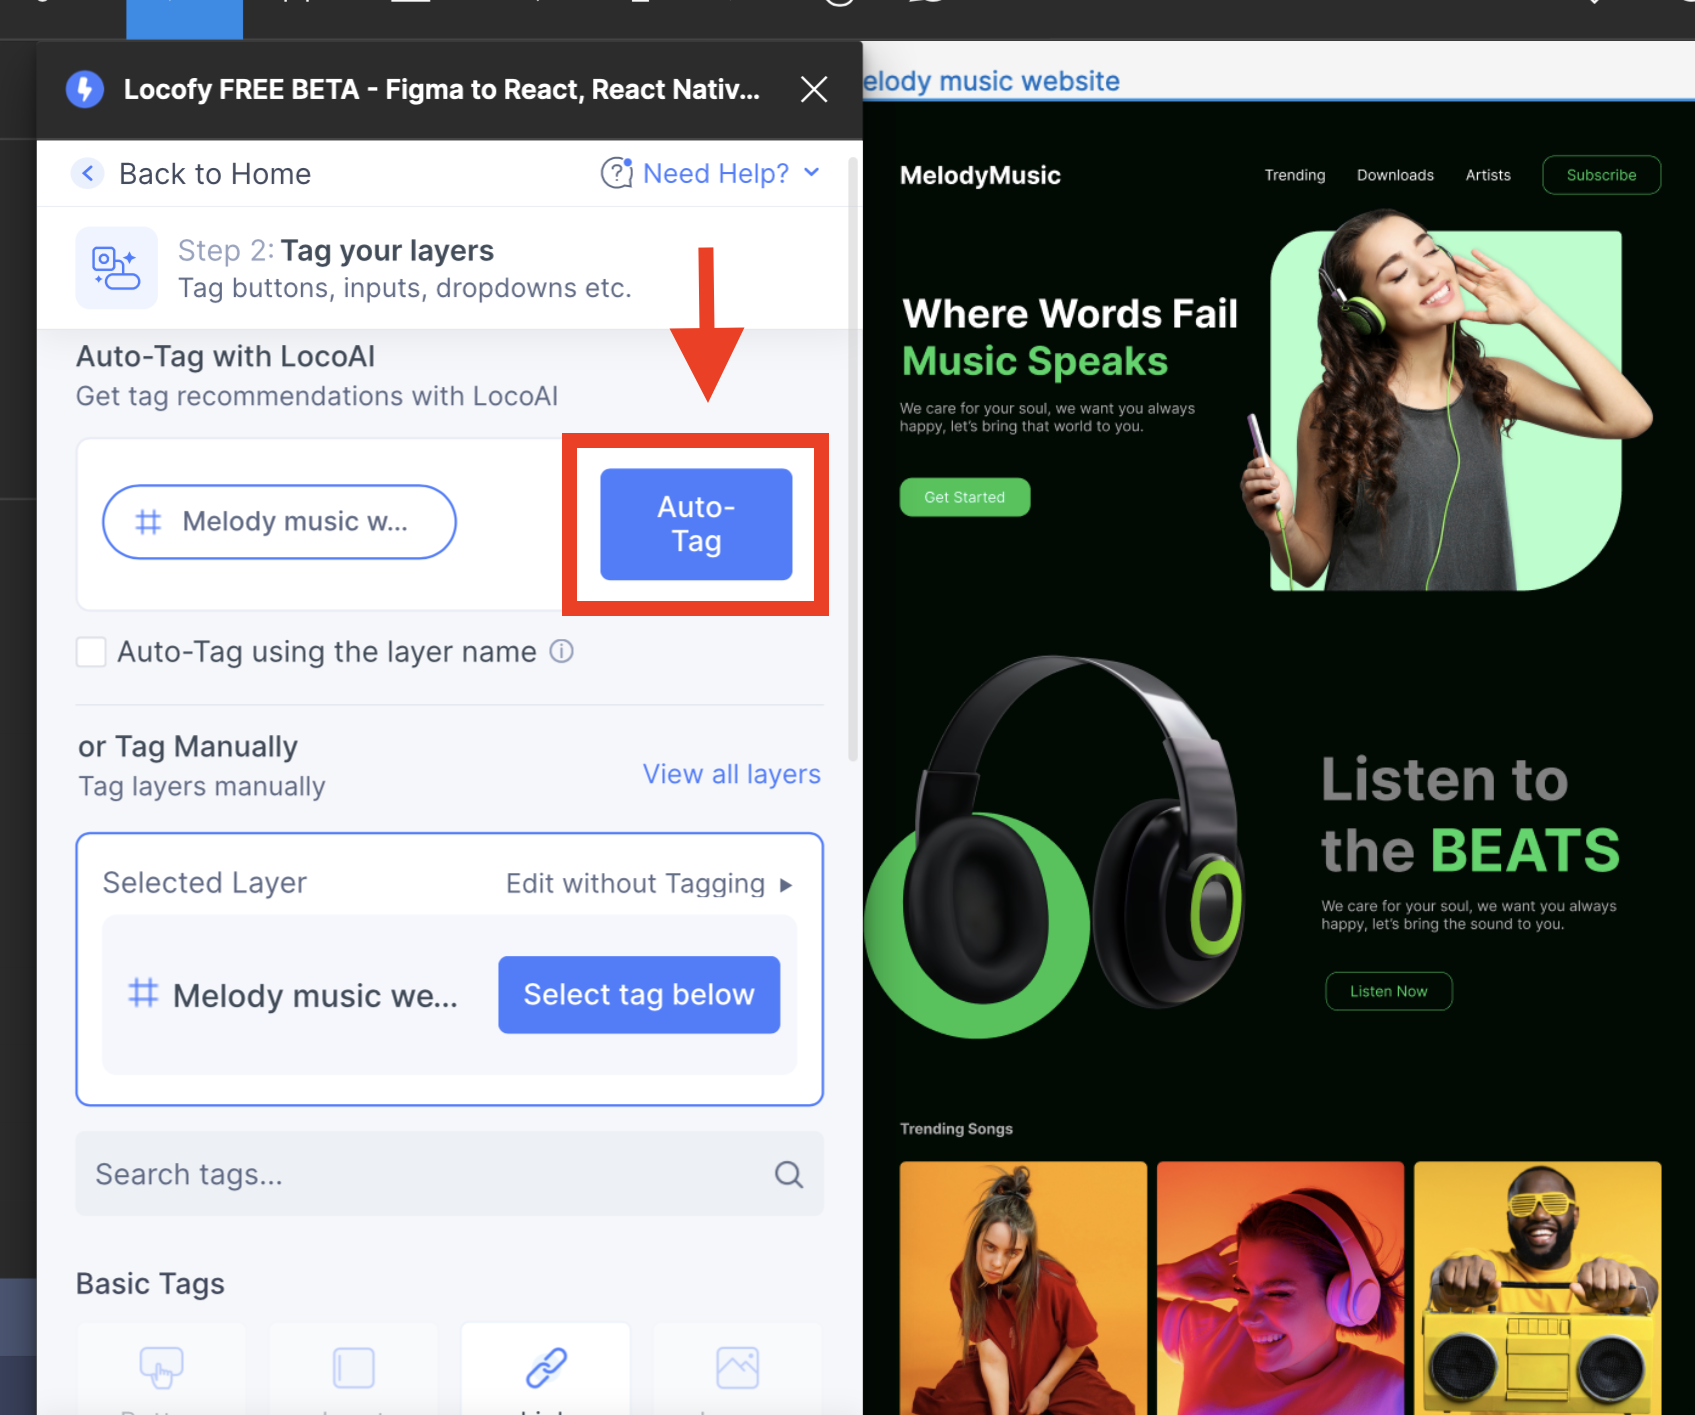
- Step 2: Tag Your Layer: In this stage, achieving well-organized design elements is a breeze. With a simple click on Auto-Tag, LocoAI automatically provides tag suggestions for your frames and layer elements. It intelligently categorizes elements into text tags, button/input tags, or container tags, ensuring a structured and organized design composition.
- Step 3: Edit Styling and Layout: This step is of utmost importance if your goal is to ensure that your design and website appear properly across a range of screen sizes once the code is generated. It entails manually adjusting images or font sizes by clicking through different screen sizes to guarantee a perfect fit.
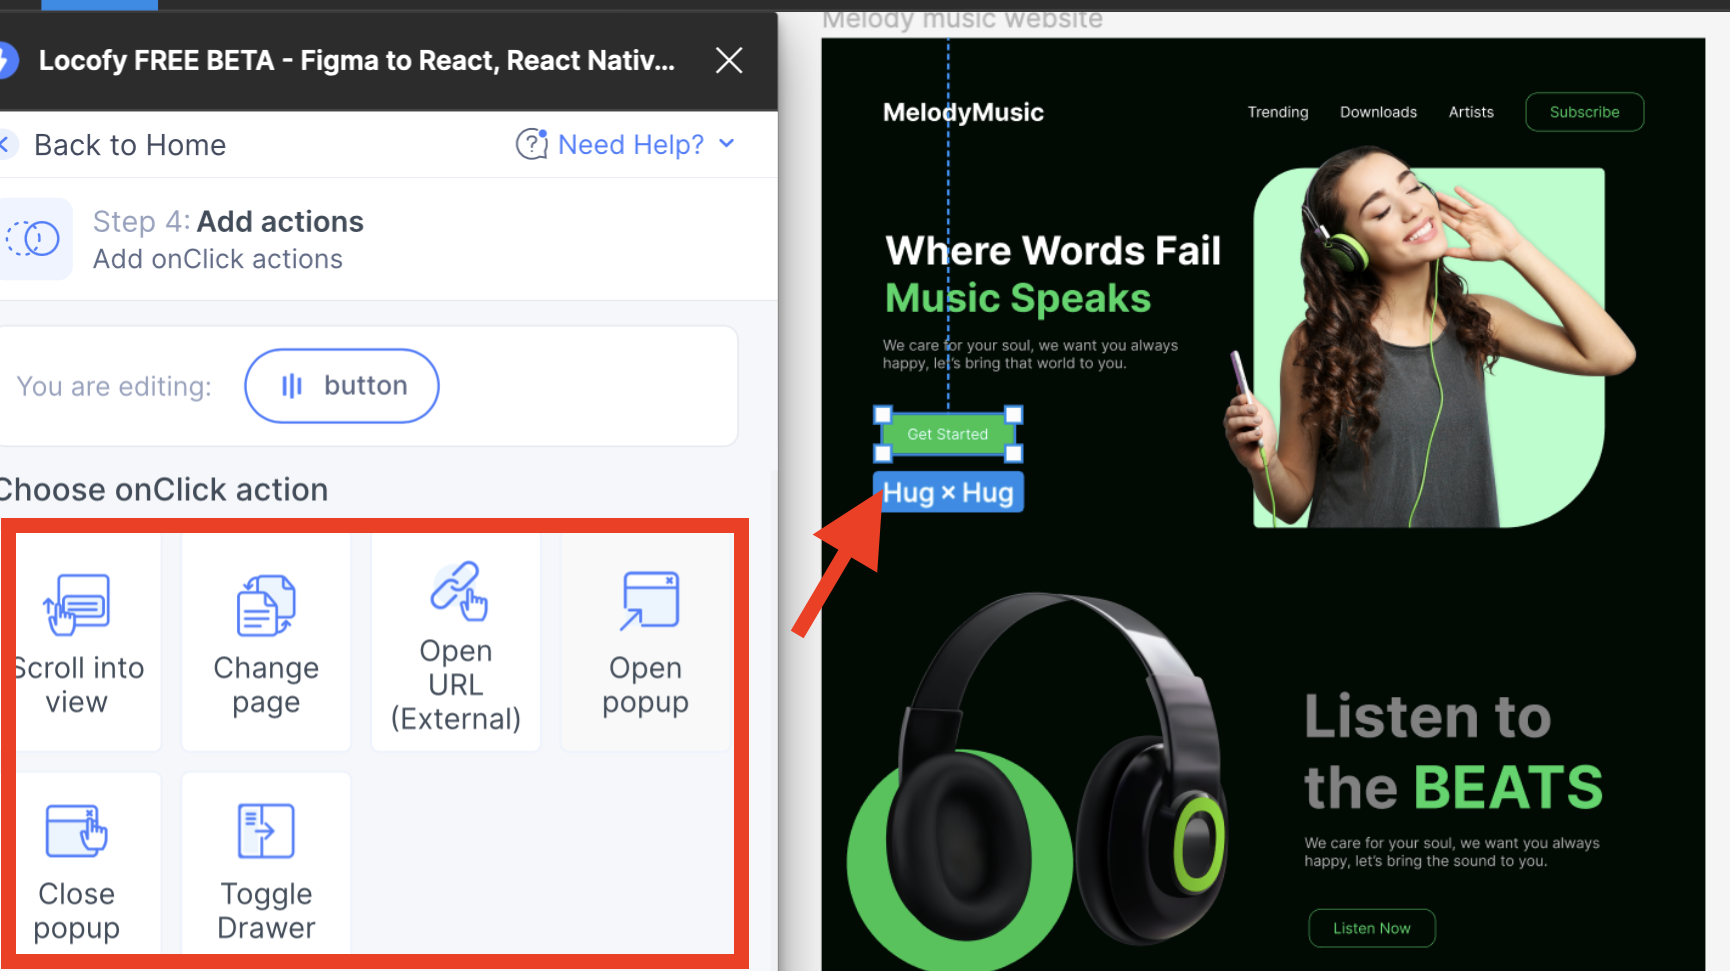
- Step 4: Add Actions: With LocoAI, you can seamlessly incorporate onclick actions into your design, such as opening pop-ups or transitioning to different pages on your website.
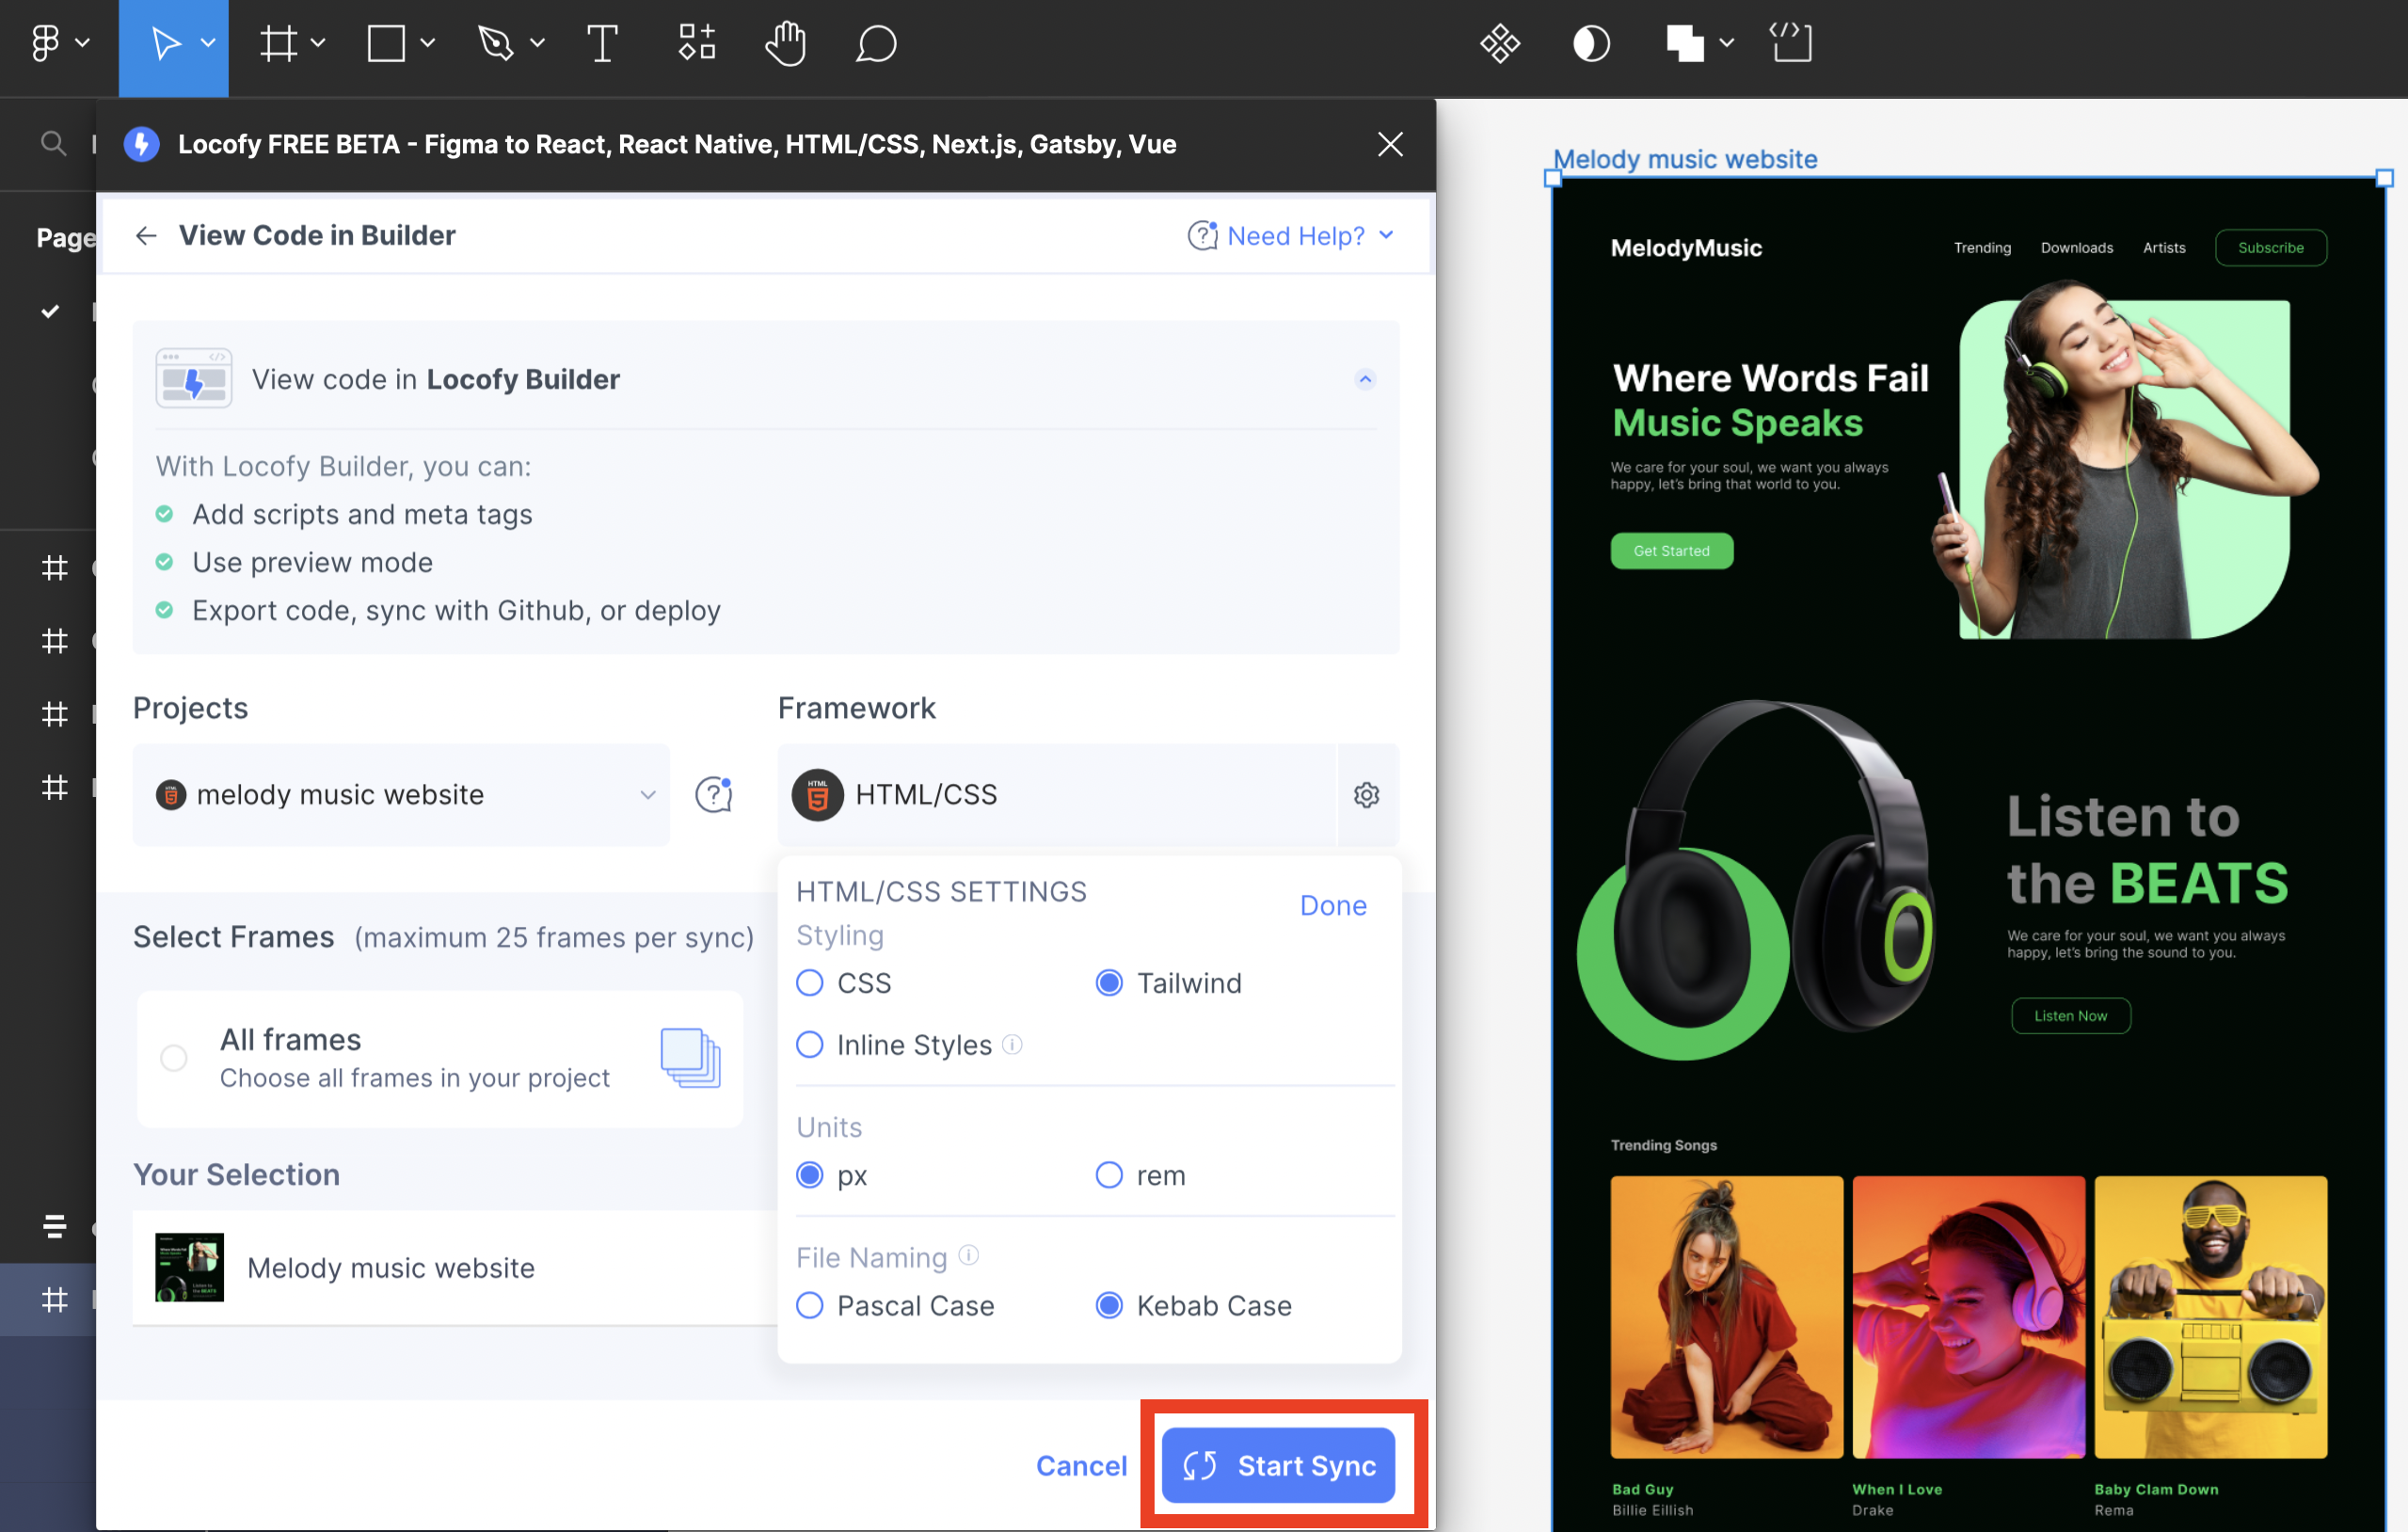
- Step 5: Synchronize with Locofy Builder: In this final step, LocoAI effortlessly merges with your finished design, working its magic to produce reusable lines of code in your chosen programming language. All that’s left for you to do is patiently await its completion.
Conversion to HTML, CSS, and Tailwind code
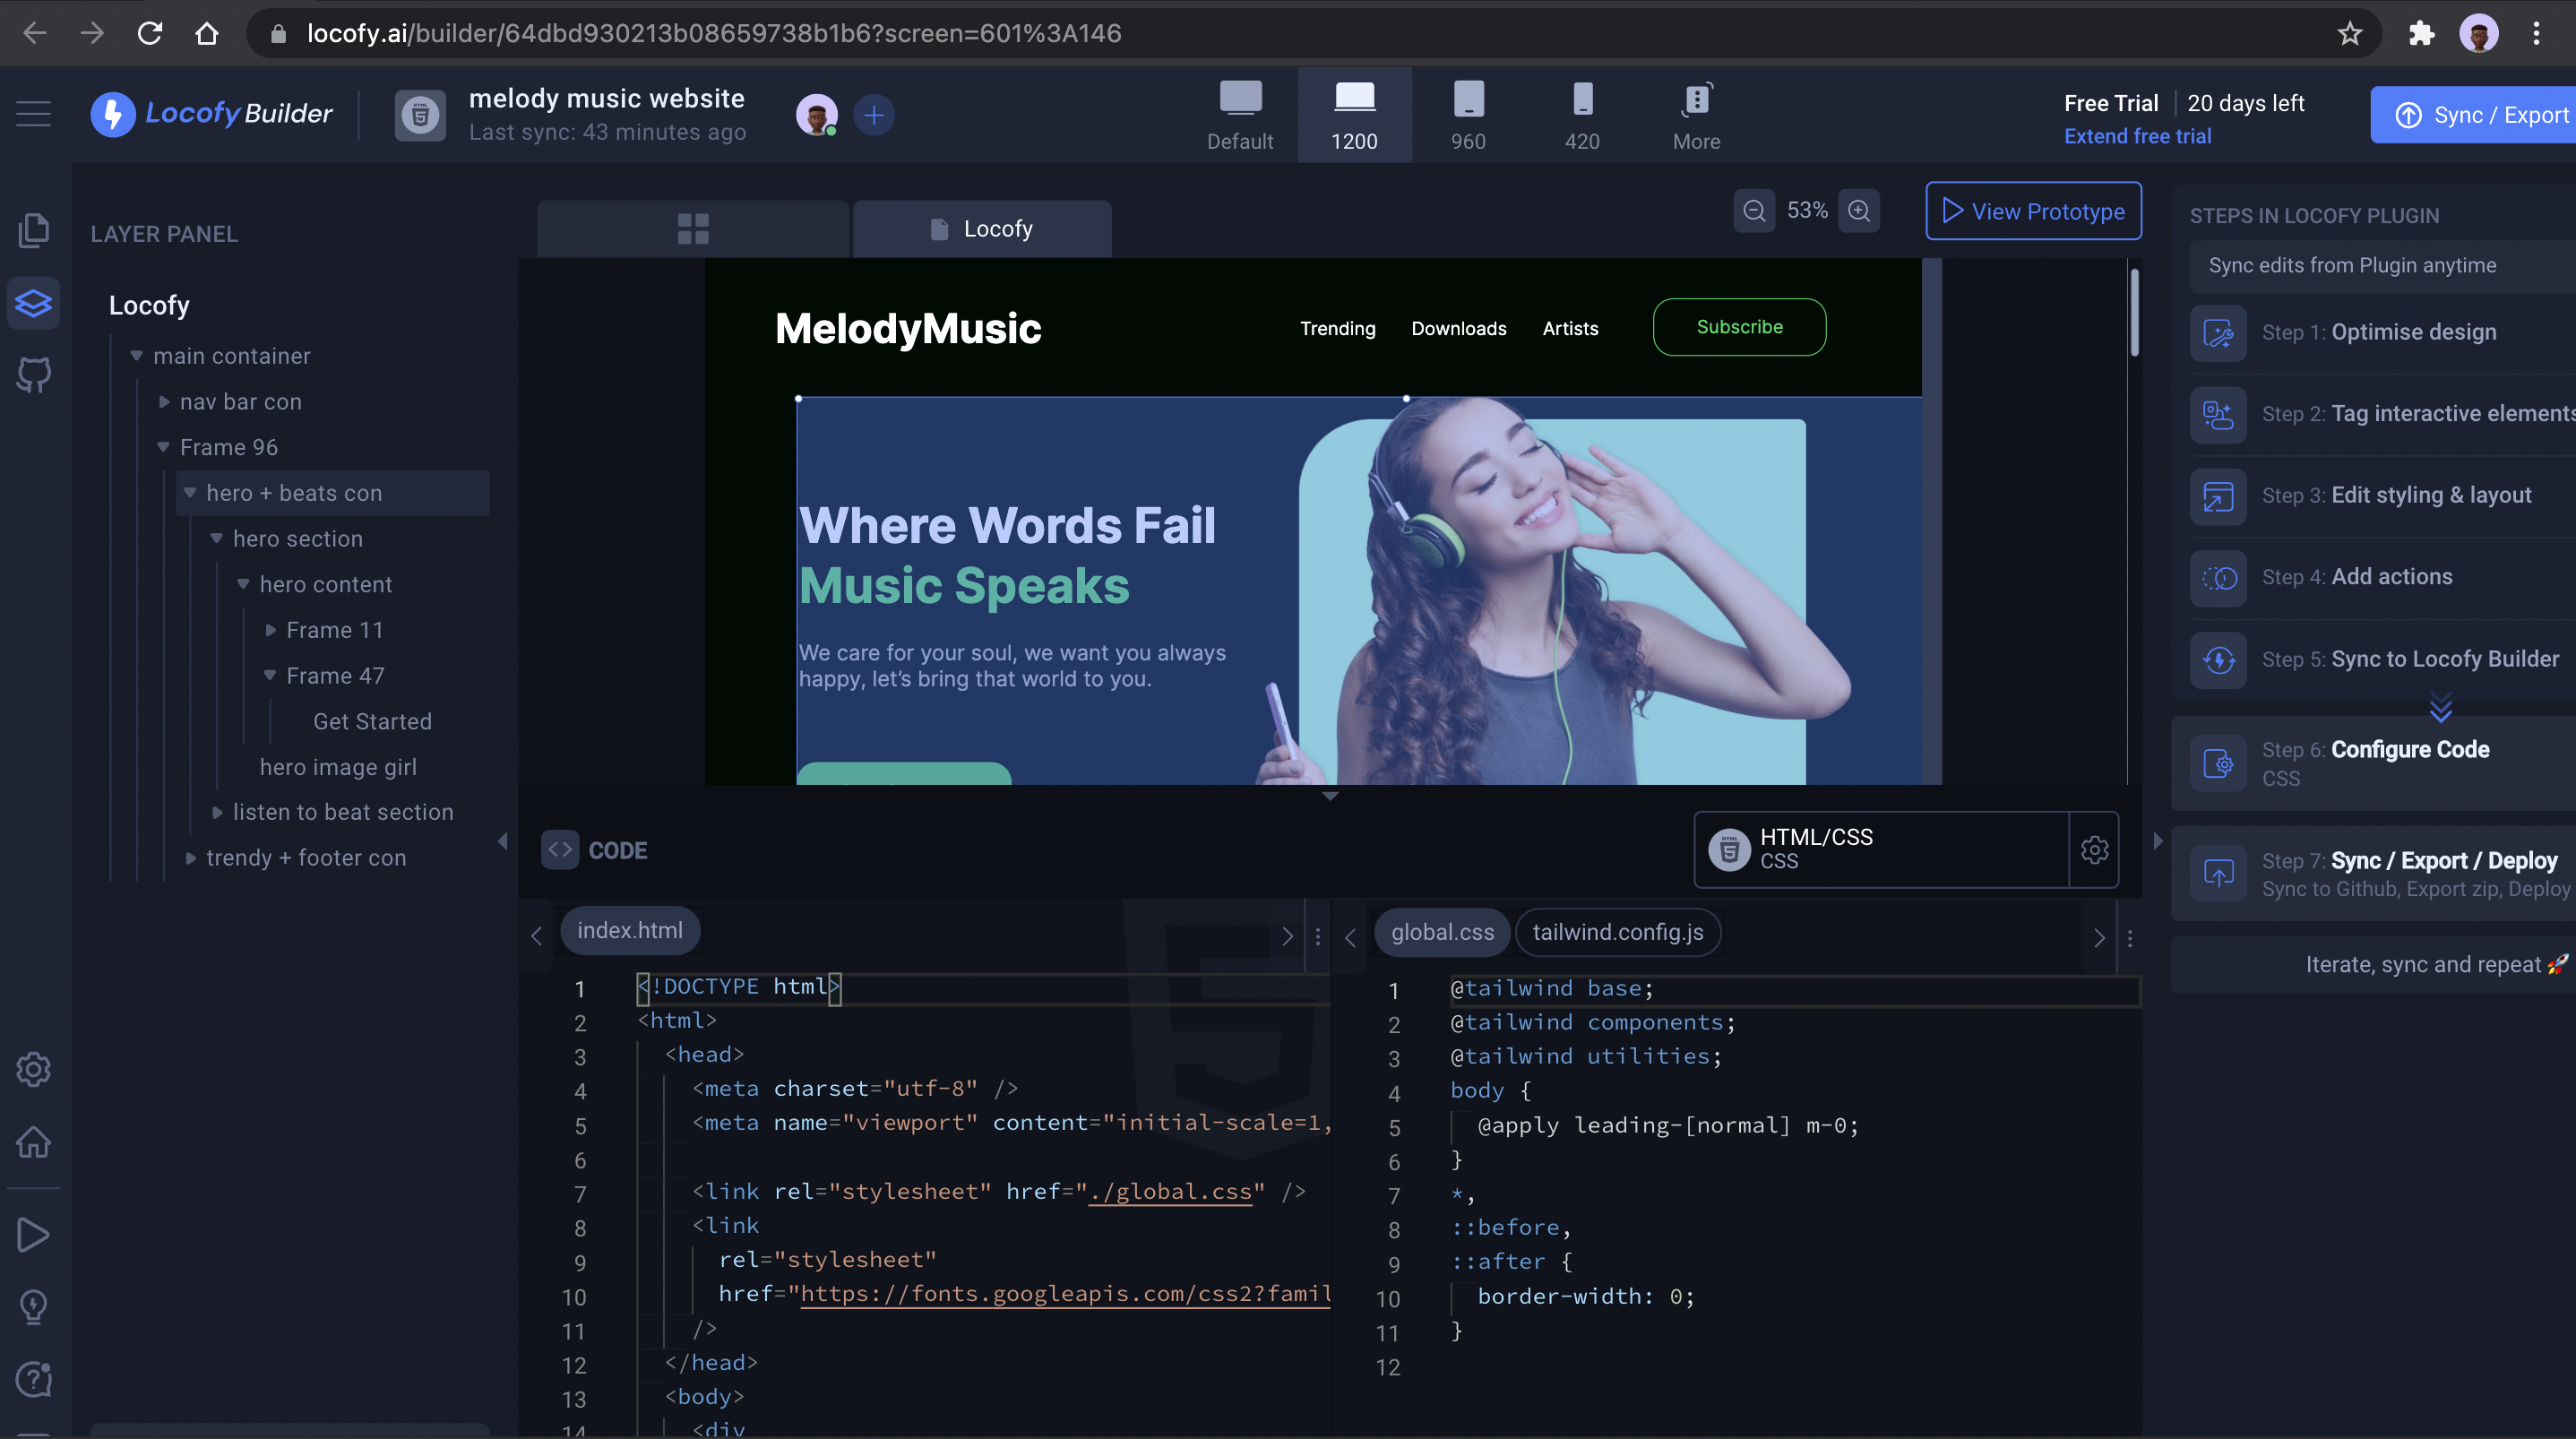
After syncing your finished design with LocoAI, click on view code in builder. You will be directed straight to the Locofy editor. Here, you can access your desired reusable code and make necessary adjustments.
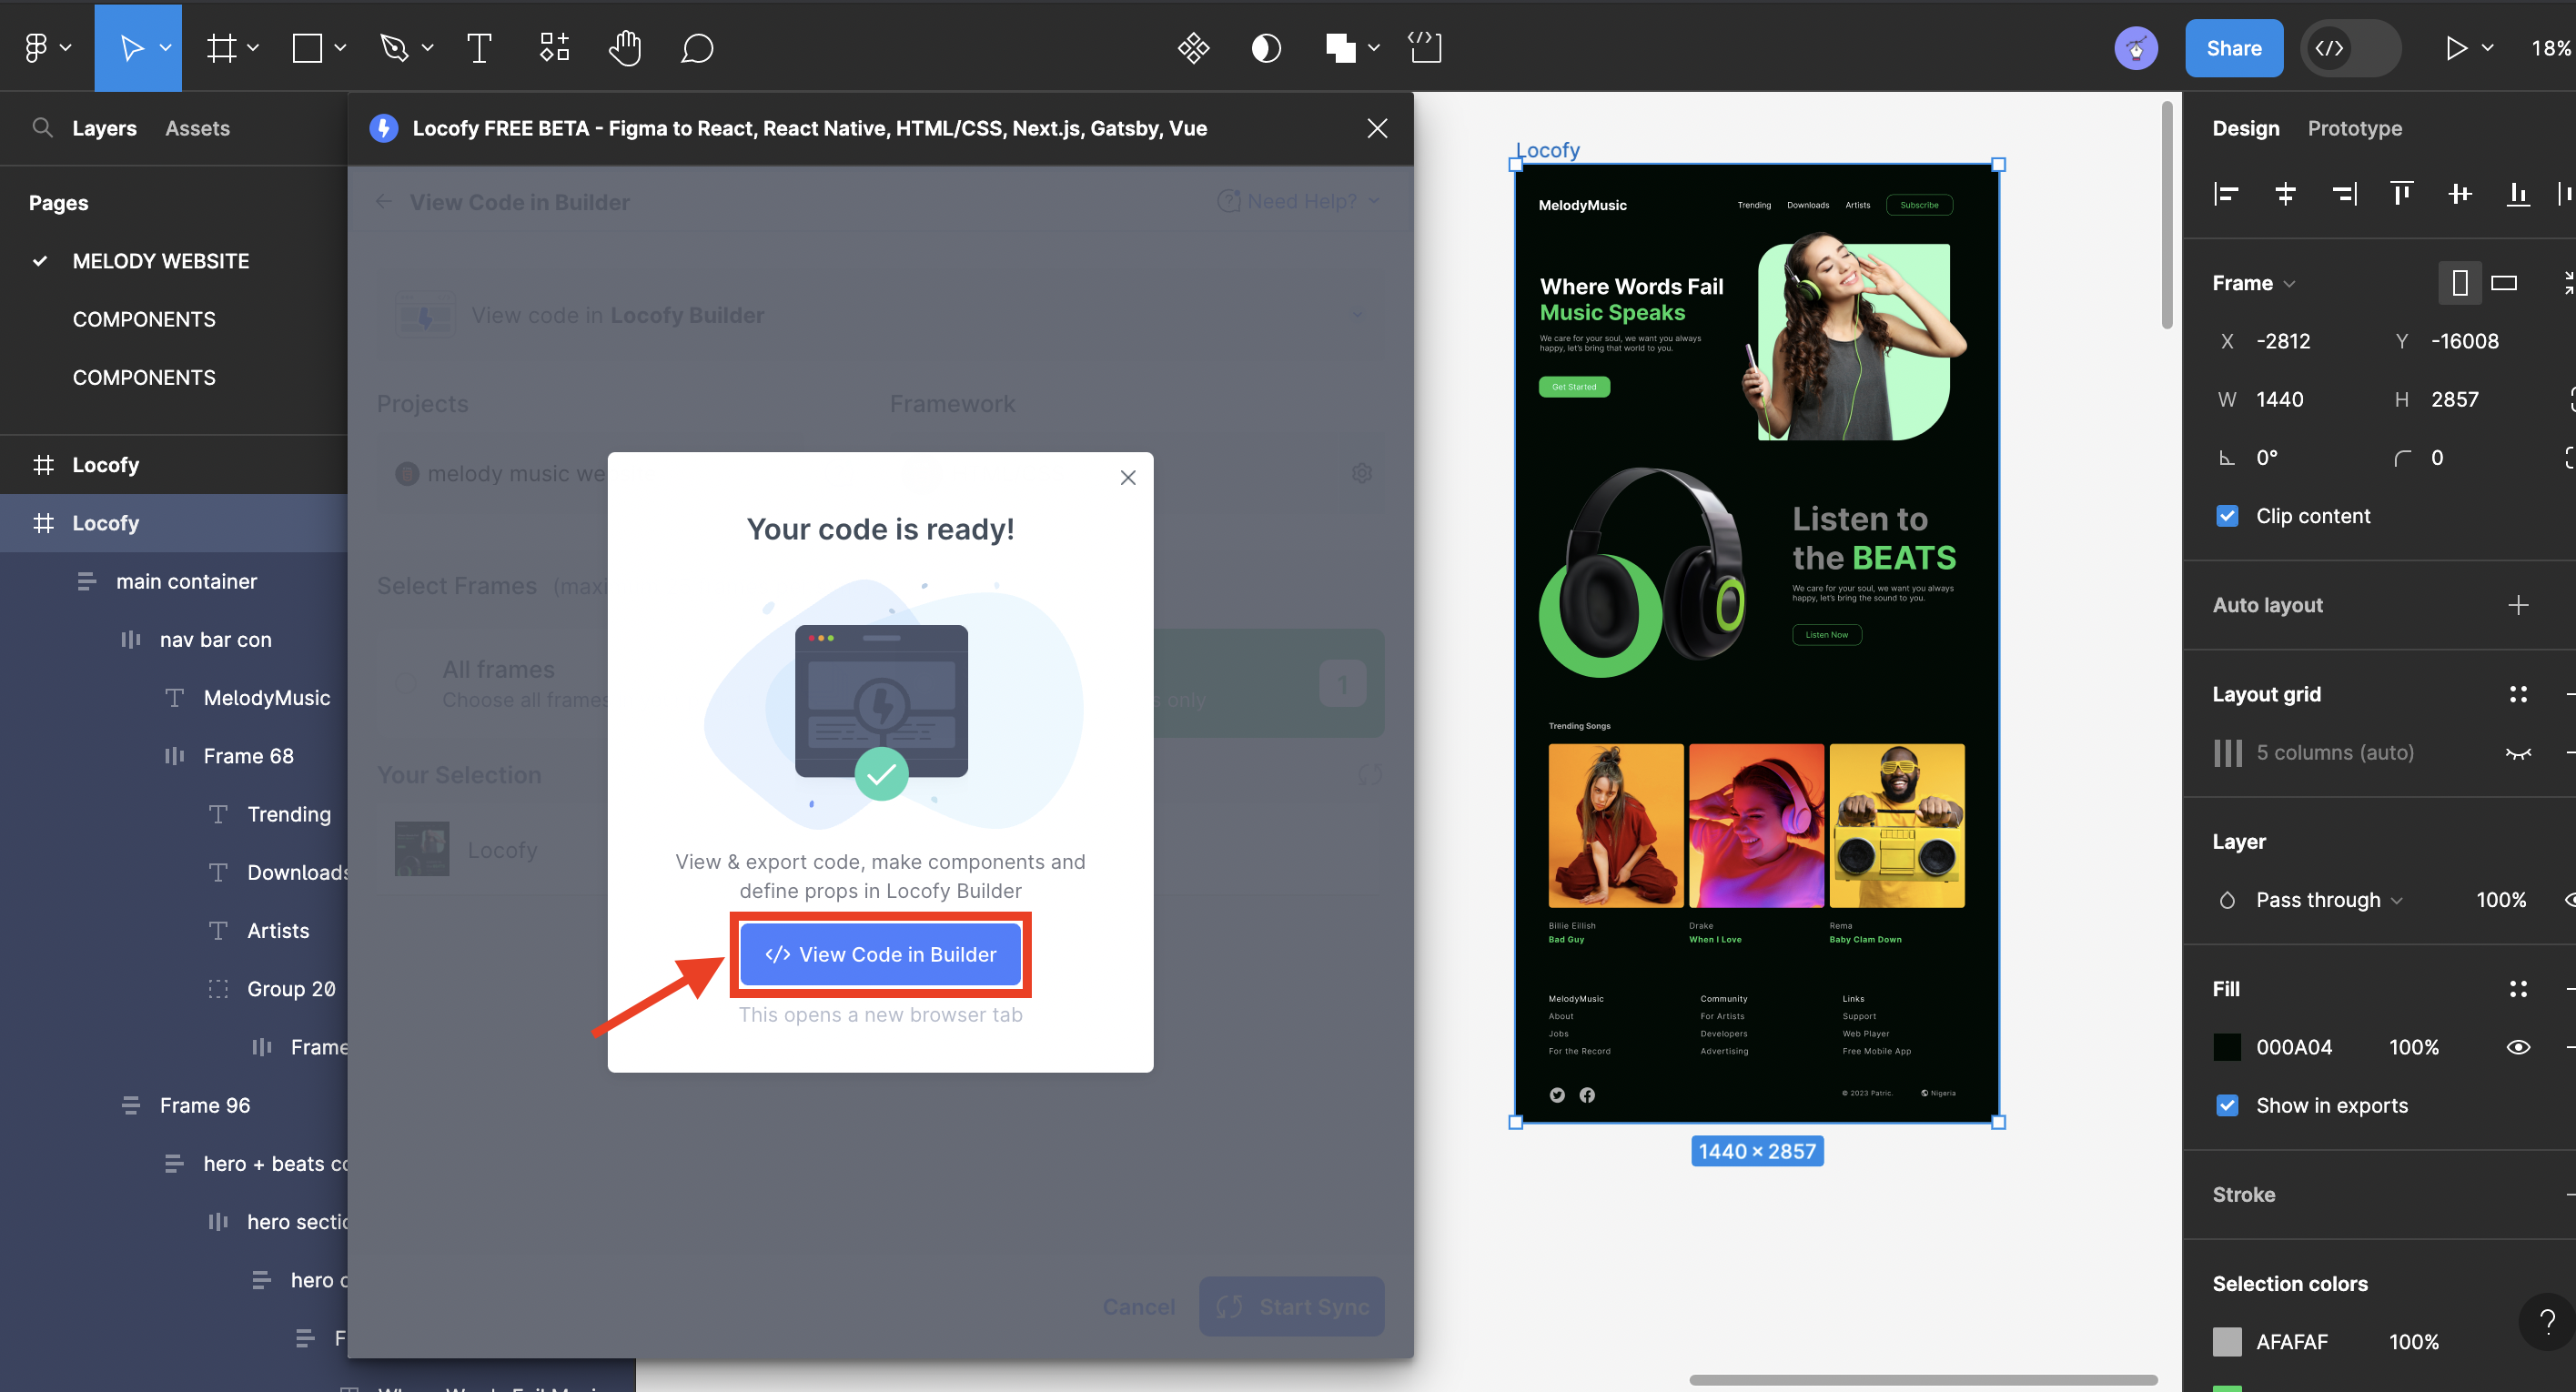
LocoAI builder interface, after which you must have clicked view code in builder:
<!DOCTYPE html>
<html>
<head>
  <meta charset="utf-8" />
  <meta name="viewport" content="initial-scale=1, width=device-width" />

  <link rel="stylesheet" href="./index.css" />
  <link rel="stylesheet" href="https://fonts.googleapis.com/css2?family=Inter:wght@400;700&display=swap" />
</head>

<body>
  <div class="locofy">
    <div class="main-container">
      <div class="nav-bar-con">
        <b class="melodymusic">MelodyMusic</b>
        <div class="trending-parent">
          <div class="trending">Trending</div>
          <div class="trending">Downloads</div>
          <div class="artists">Artists</div>
          <div class="frame-wrapper">
            <div class="subscribe-wrapper">
              <div class="subscribe">Subscribe</div>
            </div>
          </div>
        </div>
      </div>

    </div>
  </div>
</body>
</html>.melodymusic,
.trending {
position: relative;
}
.artists {
display: inline-block;
width: 74px;
flex-shrink: 0;
}
.artists,
.subscribe {
position: relative;
}
.subscribe-wrapper {
position: absolute;
top: 0;
left: 0;
border-radius: 20px;
border: 1px solid #1ed760;
overflow: hidden;
display: flex;
flex-direction: row;
padding: 17px 42px;
align-items: center;
justify-content: center;
}
.frame-wrapper {
position: relative;
width: 198px;
height: 63px;
color: #1ed760;
}
.main-container {
width: auto;
align-self: unset;
gap: 70px;
align-items: flex-start;
justify-content: flex-start;
}
.locofy {
width: 420px;
}<!DOCTYPE html>
<html>
<head>
<meta charset="utf-8" />
<meta name="viewport" content="initial-scale=1, width=device-width" />
<link rel="stylesheet" href="./global.css" />
<link rel="stylesheet" href="https://fonts.googleapis.com/css2?family=Inter:wght@400;700&display=swap" />
</head>
<body>
<div class="relative bg-gray-200 w-full h-[2857px] overflow-hidden text-left text-[40px] text-white font-inter sm:w-[420px]">
<div class="absolute top-[89px] left-[69px] flex flex-col items-start justify-start gap-[39px] sm:w-auto sm:[align-self:unset] sm:gap-[70px] sm:items-start sm:justify-start">
<div class="w-[1244px] flex flex-row items-center justify-start gap-[329px] lg:gap-[254px] md:w-[960px] md:gap-[373px] md:items-center md:justify-start sm:w-auto sm:[align-self:unset] sm:h-auto sm:flex-row sm:gap-[55px] sm:items-start sm:justify-start">
<b class="relative md:text-13xl sm:text-xl">MelodyMusic</b>
<div class="flex flex-row items-center justify-start gap-[48px] text-5xl lg:gap-[35px] sm:items-end sm:justify-start">
<div class="relative lg:text-lg md:hidden sm:hidden">Trending</div>
<div class="relative lg:text-lg md:hidden sm:hidden">Downloads</div>
<div class="relative inline-block w-[74px] shrink-0 lg:text-lg md:hidden sm:hidden">
Artists
</div>
</div>
</body>
</html>Here is the final result.
Conclusion
For developers, starting projects from scratch can prove to be a tedious and time-intensive endeavor. It encompasses the challenges of understanding the layouts of UI designs, deciding how best to recreate the structure in code, debugging lines of code, and enduring a plethora of tutorials, Figma-to-code plugins effectively bridge this gap, elevating productivity and enlisting advanced AI assistance to handle the fundamental aspects of your development tasks, thereby enabling you to channel your attention towards more intricate or complex elements.
To further enhance your experience, specific plugins such as Locofy and Teleport, as previously mentioned, can even manage the deployment and hosting of your completed website designs. By utilizing these plugins, you are not just increasing your efficiency but also acquiring innovative problem-solving skills.
Don’t hesitate to integrate these plugins into your next project; witness firsthand how they can drastically expedite and simplify your work, leaving you more time and energy to innovate and create.
Truly understand users experience
See every user interaction, feel every frustration and track all hesitations with OpenReplay — the open-source digital experience platform. It can be self-hosted in minutes, giving you complete control over your customer data.
Star on GitHub12k