Enhanced Development: Unveiling the Preact Playground


Developers can choose the best tools or libraries for their projects by understanding each one’s capabilities and use cases. This article aims to look at the tool and library ecosystem available to Preact developers. Regardless of your experience level, this exploration will equip you with the knowledge you need to maximize the ecosystem’s potential in your projects.

Discover how at OpenReplay.com.
Preact is a quick and lightweight JavaScript library for creating user interfaces. It is a less resource-intensive replacement for React that provides comparable functionality. It aims to be more effective and efficient in bundle size while maintaining the same developer experience as React. Preact’s ecosystem consists of numerous resources, libraries, and tools that extend its core functionality. These technologies help developers build dependable apps and speed up their development process.
Tools and libraries improve efficiency, include extra features, and provide solutions to common problems. Whether it’s routing or state management, adopting the right tools can help speed development and ensure high-quality code. Using these tools and libraries in their workflow allows developers to spend less time dealing with boilerplate code and more time creating new features. Insights, code samples, and practical advice will be presented to demonstrate how these tools and libraries can be successfully integrated into applications.
Understanding Preact
One of Preact’s standout features is its small footprint. The core library weighs only 4.6 kilobytes after minification and gzipping, hence its lightweight architecture. As a result, it is an excellent choice for applications where bundle size and performance are important factors.
Furthermore, it tries to remain compatible with the React API, allowing developers already familiar with the latter to quickly migrate to using the former. Its small size results from optimizations and trade-offs; hence, features and behavior may differ slightly from React’s.
Key Features and Benefits
Now, let’s examine some of the benefits of adopting Preact for your next project. Understanding these benefits will reveal how Preact improves development workflows and provides better user experiences.
-
Because of its small size, Preact loads and renders more smoothly, particularly on low-powered devices or with bad network connections. It eliminates the overhead associated with maintaining components and states to achieve this performance boost.
-
Despite its smaller size, Preact strives to remain compatible with the React API. It can thus be used as a drop-in replacement for React in various circumstances because most React code can be transferred to it with little difficulty or modification.
Popular Libraries
In this section, we’ll look at a few crucial libraries that enhance developers’ development experiences. These libraries improve functionality, provide solutions to common problems, and assist developers in creating reliable applications faster.
Despite the vast number of libraries and tools available for React, not all are instantly compatible with Preact due to implementation or API differences. Nonetheless, many React libraries offer compatible alternatives that provide similar functionality. We’ll look at the advantages of utilizing these alternatives over their React counterparts, focusing on any performance gains.
Preact Router
Modeled after React Router, this declarative routing library offers a simple way of generating and sustaining application routes to move from one view or page to another. To simplify declarative routing, this library enables route definitions using the <Route> component. With nested <Router> components, hierarchical routing is also achieved. It also allows access to query strings and route parameters, as well as making control over navigation events and route updates easier.
import { h, render } from 'preact';
import { Router, Route } from 'preact-router';

const Home = () => <h1>Welcome to the Home page!</h1>;
const About = () => <h1>About Us</h1>;

const App = () => (
  <Router>
    <Route path="/" component={Home} />
    <Route path="/about" component={About} />
  </Router>
);

render(<App />, document.getElementById('root'));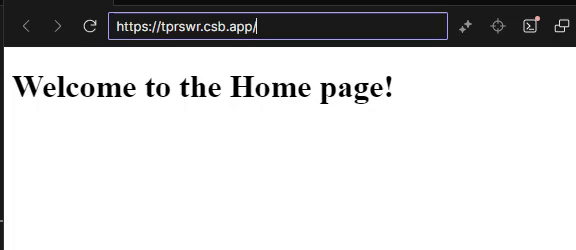
This code demonstrates how to use the Preact Router library for declarative routing. It defines two components, Home and About, representing different pages. These components are rendered based on the URL path specified in the Route components.
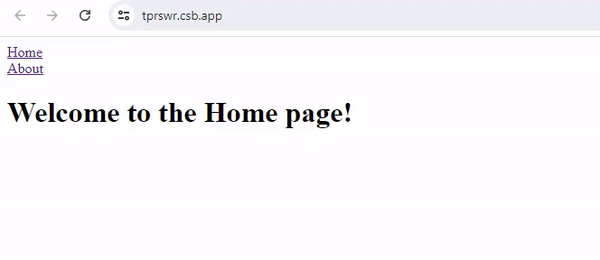
To navigate between routes in your application, you can use the Link component provided by the Router. Here’s an example:
Firstly, you set up your directory so it looks similar to this:
src/
├── components/
│   ├── Home.js
│   └── About.js
├── App.js
├── index.js
In the Home.js file, insert the following code:
import { h } from 'preact';

const Home = () => (
  <div>
    <h1>Welcome to the Home page!</h1>
  </div>
);

export default Home;
While in the About.js file, we add this:
import { h } from 'preact';

const About = () => (
  <div>
    <h1>About Us</h1>
  </div>
);

export default About;
In the App.js file, we add the code below:
import { h } from 'preact';
import { Router, Link } from 'preact-router';
import Home from './Home'; //Assuming its in the same directory
import About from './About';//Assuming its in the same directory

const App = () => (
  <div>
    <nav>
      <Link href="/">Home</Link>
      <Link href="/about">About</Link>
    </nav>
    <Router>
      <Home path="/" />
      <About path="/about" />
    </Router>
  </div>
);

export default App;
Finally, in the Index.js file we render the application:
import { h, render } from 'preact';
import App from './App';

render(<App />, document.getElementById('root'));
The Link component generates an anchor <a> tag with the correct href attribute, allowing users to navigate to different routes. Clicking on the ‘Home’ or ‘About’ links takes you to different pages.
Preact Context API
For managing global state in applications, this is a lightweight substitute for React’s Context API. It enables data sharing across components without requiring props to be manually passed through intermediate components. By establishing context providers using the createContext function, this API also makes global state management easier. The useContext hook allows components to retrieve context values; provider components are used to update context values.
import { h, createContext, useContext } from 'preact/hooks';
const ThemeContext = createContext('light');
const ThemeProvider = ({ children }) => {
const [theme, setTheme] = useState('light');
return (
<ThemeContext.Provider value={{ theme, setTheme }}>
{children}
</ThemeContext.Provider>
);
};
const ThemeToggler = () => {
const { theme, setTheme } = useContext(ThemeContext);
return (
<button onClick={() => setTheme(theme === 'light' ? 'dark' : 'light')}>
Toggle Theme
</button>
);
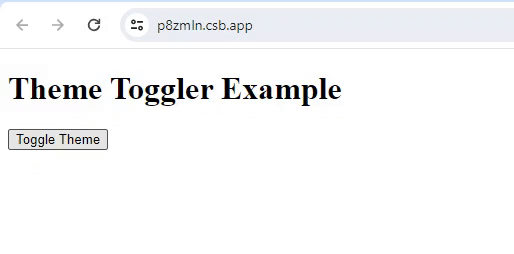
};This code showcases the use of the Preact Context API to manage the global state in an application. It defines a context provider, ThemeProvider, to manage the theme state and a context consumer, ThemeToggler, to toggle the theme.
This API also allows for more advanced use cases like nested providers, default values, and dynamic context values. You can nest multiple providers to manage different contexts in different areas of your application. Contexts can have default values utilized when a component does not have a matching Provider further up in the hierarchy. Additionally, you can dynamically alter context values to reflect changes in your application’s state. Below is an example of using nested providers:
import { h, render } from 'preact';
import { useState, useContext } from 'preact/hooks';
import { createContext } from 'preact';
const ThemeContext = createContext('light');
const AuthContext = createContext({ authenticated: false });
const App = () => {
const [theme, setTheme] = useState('light');
const [user, setUser] = useState({ name: '', authenticated: false });
const login = (name) => {
setUser({ name, authenticated: true });
setTheme('dark'); // Change theme on login
};
const logout = () => {
setUser({ name: '', authenticated: false });
setTheme('light'); // Change theme on logout
};
return (
<ThemeContext.Provider value={{ theme, setTheme }}>
<AuthContext.Provider value={{ user, login, logout }}>
<div style={{ background: theme === 'dark' ? '#333' : '#FFF', color: theme === 'dark' ? '#FFF' : '#000', minHeight: '100vh', padding: '20px' }}>
<ThemeToggler />
<UserProfile />
</div>
</AuthContext.Provider>
</ThemeContext.Provider>
);
};
const ThemeToggler = () => {
const { theme, setTheme } = useContext(ThemeContext);
const toggleTheme = () => {
setTheme(theme === 'light' ? 'dark' : 'light');
};
return (
<button onClick={toggleTheme}>
Toggle Theme
</button>
);
};
const UserProfile = () => {
const { user, login, logout } = useContext(AuthContext);
const handleLogin = () => {
const name = prompt('Enter your name:');
if (name) {
login(name);
}
};
return (
<div>
{user.authenticated ? (
<div>
<p>Welcome, {user.name}!</p>
<button onClick={logout}>Logout</button>
</div>
) : (
<div>
<p>Please log in.</p>
<button onClick={handleLogin}>Login</button>
</div>
)}
</div>
);
};
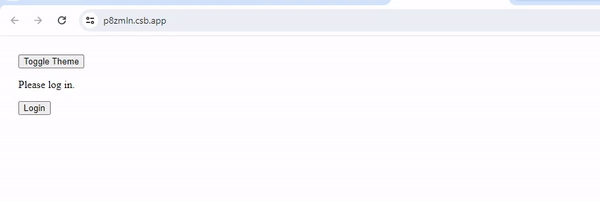
render(<App />, document.getElementById('root'));The code above consists of the App component that provides ThemeContext and AuthContext to its children. The Themetoggler component toggles between light and dark themes, while the UserProfile manages login and logout. Now, when the user logs in, the background of the page changes from light to dark. This effectively shows how context is used to transfer and manage states between the components.
Preact-Compat
This compatibility layer makes React applications work more smoothly with Preact. It mirrors the React API, allowing developers to switch to Preact without changing their applications. Using this library, developers may utilize the nature of Preact while maintaining the React development experience. This is particularly beneficial for projects that have heavily invested in React but aim to reduce bundle size and enhance performance. With this package, React components, such as classes and functional components, seamlessly interact with Preact. It fully supports React lifecycle methods like componentDidMount, componentDidUpdate, and componentWillUnmount. Additionally, it accommodates React hooks for managing state and effects within components. Furthermore, it leverages JSX, just like React, enabling developers to create components in familiar syntax.
// Counter.jsx
import React, { useState } from 'react';
const Counter = () => {
const [count, setCount] = useState(0);
const increment = () => {
setCount(count + 1);
};
const decrement = () => {
setCount(count - 1);
};
return (
<div>
<h2>Counter</h2>
<p>Count: {count}</p>
<button onClick={increment}>Increment</button>
<button onClick={decrement}>Decrement</button>
</div>
);
};
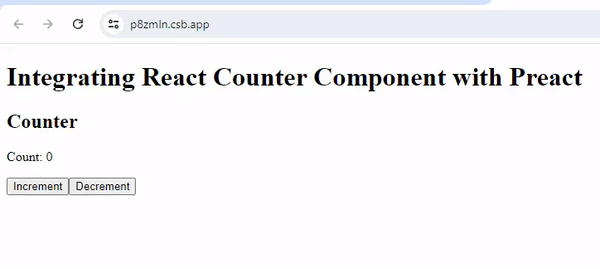
export default Counter;The above is a simple React counter component, and now let’s see how to integrate this into a Preact application.
import { h, render } from 'preact';
import Counter from './Counter'; // Assuming Counter.jsx is in the same directory

const App = () => (
  <div>
    <h1>Integrating React Counter Component with Preact</h1>
    <Counter />
  </div>
);

render(<App />, document.getElementById('root'));
Firstly, the Counter component is imported, then within the App
component, the counter is then rendered, showcasing the smooth integration of the react component into a preact application.
Preact-CLI
This tool is a command-line interface designed to create and oversee Preact projects. It provides a set of functions for generating production bundles, running development servers, initiating projects, and performing other tasks. The aim is to simplify the development process by automating activities and establishing a well-organized project framework. By using this software, developers can easily establish a development environment utilizing contemporary JavaScript capabilities and effectively develop Preact applications for platforms such as web browsers and Progressive Web Applications (PWAs).
# Create a new project
preact create my-app

# Navigate to project directory
cd my-app

# Start development server
preact watch

# Build production bundle
preact build
This example demonstrates the usage of Preact-CLI commands for project management. It showcases commands to create a new project, navigate to the project directory, start a development server, and build a production bundle.
Tools for Preact Development
Let’s explore some tools that simplify application development. These technologies enhance efficiency, automate tasks, boost performance, and elevate the developer experience.
nwb
nwb is a toolkit designed to simplify the development process by streamlining project setup, configuration, and workflow. It offers Preact and its components a fast development environment. It uses promises for configurations, auto-prefixes CSS, and default polyfills. Webpack, builders are optimized and tested in an environment provided by nwb, which makes use of JavaScript and JSX features. You can create a new application with package.json, webpack.config.js or babel.config.js files whose directory structure has been predefined using only one command. One thing that stands out about nwb is that it comes with its own built-in development server. This server supports hot module reloading so that you can see modifications to your components right away without refreshing them yourself. This speeds up the whole development process since it results in a quick feedback loop. To install this tool using npm, do the following:
npm install -g nwbBelow is a list of useful commands in the nwb environment
# Create a new Preact project named "my-preact-app" using NWB
nwb new preact my-preact-app

# Navigate to the project directory
cd my-preact-app

# Start the development server provided by NWB
nwb serve

# Generate an optimized production build of the  application using NWB
nwb build

# Run tests for the application using NWB's testing capabilities
nwb test

# Install additional dependencies for the project using npm
# Replace <dependency-name> with the actual name of the dependency
npm install --save <dependency-name>
The nwb.config.js file allows customization of webpack and babel configurations for Preact applications built with nwb.
// nwb.config.js

module.exports = {
  webpack: {
    // Custom webpack configurations
  },
  babel: {
    // Custom babel configurations
  },
};
It lets developers define unique settings for babel, like presets and plugins, and for webpack, like loaders and plugins. This allows them to customize the build process to meet specific needs or add support for language features and optimizations.
Rewired
You can customize the webpack config(s) of the create-react-app with Rewired instead of having to fork or delete the react-scripts package. By freeing them from the ‘no-config’ constraint, you can integrate plugins, loaders, and every other feature supported by the create-react-app command. This way, developers can create webpack configurations that suit their needs perfectly without necessarily conforming to the standard settings.
Use the following npm command to install rewired:
npm install react-app-rewired --save-devTo make changes to config files, you can create config-overrides.js within the root directory.
* config-overrides.js */

module.exports = function override(config, env) {
  //Modify webpack config here
  return config;
}
Inside the config-overrides.js file, you can modify the webpack configuration as needed. For example, you can add loaders, plugins, or adjust existing configurations.
const path = require('path');

module.exports = function override(config, env) {
  // Add support for SVG as React components
  config.module.rules.push({
    test: /\.svg$/,
    use: ['@svgr/webpack'],
  });

  // Adjust output directory
  config.output.path = path.join(__dirname, 'custom-build');

  return config;
};
“Flip” the current npm calls for start, build, and test of Preact-scripts. You can flip any script that isn’t needed for ejection.
/* package.json */

  "scripts": {
-   "start": "react-scripts start",
+   "start": "react-app-rewired start",
-   "build": "react-scripts build",
+   "build": "react-app-rewired build",
-   "test": "react-scripts test --env=jsdom",
+   "test": "react-app-rewired test --env=jsdom",
    "eject": "react-scripts eject"
}
The code snippet above modifies the scripts section within the package.json file of a React project. It replaces the default React script commands with those provided by react-app-rewired. This change allows for customization of the build process without ejecting from Create React App.
ESLint
ESLint is a static code analysis tool for identifying and reporting patterns in JavaScript code. It aids in maintaining code quality, finding and reducing errors, and enforcing styles in source code. ESLint is an important part of any Preact project because it enforces code standards and best practices. In this way, you have a very rich set of features in ESLint to lint (identify potential errors) your JavaScript code through checks of potential bugs, stylistic inconsistencies, and possible syntactical problems in your program. It also provides developers with the ability to configure rules and settings according to their needs so that the linting can be done according to a project. ESLint also includes real-time feedback and automatic fixes to ensure that code quality can be maintained all through the process, thus fully integrating with build tools and development environments.
// .eslintrc.js
module.exports = {
  extends: ['eslint:recommended', 'plugin:preact/recommended'],
  plugins: ['preact'],
  rules: {
    // Add custom rules and configurations as needed
  },
};
This code is for setting a configuration file .eslintrc.js, in which rules, plugins, and configurations are set up. By extending ESLint, in this example, with its recommended plugins, plugin:preact/recommended, a developer can even make necessary modifications in the rules and configurations according to project requirements.
Preact-CLI-postcss
This tool seamlessly integrates PostCSS support into Preact CLI projects, so you can leverage its power for CSS transformation tasks at will. On the other hand,PostCSS itself is a flexible tool with plugins for autoprefixing, nesting, and future CSS syntax support. Giving you more control, this tool will switch off the default postcss config and provide the postcss.config.js file. Install using the following command:
npm install preact-cli-postcssIt adds your properties to preact.config.js as follows:
const preactCliPostCSS = require('preact-cli-postcss');

export default function (config, env, helpers) {
	preactCliPostCSS(config, helpers);
}
The above JavaScript code imports preact-cli-postcss. The file exports a function with parameters from Preact CLI: config, env, and helpers. Inside the function, it calls preactCliPostCSS with config and helpers, setting up processing through PostCSS for CSS files during a project build. All the setup above enhances the capabilities for working with CSS within the project.
Extensions and Enhancements
In this part, we shall take a look at extensions and enhancements that improve the development environment. These tools increase your productivity, simplify your workflows, and give you new features.
Preact DevTools
This is a browser extension that enhances the debugging and development experience for Preact applications. With the help of its insights into component hierarchy, state, and properties, developers may more efficiently inspect and debug applications. This extension works with widely used browsers, including Edge, Firefox, and Chrome. It easily integrates into the supported browsers’ developer tools, offering a special tab just for viewing components.
Preact Snippets
This is a collection of code snippets to make the developer more productive, providing quick shortcuts for common and even somewhat boilerplate code. This repository contains code snippets for creating hooks, components, and other Preact-related functionality. This works for all code editors and IDEs with snippet support, such as Visual Studio Code, Sublime Text, and Atom. They’re provided as extensions and can be found and installed directly from the extensions marketplace of your code editor.
Best Practices and Tips
Now, let us see how one can use the Preact ecosystem to create productive applications.
-
The first priority should be making use of libraries compatible with Preact, as this will help with full performance.
-
Develop modularly to organize the code into reusable parts. Make use of Preact’s component-based architecture to create applications that are modular and maintainable.
-
Use the concepts of tree shaking and code splitting to make JavaScript bundles smaller.
-
Add server-side rendering to improve performance and SEO. Use a framework like
Next.jsor a module likePreact-SSRto fully and easily implement SSR.
Conclusion
As we have seen from the article, the Preact ecosystem consists of a variety of tools, libraries, extensions, and enhancements that help to increase productivity, streamline workflows, and also make debugging and testing easier.
So, whether you’re a seasoned developer or new to JavaScript frameworks, understanding the Preact ecosystem will greatly improve your development experience as it helps you create productive and reliable applications.
Gain Debugging Superpowers
Unleash the power of session replay to reproduce bugs, track slowdowns and uncover frustrations in your app. Get complete visibility into your frontend with OpenReplay — the most advanced open-source session replay tool for developers. Check our GitHub repo and join the thousands of developers in our community.