
Visual Studio Code (VSCode) is a popular code editor that can be used as an alternative to Postman for API testing. With the right extensions, developers can easily create, manage, and test APIs within the VSCode environment. Using Thunder Client with VSCode for API testing can streamline the development workflow and save time by using a single tool for coding and testing, as this article will show.

Discover how at OpenReplay.com.
This article aims to provide developers with an alternative to Postman for API testing using VSCode. We will introduce the Thunder Client extension for VSCode, explaining how it works, its advantages over Postman, and how to install and set it up. This article will also cover making requests and previewing responses using Thunder Client.
Thunder Client is an intuitive and lightweight GUI-based REST (REpresentational State Transfer) API testing tool available as an extension in VSCode. The term “API testing tool” refers to an application or plugin designed to allow interactions and communication of different systems, using a set of rules for establishing such connections, regarded as an API. ,Thunder Client has gained much popularity in recent years compared to other API testers like Postman.
Using Thunder Client for API testing will provide you with the following benefits:
-
Lightweight: Thunder Client is a lightweight add-on that can be installed on your VSCode editor and facilitate execution and testing of APIs right from the editor, eliminating the need to download a separate tool or having to switch between the coding environment and a web-based API testing platform
-
Simple and Intuitive UI: Thunder Client provides a simplistic interface, making it easily navigable to users without needing a manual. The interface clearly outlines the sections of the API tester, which is divided into activity history, collections, and environment variables on the left-hand side. The request definition window and the response properties section are on the right-hand side. Overall, the interface of the Thunder Client can be said to be:
- The main Thunder Client interface is subdivided into logical sections, that clearly state their functions and make it easy to find the features you need.
- The icons and buttons are clear and concise.
- The text sizes are consistent and easy to read.
- The colors are used consistently throughout the UI and can be themed to your taste using VSCode themes.
- The overall design is clean and uncluttered, making it user-friendly.
-
Collections and environment variables support: Like Postman, Thunder Client API tester also provides a collection feature, allowing similar requests to be organized and grouped, making for better accessibility and sharing with others. Thunder Client collection feature also provides functionality to import collections from other API testers such as Postman, making it easy to migrate your API collections into the Thunder Client workspace. Thunder Client also provides a window for creating and managing environment variables for your API testing needs. Environment variables in API testing refer to dynamic variables that provide configuration details for test scripts. These variables can be created and re-used in different scenarios, removing the need to redeclare them for each use. Examples of environment variables include authentication credentials, request headers and test parameters.
-
Git Synchronization: Thunder Client’s Git Integration feature enables users to save and sync API request information with a Git repository. This feature enhances data sharing among teams and serves as a backup solution.
-
Remarkable Speed: Thunder Client’s API tester ensures swift processing of extensive or intricate API requests, delivering prompt responses. Importantly, this high-performance API tester remains lightweight, seamlessly integrating with your VSCode application and computer without causing performance slowdowns.
-
CI/CD integration support: Thunder Client can also be integrated into CI/CD (Continuous Integration and Continuous Delivery) pipelines to allow for automated testing of APIs before their deployment. This automation saves time and effort spent on manual testing and increases your APIs’ reliability.
-
Handle Offline requests with local storage: Thunder Client can store request data in local storage, which allows you to work offline. Thunder Client will first check if the request data is stored in local storage when you make a request. Thunder Client will use the cached data to send the request if the data is available. If the request data is not stored in local storage, Thunder Client will send the request to the API and store the response data in local storage. With Thunder Client, the duration of cached data can be set for a specific time or to cache data indefinitely. When you send a request while offline, Thunder Client will use the cached data to send the request. If the cached data is not current, Thunder Client will show a warning message. Once there is an internet connection again, Thunder Client will automatically update the cached data.
-
Supports syntax highlighting and VSCode themes: With the Thunder Client as an add-on extension in VSCode, it also adopts your preset VSCode themes to give it a more visually appealing look.
-
Scriptless API testing: Unlike Postman and other API testers, where users need to repeat boilerplate codes to do basic API tests, Thunder Client provides an intuitive and simple GUI where dropdowns can be used to define requests without the need to write test scripts.
How does Thunder Client work?
Thunder Client sends HTTP requests to an API and then displays the response data in a human-readable format. It does this using the Fetch API, a native JavaScript API for making HTTP requests.
The Thunder Client extension allows you to perform the following simple tasks:
- Make HTTP requests and send them to an API.
- Display the response information in a readable form.
- Develop and control request collections.
- In your requests, use environment variables.
- Use a GUI-based interface to test API responses.
- Trace requests.
- Support GraphQL.
Examples of specific things you can do with Thunder Client are provided below:
- By creating a new request, specifying the URL, request method, headers, and body, and sending the request, you can use Thunder Client to test a REST API.
- Thunder Client enables you to build a set of requests for a particular API. This can make it simple to reuse your tests and help you organize them.
- Using the Thunder Client, you can use environment variables in your requests. This can be useful when testing APIs in various settings.
- With a GUI-based interface, you can test API responses using Thunder Client. Beginners who are unfamiliar with scripting may find this useful.
- You can use Thunder Client to debug requests. This can be helpful if you are having problems with a request.
- You can use Thunder Client to support GraphQL APIs.
Advantages of using Thunder Client
Having discussed what Thunder Client is, its mode of operation, and its benefits to its usage, we will discuss how it compares to Postman; a popular API testing tool.
Thunder Client and Postman are two prominent API testing tools, each with various functionalities. Below, we outline compelling reasons why Thunder Client emerges as a favorable option over Postman for carrying out API testing:
-
Integration with VSCode: Thunder Client seamlessly integrates as a plugin within the VSCode environment, offering convenient accessibility through the navigation bar or keyboard shortcuts. This integration facilitates a more streamlined workflow, empowering users to develop and test API endpoints within a unified application. This eliminates the necessity of downloading a separate tool and the hassle of frequent switching between code editing and API testing. This stands in contrast to Postman, where API testing occurs either through a web-based platform or a standalone application that requires installation on your system.
-
Ease of use: The Thunder Client API testing tool has a much simpler and more friendly interface than Postman, making it easy to learn and navigate for users. Thunder Client also provides a variety of keyboard shortcuts to access its features. The shortcuts available on Thunder Client, as stated on its GitHub repo, are outlined below:
Ctl+Shift+P(From Command Palette):- Thunder Client — New Request
- Thunder Client — Run Last Request
- Thunder Client — Import Curl
- Thunder Client — Change Environment
- Thunder Client — Convert To Postman Format
Cmd/Ctrl + Enter— To execute the request.Enter— on the request URL field to send the request.Cmd/Ctrl + s— Save Request without run.Cmd/Ctrl + click— on request in the Sidebar will open it in a new tab.Cmd/Ctrl + s— Environment view save data.Cmd/Ctrl + e— Change the active environment.Alt+Shft + f— Format Post Body data.Cmd/Ctrl + u— Import Curl.Alt + z— Toggle word-wrap on response.Escape— Cancel response in full-screen mode.
-
Lightweight: The Thunder Client API extension is light and requires less space and system resources than the Postman application software. Conversely, Postman requires more memory and CPU resources, especially when working with larger requests.
Overall, while Postman provides more features than Thunder Client such as mock servers and integration with apps such as Jira or Slack, Thunder Client is an optimal choice for users who want a unified and lightweight application for development and API testing.
Installation and Setup
To set up Thunder Client on your local machine, follow the steps outlined below:
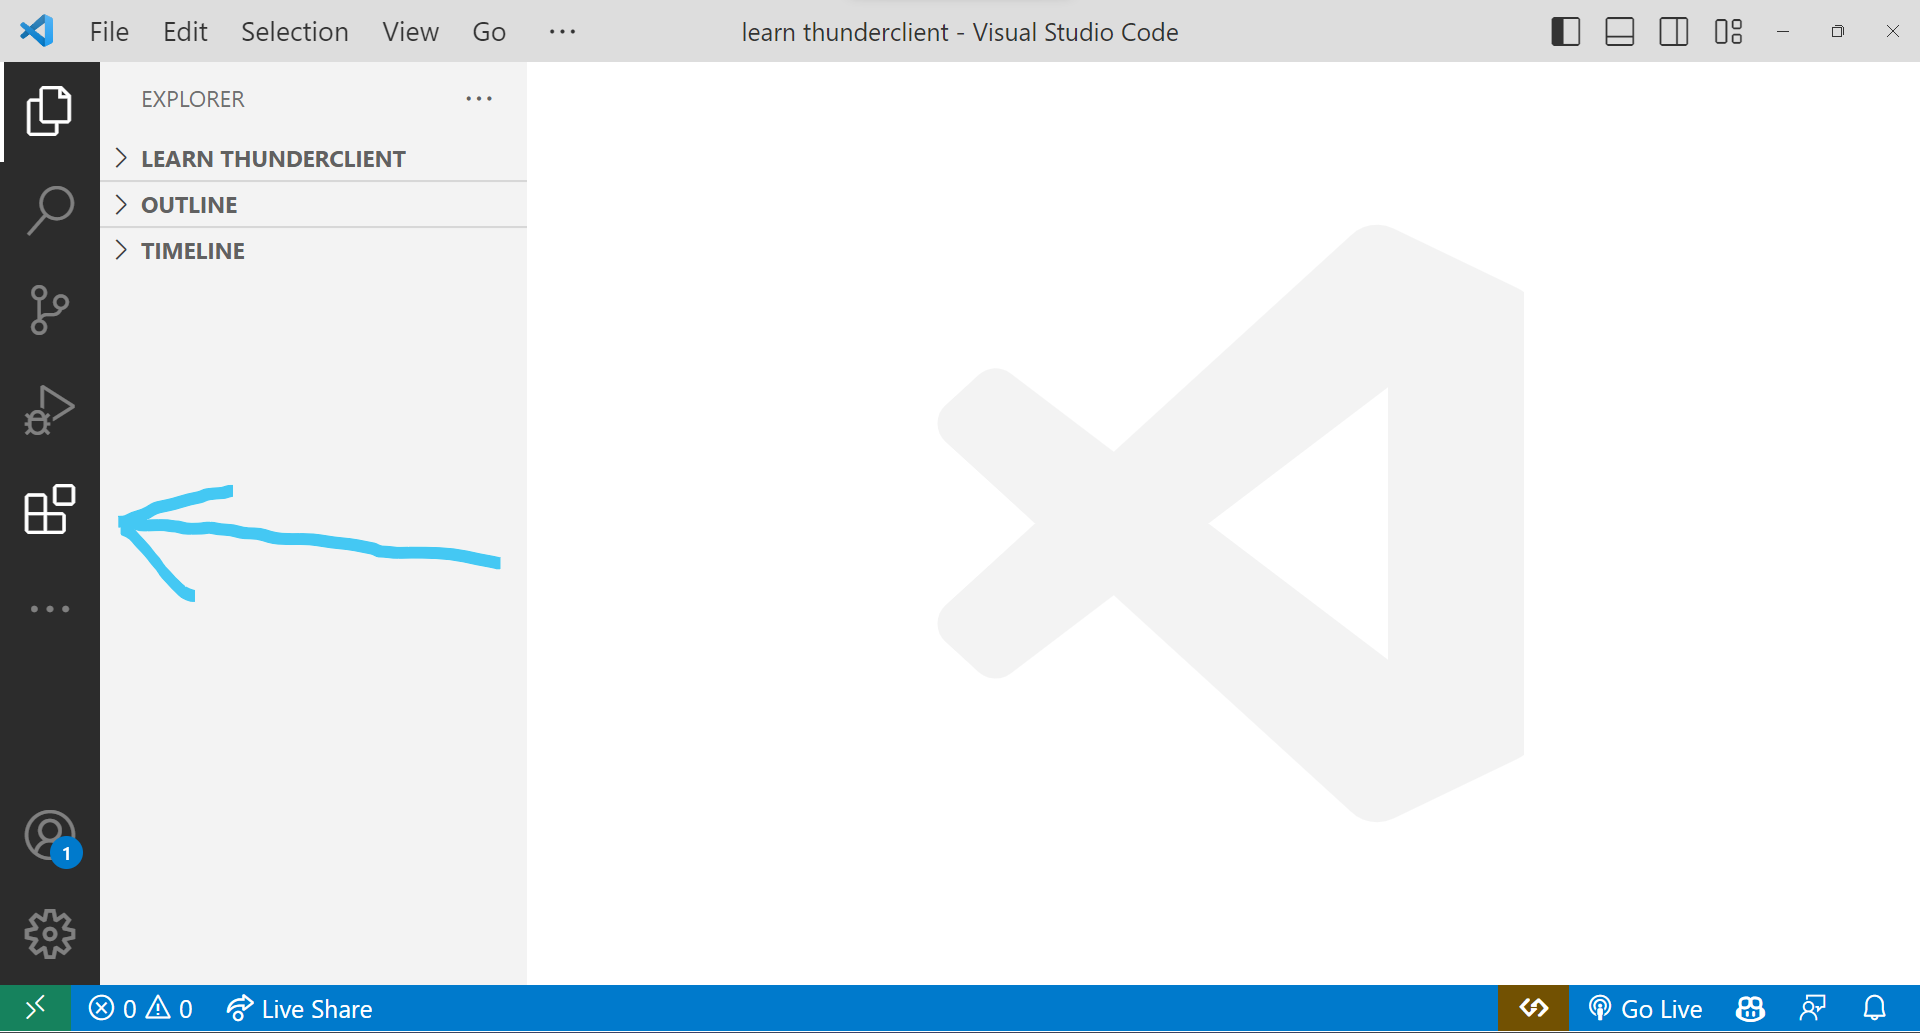
- Open the VSCode extension section within the code editor. The extension window can be accessed by using the shortcut
ctrl + shift + X, or navigating to the left sidebar and selecting the extensions option:
This opens up a new window, showing the installed extensions in VSCode and recommended extensions while providing a search bar to find the desired extensions.
- Using the search field in the extension window, search for “Thunder Client” and select the option from the list of results:
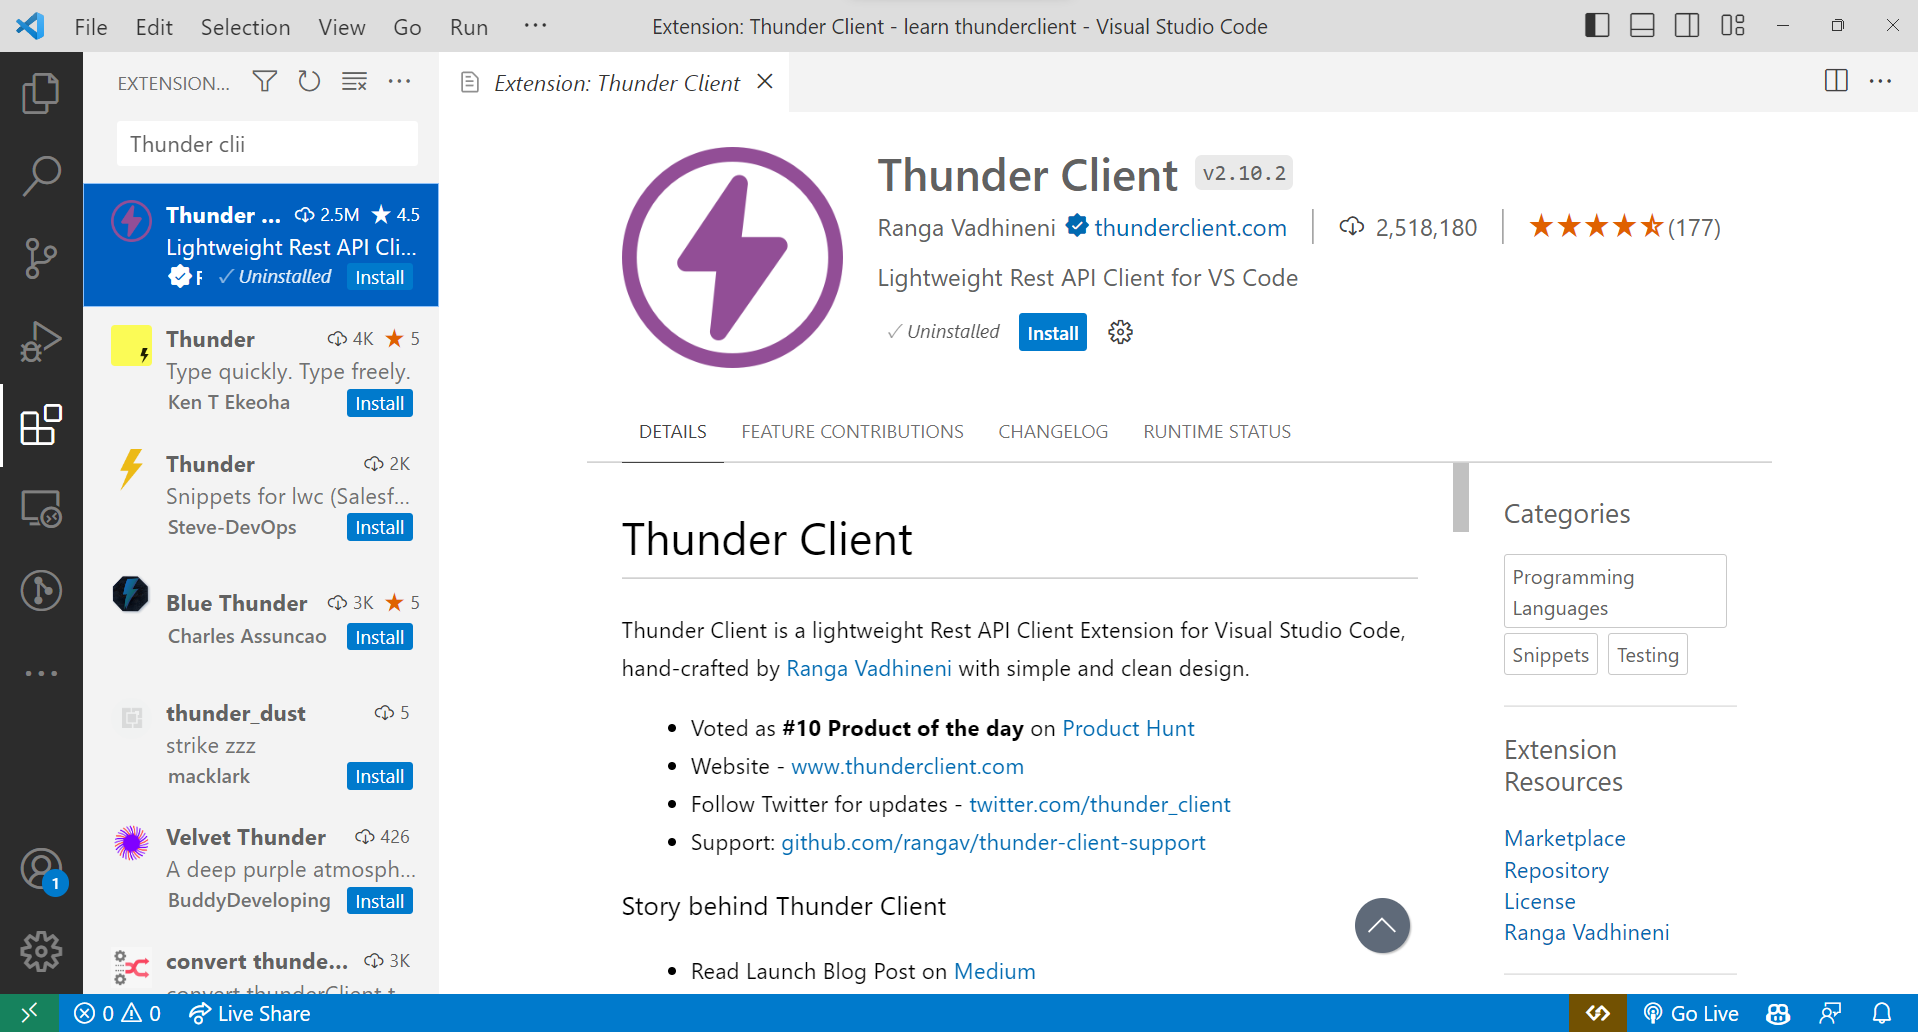
This presents additional details regarding the extension, including links to its developer, its official site, and documentation.
-
Select the ”install” option to incorporate the Thunder Client extension into your VSCode. After the installation concludes, you will observe the following presented in place of the “install” option:
-
The installed Thunder Client extension can be accessed by using the shortcut
ctrl + shift + R, or by selecting the option from the left-side navigation bar.
How to use the Thunder Client API Tester
In this segment, we will illustrate performing diverse API requests through the Thunder Client extension. We will also exhibit how to use the Thunder Client CLI and implement CI/CD integrations in your workflow using Thunder Client.
Testing API Calls
In this section, I will walk you through the process of testing API calls using Thunder Client, including how to make requests and set headers, parameters, and how to handle responses.
Let’s dive into testing API calls using Thunder Client. Front-end development relies heavily on API testing to ensure seamless interaction between the front-end and back-end. We’ll explore how to use Thunder Client to test and interact with APIs.
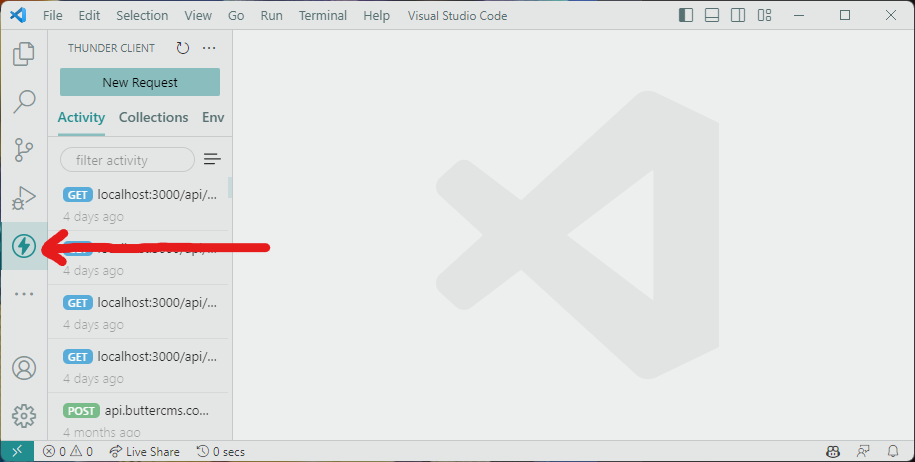
To get started, let’s create a new API request by clicking on the Lighting logo of Thunder Client ⚡ in the left sidebar:
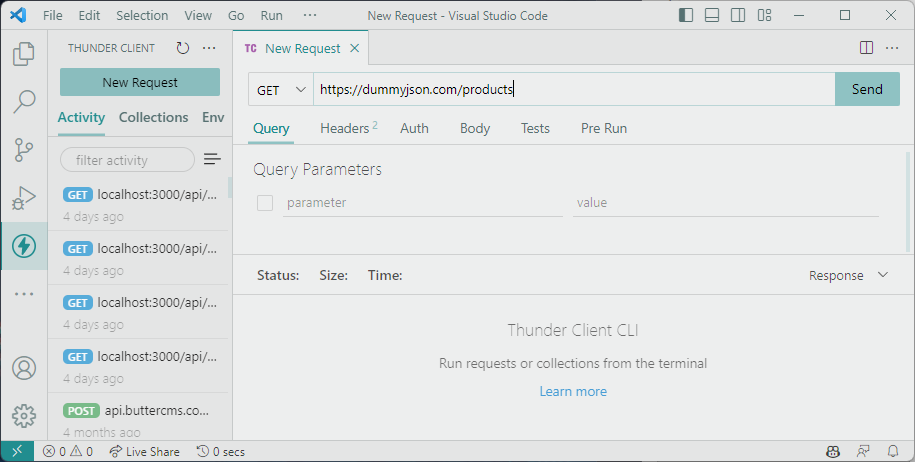
Now click the New Request button at the top.
This opens a new request tab where we can make requests.
Here are the options you’ll find:
- HTTP Method: Pick how you want to communicate with the API. Some options include GET, POST, PUT, DELETE, PATCH, HEAD, OPTIONS, or CUSTOM.
- Request URL: Enter the web address of the API you want to talk to.
- Headers: Provide extra info about your request, like what kind of data you’re sending or how you’re authenticated.
- Query Parameters: Share data with the API through these settings.
- Body: If needed, input data to send to the API. This depends on the method you’re using.
- Tests: Check if the API is responding as expected. You can inspect the response’s status code, type, or specific data.
- Auth: Tell the API how you’re authorized. Pick Basic Auth, OAuth 2.0, or Bearer Token.
- Pre Run: Get things ready before you send the request. You can set variables or do other tasks.
- Run Request: Push this button to send the request to the API. The response will show up in the Response section.
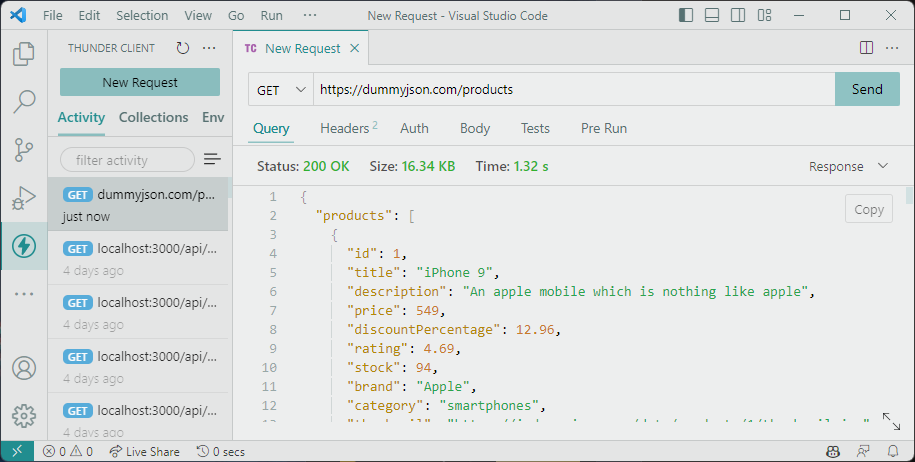
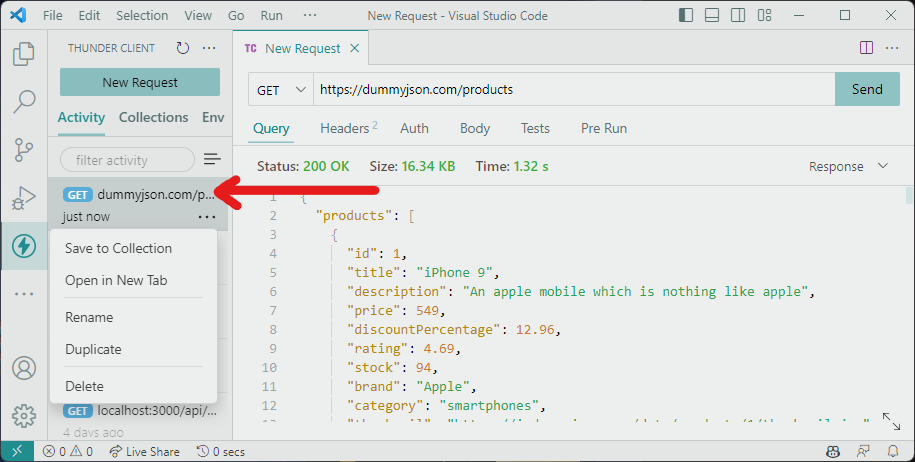
Let’s send a GET request to https://dummyjson.com/products and see the results. Enter the URL into the URL field and click on Send or Enter. With that, we should have this if the request is successful:
Awesome! If we take a look at the left sidebar, we’ll notice that the request has been added to our activity, and when we click on the options, we can see a few options available:
Renaming Your Request
It’s important to keep your requests well-organized, especially when dealing with multiple requests. To make things clearer, let’s rename our request. Click on the “Rename” button and provide a new name in the prompt that appears:
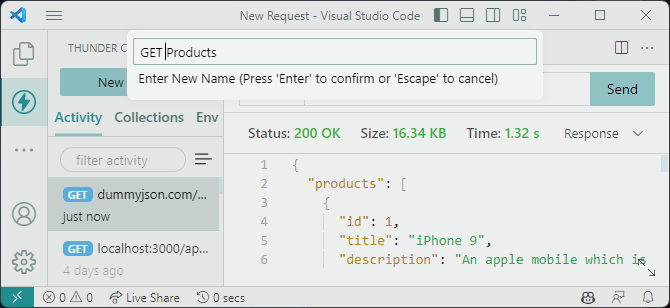
This simple step can greatly enhance the clarity of your testing process.
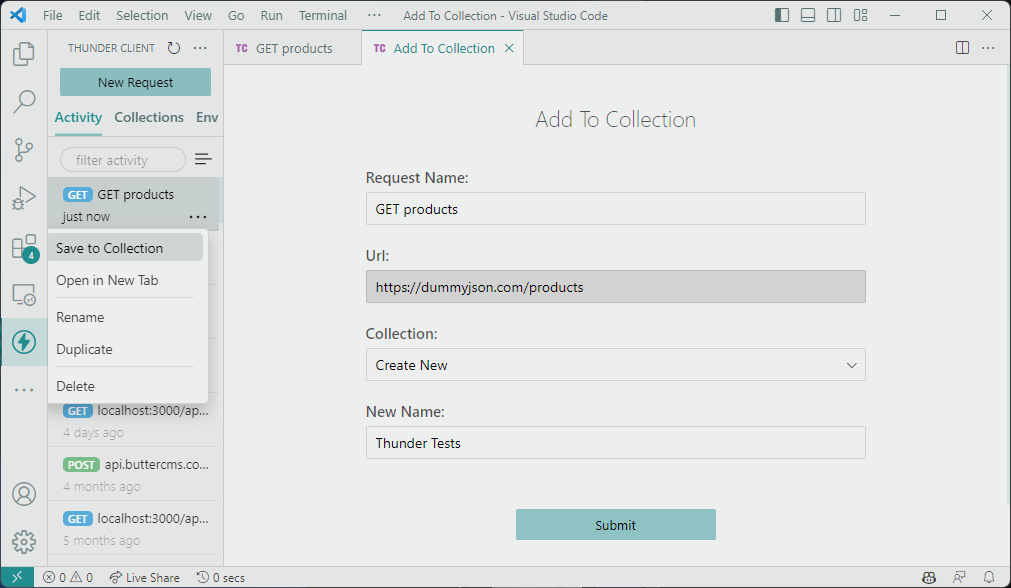
Saving to Collection
Organizing your requests becomes even more efficient when you utilize collections.
Collections group together related requests, making managing requests for different projects or functionalities easier. To save your request to a collection, follow these steps:
- Click the “Save to Collection” option from the drop-down menu.
- Select “Create New Collection.”
- Enter a meaningful name for your collection.
- Click on the “Submit” button to save your request to the collection.
With that, we should have our new collection created and our request saved:
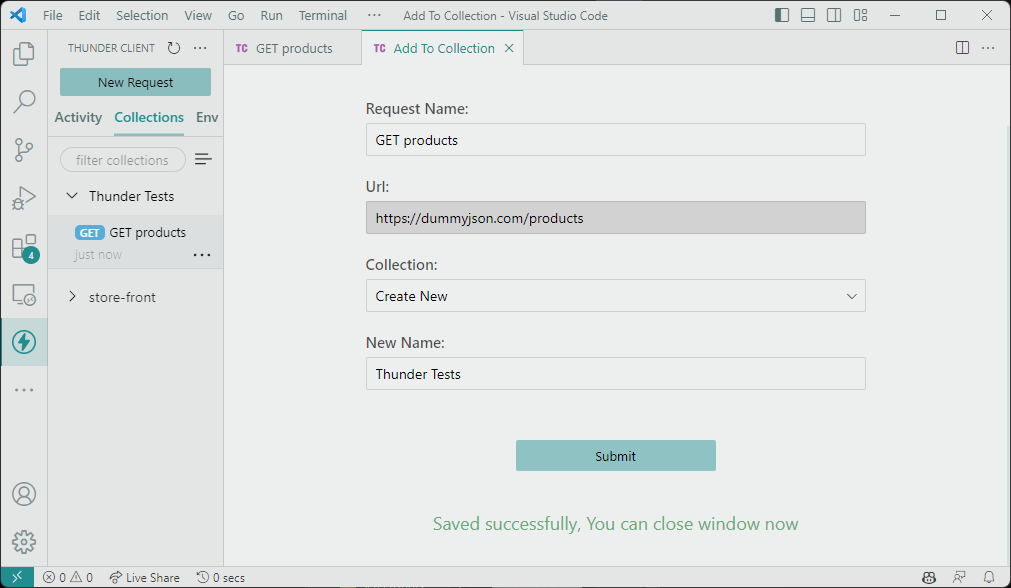
With this process, you’ll have a neatly organized collection with your request safely stored, ready to be accessed whenever needed by selecting the Collections tab.
Passing Query parameters
Query parameters are essential to many API calls, as they allow you to filter, sort, or paginate the data you retrieve. Let’s explore how to pass query parameters using Thunder Client:
Click on the Query tab to enter the parameters and values for each query parameter, and the URL will be updated accordingly.
In the Query tab, you’ll find fields where you can add query parameters and their corresponding values. You’ll need to enter the parameter name and the desired value for each parameter.
In the “Query” tab, we have fields where we can effortlessly add query parameters and their corresponding values. We simply input the parameter name and the associated value for each parameter.
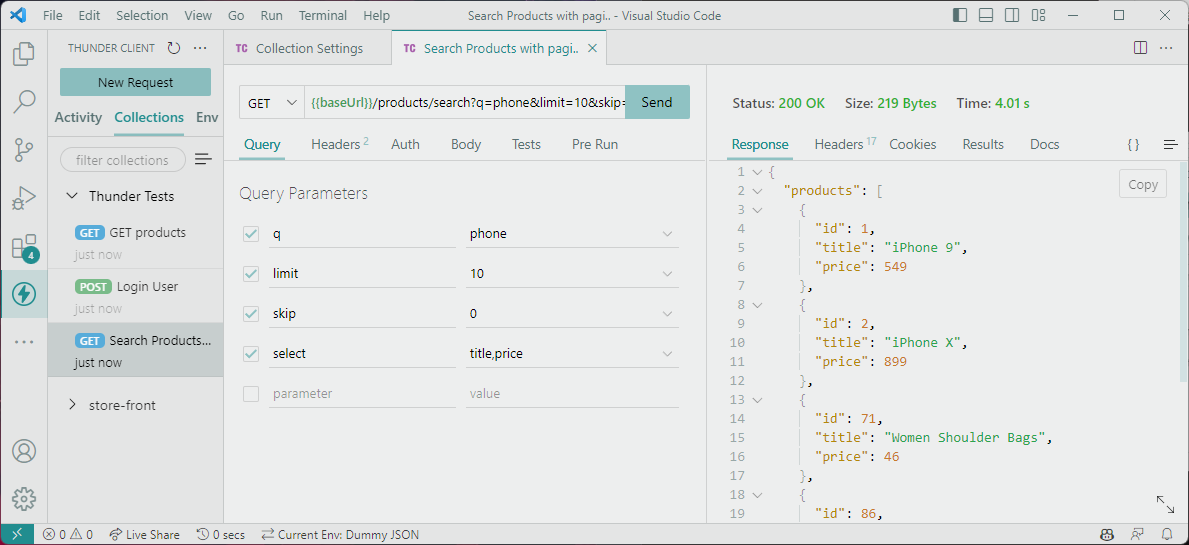
For instance, if we intend to filter products based on a specific category, limit the results to 10 items, and skip the first few, our query parameters might include:
- q: The search query, such as “phone”
- limit: The maximum number of items to retrieve, let’s say 10
- skip: The number of items to skip, which could be 0 (in this case, none)
- select: The fields we want to select from the response, perhaps “title” and “price.”
With each parameter and value we add, Thunder Client updates the URL automatically to reflect our selections.
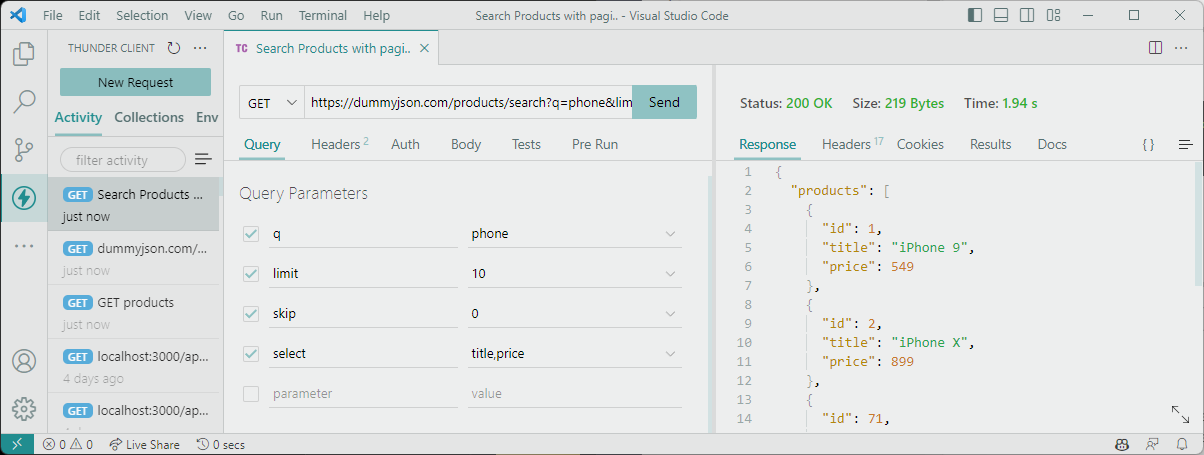
In our example, the URL would be updated to something like:
https://dummyjson.com/products/search?q=phone&limit=10&skip=0&select=title,priceThis URL now precisely outlines our specific query parameters, indicating that we’re seeking products with the query “phone,” limiting our response to 10 items, skipping none, and focusing solely on the “title” and “price” fields from the response.
By harnessing the capabilities of query parameters in this manner, we can finely tune the data we retrieve from the API. This level of customization ensures that our frontend application efficiently receives the required data, promoting a seamless integration of information between our frontend and backend systems.
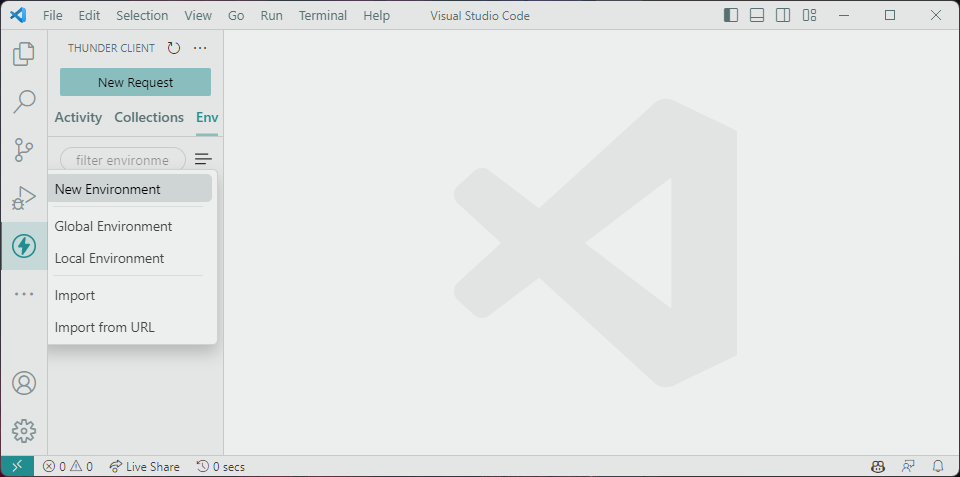
Creating variables with environments
The Environments view in Thunder Client offers us a powerful way to organize and streamline our API requests by creating and managing environments. Environments are invaluable for maintaining consistency across different API requests, especially when dealing with variables that might change between environments.
To begin, we can access the Environments view by clicking the menu button in the Env tab of the sidebar. From here, we have several options, including creating a New, Global, or Local environment or even importing an environment from a URL or a local file.
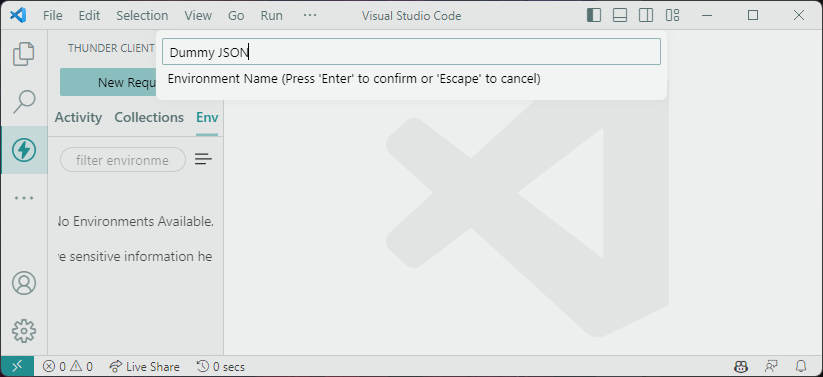
Let’s explore creating a new environment:
Once we create a new environment, Thunder Client prompts us to provide a name for the environment. This name should reflect the purpose or context of the environment, helping us easily identify and use it in the future.
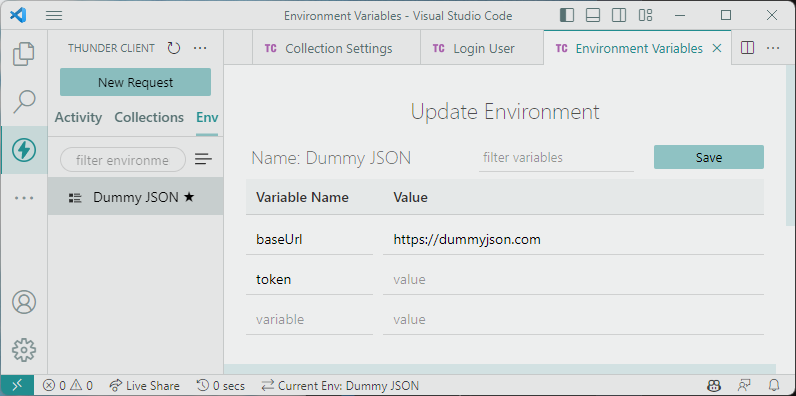
Environments become truly powerful when we add variables to them. These variables can represent values that change based on the environment, such as API URLs, authentication tokens, or any other dynamic values.
We can add variables by entering the variable name and its corresponding value. Additionally, Thunder Client allows linking to a .env file, making it even more convenient to manage multiple variables.
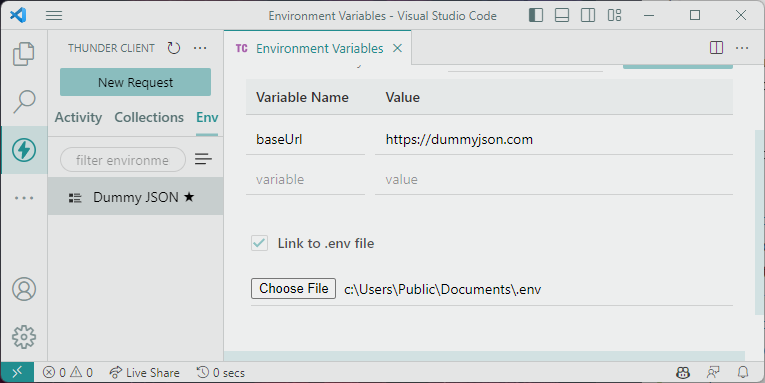
We added the {{baseUrl}} variable by entering baseUrl in the variable field and https://dummyjson.com in the value field.
With our environment and variables set up, we can utilize them in our API requests. To do this, we can navigate to the Collections tab, click on the options icon for the desired collection, and select the Settings option, which opens the Collection Settings.
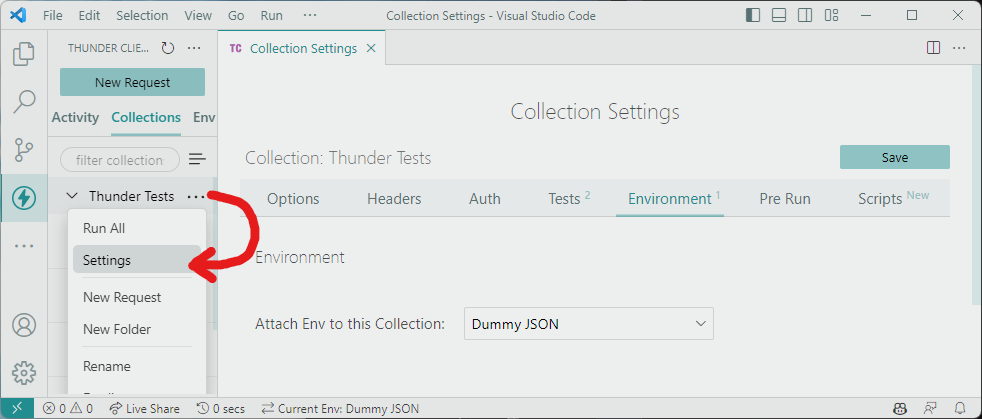
Here, we can navigate to the Environment tab and select our newly created environment in the Attach Env to this Collection option.
Using environment variables is straightforward. We simply enclose the variable name in double curly braces ({{ }}) within our request. For example, if we want to reference the baseUrl variable, we would write {{baseUrl}}/products/:
Here, we’ve utilized the baseUrl variable in a request to search for products.
Next, we’ll look at how we can write tests for our requests, which can also be used to set environment variables.
Leveraging Tests for Environment Variables
As we continue our exploration of Thunder Client’s capabilities, we’ll now turn our attention to utilizing tests to dynamically set environment variables. This dynamic approach empowers us to react to the responses we receive from our API calls, enabling us to automate processes and enhance the efficiency of our API testing and integration.
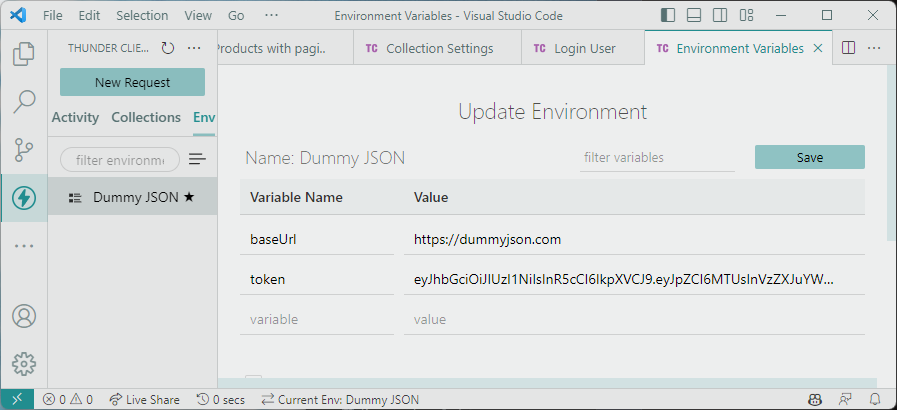
Let’s begin by revisiting the environment we created earlier. To do this, you can navigate to the Environment settings and add a new variable called token. While we won’t set the value yet, we’ll soon see how tests come into play in this scenario.
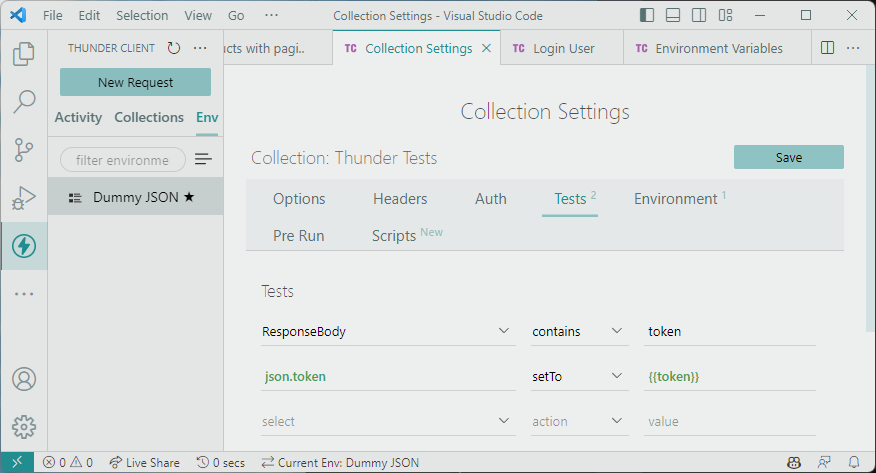
Moving on to the Collection settings tab, we’ll delve into the Tests section. In this area, we’ll create tests that allow us to dynamically set the token variable based on the response we receive from our API.
Here’s how you can set up these tests step by step:
- In the “Tests” tab, we have fields for “select,” “action,” and “value.” In the “select” field, choose
responseBody. - For the “action,” select
contains. This means we’re checking if the response body contains a property named “token.” - Enter
tokenin the “value” field. Essentially, we verify if the response body contains a “token” property.
In the next step, we’ll set the environment variable token based on the response we received. To achieve this, follow these instructions:
- In the next set of fields, select the “Set Env Variable” dropdown option (the action will automatically become “setTo”).
- In the left input box, enter
json.token. This indicates that we’re retrieving the value of the “token” key from the JSON response. - In the “value” field, enter
{{token}}. This effectively assigns the retrieved value to thetokenenvironment variable, making it available for use in subsequent requests.
More information on how to use tests and environments can be found in the docs.
Now, let’s make a login POST request, which will set this variable. Create a new request in the collection by clicking on the options button on the collection in the collection tab, give it a name, e.g., “Login User,” and set the type to POST and the URL to “https://dummyjson.com/auth/login”. The body would have the following object:
{
  "username": "kminchelle",
  "password": "0lelplR",
  "expiresInMins": 60
}
Now, when we send the request, we should get a response that should look like this, containing the token.
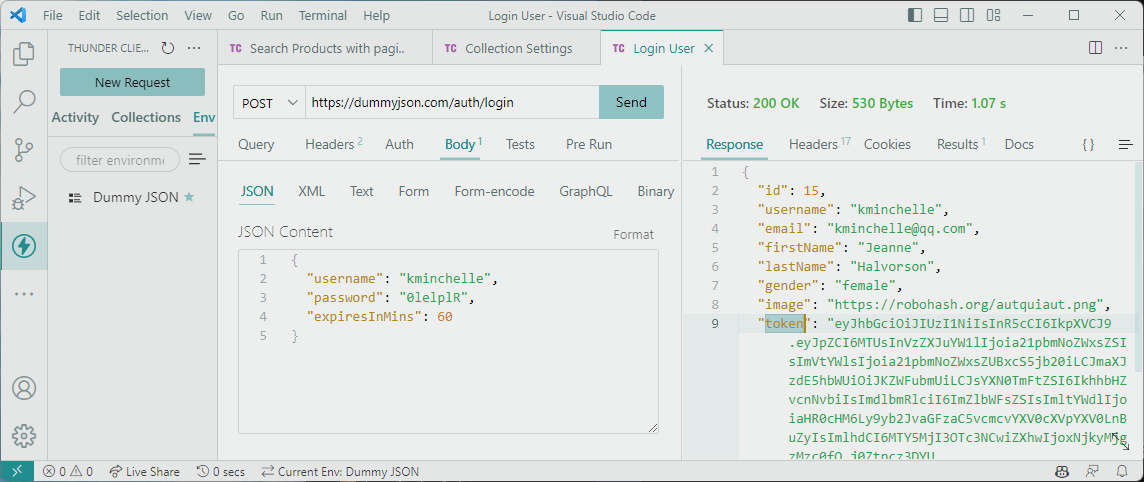
Now comes the magic of automation. Thanks to the tests we’ve set up earlier, the token value can be automatically extracted from the response and set in our environment. Here’s how this process works:
- As a result of the tests we established earlier, the token value is detected in the response and automatically extracted.
- Thunder Client’s tests then proceed to set the value of the
tokenvariable in the environment we created previously.
This seamless process ensures that the extracted token value is automatically made available in the token environment variable for use in subsequent requests. With the token now securely stored, we can proceed with our API testing, utilizing the token whenever authentication is required.
Making Authenticated Requests with Token Variable
With our environment variable token seamlessly set by our automated login request, we can now effortlessly make authenticated requests. To achieve this, follow these steps:
- Create a new request in your collection, or choose an existing request to add authentication to.
- Navigate to the Auth tab of the request editor.
- In the Bearer Token field, enter
{{token}}. Thunder Client will automatically replace this placeholder with the actual token value from the environment when the request is sent.
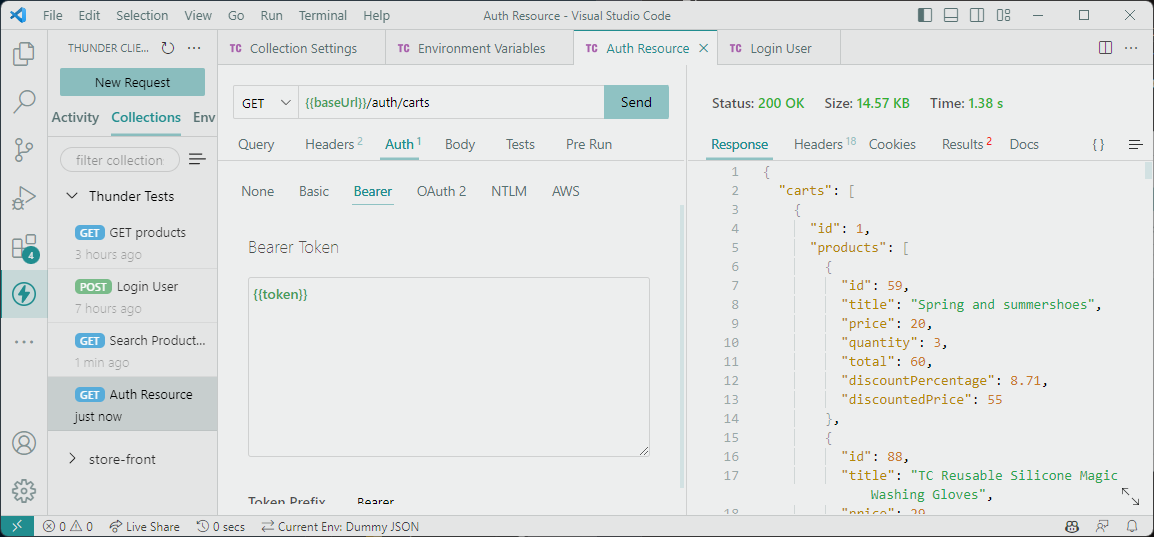
By incorporating the {{token}} variable in the Bearer Token field, Thunder Client ensures that your requests are authenticated seamlessly, allowing your frontend application to access the protected resources securely.
Productivity with Code Snippets and Type Generation
Thunder Client goes beyond simplifying the testing process; it significantly boosts productivity by providing code snippets and generating types for your API requests.
To obtain code snippets on Thunder Client, follow the steps outlined below:
- Navigate to the Results tab of your executed request.
- Click on the
{}symbol located on the right side of the tab. This action reveals the code snippet for the request written in a variety of languages, such as C, JavaScript, Swift, and more. - If you’re working with JavaScript, you’ll also have an additional dropdown menu to choose from Fetch, Axios, and other popular libraries.

Generating Types
In addition to code snippets, Thunder Client also offers a “Generate Types” feature. This functionality automatically generates types for the data returned by the API, making it easier to seamlessly integrate the API responses into your frontend application.
- In the Results tab, look for the “Generate Types” button located next to the Code Snippet tab.
- Click on “Generate Types” to generate the necessary type definitions based on the API response structure.

By offering code snippets and type generation, Thunder Client empowers developers to quickly integrate API functionality into their projects, promoting efficient development and reducing the time spent on manual coding and type inference.
Now, we can make an authenticated request using that token variable by adding the {{token}} variable in the Bearer Token field in the Auth tab of a new request.
Awesome. Next, we’ll look at how Thunder client greatly improves productivity by providing the Code for the requests in a variety of languages and frameworks as well as generating types for seamless integration.
Using the Thunder Client CLI
To get started, install the extension globally:
npm i -g @thunderclient/cliNote 1: If you are using Thunder Client settings in the extension, ensure they are in the
workspacescope for the CLI to access them.Note 2: Please make sure the commands are run from the root of the project.
To effectively use the Thunder Client CLI, we’ll need:
- Node.js 16 or higher: The CLI relies on Node.js.
- Updated Thunder Client Extension
Also, a few things to consider:
- Workspace Thunder Client Settings: if you have previously configured settings within the Thunder Client extension, it’s important to ensure these settings are scoped to the workspace.
- Project Root Directory: When using the Thunder Client CLI, it’s recommended to execute commands from the root directory of your project.
Executing Requests
We can execute saved requests by running the command:
tc <Request Name>For example, to run the “GET products” requests saved earlier, we run:
tc "GET products"With that, we should have the response shown in the terminal:
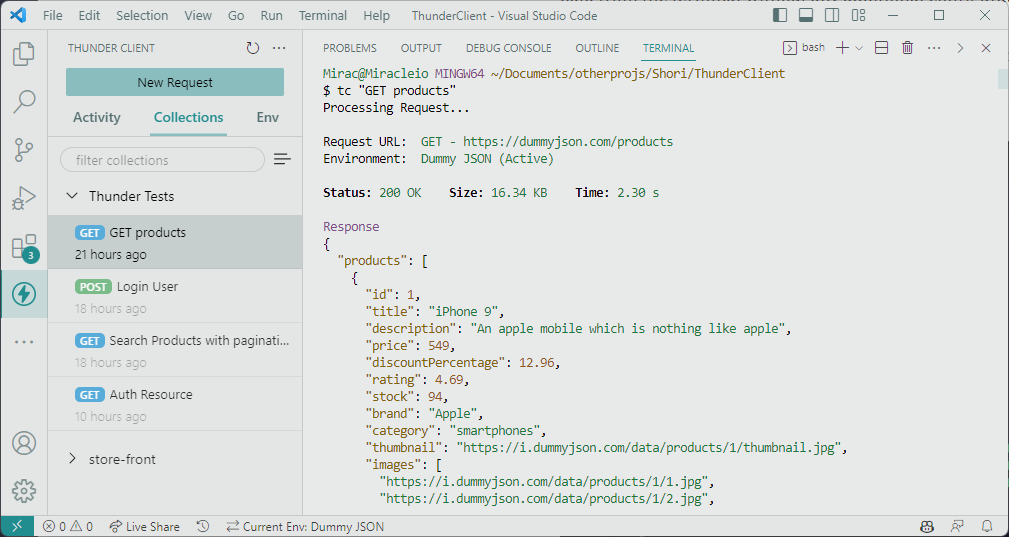
Requests can be executed using an id or partial name.
Control Output Data
In the Thunder Client CLI, we can control the output of a request using the --log argument. This argument empowers us to specify which elements of the request’s data we want to include in the output.
Let’s explore how we can manage the output of a request:
The --log argument accepts a list of options separated by commas, each corresponding to a different facet of the request data. Here’s a breakdown of the available options:
- 0: All Data
- 1: Request Headers
- 2: Request Body
- 6: Response Headers
- 7: Response Body
- 8: Tests
To customize the output, we can use the --log argument with the desired options. For instance, if we wish to see only the request headers, request body, and response body in the output, we would execute a command similar to the following:
tc 'requestNameOrId' --log 1,2,7For example, to get just the request and response headers, we can run the command:
tc "GET products" --log 1, 6With that, we should have something like this:
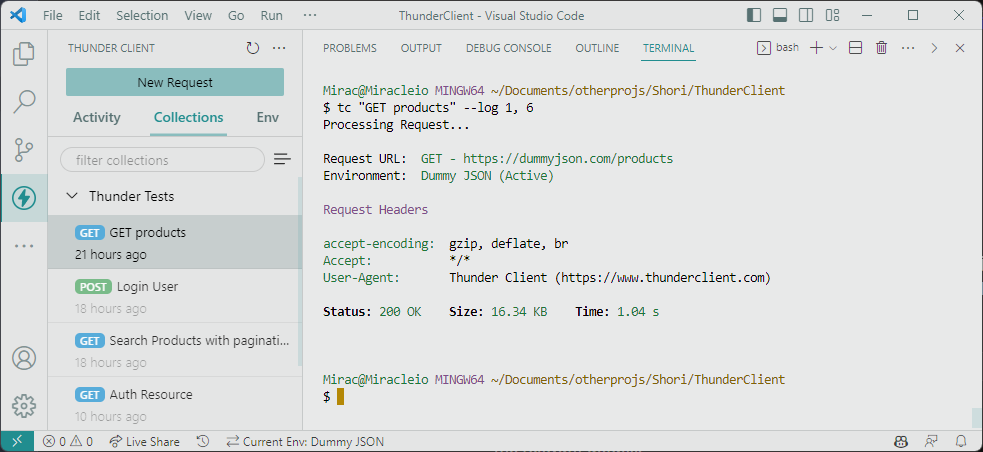
This command tailors the output to our specified preferences, allowing us to focus on the relevant details.
Run Collection: Executing Multiple Requests
The Thunder Client CLI allows us to execute all requests within a collection with a single command:
tc --col 'colNameOrId'For example:
tc --col 'Thunder Tests'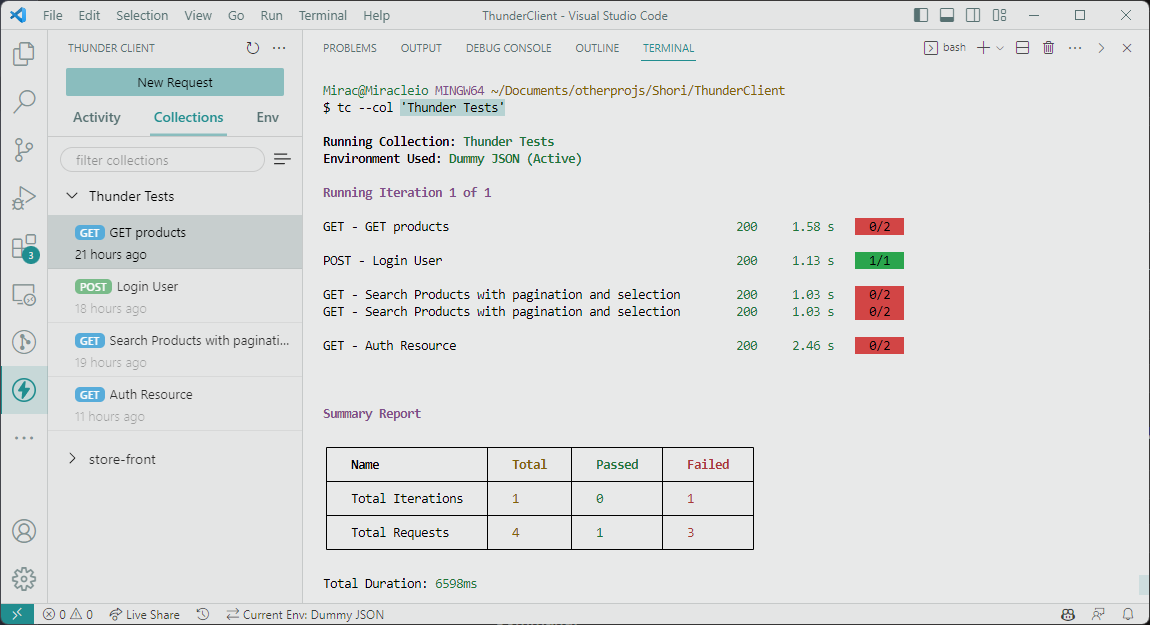
Here, it runs the requests, runs the tests defined in the collection, and generates a report.
Environment: Specifying a Different Environment
We can specify a different environment for running requests using the --env argument:
tc --col 'colNameOrId' --env 'Staging'Reports: Generating Detailed Reports
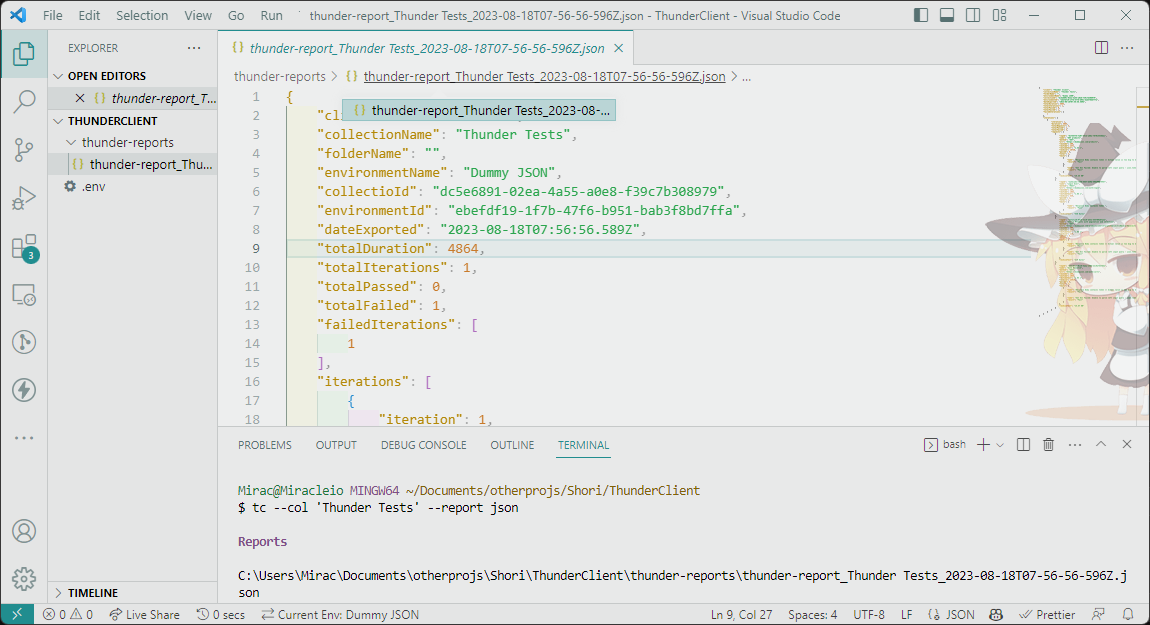
Thunder Client CLI can generate reports in various formats such as XML, HTML, JSON, and CSV:
tc --col 'colNameOrId' --report xml,htmlFor example, we can generate a JSON report for our “Thunder Tests” collection:
tc --col 'Thunder Tests' --report jsonWith that, we should have a report JSON file created in a ./thunder-reports/ folder at the root of our project:
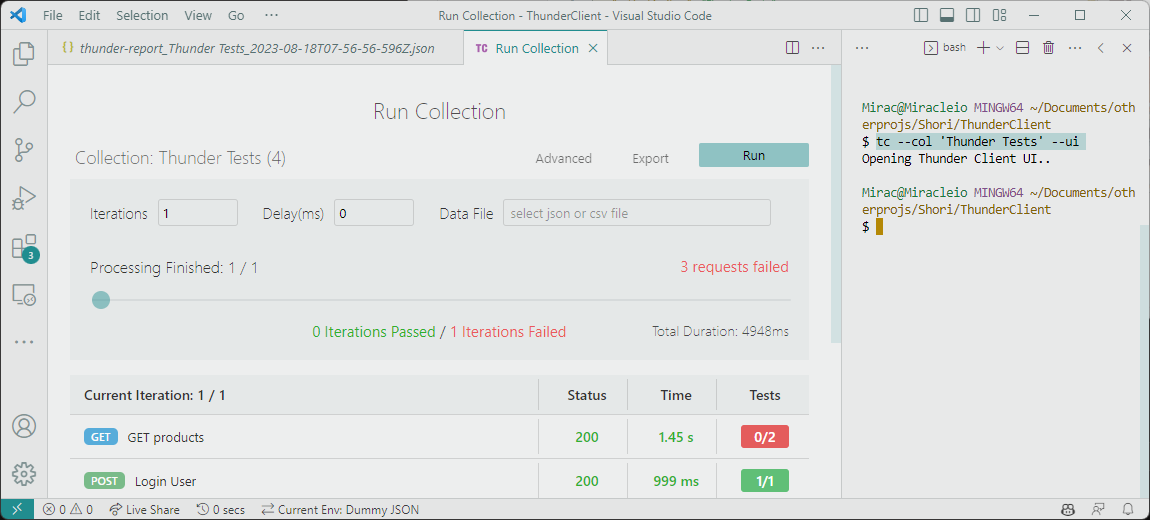
Open Run Collection UI from CLI: Easy Access to Collection Runner
We can open the Collection Runner UI directly from the CLI using the --ui flag:
tc --col 'Thunder Tests' --uiWith that, we should see the UI report for the collection requests:
List Collections or Requests: Quick Overview
The CLI allows us to list all collections or specific requests within a collection:
tc listWith that, we should have this:
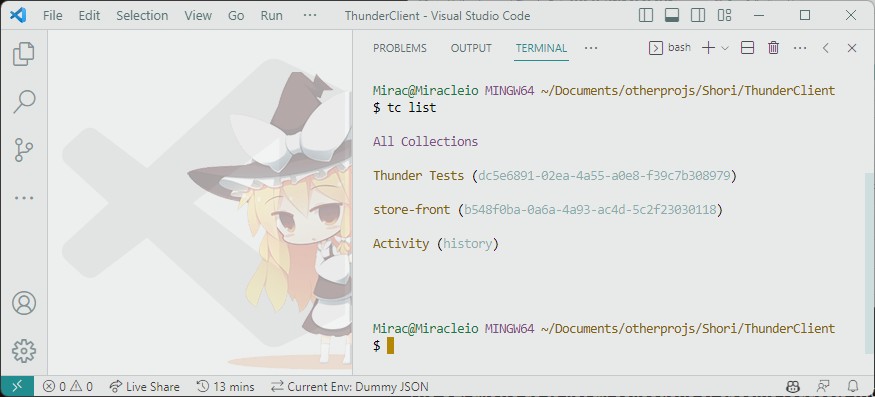
We can also list requests in a collection:
tc list 'Thunder Tests'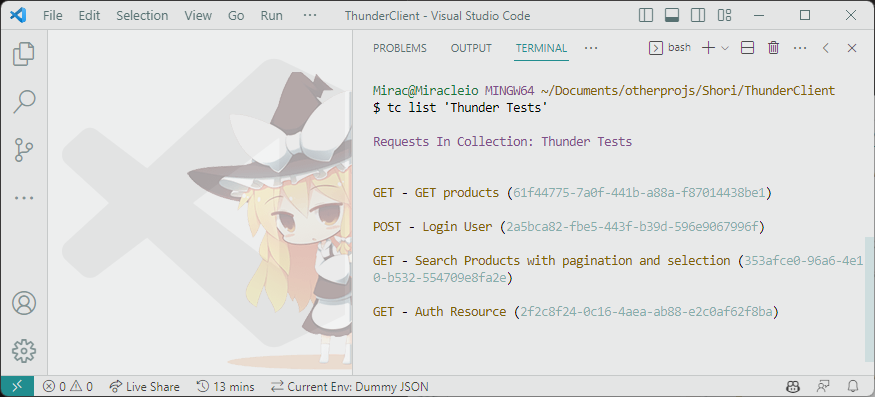
Now, this shows the requests in the collection and their types and IDs.
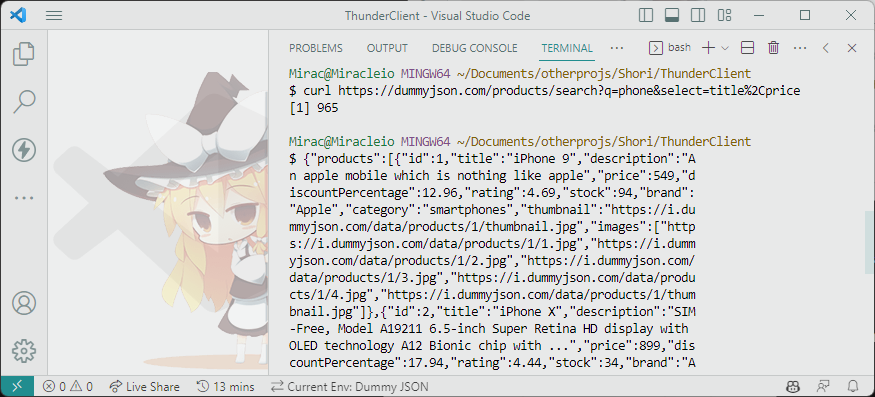
Enhances cURL Commands: Convenient Integration
Thunder Client CLI enhances cURL commands, providing formatted output and request history. A normal curl command would be something like this:
curl https://dummyjson.com/products/search?q=phone&select=title%2CpriceAnd we would get this unformatted response:
With the tc command, we can get a better-looking and more useful response, which will be saved in our activity tab:
tc curl https://dummyjson.com/products/search?q=phone&select=title%2Cprice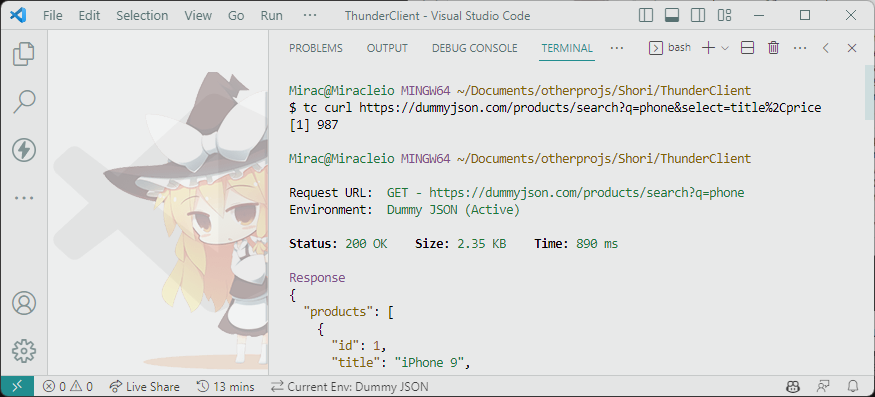
Save Request to Collection/Folder: Easy Organization
We can save requests to collections or folders directly using cURL commands:
To save to a collection:
tc curl 'https://dummyjson.com/products/search?q=phone&select=title%2Cprice' --name 'Search Phone title and Price' --col 'Thunder Tests'With that, we should have the request saved and added to our collection:
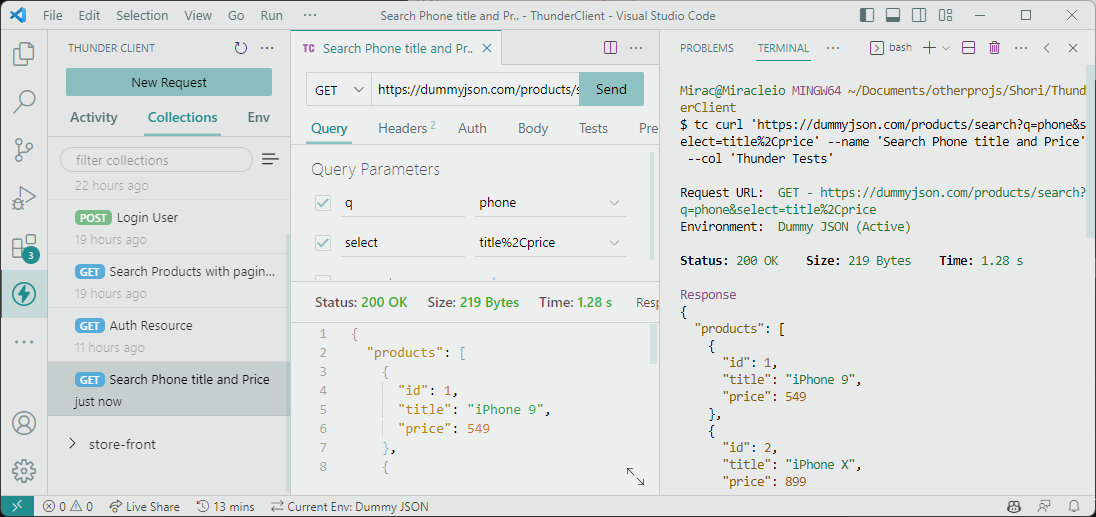
These features collectively contribute to the Thunder Client CLI’s capabilities, offering us an array of tools to streamline our API testing workflow within the command-line interface.
CI/CD Integration
Incorporating Thunder Client CLI into your CI/CD pipeline offers seamless automation of API testing and report generation in various formats.
Settings: Ensure TC VSCode settings are scoped to the workspace directory for consistency.
Git Sync: Enable git sync feature to enable the collection runner in the build server.
Command for Reports:
tc --col 'ColNameOrId' --report xml,htmlThis command executes requests and saves reports in the “thunder-reports” folder.
GitHub Actions Integration
A sample YAML file can be utilized for integrating Thunder Client CLI with GitHub Actions or other build pipelines.
Workspace Location [Optional]
Use the --ws 'fullpathToGitWorkspace' argument to specify a different workspace directory, if needed. By default, the CLI uses the current working directory.
Stop Collection When Fail [Optional]
To halt the collection execution of other requests when a request test fails, employ the --stop-on-fail argument.
By integrating Thunder Client CLI into your CI/CD processes, you can easily automate API testing, generate comprehensive reports, and streamline your development workflow.
Conclusion
In conclusion, ThunderClient emerges as an essential companion for seamless API testing. Its integration with VSCode offers a unified workspace, optimizing efficiency by erasing the need for constant app-switching. ThunderClient’s user-friendly design and lightweight resource demands set it apart from alternatives like Postman.
From effortless installation to robust API testing, ThunderClient delivers a comprehensive solution. Its versatility spans from basic request types to intricate setups, with a user-centric approach that empowers developers to easily manage headers, parameters, and responses. Moreover, ThunderClient’s seamless CI/CD integration ensures that API testing is seamlessly woven into the development pipeline, boosting software quality.
In embracing ThunderClient, developers equip themselves with a tool that streamlines API testing, enhances development workflows, and fosters a higher level of confidence in the software they produce. With its intuitive interface and adaptable functionality, ThunderClient stands as a testament to the power of efficient, integrated API testing.
Gain control over your UX
See how users are using your site as if you were sitting next to them, learn and iterate faster with OpenReplay — the open-source session replay tool for developers. Self-host it in minutes, and have complete control over your customer data.
Star on GitHub12k