Using the CSS background-color property to debug web pages
Learn an interesting technique to help debug your web layouts

Knowing how to lay out content on a webpage is an essential skill every front-end developer must have. The tool for this job is CSS (cascading stylesheet). Unfortunately, while laying out our content, it is not uncommon for our layouts to appear very different from what we expected. This occurrence may be due to bugs in our code or the cascading nature of CSS. For this reason, many developers are easily frustrated by CSS. However, the good news is that there are many tools and tricks for debugging CSS layouts, and in this article, we will learn a new way to do it using the CSS background-color property.
By the end of this article, you will know how to: -Write a few lines of CSS that will help you debug any webpage layouts. -Find faults in any webpage layout quickly using the background-color property. -Find the cause of unwanted horizontal (side) scrolling on your web pages. -Create neater and more accurate layouts.
Webpage Layouts
Webpage layout refers to how contents are arranged on a webpage. In modern web development, this is very important as studies have shown a high correlation between clean, attractive layouts and an improved user experience. Hence, it is common practice that modern front-end development starts on the tables of web designers who design user-friendly layouts for our websites before being passed off to front-end developers to implement these layouts and designs.
Although CSS features like grid and flexbox were created with the central idea of making these layout implementations easier, as previously mentioned, it does not always work out quite so easily.
While trying to implement these layouts as described by the web designer, we often run into some common problems like:
- Unwanted horizontal scrolling (side-scrolling)
- Troubles with relative and absolute positioned elements
- Unknown Z-index interferences
- Overwriting due to CSS cascade
- And generally distorted layouts.
The problem becomes even more challenging to handle when trying to modify already existing web pages on large, complex websites.
Common debugging solutions for layouts
A handful of quick and useful solutions exist to tackle the issue of distorted layouts with varying degrees of success. Of course, the most useful is the developer tool in the browser (chrome dev tools, Firefox dev tools, etc.). A few different browser extensions, like the ‘CSS overview’ chrome extension, may also come in handy.
However, the focus of this article is more on hacky CSS solutions. The general idea of these hacks is to reveal the box model of every element on the screen. This makes it possible to visualize the actual space and position these elements occupy on our webpage, making it easier to identify problems in our layout.
One of the most common ways of doing this is by using the CSS outline property, as shown below:
* {
outline:1px solid red!important
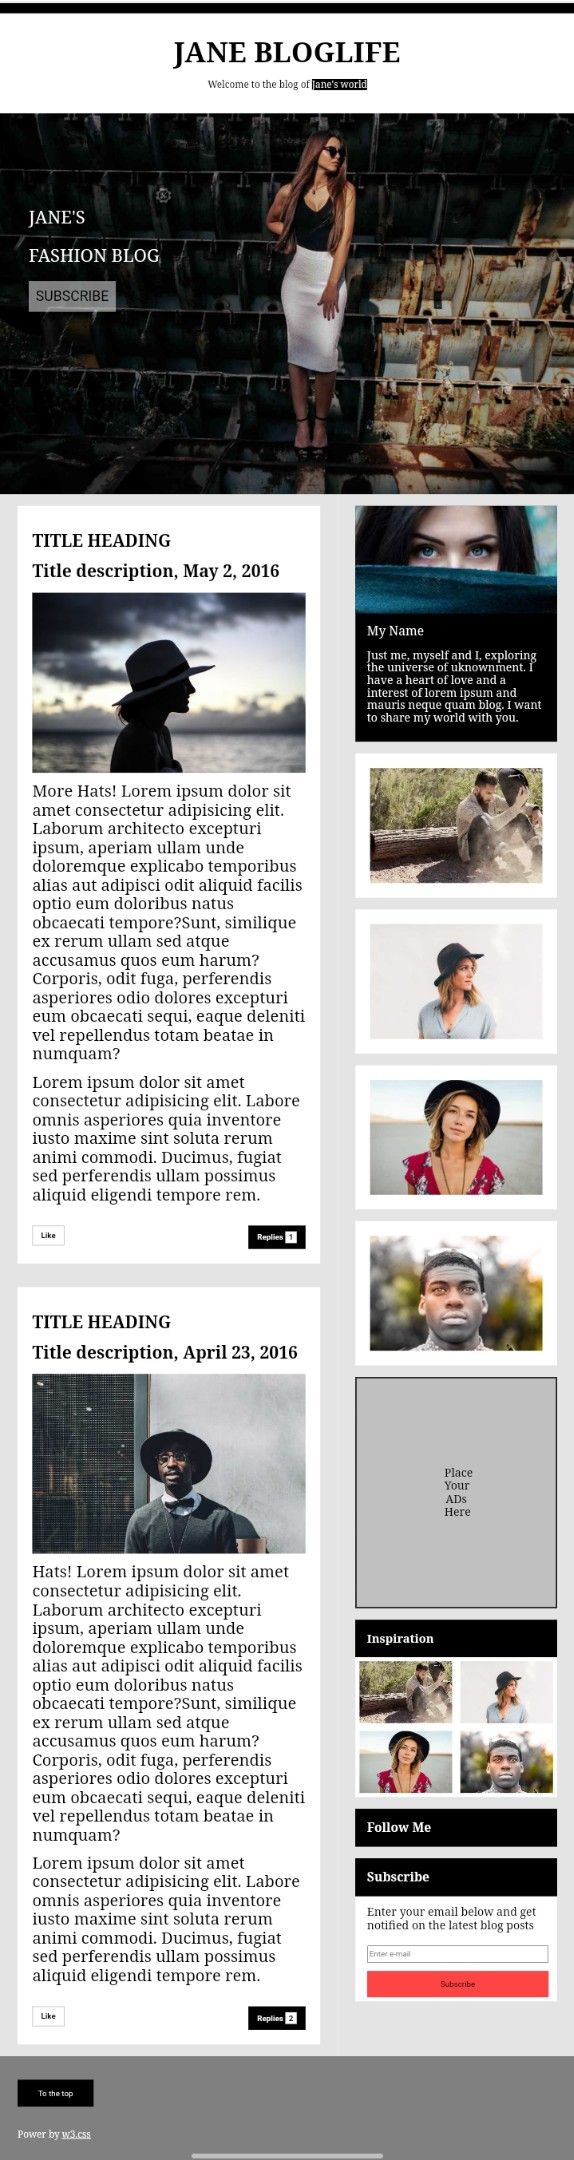
}Sample webpage (Plain)
Sample webpage (with Outlines Applied)
The simple line of code above selects every element on the webpage and gives an outline of red to each of them. This makes it easy to view all the different contents within their box model and see exactly how they are positioned on screen (as seen in the picture). Outlines are preferred here to borders as they do not take up any space on the box model.
Session Replay for Developers
Uncover frustrations, understand bugs and fix slowdowns like never before with OpenReplay — an open-source session replay tool for developers. Self-host it in minutes, and have complete control over your customer data. Check our GitHub repo and join the thousands of developers in our community.
Debugging with the CSS background-color property (based on color density)
The rest of the article will focus on debugging layouts using the background-color property. One way to do this is shown below:
* {
    background-color:rgba(0, 0, 255, 0.2)!important
}
//0.2 is the value of the alpha channel, which controls how transparent the background color is.
Here, instead of applying an outline to every element on the page, we apply a semi-transparent background color (I used blue). This works great because if the background color is semi-transparent, each child element will have a less transparent background color than the parent element due to the stacking of colors, which increases the color density.
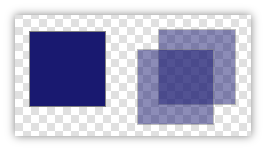
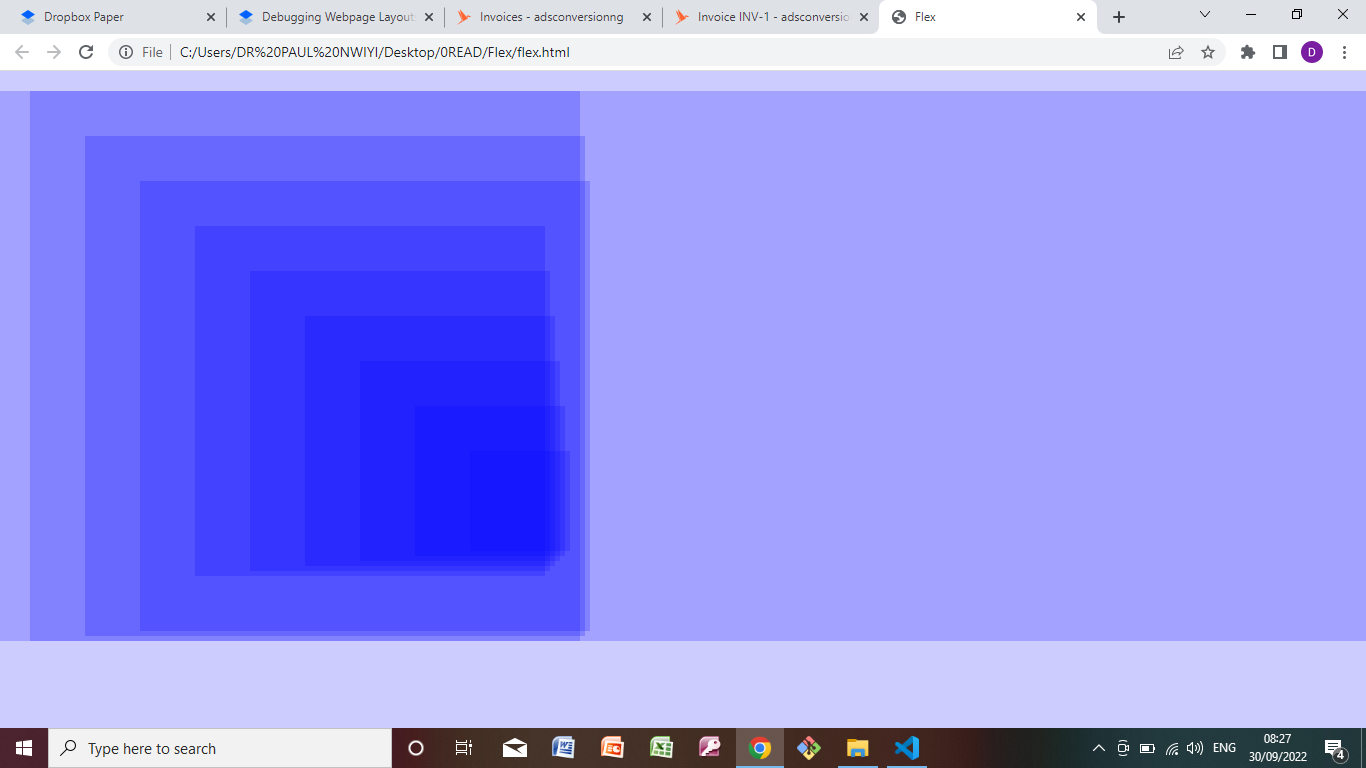
The above picture represents what is happening on our webpage when we add that line of code. If multiple semi-transparent boxes of the same color are stacked on top of each other (as shown in the image above), the smaller ones will have a less transparent (more opaque) color. This is because their color density is the sum of their own background color and that of their parents. In the context of our web pages, the larger boxes here are less nested (parent) elements and the smaller boxes are more deeply nested (children) elements.
What this code does for us about web layouts is that, just like the outlines, it makes it easy to view all the different content within their box model and see exactly how they are positioned on the screen. However, it has an advantage over the use of an outline because it also visually describes the structure of the HTML document for the web page. The more transparent elements are generally less nested (parent) elements, and the less transparent ones are more deeply nested (children) elements. The nested but also transparent children element can be easily identified as elements with absolute, sticky, or fixed positions (these elements have been taken out of normal document flow).
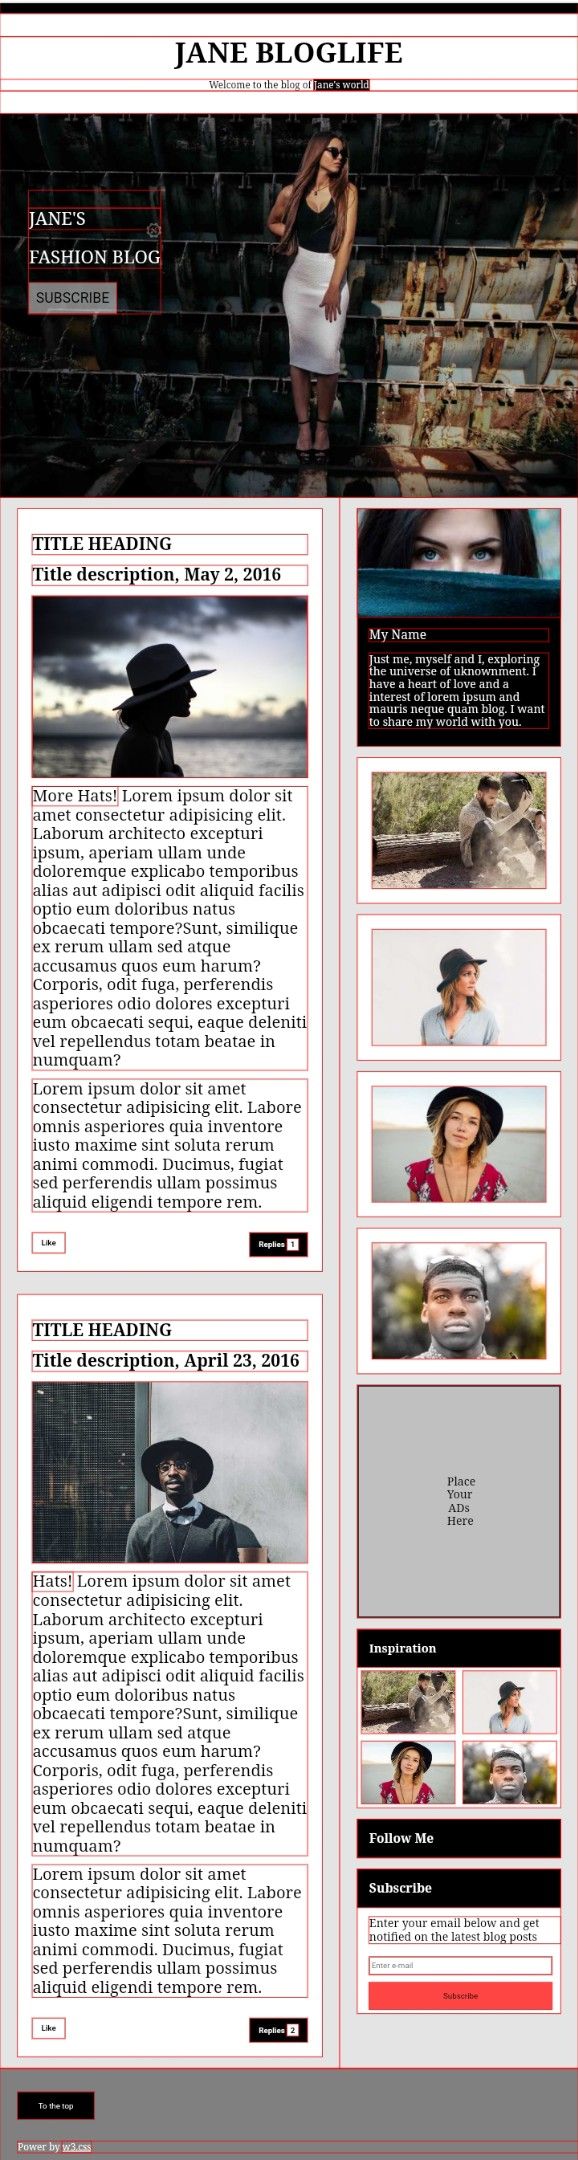
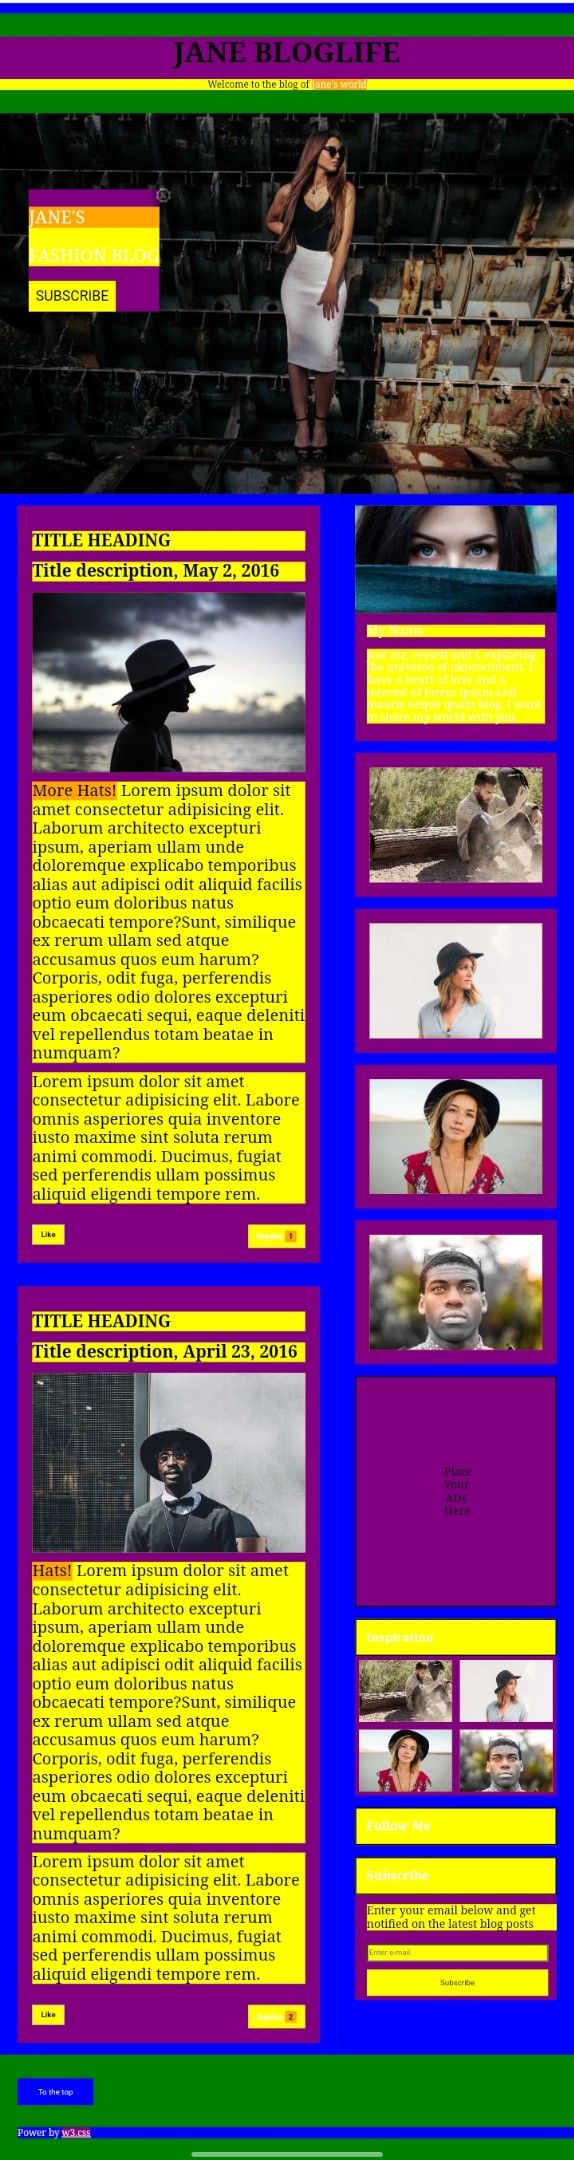
Sample webpage (with semi-transparent background-color applied)
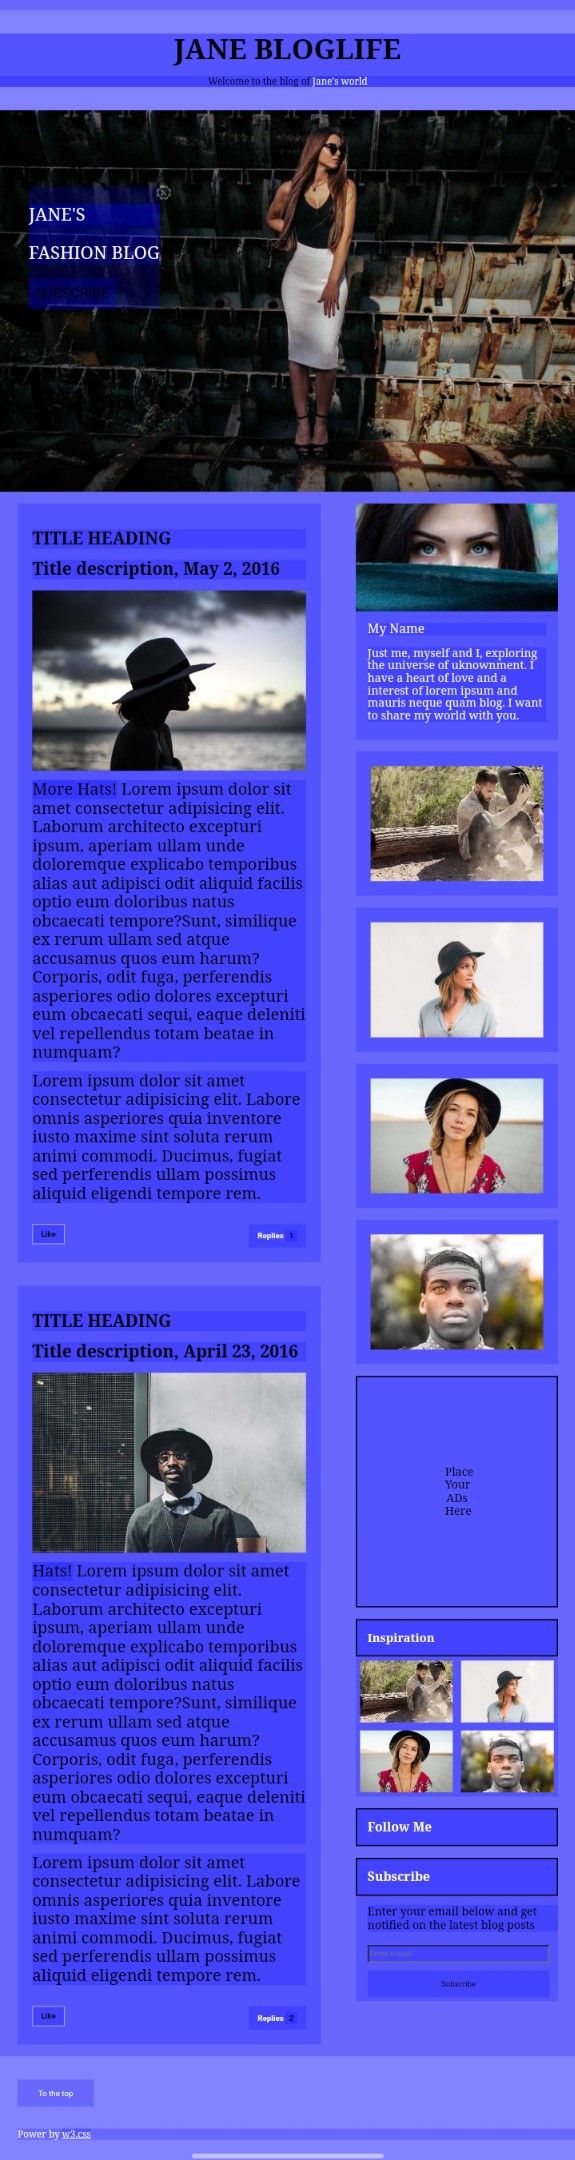
In the webpage above, by adding that simple line of code, we can easily visualize the layout as it is truly represented in the CSS box model. Now by just looking at the page, we can check if buttons, paragraphs, sections, and all other elements are properly spaced, aligned, and arranged in line with the web design and quickly figure out lapses in our spacing or arrangement. We can also easily see the element causing the unwanted side-scrolling (A div at the bottom of the sample webpage is shown to be responsible for the side-scrolling). We can tell the absolute positioned elements apart (the caption on the hero image has an absolute position) and even get a general overview of the HTML structure of the site, which is very helpful when modifying an already existing web page.
All these things can be done in the browser dev tools, with the clicks of multiple buttons and tons of hovering, but this code can do it for you all at once.
Note: When using this trick, stick with colors that show high contrast at different levels of transparency. Also, always add these CSS debugging codes at the bottom of the stylesheet with the !important label to escape CSS cascading.
Drawbacks
Unfortunately, as with most hacks such as this one, there are some drawbacks. The most obvious one is that it is a strain on the eye. For people without crystal clear eyesight or those using computer screens that do not show the best contrast, using this hack would be a struggle. This problem is further complicated when we have a webpage with very deeply nested elements, as is common nowadays when working with libraries like React.
Modifying the code (to use multiple colors)
//Select everything nested three (3) levels deep from the root
* * * {
    background-color:green!important
}
//4 levels deep
* * * * {
    background-color:blue!important
}
//5 levels deep
* * * * * {
    background-color:purple!important
}
//6 levels deep
* * * * * * {
    background-color:yellow!important
}
//7 levels deep
* * * * * * *{
    background-color:orange!important
}
//8 levels deep
* * * * * * * *{
    background-color:red!important
}
/*We started by selecting three (3) universal selectors because we were only interested in the content of the body of the webpage.
Html tag>head & body tags> webpage content*/
To solve the problems discussed, we could modify the code to work with different colors instead of relying on a single semi-transparent background-color and the varying color density. The modified code works by selecting all elements at a particular level of nesting and giving them a unique background color. To use this method, we have to keep track of the color for each nesting level (we can easily do this by writing it down on paper). We will start on the 3rd level of nesting since we are only interested in the content within the body tag of the HTML document and assign a unique background color for each deeper level of nesting in the HTML document.
The code does the same thing as the previous one, only this time we use different colors instead of a single semi-transparent color. The advantage of this method is quickly noticed as each level of nesting stands out clearly from the next, making it much easier to visualize each element’s CSS box model and then make adjustments where necessary. We can also easily add more lines of code to select more deeply nested elements and assign them a different color.
However, using this method, we can no longer tell absolute fixed or sticky position elements on sight.
Again, this looks a bit hideous, but it is way better than squinting your eyes over which color is less transparent. It also works better for deeply nested web pages, as you can specify the color for every nested level differently.
Sample webpage (with multiple background-color applied)
List of colors used in order of nesting.
[green,blue,purple,yellow,orange,red]
In HTML pseudo-code, it represents a doc structure like this.
<body>
    <green>
    <blue>
        <purple>
        <yellow>
            <orange>
            <red>
            <red>
            <orange>
        <yellow>
        <purple>
    <blue>
    <green>
<body/>
Selecting the different nested levels of elements until we find the most deeply nested and applying a different color to each level can be easier with some JavaScript.
Summary
All contents arranged to make up the layout of a webpage are represented by the CSS box model. Any CSS property that allows us to visualize the box model of every element on a web page without altering the boxes’ shape or size will help debug web layouts. The background-color property is one such property, and taking advantage of it in the ways discussed in this article will make creating and debugging web layouts much easier and faster.
A TIP FROM THE EDITOR: This article helps debug the visual part of your web page; for logic debugging, do not miss the How to use Chrome as a Code Editor and Debugger article.
Gain Debugging Superpowers
Unleash the power of session replay to reproduce bugs and track user frustrations. Get complete visibility into your frontend with OpenReplay, the most advanced open-source session replay tool for developers.