Using an Event Bus for Cross Component Communication
Learn how to use the Event Bus design pattern for communication among components

The Event Bus pattern allows different components to communicate with each other. It calls for a central hub where the components can send and receive events, making data exchange and interactions between components smoother. This article explores its usage, so developers can harness its full potential for efficient Vue development.

Discover how at OpenReplay.com.
Cross-communication is the interaction between components in an application. This helps in a smooth collaboration among the different parts of the application. Its importance lies in the following aspects:
-
Sharing Data: Cross-component communication ensures data is efficiently exchanged between components.
-
Handling Events: It helps them update their states and trigger necessary events. It ensures that components react accordingly to events,
-
Simplified Development and Reusability: When components interact, they can work independently. So, managing the code and reusing components throughout the application is easier.
-
Enhanced User Experience: Effective communication contributes to a smooth and interactive user experience.
-
Scalability: Cross-component communication helps developers to manage their applications. It breaks them down into smaller, manageable pieces. This scalability is vital as applications evolve and expand over time.
Overview of Event Bus in Vue
Event Bus in Vue is a mechanism like a messenger that helps components communicate. It’s like sending messages between friends who might not know each other. With a global Event Bus, components can interact without close connection. It makes it flexible and efficient. You set up the Event Bus, and then components can emit events when there is a need. Other components can listen to/for those events and react in accordance. It helps to keep your code organized and promotes teamwork among components in a Vue application.
Event Bus has some methods it uses to facilitate cross-component communication. They include: $on(eventName, callback) listens for events, $emit(eventName, data) triggers events with optional data payload, and $off(eventName, callback) removes event listeners. The $once method is another Event Bus method in Vue that allows a component to listen for an event only once. It functions similarly to the $on method but differs in that it automatically removes the event listener after the event is triggered once.
Setting Up a Vue Project
We will start by creating a Vue app then we will proceed to set up the Event Bus for cross-communication.
- In your terminal or command prompt, navigate to the directory where you want to create the new Vue project.
- Next, run the following command to create a new Vue project in the directory.
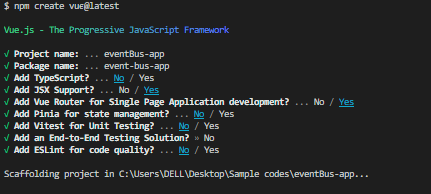
npm create vue@latest- Follow the wizard and select the right tools for your setup based on your project needs.
- Once the setup is complete, navigate into the project directory by running the command:
cd eventBus-appnpm install- Now, you can run the development server to see your Vue app in action:
npm run dev- Open your browser and visit the provided local development URL on http://127.0.0.1:5173/
Setting Up Event Bus
In Vue, setting up Event Bus is a straightforward process allowing components to communicate without direct dependencies.
To create the Event Bus instance, we start by defining a new Vue instance dedicated to handling events. This can be done in a separate JavaScript file or the main Vue application file.
Firstly, Since we are using vue 3, we have to update the Event Bus setup to use the mitt library for event handling:
Go to your terminal and install the mitt library using the following:
npm install mittor
yarn add mittNext, create a separate js file named eventBus.js in the src folder.
// eventBus.js file for Vue3

import mitt from 'mitt';

// Create a new event bus using mitt
const Event Bus = mitt();

export default eventBus;
By importing Vue and creating a new instance, we now have an Event Bus ready to facilitate communication between components.
Note: If you are using Vue 2, the mitt library is not needed; you can go ahead to configure the eventBus.js as seen below:
// eventBus.js file for Vue2

import Vue from 'vue';

// Create a new Vue instance to act as the Event Bus
const eventBus = new Vue();

export default eventBus;
Emitting and Listening to Events
Once the Event Bus instance is set up, components can start emitting events and listening to them. A component uses the $emit method available in Vue to emit an event. This method takes the event name as the first argument and an optional payload as the second argument if data needs to be passed along with the event.
// ComponentA.vue

<template>
 <div>
   <button @click="handleClick">Say Hello</button>
 </div>
</template>

<script setup>
import eventBus from "../eventBus";

const handleClick = () => {
 // Emitting an event with the name 'sayHello'
 eventBus.emit("sayHello", "Hello from Component A!");
};
</script>
On the receiving end, other components can listen for the emitted event and execute appropriate actions when it occurs. This is achieved using the $on method, which listens for a specific event name.
// ComponentB.vue

<template>
 <div>
   <p>{{ message }}</p>
 </div>
</template>

<script setup>
import { onMounted, ref } from "vue";
import eventBus from "../eventBus";

const message = ref("")

onMounted(() => {
 // Listening for the 'sayHello' event from the 'eventBus'
 eventBus.on("sayHello", (data) => {
   // Handling the event and accessing the payload data
   message.value = data
 });
});
</script>
Passing Data with Event Bus
Passing data with Event Bus involves the use of event payloads and the sharing of complex data structures. Let’s illustrate these concepts using code samples:
- Using Event Payloads:
Event payloads allow components to pass additional data along with emitted events. This is useful when sending specific information from one component to another. An example of how this works has been illustrated above in the emitting and listening instance. The ComponentA emitter emits a sayHello event with a payload of ‘Hello from Component A!’. The ComponentB, the listener, listens for the event and updates its message value with the payload sent with the event.
That’s basically how the event payload works.
- Sharing Complex Data Structures:
Event Bus can also share more complex data structures between components, such as objects or arrays. This allows components to exchange structured data without the need for tight coupling. Here’s an example of sharing a complex data structure:
Let’s update our initial component A (the emitter) with more complex payload data.
// ComponentA

<template>
 <div>
   <button @click="fetchUserDetail">Fetch User</button>
 </div>
</template>

<script setup>
import { reactive, ref } from "vue";
import eventBus from "../eventBus";

const userDetails = reactive({
 name: "Hannah",
 dob: "23-Nov",
 favColor: "Gray",
});

const fetchUserDetail = () => {
 eventBus.emit("getUserDetails", userDetails);
};
</script>
The receiving component (listener) implements an event handler and accesses the shared data is:
// ComponentB

<template>
 <div>
   <p>{{ user.name }}</p>
   <p>{{ user.dob }}</p>
   <p>{{ user.favColor }}</p>
 </div>
</template>

<script setup>
import { onMounted, reactive, ref } from "vue";
import eventBus from "../eventBus";

const user = ref({})

onMounted(() => {
 eventBus.on("getUserDetails", (userData) => {
   user.value = userData
 });
});
</script>Best Practices and Tips
-
Keeping Event Names Consistent: It is essential to maintain consistent event names to ensure clarity and prevent confusion. By using meaningful and descriptive event names, you can easily identify the purpose of each event and its corresponding functionality. For example, the
sayHelloandgetUserDetailsare used above. They are self-descriptive, and one can state their functions easily. -
Handling Asynchronous Events: When dealing with asynchronous operations in Event Bus, handling them appropriately is crucial. For instance, if an event involves data fetching or API calls, use async/await or Promises to manage asynchronous code flow effectively.
// emitter

onMounted(async () => {
 const data = await fetchData(); // Some asynchronous data fetching function
 eventBus.emit("data-fetched", data);
});
// listener
onMounted(() => {
eventBus.on("data-fetched", async (data) => {
// Handle the asynchronously received data here
await processData(data); // Some asynchronous data processing function
});
});- Avoiding Event Collisions: Event collisions can occur when two or more components use the same event name. This can lead to unintended behavior or conflicts. To avoid this, namespace the events based on component names or specific purposes.
// In Component A

<script setup>
import eventBus from "../eventBus";

const handleClick = () => {
 // Emitting an event with the name 'sayHello'
 eventBus.emit("componentA-sayHello", "Hello from Component A!");
};
</script>
// In Component B
onMounted(() => {
eventBus.on('componentA-sayHello', (data) => {
message.value = data;
});
}By prefixing event names with a component-specific identifier, the risk of event collisions can be minimized.
Comparing Event Bus with Props
Event Bus and Props are two common methods for inter-component communication in Vue. Let’s explore their differences.
Event Bus
Event Bus allows communication between components that are not directly related, without the need to pass data through parent components. It serves as a central event hub for emitting and listening to custom events.
Example:
In Component A:
<template>
 <button @click="send">Emit Event</button>
</template>


<script setup>
import eventBus from "../eventBus";
import {ref } from "vue";

const send = () => {
 eventBus.emit('sendFile', { message: 'File Sent' });
},
</script>
In Component B:
<template>
 <div>
   <p>{{ message }}</p>
 </div>
</template>

<script setup>
import eventBus from "../eventBus";
import { onMounted, ref } from "vue";

const message = ref("")

onMounted(()=> {
   eventBus.on('custom-event', (data) => {
     message.value = data.message;
   })
}),
</script>
Props
Props involve passing data from a parent component to a child component through attributes.
Example:
In ParentComponent:
// Parent Component

<template>
 <child-component :message="message" />
</template>

<script setup>
import ChildComponent from './ChildComponent';
import { ref } from "vue";

const message = ref("Happy Holidays")
</script>
In ChildComponent:
<template>
 <div>
   <p>{{ message }}</p>
 </div>
</template>

<script setup>
defineProps({
 message: {
   type: String,
   required: true
 }
})
</script>
Comparing Event Bus with Vuex
Event Bus and Vuex are different in their scopes and use cases. Event Bus is ideal for localized communication, while Vuex is a state management solution for global data sharing across multiple components.
Event Bus (local communication):
Event Bus example was already demonstrated above. It is suitable when only a few components need to communicate and the data exchange is not complex.
Vuex (global state management):
Vuex allows centralized state management, which means data can be shared and accessed by multiple components across the entire application.
Example:
In store.js (Vuex setup):
import { createStore } from 'vuex';

export default createStore({
   state() {
       return {
           message: 'Hello from Vuex store',
       };
   },
   mutations: {
       setMsg: (state, msg) => state.message = msg
   },
   actions: {},
   getters: {
       getMsg: (state) => state.message,
   },
});
In Component A:
<template>
 <div>
   <p>{{ message }}</p>
 </div>
</template>

<script setup>
import { computed, onMounted, reactive, ref } from "vue";
import { useStore } from 'vuex';

const store = useStore();

const message = computed(() => {
 return store.getters['getMsg'];
});
</script>

<style></style>
In Component B:
<template>
 <div>
   <button @click="updateMsg">Update Message</button>
 </div>
</template>

<script setup>
import { useStore } from "vuex";

const store = useStore();

const updateMsg = () => {
 store.commit("setMsg", "Hello World");
};
</script>
Both Event Bus and Vuex have their strengths and should be chosen based on the specific communication requirements of the application. Event Bus is suitable for simple and localized communication, while Vuex is recommended for managing complex global states across multiple components.
Conclusion
Event Bus in Vue facilitates efficient cross-component communication, enhancing modularity and reusability. Its benefits include simplified data sharing, flexibility, and maintainability. By following best practices, developers ensure organized event systems and smooth communication. Event Bus empowers Vue applications, streamlining development and enriching user experiences.