Using JWT for authentication in React


JSON Web Tokens (JWT) is a widely used web authentication mechanism, providing a secure and compact way to transmit information. This article will explore how to perform JWT authentication in React, covering the essentials for sending a request to the server, receiving the JWT token via cookies, and protecting routes.
JSON Web Tokens (JWT) is a widely used authentication mechanism in modern web applications. They provide a secure and compact way to transmit information between parties. This article will explore how to perform JWT authentication in React, a popular JavaScript library for building user interfaces. We will cover the essentials for sending a request to the server receiving the JWT token via cookies and protecting routes in React. By the end of this article, you will clearly understand how to perform JWT authentication with React and the importance of secure authentication in web applications.
JWT (JSON Web Token) is a way to securely transmit information between parties, usually between a client and a server. It is used to authenticate and authorize users without having to store session data on the server as it contains information about the user, such as their ID, access rights, and expiration time. It is used to verify that the user is who they say they are and is authenticated and authorized to access the requested resource.
Before we dive into coding, we’ll define some key terms and concepts to help us understand how JWT authentication works. After this, we will create a simple React application to see how we can integrate this form of authentication into a React application. By the end of this article, you will clearly understand how to perform JWT authentication with React and the importance of secure authentication in web applications.
How does JWT work?
In traditional web applications, when you log in, the server stores some information about you in a database or cache and sends you a session ID that is usually stored in a cookie. Every time you request the server, it looks up your session data in the database using the session ID to check if you are authenticated and authorized to access the requested resource.
However, this approach can become a bottleneck and less secure as users and requests increase. It requires a database lookup for every request, slowing down the system and creating a single point of failure.
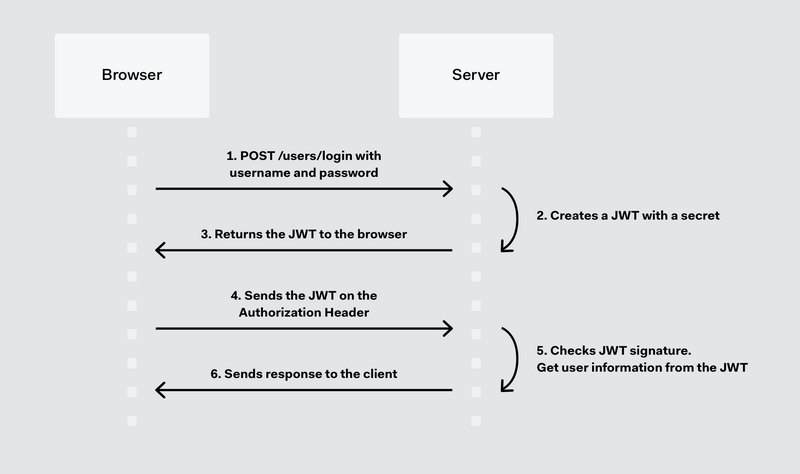
JWT provides a better way to handle authentication and authorization. When a user logs in, the server creates a token that contains information about the user, such as the user ID, access rights, and expiration time; instead of storing the session data on the server it sends the token to the client. The client then stores the token locally.
On subsequent requests, the client sends the JWT to the server in the Authorization header, and the server uses the signature in the JWT to verify that it has not been tampered with and the information in the token is valid. This approach eliminates the need for a database lookup, which makes the authentication process more scalable and efficient, especially for single-page applications and microservices.
Here’s a pictorial representation of how JWT works;
JWT Structure
A JWT consists of three parts separated by dots: the header, the payload, and the signature.
- The header is a JSON object that contains information about the token, such as the algorithm used for the signature. The header is
Base64Urlencoded. Here’s an example;
{
  "alg": "HS256",
  "typ": "JWT"
}- The payload (also known as “claims” or “body”) is a JSON object containing the data being transmitted, such as the user ID, permissions, and expiration time. The payload is also
Base64Urlencoded. Here’s an example;
{
  "sub": "1234567890",
  "name": "John Doe",
  "iat": 1516239022
}- The signature is used to verify the token’s integrity and ensure it has not been tampered with. The signature is calculated using a secret key known only to the server, and it is typically a combination of the header and the payload, encoded with the algorithm specified in the header. Here’s an example of the signature;
HMAC256(base64UrlEncode(header) + "." + base64UrlEncode(payload), secret_key);When a client receives a JWT token, it can decode the header and the payload to read the information, but it cannot modify the token without invalidating the signature. The server can use the secret key to validate the signature and ensure the token is authentic.
In summary, a JWT token consists of three parts: the header, the payload, and the signature. The header contains information about the token, the payload contains the data being transmitted, and the signature ensures the token’s integrity. You can learn more about JWT structure here.
Building our React Application
To better understand the concept of JWT authentication, we’ll build a simple React application containing a simple login form that will allow users to enter their credentials (username and password) and authenticate with a back-end API using JWT tokens. In addition to the simple login form, we will also be implementing a protected route that requires a valid JWT token to access. This will allow us to demonstrate how to handle authentication and authorization in a React application using JWT tokens.
To do this, navigate to your desired project directory and run the following command to create our React app:
npx create-react-app my-appReplace my-app in the command above with the name of your application.
- Wait for the installation to complete.
Create React Appwill create a new directory calledmy-app(or whatever name you specified) with all the files and folders needed to start building your React application. - Navigate into the new directory by running this command.
cd my-app- To start the development server, run this command;
npm startThis will open a new browser window with your React application running at http://localhost:3000.
Installing required packages
To perform JWT authentication in our React application, we must install axios package to make HTTP requests to the server.
We can use npm or yarn to install these packages. Open a terminal window and navigate to the root directory of your React application. Then run the following command:
npm install axiosOr if you’re using yarn, run this command:
yarn add axiosThis will download and install the axios package into your project’s node_modules directory, and add it as a dependency in your package.json file.
Once the installation is complete, we can use these packages in our application to implement JWT authentication.
Implementing JWT Authentication
To implement JWT authentication in our application, we will create a login route to authenticate users and grant them access to our application. When a user enters their credentials on the login page, the server verifies the information and generates a JWT token if the user is authenticated. Here’s what this component would look like;
import { useNavigate, useLocation } from "react-router";
import { useState, useContext } from "react";
import useAuth from "./hooks/useAuth";
import axios from "axios";

const Signin = () => {
  const navigate = useNavigate();
  const location = useLocation();
  const from = location.state?.from?.pathname || "/linkpage";
  const { auth, setAuth } = useAuth();
  const [name, setName] = useState("");
  const [password, setPassword] = useState("");
  const [error, setError] = useState("");

  const API = axios.create({
    baseURL: "http://localhost:5000",
  });

  const handleSubmit = async (e) => {
    e.preventDefault();
    try {
      const res = await API.post("/Login-marketer", {
        name,
        password,
      }).then((res) => {
        if (res?.data.name) {
          const role = res?.data.role;
          setAuth({ role: `${role}`, name: `${name}` });
          setName("");
          setPassword("");
          navigate(from, { replace: true });
        } else {
          console.log("incorrect submission");
          setError(res.message);
        }
      });
    } catch (err) {
      if (!err?.response) {
        setError("no server response");
      } else {
        setError("registeration failed");
      }
    }
  };

  return (
    <div className='App'>
      <form onSubmit={handleSubmit}>{/*code for signin form*/}</form>
    </div>
  );
};

export default signin;
In the above component, when our form is submitted, the handleSubmit function is called, sending a POST request to the server at the “/Login-marketer” endpoint using axios. If our request goes through to the server and the user is authenticated, our server responds with the user information in JSON format. Our JWT token can be sent in our JSON object and saved in local storage, but this has some disadvantages as opposed to cookies, such as:
- Vulnerability to Cross-site scripting (XSS) attacks: Local storage is vulnerable to
XSSattacks, which occur when a hacker injects malicious code into a website. If an attacker gains access to the local storage, they can steal and use the JWT token to access protected resources. - Lack of HttpOnly and Secure flags: When cookies are used to store JWT tokens, they can be set with the
HttpOnlyandSecure flags, which prevent client-side scripts from accessing the cookie and ensure that the cookie is only transmitted overHTTPS. Local storage, on the other hand, does not support these flags. - Difficulty in revoking tokens: If a JWT token is stored in local storage, it can be difficult to revoke the token when necessary, such as when a user logs out, or their account is terminated. This is because local storage is accessible from any window or tab in the browser, and the token cannot be selectively invalidated.
- Limited data: Local storage has a limited data size that can be stored, typically around 5-10 MB. If the JWT token contains a large amount of data, it may not fit in local storage and may need to be split across multiple storage mechanisms.
Due to these disadvantages, our token will be sent via httpOnly cookies. If our request fails, our handleSubmit function sets an appropriate error message based on the error response.

In the highlighted part of the image above, we see the cookie containing our JWT token after logging in sent from the server.
Session Replay for Developers
Uncover frustrations, understand bugs and fix slowdowns like never before with OpenReplay — an open-source session replay tool for developers. Self-host it in minutes, and have complete control over your customer data. Check our GitHub repo and join the thousands of developers in our community.
Route Protection with JWT
Protected endpoints in web development refer to endpoints or URLs that require some form of authentication or authorization before allowing access to their resources. In other words, protected endpoints are URLs that no one can access but users with the proper credentials, permissions, or access rights.
For example, consider a web application that allows users to create, read, update, and delete (CRUD) resources such as blog posts or comments. To ensure that only authorized users can perform these actions, the application may require users to sign in using a username and password or some other form of authentication such as OAuth or OpenID Connect.
Once authenticated, the application may use a session token or a JSON Web Token (JWT) to identify the user and provide access to the protected endpoints. These tokens are typically sent with each request to the server, and the server verifies them before allowing access to the requested resource.
To implement protected routes in a React application, we must send our JWT token to the server with every request. One of the advantages of sending JWT tokens via cookies is that using axios, we can send our JWT cookie with every request made to our server.
To do this, we’ll do the following;
- First, using
axios.createwe’ll create an axios instance
const API = axios.create({
  baseURL: "http://localhost:5000",
  withCredentials: true,
});
The withCredentials option in axios is used to determine whether or not to include credentials such as cookies or authorization headers in cross-site Access-Control requests. Enabling this option can potentially expose sensitive information to third-party websites and increase the risk of CSRF attacks, so it should only be used cautiously when necessary. Additionally, the server must be configured to accept credentials from cross-site requests else you’ll get this error;
 To deal with this error, set the response headers on your server;
const corsOptions = {
  origin: "http://localhost:3000",
  credentials: true,
  methods: ["GET", "POST", "PUT", "DELETE"],
  allowedHeaders: [
    "Content-Type",
    "Authorization",
    "Access-Control-Allow-Credentials",
  ],
};

app.use(cors(corsOptions));- With this done, our browser will send our JWT token alongside every request made to our server. To test this, let’s create a component called
Protectedthat will try to access a protected endpoint on our server;
import axios from "axios";
import { useState, useEffect } from "react";

function Protect() {
  const [message, setMessage] = useState("Couldn't access endpoint");

  useEffect(() => {
    const fetchData = async () => {
      const API = axios.create({
        baseURL: "http://localhost:5000",
        withCredentials: true,
      });
      try {
        const res = await API.post("/protected");
        console.log(res.data);
        setMessage(res?.data);
      } catch (err) {
        if (!err?.response) {
          setMessage("no server response");
        } else {
          setMessage("token not found or invalid");
        }
      }
    };
    fetchData();
  }, []);

  return (
    <div className='App'>
      <h1>Protected Route </h1>
      <p>{message}</p>
    </div>
  );
}

export default Protect;
With this done, whenever this component is loaded, our React application will try to access a protected endpoint on our server that requires a JWT token. Here’s the outcome;
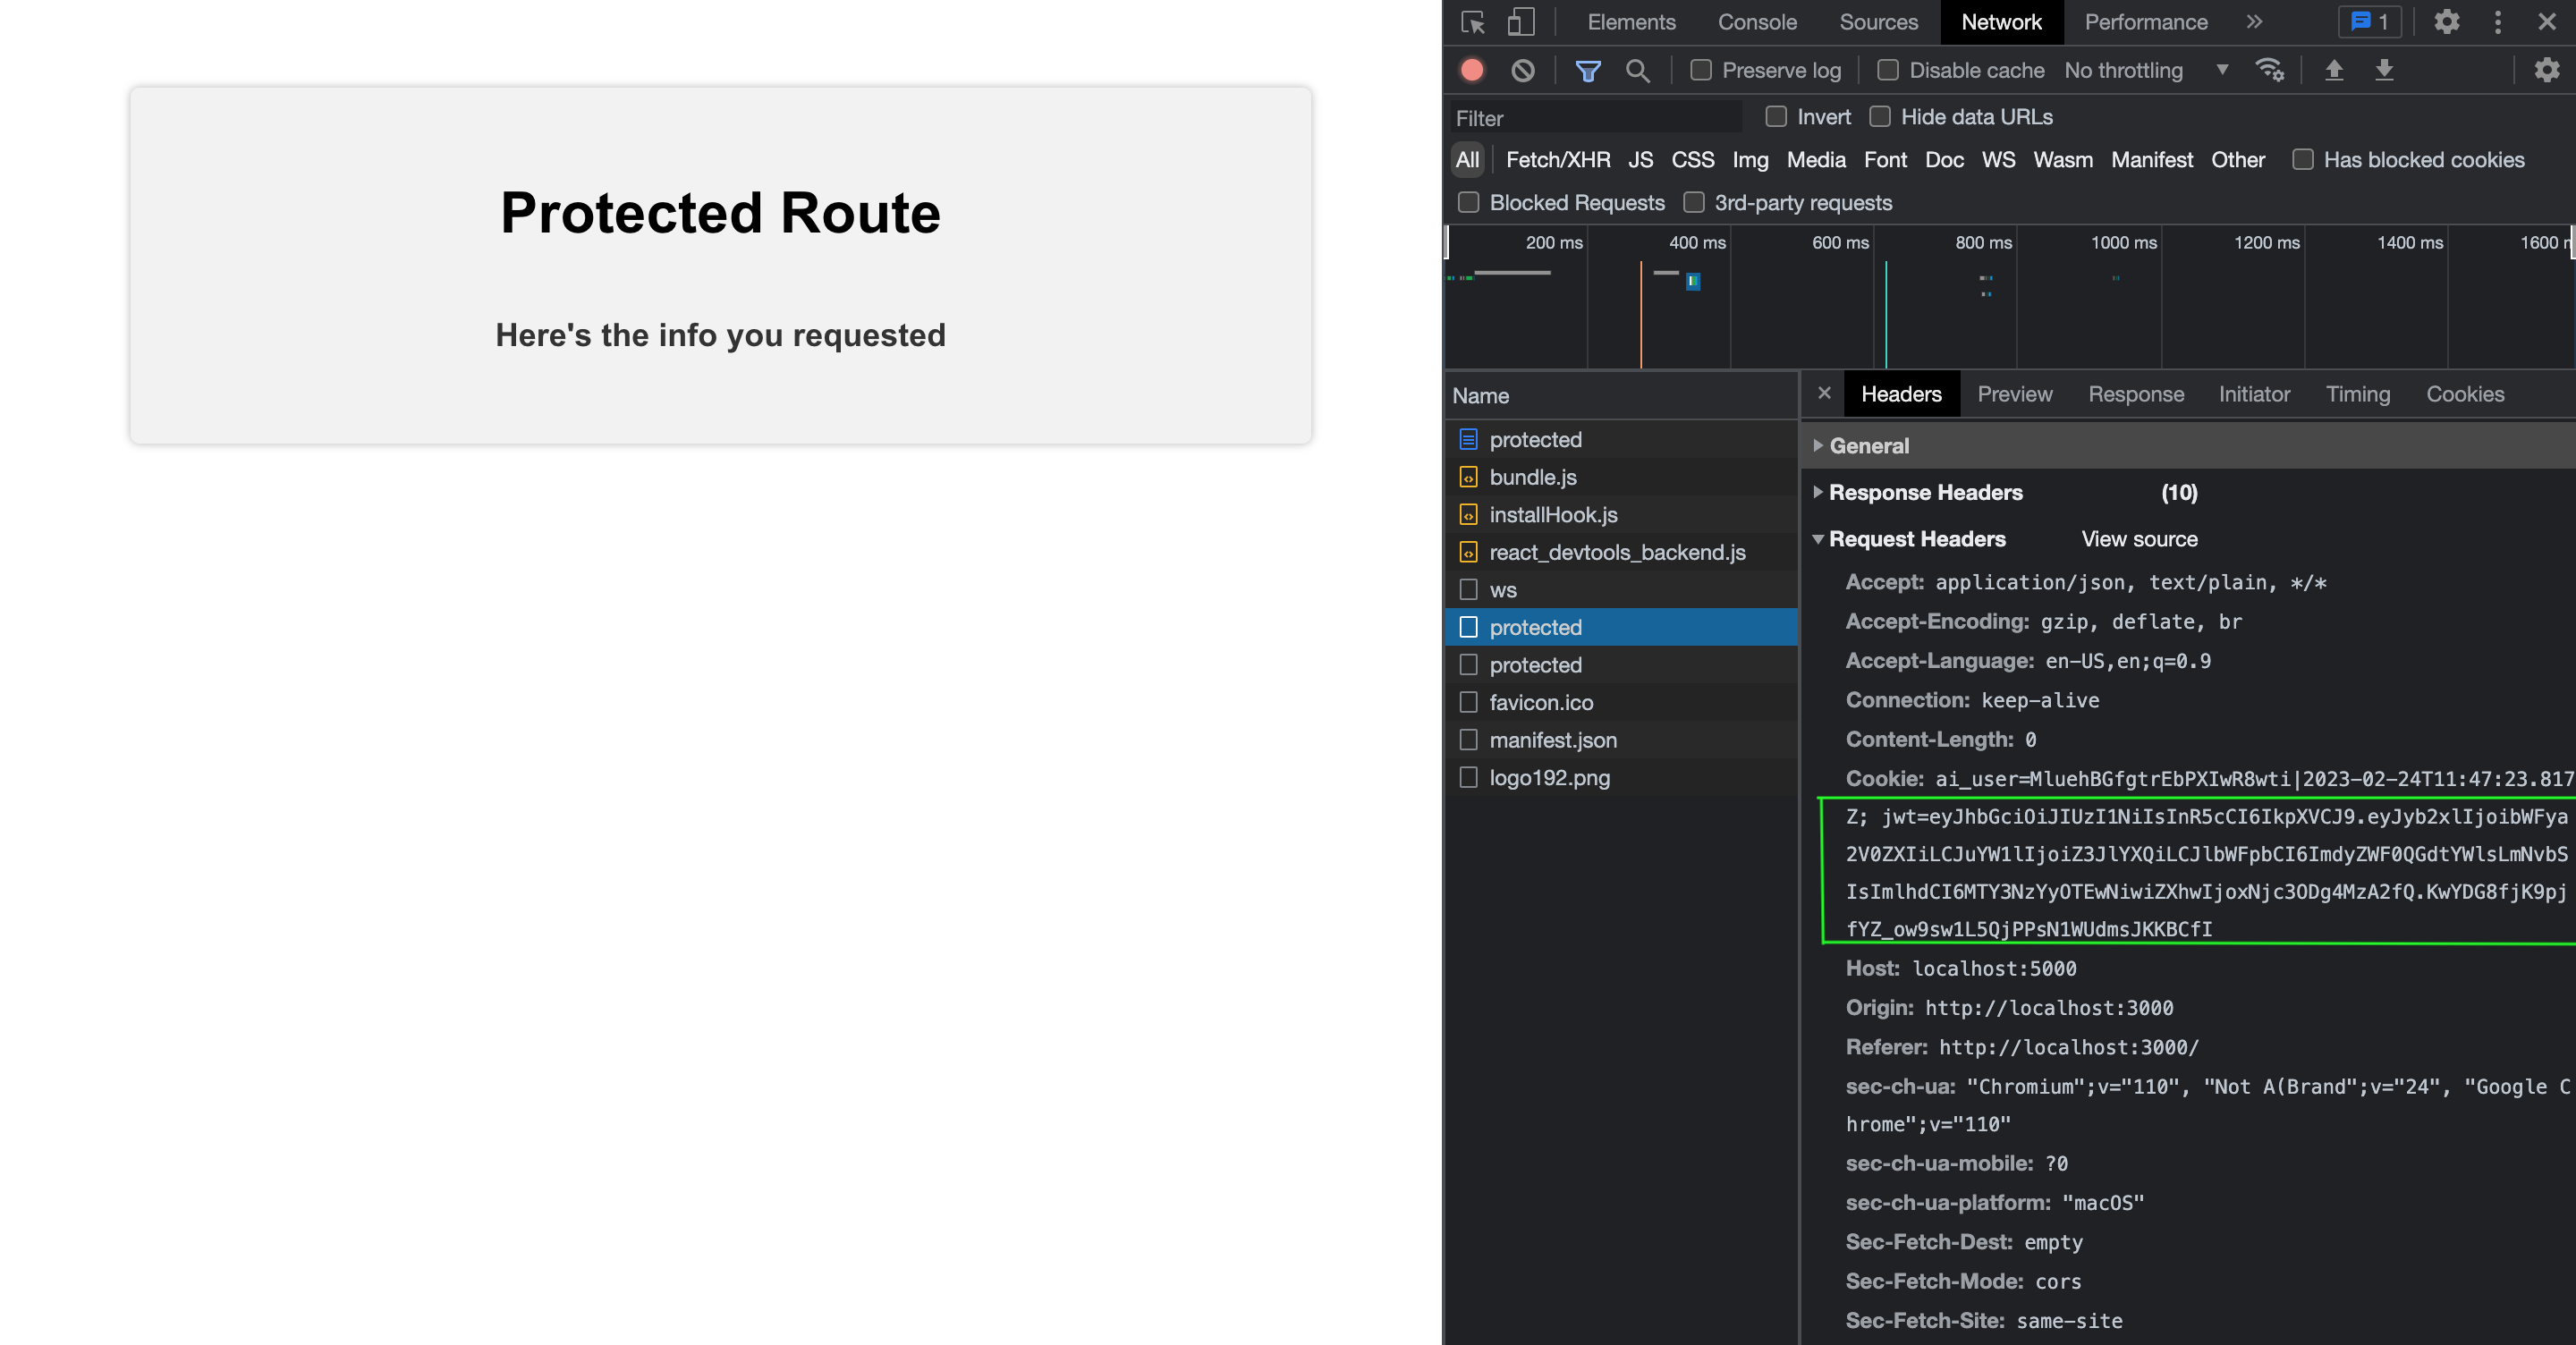
From the image above, we can see that our JWT cookie is sent as part of the header to our server. Any request made to our server using our axios instance will carry our JWT token, meaning we don’t have to manually insert our token for every protected route, and our token is inaccessible in case of man in the middle attacks.
Conclusion
Throughout this article, we have walked through implementing JWT authentication in a React application, highlighting the importance of securing our JWT tokens against potential threats such as cross-site scripting (XSS) and cross-site request forgery (CSRF).
Overall, implementing JWT authentication in a React application is a powerful tool for developers looking to build modern, secure, and user-friendly applications.
Resources
Gain Debugging Superpowers
Unleash the power of session replay to reproduce bugs and track user frustrations. Get complete visibility into your frontend with OpenReplay, the most advanced open-source session replay tool for developers.