

Vue is one of the most used JavaScript libraries by front-end developers. Its most recent version is Vue 3.4, titled Slam Dunk, released December 28th, 2023. It offers several features for front-end web development, one of which is the Vue Router. In this article, you will learn the key Vue router enhancements to help you improve the way you use Vue routes.

Discover how at OpenReplay.com.
You may already be familiar with Vue routing and how it works, so instead of focusing much on Vue router definitions, let us look at how to use them in different scenarios to enhance their use. Dynamic routes are a cornerstone of creating flexible and user-friendly navigation experiences in Vue applications. They enable you to define URL paths with variable segments that capture data from the user’s input, allowing you to render appropriate content or components based on the parameters passed.
Before going further, you need to set up a Vue project to follow up on this tutorial. To do so, create the following:
- Create a new Vue project using the CLI.
vue create my-vue-routes- Install a router plugin.
npm install vue-routerNow, let’s continue with dynamic routing. You can define dynamic routes in your Vue Router configuration’s routes array. To do so, create a file or open router.js and write the following code:
import { createRouter, createWebHistory } from "vue-router";
import Home from "./views/Home.vue";
import BlogPost from "./views/BlogPost.vue";

//below is the code for dynamic routes
const routes = [
  {
    path: "/",
    component: Home,
    name: "home",
  },
  {
    path: "/blog/:id", // Dynamic segment using a colon (:)
    component: BlogPost,
    props: true, // Pass dynamic segment as a prop
  },
  // Other routes...
];

const router = createRouter({
  history: createWebHistory(),
  routes,
});

export default router;
In this example:
/:idis the dynamic segment, capturing any value the user enters (e.g.,/blog/123).BlogPostis the component that will be rendered for this route.props: trueinstructs Vue Router to pass the captured value (id) as a prop to theBlogPostcomponent, accessible as$route.params.id.
To access your dynamic route properties within your component BlogPost, add the following code:
<template>
  <div>
    <h1>Blog Post {{ $route.params.id }}</h1>
    <p>This is the content of blog post {{ $route.params.id }}</p>
  </div>
</template>

<script>
export default {
  // You can add component logic here if needed
};
</script>

<style>
/* You can add component styles here */
</style>- Access the dynamic parameter using
$route.params.id. - Perform actions (fetching data and displaying content) based on the captured value.
Note: create the
BlogPost.vueandHome.vuewithin aviewsfolder.
Also, you can add the code for Home.vue as follows:
<!-- Home.vue -->
<template>
  <div>
    <h1>Home</h1>
    <h2>Welcome to the home page</h2>
  </div>
</template>
The example given above only shows dynamic routes. In a more advanced setup, you can have nested routes and route guards to secure routes.
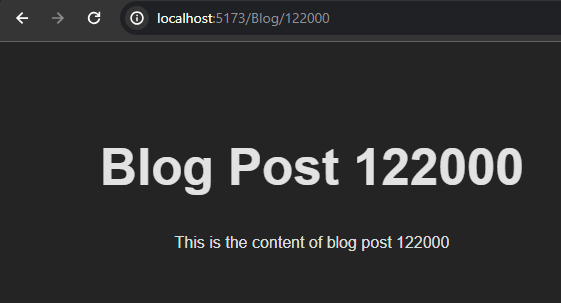
The image above shows the blog post for post 122000. The URL for the blog post in the image is /Blog/122000.
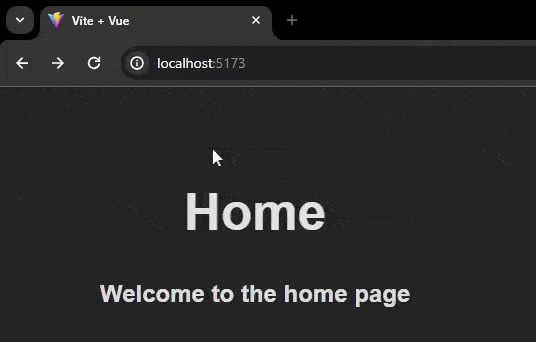
The images and GIF above show how the dynamic routes work.
Nesting Dynamic Routes
You can nest dynamic routes. It is done when you have more complex routes or applications with much data. An example is a blog or an e-commerce site, which may have several articles or products under a specific section. Using the blog example to achieve a nested route, you can do the following. Say you have a section or category in your blog called news and another to get individual posts based on ID. You can do the following:
- Inside your ‘router.js’ file, import the
categoryViewandpostViewcomponents and modify your routes array.
const routes = [
  { path: "/", name: "home", component: Home },
  {
    path: "/categories/:categoryName",
    name: "category",
    component: CategoryView,
    props: true,
  },
  {
    path: "/categories/:categoryName/:postId",
    name: "post",
    component: PostView,
    props: true,
  },
];
Note,
categoryViewandpostViewshould be created inside thecomponentsfolder.
- add the code to get each category inside the
categoryView.vuecomponent.
<!-- CategoryView.vue -->
<template>
  <div>
    <h1>Category: {{ categoryName }}</h1>
    <ul>
      <li v-for="post in categoryPosts" :key="post.id">
        <router-link :to="{ name: 'post', params: { postId: post.id } }">{{
          post.title
        }}</router-link>
      </li>
    </ul>
  </div>
</template>

<script>
import posts from "../data/posts";

export default {
  props: ["categoryName"],
  computed: {
    categoryPosts() {
      return posts.filter((post) => post.category === this.categoryName);
    },
  },
};
</script>- Add the code for the
postView.vuecomponent to get each post based on its category.
<!-- PostView.vue -->
<template>
  <div>
    <h1>Post: {{ post.title }}</h1>
    <p>{{ post.content }}</p>
  </div>
</template>

<script>
import posts from "../data/posts";

export default {
  props: ["postId"],
  computed: {
    post() {
      return posts.find((post) => post.id === parseInt(this.postId));
    },
  },
};
</script>- Next, in the
Home.vuefile, add the code to the list for each category.
<!-- Home.vue -->
<template>
  <div>
    <!-- <h1>Home</h1>
    <h2>Welcome to the home page</h2> -->
    <h1>Welcome to our Blog</h1>
    <h2>Explore Categories:</h2>
    <ul>
      <li v-for="category in categories" :key="category.id">
        <router-link
          :to="{ name: 'category', params: { categoryName: category.name } }"
          >{{ category.name }}</router-link
        >
      </li>
    </ul>
  </div>
</template>

<script>
import categories from "../data/categories";
import { logout } from "../router";

export default {
  name: "Home",
  data() {
    return {
      categories,
    };
  },
};
</script>
Finally, since there is no database to add the list of categories and posts, create a folder called data. Create two javascript files inside the folder named categories.js and posts.js. Next, add the following code:
// categories.js
const categories = [
  { id: 1, name: "Technology" },
  { id: 2, name: "Sports" },
];

export default categories;
// posts.js
const posts = [
{
id: 1,
category: "Technology",
title: "Tech Post 1",
content: "Content of Tech Post 1",
},
{
id: 2,
category: "Technology",
title: "Tech Post 2",
content: "Content of Tech Post 2",
},
{
id: 3,
category: "Sports",
title: "Sports Post 1",
content: "Content of Sports Post 1",
},
{
id: 4,
category: "Sports",
title: "Sports Post 2",
content: "Content of Sports Post 2",
},
];
export default posts;
The GIF above shows how nested dynamic routes work.
Navigation Controls in Vue Router
Navigation controls in Vue Router provide developers with granular control over the routing behavior of their Vue applications. These controls are implemented through navigation guards, which intercept route navigation and allow developers to execute logic before allowing the route transition to proceed.
Types of Navigation Guards
Vue Router offers several types of navigation guards:
- Global Guards
- Per-route Guards
- In-component Guards
Global Guards
Global guards are applied to all routes in your application. They help implement authentication, authorization, and other global navigation logic. Global guards are functions that run before every route navigation in your application. They are defined once and apply to all routes, making them ideal for implementing logic that should be enforced across your entire application, such as authentication checks.
Example:
// main.js or router.js
import { createRouter, createWebHistory } from "vue-router";
import router from "./router"; // Import your Vue Router instance

router.beforeEach((to, from, next) => {
  // Check authentication status before allowing route transition
  if (!isAuthenticated && to.meta.requiresAuth) {
    next("/login");
  } else {
    next();
  }
});
Per-Route Guards
Per-route guards are applied to specific routes. They allow you to define custom navigation logic for individual routes. Per-route guards are defined directly within the route configuration and apply only to the routes to which they are attached. It allows you to implement route-specific logic, such as role-based access control or route-specific data fetching.
Example:
// router.js
const routes = [
  {
    path: "/admin",
    component: AdminPanel,
    beforeEnter: (to, from, next) => {
      // Check if the user has admin privileges before allowing access to the route
      if (!isAdmin) {
        next("/unauthorized");
      } else {
        next();
      }
    },
  },
  // Other routes...
];In-Component Guards
In-component guards are defined within component definitions. They allow you to execute logic specific to a particular component before route navigation. In-component guards are methods defined within Vue components that are called before a route transition occurs. These guards allow you to implement component-specific logic, such as fetching data or performing cleanup tasks before the component is rendered or destroyed.
Example:
// MyComponent.vue
export default {
  beforeRouteEnter(to, from, next) {
    // Execute logic before entering the route component
    next();
  },
  beforeRouteLeave(to, from, next) {
    // Execute logic before leaving the route component
    next();
  },
};
Use Case: Authentication
Navigation controls are commonly used to implement authentication in Vue applications. By leveraging global guards, you can restrict access to specific routes based on user authentication status, ensuring that only authenticated users can access protected routes.
Using the previous example, which explained nested routes, we will edit it to use the navigation controls for authentication. The simple blog will have a login page where users will have to be authenticated before they can access other routes in the blog, and on the home page, there will be a logout button to go back to the login page, which makes the user unauthenticated.
In the router.js, modify the following to add the login.vue component and the navigation controls by adding the following code:
// router.js
import { createRouter, createWebHistory } from "vue-router";
import CategoryView from "./components/CategoryView.vue";
import PostView from "./components/PostView.vue";
import Home from "./views/Home.vue";
import Login from "./components/Login.vue";

let isAuthenticated = false;

const routes = [
  { path: "/", name: "home", component: Home },
  { path: "/login", component: Login },
  {
    path: "/categories/:categoryName",
    name: "category",
    component: CategoryView,
    props: true,
  },
  {
    path: "/categories/:categoryName/:postId",
    name: "post",
    component: PostView,
    props: true,
  },
];

const router = createRouter({
  history: createWebHistory(),
  routes,
});

// Navigation guards
router.beforeEach((to, from, next) => {
  // Redirect unauthenticated users to the login page if accessing protected routes
  if (to.path !== "/login" && !isAuthenticated) {
    next("/login");
  } else {
    next(); // Continue navigation
  }
});

// Simple login function to set isAuthenticated to true
export function login() {
  isAuthenticated = true;
}

// Simple logout function to set isAuthenticated to false
export function logout() {
  isAuthenticated = false;
}

export default router;
In the login.vue component, add the following code:
<!-- Login.vue -->
<template>
  <div>
    <h2>Login</h2>
    <form @submit.prevent="login">
      <label for="username">Username:</label>
      <input type="text" id="username" v-model="username" />
      <label for="password">Password:</label>
      <input type="password" id="password" v-model="password" />
      <button type="submit">Login</button>
    </form>
  </div>
</template>

<script>
import { login } from "../router";
export default {
  data() {
    return {
      username: "",
      password: "",
    };
  },
  methods: {
    login() {
      // Call login function from router.js to update authentication status
      login();
      // Redirect to home page after successful login
      console.log("Username:", this.username);
      console.log("Password:", this.password);
      this.$router.push("/");
    },
  },
};
</script>
Next, inside the Home.vue component, add the method for the logout.
<!-- Home.vue -->
<template>
  <div>
    <h1>Welcome to our Blog</h1>
    <h2>Explore Categories:</h2>
    <ul>
      <li v-for="category in categories" :key="category.id">
        <router-link
          :to="{ name: 'category', params: { categoryName: category.name } }"
          >{{ category.name }}</router-link
        >
      </li>
    </ul>
    <button @click="logout">Logout</button>
  </div>
</template>

<script>
import categories from "../data/categories";
import { logout } from "../router";

export default {
  name: "Home",
  data() {
    return {
      categories,
    };
  },
  methods: {
    logout() {
      // Call logout function from router.js to update authentication status
      logout();
      // Redirect to login page after logout
      this.$router.push("/login");
    },
  },
};
</script>
After that, you can try looking at your result in the browser. Based on the code above, let’s examine what each code in each file does.
The code in the router.js file starts by importing necessary functions and components from the Vue Router library and other project files. createRouter and createWebHistory are functions imported from Vue Router to create the router instance. CategoryView, PostView, Home, and Login are Vue components imported from project files.
The routes constant defines an array of route objects, where each route object specifies a path and its corresponding component.
A global navigation guard is added using beforeEach() to intercept navigation requests and perform authentication checks. This guard checks if the user is authenticated. If not, it redirects the user to the login page. The functions login() and logout() are defined to manage the authentication state. These functions are exported and can be called from other application parts to update the authentication state.
Inside the login.vue component, the <script> section, the component imports the login function from the router module to handle authentication. To store the user input, two data properties, username and password, initialize the component’s data function. The login method, triggered upon form submission, calls the login function from the router module to update the authentication status. It then logs the username and password entered into the console for debugging. Finally, it redirects the user to the home page ('/') upon successful login using $router.push('/').
In the Home.vue component, the logout button triggers the logout method when clicked, defined in the <script> section. Within the <script> section, the component imports the logout function from the router module to handle logout functionality. The logout method is defined to call the logout function from the router module to update the authentication status. Upon successful logout, it redirects the user to the login page /login using $router.push('/login'). After logging out, it ensures the user is redirected to the login page, effectively ending the authenticated session.
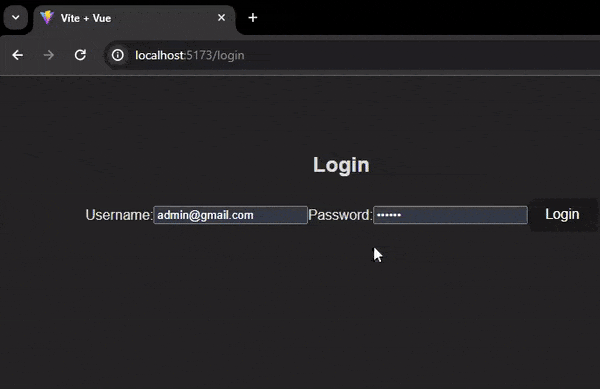
The GIF shows how the authenticated route works. You have to log in first before you can access the other routes. If you log out, you must log in again to access the nested routes.
Named Routes and Views
Named routes and views are powerful features of Vue Router that enhance the maintainability and readability of your routing configuration. Instead of hardcoding route paths throughout your application, you can assign meaningful names to routes and views, making it easier to refactor and update your routing structure.
const routes = [
  {
    path: "/about",
    component: AboutView,
    name: "about", // Assigning a name to the route
  },
  // Other routes...
];
In this example, the route /about is named 'about'. You can then use this name to generate URLs and navigate programmatically.
<router-link :to="{ name: 'about' }">About</router-link>Using named routes and views improves code readability and maintainability, especially in larger applications with complex routing requirements.
Transition Effects
Transition effects in Vue Router allow you to add animations and transitions to route changes, enhancing the overall user experience of your application. It will enable you to create smooth and appealing transitions between views by applying transition classes to route components.
Transition Components
Vue provides a built-in <transition> component that can apply transition effects to elements when inserted, updated, or removed from the DOM.
Using the code example in our nested routes, we can add transitions by modifying our app.vue file.
Inside the app.vue file, add the following:
<template>
  <div id="app">
    <router-view v-slot="{ Component }">
      <transition name="fade" mode="out-in">
        <component :is="Component" />
      </transition>
    </router-view>
  </div>
</template>

<script>
export default {
  name: "App",
};
</script>

<style>
#app {
  font-family: Arial, sans-serif;
  text-align: center;
}
.fade-enter-active,
.fade-leave-active {
  transition: opacity 5s;
}
.fade-enter,
.fade-leave-to {
  opacity: 0;
}
</style>
The App.vue component, the main application layout, and the transition effect are defined. In the <template> section, the component renders an <router-view> element with a scoped slot. The <router-view> component renders the matched component for the current route, and its content is wrapped inside a <transition> element. The <transition> element applies a fade effect to the rendered component when it enters or leaves the DOM, with a duration of 5 seconds specified by the CSS transition property. Within the <script> section, the component exports an object with a name property set to App, defining the name of the Vue component. In the <style> section, CSS rules are applied to style the application layout. The #app selector styles the root element of the application, setting the font family to Arial or sans-serif and aligning text to the center. The CSS classes, .fade-enter-active and .fade-leave-active specify the transition behavior for the fade effect, while .fade-enter and .fade-leave-to specify the initial and final states of the transition, respectively. Overall, this code sets up the main layout of the application and applies a fade transition effect to route transitions for a visually appealing user experience.
The GIF shows how transition effects affect the routes. When a route is navigated to the UI of the previous route, it fades out.
Lazy Loading Routes
Lazy loading routes is a technique for optimizing initial page load performance by deferring the loading of route components until they are needed. Instead of loading all route components upfront, lazy loading allows you to load components asynchronously, reducing the initial bundle size and improving overall page load times.
Dynamic Import
Vue Router supports lazy loading of route components using dynamic import syntax, allowing you to import components asynchronously when needed.
Example:
// router.js
const CategoryView = () => import("./components/CategoryView.vue");
const PostView = () => import("./components/PostView.vue");

let isAuthenticated = false;

const routes = [
  { path: "/", name: "home", component: Home },
  { path: "/login", component: Login },
  {
    path: "/categories/:categoryName",
    name: "category",
    component: CategoryView,
    props: true,
  },
  {
    path: "/categories/:categoryName/:postId",
    name: "post",
    component: PostView,
    props: true,
  },
];
The code snippet above implements lazy loading routes using dynamic imports. Instead of directly importing components, arrow functions are used to dynamically import the components only when needed. This approach helps split the bundle size and improves initial load times by loading components asynchronously. Within the routes array, the CategoryView and PostView components are defined using arrow functions with import() statements. These functions return promises that resolve to the imported components when executed. The CategoryView and PostView components are assigned as their respective routes component properties.
Lazy loading routes allow for better performance optimization by deferring component loading until required, resulting in faster page loads and a smoother user experience.

The image above shows the load speed without using dynamic import, and the image below shows the load speed with dynamic import.

Overall, the difference is not much due to the UI components of each route not being much. To test it, you will need a more complex route with lots of UI or content.
Conclusion
In this article, we’ve explored several enhancements to the Vue Router that can help you build more powerful and efficient Vue applications. From dynamic routing and navigation controls to named routes, transition effects, and lazy loading routes, Vue Router offers many features and capabilities to suit your routing needs.
By leveraging these enhancements, you can create intuitive navigation experiences, optimize page load performance, and deliver engaging user experiences that keep your users returning for more. Whether building a simple blog or a complex web application, Vue Router has the tools you need to succeed.
Gain Debugging Superpowers
Unleash the power of session replay to reproduce bugs, track slowdowns and uncover frustrations in your app. Get complete visibility into your frontend with OpenReplay — the most advanced open-source session replay tool for developers.
Star on GitHub12k