Vuex: State management for Vue Projects
Learn how to handle your state with VueX, the state management library for Vue


State is a crucial part of Vue applications and other frontend frameworks as it is responsible for how data is passed among components and views. The managing of state tends to become complex as an application grows larger. In this article, we will look at how to use a popular state management library of Vue called Vuex to manage state in Vue projects. But before we talk about State management we have to backtrack a little bit and talk about state.
What is State?
Components in a Vue application contain data that may be dynamic and likely to change across the lifecycle of the component. A state is basically an object where the data a component needs is stored. For example, we can store a message a component needs in the state and display the message whenever the component is rendered. In Vue components, the state is stored in the data function so that each instance can maintain a copy of its state. The example below shows how to create a state for a single file component
<template>
  <button>{{message}}</button>
</template>

<script>
export default(){
  data(){
    message: 'Hello world'
  }
}
</script>
What is State Management?
State management is a way of managing the state across multiple UI components efficiently. As we discussed earlier when an application becomes complex so does managing its state due to shared data across many components that need to interact with each other. This unique problem has giving rise to state management libraries in the last few years.
State management libraries provide a solution to this problem by providing a centralized store for storing state that can be used across components even if the components are unrelated. As opposed to passing props down the tree, which can become really complex for deeply nested components. Some popular state management libraries for Vue are: Vuex, Redux, Mobx, and vue-stash.
What is Vuex?
Vuex is a state management library and state management pattern geared towards Vue applications. It makes managing state in Vue applications easier by providing a central storage for the state (and other computations) called a store. That way you can keep that business logic away from your components. Vuex is inspired by other state management libraries like Flux and Redux which advocate for the separation of a shared state, the major difference between Vuex and these libraries is Vuex is geared more towards the reactive system of Vue.js
Why Vuex?
As mentioned earlier there are other state management libraries for Vue like Redux, so why should you use Vuex?
- Easier learning curve when compared to other state management libraries: since Vuex was made with Vue in mind it makes it easier integrating it into a Vue application, you can also quickstart a Vuex application from the vue-cli.
- Mutations: In Vuex state isn’t immutable because Vuex provides designated functions called mutations for modifying state without entirely replacing it.
- Easy to use dev tools: The Vue Dev Tools can also be used for Vuex applications making it easier to track state changes and also debug Vuex applications.
Getting Started
I will be demonstrating practically how to use Vuex to manage state in a Vue application by building a to do list. Open your terminal and run the code below to install vue-cli
npm install -g @vue/cli
# OR
yarn global add @vue/cli
The vue-cli is a standard tooling for Vue.js development. After installing the CLI run the code below to initialize a new Vue project
vue create vuex-tutorialAfter initializing a Vue project, navigate to the project directory
cd vuex-tutorialRun the command below to install Vuex
npm install vuex --save
# OR
yarn add vuex
After installation run the code below to start the application
npm run serve
# OR
yarn serve
Lastly, this is an optional step but very recommended: vue-devtools is a browser plugin that makes it easier to debug Vue.js applications, head over here to download and install the extension compatible for your browser.
Creating Components
Before we go ahead into integrating Vuex into our application let’s create the components we will be needing for the application.
Go to the components directory and delete HelloWorld.vue as we won’t be needing it for our application. Create a file called TodoList.vue in the components directory, open the file and paste the code below
<template>
  <div class="todo-list">
    <div class="todo-item" v-for="todo in todos" :key="todo.id">
      <p>{{ todo.title }}</p>
      <input
        type="checkbox"
        name="todo.id"
        v-on:change="updateTodo(todo)"
        v-bind:checked="todo.completed"
      />
    </div>
    <p>Completed Todos: {{ todosCount }}</p>
  </div>
</template>

<script>
export default {
  data: () => {
    return {
      todos: [],
    };
  },
};
</script>
This component will contain the list of Todos for the application. Create another file called TodoForm.vue in the components directory and paste the code below
<template>
  <form class="todo-form" @submit="submitTodo">
    <input
      class="todo-input"
      name="todo"
      v-model="todo"
      placeholder="Start typing..."
      required
    />
    <button class="todo-btn" type="submit">Add Todo</button>
  </form>
</template>

<script>
export default {
  data() {
    return {
      todo: '',
    };
  },
  methods: {
    submitTodo: function(event) {
      event.preventDefault();
      console.log(Todo)
    },
  },
};
</script>
This contains a form to add a new note to the note list. Go to App.vue and replace the contents with the code below
<template>
  <div id="app" class="container">
    <h1>todos...</h1>
    <TodoForm />
    <TodoList />
  </div>
</template>
<script>
import TodoList from './components/TodoList';
import TodoForm from './components/TodoForm';
export default {
  name: 'App',
  components: {
    TodoList,
    TodoForm,
  },
};
</script>
Creating a Vuex Store
A store is the single source of truth in a Vuex application and is responsible for holding the state of all the components in the application. Navigate to the src directory of the application and create a store.js file. Open the file and paste the code below
import Vue from 'vue';
import Vuex from 'vuex';
Vue.use(Vuex);
export const store = new Vuex.Store({
  state: {
    todoList: [],
  },
});
What we’ve done above is creating a store with an initial state object. Our state at the moment contains an array called todoList which will be responsible for storing the to-dos in our application.
The next step is to connect the store we’ve created to our application in order to have access to it in our components. Open main.js file and refactor it to look like the code below
import Vue from 'vue';
import App from './App.vue';
import store from './store';
Vue.config.productionTip = false;
new Vue({
render: (h) => h(App),
store,
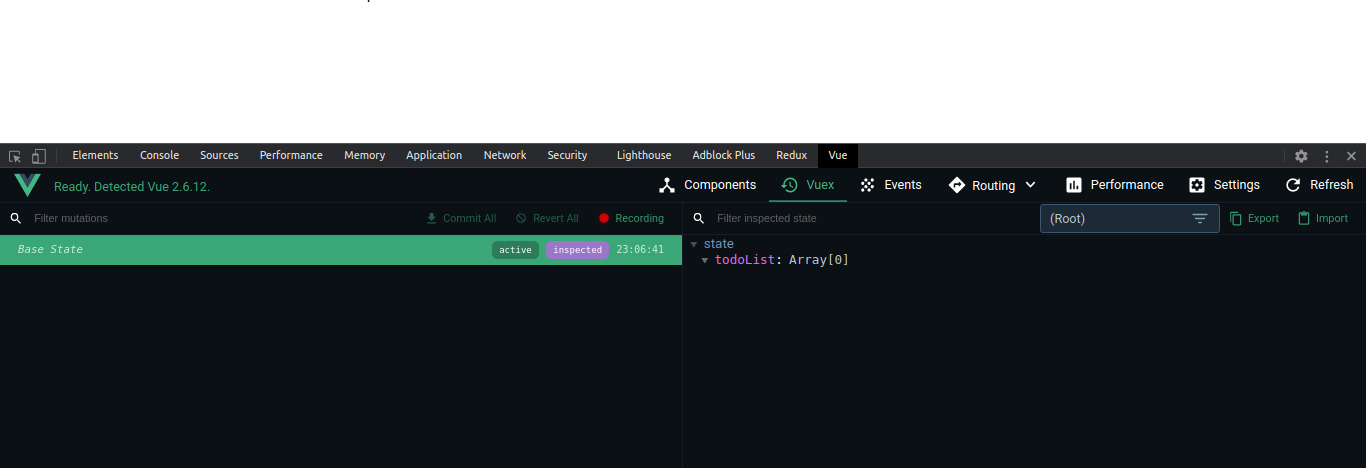
}).$mount('#app');The change we’ve made to this file is importing the store we’ve created and injecting it into the root component. If you have the vue-devtools installed you can take a look at the store by opening your browser console and navigating to the Vue tab.
Mutations
To manipulate the state we’ve created we will need a mutation. Mutations help in modifying the state in the store, to modify a state we will need to commit a mutation.
Our to-do app will need some mutations to function, we want to be able to add to-dos, and update to-do items. Go back to your store.js and add this as a property after the state created earlier
mutations: {
  addTodo(state, title) {
    state.todoList = [
      ...state.todoList,
      {
        id: Math.random(),
        title,
        completed: false,
      },
    ];
  },
  addTodos(state, todos) {
    state.todoList = todos;
  },
  updateTodo(state, todoId) {
    state.todoList = state.todoList.map((item) => {
      if (item.id === todoId) {
        item.completed = !item.completed;
      }
      return item;
    });
  },
}
We’ve created three mutations:
addTodo- for adding a single to-do itemaddTodos- for adding an array of to-dosupdateTodo- for updating the completed status of a to-do item.
To commit a mutation we use the store.commit() function. It accepts a string which is the name of the mutation and an optional payload which is the data to be passed to the mutation. We will be using this mutations in subsequent sections.
Getters
Getters provide a way of getting a computed state from the store so instead of fetching a state in your components and then making computations on the state you can make the computations using a getter. This helps when more than one component needs to make use of the same computed state.
We will need a getter to compute the number of completed to-dos in our application
// This should be pasted after the mutations property
getters: {
  completeTodosLength: (state) => {
      const completeTodos = state.todoList.filter((item) => item.completed);
      return completeTodos.length;
    },
},
If you notice from the code above you will see the getter accepts a state as a parameter that way it gives you complete read access to the state object. Getters can be fetched in components by either accessing it with store.getters or using a helper function from Vuex called mapGetters which is used in mapping store getters to local computed properties.
Actions
Actions are functions that dispatch mutations. They differ from mutations as they commit mutations instead of mutating the state directly. Since actions don’t modify a state directly they can be used to commit multiple mutations making it a better choice.
They can also be used to perform asynchronous operations, unlike mutations that are meant to be synchronous. A use case for actions is fetching data from an API and then committing a mutation that will modify the state based on the data received.
Let us create an action to get to-dos from an api and store them in the todoList state. Open the store.js file and refactor the actions property
actions: {
    getTodos({ commit }) {
      fetch('https://jsonplaceholder.typicode.com/todos?userId=1')
        .then((res) => res.json())
        .then((data) => commit('addTodos', data))
        .catch((error) => console.log(error));
    },
},
Actions receive an instance of the store as a context object which give us access to the same properties as that of the store like commit, state, and getter . The action we created makes a request to a fake API JSONPlaceholder to get an array of to-dos and then commits a mutation addTodos which was destructured from the context object to modify the todoList in state. In order to use an action we will need to trigger the action.dispatch() method which accepts the same parameters as a mutation.
Bringing Everything Together
We’ve been able to create state, mutations, and actions the next step is plugging all that into our components. Open the TodoList.vue and refactor the script with the code below
<script>
export default {
  created: function() {
    this.getTodos;
  },
  computed: {
    todos() {
      return this.$store.state.todoList;
    },
    todosCount() {
      return this.$store.getters.completeTodosLength;
    },
    getTodos() {
      return this.$store.dispatch('getTodos');
    },
  },
  methods: {
    updateTodo: function(todo) {
      this.$store.commit('updateTodo', todo.id);
    },
  },
};
</script>
When this script runs we dispatch an action that we created earlier to get the to-dos from an api and then update the todoList state. We then get the list of to-dos from the store state in our todos function to use in our component. The number of completed to-dos is returned from the getter function getTodos and when a user toggles the checkbox of a to-do item it runs the updateTodo method which commits a mutation responsible for updating the completion status of a to-do item.
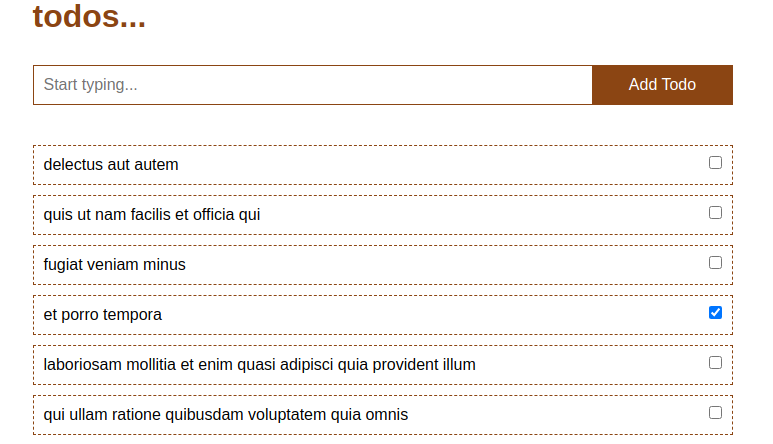
At this point, you should be able to see and update a list of to-dos on your browser
What’s left is making sure a user can create a new to-do item, so open the TodoForm.vue file and refactor the submitMethod to commit a mutation that adds a new to-do item to the state
submitTodo: function(event) {
  event.preventDefault();
  this.$store.commit('addTodo', this.todo);
  this.todo = '';
}
Open Source Session Replay
OpenReplay is an open-source, session replay suite that lets you see what users do on your web app, helping you troubleshoot issues faster. OpenReplay is self-hosted for full control over your data.

Start enjoying your debugging experience - start using OpenReplay for free.
Conclusion
In this article, we have looked at the major concepts of Vuex: state, mutations, getters, actions, and how to integrate them into a Vue application. This is enough to get you going in creating Vue applications with Vuex, there are other advanced concepts not covered so be sure to check out the docs. The code for this article is available in this repo.