
A website was once just a small bundle of good old .html, CSS, and possibly one or more JavaScript files in some cases. To understand what Webpack is all about, it is better to go back, way back, to those old-timey ages when JavaScript was not the new sexy and trendy thing.
With the advent of JavaScript modules, however, the new trend of encapsulating small chunks of code meant that all of this was soon going to change as websites started to become bloated and difficult to maintain.
You may be knowledgeable about Webpack, such as how it functions, or you may know nothing at all. You should be sufficiently familiar with the Webpack tool after reading this article.
It can be challenging to write JavaScript when creating large web applications. It is crucial to consider both the features the target browsers offer and the effects of not implementing a feature.
Webpack is a command-line tool to create bundles of assets (code and files). Neither the server nor the browser run Webpack. Your javascript files and other materials are combined into one massive file using Webpack. The server can then send this large file to a client’s browser.
Using modules with dependencies, Webpack creates static assets to represent those modules.
In essence, Webpack examines your package and builds what is known as a “dependency graph,” which comprises different modules that your web app would need to work as intended.
Then, based on this graph, it generates a new package with the absolute minimum amount of files necessary—often just one bundle. HTML file and utilized for the app.js file that can be readily plugged in.
What Does It Mean To “Bundle” Your Code?
Coding bundles are created by combining and optimizing various modules into single or multiple production-ready bundles. This bundle is best understood as the culmination of the entire bundling process.
In this article, we will delve deeply into Webpack concepts and how modern browsers provide good support for JavaScript modules. Still, module bundlers such as Webpack remain an important part of the JavaScript development workflow.
Before diving further into Webpack, let’s take a look at a few concepts which are
- Compliers
- Modules
Compilers are specialized software tools that convert one programming language’s source code into machine code, bytecode, or into another programming language. Typically, a high-level, understandable language like Javascript or C++ is used to create the source code.
Modules, on the other hand, are a portion of code that is inserted all at once and created to be easily reused. One possible example is a module that provides a collection of classes, functions, etc., to act on user profiles, admin privileges, and payroll on a System Applications and Products (SAP) application.
There are no restrictions on a module using other modules; for example, a DateTime module may use a time module or timezone module to perform some of the processing. In most programming languages, a “module” is a single file to which the rest of the program connects.
Why The Need For Fodules?
We have two options if we don’t have Webpack.
- Create from a single large file. The development would become impractical as readability and maintainability would be severely hampered.
- Include many include statements in your app’s HTML file that import all of your Javascript files and their dependencies individually. This means a lot of network requests for each asset, and it also doesn’t scale to usefully sized projects.
Now, Webpack is a compiler that uses Babel and other tools to condense many assets, including Javascript code, into a small number of bundle files that users can download when they first visit our website.
Webpack compresses each module in your application into one or more (usually just one) bundles that are then served to the browser.
Why Use Webpack: The Problem
Previously, websites were more than just a small bundle of files. They claimed that writing code that contained little bits of information was the new trend, but with the advent of JavaScript modules, things started to get bulky.
This culminated in a situation where the total number of files in the application bundle was three or four times higher.
Due to the code being incredibly bulky and developers having to include a lot of assistance code called “polyfills” to ensure that the browsers could understand the code in their packages, code maintenance almost became impossible to maintain.
Webpack jargon refers to this large file as a “bundle.” A module bundler is a system that combines many small parts into something larger and more self-contained.
Why Use Webpack: The Solution
To resolve dependencies, we need a module bundler like Webpack. Node has a built-in module resolver on the server side where you can “require” modules; in ES6, this syntax is “import.”
However, this functionality is not built into browsers; Webpack can recognize the relationships between files and “resolve” them in a process known as dependency resolution. When one is dependent on another, the latter is referred to as the former’s dependency.
The process of resolving dependencies traverses every file in your code and begins with the entry point (“app.js”).
Using Javascript modules for development and bundling them into a single large file that the browser can use is the primary purpose of Webpack. Hence, Webpack (a static module bundler) was developed to solve these problems.
It combines and supplements what you’re working on so the web browser can understand it. Webpack is more than just a build tool; it manages your entire codebase, allows you to create amazing web applications, and handles JavaScript font styling.
Session Replay for Developers
Uncover frustrations, understand bugs and fix slowdowns like never before with OpenReplay — an open-source session replay tool for developers. Self-host it in minutes, and have complete control over your customer data. Check our GitHub repo and join the thousands of developers in our community.
What are we building?
You are familiar with JavaScript. If you know JavaScript well enough, you likely know how to create an app.js file. For those of you who have no idea what JS, HTML, and CSS code structures are, brush up on the JavaScript basics first. I hope this sounds fun enough to you.
Explore a simple sample project to understand Webpack functionalities better. To help you follow along with the code, all code snippets are available in my GitHub repository.
//app.js
var showSecret = false;

secretButton.addEventListener('click', toggleSecretState);
updateSecretParagraph();

function toggleSecretState() {
    showSecret = !showSecret;
    updateSecretParagraph();
    updateSecretButton()
}

function updateSecretButton() {
    if (showSecret) {
        secretButton.textContent = 'Hide the course title';
    } else {
        secretButton.textContent = 'Show the course title';
}}
function updateSecretParagraph() {
    if (showSecret) {
        secretParagraph.style.display = 'block';
    } else {
        secretParagraph.style.display = 'none';
}}
We associate a button with an event listener using the addEventListener method on line two of the code block above. The function updateSecretParagraph() merely updates the paragraph and displays a secret item based on the showSecret boolean variable on line one.
When we click the button, the function toggleSecretState() enables the toggle, changes the state of the event listener, and modifies the content of updateSecretButton().
To assess these buttons and paragraphs, we can only gain assess to them from the Loader.js file as so;
//Loader.js
export var secretButton = document.querySelector('#secret-button');
export var secretParagraph = document.querySelector('#secret-paragraph');
All we do here is assign the button and paragraph to variables and get values for them with the traditional JavaScript method using document.QuerySelector.
We can see that both app.js and Loader.js are imported as such by looking at our imports within the main Index.html file;
//index.html
<body>
<h1>Let's learn Webpack </h1>
<button id="secret-button">Click me to show toggle</button>
<p id="secret-paragraph">Webpack for dummies</p>
<script src="src/js/Loader.js"></script>
<script src="src/js/app.js"></script>
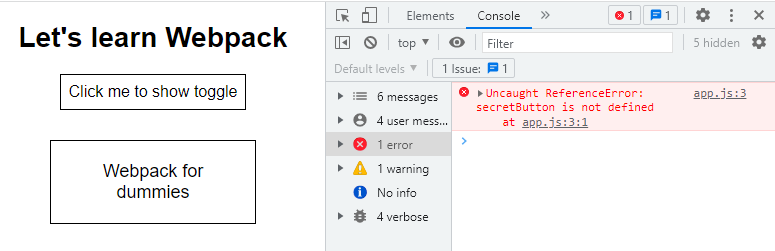
</body>The code works just fine. Notice how we first imported src/js/Loader.js, which first assesses the elements in the DOM and stores them in the DOM variable before importing src/js/app.js
If we reverse that order and import app.js before Loader.js, we can see from the image below that an error was thrown, indicating that secretButton is not defined, and nothing happens when we click on the toggle button.
Consider working with very large applications that have hundreds of files, functions, and so on. Maintaining or managing these applications may become difficult, or you may have multiple files that require careful attention to import order and file structure. This is where Webpack comes into play by enabling us to minify and maintain our codebase.
Webpack Setup And Installation
Install Webpack into our application and optimize our code Note: You will need Node installed on your local machine, so install and use Webpack locally.
Open the command terminal and run the command as so;
npm initInsert the project name, author, and other variables and defaults as needed. After initializing npm, notice a file was created in the root folder, the package.json file, which will allow npm to manage your project and keep track of any changes made in real time.
Next, run the following command on the terminal;
npm install webpack --save-deThis command will inform you that the dependency is exclusively for development and not production. The command will download all Webpack packages and dependencies required to successfully bundle the application from the node modules folder, where they are stored.
To use Webpack directly inside our project, open the package.json file and edit with the following configuration as so;
//Package.json
"build": "webpack src/js/app.js dist/bundle.js"
Webpack will bundle the file in the src/app.js directory and output it in a main.js file in a dist directory when the build command in the file above is executed.
Webpack, on the other hand, is much more adaptable. We can change the entry point, adjust the output point, and fine-tune many default behaviors by editing the configuration file with the’— config’ flag.
An example is the modified build command from the package.json file above:
"build": "webpack --config webpack.config.js"Next, modify app.js to enable the import of loader.js; these files can be manipulated using the export method present in variables.
I am nearly finished. Now, all that needs to be done is enable hot reloading. As a result, the browser automatically reloads the page whenever a change is detected and can build and bundle the entire application later.
Adding script values to the package.json file will allow us to achieve this. In your package.json file, remove the test property from the scripts object, and then add these two scripts:
"start": "webpack-dev-server --mode development --open --hot",
"build": "webpack --mode production"
To enable Webpack bundling, modify the app.js folder by including this line in the code block as so;
//app.js

import { secretParagraph, SecretButton } from "./Loader.js"
Notice how we referenced both variables in the loader.js file using the javascript ES6 “import” syntax.
Now we can run the command npm run build on the terminal; this command will create a bundle.js file in the dist folder. bundle.js includes a lot of code that Webpack added for us.
Navigate to the root folder and run npm start. It should launch a development server on your machine and serve the HTML file in your browser. If you make any minor or major changes to the code and save it, your browser will automatically refresh to show the most recent set of changes.
When you’re ready, type “npm build” and Webpack will create an optimized bundle in your project folder that can be deployed on any web server.
Modify index.html with the source location of bundler.js to enable Webpack to render the already bundled data on the browser
//index.html

<body>
    <script src="dist/bundle.js"></script>
</body>
Now that our test app has been reloaded, you can click the toggle button to see how the functionalities operate as expected, thanks to the bundle.js data.
Webpack will automatically bundle and manage our code for us if any additional imports or codes are added. We just have one import on index.html, which Webpack manages.
Conclusion
So far, Webpack has proven to be an essential component of the JavaScript toolchain used by a wide range of projects. The adaptability and extensibility of Webpack are only the tip of the iceberg in this article.
Webpack is a highly opinionated module bundler, but with a solid grasp of the guiding principles; Working with the documentation and achieving your performance objectives is much simpler.
The next time you need to select a module bundler for your application, hopefully you will have a better understanding of Webpack’s basic concepts, the problem it solves, and the steps
Gain Debugging Superpowers
Unleash the power of session replay to reproduce bugs and track user frustrations. Get complete visibility into your frontend with OpenReplay, the most advanced open-source session replay tool for developers.