Writing cleaner CSS code with BEM
Dive in and discover the hidden secret to maintainable code using BEM!


Clean and organized code is crucial in modern web development projects, and developers are constantly seeking ways to improve code maintainability and organization. Thankfully, various techniques exist to achieve this goal, including the popular Block Element Modifier (BEM) methodology — and this article will explain how BEM works and why you should start applying it.
In this article, we’ll delve into the world of BEM, exploring its many advantages, usage, and implementation strategies for both HTML and CSS. By using BEM, developers can implement a structured, modular approach to naming conventions in HTML and CSS, resulting in code that is easier to read, more maintainable, and less prone to errors. This article will equip you with an understanding of the importance of BEM in modern web development and the ability to write cleaner, more maintainable code for your next project or product. Let’s get started!
What is BEM?
BEM is a naming convention for HTML and CSS classes that helps developers create maintainable and organized code. It provides a structured format for naming the HTML and CSS classes, leading to the breakdown of our webpage into smaller components (block, elements, and modifiers components). It was created in the mid-2000s by developers working on the complex user interface of the Yandex search engine. The developers were struggling with maintaining their rapidly growing CSS codebase. They needed a structured approach to naming conventions in HTML and CSS to make their codebase more maintainable, scalable, and reusable. After experimenting with several methods, they settled on BEM, which aims to create a hierarchy of components on the webpage. In 2010, they published their approach in a blog post, which gained popularity in the web development community. Today, BEM is widely adopted as a naming convention for HTML and CSS by companies such as Google, Airbnb, and GitHub, and has spawned many tools and resources to assist developers in implementing the methodology more efficiently.
There are many benefits to using the BEM methodology. Here are a few reasons for you to consider using BEM:
- Reusability: BEM methodology allows us to generate code that enables the reuse of components in multiple instances, resulting in a well-structured and organized hierarchy of components on the webpage. As a result, it becomes possible to use blocks in various locations on the page.
- Maintainability:BEM’s well-defined structure facilitates targeted changes or updates to particular sections of a webpage. By employing BEM, we can ensure smooth code maintenance, faster updates, and minimize coding errors, resulting in an error-free codebase.
- Better accessibility: The naming convention offered by BEM enhances accessibility as it helps technologies, such as screen readers, to detect, interpret, and understand the content on a webpage with greater ease.
- Better collaboration: BEM’s naming convention simplifies teamwork among developers. By adopting a unified naming convention for classes, developers can comprehend and edit each other’s code more effortlessly, ultimately fostering better collaboration and teamwork.
Before you continue reading, take this practical explanation as the primary goal of BEM. For instance, if your friend or another developer were to look at your CSS code, they should easily understand the code. It means that your code should be readable, clear, and concise. In other words, your code should have a consistent style that your friend or another developer can easily understand.
When should we use BEM?
We mostly used BEM when dealing with projects having a huge codebase comprising multiple pages. Here are some practical samples of where we can implement BEM:
- Large-Scale Projects: We can introduce BEM when we have a project with a large codebase, which comprises multiple developers building different parts of the project. Using BEM, we can easily maintain the project and reduce the risk of error and code conflict.
- Accessibility-focused projects: The BEM methodology will make our website more accessible to users when projects prioritize Search Engine Optimization (SEO). With BEM, our website would be more accessible to users when they use technology that detects the contents of a webpage.
The breakdown of the keyword “BEM”
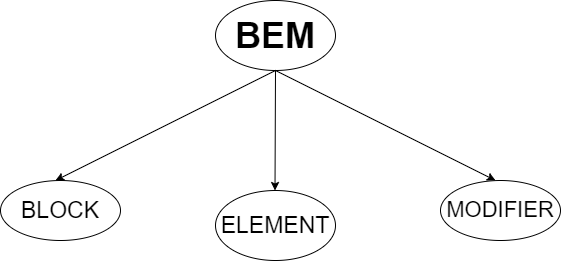
BEM is a keyword that represents three entities:
Block
This is a fundamental entity in the structure of BEM, which is very useful in organizing and structuring CSS and HTML code for websites and web applications. A block is an independent User Interface (UI) entity that represents a reusable component of a web page. Some examples of the block entity on the webpage are the navigation bar, sidebar, header, etc.
Example of the block naming method:
.btn {
  color: red;
  font-size: 15px;
}
In the code snippet above, we can easily deduce that the developer is trying to style a button (a block in this case). It means that when choosing a name for a block element to style, we should choose names that are easy to read and understand. Also, the block name should start with a small letter like the block name btn above.
When applying the block method while setting the class name, we should remember the name should be descriptive and show the function or purpose of the block. That is the sole aim of the block naming convention. You are not required to consider other features (like appearance - color) of the block element when creating a class name. The modifier entity deals with appearance, so never try to do this:
.blue-btn {
  color: blue;
  font-size: 18px;
}
Instead, try to follow best practices by just using a word or set of descriptive words in alignment with the function of the element.
Another school of thought when working with the block is when we want to use more than a word for our block name. The creators of BEM had this in mind while developing it, and thus, they came up with a solution - separating words with hyphens.
For example, a product list block would be named “product-list”:
.product-list {
  list-style: none;
  font-size: 14px;
}
When using the block entity, you should always try to integrate the following guidelines:
- Choose semantic block names: Choose names that explicitly define the function of the element, not its appearance.
- Use class names consistently: BEM enforces having class names for every element in your code. Therefore, all element entities within a block should have a class name, including the block entity. With this, nothing is affected by changing the class style. Instead of using element selectors, assign a class name for each element in your codebase.
- Separate block styles from their elements: BEM encourages us to separate block styling from other components, like the element. We often use Block styles in other parts of the code, which is why code conflicts may occur when combining the style of a block with another component.
Following the guidelines above will ensure that integrating the block entity when defining classes for our markdown or when styling (CSS) is a seamless process.
Element
The letter’ E’ in the BEM symbolizes the Element entity. Element, unlike the block entity, is dependent. They are the children of the block entity, as they can not stand alone. We can find them inside a block - they live inside the block.
Note: an element can only have a parent (just a block it’s tied to), and we can’t use it outside that block. Let’s take an example of a block - header. Inside the header block, we have things like logos, links, and buttons embedded in it. These things found in the header block are the “elements.” Now, how do we create an element name? An element name starts with the parent name (block name), followed by double underscores, and ends with the element name.
The CSS code:
/*recall header is our block name, therefore header comes first*/
.header__logo {

}
Our HTML code:
<div class="header">
  <img class="header__logo" alt="logo"/>
</div>
In the code sample above, we have a parent element (div) with a block name of header. Inside it, we have an image element with an element name header__logo.
Nesting Elements within the same block
Nesting elements is embedding an element inside another element within the same block. Using the example of a header block with a navigation element inside it containing a menu-item element (ul tag - an unordered list), we can then say the menu item is nested in the navigation element.
Nesting Elements are very useful in representing complex or hierarchical relationships between parts of a Block. However, it is advisable to keep the Element hierarchy flat and avoid nesting elements deeply. Deeply nested elements can make the HTML and CSS code more complex and harder to read and maintain. It can also lead to specificity issues when styling the nested elements, making it harder to override styles or change the layout later.
Therefore, use nesting sparingly only when it is necessary to represent the structure of the block. It is often better to use multiple blocks or elements at the same hierarchy level to represent different parts of the page rather than nesting elements intensely.
Here is a code sample to explain the theory of nesting of elements:
<div class="header">
  <img class="header__logo" alt="logo"/>
  <nav class="header__link">
<!--     menu-list -->
    <ul class="header__menu-list"></ul>
  </nav>
</div>
We can deduce from the code that we still implement the standard naming convention for defining element names, even when elements are being nested. We could have written the code above this way:
<div class="header">
  <img class="header__logo" alt="logo"/>
  <nav class="header__link">
<!--     menu-list -->
    <ul class="header__link__menu-list"></ul>
  </nav>
</div>
When defining an element name for a nested element, you shouldn’t prefix it with the parent element name (header__link in this case), which results in this - header__link__menu-list. Just prefix it with the block name (header), followed by double underscores, then the element name, which results in this - header__menu-list (for this example).
Here are some key things to consider when using the Element entity:
- We use elements to represent sub-components of a block.
- Assign a descriptive name to your element and always follow the standard naming convention, even when working with nested elements.
- Avoid using an element outside the block it belongs to.
- Reduce the level of nesting elements.
Considering these tips will let you adapt to industry-standard usage of the Element entity in the BEM methodology.
Modifier
This determines/defines the appearance, state, or behavior of a Block or an Element independently (without creating a new Block or Element from scratch).
We separate the modifier name from the block or element name by using two hyphens (--). The ideal way of naming modifiers is to prefix them with a double hyphen (--), though some people use double underscores (__) or a single hyphen (-). I would advise you to take it as an ideal practice to use the double hyphen (–-) as a prefix for the modifier name and not the other methods in other not to mix the modifier with another entity, like an element since it uses the double underscore (__) prefix.
Here is the syntax:
/*when targeting a Block*/
.block-name-modifier-name {
/*   styles go in here */
}

/*when targeting an Element*/
.block-name__element-name-modifier-name {
/*   styles go in here */
}
We add Modifiers to Blocks or Elements by adding their name as a suffix to the Block or Element’s class, separated by two underscores.
Note, Modifiers are optional, but you can choose to use them because of their efficiency in creating visual styles and adding variation to Elements and Blocks. Some examples of modifier names are disabled, primary, and so on.
For example, within a div container are two buttons with identical styles except for their state (active or disabled). To accomplish this, we utilize a Block named card that contains an Element called buttons. From there, we apply Modifier to the buttons we want to assign a state. The HTML code
<div class="card">
  <div class="card__buttons">
    <button class="card__buttons–active"></button>
    <button class="card__buttons–disabled"></button>
  </div>
</div>
In the code above, we have two modifiers named card__buttons–active and card__buttons–disabled, respectively.
When creating a name for any entity in the BEM methodology, try to use names that people who are not developers can easily understand.
<div class="card">
  <div class="card__buttons">
    <button class="card__buttons–active"></button>
    <button class="card__buttons–disabled"></button>
  </div>
</div>
Even if a non-developer looks at this code, they can easily predict that we are styling buttons on the card and that we assigned one to be active (a state that shows it has already been clicked) and the other to be disabled (a state that makes the button unclickable).
Modifiers are optional, but if you choose to use them, you need to note these things:
- Use them judiciously and only when essential to prevent needless complications in our code.
- When creating a modifier name, try to be clear and specific about its purpose, like disabling buttons, changing the font size, etc.
- Avoid using a Modifier to override a style. Instead, consider adjusting the style to your desired outcome.
Session Replay for Developers
Uncover frustrations, understand bugs and fix slowdowns like never before with OpenReplay — an open-source session replay tool for developers. Self-host it in minutes, and have complete control over your customer data. Check our GitHub repo and join the thousands of developers in our community.
The Practical Aspect
In this section, we’re going to take a look at a real-world example that demonstrates the BEM methodology.
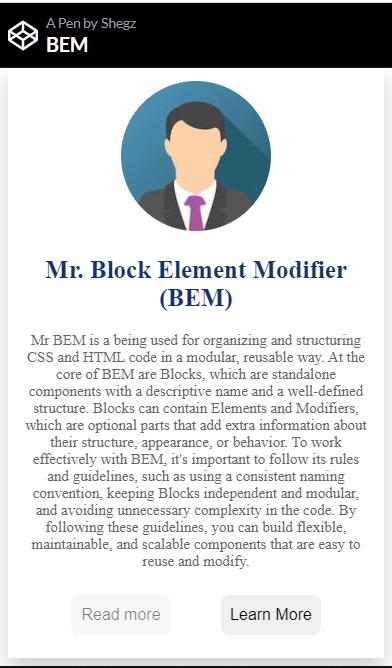
The case study for this segment is a Card structure built with HTML and CSS - the image above.
From the image, we can deduce the following entities:
- Block: The card itself is the Block; it can also be referred to as the Parent of all other elements since other elements are embedded in it.
- Element: Here, we can say that we have just two direct elements, a header component, and a button component. But in the actual sense, we have five elements - a header element with three elements (image element, title element, and description element) nested within it and a button element that has two actual button elements nested within it.
- Modifier: Just as I said earlier, modifiers are used in place of setting appearance, and tweaking styles - as its name suggests, it helps us modify styles. In the card above, a modifier was created to disable one of the buttons, i.e., making the button inactive and unclickable.
Here is the code to create the card above; take a deep look at it - the HTML and CSS code. Try to see how I implemented BEM when defining class names in the semantic HTML and how I structured the classes in CSS following each other from top-to-bottom (this is very important, try to always let your style be in a top-down approach).
Resources
For more understanding of the subject discussed, you can use these websites:
Conclusion
This article explored how the Block Element Modifier (BEM) methodology can aid in writing cleaner, more maintainable CSS code. We analyzed BEM’s history, principles, implementation, and best practices. Although some arguments against BEM exist, many people accept that it offers a clear and consistent approach to organizing CSS code.
I hope you will consider using BEM in your subsequent projects because of its benefits. The benefits of BEM, such as easier collaboration, faster development time, and reduced errors, make it a valuable tool in modern web development.
Call to action: I challenge developers to try implementing BEM in their next project and see the positive impact it can have. Remember to start with a solid foundation by naming and structuring your blocks, elements, and modifiers. With the BEM methodology, you can take your CSS coding skills to the next level and create more efficient and maintainable user interfaces.
I trust that you found this piece informative and enjoyable. If you have any questions, please don’t hesitate to ask them in the comment box below. Additionally, I would appreciate it if you could share, like, and comment. Thank you for reading.
Gain Debugging Superpowers
Unleash the power of session replay to reproduce bugs and track user frustrations. Get complete visibility into your frontend with OpenReplay, the most advanced open-source session replay tool for developers.