XState: The Solution to All Your App State Problems
Reliable and predictable state for all your apps is not a dream


Regardless of what kind of software it is, most apps use some sort of state. Whether it’s internal state or data fetched from an API, state management is a key element to building software. Most of them utilise a bottom-up approach to state management where the state is made up of small units of stateful variables scattered across the codebase.
However, as an application grows, it becomes harder to track and manage those stateful variables. Updating the state in a predictable and effective manner becomes more difficult and can make it easier for bugs to sneak in. This is especially worse when there are no strict guidelines and code documentation.
A better alternative to managing state like this are state machines. State machines offer a predictable way to manage state by utilising a well-known mathematical concept called Automata Theory.
Let’s dive in a little deeper and break down what this means.
Why do we need state machines?
Before we define state machines, let’s look at a scenario that most developers have probably come across and see the downsides of how we currently handle state. I will be using React as an example but the concept is framework-agnostic.
Let’s imagine a component with a button that you can click to make an API call to retrieve users from a backend. This component can be in the following states —
- Idle - No request is being made or has been made. This is the default state.
- Loading - A request is being made. This happens when you click on the button
- Success - A request is completed and was successful
- Error - A request is completed but failed due to some reason
How would you go about modelling the state for this component? Most developers (myself included) would probably do something like this
const Users = () => {
  const [users, setUsers] = useState(null)
  const [isLoading, setIsLoading] = useState(false)
  const [error, setError] = useState(null)
}
At first glance, this looks quite alright. Say you click the button to fetch users for the first time and the following occurs —
- You enter into the loading state
- If the request is successful
- You exit the loading state
- You update the users state variable with the new data
- If the request failed
- You also exit the loading state
- You update the error state variable with the request error
...other code

const handleButtonClick = async (event) => {
  event.preventDefault()

  try {
    setIsLoading(true)
    const newUsers = await api.fetchUsers()
    setUsers(newUsers)
  } catch (error) {
    setError(error)
  } finally {
    setIsLoading(false)
  }
}

...other code
Do you see any potential bugs with this implementation?
Now let’s look at another scenario. You click the button to fetch users and the request fails the first time. This means you’re in the error state. You try again, and this time it works. Can you spot the bug now?
Multiple app states
We’re now in two different states at the same time! This is because we’re not clearing any previous errors so we’d be in both the Success state and the Error state at the same time.
To fix this, we can add a check for a previous error and clear it when the request is successful. We also have to clear the users state variable when there’s an error (You could also decide to leave the previous data and just show an error message).
...other code

const handleButtonClick = async (event) => {
  event.preventDefault()

  try {
    setIsLoading(true)
    const newUsers = await api.fetchUsers()
    setUsers(newUsers)

    // we add a check for previous errors
    if (error) {
      setError(null)
    }
  } catch (error) {
    setError(error)

    // we add a check for previous users data
    if (users) {
      setUsers(null)
    }
  } finally {
    setIsLoading(false)
  }
}

...other code
We’ve fixed the multiple states bug but the code is already looking a bit more complex. But there’s another potential bug we’re not thinking about.
Preventing undesired actions
Let’s say you click on the button to fetch users and for some reason, the request was taking too long. You decide to click on it four more times to see if it helps.
You now have 5 pending network requests which, depending on the kind of app you’re building, can be expensive. When these requests start resolving (or rejecting), your app may have moved on to a different state and may cause some unpredictable behaviour.
By now, you’re probably thinking — that’s easy, I can just add a flag to the button and disable it when isLoading is true. Of course, this works to fix the issue but a tech-savvy user can simply open devtools and re-enable the button manually.
Or you could decide to add a check in the handleButtonClick function to only fetch users if we’re not already making a request.
...other code
const handleButtonClick = async (event) => {
event.preventDefault()
// Exit early if already making a request
if (isLoading) return
try {
setIsLoading(true)
const newUsers = await api.fetchUsers()
setUsers(newUsers)
// we add a check for previous errors
if (error) {
setError(null)
}
} catch (error) {
setError(error)
// we add a check for previous users data
if (users) {
setUsers(null)
}
} finally {
setIsLoading(false)
}
}
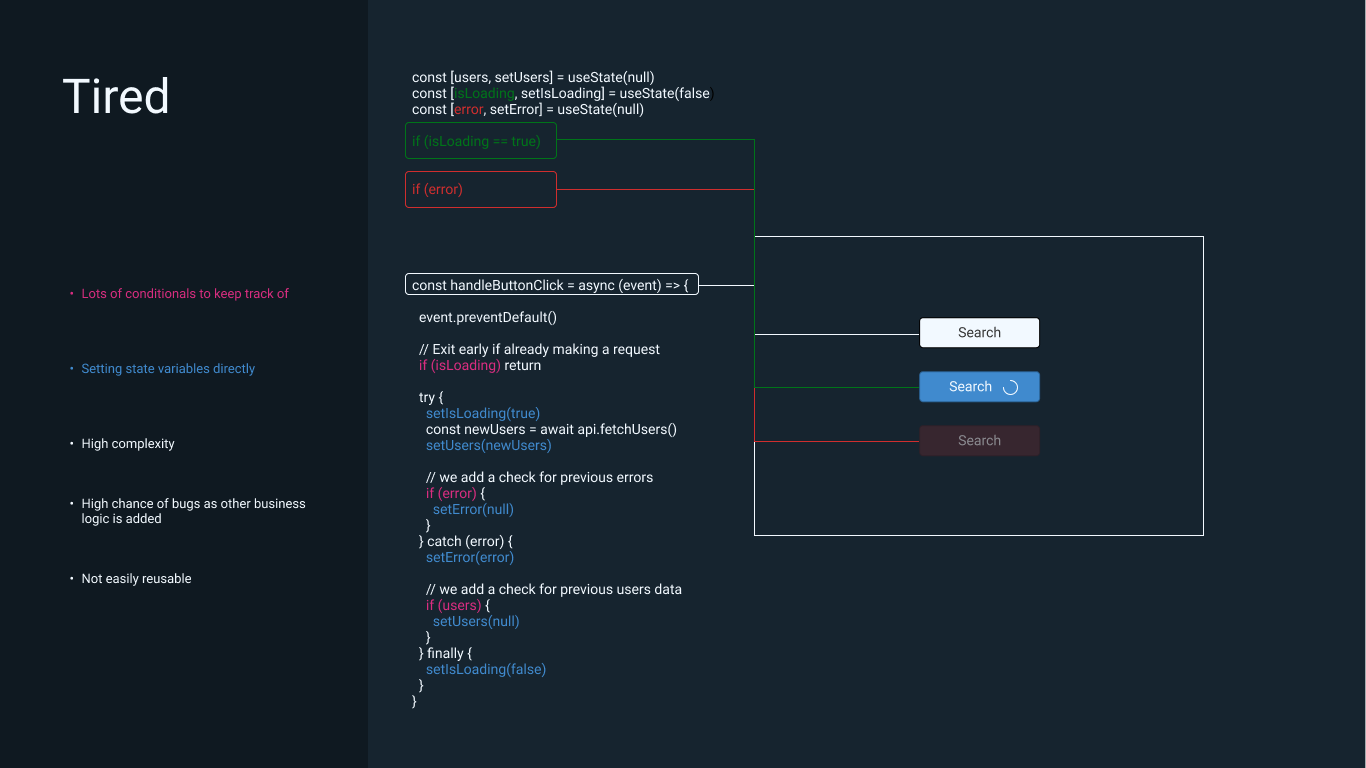
...other codeThis works as well but you can begin to see how the logic is littered with conditionals. This is fine for such a small example but for larger, production-ready applications, this can get quite difficult to maintain.
We also can’t reuse any of this state logic because of how tightly coupled it is to the component. A benefit of state machines is that it allows you decouple your state management from business logic.
The code is now much harder to reason about at first glance and you have to slow down and account for all the conditionals and state updating code.
State machines to the rescue
What we need, is a way to manage our application state in a way that makes it impossible for the issues we’ve explored above to occur. Here are some things I’d consider useful in an app state model —
- The app should only be in one state at a time
- The possible valid states should be explicitly defined
- The state logic should not be tightly coupled to business logic
- It should be easy to reason about
- It should be possible to tell the next and previous states based on the current state
This is where state machines can help us.
What is state?
Before we talk about state machines, let’s define what “state” actually means. Wikipedia defines “state” in the context of state machines as —
“A state is a description of the status of a system that is waiting to execute a transition.”
In the context of software, state is the set of all the variables and their values at any given point in time. This is important to note because the more variables a program has, the higher the possible states it can be in.
If a program contains 5 boolean variables, each being able to be set as true or false, then that program could theoretically be in one of 32 states at any given time (2^5). In practice, however, this doesn’t happen as most of those states would be invalid.
A state machine is a way to reduce the number of variables and invalid states. It does this by defining an explicit list of valid states, transitions between these states, and side effects that should happen during the transitions.
So how does this work in practice and how does it reduce bugs in an app? Well, let’s go back to our Users component example from earlier. What bugs did we identify?
- The component can be in different states at a time
- There could be a race condition from the user clicking on the button multiple times
- There are too many conditionals
- The code is difficult to reason about
- The code is tightly coupled to business logic
Let’s redo the same example of fetching prices but using a state machine instead.
State machines in practice
There are numerous state management libraries that use state machines but for this example, I’ll use XState.
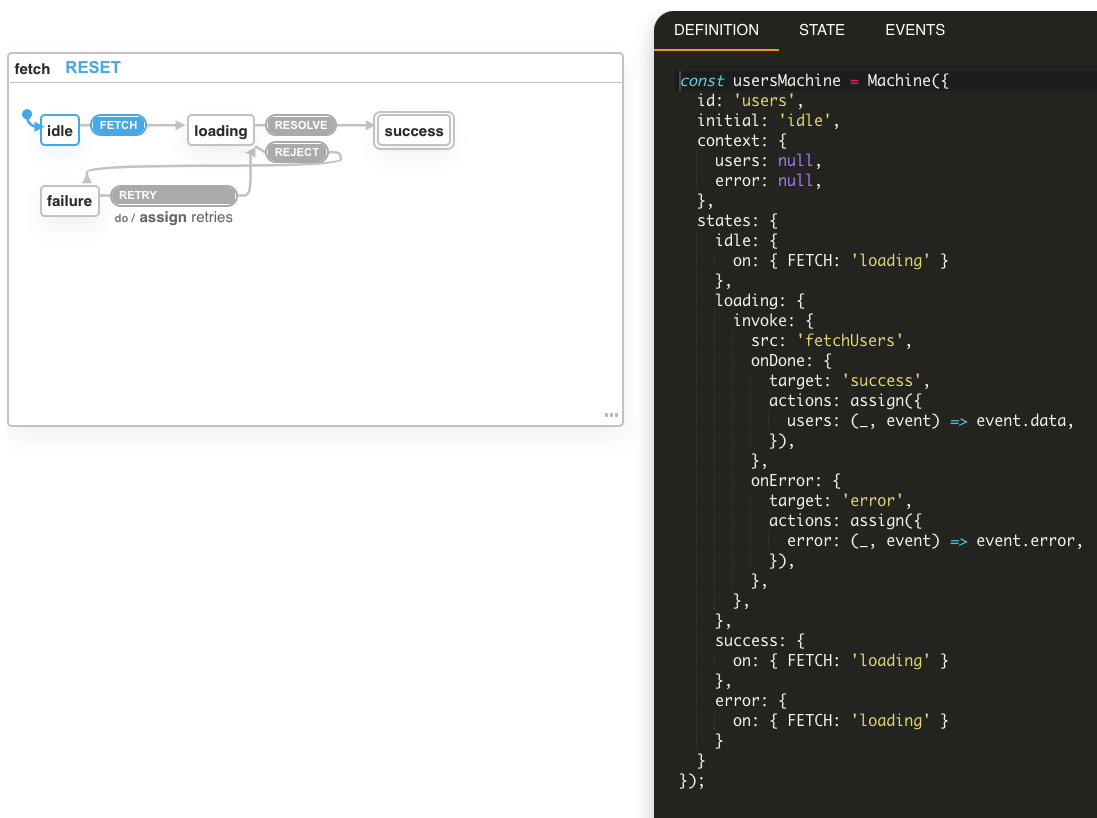
const usersMachine = Machine({
  id: 'users',
  initial: 'idle',
  context: {
    users: null,
    error: null,
  },
  states: {
    idle: {
      on: { FETCH: 'loading' }
    },
    loading: {
      invoke: {
        src: 'fetchUsers',
        onDone: {
          target: 'success',
          actions: assign({
            users: (_, event) => event.data,
          }),
        },
        onError: {
          target: 'error',
          actions: assign({
            error: (_, event) => event.error,
          }),
        },
      },
    },
    success: {
      on: { FETCH: 'loading' }
    },
    error: {
      on: { FETCH: 'loading' }
    }
  }
});
Anatomy of an XState machine
Let’s break down what’s going on here. This machine has the following parts —
id - A string identifier for the machine. This is useful for identifying the machine that triggered an update. It’s not required but can be useful when debugging an application.
initial - The initial state the machine is in. Every state machine starts at an initial state. This represents the state before any action or transitions is made.
context - An internal state of sorts for the machine. This can be used to store quantitative data that your application needs such as strings, numbers, objects, etc.
states - This represents all the states, actions, and possible transitions in the machine. Each key in the states object matches a state so for instance, idle represents the idle state, loading represents the loading state, and so on.
The on property models the actions and possible transitions from that state. Let’s look at an example —
idle: { // For this idle state
  on: { // This holds all possible actions this state can handle
    FETCH: 'loading' // On the FETCH action, transition to the loading state
  }
}
There are multiple ways to handle actions and transitions in XState but this is the simplest way.
XState also provides the ability to trigger side effects when we transition into a new state. For example, when we transition to the loading state, we might want to kick off a network request to fetch some data. And when that request is done, transition to the success (or error) state.
Let’s look at how that works —
loading: {               // For this loading state
  invoke: {              // When we transition into the loading state,
    src: 'fetchUsers',   // call a "fetchUsers" function which returns a promise
    onDone: {            // If the promise is resolved,
      target: 'success', // Transition to the success state
      actions: assign({  // And update the context data
        users: (_, event) => event.data,
      }),
    },
    onError: {           // If the promise is rejected
      target: 'error',   // Transition to the error state
      actions: assign({  // And update the context data
        error: (_, event) => event.error,
      }),
    },
  },
},
Note that the fetchUsers function being called will be passed as an argument when the usersMachine is initialised. Also, notice how we’re transitioning to a new state differently from the previous method in the idle state.
Check the XState docs for a full list of config options
At first glance, this may seem like more work than the previous implementation but this comes with some benefits.
- You can easily see all possible states for the app
- There are fewer state variables to keep track of
- The risk of impossible states is reduced to zero as all valid states are explicitly defined
- The state management can be decoupled from the app (the code above will work in any framework)
- Side effects are clearly defined and handled
These are just some of the benefits we get from modelling our application state using state machines. Another one is that we can paste this code in a statechart visualiser and get a visual representation of the states and actions.
Go ahead and paste the code above into the XState visualiser and interact with it.
We can then use this machine in our Users component and update our button handler like so —
import { useMachine } from '@xstate/react'
...other code
const [state, send] = useMachine(usersMachine, {
// This is where we pass in the "fetchUsers" function that we
// referenced in the machine configuration
services: {
fetchUsers: () => fetch('some-endpoint')
.then((res) => res.json())
// When we resolve the promise here, we'll trigger a state transition
// to the "success" state
.then((res) => Promise.resolve(res.data))
.catch((err) =>
// When we reject the promise here, we'll trigger a state transition
// to the "error" state
Promise.reject({
status: err.response.status,
data: err.response.data
})
)
}
})
const isLoading = state.matches('loading')
const isSuccess = state.matches('success')
const isError = state.matches('error')
const handleButtonClick = () => {
send('FETCH')
}
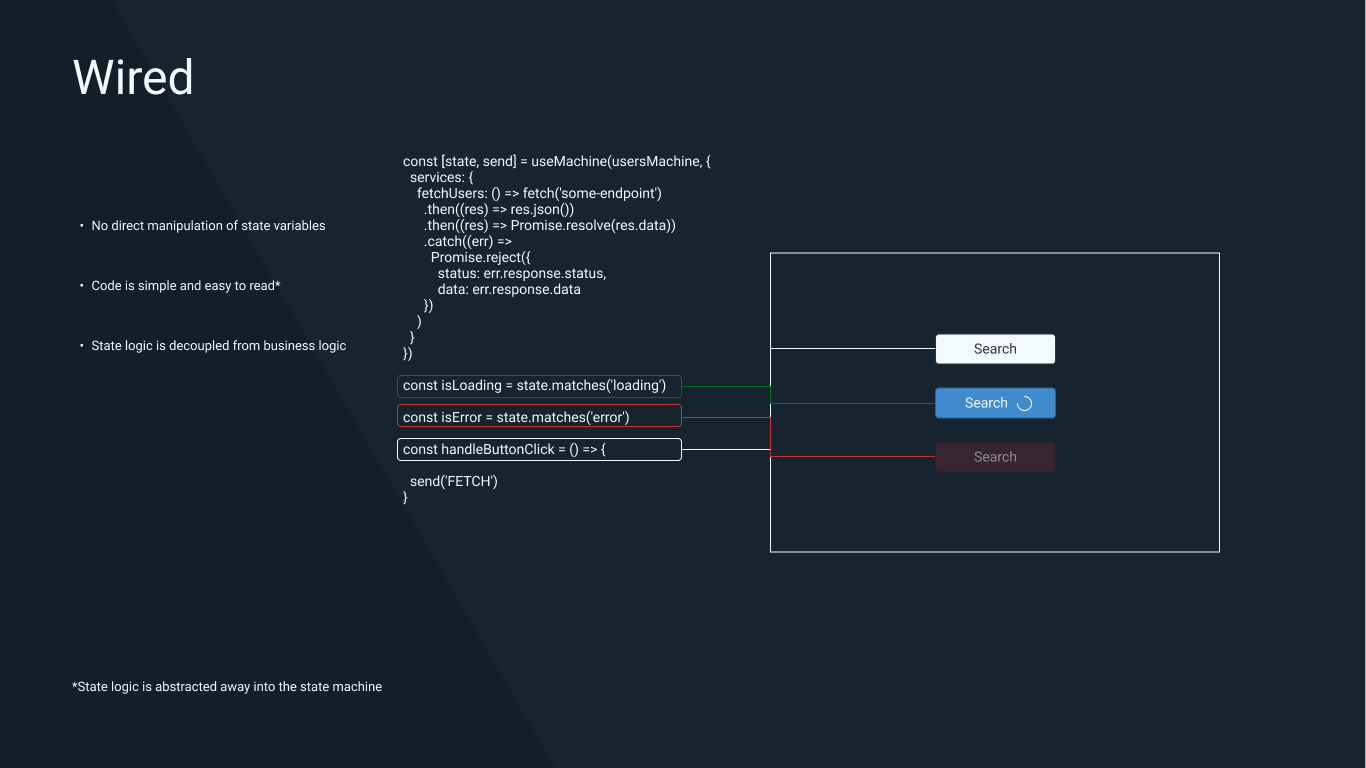
...other codeLook how much simpler the button click handler is. Let’s break this down —
Firstly, we consume the price machine using a useMachine hook for React. This hook is provided by the @xstate/react library (other frameworks consume this machine differently). We pass a config object including a services object containing a fetchUsers function. This will be called when we transition to the loading state and handles the actual fetching of data.
Secondly, instead of managing a bunch of variables ourselves, we can make our boolean flags derived from the current state. The state object provided by XState has a .matches method that we can use to verify what state the machine is currently in at any point in time.
- Finally, we update the button click handler to dispatch a “FETCH” event. When this event is dispatched, the machine transitions to the loading state and invokes the
updatePricesservice we passed in the config. IfupdatePricesresolves, the machine transitions to the success state, and if not, transitions to the failure state.
Granted, there is a small learning curve to state machines and tools like XState but the payoff is that you will be able to use statecharts to program predictable, maintainable, and reusable app states.
Open Source Session Replay
OpenReplay is an open-source, session replay suite that lets you see what users do on your web app, helping you troubleshoot issues faster. OpenReplay is self-hosted for full control over your data.

Start enjoying your debugging experience - start using OpenReplay for free.
What next?
If you made it to the end of this article, thank you and congratulations on learning a new thing today. If you’re curious about learning more about statecharts, you can utilise these resources —
- A sandbox with the code written in this article for you to explore
- The official XState documentation
- A live stream of XState in practice with David Khourshid, the creator of XState, and Jason Lengstorf
- A talk on state machines and automata theory by David Khourshid
The world of state machines is extensive and this article is just an introduction so if you’re looking to build real-world apps, I recommend checking out the resources linked above.