Adding Google Fonts to Next.js 14 in Three Ways: A Step-by-Step Guide
Add Google Fonts to your Next.js code


Adding Google Web Fonts to a Next.js project is optimized because the fonts are bundled at build time, and this article will show you three ways to manage this so your web app achieves maximum performance.

Discover how at OpenReplay.com.
Next.js now comes with some amazing improvements/additions that have caused front-end engineering in the React ecosystem to take a more awesome and performance-inclined path.
With super-impressive introductions like the use of client and server components, new data fetching patterns, the new routing patterns inside the app router, and more, One other performance-boosting feature in Next.js is the way Google fonts can be used.
From Next.js 13 on, Google fonts usage takes a different approach. This approach provides some extra performance boost because the (custom) fonts are now bundled into the application at build time. Hence, no request is made to fetch fonts whenever the app is used.
In this article, and in line with this new build time approach of adding Google fonts to Next.js applications, I’ll show three different ways to add them to your next Next.js project.
We’ll install a Next.js application bootstrapped with Tailwindcss.
Installing a new Next.js application (with Tailwindcss)
Installing a Next.js application is very easy. Refer to the installation page on the Next.js docs for a detailed installation process outline.
Simply ensure that you use the app router while installing the app. You can proceed once you’re done with the installation.
Analyzing Google fonts usage in the Next.js layout file
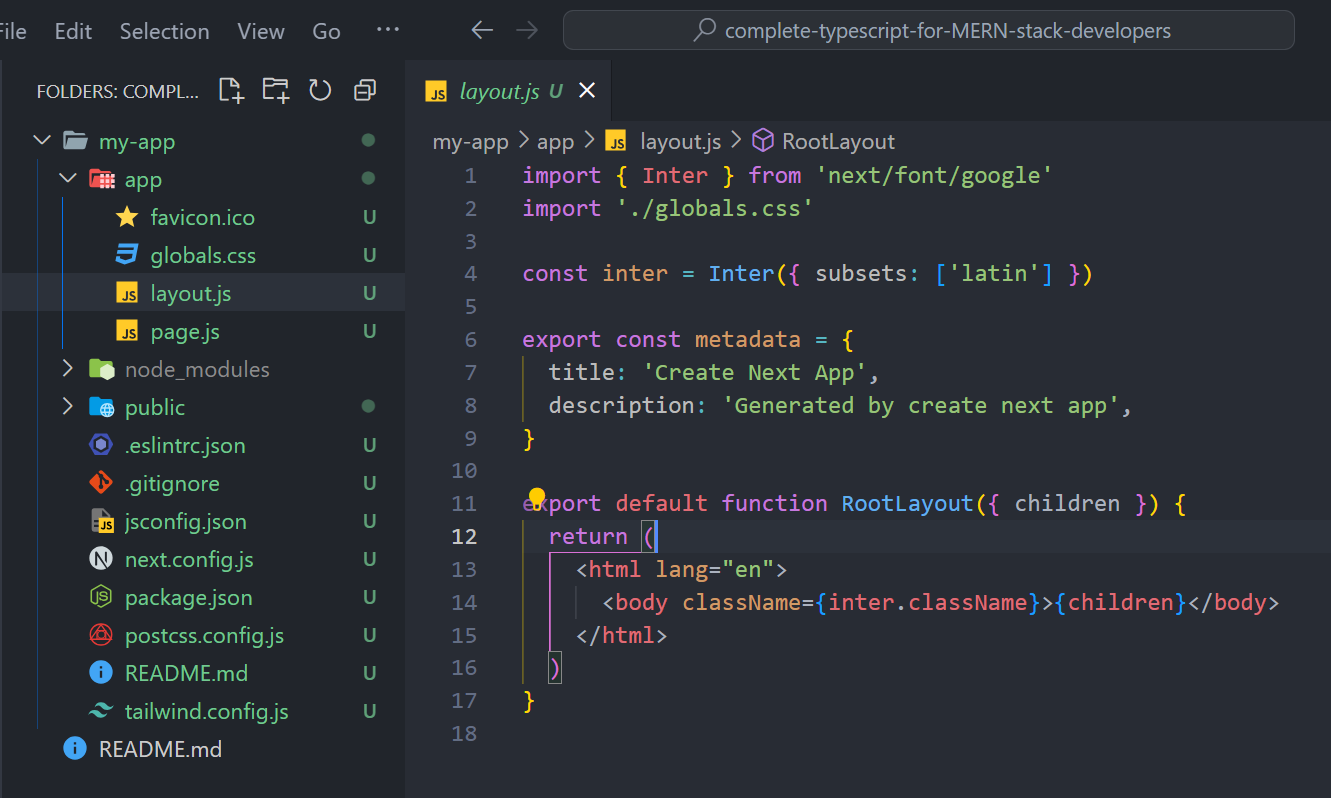
The app’s entry point is the layout.js file in a new Next.js installation. Hence, as seen in the screenshot below, Google fonts can be imported inside that file and applied to any available element or component that wraps the remaining part of the app.

Customizing the font is one process carried out before wrapping the remaining parts of the app with the fonts. As shown on line 4 in the above screenshot, a simple customization was carried out on the font before it was finally used.
Using a Google font in Next.js is as flexible as the regular method we’ve been using (maybe even more flexible). You can use multiple fonts, set your font weights, and make other customizations, which we will see later in this article.
Let’s see three different methods for adding Google fonts to Next.js using this new build time font usage approach.
Method 1: Using Google fonts in Next.Js 14 through CSS (variables and selectors)
The first method will require using CSS variables and any CSS selector you choose.
A quick recap of variables and selectors
Variables are common terms in programming languages, but for some years now, we’ve had the use of variables (also known as custom properties) in CSS.
The code sample below shows how variables can be created and used in CSS.
:root {
 --spacing: 10px;
}

.button {
 padding: var (--spacing) var (--spacing * 2);
 margin: var (--spacing);
}
On the other hand, CSS selectors are patterns used to target HTML elements in web pages. Below are some examples of CSS selectors and their type names.
*Type Selector* or *Element Selector*:
selects HTML elements by their types.
Example: `div` (selects all `div` elements).

*Class Selector*:
selects HTML elements by the `class` names assigned to them.
Example: `.btn` (selects all elements with the `class` attribute value set to `"btn"`).

*ID Selector*:
selects HTML elements by the `id` names assigned to them.
Example: `#header` (selects the element with the `id` attribute value set to `"header"`).
As you can see, these (CSS elements and selectors) are basic CSS concepts, but I thought I would explain them just in case you need a refresher on what they are. You’ll need this knowledge as we proceed in this article.
Importing and setting up the fonts inside the layout file
Checking the screenshot above, you’ll find that only one font was imported and used. Also, in that screenshot, the method used to add the Google fonts is the default className method, which we’ll cover later in this article.
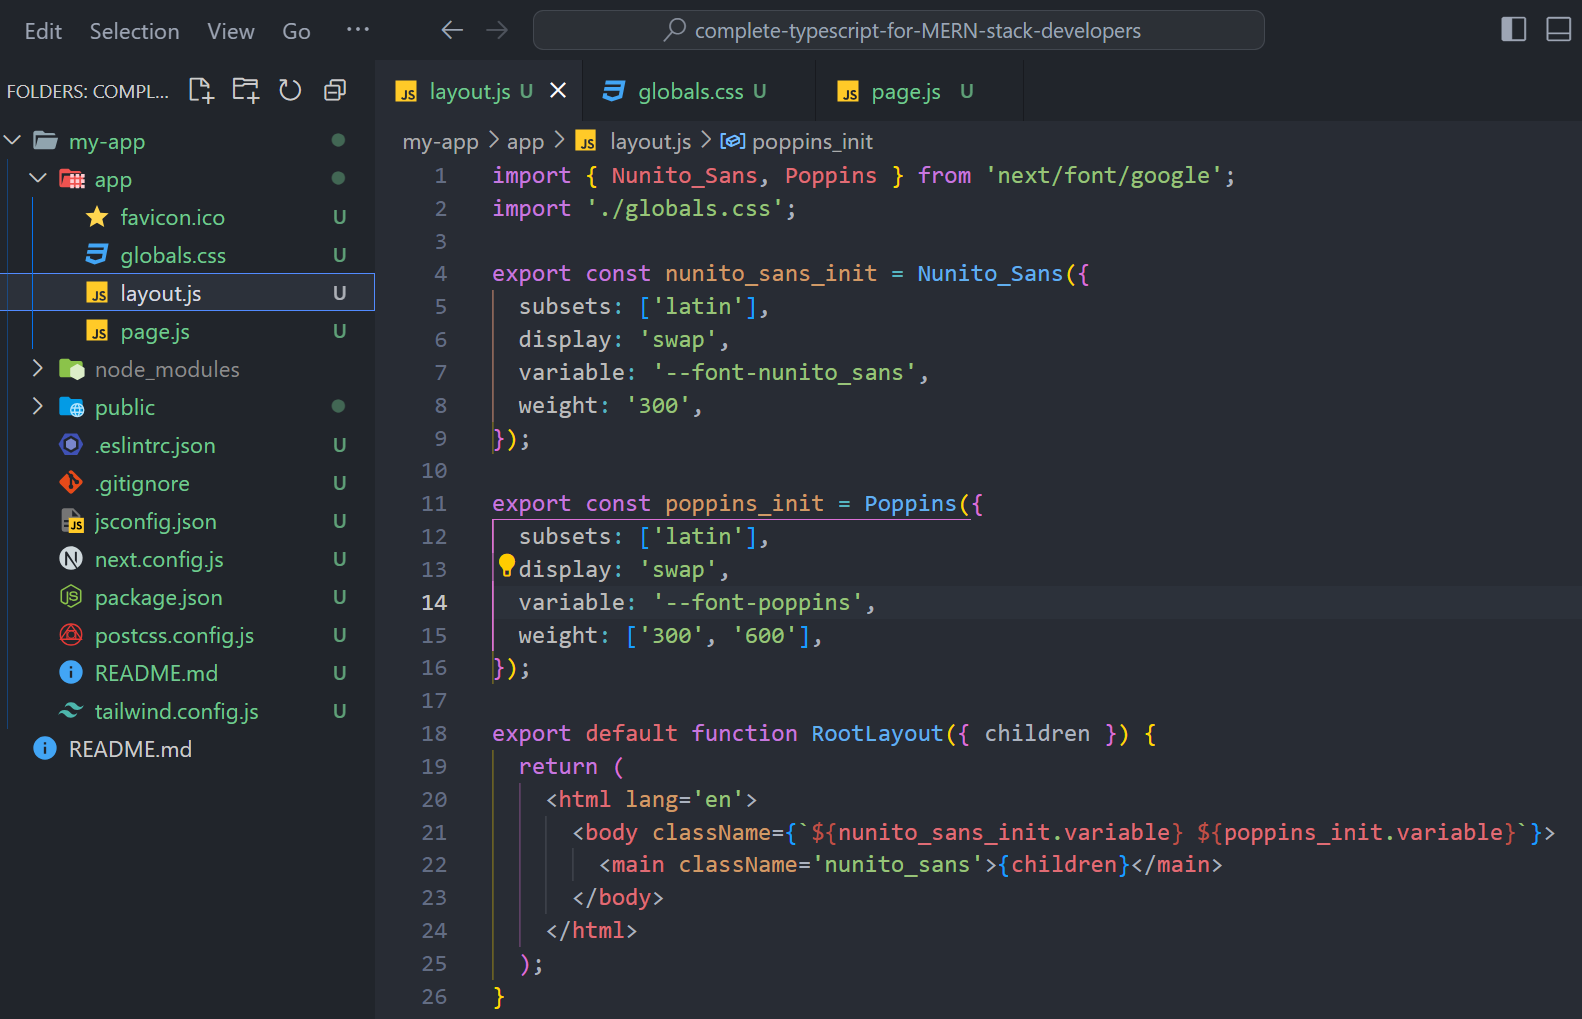
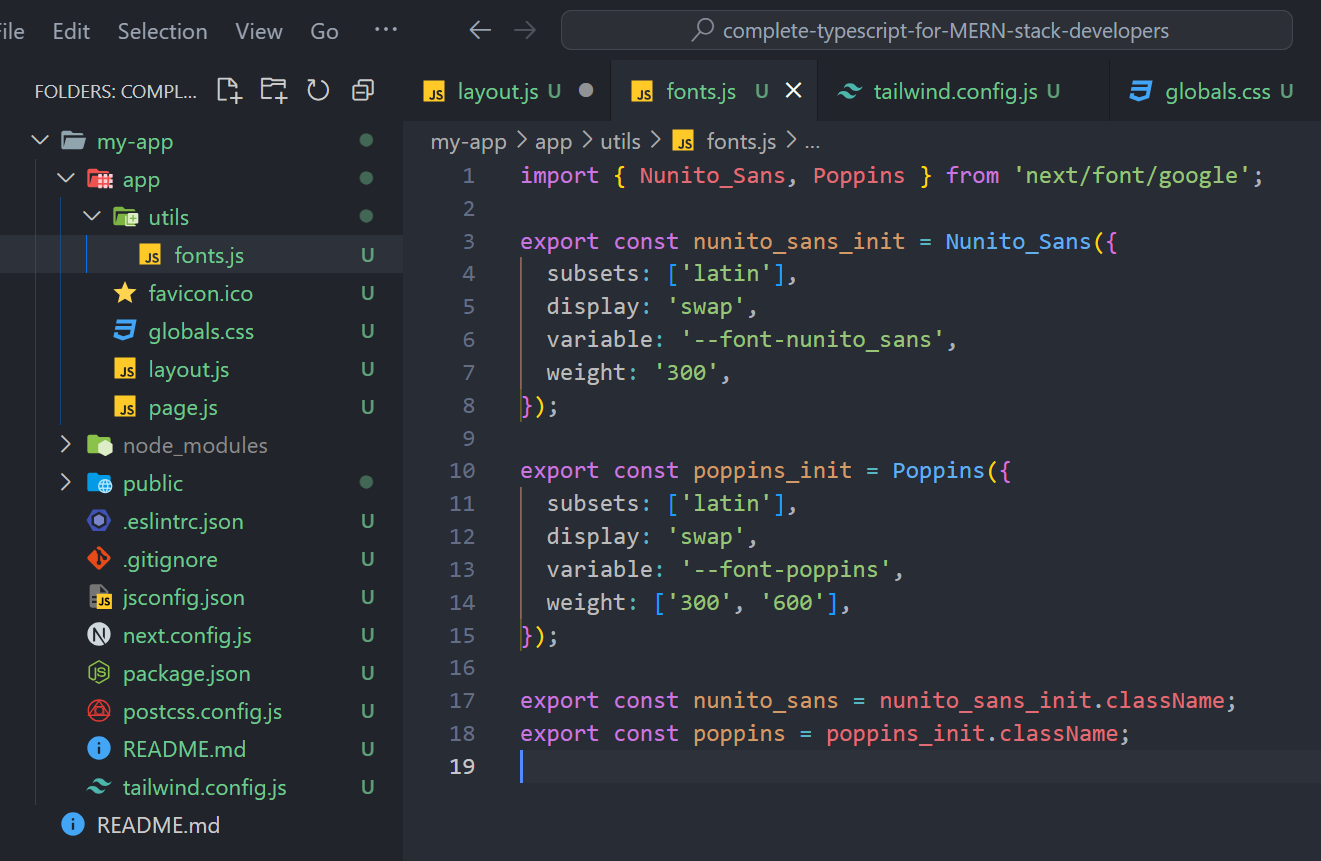
As seen in this second screenshot above, multiple (two) fonts were imported and used. You can also see how to import and use multiple fonts in Next.Js 14.
Explaining the implementation process
- FIRSTLY: From this second screenshot, the two fonts were imported, attached to different variables, and configured as seen above. They were configured with different selections, which you can learn about and add to your project.
The two most relevant configurations in the above screenshot are the variables and the font weights (weight).
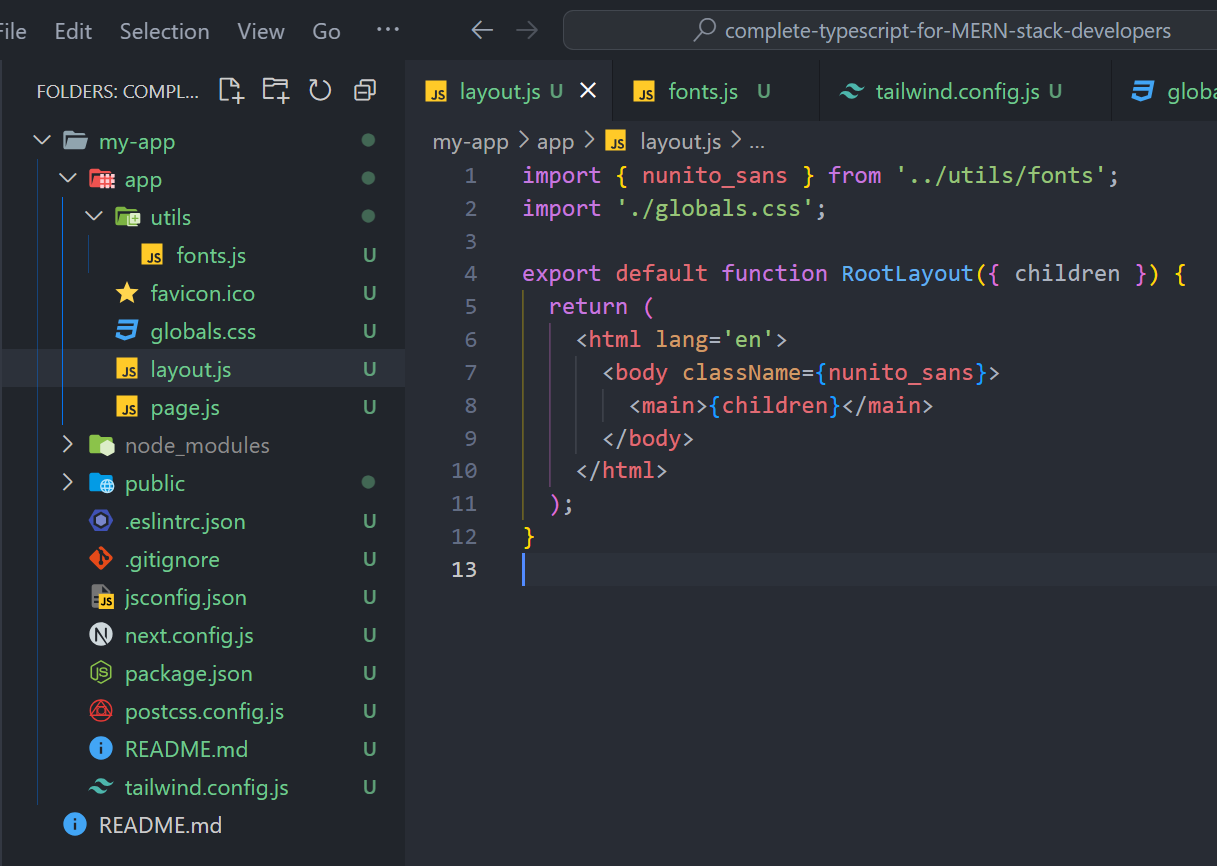
- SECONDLY: From the screenshot above, it can also be noted how a
nunito_sans(font)classwas attached to themainelement that served as the wrapper of thechildrenprop. We will then need to set that up (and that of thepoppinsfont as well) inside the CSS file imported in thelayout.jsfile, as shown in the second screenshot above. Below is a third screenshot showing the implementation of that.
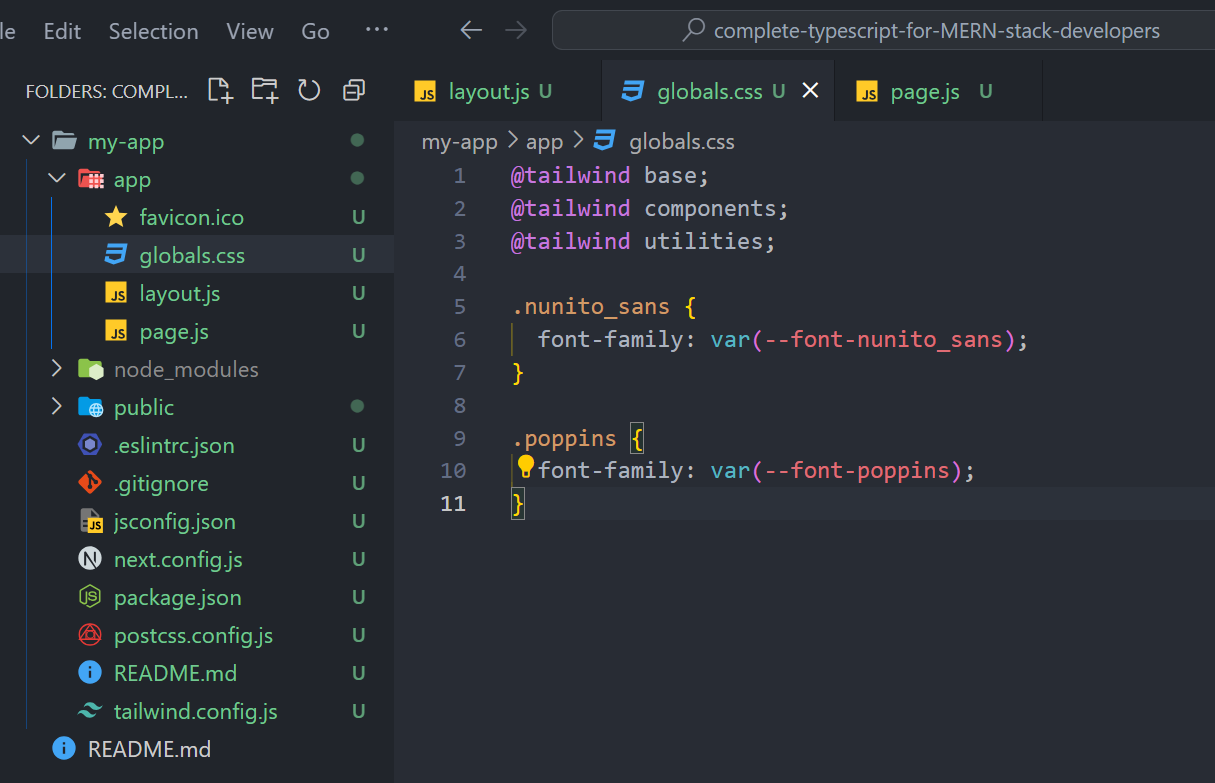
NB: Observe carefully how the same variable was used in the font configurations that were called here inside the CSS. Note, however, that you can use any selector pattern you wish. (selector patterns were explained above). For example, you can target HTML elements directly instead of classes.
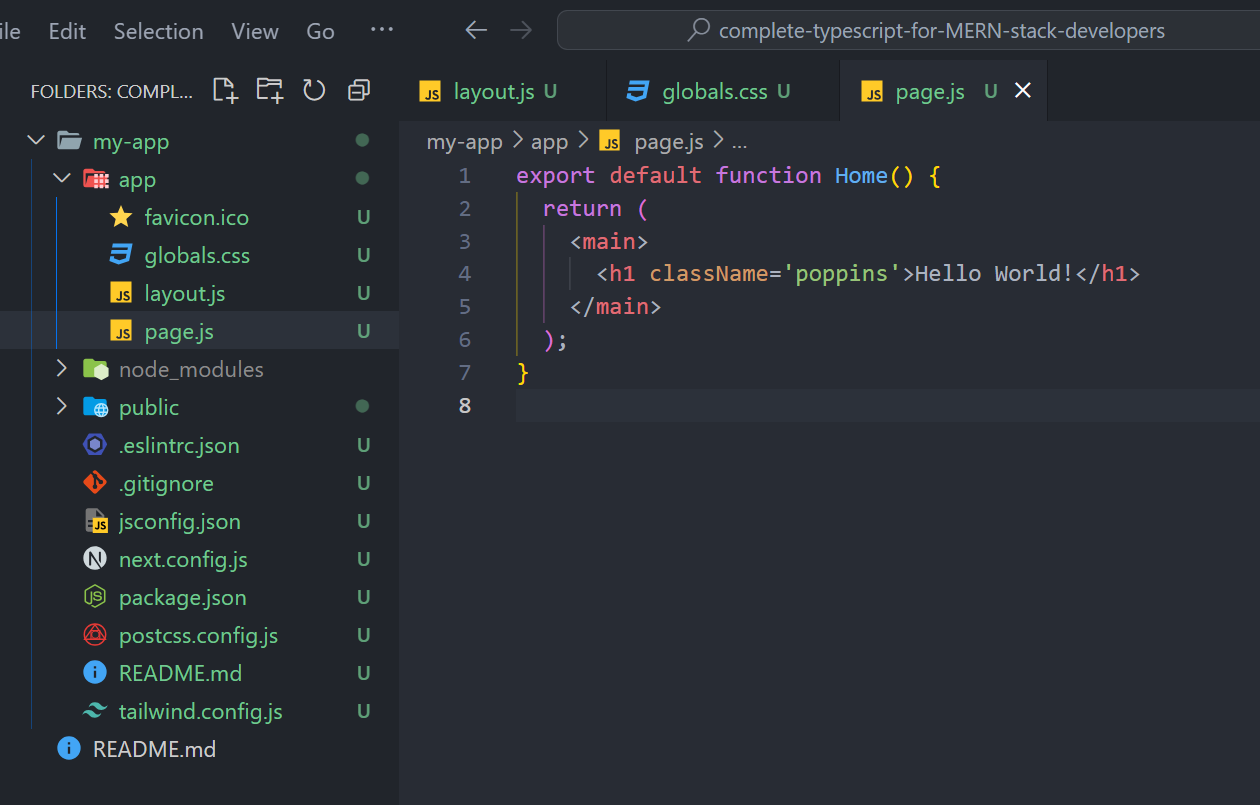
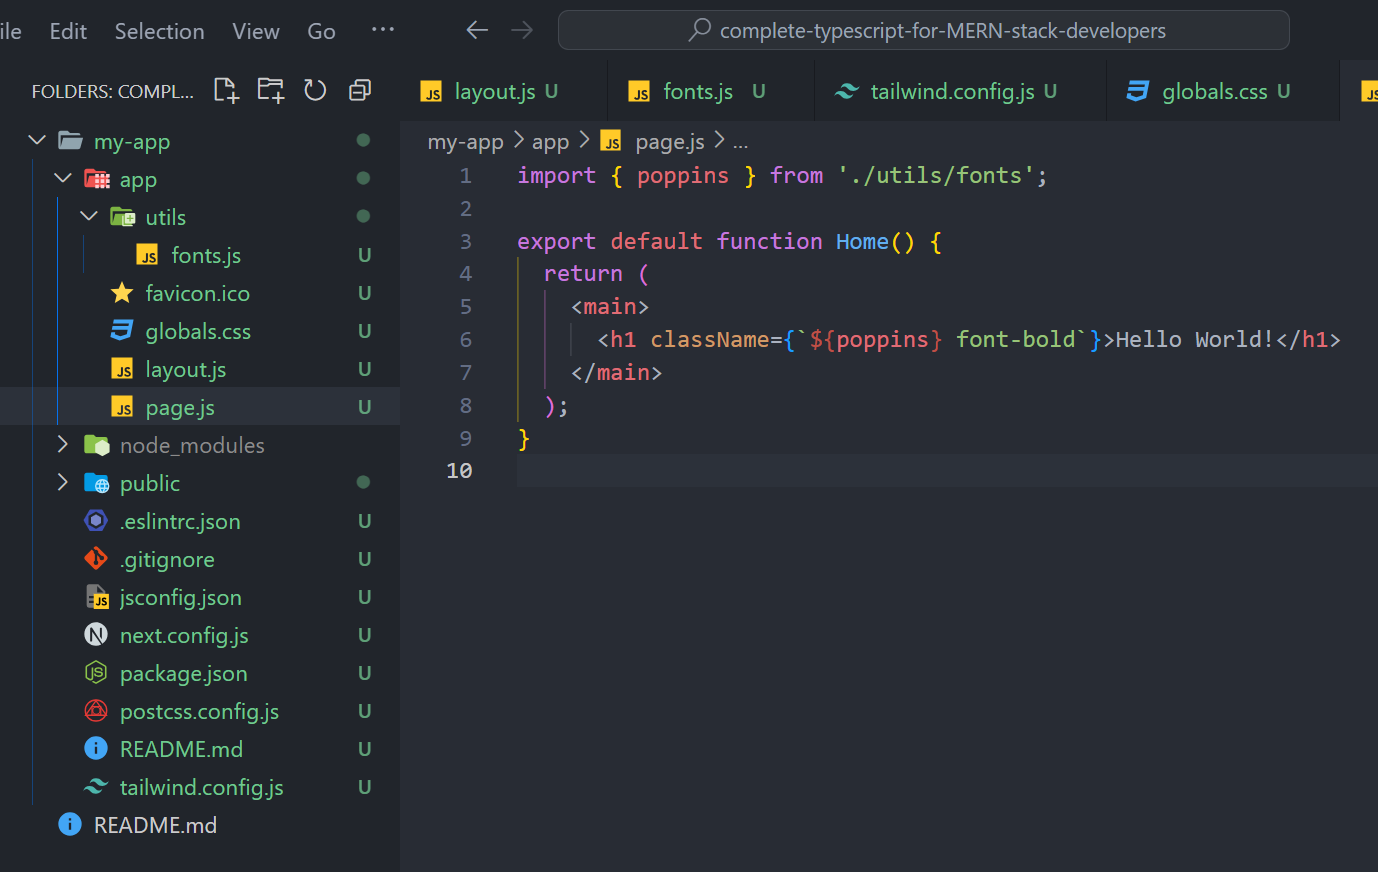
- FINALLY: since we selected multiple fonts and have used only one of them - the
nunito_sans(font)class, we can now practically use the other at any point inside our app without any further hassle. Below is an implementation of that in a fourth screenshot.
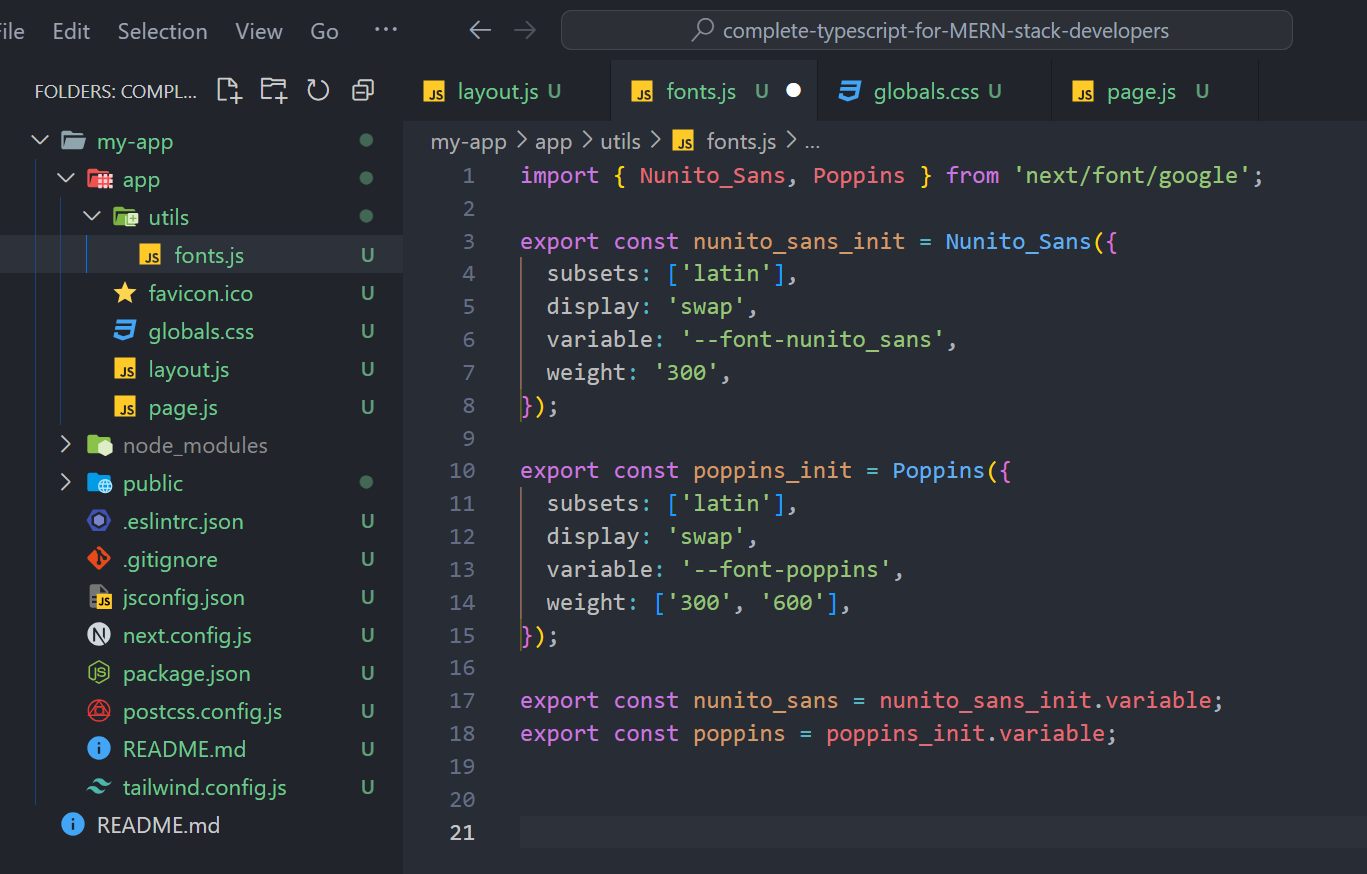
Extracting the font setup into a different font utility file
After all the setups implemented above, we can see that our work can be made cleaner by extracting the font setup into a separate utility file. This will result in a font utility file like the one in the fifth screenshot below.

Our layout.js file will look as simple as shown in the sixth screenshot below. Please observe closely how the fonts (configuration variables) were exported as new JavaScript variables and then imported and used in the layout.js file.
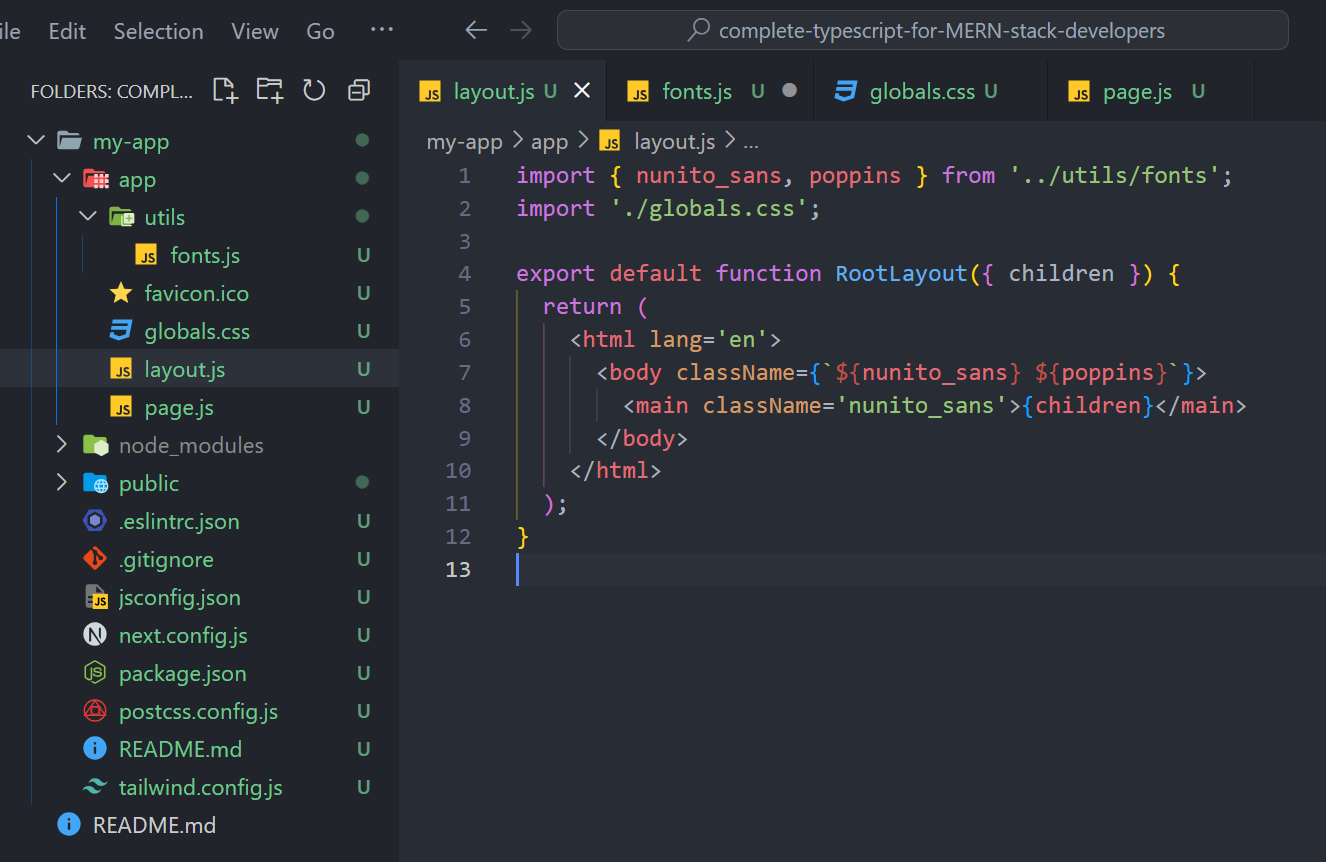
NB: Also observe, and take note that the nunito_sans (font) class used on the main element that wraps the children prop is different from the JavaScript variable imported from the utils file even though they were spelled the same. You can alter the spellings to avoid confusion/errors.
This method is my favorite because it simplifies your work in the long run as you build. Once your setup is done, you just call customized font classes and enjoy the build.
Method 2: Using Google fonts in Next.js 14 through Tailwindcss configuration
The next method involves setting up the fonts using a Tailwindcss configuration file.
A quick recap of the Tailwindcss configuration file
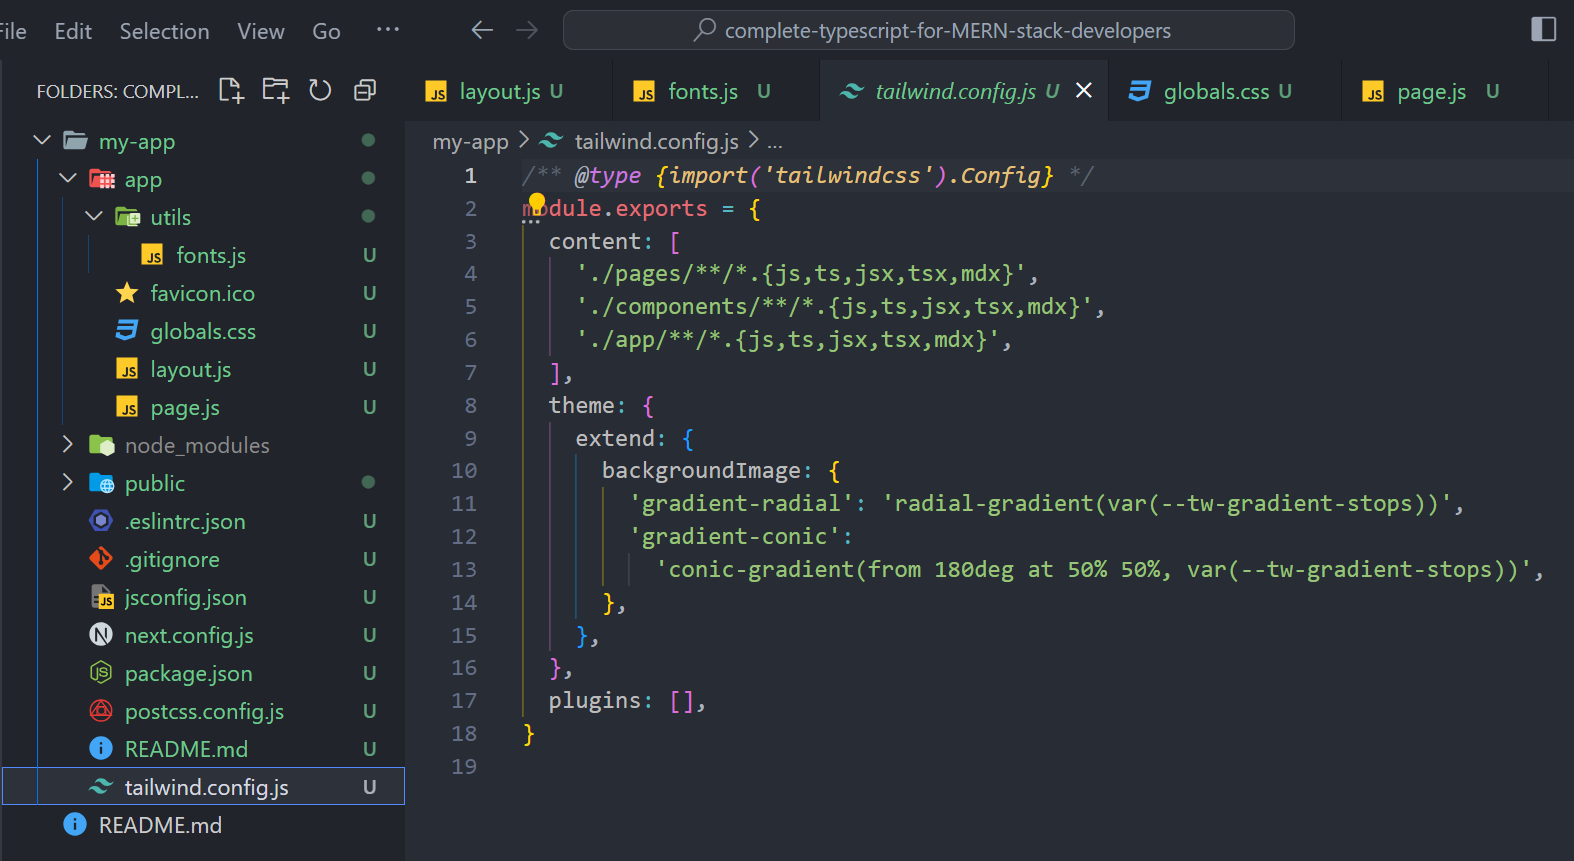
The Tailwindcss configuration file is a file that contains Tailwindcss configurations for your project. Below is the Tailwindcss configuration file of the app installed for this demo.
Importing and setting up the fonts
We won’t start from scratch before refactoring our code and bringing in the font utility file to implement fonts using this second method. The font utility file will stay the same as the first method discussed above, as shown in the screenshot below.
The differences in this case will come from:
- the usage of the fonts inside the project, and
- the fact that we won’t be handling our font setup with CSS (variables and selectors)*, but inside our
Tailwindcssconfig file.
Explaining the implementation process
-
FIRSTLY: As explained above, we have established that our font utility file will stay the same. We can now set the font inside our
Tailwindcssconfig file. -
SECONDLY: Below is how the
Tailwindcssconfig file will look.
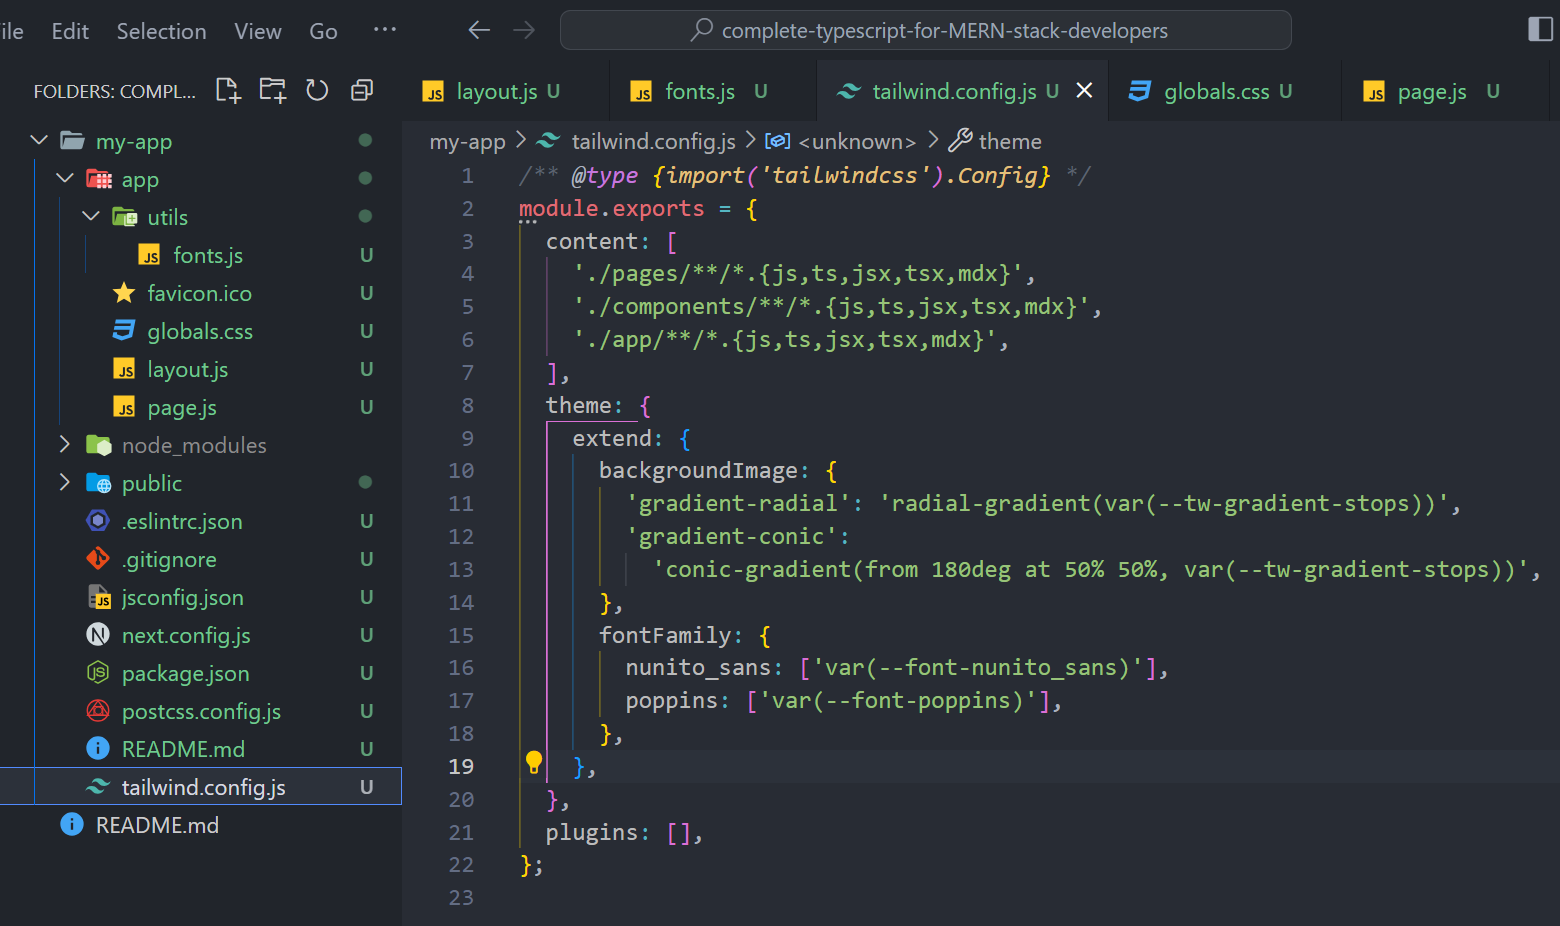
The notable change here is the addition of a fontFamily object/setup inside the extend object, which is, in turn, contained inside the theme object of the Tailwindcss config file. That is all we need to do.
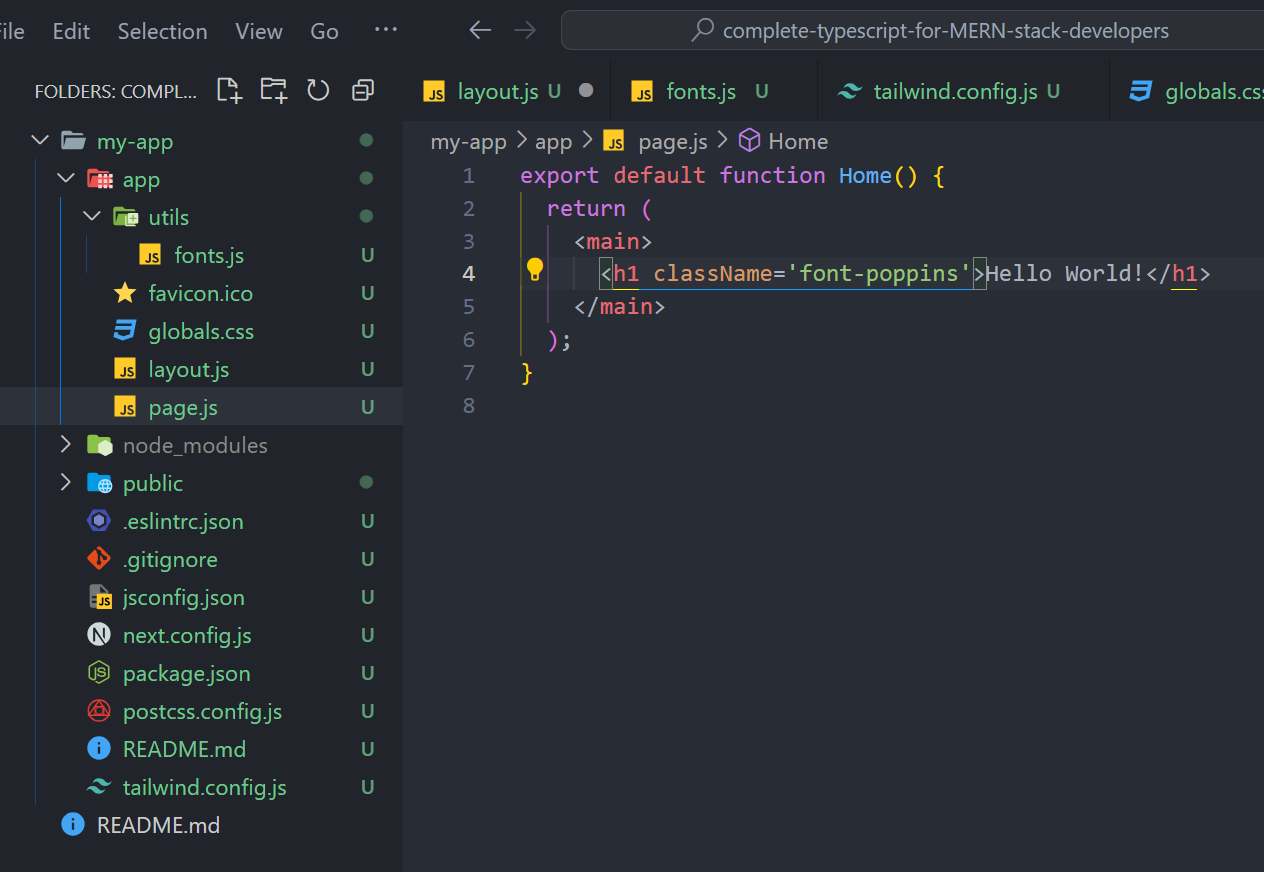
- FINALLY: We can now use the fonts anywhere inside our app as we did in the previous method. But in this case, we’ll need to prefix each font
classwith the “font” keyword. So thenunito_sans(font)classwill becomefont-nunito_sansand thepoppins(font)classwill becomefont-poppins- all as shown below in the two screenshots for thelayout.jsfile, and thepage.jsfile respectively.

Method 3: Using Google fonts in Next.js 14 through the default className method
The final method in this article is the default method used in a fresh Next.js 14 installation.
Understanding the native/default className method
This default method, used in fresh Next.js app installations, has some disadvantages. One problem with this method is that you must keep converting your line of class names into JSX since the fonts are imported and configured in Javascript format using variables. The other two methods discussed earlier involved the use of CSS, making them easier to use; hence,, they give you a better developer experience as you build ahead.
Below is what the font import and usage look like in a new Next.js app installation.
Importing and setting up the fonts
The font import will remain the same inside the font utility filefor this method. But we will need to make some changes.
Explaining the implementation process
- FIRSTLY: in this method, the
exportfrom the font utility file will be with theclassName(e.g.,nunito_sans_init.className) instead of the CSS variable (e.g.,nunito_sans_init.variable) as used in the two previous methods. Also, note that we’ll not need any further setup inside the global CSS file or theTailwindcssconfig file as we did in the other two methods.
See the implementation in the screenshot below.
- FINALLY: We can now use the JavaScript variables we exported from the font utility file on every
classNameproperty inside our app, as shown in the screenshots below.
Another problem with this method is that we must keep importing the fonts into whichever file we use them in.
This method is suitable for simple projects or projects where you need to use only a single font. However, it becomes challenging if you need to use multiple fonts.
Comparing and commenting on the three different methods explained
All three methods discussed in this article have their pros/cons. Here are my comments on how to use them.
- Use the CSS (variables and selector) method or the
TailwindCSSconfig method if you’re building a project that requires multiple fonts. Especially one that is medium or large-sized. This will give you the flexibility and ease of only calling CSS class names and having your fonts work flawlessly.
The problem with these two methods lies in how long it’ll take you to set things up. However, that will no longer be a problem after you’ve mastered the steps.
The CSS (variables and selector) method is my number one recommendation since it’s the easiest to use. The impressive developer experience it gives you is just incomparable.
- Use the default
classNamemethod if you are building a simple or small-scale project. This method will also be a perfect choice if you’re building a project that requires only a single font.
Conclusion
There you have it. Three awesome ways to use Google fonts in Next.js 14 applications: to make the best use of the new build time approach and to give your app users the better UX (user experience) they deserve.
I trust you found so much value in reading this.
Thanks for Reading.
Cheers!!!
Truly understand users experience
See every user interaction, feel every frustration and track all hesitations with OpenReplay — the open-source digital experience platform. It can be self-hosted in minutes, giving you complete control over your customer data.
Star on GitHub12k