All about Cookies and JavaScript


Have you ever wondered how websites remember your login information, shopping cart contents, and other preferences? The answer is cookies. This article will explain the types of cookies, working with cookies in JavaScript, when to use them, and the best practices.

Discover how at OpenReplay.com.
Cookies play an important role in enhancing website user experience by storing small pieces of information on the user’s device. This information helps websites remember user preferences and activities, making subsequent visits more personalized.
Cookies are like little notes that websites leave on your computer when you visit them. These notes contain small information about your visit, such as username, language preference, or the items you added to your shopping cart. They are like a helpful memory for the website. When you go to a website, it is like having a conversation. You tell the website your name, what language you prefer, and what you are interested in. The website then writes these details in a cookie and keeps them safely on your device. And in the world of web development, JavaScript helps make these cookies work.
Types of Cookies
Cookies come in different types, each serving a unique purpose to enhance your browsing experience. Understanding the types of cookies helps you comprehend how websites remember your preferences and actions. Let’s look at the two main types:
-
Session Cookies: When you visit a website, it gives you a session cookie. This cookie is your short-term memory during your visit to that website. They are stored in the browser’s memory and deleted when closed. They last only as long as your session on the website. They are gone once you close your browser, just like erasing the slate after you are done reading.
-
Persistent Cookies: Persistent cookies are like a journal. They record your preferences and actions over a more extended period. When you visit a website, it may give you a persistent cookie that stays with you even after you leave and return later. They remember your preference, ensuring the website recognizes you and customizes your experience based on your previous visits. They can last much longer, defined by an expiration date set by the website. Some can last for years, while others might expire after a few days or weeks.
When to use Cookies
Cookies can be used for different purposes, but they are generally used to improve the user experience and to make websites more efficient. Here are some specific examples of when to use cookies:
-
To remember login information: Cookies can be used to remember the user’s login information so that they don’t have to enter it every time they visit the website. It is beneficial for websites requiring users to log in frequently, such as email and social media websites.
-
To personalize the user experience: Cookies can be used to track the user’s preferences, such as their language and time zone, and display content relevant to their interests. For example, a news website might use cookies to track the user’s favorite topics and display more articles on those topics.
-
To keep track of shopping cart contents: It can be used to track the items a user has added to their shopping cart. It allows users to complete their purchase without having to start over if they leave the website and return later.
-
To improve website performance: Cookies can be used to cache data and reduce the number of requests that need to be made to the server. It can improve the loading speed of websites and make them more responsive.
-
To track user behavior: It can track the user’s browsing activity across different websites. This information can be used for various purposes, such as targeted advertising and website analytics.
Attributes
Cookies can have a number of attributes that control how the cookie is used and how long it is stored. The most common cookie attributes are:
-
Name: The name of the cookie. It is an identifier for the cookie.
-
Value: The value of the cookie. It is the data that is stored in the cookie.
-
Domain: The domain that the cookie belongs to. This is the website that sets the cookie.
-
Path: The path on the domain for which the cookie is valid. It is the part of the website that the cookie can be used on.
-
Expires: The date and time that the cookie expires. After this date and time, the cookie will be deleted from the user’s computer.
-
Secure: Whether the cookie should only be sent over secure connections. The cookie will only be sent when the user is connected to a website over HTTPS.
-
HttpOnly: Whether the cookie can be accessed by JavaScript. It helps to protect the cookie from being accessed by malicious websites.
Working with Cookies in JavaScript
Working with cookies in JavaScript can be essential for storing and managing data on the client side. JavaScript can be used to work with cookies in several ways. For example, It can be used to:
- Set and create cookies
- Retrieve cookie data
- Delete cookies
Setting and Creating Cookies
To set or create a cookie, we assign a string to the document.cookie property. This string usually contains the cookie name, its value, and optional attributes like expiration date, domain, and path.
Setting a Cookie:
document.cookie = "username=ChisomKanu";Here, we’re setting a simple ” username ” cookie with the value “ChisomKanu.” However, please note that this cookie is a session cookie, meaning it will be removed when the browser is closed.
Setting a Persistent Cookie:
const expirationDate = new Date();
expirationDate.setDate(expirationDate.getDate() + 7);  // Cookie expires in 7 days

document.cookie = "username=ChisomKanu; expires=" + expirationDate.toUTCString();
We set a persistent cookie by specifying an expiration date. The cookie will be stored for seven days, even if the browser is closed and reopened.
Creating a Cookie Function: To simplify cookie creation and make the process more reusable, you can create a function:
function setCookie(name, value, daysToExpire) {
  const date = new Date();
  date.setTime(date.getTime() + daysToExpire * 24 * 60 * 60 * 1000);
  const expires = "expires=" + date.toUTCString();
  document.cookie = name + "=" + value + "; " + expires + "; path=/";
}

// Usage:
setCookie("username", "ChisomKanu", 7); // Cookie will expire in 7 days
The setCookie function takes the cookie’s name, value, and the number of days it should persist. It calculates the expiration date and sets the cookie accordingly.
Retrieving Cookie Data
Let’s break down the process of retrieving cookie data into a step-by-step approach:
-
Accessing
document.cookie: To start, we will access thedocument.cookieproperty, which contains all the cookies for the current document. -
Splitting the Cookie String: Then split the
document.cookiestring into individual key-value pairs using the.split('; ')method. This method separates the cookies based on the semicolon and space. -
Creating a Cookie Object: We create a JavaScript object to store the cookie data. Each key-value pair extracted from the cookie string is added as a property to this object.
-
Looping Through Cookies: We iterate through the array of key-value pairs and further split each pair into its cookie name and value using
.split('='). -
Populating the Cookie Object: We populate the cookie object with the cookie names as keys and their respective values as values.
Let’s put the steps into action with a code example:
function getCookies() {
  const cookies = document.cookie.split('; ');
  const cookieData = {};

  for (let cookie of cookies) {
    const [name, value] = cookie.split('=');
    cookieData[name] = decodeURIComponent(value);
  }

  return cookieData;
}

const cookies = getCookies();
console.log(cookies);
The getCookies function splits the cookie string into an array of individual cookies using .split('; '). We initialize an empty object cookieData to store the cookie key-value pairs. We iterate through each cookie in the array using a’ for’ loop. We split the name and value using .split('=')for each cookie. We also use decodeURIComponent to decode any special characters in the cookie value. Then, we populate the cookieData object with the cookie name as the key and the decoded cookie value as the value. Finally, we return the populated cookieData object containing all the cookie information.
After retrieving the cookie data as a JavaScript object, we can access individual cookie values using their respective keys.
Let’s illustrate the process of using the retrieved cookie data with a code example:
function customizeUserExperience(cookies) {
  if (cookies.username) {
    console.log(`Welcome back, ${cookies.username}!`);
  } else {
    console.log('Welcome to our website!');
  }

  if (cookies.language) {
    console.log(`Displaying content in ${cookies.language}.`);
    // Additional logic to set the website language accordingly
  }
}

// Assuming cookies is the cookie object retrieved earlier
customizeUserExperience(cookies);
The customizeUserExperience function takes the retrieved cookie object as an argument. It checks if the username cookie exists. If it does, it logs a personalized welcome message. If not, a general welcome message is logged. It also checks if the language cookie exists. If it does, it logs a message indicating the displayed content language.
Further logic can be added to set the website language or customize the user interface based on other retrieved cookie values.
Cookie Deletion
Cookie deletion is an important aspect of web development, allowing developers to manage user data and privacy effectively. In JavaScript, cookies can be deleted to enhance user privacy or remove outdated information. When a cookie is deleted, it is removed from the user’s device, and the browser will no longer send that cookie to the server. Cookies can be deleted based on various conditions, such as user actions or when certain data is no longer needed.
Let’s look at the process of deleting cookies using JavaScript:
-
Accessing
document.cookie: To start, we access thedocument.cookieproperty to manipulate the cookie data. -
Setting the Expiry Date to the Past: To delete a cookie, we set its expiry date to a date in the past. This tells the browser to remove the cookie.
-
Setting the Path (if needed): If the cookie was initially set with a specific path, the deletion should use the same path for consistency.
Illustration with a code example:
function deleteCookie(cookieName) {
  document.cookie = `${cookieName}=; expires=Tue, 10 Oct 2023 00:00:00 UTC; path=/;`;
}
The deleteCookie function takes the cookie name as a parameter. The function then modifies the document.cookie property by setting the expiry date of the specified cookie to a date in the past (October 10, 2023). The path attribute is set to ’/’ to ensure the cookie is deleted regardless of its initial path.
Some things to keep in mind when deleting cookies:
-
If you delete a cookie used for authentication, the user will be logged out of the website.
-
If you delete a cookie that is used for personalization, the user’s preferences will be reset.
-
If you delete all of the cookies for a website, the user will have to log in and set their preferences again the next time they visit the website.
How to Use DevTools to Examine Cookies
Web developers frequently use browser DevTools to inspect and analyze various aspects of their web applications. As an essential part of web development, Cookies can also be examined using DevTools. It enables developers to verify that cookies are set, read, and deleted as intended.
To begin, open your web browser and navigate to the web page for which you want to examine cookies. Once on the webpage, you can open DevTools using one of the following methods:
-
Right-click and Inspect: Right-click on any element on the page and select “Inspect” or “Inspect Element” from the context menu.
-
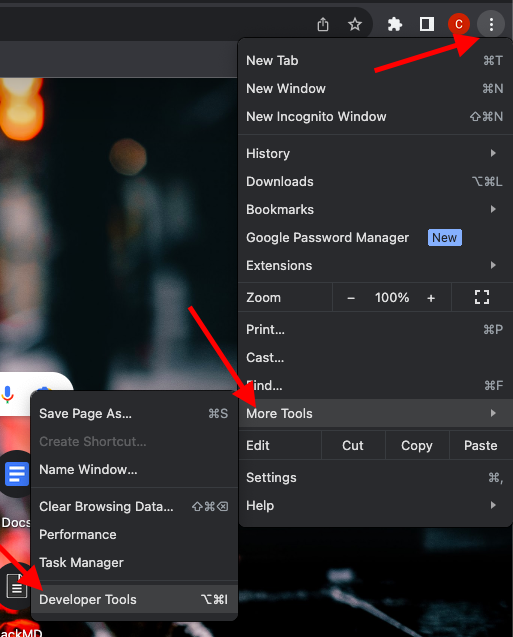
Keyboard Shortcut: Use the keyboard shortcut: Windows/Linux: Ctrl + Shift + I Mac: Command + Option + I Menu: Open the browser menu (usually represented by three vertical dots or lines), go to “More Tools,” and then select “Developer Tools.”
- Navigating to the Application Tab: Once DevTools is open, navigate to the “Application” tab. This tab contains various sections related to application data, including Cookies, Local Storage, Session Storage, and more.

To examine cookies in DevTools, follow the steps below:
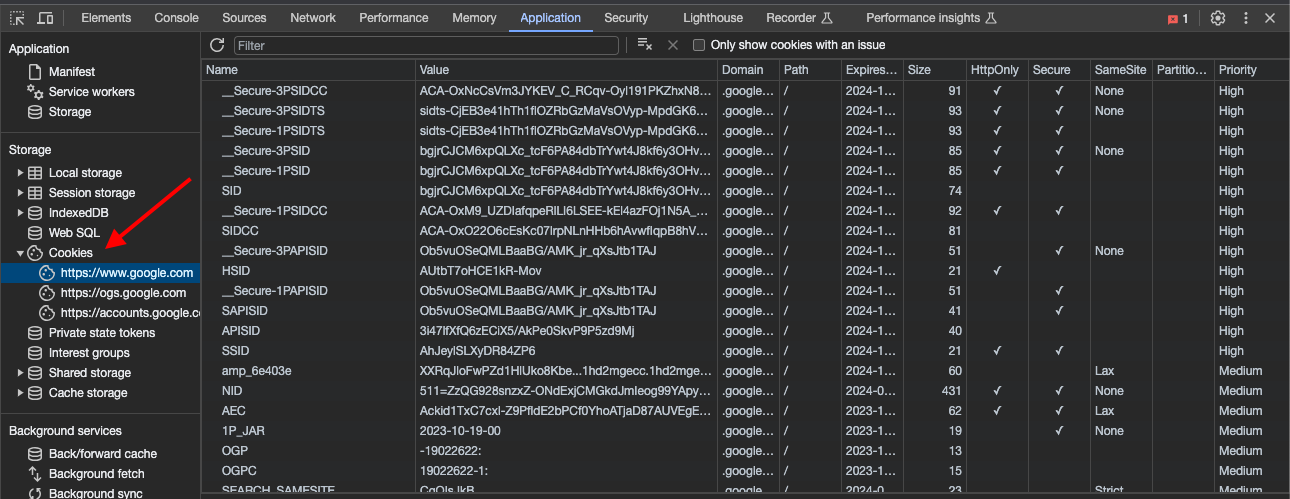
- Viewing Cookies In the “Application” tab, look for “Cookies” in the left sidebar. Clicking on it will display all the domains related to the current website. Select a domain to view its associated cookies.
The picture below shows the cookies of google.com:
-
Cookie Details Click on a specific cookie to view its details. This includes the cookie name, value, domain, path, expiration, and other attributes.
-
Filtering Cookies DevTools allows you to filter cookies by domain. It can be useful when dealing with websites that have many cookies. Use the filter option to narrow the list and focus on specific cookies.
-
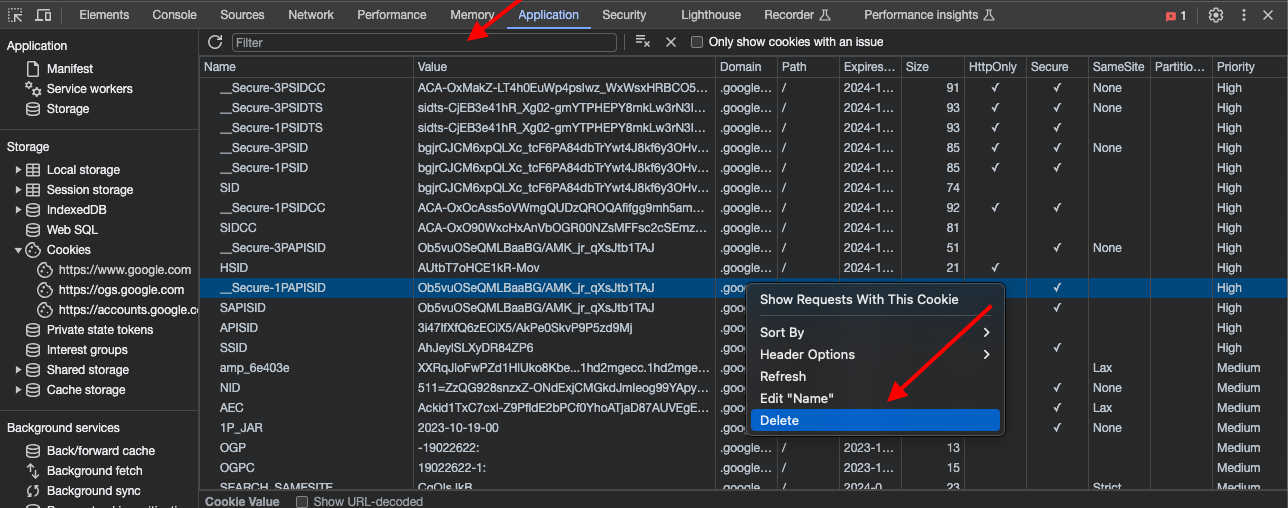
Deleting Cookies To delete a cookie, right-click on the cookie in the list and select “Delete” or use the “Delete” button at the bottom. This action will remove the cookie from the browser.
Conclusion
In conclusion, It is important to note that not all cookies are created equal. Some cookies are essential for the proper functioning of a website, while others are used for less essential purposes such as tracking and advertising. However, disabling cookies may prevent some websites from functioning properly. Cookies can be a valuable tool for improving the user experience, but they should be used cautiously. Users should be aware of the types of cookies they accept when they visit a website and should have the option to opt out of cookies. Also, disabling cookies may prevent some websites from functioning properly. Websites should have a clear and concise privacy policy explaining their use of cookies. Developers should take steps to protect cookies from being stolen or modified by attackers.
Gain control over your UX
See how users are using your site as if you were sitting next to them, learn and iterate faster with OpenReplay. — the open-source session replay tool for developers. Self-host it in minutes, and have complete control over your customer data. Check our GitHub repo and join the thousands of developers in our community.