
OAuth 2.0 is a popular way to implement authorization and even authentication in web applications today. Thanks to it being easy to use and the widespread support by tech giants, more and more developers are incorporating it into their applications daily. This article will let you in the details of its usage so you too can start working with it.
OAuth is short for “Open Authorization.” OAuth 2.0 is a second version of its implementation which has grown to be one of the most popular ways of implementing authentication and authorization in web applications today. It is very interesting how it has impacted front-end development and given front-end developers the ability to easily manage some form of authorization and authentication on the client side. Nowadays, most front-end developers can implement OAuth 2.0 strategies on the client side, but what happens behind the scenes remains oblivious to many. We will examine the OAuth 2.0 flows in this piece and discuss the best ways to integrate them into our web applications.
At the end of this article, you will:
- Understand what happens behind the scenes of implementing authentication using OAuth 2.0
- Know the best grant type for your application
- Know what OpenID Connect (OIDC) is all about
- Know how best to implement OAuth2.0
Authentication and Authorization
The terms authentication and authorization (commonly referred to collectively as AUTH) are often used interchangeably in web development, but they are two different concepts. Nevertheless, these concepts represent the two necessary steps for access control in web applications.
Authentication is the process of verifying the identity of a user. It typically involves collecting credentials, such as a username and password, and validating them against a trusted source, such as your user database or a third-party service.
For instance, when you log in to your email account, your email address and password are verified against the credentials stored in your email provider’s user database. Your details are matched against your user profile on the email provider’s database, and you are uniquely identified as a specific user. This process is authentication.
Authorization implies determining whether an authenticated user has access to a specific resource or action. It involves a system of roles and permissions that specify which resources a user can access on a web application and what operations he is permitted to carry out on those resources.
For instance, if two users were authenticated on a web application, one recognized into the role of a customer and the other into that of an admin, only the user authenticated as an admin will have access to the admin control panel.
Authentication is a necessary step that precedes authorization since a user must first be identified before information on that user, including the role assigned to the user, can be accessed and used for the user’s authorization. The AUTH process protects our websites and database from unauthorized access.
Description of OAuth 2.0
OAuth 2.0 is a three-legged authorization procedure involving a user and two web applications. The OAuth 2.0 protocol allows users to grant limited access to their protected resources on one website to a third-party application without giving away their authentication credentials(username and password) for the first application to the third-party application.
Now, that’s a precise definition only if you have a good understanding of OAuth 2.0 already. I’m assuming that we do not. Hence, to fully understand and describe OAuth 2.0, we will view it from two perspectives.
- The user’s perspective
- The developer’s perspective.
The user’s perspective
Imagine you (a user in this case) want to use a web application (we will name the app “pic-upload”) that offers the service of posting your pictures to your Facebook account automatically every week. Rather than the app requesting your Facebook login credentials to access your Facebook account and upload your pictures (this is how things worked before OAuth 2.0), the app will use OAuth 2.0 to gain the necessary authorization to upload the pictures.
In using OAuth 2.0, your interaction with the app as a user will be as follows;
- when you open the app (“pic-upload”) for the first time, it will redirect you to Facebook.
- Next, you will be required to log in to your Facebook account.
- Once you enter your credentials, Facebook will redirect you to a consent screen, where you are prompted to grant the app permission to access some resources on your account. The app will specify which of your resources it needs to access, such as photos or status updates.
 A Sample Google consent screen
If you grant permission, Facebook will generate what is known as an access token, which serves as a sort of pseudo-password the app (“pic-upload”) can use to access the requested resources. The app will then subsequently use this token to authorize requests to post photos to your Facebook account on your behalf.
If you later decide you no longer want the app (“pic-upload”) to access your Facebook account, you can revoke the app’s permission in your Facebook settings. This action will invalidate the access token and prevent the app from accessing your account in the future.
Note that using the previous standard, where the user’s Facebook username and password are revealed to the app (“pic-upload”), the app would have full access to perform any task on the user’s Facebook account. This total control poses a significant security risk to the user. Due to this risk, many applications (like Facebook) in the past found it hard to integrate with other apps (smaller apps like our pic-upload apps) since malicious applications could easily use the users’ shared details to wreak havoc on user accounts.
However, using OAuth 2.0, applications are only allowed to access the minimum amount of the user’s resources required to perform their task. This approach provides better security and privacy for users as it gives them better control over what information a third-party application has access to. It also enables seamless integration between multiple web applications, allowing them to share their user’s resources safely.
In upcoming sections, we will look at the OAuth 2.0 process from the developer’s view to get the complete picture of the OAuth 2.0 flow. Note that OAuth 2.0 is not limited to web applications.
The Developer’s Perspective
From the developer viewpoint, we would consider ourselves the developers of the 3rd party app used in our previous example (“pic-upload”) and take a look at what goes on as we integrate our applications with another application like Facebook and gain access to some of their user resources using OAuth 2.0.
To begin, we need to know the major components involved in the OAuth 2.0 flow. These components include:
- The Resource owner
- The Client
- The Resource server
- The Authorization server An additional component, “The Resource provider,” would be considered as it eases the understanding of the topic.
The resource owner is the user who owns and controls the resource that the client application(our web application) is trying to access. This component can be an individual or an organization. In the case of our example, the resource owner is any subscriber to our app whose Facebook account we need to access to post pictures.
The client is our web application (“pic-upload”), the third-party application or service that wants to access some resource on behalf of the resource owner(the users). The client can be a web application, mobile application, or any other software component that interacts with the OAuth 2.0 framework.
The authorization server is responsible for authenticating the resource owner and issuing an access token to the client when the user is successfully authenticated and has consented to grant the client access to his resources. In our example, this is the Facebook authorization server.
The resource server is the server that hosts the protected resources that the client is trying to access on behalf of the resource owner. It may sometimes be on the same server as the authorization server, although this is not the best practice. In our example, this is the Facebook database server.
The resource (OAuth) provider: Refers to the application that owns the authorization and resource server. Although not recognized as an OAuth 2.0 component by the official docs, identifying it as a unique entity in OAuth 2.0 makes the explanation a bit easier. In our example, this is the Facebook application.
These components work together to provide a secure and standardized way for third-party applications to access user resources without requiring their user to share their login credentials. Please thoroughly understand these terms before you move to the next section, as understanding the roles and responsibilities of each component is crucial for grasping the Oauth2.0 flow and implementing OAuth 2.0 properly in a web or mobile application.
OAuth 2.0 Grant Types
Grant types are a group of standardized methods the client (the web developer) utilizes to obtain an access token from the authorization server. When the topic of Oauth flow is being discussed, the grant type would be the center of discussion.
OAuth 2.0 allows several grant types options, depending on the use case and security requirements. The most popular grant types in OAuth 2.0 include:
- Authorization Code
- Implicit flow
- Client Credentials
- Device Code
As a developer trying to implement OAuth 2.0 on your application (the client), the first step is to register (authenticate) the client (“pic-upload”) with the resource provider’s authorization server.
During registration, you will usually have to fill in specific information, including client id, scope, callback URL, and response type.
- The client ID is the name the OAuth provider will associate the client with.
- The scope defines what resources the client would like to access or manipulate on behalf of the resource owner.
- The callback URL is the URL that the resource owner would be redirected to after they have given their consent.
- The response type defines what type of response format you want the Oauth provider to pass to the client app.
After registering, the OAuth provider gives the client unique credentials consisting of a client ID and client secret. These credentials will be used for authenticating the client by the Oauth provider and authorizing it as an application capable of integrating with the Oauth provider application on behalf of its users.
By performing the AUTH process on the client applications, the OAuth provider can identify which client accessed what resource owner and easily cross off clients who carry out malicious activities, thereby enhancing security.
Now that the client (your web app- “pic-upload”) is registered with the OAuth provider (Facebook, for instance), you can go ahead and implement the appropriate grant type within your application.
Here, the main focus would be on the authorization code and implicit flow grant types, which are more common for web applications. (A) Description of Authorization code The Authorization Code grant type involves a five-step process:
- the client sends a request to the authorization server to initiate the OAuth process,
- the authorization server redirects the user of the third-party app(the client app) to the OAuth provider’s login page, where they enter their credentials. Next, a consent screen where the resource owner(user) is shown the scope of resources, the client wishes to access on his behalf. The resource owner might either consent to all, some, or none of the scopes.
- the authorization server sends an authorization code to the client
- the client sends the authorization code back to the authorization server alongside the client’s secret
- the authorization server sends an access token to the client
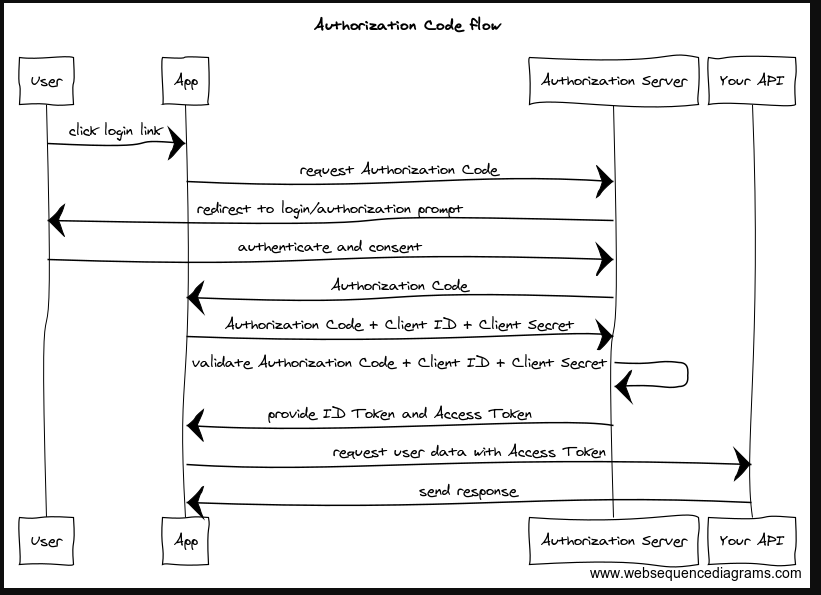 Authorization code flowchart
(B)Description of Implicit grant type The Implicit grant type follows the same as the authorization code flow but skips steps 3 and 4, making it a three-step process.
- the client sends a request to the authorization server to initiate the OAuth process,
- the authorization server redirects the user of the third-party app(the client app) to the OAuth provider’s login page, where they enter their credentials. Next, a consent screen where the resource owner(user) is shown the scope of resources, the client wishes to access on his behalf. The resource owner might either consent to all, some, or none of the scopes.
- the authorization server sends an access token to the client
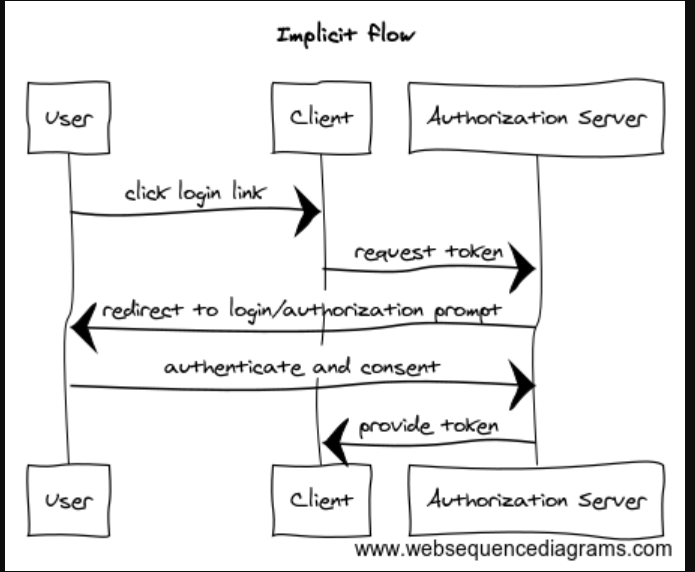
Implicit flowchart
Authorization code vs. Implicit
On observation, we quickly notice the difference in the authorization code grant type, and the implicit flow is the existence of an extra step of obtaining an authorization code in the authorization code flow before the client is finally given an access token. One might wonder why the authorization code step is relevant if we arrive at the same result of gaining an access token using either flow.
As previously mentioned, each of these flows has its use cases. The authorization code flow is a standard flow for web applications with a dedicated server; obtaining an authorization code adds a thick layer of protection not seen in the implicit flow. This is because, in implicit flow, the access token is sent directly to the client as a URL fragment, visibly exposed, and can be accessed easily by malicious code. When using the authorization code flow, only the authorization code is sent back as a URL fragment, and we already know that this authorization code and client secret must be exchanged for an access token. This additional step makes it much more secure since even if the authorization code may be stolen by malicious code, it will be difficult for malicious code to access the client secret, which is stored on the server, making the stolen code useless to any potential hacker.
The implicit flow will often be seen only on web applications (usually SPA’s) that do not have a dedicated server. Since these applications lack a server, the developer is forced to store the access token on the browser, leaving the web application very vulnerable to cross-site scripting (XSS) attacks. Presently, the implicit flow has been labeled legacy and is unadvised, except no other viable option is feasible, in which case it should be used with PKCE.
Session Replay for Developers
Uncover frustrations, understand bugs and fix slowdowns like never before with OpenReplay — an open-source session replay tool for developers. Self-host it in minutes, and have complete control over your customer data. Check our GitHub repo and join the thousands of developers in our community.
What is OpenID Connect (OIDC)
OpenID Connect (OIDC) is a common topic that pops up nearby when OAuth 2.0 is being discussed. OIDC is a protocol built on top of OAuth 2.0 that allows users to authenticate with third-party applications(the client) using their existing credentials on another application(the resource provider). OIDC provides a standardized way for users to authenticate across multiple applications without needing separate usernames and passwords.
 OIDC Authentication Screen
Often it raises a bit of confusion as people may find it difficult to differentiate between OIDC and OAuth 2.0. However, as we can see from the definition, OIDC is built atop OAuth 2.0. The main difference is that while OAuth 2.0 focuses on authorization, OIDC focuses on authentication. Think about it for a minute; in our image-upload app example, the app did not need Facebook to authenticate its user; it only required Facebook to authorize it to complete a task on behalf of the user. The app may have had its own built-in username and password authentication system independent of OAuth 2.0. However, with the help of OIDC, we can both authenticate and authorize using a similar OAuth 2.0 flow. The basic idea is that while the user signs in to the resource provider, the user is being authenticated by the resource provider. We can use this to our advantage and request unique profile information on that user after he has been authenticated by the resource provider and consented to share the requested profile data. Usually, the username and email would be requested since they provide a unique identity. Managing authentication with OAuth 2.0 principles is what OIDC is all about.
A similar platform called “OpenID” is used for the same purpose as OIDC, but OpenID is not built directly atop OAuth 2.0. In summary, both OIDC and OpenID are often used with OAuth 2.0 to authenticate and authorize web applications.
What is PKCE
PKCE (Proof Key for Code Exchange) extends to the Authorization Code grant type, providing enhanced security for mobile and browser-based applications. PKCE prevents a malicious attacker from intercepting and using the authorization code to obtain an access token. PKCE can also be used in the implicit flow, this time to protect the access token from being used by an attacker.
PKCE involves the client generating a random value called a code verifier and transforming it using a cryptographic hash function to create a code challenge. The code challenge is then sent to the authorization server along with the initial authorization request. When the authorization server returns the authorization code, the client sends the code verifier along with the code to the authorization server to exchange it for an access token. The authorization server then verifies that the code verifier matches the code challenge before issuing the access token. It is advised to use PKCE as an addition to the authorization code and implicit flow.
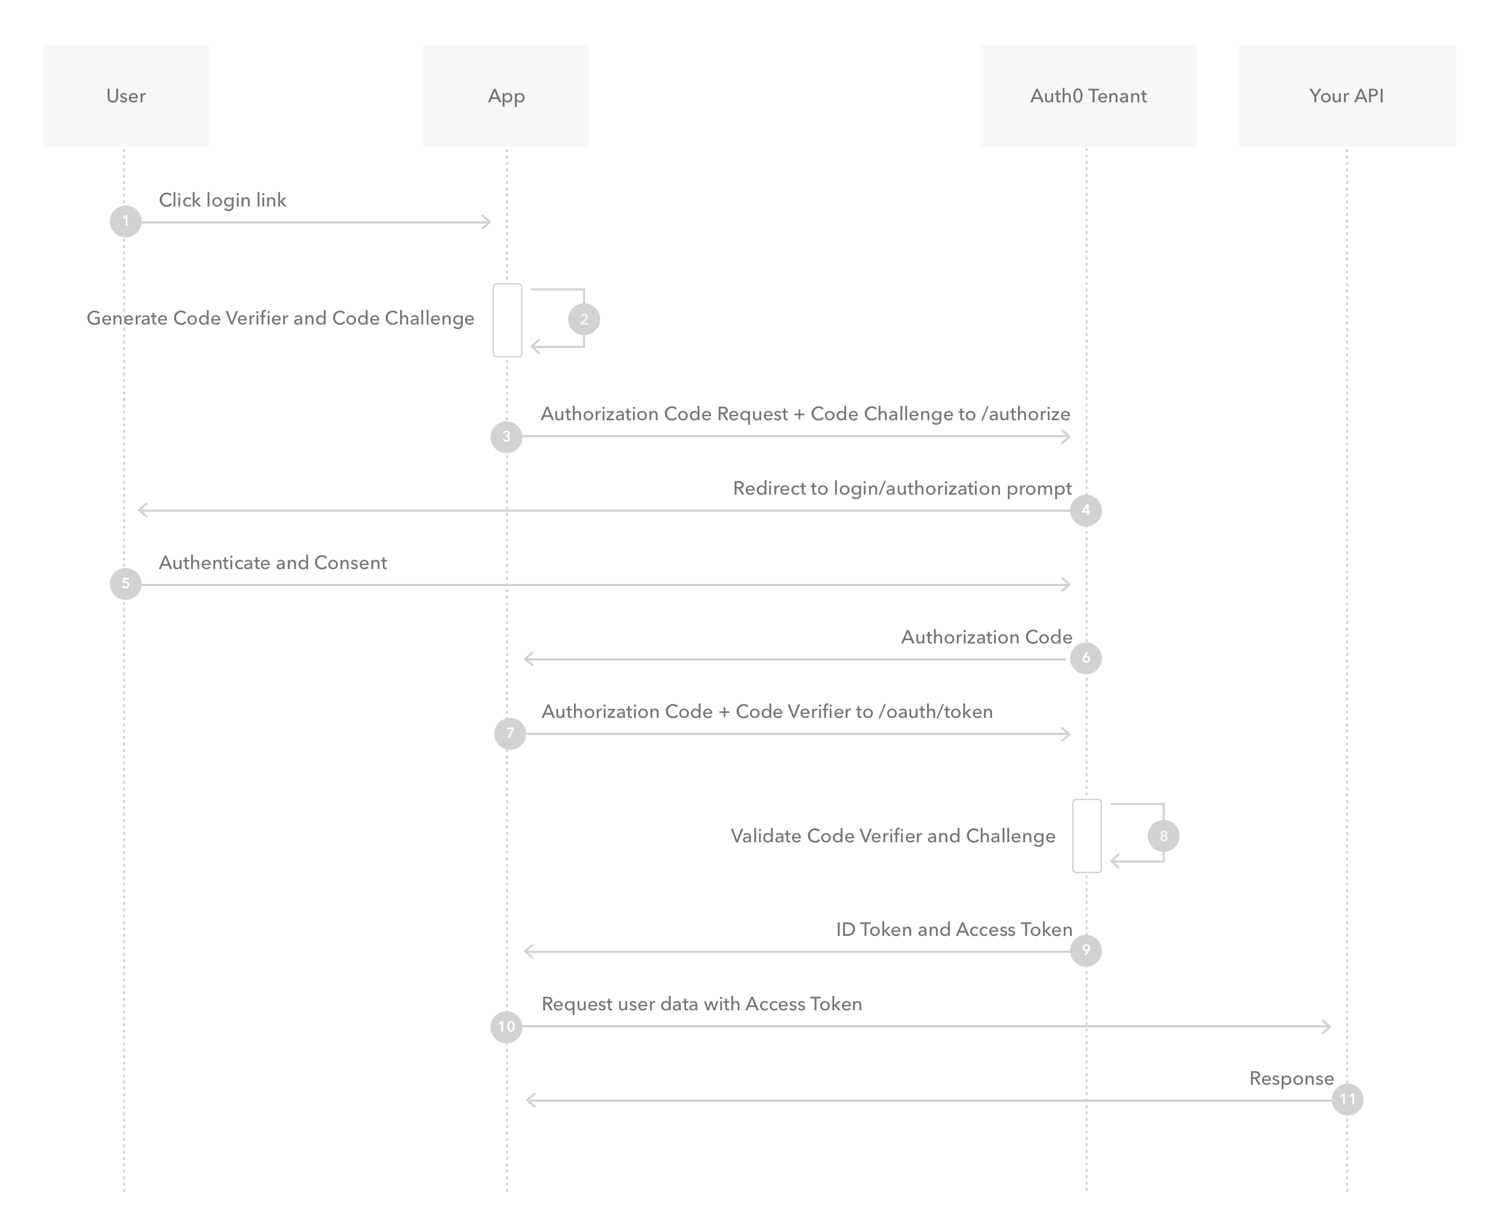 Authorization code flowchart with PKCE
Summary
OAuth 2.0 is a widely adopted protocol for handling authentication and authorization in web applications. It involves four main components: the resource owner, the client, the resource server, and the authorization server. In addition, OAuth 2.0 defines several grant types that can be used depending on the use case and security requirements, such as Authorization Code, Implicit, Client Credentials, and Device Code. OpenID Connect (OIDC) is a protocol built on OAuth 2.0 that allows users to authenticate with third-party applications using their existing credentials. PKCE is an extension to the Authorization Code grant type, which provides enhanced security for mobile and browser-based applications.
Overall, OAuth 2.0 and its ecosystem provide a flexible and secure way for users to grant access to their protected resources without sharing their credentials with third-party applications, enabling seamless integration between applications and improving the overall user experience.
References
- The OAuth 2.0 official site https://oauth.net/2/
- The OAuth 2.0 Authorization Framework: https://tools.ietf.org/html/rfc6749
- OpenID Connect: https://openid.net/connect/
- OAuth 2.0 Security Best Current Practice: https://tools.ietf.org/html/draft-ietf-oauth-security-topics-16
- OAuth 2.0 Using PKCE:https://auth0.com/docs/get-started/authentication-and-authorization-flow/authorization-code-flow-with-proof-key-for-code-exchange-pkce
Gain Debugging Superpowers
Unleash the power of session replay to reproduce bugs and track user frustrations. Get complete visibility into your frontend with OpenReplay, the most advanced open-source session replay tool for developers.