All about the Vue CLI
Learn all you need to know about using the Vue CLI to bootstrap your Vue apps


You might have just learnt about HTML, JavaScript and CSS and you have been hearing about popular JS frameworks such as Vue JS. Vue JS is one of the most loved frontend frameworks out there and you might be wondering how to get started with Vue JS easily. In this post, we will take you through how easy it is to setup your Vue JS projects with the Vue CLI with zero configurations.
Prerequisites
You need to have a few things set up first before going through this post if you are a beginner, if you are not please feel free to skip to what is Vue CLI.
- You need Vue JS globally installed on your machine, you can check if you already have by running the command below in your terminal:
vue --version- If you see a version then you can go along, but if you see an error message, it would prompt you to run this command below:
npm install vue- You also need Node.js version 8.9 or above (v10+ recommended). You can manage multiple versions of Node on the same machine with nvm
What is Vue CLI?
This is the node installable command-line interface with which you can run Vue commands in the terminal. It is a powerful system for rapid Vue JS development, you can scaffold a new Vue project and prototype your app as you build in one command. The CLI is super extensive, integrating nicely with the Vue build tools so that you do not spend unnecessary time on configurations, and when you do choose to do so the CLI also allows you to handle config without ejecting. It is the standard tooling baseline for using Vue JS which provides you with the Vue CLI service which is a runtime dependency, built on Webpack with 0 configs. It has a very extensive collection of plugins you can add to your project with a line of command.
How to install Vue CLI
Installing the Vue CLI is done by running one single command in your terminal:
npm install -g @vue/cli
# OR
yarn global add @vue/cli
This depends on your package manager, after the installation is complete the Vue binary can now be accessed anywhere on your machine. This can be confirmed by running the Vue command like this:
vueWhat you would see is a help result that can help you navigate your first few commands:
Usage: vue <command> [options]

Options:
-V, --version                              output the version number
-h, --help                                 output usage information

Commands:
create [options] <app-name>                create a new project powered by vue-cli-service
add [options] <plugin> [pluginOptions]     install a plugin and invoke its generator in an already created project
info                                       print debugging information about your environment

Run vue <command> --help for detailed usage of given command.
Notice how Vue commands work with three keywords, this is the only format for Vue commands. If you already have Vue installed and it is an old version, you can easily upgrade it with this command:
npm update -g @vue/cli
# OR
yarn global upgrade --latest @vue/cli
Vue CLI vs WebPack
There has been this debate on what to use to configure or scaffold your application. While Webpack is a module bundler for JavaScript apps that includes Vue JS projects, it builds a dependency graph with your components and generates the bundle from there. Vue CLI is built on top of Webpack and so for beginners, you do not need to know what Webpack is as the Vue CLI has taken care of the configurations with great default presets and you literally need 0 configs to start. Most people really also dislike how redundant the processing of config per project is with Webpack. However in your journey as a JavaScript developer, knowledge of tools like Webpack can be useful as many other JS frameworks, not just Vue JS, have the scaffolder product built on Webpack. This makes it important to understand at least the basic workings of Webpack.
Building your first Vue app with the CLI
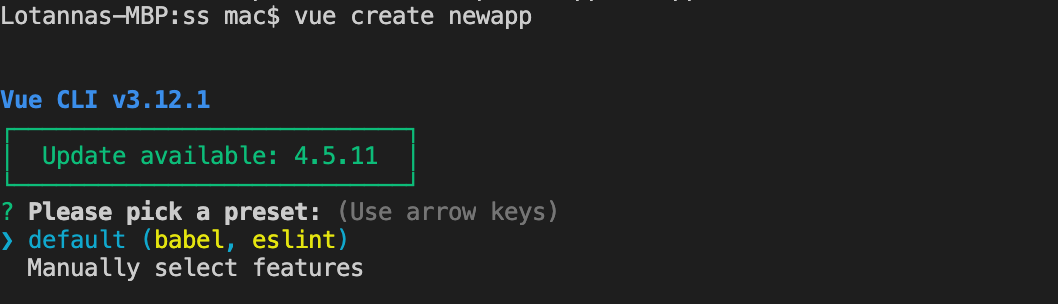
If you have followed this let us go ahead and build our first Vue app using the CLI. Open your terminal to the file location of your choice or use VS Code’s embedded terminal. Run the command below to create a new Vue project:
vue create newappThe first thing you would see are two options to pick a preset with your arrow keys, the default which has babel and ESlint config out of the box or another option to select your own features.
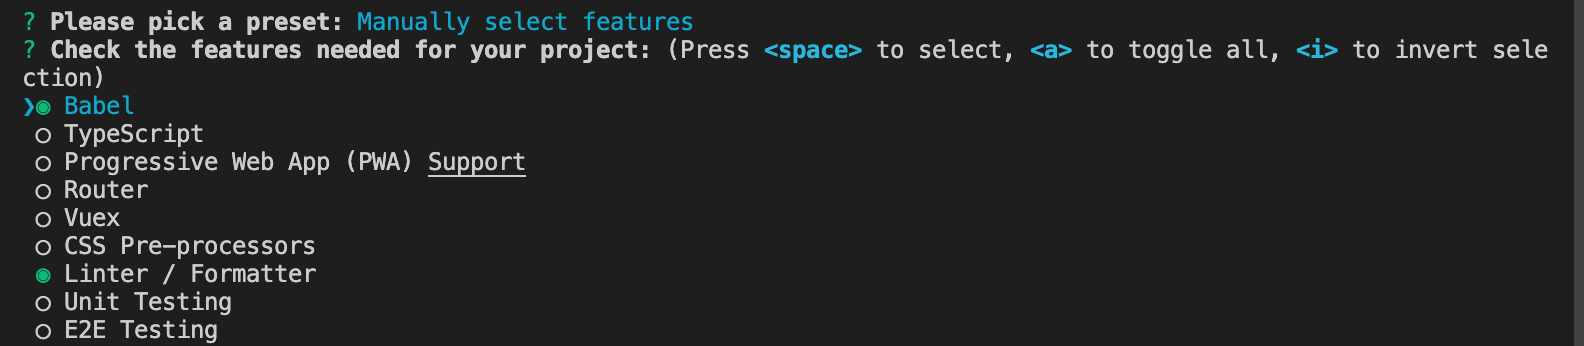
If you chose manual you would see features such as Babel, TypeScript, PWA support, Router, VueX, Linter, Unit testing and you can choose more than one. It will ask a couple of other questions for more clarity on the selected features and then you can save the custom preset for future use which is an amazing feature by the way.
This command we just ran has a few shortcuts you can learn to even make your process faster, here is a list from the Vue docs
Usage: create [options] <app-name>

create a new project powered by vue-cli-service


Options:

    -p, --preset <presetName>       Skip prompts and use saved or remote preset
    -d, --default                   Skip prompts and use default preset
    -i, --inlinePreset <json>       Skip prompts and use inline JSON string as preset
    -m, --packageManager <command>  Use specified npm client when installing dependencies
    -r, --registry <url>            Use specified npm registry when installing dependencies
    -g, --git [message|false]       Force / skip git initialization, optionally specify initial commit message
    -n, --no-git                    Skip git initialization
    -f, --force                     Overwrite target directory if it exists
    -c, --clone                     Use git clone when fetching remote preset
    -x, --proxy                     Use specified proxy when creating project
    -b, --bare                      Scaffold project without beginner instructions
    -h, --help                      Output usage information
For example, knowing you will pick the default preset without manual configuration, the next time you want to create a new app, you can just prompt it to use the default with this shortcut:
vue create --default newapp
OR
vue create -d newapp
This would return the exact same result with what we did above, but without the prompts. If you have saved a preset before with a name such as “preset1”, when next you want to create a new project with that same preset, all you have to do is to run the command like this:
vue create --preset preset1 newappThis would immediately tell Vue to create a new project with preset1 settings. Now you have created the Vue boilerplate project, you can run the app in the development server right from the CLI with this command:
cd newapp
npm run serve
If you open your browser to localhost:8080 you will see the app is running.
Other popular Vue CLI commands
You can do a lot of cool things with the CLI, some of them include
- Adding Vue plugins to your Vue application, remember those features we saw when we chose the manual selection when we wanted to create a new Vue project? Those features can be added to a Vue project after it has already been created. Adding a feature like Vuex is as easy as a single command:
vue add vuex- Building out the project for production. After you have built your Vue app, it is time to host it and so you need to bundle the app into static files so that it can be hosted. This can also be done easily using the Vue CLI, to do this, usually after your app has been built and ready to be deployed you can run this command:
npm run build- Inspecting your Webpack config without exporting the application an generating a whole new file can also easily be achieved with the Vue CLI using the command below:
vue inspectThis basically lets you take a look at the config by Webpack and what exactly is being generated by the CLI.
- Invoking helpful testing plugins can also be done with the Vue CLI to scaffold out everything you need to start testing with Cypress:
vue invoke e2e-cypressThis makes sure that cypress is setup with required scripts for testing in your Vue project.
When to use Vue CLI
Vue CLI is perfect for beginners who want to get up and running with their first Vue projects. It does not require any additional config. It is also perfect for developers of all levels who have a lot of Vue projects to start a new project, the speed and zero-barrier to just start coding in a few minutes is really great.
The Vue UI
This is one of the special things about the Vue CLI, it has a GUI version and this would definitely blow your mind especially if you have used the CLI for a while now. Go open your terminal and run the command below:
vue uiThis is exactly what you would see in your default browser.
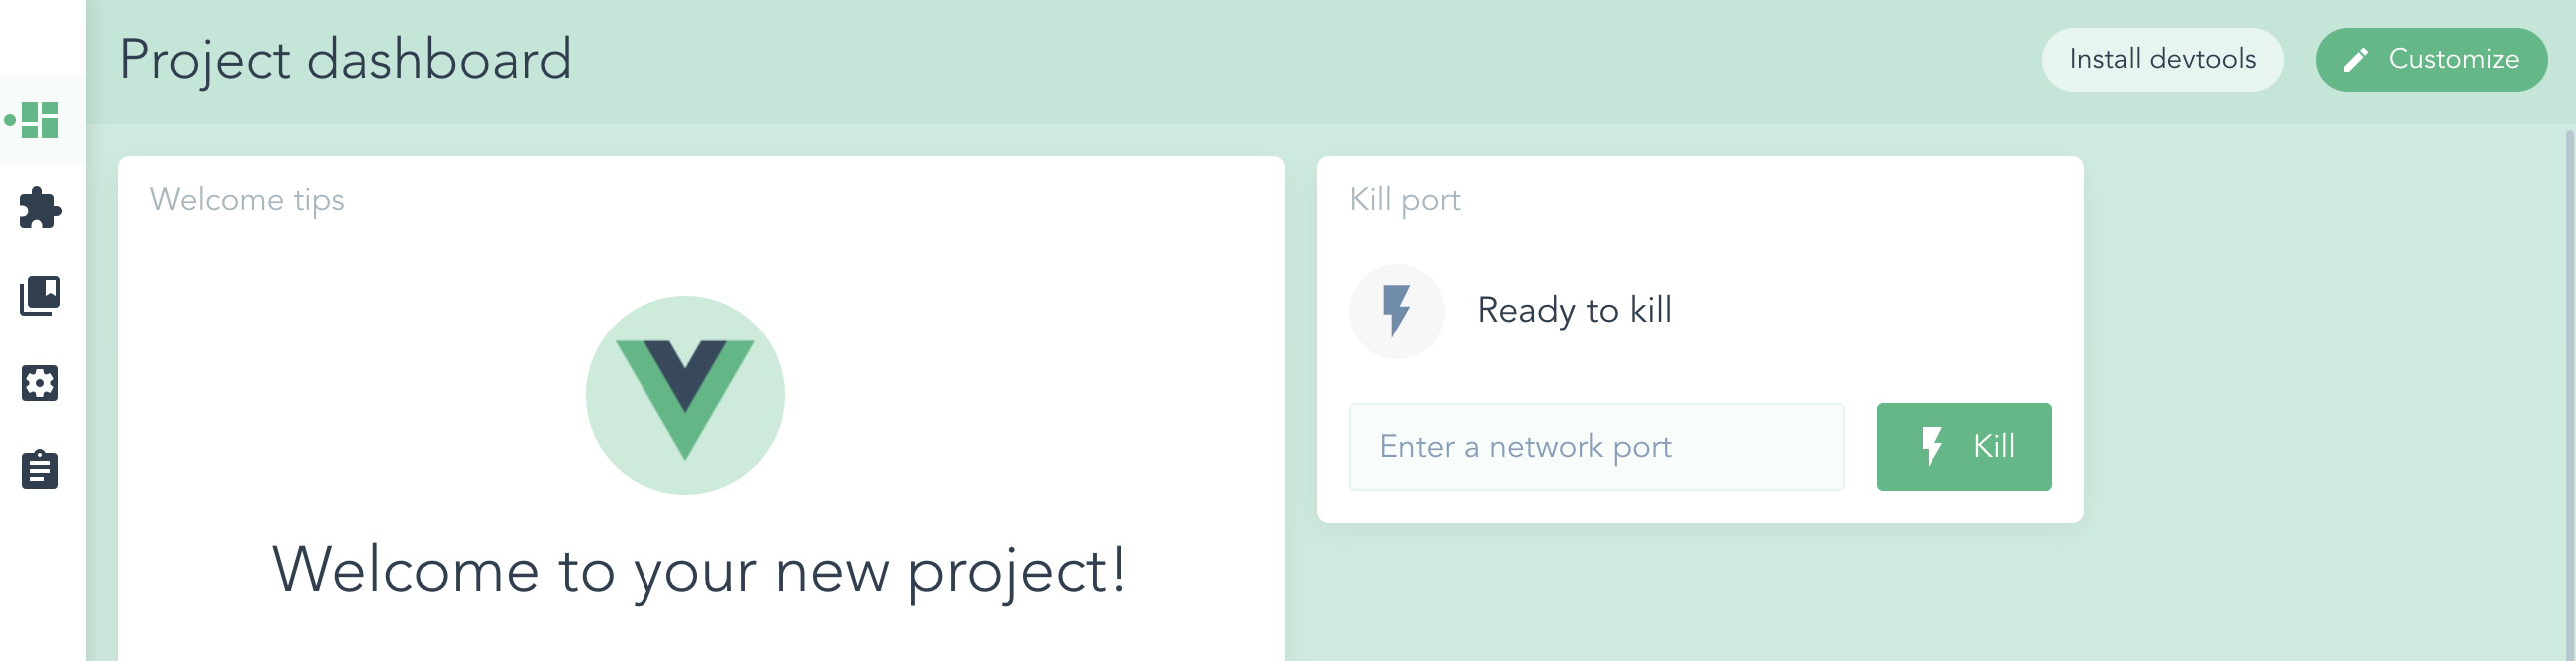
This is an amazing way to manage Vue projects, install and customize dev tools, run your Vue app both in the development server and in production. You can also install plugins, instead of using the command I showed before, you can do it with a simple search and button click like this:
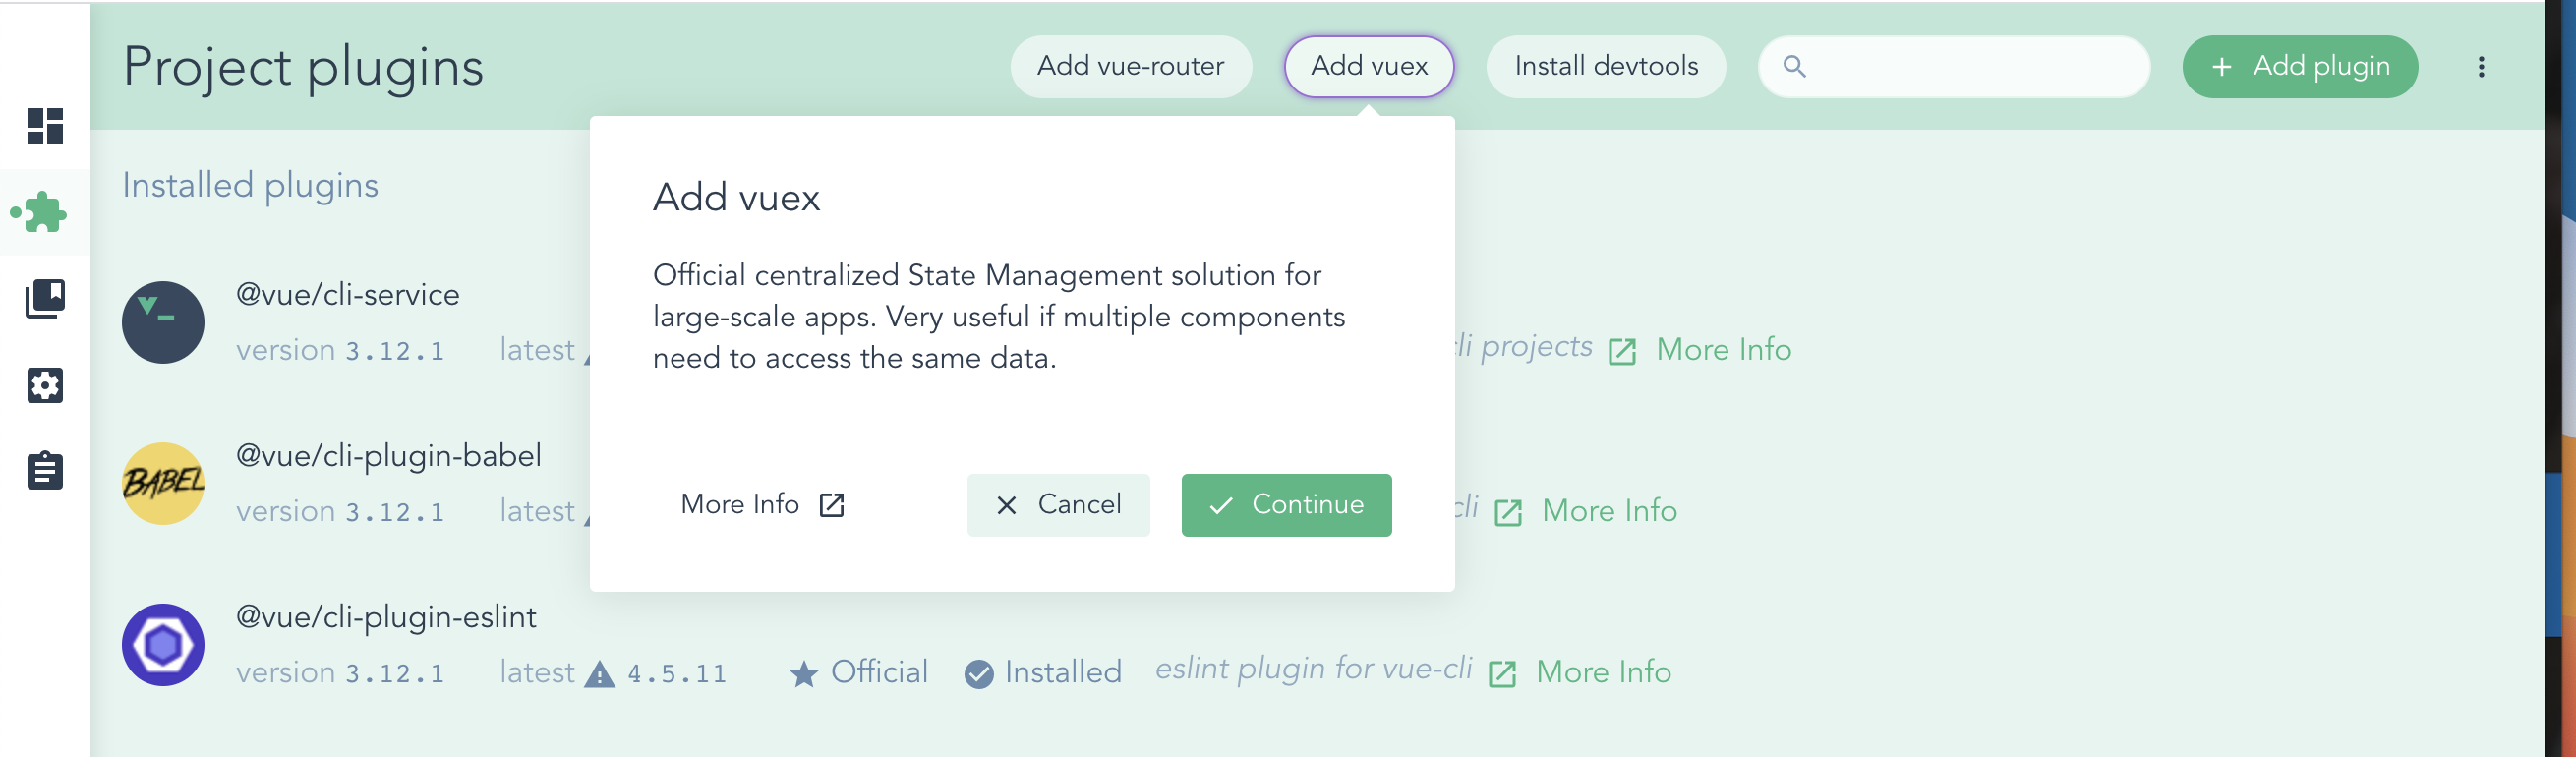
You can do linting, you can change the settings in your config files and do practically 97% of all the things you can do in the IDE with the CLI. This is a great product and a testament to the fact that the Vue core team cares about getting more people to use Vue because of the great focus placed on the ease of use.
Wrapping up
In this post we have taken a look at the Vue CLI tool, what it is, why it is great and even how it differs from Webpack. We also learnt how to get started with building a new Vue app and a few popular commands to try out, happy hacking!
Open Source Session Replay
OpenReplay is an open-source, session replay suite that lets you see what users do on your web app, helping you troubleshoot issues faster. OpenReplay is self-hosted for full control over your data.

Start enjoying your debugging experience - start using OpenReplay for free.