
Applying Design Principles in React


Software development, in general, has several principles that guide and govern the development of quality software. These solid design principles help developers greatly improve their code base’s efficiency, maintainability, and scalability. This article will explain several popular software development principles and when and how to implement them in your React code base.

Discover how at OpenReplay.com.
KISS Principle
KISS is an acronym for “keep it simple, stupid”. This principle was first coined by Clarence Leonard ‘Kelly’ Johnson (1910-1990), an American aeronautical and systems engineer. This principle is developed around the fact that systems work better when they are clear, straightforward, and without unnecessary complexities.
As your React application grows in size, it is important to ensure that fractions of your code base are simple and focused on handling the task at hand. Adding unnecessary complexities to your code base makes maintainability and scalability daunting. It’s always important that when building, ask yourself, “Is there a more straightforward way to handle this?” always strive for clarity and simplicity.
-
Improves code readability: By implementing the kiss principle and keeping your code base simple and smart, you improve code readability and make it easier for you and other developers to understand the functionality of your code base in general. When working in a large organization, several individuals work on the same code base. Improving code readability is crucial in assisting your teammates in understanding what your code is trying to achieve.
-
Improves code maintainability: Maintaining code bases is one of the tasking aspects of being a software engineer. You can, however, make it less of a daunting task by writing simple code. It is easier to maintain and improve simpler and clearer code bases than code bases with unnecessary complexities implemented in them.
-
Improves scalability: When your code base follows the KISS principle, it becomes generally easier to scale. Adding new features and modifying existing features becomes a breeze while keeping unintended side effects and bugs to a minimum.
-
Performance optimization: When your
Reactcomponents are built simply and smartly following the KISS principle, performance levels are improved significantly by avoiding unnecessary re-renders and expensive logic, ensuring a unidirectional data flow, and optimizing state management. With all these factors tackled, your application becomes simple, lean, and focused, thus improving its overall performance. -
Promotes better collaboration: Keeping your code straightforward improves readability and reduces the cognitive power required to understand the function of components across your code base. This fosters communication between team members, enables a smoother workflow, and improves the productivity of the team in general.
We have spent some time explaining the KISS principle and its numerous benefits to your React codebase. Well, how do you practically implement this principle in your React code? Let’s find out!!. I will show an example of solving a problem without implementing the KISS principle, then another code block solving the same problem, but this time, implementing the KISS principle.
// Not following KISS principle

import { cart } from "./cartItems";
export default function Cart() {
 return (
   <div>
     {cart.length === 0 ? (
       <p>You have no items in your cart</p>
     ) : (
       cart.map((item) => (
         <div key={item.id}>
           <h2>{item.product}</h2>
           <h3>{item.price}</h3>
           <p>{item.description}</p>
         </div>
       ))
     )}
   </div>
 );
}
In the code block above, we are importing an array of cart items, and depending on if the array is empty or not, we either display the text ‘You have no items in your cart’ or loop through the array and display its items. This approach works fine. However, understanding what is going on at first glance might be difficult. We have the ternary and the map method together, making it unreadable.
Let’s refactor this code adhering to the kiss principle.
// Following KISS principle
import { cart } from "./cartItems";
import { useState } from "react";
export default function Cart() {
 if (cart.length === 0) {
   return <p>You have no items in your cart</p>;
 }
 return (
   <div>
     {cart.map((item) => (
       <div key={item.id}>
         <h2>{item.product}</h2>
         <h3>{item.price}</h3>
         <p>{item.description}</p>
       </div>
     ))}
   </div>
 );
}
We have refactored our code to follow the KISS principle, and from the code block above, you can see it is easier to understand what is going on at first glance. The logic for checking if the array is empty is extracted from the loop rendering the array items.
DRY Principle
Our next principle is the DRY principle. DRY stands for “do not repeat yourself”. This principle was first stated by Andy Hunt and Dave Thomas in their book The Pragmatic Programmer. This principle implies that a piece of UI or logic should be written once and only once. It encourages code reusability, modularity and improves maintainability by reducing code repetition and redundancy. A very common situation among developers when building applications is that, as the application grows larger, you find yourself writing the same piece of code repeatedly. The DRY principle aims to reduce repetition by extracting functionality and logic into reusable components and custom hooks.
Advantages of using DRY include:
- Making your functions and logic reusable improves your efficiency as a React developer. Less time will be spent building and implementing features because logic and components are reusable.
- Avoiding code duplication by implementing the DRY principle makes maintaining your code base less daunting. Changes and updates only need to be made in one place, and it reflects throughout your application
- Making debugging easier. Problems can be easily traced to where the reusable component was made and fixed, rather than fixing the same problem in multiple locations across your application
- Avoiding code repetition encourages consistency across your code base.
- Improving code readability. Having reusable components around your code base makes it easier to read and reduces the amount of redundant code to go through before understanding the component’s purpose.
Let’s see some patterns that follow the DRY principle.
1. Building reusable components
Writing reusable components are a great way of avoiding repetition around your code base. A reusable React component is a piece of user interface that is written once and used in several places in your code base. Making components you know will be used several times in your application reusable is a great step toward encouraging code reusability.
For a better demonstration, we will create a reusable card component in our next example.
import styled from "styled-components";

export default function UIcard({ image, title, description }) {
 return (
   <Card>
     {image && <img src={image} alt="Card" className="card-image" />}
     <div className="card-content">
       {title && <h2 className="card-title">{title}</h2>}
       {description && <p className="card-description">{description}</p>}
     </div>
   </Card>
 );
}

const Card = styled.div`
 max-width: 300px;
 border: 1px solid rgb(176, 176, 176);
 border-radius: 4px;
 padding: 10px 8px;
 img {
   max-width: 100%;
   border-radius: 5px;
   margin-bottom: 4px;
 }

 &:hover {
   border-color: rgba(137, 43, 226, 0.689);
 }
`;
We created a component named Card in the above code block. This component receives the props image, title, and description and dynamically displays them. We also ensured the styles were localized by utilizing styled-components.
Let’s see how a parent component will utilize our card component.
import React from "react";

import UIcard from "./components/Card";
import CardImage from "./assets/card-image.png";
import styled from "styled-components";
function App() {
 return (
   <CardContainer>
     <UIcard
       description={
         "Web developer with 3 years of experience building user-friendly interfaces with react"
       }
       image={CardImage}
       title={"John Doe"}
     />
     <UIcard
       description={
         "Web developer with 2 years of experience building user-friendly interfaces with Angular"
       }
       image={CardImage}
       title={"Max Fury"}
     />
     <UIcard
       description={"Freelance writer and editor"}
       image={CardImage}
       title={"Sarah Edwards"}
     />
   </CardContainer>
 );
}
const CardContainer = styled.div`
 display: flex;
 justify-content: center;
 gap: 2rem;
 margin-top: 4rem;
`;
export default App;
In the parent component, we just have to pass in the necessary props, and we can create several instances of our card component. This is what our component looks like in the browser.

2. Localized Styling
In the last section, when we built a reusable card component, we utilized styled-components to localize our styles. The styling for a particular component is located in the same file as that component. This way, it is easier to locate the styling for a particular component as it is located in the same file as the component. Making changes to the styling becomes easier as it is written only once. Reusing a particular component across your application means you don’t have to worry about styling, as it is already done within the component file.
3. Separation of concerns
Separation of concerns is a practice in React that involves dividing our code into separate sections that focus on specific tasks. This design pattern involves dividing the UI layer of a component from the logic/data fetch layer.
Concerns can be separated using the Container/presentational pattern. In this pattern, the logic/data fetch layer of your component(container) performs the necessary logic and passes the data to the UI presenting layer(presentational) of your component, which displays the necessary data. Handling things this way prevents the repetition of logic and improves organization. This is a link to an article explaining more and demonstrating practical examples of the Container/presentational pattern.
4. Custom React hooks
In the last session, we discussed separating concerns by implementing the Container/presentational. This Pattern works well when dealing with the separation of concerns, but a better approach is using custom hooks.
Hooks in React enable functional components to access state and other React features. Examples of these hooks include useState, useEffect, useContext, useReducer, useRef, etc. We can create custom hooks utilizing one or more of the already existing React hooks. In the next example, we will take the separation of concerns further by utilizing custom hooks.
Let’s say in an application you are building, you need to check for a particular user in a database using some sort of ID. If you need to perform this logic of fetching a particular user multiple times across your application, extracting this logic into a custom hook will be better than repeating the logic severally,
Let’s see what this custom hook will look like.
import { useState, useEffect } from "react";
import axios from "axios";

export default function useFetchUser(userId) {
 const [user, setUser] = useState(null);

 useEffect(() => {
   const fetchUser = async () => {
     const response = await axios.get(`/users/${userId}`);
     setUser(response.data);
     fetchUser();
   };
 }, [userId]);
 return user;
}
In the code block above, we have created a custom hook named useFetchUser. Custom hooks, by convention, start with the prefix ‘use’ f what the custom hook does.
Our custom hook useFetchUser combines the useEffect and the useState hooks. This custom hook utilizes axios to fetch a user from a database through the user ID. The function fetchUser fetches the user and stores it in the user state. The component then returns the user stored in the state.
Let’s see how to utilize our custom hook in a component.
import { useParams } from "react-router-dom";
import useFetchUser from "./components/useFetchUser";
function App() {
 const { userId } = useParams();
 const { name, address, telephone } = useFetchUser(userId);

 return (
   <>
     <h1>{name}</h1>
     <p>{address}</p>
     <p>{telephone}</p>
   </>
 );
}

export default App;
Utilizing our custom is straightforward. All we need to do is call import our custom hook and pass in the userId for the particular user we want to fetch. In this case, the userId is saved to the params and extracted from there. Handling logic this way not only avoids repetition but also makes your component cleaner and more readable.
SOLID Principle
SOLID principles are a group of designs principle that governs the flexibility, maintainability, and scalability of object-oriented designs. These principles were first coined by Robert C. Martin, an American software engineer, in his 2000 paper “Design Principles and Design Patterns”. Implementing the SOLID principle ensures your software is easy, modular, smart, scalable, and easy to debug. Although this principle was first formulated for object-oriented programming (OOP), we will be looking to apply its principles to functional programming with React in mind.
SOLID is a mnemonic acronym that stands for;
- S — Single-responsibility Principle
- O — Open-closed Principle
- L — Liskov substitution principle
- I — Interface Segregation Principle
- D — Dependency Inversion Principle
Let’s look at these principles and see how to implement them in our React code base.
1. Single-responsibility Principle (SRP)
The single responsibility principle states, “A class must have a single responsibility”. In our case, class refers to functional components. This principle explains that components should have only one task to perform; every other unrelated task should be extracted into separate components. We will look at a practical example to make things clearer.
In the code example, I will show an approach violating this principle and then refactor the code to follow this principle.
import { useState, useEffect } from "react";

export default function Todos() {
 const [todos, setTodos] = useState(null);

 useEffect(() => {
   const fetchTodos = async () => {
     const response = await fetch(
       "https://jsonplaceholder.typicode.com/todos",
     );
     const data = await response.json();
     setTodos(data);
   };

   fetchTodos();
 }, []);

 return todos
   ?.filter((todo) => todo.completed === true)
   .map((todo) => (
     <div key={todo.id}>
       <h3>{todo.title}</h3>
       <p>status:{todo.completed ? "Completed" : "Pending"}</p>
     </div>
   ));
}
In the above code block, we have a component named Todos. This component fetches todos from an external API and stores it in the state. This same component filters through the todos in state and returns only todos that have been completed. Our component handles several tasks, violating the single responsibility principle. Let’s refactor our component by extracting some logic to external functions and reduce the task of our component to just rendering todos.
Firstly, let’s extract the logic of fetching todos and filtering out uncompleted todos to a custom hook named useFetchTodos.
import { useState, useEffect } from "react";
export default function useFetchTodos() {
 const [todos, setTodos] = useState(null);

 useEffect(() => {
   const fetchTodos = async () => {
     const response = await fetch(
       "https://jsonplaceholder.typicode.com/todos",
     );
     const data = await response.json();
     const completdTodo = data.filter((todo) => todo.completed === true);
     setTodos(completdTodo);
   };

   fetchTodos();
 }, []);

 return { todos };
}
Our useFetchTodos hook fetches our todos and filters out uncompleted ones. Let’s see how our Todos component uses this hook.
import useFetchTodos from "./useFetchTodos";

export default function Todos() {
 const { todos } = useFetchTodos();

 return todos?.map((todo) => (
   <div key={todo.id}>
     <h3>{todo.title}</h3>
     <p>status: completed</p>
   </div>
 ));
}
Our component now only renders our list of todos as our useFetchTodos hook handles data fetching and state management. We can make one last change to our component, further adhering to the single responsibility principle. We can extract the JSX returned in our Todos component to a separate component. Let’s call this component TodoItem.
export default function TodoItem({ todo }) {
 return (
   <div key={todo.id}>
     <h3>{todo.title}</h3>
     <p>status: completed</p>
   </div>
 );
}
Now let’s import this into our Todos component.
import useFetchTodos from "./useFetchTodos";
import TodoItem from "./TodoItem";

export default function Todos() {
 const { todos } = useFetchTodos();

 return todos?.map((todo) => <TodoItem todo={todo} key={todo.id} />);
}
Our component looks much better as it’s handling only one responsibility which is rendering a list of todos. This approach of single responsibility of components makes code more readable, easy to test and maintain.
2. Open-closed principle
This principle states that “Software entities, e.g. classes, functions, modules, components, should be open for extension but closed for modification”. I will explain this in simpler terms. The open-closed principle simply explains that React components should be built so that extending or modifying the behavior of a component can be achieved without changing the existing code in the component. Let’s create a scenario where we have a component that displays information about users, and depending on the user type, we display different information. Let’s handle this solution in a rookie manner violating the open-closed principle, then refactor our solution to adhere to it.
This is what our user data looks like
export const users = [
 {
   id: 1,
   name: "John Doe",
   role: "Product designer",
   userType: "regular",
   isActive: false,
 },
 {
   id: 2,
   name: "Jane Smith",
   role: "Marketer",
   userType: "regular",
   isActive: true,
 },
 {
   id: 3,
   name: "Edward Simons",
   role: "Snr software engineer",
   userType: "admin",
   isActive: true,
 },
];
Below is the structure of our User component.
export default function User({ userDetails }) {
 const { name, role, userType, isActive } = userDetails;
 return (
   <div>
     <h3>{name}</h3>
     <p>{role}</p>
     <p>Status: {isActive ? "Online" : "Offline"}</p>
     {userType === "admin" && (
       <div>some details and logic for admin users</div>
     )}
     {userType === "regular" && (
       <div>some details and logic for regular users</div>
     )}
   </div>
 );
}
From the above code block, we can see that we are rendering the details of users passed from the userDetails prop, and depending on if the userType is ‘admin’ or ‘regular’, different details and logic are rendered.
Let’s utilize this User component in the parent component.
import User from "./components/User";
import { users } from "./components/userData";
function App() {
 return (
   <>
     {users.map((user) => {
       return <User userDetails={user} key={user.id} />;
     })}
   </>
 );
}

export default App;
The implementation above might seem okay, but what if we introduce another user with a different userType? We will need to go back to our User component to modify it to suit the current need. This violates the open-closed principle and makes our main component messy and unreadable.
Let’s refactor our approach and minimize the modification done to our User component. We will start by slightly changing our
User component.
export default function User ({userDetails, children}) {
 const { name, role, isActive } = userDetails;
 return (
   <div>
     <h3>{name}</h3>
     <p>{role}</p>
     <p>Status: {isActive ? 'Online' : 'Offline'}</p>
     {children}
   </div>
 )
}
We made a slight change to our component introducing the children prop. The next step is to create two separate components to display and handle the logic for two different userType.
For regular users:
import User from "./User";

export default function RegularUser({ userDetails }) {
 return (
   <User userDetails={userDetails}>
     <div>content and logic for regular user</div>
   </User>
 );
}
Admin user:
import User from "./User";
export default function AdminUser({ userDetails }) {
 return (
   <User userDetails={userDetails}>
     <div>content and logic for admin user</div>
   </User>
 );
}
We have extracted the logic for both admin and regular users into different components that were built around the User component. We have successfully extended our User component without having to do some heavy modifications.
Let’s see how we will render a list of users in the parent component.
import { users } from "./components/userData";
import AdminUser from "./components/AdminUser";
import RegularUser from "./components/RegularUser";
function App() {
 const userTypes = {
   regular: AdminUser,
   admin: RegularUser,
 };
 return (
   <>
     {users.map((user) => {
       const UserComponent = userTypes[user.userType];
       return <UserComponent userDetails={user} key={user.id} />;
     })}
   </>
 );
}

export default App;
To create a list of user components, we create an object, userTypes, containing our two user components, AdminUser and RegularUser. Then we render a particular user component depending on the userType from our user’s data users. Obeying the open-closed principle ensures that our components are not tightly coupled and are more flexible, extensible, and reusable.
3. Liskov substitution principle (LSP)
The Liskov substitution principle states that “a subclass should be able to be substituted for its parent class without changing the correctness of the program”. In React terms, you should be able to substitute a sub-component instead of a super component without unexpected results. There should be some sort of contract between them to avoid any conflicts. For this example, we will use typescript and React to better understand.
Let’s create a simple modal component that displays some content at the click of a button.
import { useState } from "react";
export default function Modal({ contentToShow }) {
 const [visibility, setVisibility] = useState(false);

 const toggleVisibility = () => {
   setVisibility(!visibility);
 };

 return (
   <>
     <button onClick={toggleVisibility}>
       {visibility ? "Hide Modal" : "Show Modal"}
     </button>
     {visibility && <div>{contentToShow}</div>}
   </>
 );
}
Let’s use this component in a parent component.
import Modal from "./Modal";
function App() {
const content = <div>Show this content </div>;
return (
<>
<Modal contentToShow={content} />
</>
);
}
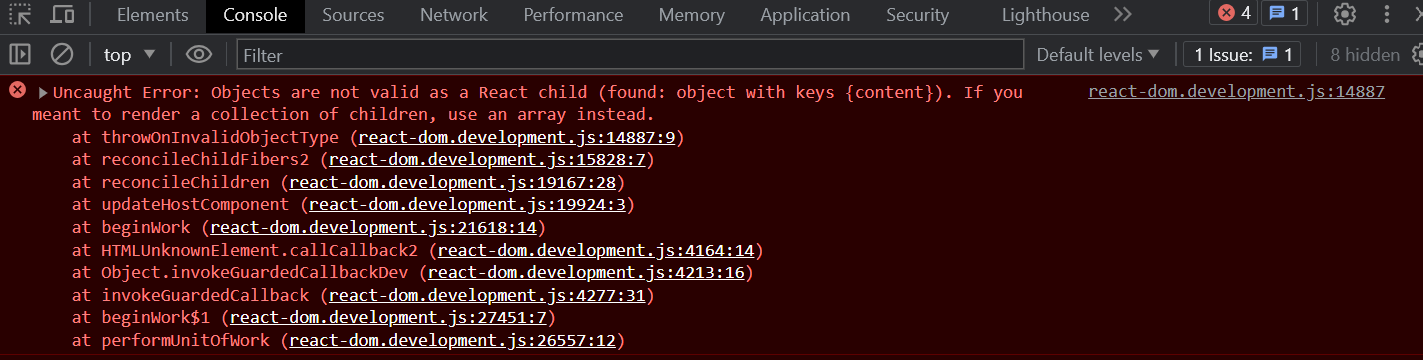
export default App;As you can see, this is a simple modal component that displays the content passed through the contentToShow props. Our component works fine now, but imagine we passed an object in the contentToShow props, then triggering our modal would result in the error below.
Obeying the LSP principle would prevent this unexpected behavior. Tackle this by utilizing typescript to define the type of the contentToShow props. Observe the code block below
import React, { useState } from "react"

interface ModalProps  {
 contentToShow : JSX.Element
}
export default function Modal ({contentToShow}: ModalProps) {
 const [visibility, setVisibility] = useState(false);

 const toggleVisibility = () => {
   setVisibility(!visibility)
 }

 return(
   <>
    <button onClick={toggleVisibility}>{visibility ? 'Hide Modal' : 'Show Modal'}</button>
    { visibility && <div>{contentToShow}</div> }
   </>
 )
}
We have refactored our Modal component and set the type of the contentToShow prop to only receive a JSX element. This way, any component utilizing the Modal component has to abide by its rules. This reduces unexpected behaviors of our component.
4. Interface Segregation Principle (ISP)
This principle states that “Clients should not be forced to depend on interfaces they do not use”. In React, this means that functional components should only receive the props that they need. Let’s say, for instance, we have a component that displays user profile details like their bio and username, and it also has a thumbnail component that displays their profile picture and also an online or offline tag. See the code block below for a better understanding.
import ThumbNail from "./Thumbnail";
export default function Profile({ profileDetails }) {
 return (
   profileDetails && (
     <UserProfile>
       <ThumbNail profileDetails={profileDetails} />
       <div>
         <h2>{profileDetails.username}</h2>
         <p>{profileDetails.bio}</p>
         <button>follow</button>
       </div>
     </UserProfile>
   )
 );
}
const UserProfile = styled.div`
 max-width: 400px;
 border: 1px solid rgb(176, 176, 176);
 border-radius: 4px;
 padding: 20px 16px;
 margin: 20px 0 0 30px;

 h2 {
   margin-bottom: 5px;
 }
 p {
   margin-bottom: 15px;
 }
 button {
   border: none;
   outline: none;
   padding: 6px 12px;
   border-radius: 3px;
   cursor: pointer;
   background-color: rgba(0, 9, 128, 0.63);
   color: white;
 }
`
Let’s see how the ThumbNail component is structured.
import styled from "styled-components";
export default function ThumbNail({ profileDetails })
 const { image, isOnline } = profileDetails;
 return (
   <StyledThumbnail>
    <img src={image} alt="image" />
    <span>{isOnline ? 'Online' : 'Offline'}</span>
   </StyledThumbnail>
 );
}
const StyledThumbnail = styled.div`
 position: relative;
 img {
   max-width: 100%;
   border-radius: 5px 5px 0 0;
   margin-bottom: 10px;
 }
 span{
   position: absolute;
   top: 10px;
   right: 20px;
   background: rgba(0, 9, 128, 0.087);
   padding: 2px 4px;
   color: rgb(26, 183, 26);
   border-radius: 10px;
 }
`
Our ThumbNail component receives the whole profileDetails props, although it only needs the image and isOnline props. This gives our component access to more props than it needs. The ideal approach is to pass only the props necessary for a particular component.
import ThumbNail from "./Thumbnail";
export default function Profile({ profileDetails }) {
return (
profileDetails && (
<UserProfile>
<ThumbNail
isOnline={profileDetails?.isOnline}
image={profileDetails?.image}
/>
<div>
<h2>{profileDetails?.username}</h2>
<p>{profileDetails?.bio}</p>
<button>follow</button>
</div>
</UserProfile>
)
);
}
const UserProfile = styled.div`
max-width: 400px;
border: 1px solid rgb(176, 176, 176);
border-radius: 4px;
padding: 20px 16px;
margin: 20px 0 0 30px;
h2 {
margin-bottom: 5px;
}
p {
margin-bottom: 15px;
}
button {
border: none;
outline: none;
padding: 6px 12px;
border-radius: 3px;
cursor: pointer;
background-color: rgba(0, 9, 128, 0.63);
color: white;
}
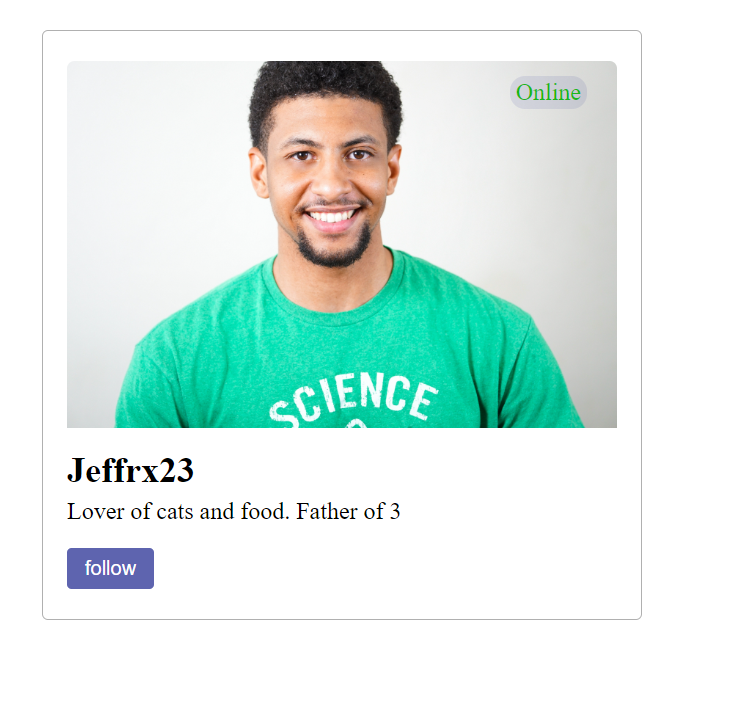
`We have refactored our code, and you can see that the ThumbNail component only receives the isOnline and image props, which are the only props it needs. This is what our component will look like in the browser.
5. Dependency inversion principle (DIP)
This design principle states that High-level modules should not depend on low-level modules. Both high-level modules and low-level modules should depend on abstractions. In React terms, this means that high-level components(usually components that handle logic or use one or more low-level components) should not interact with low-level components through abstractions(which, in our case, refers to interfaces or props ).
This principle aims to avoid tightly coupling two components and improve code flexibility and reusability. Let’s better understand this principle by considering the following example. Imagine we have a form used to input user details and save it to some backend. See the code block below to better understand.
import { useState, useEffect } from "react";

export default function Form() {
 const [formData, setFormData] = useState({
   firstname: "",
   lastname: "",
   username: "",
   bio: "",
 });

 const handleChange = (e) => {
   const { name, value } = e.target;
   setFormData((prevData) => ({
     ...prevData,
     [name]: value,
   }));
 };

 const handleSubmit = async (e) => {
   e.preventDefault();
   try {
     await axios.post("https://backend/create-profile", formData);
   } catch (error) {
     console.error("Error:", error);
   }
 };

 return (
   <form onSubmit={handleSubmit}>
     <div>
       <label htmlFor="firstname">First Name:</label>
       <input
         type="text"
         id="firstname"
         name="firstname"
         value={formData.firstname}
         onChange={handleChange}
       />
     </div>
     <div>
       <label htmlFor="lastname">Last Name:</label>
       <input
         type="text"
         id="lastname"
         name="lastname"
         value={formData.lastname}
         onChange={handleChange}
       />
     </div>
     <div>
       <label htmlFor="username">Username:</label>
       <input
         type="text"
         id="username"
         name="username"
         value={formData.username}
         onChange={handleChange}
       />
     </div>
     <div>
       <label htmlFor="username">Bio:</label>
       <input
         type="text"
         id="bio"
         name="bio"
         value={formData.bio}
         onChange={handleChange}
       />
     </div>
     <button type="submit">Submit</button>
   </form>
 );
}
So our form component sends the data stored in the formData state to the backend. This works quite alright, but imagine a case where we need a function that edits user details and sends them to the back end. We might be like, “Oh, let’s obey the DRY principle and reuse our form component”, but the issue is our form component is not flexible. We have a handleSubmit function that posts data to an already hard-coded URL. You might also devise a solution of creating an if-else statement in the handleSubmit function and either create or edit a user profile. This solution would make your code messy, so here is a better solution.
Let’s refactor our Form component to accommodate both inputting and editing user details.
import { useState } from 'react';


export default function Form ({ submitFunc, existingData }) {
 const [formData, setFormData] = useState( existingData ? existingData :
 {
 firstname: '',
 lastname: '',
 username: '',
 bio: '',
}
 );
 const handleChange = (e) => {
   const { name, value } = e.target;
   setFormData((prevData) => ({
     ...prevData,
     [name]: value,
   }));
 };

 const handleSubmit = async (e) => {
   e.preventDefault();
   submitFunc(formData);
 };

 return (
   <form onSubmit={handleSubmit} >
     <div>
       <label htmlFor="firstname">First Name:</label>
       <input
         type="text"
         id="firstname"
         name="firstname"
         value={formData.firstname}
         onChange={handleChange}
       />
     </div>
     <div>
       <label htmlFor="lastname">Last Name:</label>
       <input
         type="text"
         id="lastname"
         name="lastname"
         value={formData.lastname}
         onChange={handleChange}
       />
     </div>
     <div>
       <label htmlFor="username">Username:</label>
       <input
         type="text"
         id="username"
         name="username"
         value={formData.username}
         onChange={handleChange}
       />
     </div>
     <div>
       <label htmlFor="username">Bio:</label>
       <input
         type="text"
         id="bio"
         name="bio"
         value={formData.bio}
         onChange={handleChange}
       />
     </div>
     <button type="submit">Submit</button>
   </form>
 );
};
From the code block above, you can see that the handleSubmit function just invokes another function, submitFunc, passed as a prop. Also note that there is an existingData prop which is the data that will come from our EditUser component, a component we will build shortly.
Let’s create a separate component for creating users.
import Form from "./Form"
export default function CreateUser () {

 const handleSubmit = async (formData) => {
   try {
     await axios.post('backend/create-profile', formData);
   } catch (error) {
     console.error('Error:', error);
   }
 };

 return(
   <Form submitFunc={handleSubmit} />
 )
}
You can see that in this component, we handle creating a new profile in the handleSubmit function and pass that function to our Form component. Let’s see how our Edituser component will be utilized.
import Form from "./Form";
import axios from "axios";
import { useEffect, useState } from "react";
import { useParams } from "react-router-dom";
export default function EditUser() {
 const [data, setData] = useState(false);
 const { userId } = useParams();

 useEffect(() => {
   const getProfileDetails = async () => {
     const details = await axios.get(`backend/user-details/${userId}`);
     const userData = await details.json();
     setData(userData);
   };
   getProfileDetails();
 }, []);

 const handleSubmit = async (formData) => {
   try {
     await axios.patch(`backend/update-profile/${userId}`, formData);
   } catch (error) {
     console.error("Error:", error);
   }
 };

 return <>{data && <Form existingData={data} submitFunc={handleSubmit} />}</>;
}
This component fetches the existing profile details and sends them to our form component. It also sends thehandleSubmit function, hitting the particular endpoint required. Building components this way, decoupling high-level components from low-level components improves flexibility and reusability.
Conclusion
In conclusion, adhering to the KISS, DRY, and SOLID principles in React leads to more maintainable and reusable code.KISS improves code readability, promoting cleaner and smarter code. DRY reduces duplication, promoting modularity. SOLID principles guide the design for scalability, flexibility, and robustness. Embracing these principles enhances collaboration, reduces bugs, and improves the overall development experience.
Understand every bug
Uncover frustrations, understand bugs and fix slowdowns like never before with OpenReplay — the open-source session replay tool for developers. Self-host it in minutes, and have complete control over your customer data. Check our GitHub repo and join the thousands of developers in our community.
