Authentication in React 18 using Firebase v9 and the Firebase console
Learn how to implement a production-ready authentication flow using Firebase and the Firebase console for your React 18 application


If you want to somehow authenticate users in your application, you’ll have to create what is known as an “authentication flow”. On a backend server, this process can be difficult to implement at times, there are many method and considerations to keep in mind and making sure they’re secured is cirtical to the success of the project. This is when Firebase enters the picture. Firebase has made it incredibly simple to create a complete authentication infrastructure without having to worry about security, scaling, or maintenance, among other things.
In this article, we will implement an authentication flow in React 18 using Firebase v9 Web SDK. We’ll enhance a starter React application to practice the following security concepts:
- Adding user login and logout (using email/password and with Google)
- Retrieving user information, using the Context API for managing the Auth state
- Protecting application routes from unauthorized users using React Router v6.
But before you get stared, make sure you have the following:
- Prior Knowledge of React.
- Code Editor — such as VSCode.
- A Google Account.
- Node.js Latest LTS installed on your computer.
Ok, let’s jump right in.
Create a Firebase Project
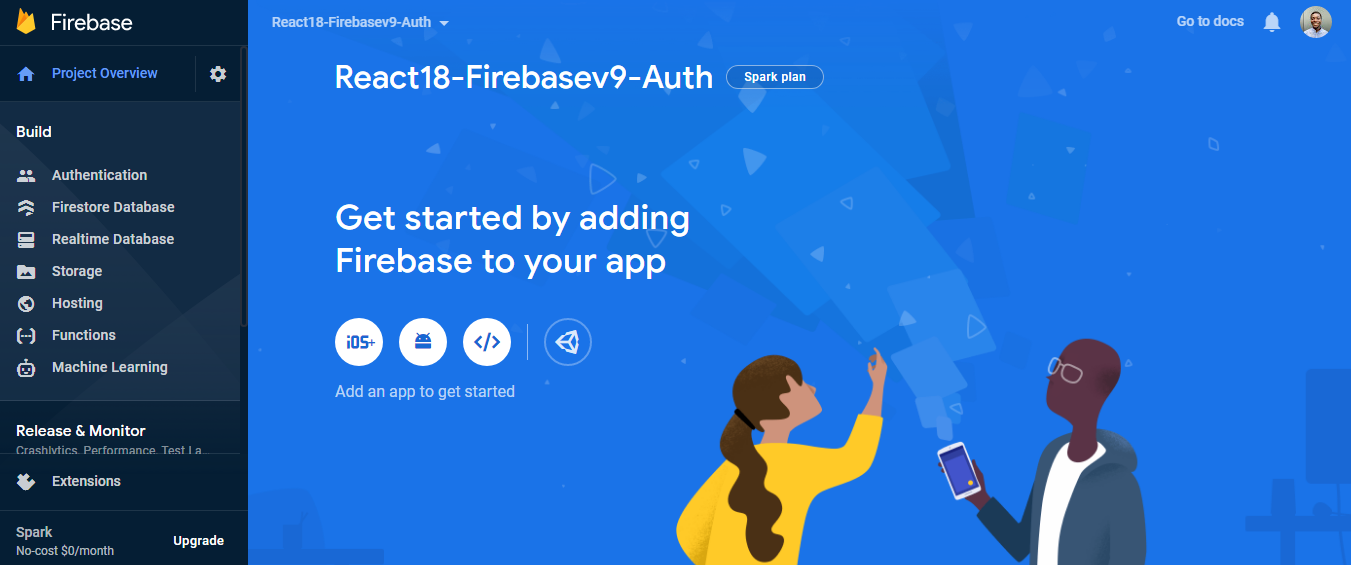
After ensuring you are logged in with your Google account, go to the Firebase Console. Click add Project and give your project a name, I’m calling mine “React18-Firebasev9-Auth”. Then click Continue. We won’t be using Google Analytics in this case, so we’ll skip that step.
You will then be redirected to the Dashboard which should look like this:
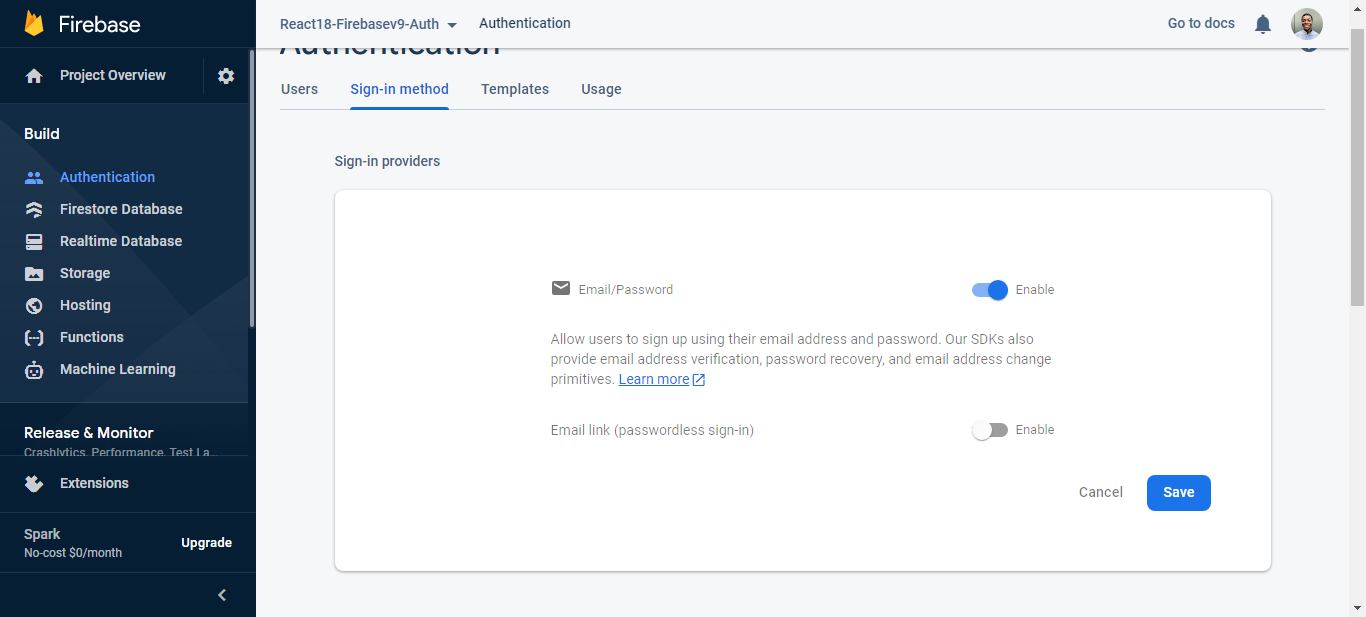
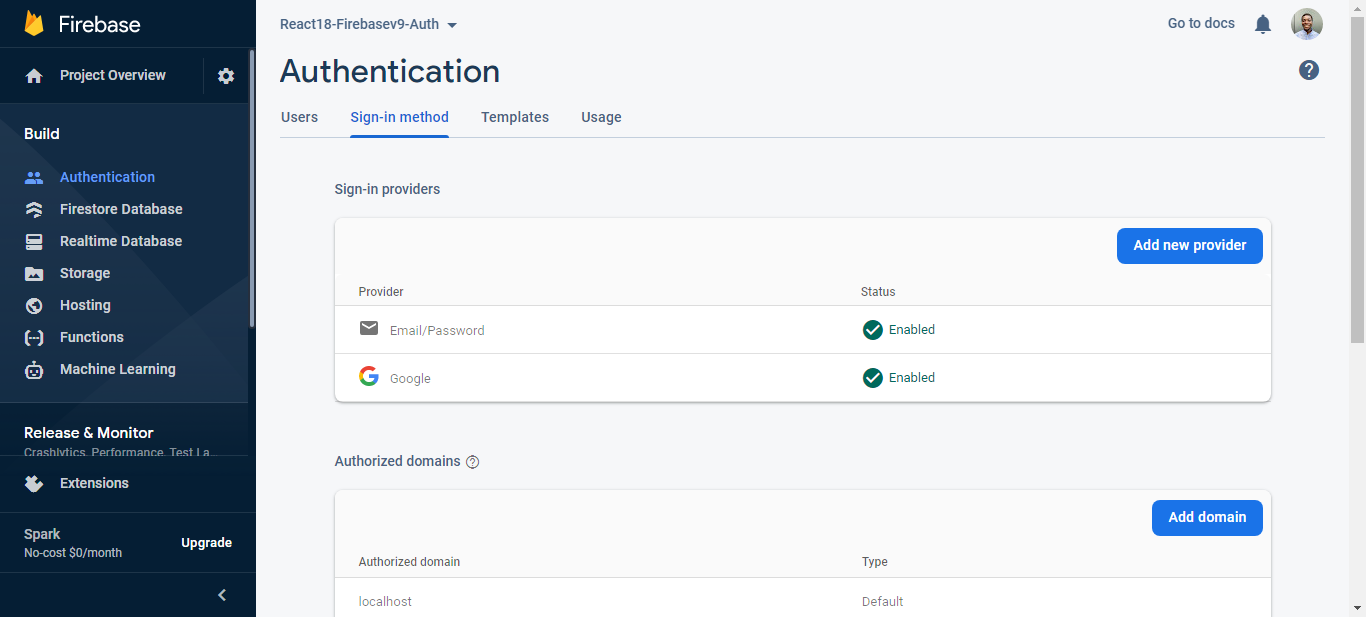
Go to “authentication”, Click on Get Started, and navigate to Sign-in method. Here, you will see various available methods, but we will be implementing just two (Email/Password and Google) for this tutorial. Click on Email/Password, Enable and then save.
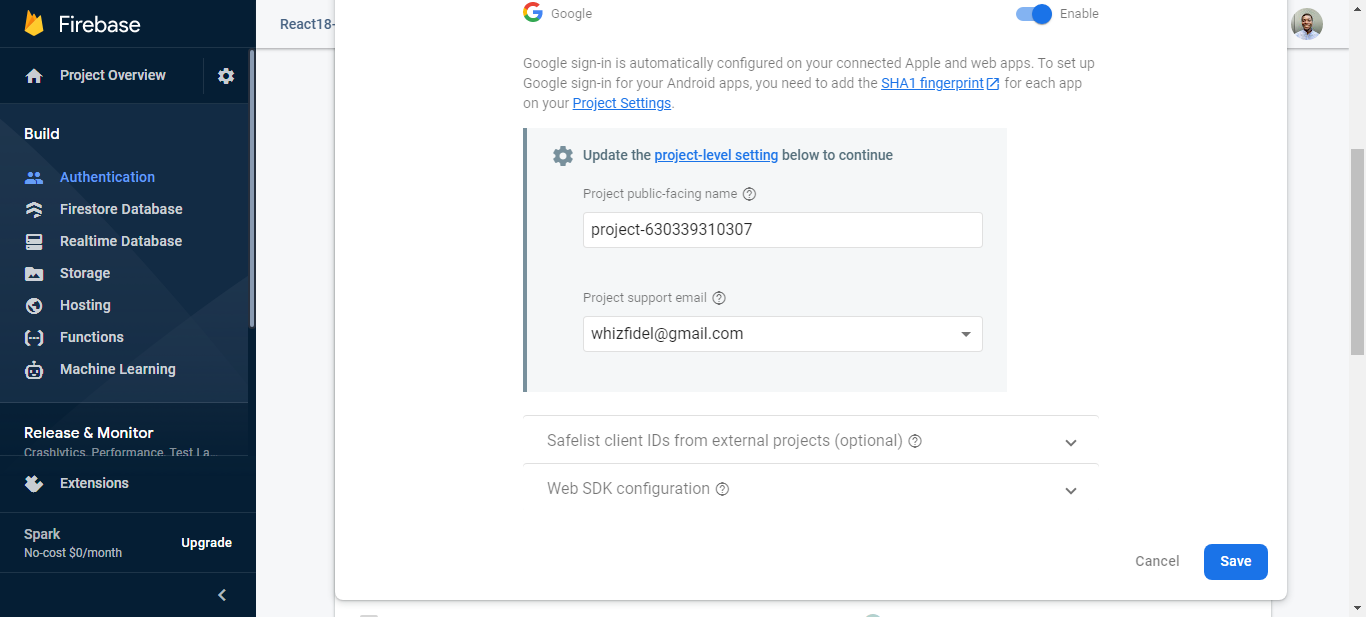
Then, for Google, we repeat the process. Enable it, add the Project support email, and save it.
With the initial configuration ready, we can move on to the next step: the React app.
Get the Starter React 18 Application
For the purpose of this tutorial, I have created a starter project using create-react-app to enable us to focus more on authentication. The starter application uses React Bootstrap to manage styling and layout, so you don’t have to worry about that. To get started, clone the react18-firebasev9-auth repository on the starter branch:
git clone -b starter https://github.com/wisdomekpotu/react18-firebasev9-auth.gitOnce you clone the repo, make react18-firebasev9-auth your current directory:
cd react18-firebasev9-authInstall the React project dependencies:
yarn install Start the application:
yarn startAdding Firebase to our React app
To add Firebase to our React application, we must first register it on the Firebase Console. Click on the 3rd icon, which is used to connect Web Applications.

Then add the application name and click Register app.
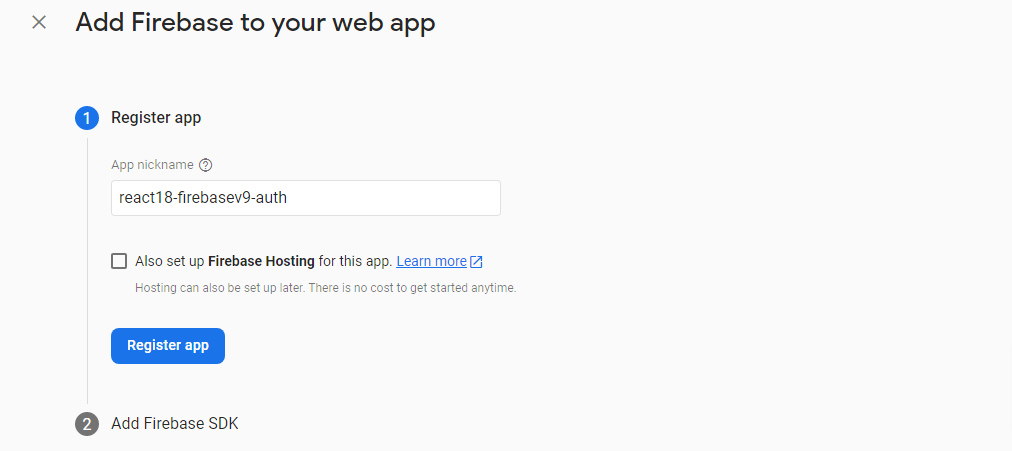
We don’t need to set up Firebase hosting, so we’ll skip it. You’ll see your Firebase project credentials, which we’ll need to set up Firebase.
The next step is to add the Firebase package to our project. You can do this with a single line:
yarn add firebaseCreate a firebase-config.js file in the src folder. This is where we’ll enter our credentials to connect to Firebase. According to the documentation for create-react-app,
- Do not store any secrets (such as private API keys) in your React app!.
- You must create custom environment variables beginning with
REACT_APP_.
So according to these best practices, we must save all sensitive information about our Firebase project inside a .env file. Go to the root of your application and create a file called .env.
touch .envThen populate the .env file as follows with the credentials generated from Firebase :
REACT_APP_FIREBASE_API_KEY =
REACT_APP_FIREBASE_AUTH_DOMAIN =
REACT_APP_FIREBASE_PROJECT_ID =
REACT_APP_FIREBASE_STORAGE_BUCKET =
REACT_APP_FIREBASE_MESSAGING_SENDER_ID =
REACT_APP_FIREBASE_APP_ID =
Include the .env file in the .gitignore file to prevent it from being pushed to our GitHub repo (otherwise you’re making it public for everyone to see).
# misc
.DS_Store
.env
.env.local
.env.development.local
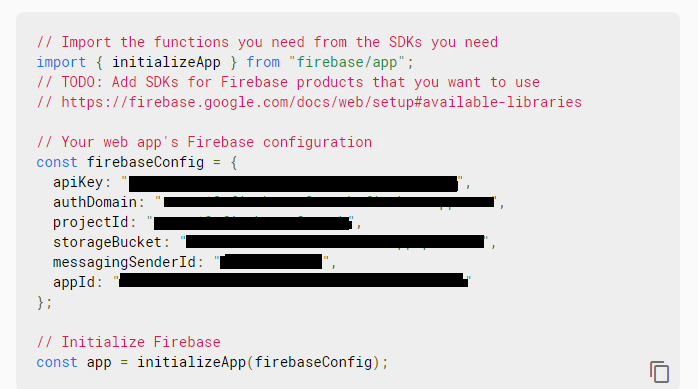
.env.test.localAdd the following code to the firebase-config file:
import { initializeApp } from "firebase/app";
import { getAuth } from "firebase/auth";

const firebaseConfig = {
  apiKey: process.env.REACT_APP_FIREBASE_API_KEY,
  authDomain: process.env.REACT_APP_FIREBASE_AUTH_DOMAIN,
  projectId: process.env.REACT_APP_FIREBASE_PROJECT_ID,
  storageBucket: process.env.REACT_APP_FIREBASE_STORAGE_BUCKET,
  messagingSenderId: process.env.REACT_APP_FIREBASE_MESSAGING_SENDER_ID,
  appId: process.env.REACT_APP_FIREBASE_APP_ID,
};

// Initialize Firebase
const app = initializeApp(firebaseConfig);
export const auth = getAuth(app);
export default app;
With our credentials, we initialize Firebase in our app. To access our configuration credentials, we use the process.env just right in front of the variable names as declared in the .env file. Then we import the getAuth method from the Firebase auth’s module and export both for use in our app. Let’s go on and write the Firebase functions for authentication.
Context API for Authentication
The Context API is a feature in React that will allow us to share state across the entire app (or part of it). Add the following code to the UserAuthContext.js file:
import { createContext, useContext, useEffect, useState } from "react";
import {
  createUserWithEmailAndPassword,
  signInWithEmailAndPassword,
  onAuthStateChanged,
  signOut
} from "firebase/auth";
import { auth } from "../firebase";

const userAuthContext = createContext();

export function UserAuthContextProvider({ children }) {
  const [user, setUser] = useState({});

  function logIn(email, password) {
    return signInWithEmailAndPassword(auth, email, password);
  }
  function signUp(email, password) {
    return createUserWithEmailAndPassword(auth, email, password);
  }
  function logOut() {
    return signOut(auth);
  }

  useEffect(() => {
    const unsubscribe = onAuthStateChanged(auth, (currentuser) => {
      console.log("Auth", currentuser);
      setUser(currentuser);
    });

    return () => {
      unsubscribe();
    };
  }, []);

  return (
    <userAuthContext.Provider
      value={{ user, logIn, signUp, logOut }}
    >
      {children}
    </userAuthContext.Provider>
  );
}

export function useUserAuth() {
  return useContext(userAuthContext);
}
We first build a context provider called UserAuthContextProvider and then pass in the children. Then we import a few of Firebase methods (createUserWithEmailAndPassword , signInWithEmailAndPassword , and signOut) from our Firebase auth module. These methods are used to develop functions for creating, logging in, and signing out users through email and password. We also import a method named onAuthStateChanged, which monitors authentication status changes and returns the current user. We construct a function called useUserAuth and wrap it in a custom hook called useContext to make it available to our app (through the use of the Context API).
Signup Component Firebase Integration
We’ve have the Firebase functions, but they’re not yet available in our app. As a result, we must import them into our App.js file. Add this line of code to the App.js file.
import { UserAuthContextProvider } from "./context/UserAuthContext";Then wrap the routes with the provider. It should look like this.
 <UserAuthContextProvider>
      <Routes>
              <Route path="/home" element={<Home />} />
              <Route path="/" element={<Login />} />
              <Route path="/signup" element={<Signup />} />
     </Routes>
</UserAuthContextProvider>
Navigate to the Signup.js file and modify the code like this:
import React, { useState } from "react";
import { Link, useNavigate } from "react-router-dom";
import { Form, Alert } from "react-bootstrap";
import { Button } from "react-bootstrap";
import { useUserAuth } from "../context/UserAuthContext";

const Signup = () => {
  const [email, setEmail] = useState("");
  const [error, setError] = useState("");
  const [password, setPassword] = useState("");
  const { signUp } = useUserAuth();
  let navigate = useNavigate();

  const handleSubmit = async (e) => {
    e.preventDefault();
    setError("");
    try {
      await signUp(email, password);
      navigate("/");
    } catch (err) {
      setError(err.message);
    }
  };

  return (
    <>
      <div className="p-4 box">
        <h2 className="mb-3">Firebase Auth Signup</h2>
        {error && <Alert variant="danger">{error}</Alert>}
        <Form onSubmit={handleSubmit}>
          <Form.Group className="mb-3" controlId="formBasicEmail">
            <Form.Control
              type="email"
              placeholder="Email address"
              onChange={(e) => setEmail(e.target.value)}
            />
          </Form.Group>

          <Form.Group className="mb-3" controlId="formBasicPassword">
            <Form.Control
              type="password"
              placeholder="Password"
              onChange={(e) => setPassword(e.target.value)}
            />
          </Form.Group>

          <div className="d-grid gap-2">
            <Button variant="primary" type="Submit">
              Sign up
            </Button>
          </div>
        </Form>
      </div>
      <div className="p-4 box mt-3 text-center">
        Already have an account? <Link to="/">Log In</Link>
      </div>
    </>
  );
};

export default Signup;
Basically, we import the useUserAuth method from useUserContext, and then we add onChange handlers to listen to changes in our input fields and get the values. We initialize the email and password states as empty and then assign these values as the new state values. We constructed a handleSubmit function that will use our useUserAuth method to call the signUp Firebase function and then sign in users only when the submit button is clicked, after which we will redirect to the Login component page using the useNavigate hook.
Open Source Session Replay
OpenReplay is an open-source, session replay suite that lets you see what users do on your web app, helping you troubleshoot issues faster. OpenReplay is self-hosted for full control over your data.

Start enjoying your debugging experience - start using OpenReplay for free.
Login Component Firebase Integration
Let’s now create the Login component which we’ll need to let the user enter their credentials when required.
Open src/components/Login.js and update it as follows:
import React, { useState } from "react";
import { Link, useNavigate } from "react-router-dom";
import { Form, Alert } from "react-bootstrap";
import { Button } from "react-bootstrap";
import GoogleButton from "react-google-button";
import { useUserAuth } from "../context/UserAuthContext";

const Login = () => {
  const [email, setEmail] = useState("");
  const [password, setPassword] = useState("");
  const [error, setError] = useState("");
  const { logIn } = useUserAuth();
  const navigate = useNavigate();

  const handleSubmit = async (e) => {
    e.preventDefault();
    setError("");
    try {
      await logIn(email, password);
      navigate("/home");
    } catch (err) {
      setError(err.message);
    }
  };

  return (
    <>
      <div className="p-4 box">
        <h2 className="mb-3">Firebase Auth Login</h2>
        {error && <Alert variant="danger">{error}</Alert>}
        <Form onSubmit={handleSubmit}>
          <Form.Group className="mb-3" controlId="formBasicEmail">
            <Form.Control
              type="email"
              placeholder="Email address"
              onChange={(e) => setEmail(e.target.value)}
            />
          </Form.Group>

          <Form.Group className="mb-3" controlId="formBasicPassword">
            <Form.Control
              type="password"
              placeholder="Password"
              onChange={(e) => setPassword(e.target.value)}
            />
          </Form.Group>

          <div className="d-grid gap-2">
            <Button variant="primary" type="Submit">
              Log In
            </Button>
          </div>
        </Form>
        <hr />
        <div>
          <GoogleButton
            className="g-btn"
            type="dark"
          />
        </div>
      </div>
      <div className="p-4 box mt-3 text-center">
        Don't have an account? <Link to="/signup">Sign up</Link>
      </div>
    </>
  );
};

export default Login;
The code above is similar to what we did in Signup.js. We import the useUserAuth method from UserAuthContext, and then we set email and password states to empty. Add onChange listeners to get the values from the inputs. Then we wrote a function that will call the logIn function passed down from useUserAuth to authenticate the user, and then we also make use of the useNavigate hook from “react-router-dom” to redirect to the home page.
Adding Firebase Logout Functionality
This is pretty simple to implement as all we need to do is call the logOut function. First, we go to the Home.js component, where we would find our logout button. We add an onClick handler and then write a handleLogout function which calls the firebase logOut function gotten from the useUserContext imported. The code should look like this:
import { useNavigate } from "react-router";
import { useUserAuth } from "../context/UserAuthContext";

const Home = () => {
  const { logOut, user } = useUserAuth();
  const navigate = useNavigate();
  const handleLogout = async () => {
    try {
      await logOut();
      navigate("/");
    } catch (error) {
      console.log(error.message);
    }
  };

  return (
    <>
      <div className="p-4 box mt-3 text-center">
        Hello Welcome <br />
      </div>
      <div className="d-grid gap-2">
        <Button variant="primary" onClick={handleLogout}>
          Log out
        </Button>
      </div>
    </>
  );
};

export default Home;
Sign In With Google Auth
Now that we have the basic username/password log-in flow working, let’s also add the social auth with Google.
Navigate to the Login component from before. On the GoogleButton add an onClick handler onClick={handleGoogleSignIn}. Then create an asynchronous function handleGoogleSignIn, which will call the googleSignIn function from our context, authenticate the user, and redirect to the home page.
const handleGoogleSignIn = async (e) => {
e.preventDefault();
try {
await googleSignIn();
navigate("/home");
} catch (error) {
console.log(error.message);
}
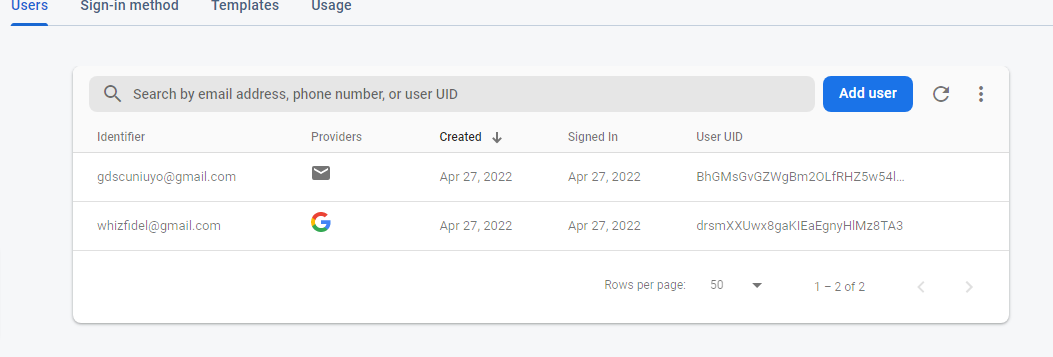
};Once you have successfully authenticated users using both email/password and Google. Go back to your Firebase Console and notice that the user data has been saved.
Firebase Protected Route Setup
React Router v6 enables us to prevent unauthorized/unauthenticated users from accessing sensitive routes. Since we do not want users having access to the home page when not logged in, we need to make it protected. To start, create a ProtectedRoute.js file under the src/components directory:
touch src/components/ProtectedRoute.jsPopulate src/auth/protected-route.js as follows:
import React from "react";
import { Navigate } from "react-router-dom";
import { useUserAuth } from "../context/UserAuthContext";
const ProtectedRoute = ({ children }) => {
  const { user } = useUserAuth();

  console.log("Check user in Private: ", user);
  if (!user) {
    return <Navigate to="/" />;
  }
  return children;
};

export default ProtectedRoute;
We import the useUserAuth method from our Context API and the useNavigate hook from React Router in the code above. If the user is not authenticated, we redirect them to the login page; otherwise, we make the home page available and redirect the user to it.
After that, we must export it to use it in our App.js file. Go to App.js and make the necessary changes.
import { Container, Row, Col } from "react-bootstrap";
import { Routes, Route } from "react-router-dom";
import "./App.css";
import Home from "./components/Home";
import Login from "./components/Login";
import Signup from "./components/Signup";
import ProtectedRoute from "./components/ProtectedRoute";
import { UserAuthContextProvider } from "./context/UserAuthContext";

function App() {
  return (
    <Container style={{ width: "400px" }}>
      <Row>
        <Col>
          <UserAuthContextProvider>
            <Routes>
              <Route
                path="/home"
                element={
                  <ProtectedRoute>
                    <Home />
                  </ProtectedRoute>
                }
              />
              <Route path="/" element={<Login />} />
              <Route path="/signup" element={<Signup />} />
            </Routes>
          </UserAuthContextProvider>
        </Col>
      </Row>
    </Container>
  );
}

export default App;
In the code above, we import the ProtectRoute and proceed to wrap the Home component with it: now our home route is protected, but the login and sign up routes are still available to everybody.
The code for this tutorial can be found here GitHub Repo.
Conclusion
So far in this tutorial, we have used Firebase to authenticate users using their email/password and with a Google account. You can take this a step further by adding the “forgot password” functionality. You can also make use of Firestore to save users. And then you can also see how to implement sign-in with Twitter, Facebook, etc. — plenty of options!
Once your’re ready to take your app into production, remember that you’ll have to define the ENV variables on that system, either with a new .env file or some other method provided by your deployment system.
Some resources you may want to look at:
A TIP FROM THE EDITOR: If you enjoyed this article, you should also take a look at Firebase Cloud Storage for React apps for more information about Firebase.