Authentication with JWT for your website
Learn how to add JWT authentication to your web pages


Since the advent of web application development, a lot of sensitive information is being sent through the internet making the concept of authentication something every web developer should understand and apply in an application to secure the information entrusted to the application by the user. In this article, we’ll look at a means of authentication for web applications known as JWT authentication. Compared to others, JWT authentication has become a favorite due to its many advantages to developers.
Before we dive into coding, we’ll be defining some key terms and concepts to help us understand how JWT authentication works, after which we will be integrating this form of authentication into a project that has a server created with Node.js, and a front-end created with React.js a widely used framework (actually my personal favorite) for front-end development.
To be able to follow through with the rest of the article, you need the following:
- Working knowledge of JavaScript
- A good understanding of Node.js and how to use it in creating a server.
- Working understanding of database creation.
- Basic knowledge of React.js
- Postman and knowledge on how to use Postman.
What is JWT, and how does it work?
JWT stands for JSON Web Token, an open standard used to share security information as a JSON object between a client and a server. The presence of a JWT in a request to the server from the client signifies that the information is verified, and its credibility is established because it is digitally signed using a secret written with a cryptographic algorithm to ensure that the claims aren’t altered after the token is issued. Although no middleman can modify a JWT, using it in an HTTPS environment is recommended as JWT is not encrypted.
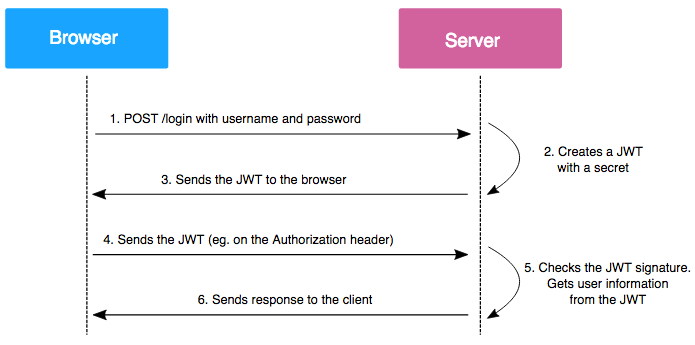
JWT authentication is a stateless authentication mechanism popularly used as a client-side stateless session. The server doesn’t have to entirely rely on a database to save session information. The session information is stored on the client’s end; therefore, a database lookup isn’t required to verify the requesting user’s identity. It works like this:
- A user logs in to a website or application with an email/username and password to prove his identity.
- The server confirms the user’s identity and sends back a unique access token containing a reference to his identity.
- The client then includes this unique access token with every request to the server, so if the access token is wrong/altered, the client is denied access.
- For protected routes, an authentication middleware is created in the server to assert the presence of a valid token. The server can further use the identity to implement more granular permissions.
Pros and Cons of JWT Authentication
There are several advantages:
- More compact: JSON is less verbose than XML, so when it is encoded, a JWT is smaller than a SAML token. This makes JWT an excellent choice to be passed in HTML and HTTP environments.
- More secure: JWTs can use a public/private key pair as an X.509 certificate for signing. A JWT can also be symmetrically signed by a shared secret using the HMAC algorithm. And while SAML tokens can use public/private key pairs like JWT, signing XML with XML Digital Signature without introducing obscure security holes is very difficult when compared to the simplicity of signing JSON. Read more about JWT signing algorithms here.
- More common: JSON parsers are common in most programming languages because they map directly to objects. Conversely, XML doesn’t have a natural document-to-object mapping, making it easier to work with JWT than SAML assertions.
- Easier to process: JWT is used on an internet scale. This means that it is easier to process on users’ devices, especially mobile.
However, there also are some disadvantages:
- If a client needs to be blocked or deactivated, the application will have to wait for the token to expire for the lockout to be fully effective.
- If a client needs to change their password, and authentication has been performed beforehand, a token generated with the previous password will still be valid until expiry.
- The standard implementation specifies no “refresh” token. On expiry, the client will therefore have to re-authenticate.
- It is impossible to destroy a token without breaching the “stateless” aspect of JWT tokens: Even if the token is deleted from the browser, it is still valid until expiry, so no real logout is possible.
To deal with these challenges, some JWT libraries add a layer above the standard specification, allowing token refresh mechanisms and some features like forcing a user to re-authenticate. Here are some recommendations for JWT developers.
What is the JWT Structure?
A JSON web token in its compact form consists of three parts separated by dots, which are:
- Header
- Payload
- Signature
The header contains two parts: the token type and the signing algorithm. The signing algorithm could be HMAC SHA256 or RSA. This JSON is then Base64Url encoded to form the first part of the JWT. Here is an example of a header:
{
  "alg" : "HS256",
  "typ": "JWT"
}
The payload mainly contains claims. Claims are statements about an item, in our case, the user, and additional data. The server typically uses this information to verify that the user has permission to carry out the action they are requesting. For example:
{
  "iss":" Signin route",
  "name": "janet",
  "sub":"2"
  "admin": true
}
Finally, the signature is used to verify that the message wasn’t changed, and it is also used to verify that the sender of the JWT is who it says it is. The signature is created by taking the encoded header, the encoded payload, a secret, and the algorithm specified in the header and encoding that. For example, if you want to use the HMAC SHA256 algorithm, the signature will be created this way:
HMAC256(
base64UrlEncode(header) + "." + base64UrlEncode(payload), secret
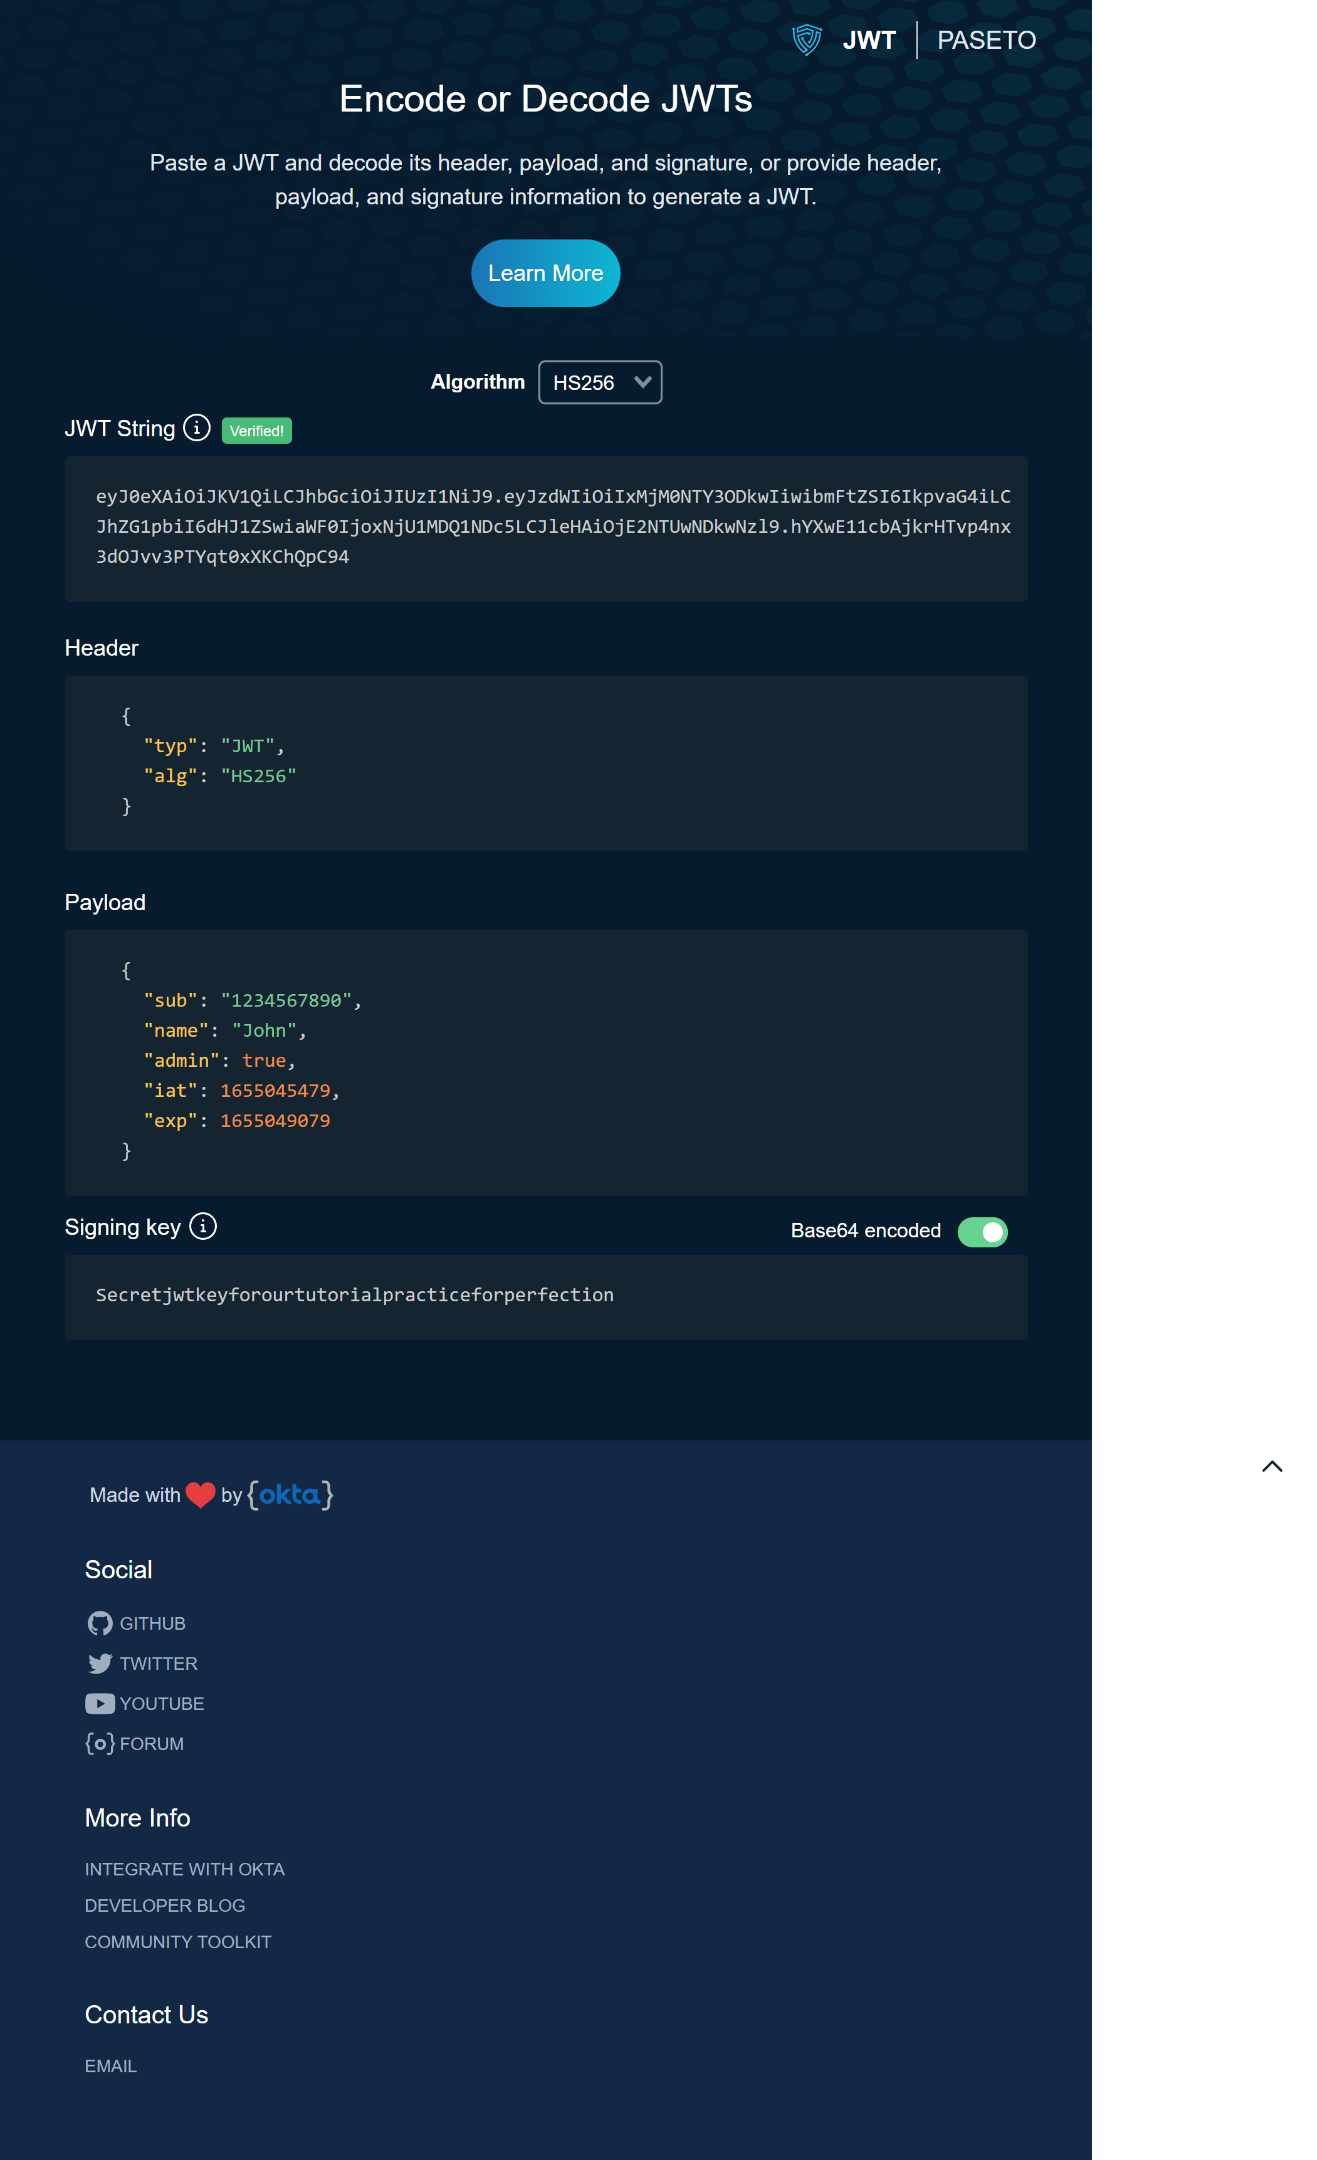
)After all this is done, we get three Base64Url strings representing the three different parts of a JWT token separated by dots that can be easily passed in HTML and HTTP environments. Here is an example from https://token.dev/paseto/ showing the header, the payload, the signature, and our three Base64Url strings separated by dots.
Integrating JWT Authentication into the back end
Node.js is an open-source, cross-platform, back-end JavaScript runtime environment that executes JavaScript code outside a web browser. It was designed to build scalable network applications. To me, Node.js is the React of back-end web development. Using Node.js, we’ll create our login, registration, and authentication routes that will receive the user information from the front-end, hash the passwords where necessary, create, verify and authenticate the user whenever the user logs in and request to access our protected route.
Alongside Node.js for this project, we used PostgreSQL to create our database; you can learn how to do that here, Knex.js for query building, and bcrypt.js to hash our passwords so that if our database is compromised the user password wouldn’t be available to the hacker.
Open Source Session Replay
OpenReplay is an open-source, session replay suite that lets you see what users do on your web app, helping you troubleshoot issues faster. OpenReplay is self-hosted for full control over your data.

Start enjoying your debugging experience - start using OpenReplay for free.
Creating our Registration route
Firstly we need to install the JWT library and other dependencies we’ll need for this project. To do that, we’ll run the following command:
npm i jsonwebtoken bcrypt knex postgres --saveWe’ll then store our secret in our .env file;
REACT_APP_TOKEN= "jwtsecrettutorial"We’ll create our registration endpoint that will receive the user’s information from the front-end request, hash the password, send the information to our database, create our JWT token and respond to the front-end with our JWT token ;
app.post("/register", (req, res, db, bcrypt, jwt) => {
  const { email, name, password } = req.body;

  if (!email || !name || !password) {
    return res
      .status(400)
      .json(`${console.log(req.body)}incorrect form submission`);
  }

  //Hashing our password with bcrypt
  const hash = bcrypt.hashSync(password);
  db.transaction((trx) => {
    trx
      .insert({
        hash: hash,
        email: email,
      })

      //Inserting our user's info into our login and user table
      .into("login")
      .returning("email")
      .then((loginEmail) => {
        return trx("users").returning("*").insert({
          email: loginEmail[0].email,
          name: name,
          joined: new Date(),
        });
      })
      //creating the JWT token and responding to the front end with our token
      .then((user) => {
        const accessToken = jwt.sign({ email }, process.env.REACT_APP_TOKEN, {
          expiresIn: "3000s",
        });
        res.json({ accessToken });
      });
  })
    .then(trx.commit)
    .catch(trx.rollback);
});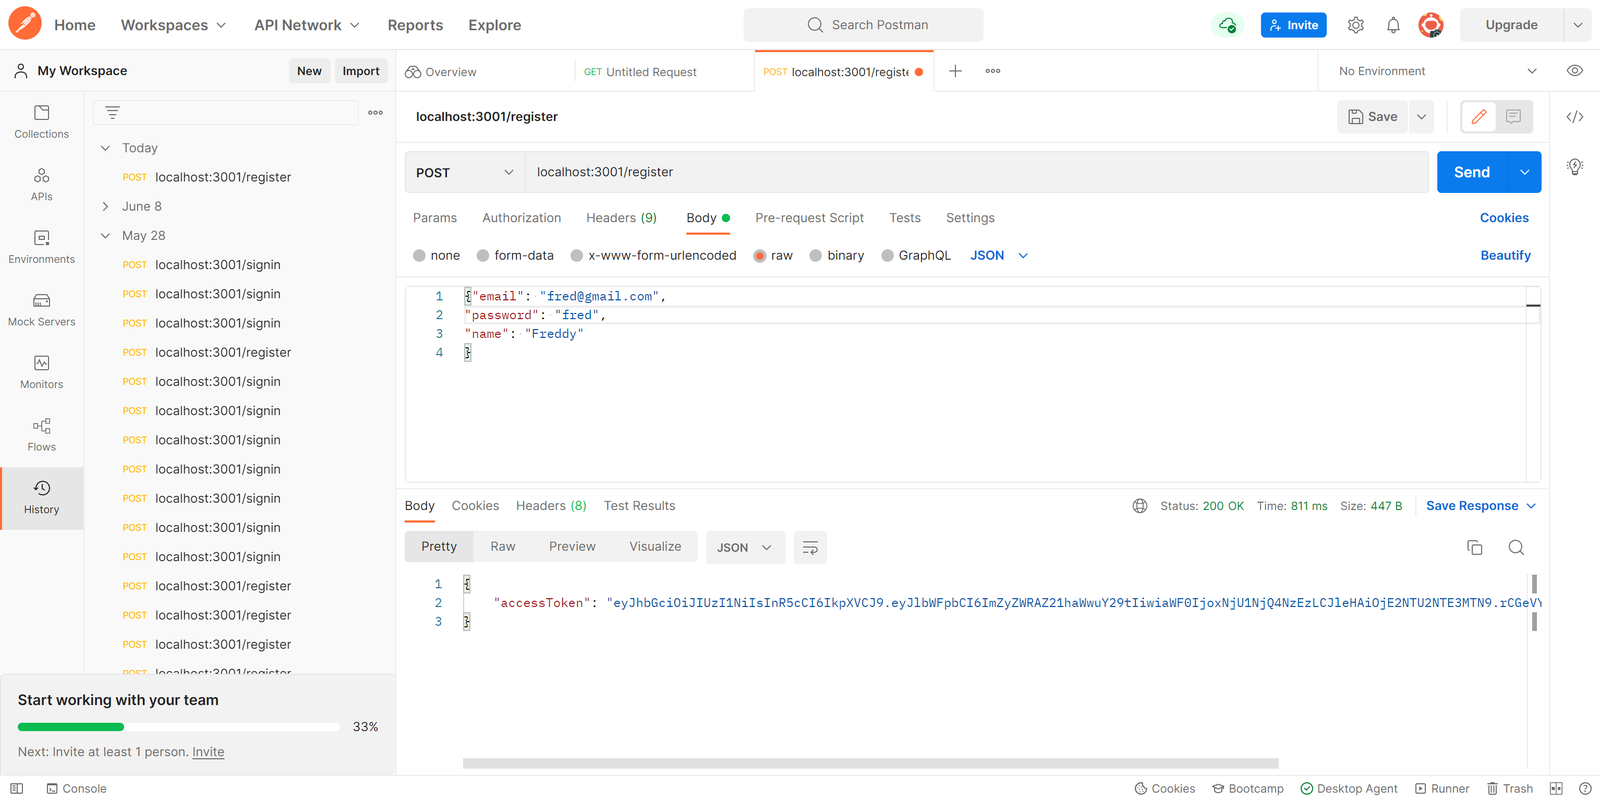
The client’s information was sent to the server using Postman in the image above. After saving the client’s information, the server responds with the JWT token for a subsequent request.
Creating our Login/Sign-In route
For the login route, we’ll create our endpoint to receive the user information from the front-end request, verify if the user exists in our database, and if the user exists, a JWT token is created and sent to the client-side; this token will be used for a subsequent API request.
app.post("/signin", (req, res, db, bcrypt, jwt) => {
  const { email, password } = req.body;
  if (!email || !password) {
    return res.status(400).json("incorrect form submission");
  }
  //Getting the user info from the database
  db.select("email", "hash")
    .from("login")
    .where("email", "=", email)
    .then((data) => {
      //comparing the password rech the one in the database using bcrypt
      const isValid = bcrypt.compareSync(password, data[0].hash);
      if (isValid) {
        return db
          .select("*")
          .from("users")
          .where("email", "=", email)
          .then((user) => {
            const accessToken = jwt.sign(
              { email },
              process.env.REACT_APP_TOKEN,
              { expiresIn: "3000s" }
            );
            res.json({ accessToken });
          })
          .catch((err) => res.status(400).json(`${err}wrong credentials`));
      } else {
        res.status(400).json(`${err}wrong credentials`);
      }
    })
    .catch((err) => res.status(400).json(`${err}wrong credentials`));
});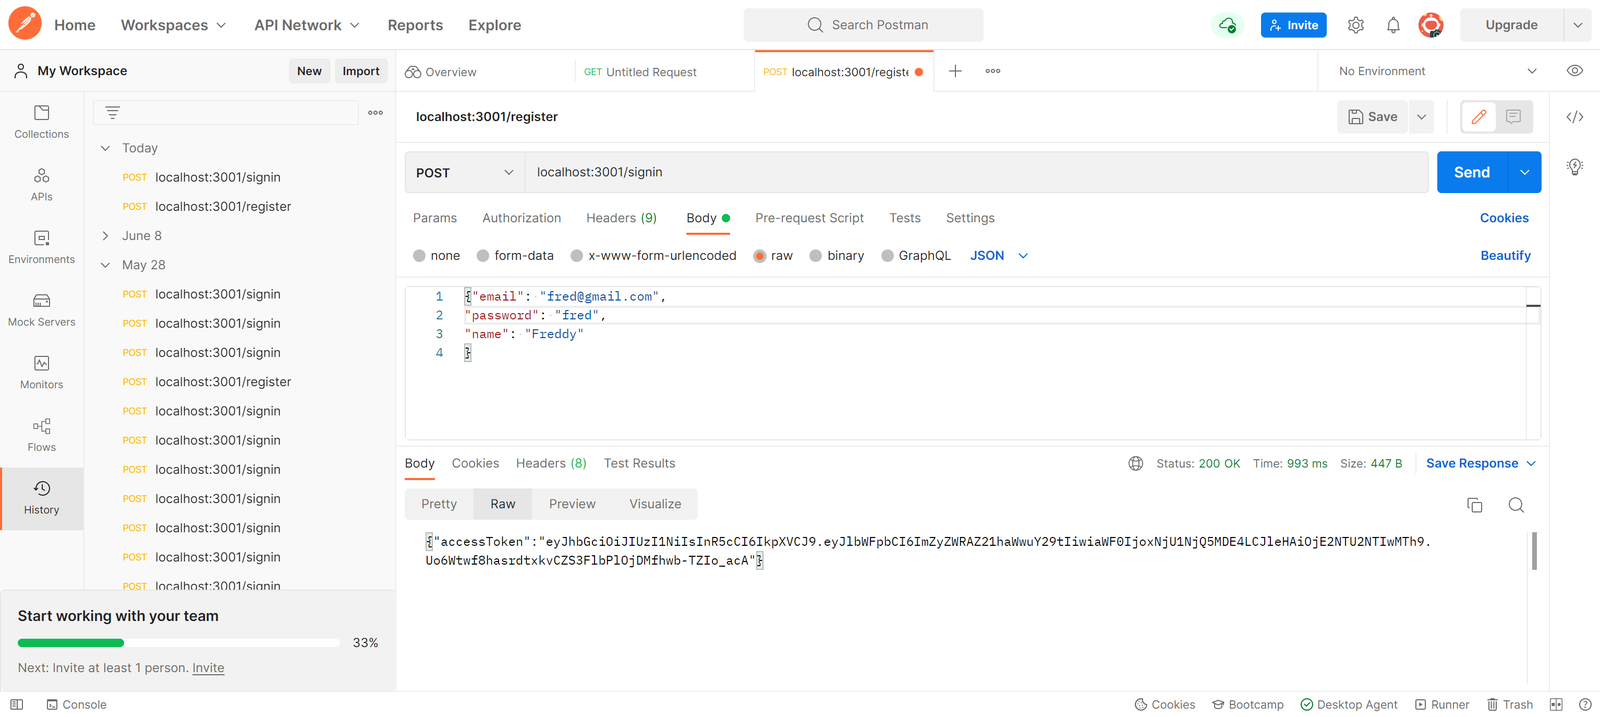
In the image above, the client’s information was sent to the server using Postman. After cross-checking and confirming the client’s information, the server responded with the JWT token for subsequent requests.
Creating our Authentication Route
For authentication, we’ll create a middleware that carries out authentication whenever a request is made through our protected route. This route will require the user token in the request header as ‘x-auth-token’ for authorization. The token will be gotten from the header and verified by our middleware. You could learn more about HTTP Authorization via a request header here. To create the middleware, use the code below;
require("dotenv").config();
var jwt = require("jsonwebtoken");

module.exports = {
  jwtauth(req, res, next) {
    const token = req.header("x-auth-token");
    if (!token) {
      res.status(401).json("token not found");
    }
    try {
      const user = jwt.verify(token, process.env.REACT_APP_TOKEN);
      req.user = user.email;
      console.log("middleware is working");
      next();
    } catch (error) {
      res.status(401).json("invalid token");
    }
  },
};
We can now add a protected route to our server; a request to this route will first go through our middleware before access is granted or denied.
const jwtauth = require("./middleware/jwtauth");

app.post("/protected", jwtauth, (req, res) => {
  res.status(200).send("Here's the info you requested ");
});
If a request is made without providing a token using the ‘x-access-token’ in the header, an error message will be returned saying “token not found”.
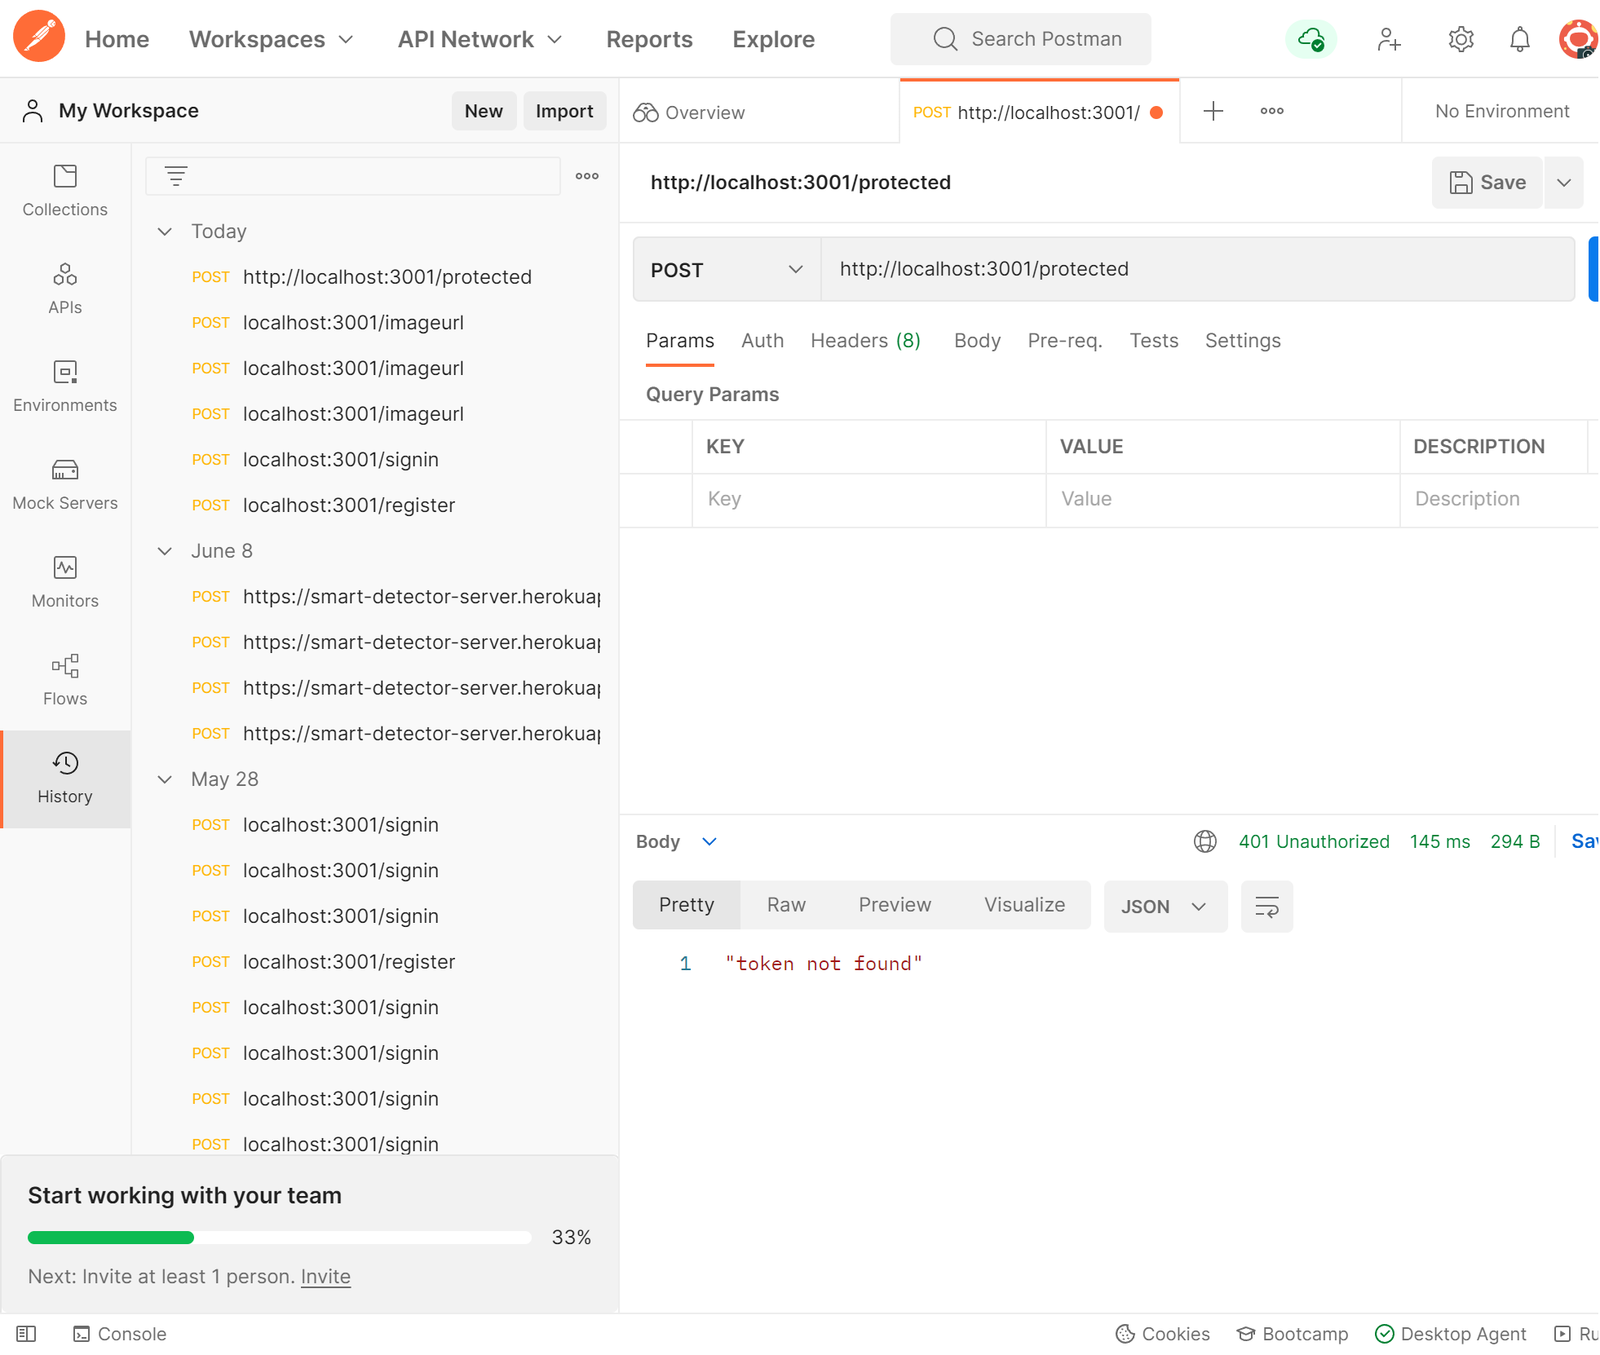
In the image above, a request is sent to the server via Postman without the token in the header, and the server responds with an error message saying token not found. If a token is provided in the header and that token is correct, it allows the client access to the protected route, but if the token is wrong, it responds with an error message saying “invalid token”.
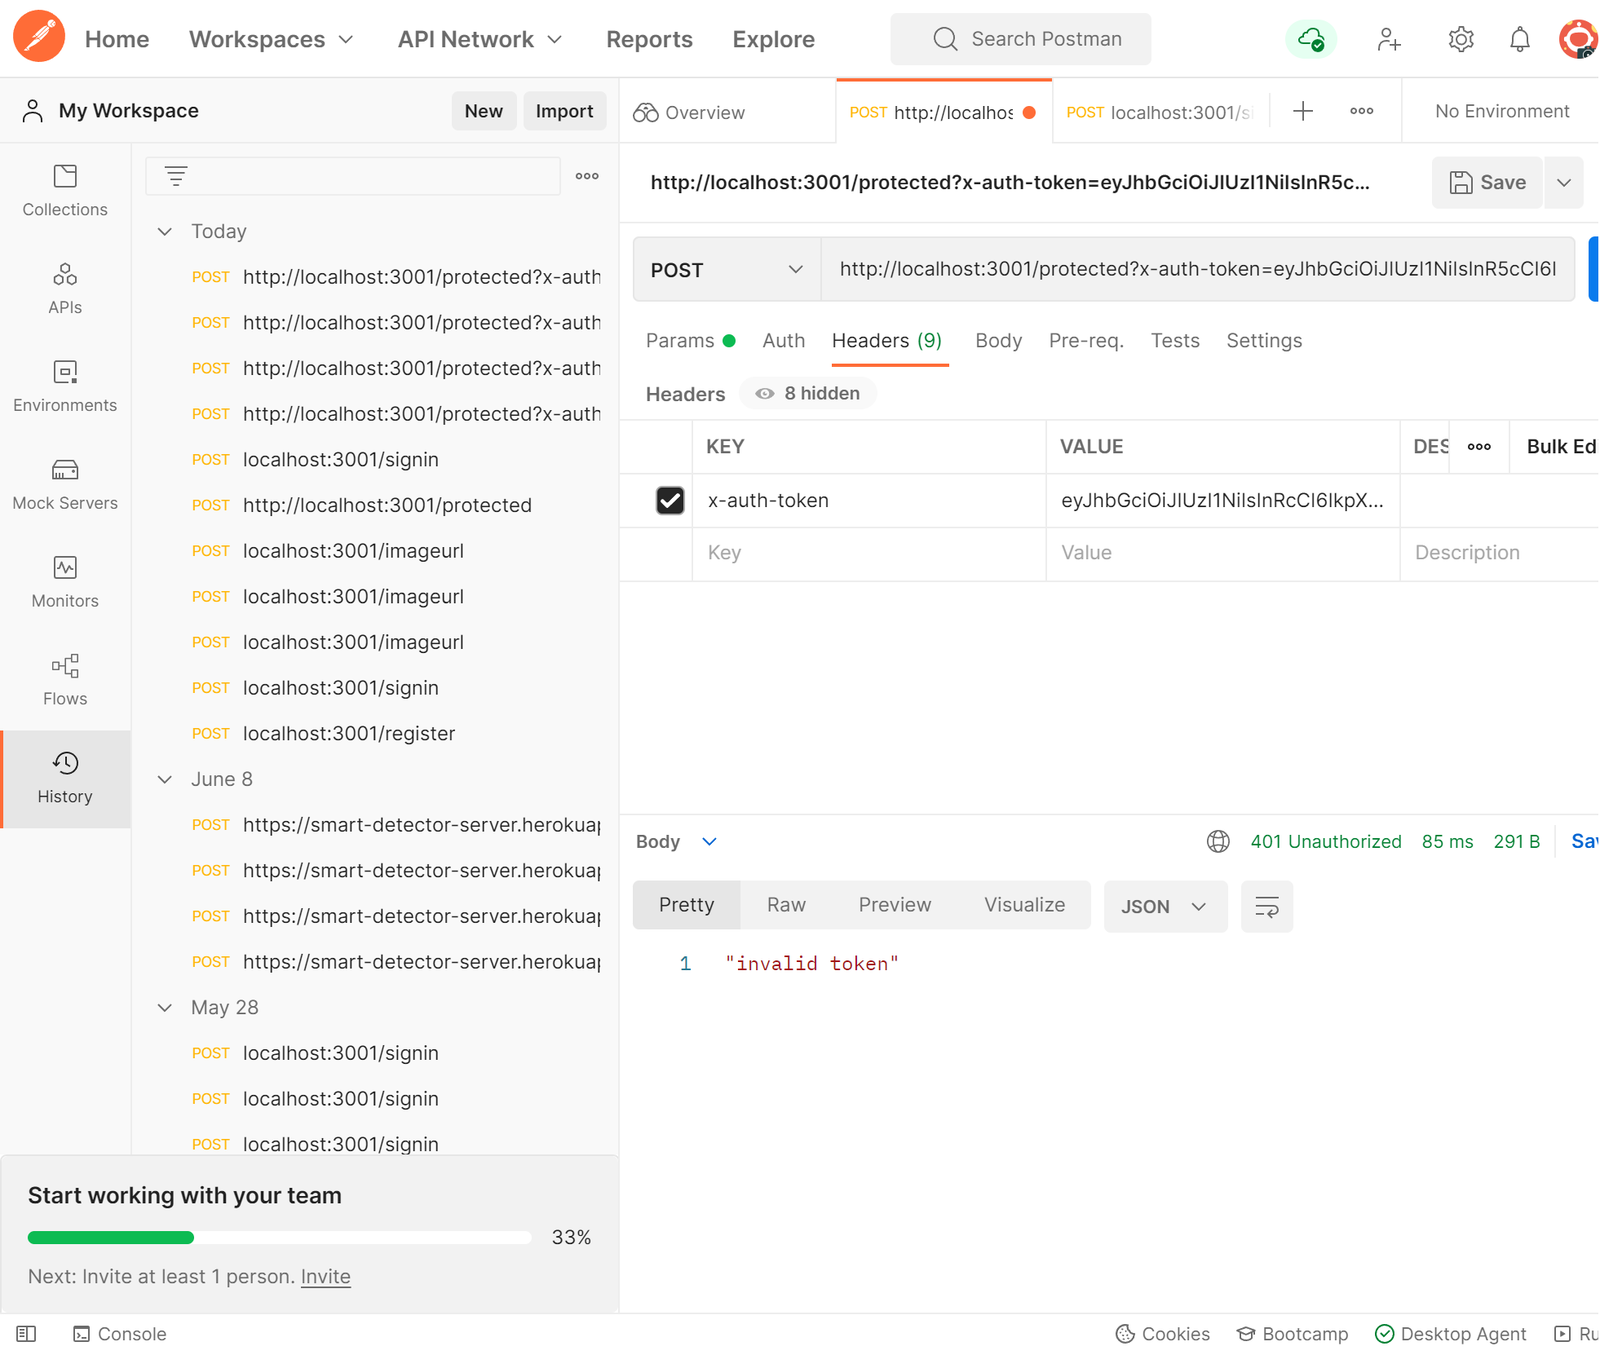
In the image above, a request is sent to the server via Postman with an incorrect token in the header, and the server responds with an error message saying invalid token.
Integrating JWT Authentication into the front end
To do this, you would need to install Axios in our front-end created with React.js by doing;
npm i axiosIn our register/sign-up page in our React.js, we want our client-side to store the JWT it receives from the server-side after their information is stored on the database. This token will be used for subsequent API requests, so we add this function to our code;
onSubmitSignUp = () => {
  console.log(this.state);
  axios
    .post("http://localhost:3001/register", {
      email: this.state.email,
      password: this.state.password,
      name: this.state.name,
      enteries: this.state.enteries,
    })

    .then((response) => {
      if (response.data.accessToken) {
        localStorage.setItem("user", JSON.stringify(response.data));
      } else {
        console.log("no response");
      }
    });
};
With this done, the token is stored in our local storage on the client-side. We’ll do the same thing to our sign-in page so that a token will be created for subsequent API calls when an already existing user signs in.
onSubmitSignIn = () => {
  console.log(this.state);
  axios
    .post("http://localhost:3001/signin", {
      email: this.state.email,
      password: this.state.password,
    })

    .then((response) => {
      if (response.data.accessToken) {
        localStorage.setItem("user", JSON.stringify(response.data));
      } else {
        console.log("no response");
      }
    });
};
For our authentication route, we have to retrieve the already stored token from our storage which will then be sent to the server-side for authentication and further action.
export default function authHeader() {
  const user = JSON.parse(localStorage.getItem("user"));
  if (useraccessToken) {
    return { "x-auth-token": user.accessToken };
  }
}
axios.post("http://localhost:3001/protected", { header: authHeader() });
With all this done, we have successfully set up a working authentication system that works with our node.js (back-end), creates our token, and sends it to our react.js (front-end), which then stores our token and uses it for subsequent requests to our protected route.
Conclusion
So far, we’ve looked at JWT authentication, the JWT structure, what JWT authentication is, how it works and how to add it to our server-side node.js routes and our React.js app. You can learn more about JWT and libraries and tools that make your use of JWT authentication easier and more secure here. I hope this tutorial was helpful, have fun authenticating requests with JSON web Tokens.