Automating Releases in GitHub with Conventional Commits
Implement automatic releases via specific commits


This article will guide you through the process of automating your release cycle on GitHub, by exploring how to set up automatic releases using conventional commits, Commitlint, and Husky, starting with the concept of conventional commits and going on to the technical setup.

Discover how at OpenReplay.com.
One crucial aspect of software development is controlling the code and ensuring that projects are on track. Developers typically use version control systems like Git to manage changes, collaborate efficiently, and undo changes when necessary. However, release management, which includes planning, scheduling, and controlling software builds, can be challenging. So, how can teams ensure that their software is delivered on time and of the best quality possible?
Enter automatic releases, an approach that simplifies the entire release process. By automating release notes, versioning, and software packaging, developers can reduce their workload and the chances of errors, ultimately leading to more consistent and reliable releases. It’s a great way to streamline the process and ensure everything runs smoothly.
Understanding Conventional Commits
Managing commit messages can be a source of frustration. Too often, they lack consistency and clarity, making understanding the project’s history at a glance challenging. This is where Conventional Commits come into play, offering a lifeline for teams drowning in a sea of ambiguous commit messages.
Conventional Commits is a set of rules developers can follow to make their commit messages clear and understandable for humans and machines. These rules help create a transparent history of changes in the code. By doing so, automated tools can easily interpret and understand the changes made. The rules are based on Semantic Versioning (SemVer) principles, providing a structured commit format. This simplifies the versioning process and helps generate changelogs.
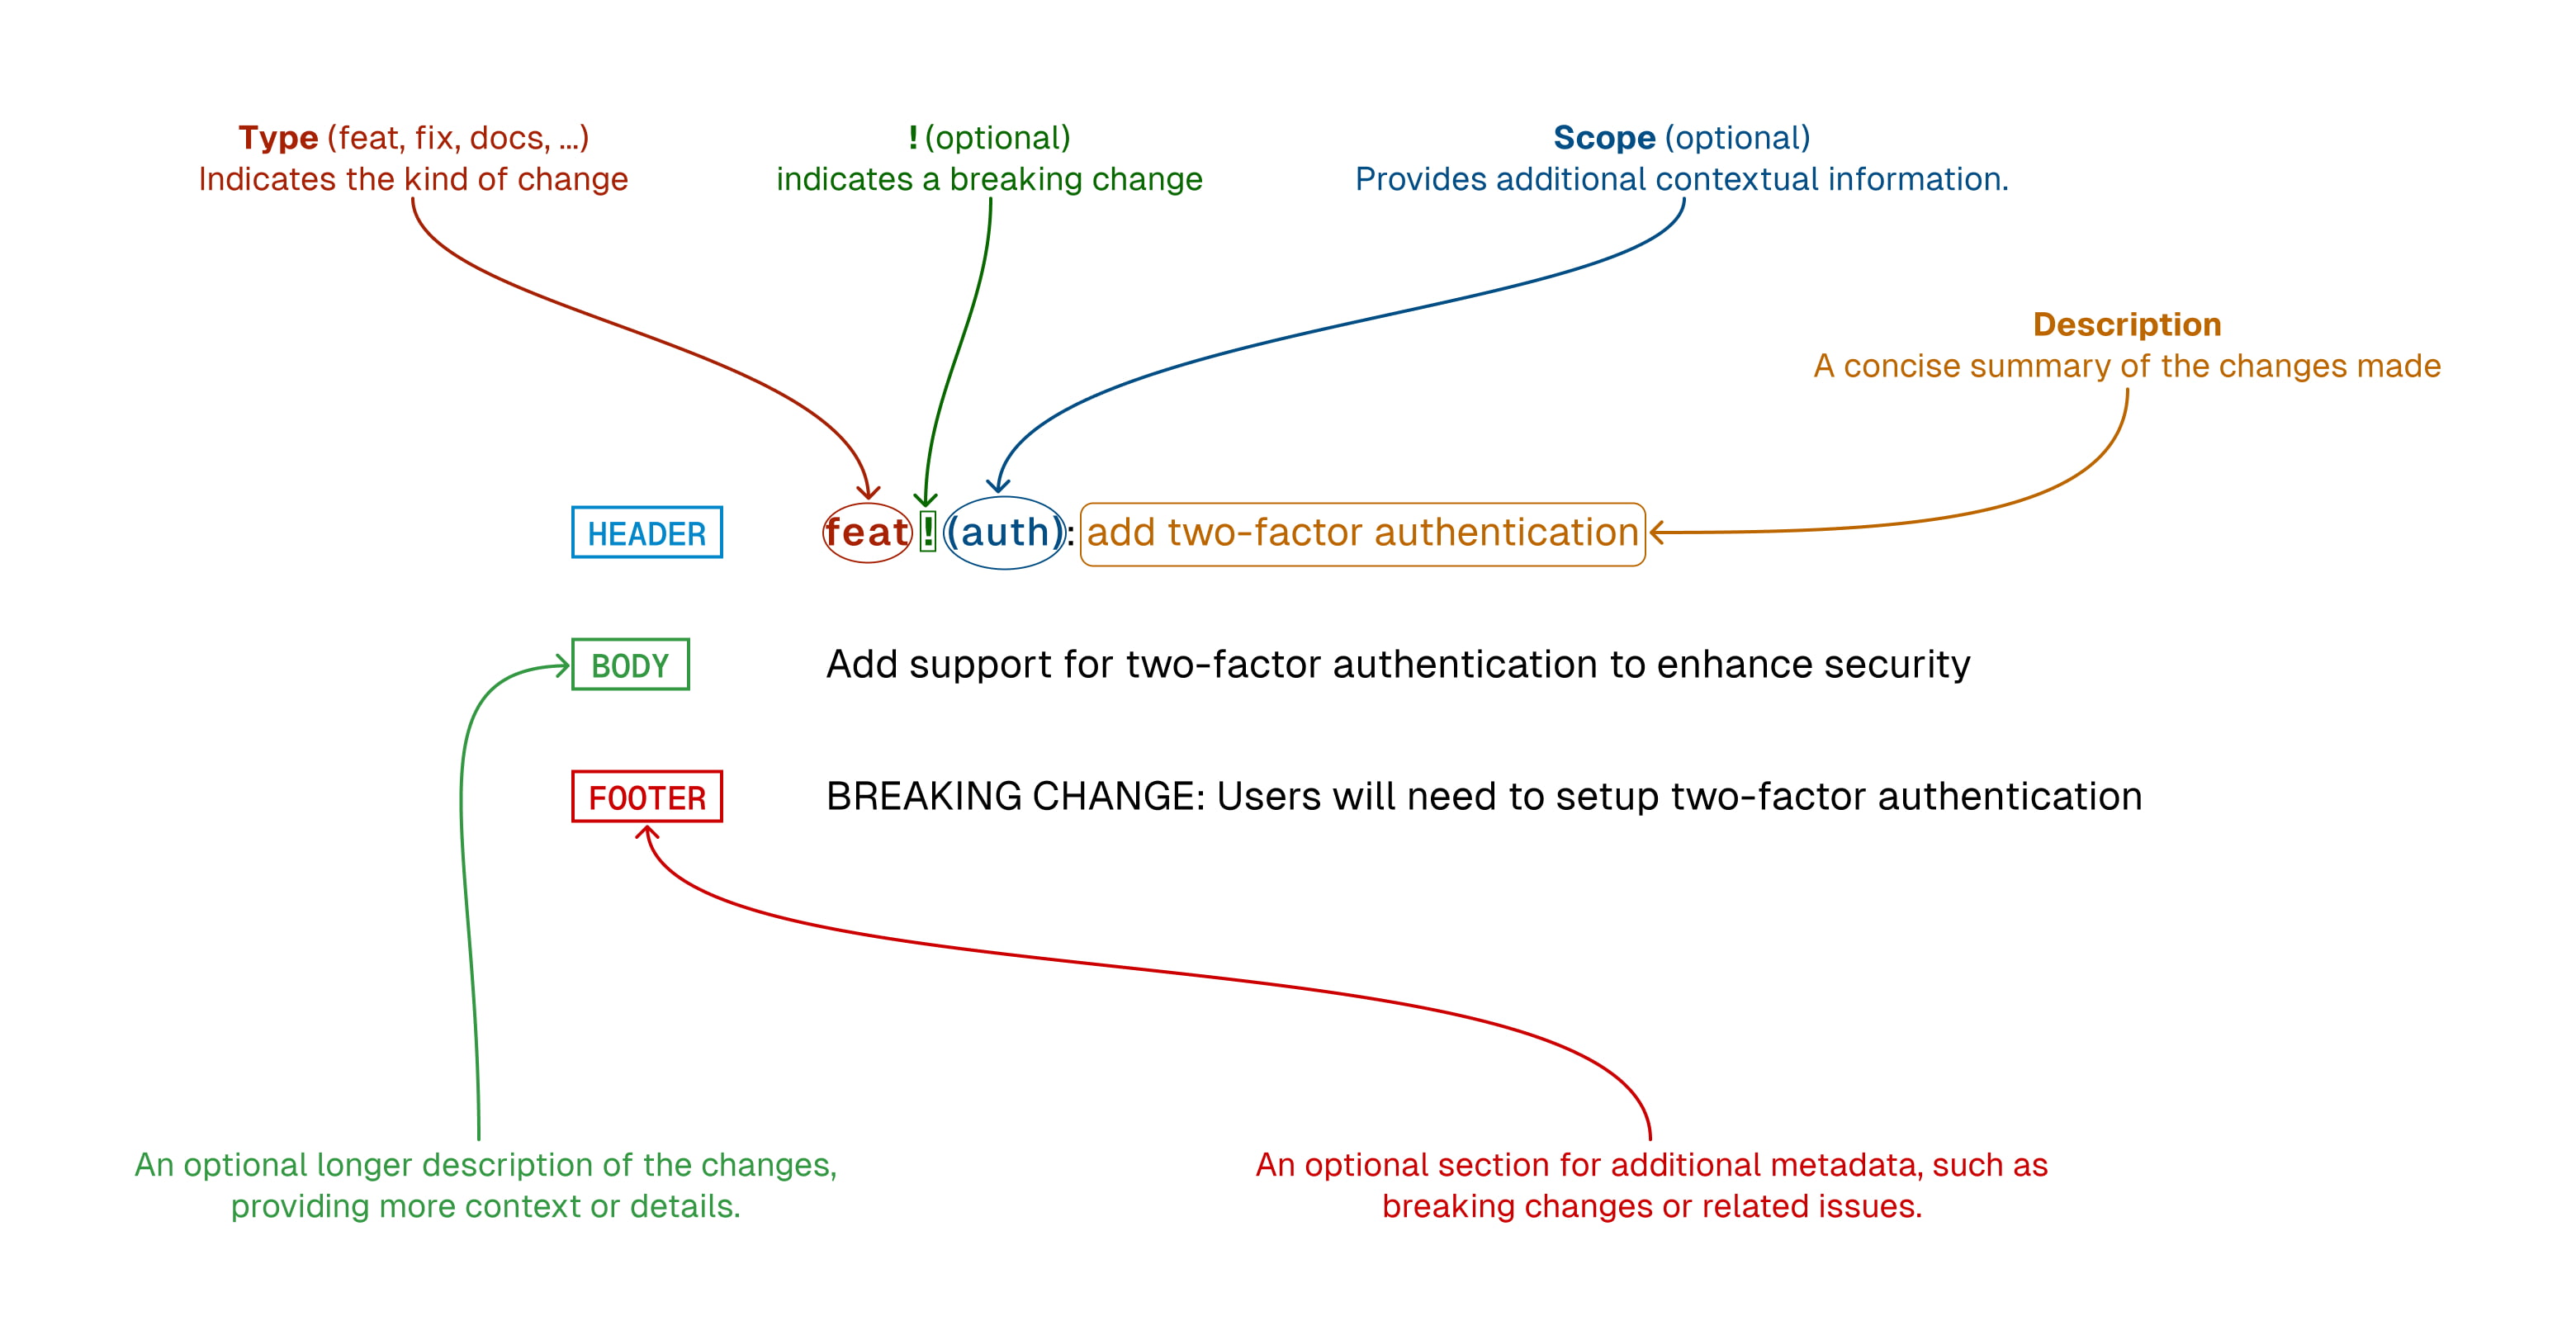
A conventional commit message can be broken down into three main components:
- The header is the only required part. It comprises three parts: type, scope, and description. The type reveals the type of change that was made, for instance,
featfor a new feature orfixfor a bug fix. The scope is optional and provides additional context, usually indicating which part of the codebase was affected by the change. The changes are summarized briefly in the description, explaining what was done and why. - The body is an optional part of the commit message that provides a more detailed explanation of the changes. It can include the motivation behind the changes, the approach taken, and any additional context that might help understand the commit.
- The footer is another optional part of the commit. It is typically used to provide metadata about the commit, such as references to related issues or pull requests (e.g.,
Fixes #123) and information about breaking changes (e.g.,BREAKING CHANGE: This change breaks the API in the following ways...).
The format looks like this:
<type>[optional scope]: <description>

[optional body]

[optional footer(s)]
Here’s an overview illustration that showcases the components of a conventional commit:
Adopting conventional commits brings several benefits:
- The structured format of commits helps understand their purpose and impact quickly.
- Tools can automatically perform versioning and generate changelogs by parsing conventional commit messages.
- When everyone on the team follows the same format for commit messages, it becomes easier to collaborate and read through the codebase. This is because the uniformity in the format creates consistency and clarity throughout the project.
Developing teams can standardize their commit messages by adopting Conventional Commits and automating their versioning and release strategies. This leads to a more streamlined and predictable workflow.
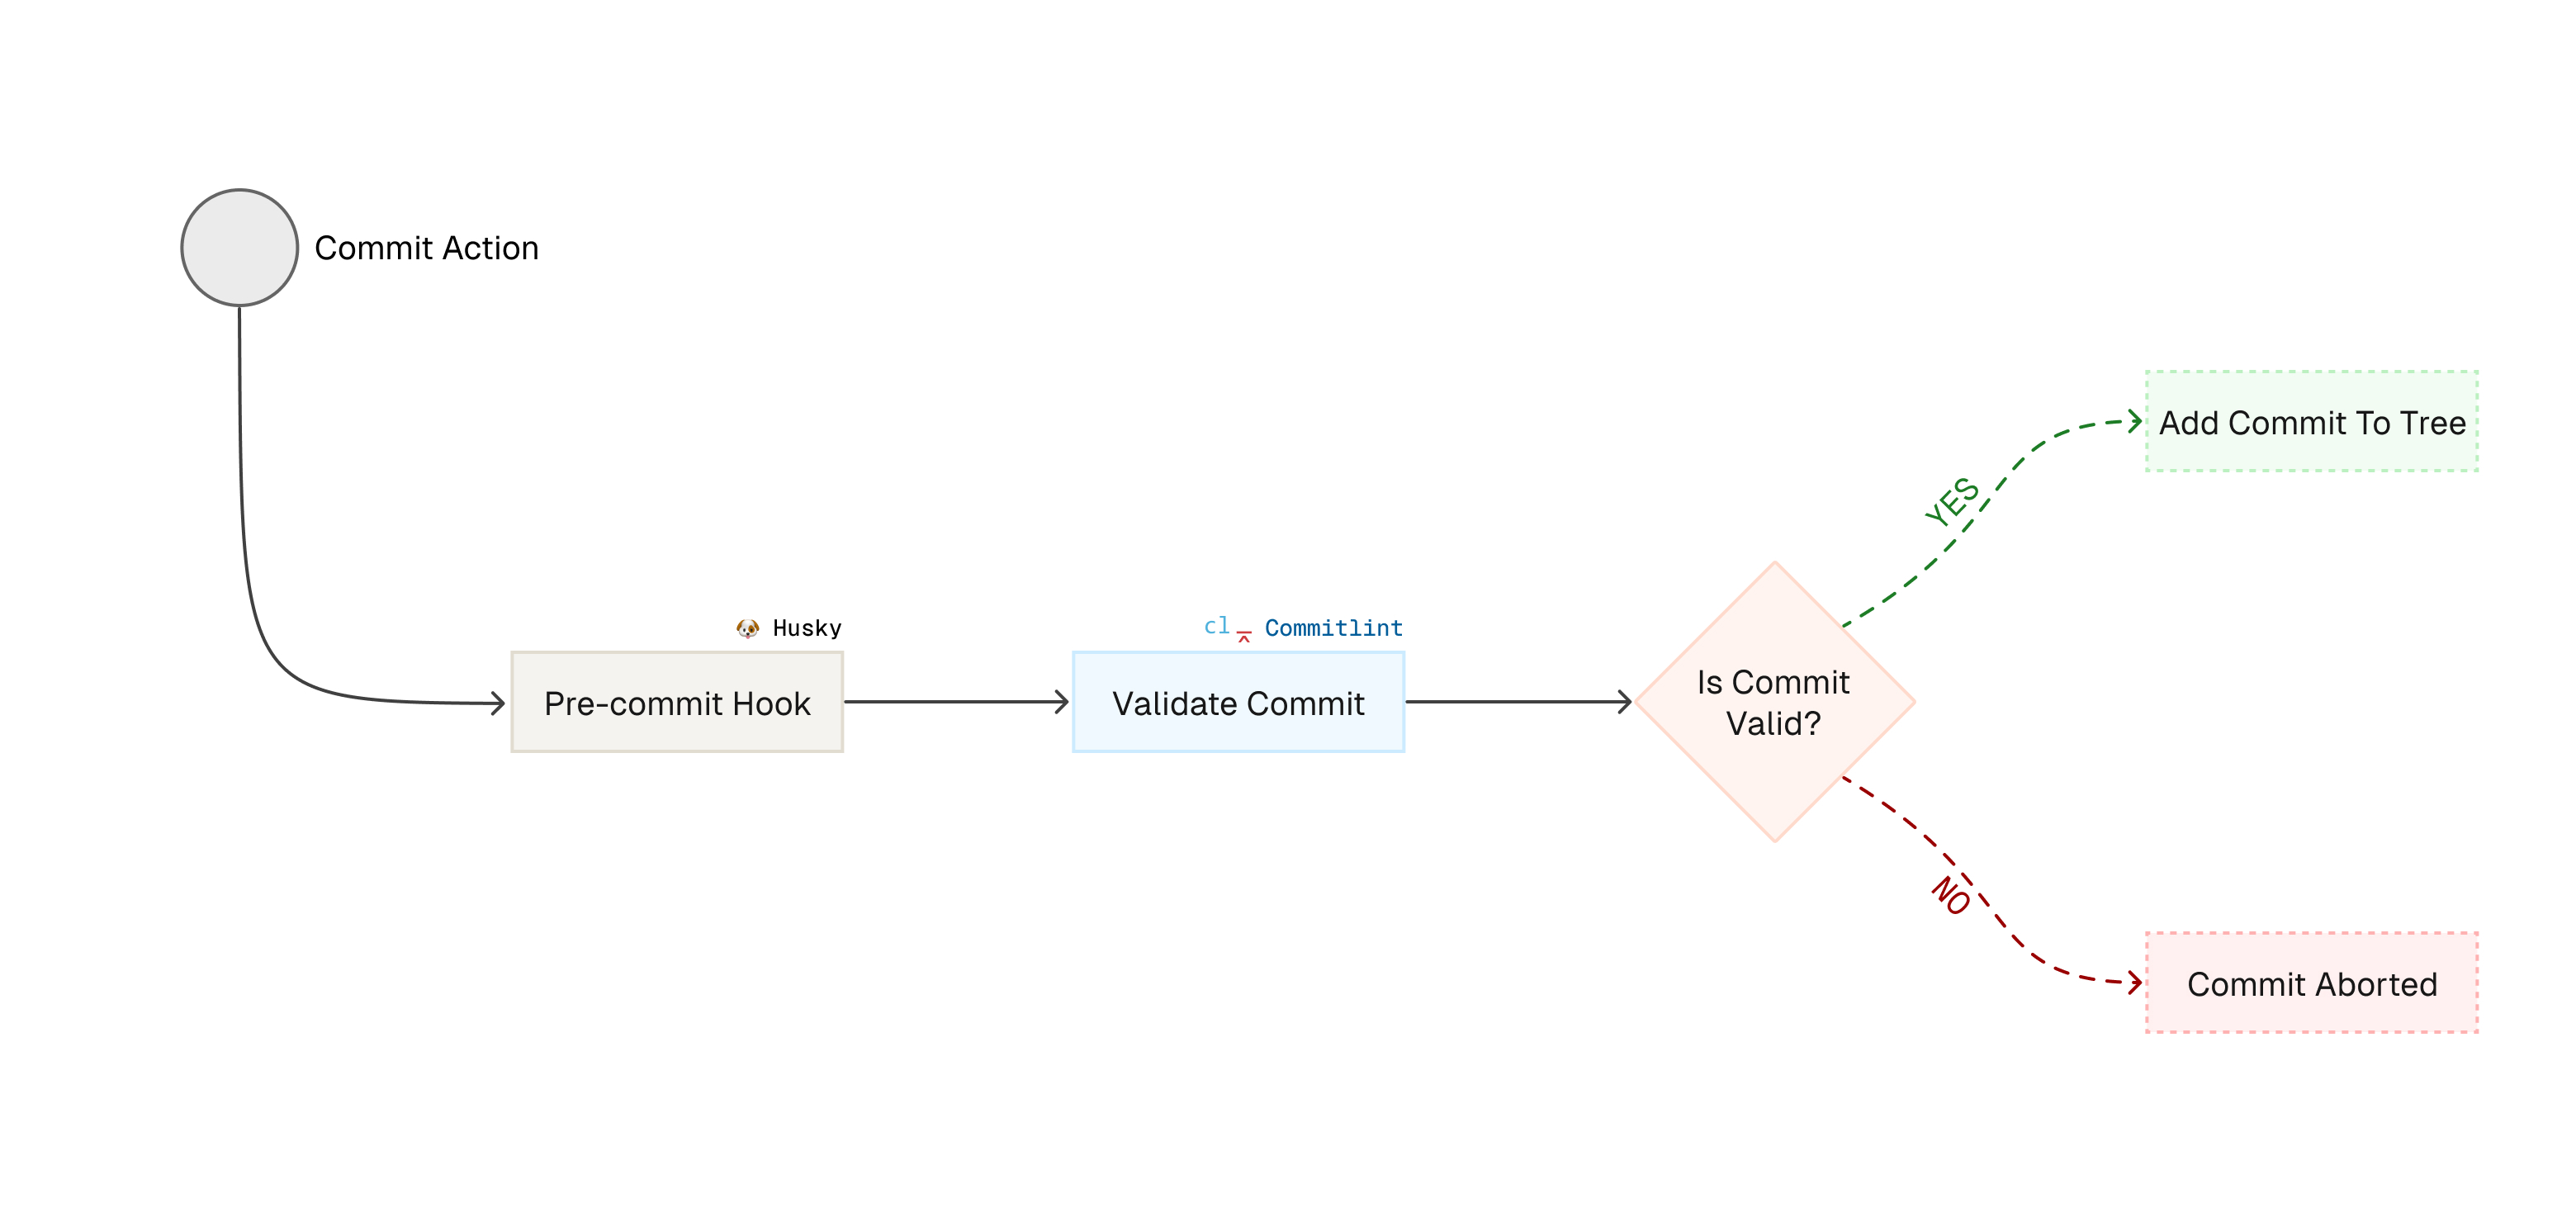
Enforcing Conventional Commits with Commitlint and Husky
A standardized commit history benefits the development process and allows for automated versioning and changelog creation. Commitlint and Husky are two important tools that can be used to achieve this.
Commitlint is a tool that helps you keep your commit messages consistent and readable. It does this by checking that your messages follow the Conventional Commits specification, which is essential for triggering automated processes based on the types of changes each commit represents. Commitlint uses predefined rules to evaluate your messages, and it will reject any messages that do not comply. This ensures your project’s commit history is well-organized and easy to understand.
On the other hand, Husky can help you control who can commit and push changes to your repository. Using Git hooks, it can verify the commit messages before they’re accepted, ensuring they follow the conventional format. You can use Commitlint and Husky to automate this process at the pre-commit stage. This way, you can ensure that every commit message is checked for compliance with the format rules before it’s added to the repository.
Here’s a workflow diagram highlighting how those tools work together on a specific commit:
Let’s begin the setup process of Commitlint and its conventional configuration by installing the Commitlint CLI and the Conventional Config.
npm install -D @commitlint/{cli,config-conventional}Next, create a file named commitlint.config.js at the root of your project. This file will configure Commitlint to use the conventional configuration. Add the following content to the file:
module.exports = {
  extends: ['@commitlint/config-conventional']
};
This configuration extends conventional rules to ensure a standard commit message format.
To add Husky, which allows for Git hooks, you must install it first.
npm install -D huskyAfter installing Husky, initialize it by running:
npx husky initThis command adds a prepare script to your package.json, ensuring that Husky is set up correctly when installing dependencies. It also creates a .husky directory at the root of your project with a default pre-commit hook.
You need to create a commit-msg hook to enforce message standards. Rename or delete the default pre-commit hook, then create a new commit-msg file in the .husky directory. Add the following line to the file:
npx --no -- commitlint --edit $1This hook uses Commitlint to check the commit message against the configured rules. If the commit message does not meet the standards, the commit will be rejected, prompting you to revise the message.
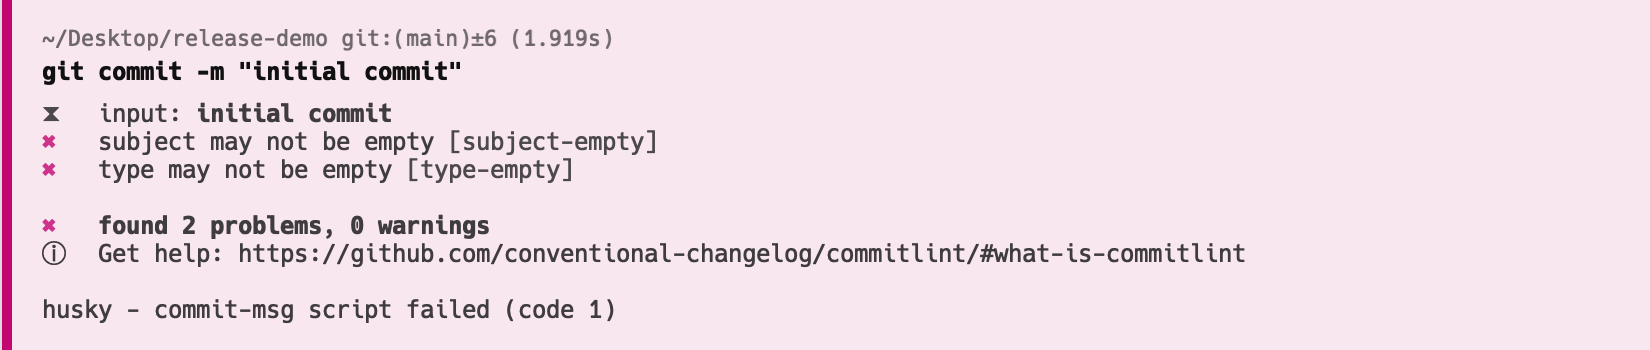
For demonstration purposes, let’s consider an example where we attempt to make a commit with the message "initial commit":
git commit -m "initial commit"This message intentionally does not follow the standard commit format. As a result, Commitlint expects it to be rejected. This rejection prompts you to review and revise the commit message according to the established standards.
In contrast, when a commit message follows the conventional format, such as by including the "chore: " prefix:
git commit -m "chore: initial commit"Commitlint recognizes the message as conforming to the standard and allows the commit to proceed. This is Commitlint’s way of approving the well-structured commit message.
:::info :bulb: TIP: If you’re using VSCode, you can simplify committing by utilizing the Conventional Commit Extension. :::
Here are a few more examples of conventional commit messages that Commitlint would recognize as valid:
# Adding a new feature
git commit -m "feat: add user registration feature"

# Fixing a bug
git commit -m "fix: resolve login issue with special characters"

# Updating documentation
git commit -m "docs: update API documentation with new endpoints"

# Making changes that do not affect the code's functionality (e.g., formatting)
git commit -m "style: format code with Prettier"

# Refactoring code without changing its behavior
git commit -m "refactor: simplify user authentication logic"

# Adding or updating tests
git commit -m "test: add unit tests for user service"

# Making changes to the build process or auxiliary tools
git commit -m "chore: update dependencies to latest versions"
Commitlint offers flexibility through customizable rules. For instance, the default config @commitlint/config-conventional has a rule, subject-case, that specifies the commit message subject shouldn’t be in sentence-case, start-case, pascal-case, or upper-case.
Suppose you use sentence-case in your commit subject, like the following.
git commit -m "chore: Initial commit"The commit will be rejected because it violates the subject-case rule.
However, you can override this behavior by modifying the rule in the commitlint.config.js file:
module.exports = {
  extends: ['@commitlint/config-conventional'],
  rules: {
    'subject-case': [2, 'always', 'sentence-case']
  }
};
For the complete list of the rules, refer to the Commitlint Official Documentation. And for the default rules provided by config-conventional, check their GitHub repo.
Automating Releases with GitHub Actions
GitHub Actions is a powerful automation tool that enables you to create custom workflows within your GitHub repository. With GitHub Actions, you can automate a wide range of tasks, such as testing and building your code, deploying applications, and managing releases. In particular, regarding release management, they play a crucial role in automating the creation of tags and releases.
Git tags serve as markers that point to specific points in your repository’s history. They usually mark release points, such as version 1.0.0. GitHub Releases build on this concept and provide a comprehensive interface for managing software releases. This feature enhances tags by offering extra capabilities, including detailed release notes, distributing binary assets, and linking to relevant commits and pull requests.
One powerful GitHub action that simplifies release management is release-please, provided by Google. This action automates the versioning and changelog generation process based on conventional commit messages. By following a standardized format for commit messages, it accurately determines the next version number and generates a detailed changelog for the release.
:::info :bulb: You have the option to choose from a variety of actions created by the community to suit your specific needs. For instance, you can use pre-existing actions like release-it and semantic-release, or you can create your own custom action. :::
Here’s a minimal example of a Github action using release-please:
name: Release

on:
  push:
    branches:
      - main

permissions:
  contents: write
  pull-requests: write

jobs:
  release:
    runs-on: ubuntu-latest
    steps:
      - name: Checkout code
        uses: actions/checkout@v3

      - name: Set up Node.js
        uses: actions/setup-node@v3
        with:
          node-version: '20'

      - name: Create Release
        uses: google-github-actions/release-please-action@v4
        with:
          token: ${{ secrets.GITHUB_TOKEN }}
          release-type: node
This workflow is set to activate whenever there is a push to the main branch. It requires permissions to write to the repository and manage pull requests. It consists of three steps:
- Checkout code: The first step in the job is to check out the code from the repository. This is done using the
actions/checkout@v3action, which checks out the repository under$GITHUB_WORKSPACEso your workflow can access it. - Set up Node.js: The second step sets up Node.js on the runner. The
actions/setup-node@v3action is used to install Node.js version 20. This step is necessary if your project uses Node.js or if any subsequent steps in the workflow require Node.js. - Create Release: Whenever the
release-pleaseaction is activated, it scans the commit messages made since the last release. Based on this analysis, it determines the next version number. After that, a new branch will be created that includes the updatedpackage.jsonandCHANGELOG.mdfiles. Then, it opens a pull request for this branch. Finally, when this pull request is merged, a new release is created, which includes the corresponding tag.
Here’s an illustration that simplifies this process:
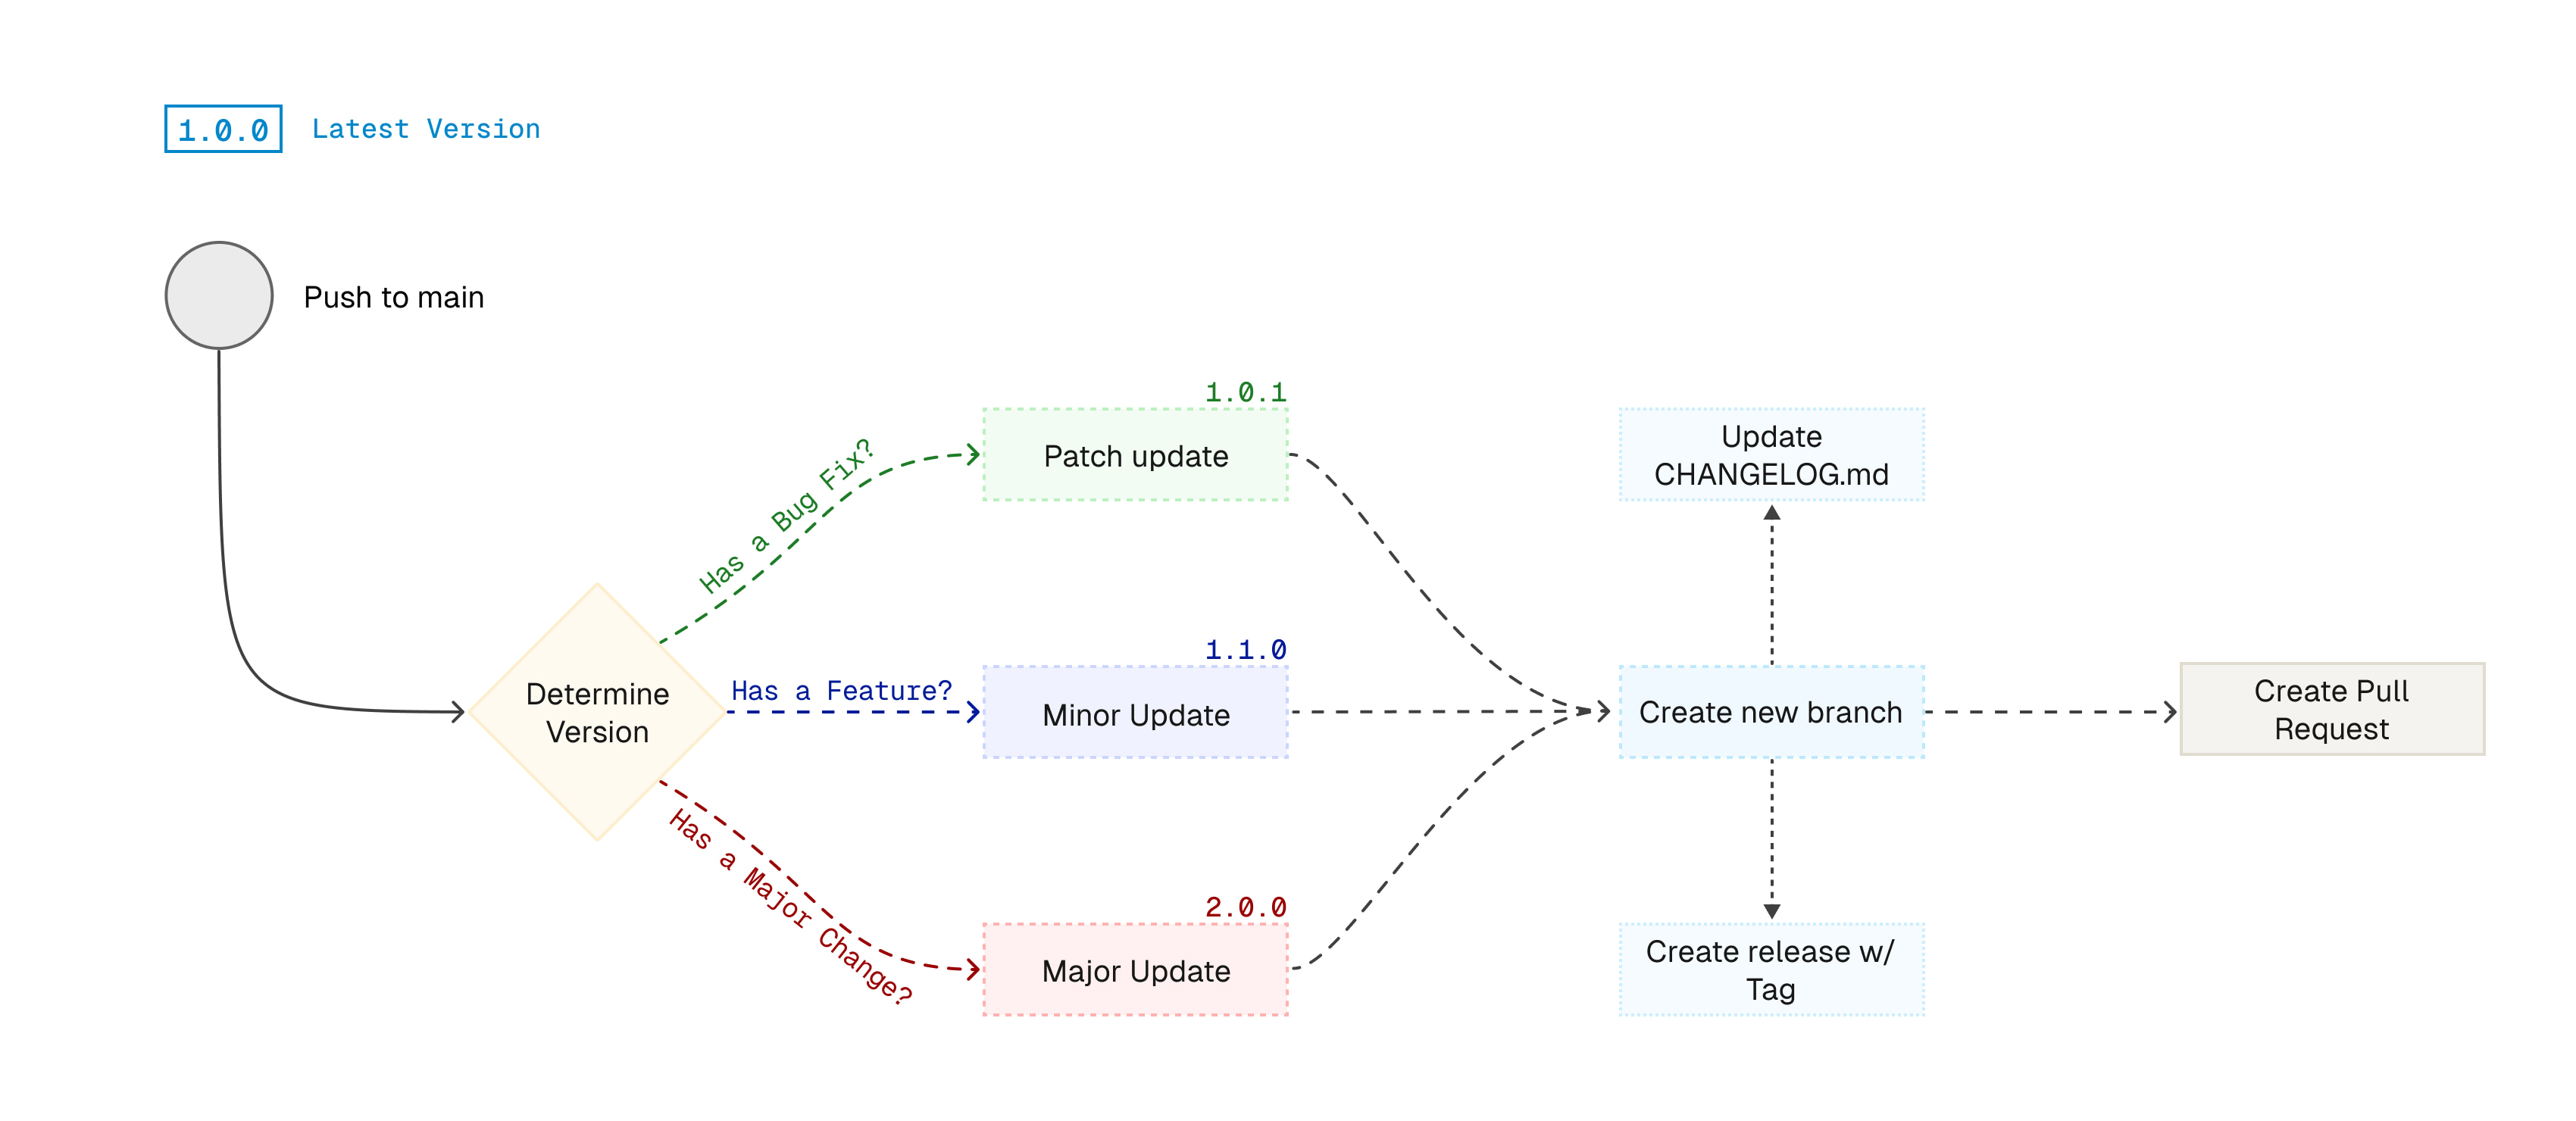
The changelog plays a crucial role as it documents all notable changes made to the project. release-please automatically updates the changelog with the information derived from the commit messages. The types of commits directly influence the changes in version numbers:
fix: commits lead to a patch version bump, for example, from1.0.0to1.0.1.feat: commits result in a minor version bump, such as from1.0.0to1.1.0.- Commits marked with a
!after the type or containingBREAKING CHANGE:in the footer prompt a major version bump, moving from1.0.0to2.0.0, for instance.
:::info
:bulb:
By default, the changelog primarily showcases fix and feat commits. However, other types of commits, like docs or style, are incorporated into the changelog only when there is a major version change.
:::
Testing Your Setup
After configuring your GitHub Actions workflow for automatic releases, it’s crucial to verify that everything functions correctly. Here’s a detailed guide to testing the automatic release process.
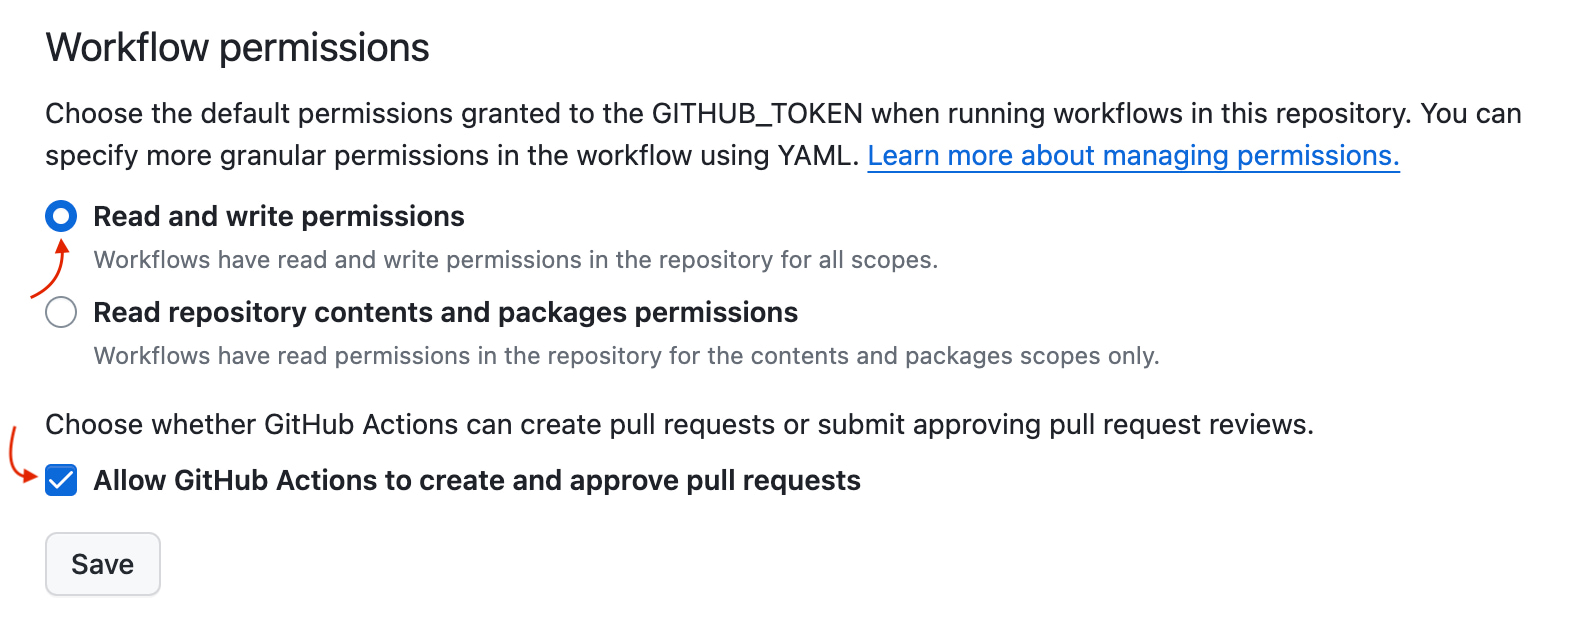
First, ensure your workflow permissions are correctly configured. In your GitHub repository, navigate to Settings → Actions → General and confirm that the necessary permissions are enabled.
To test the workflow, we’ll use the main branch for simplicity (usually, you’ll want to keep the main branch clean and use a dev or release branch). Start by making some changes to your codebase and creating a new commit. For instance:
git commit -am "fix: resolve memory leak in data processing module"This commit simulates a fix, which should trigger a patch version bump in the release process.
Next, push your changes to the remote repository:
git push origin mainAfter pushing the changes, navigate to the Actions tab in your repository. You should see that your workflow has been triggered and run successfully. If there’s an error, click on the workflow run to view the logs and identify what went wrong.
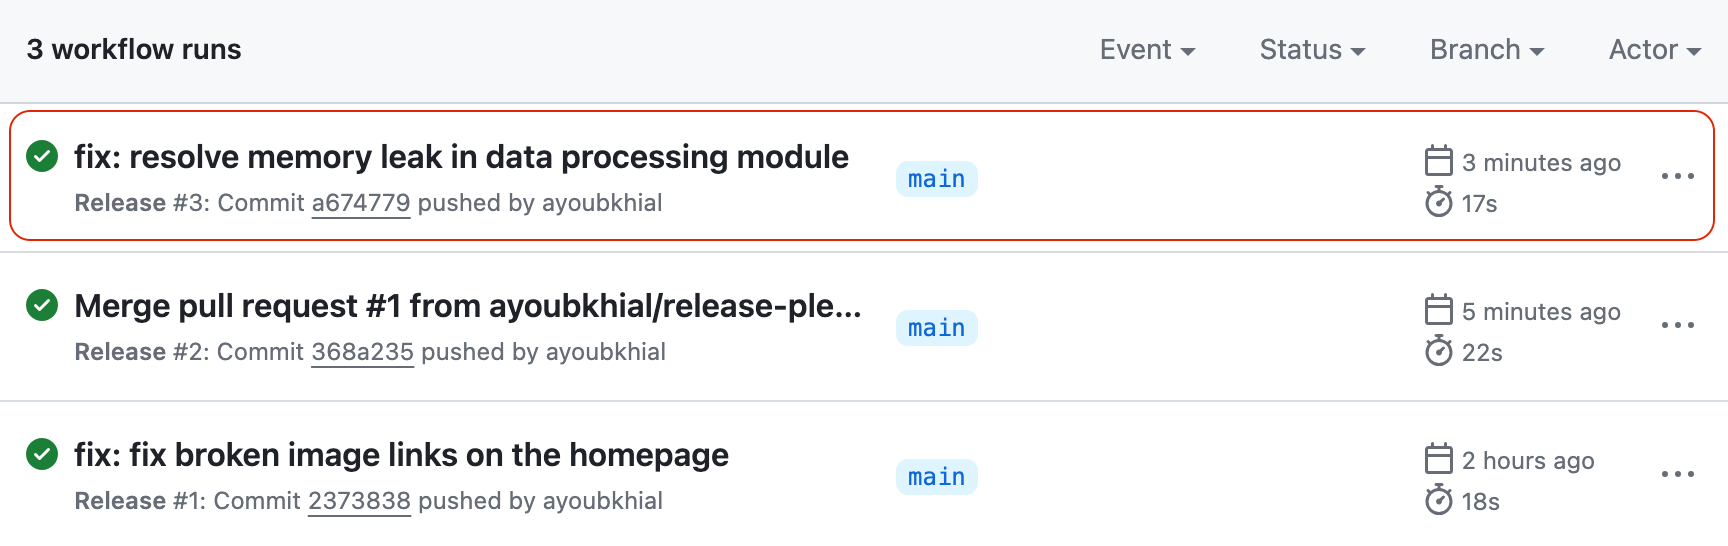
Once the workflow runs successfully, it performs several actions:
- Branch Creation: It creates a new branch with updated
package.jsonandCHANGELOG.mdfiles, reflecting the new version and changes. - Pull Request: It opens a pull request from the new branch to the main branch, proposing the changes for merging.
- Release and Tag: A new release is generated with a corresponding tag upon merging the pull request. The release includes the log of commits, similar to the
CHANGELOG.mdfile.
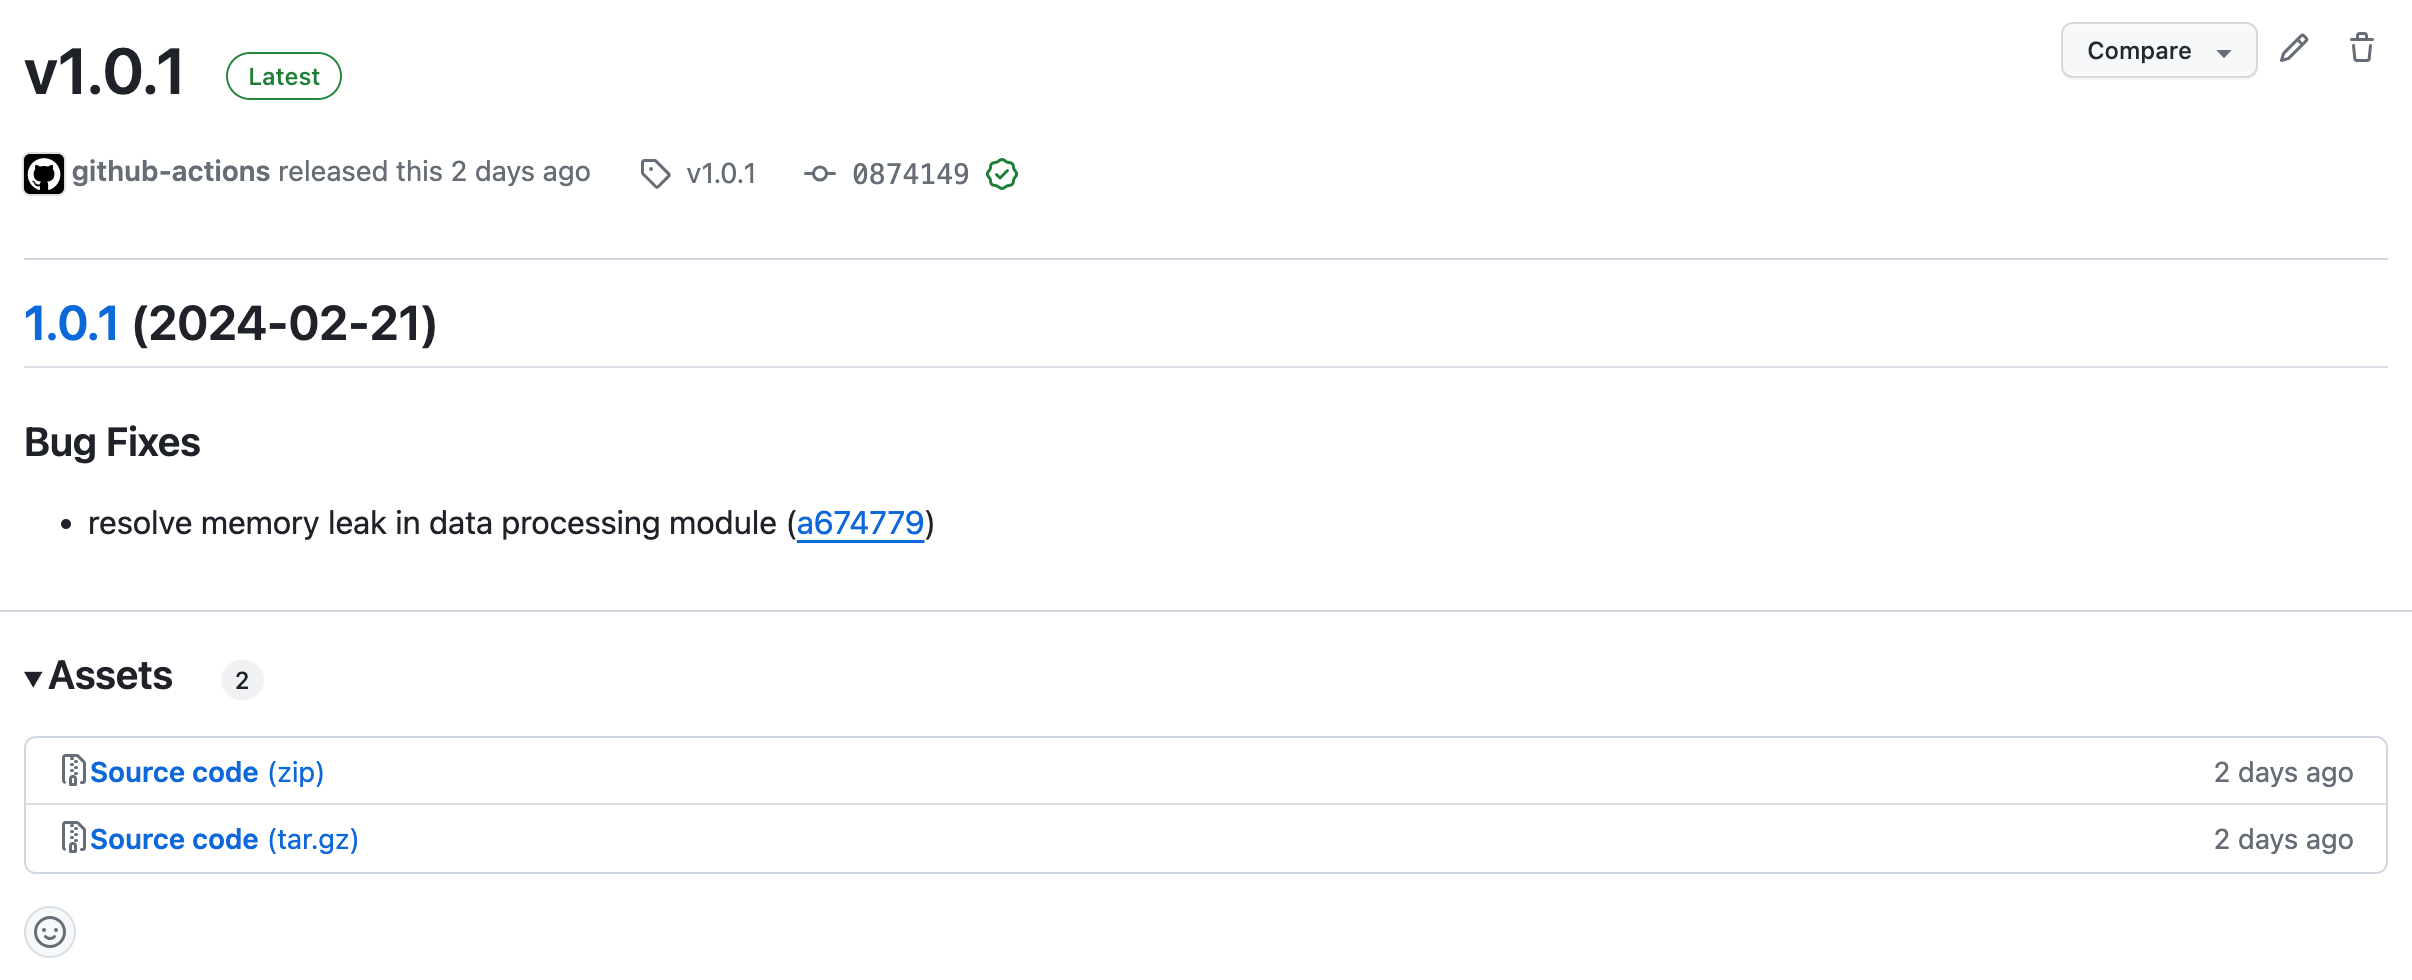
In this example, since the commit type was fix, the version in package.json should be bumped from 1.0.0 to 1.0.1 (a patch increment).
Merge the pull request through your repository’s interface. Once merged, a new release with the tag v1.0.1 will be created, containing the commit log for that version.
Conclusion
This article explored the power of automating releases on GitHub using conventional commits, Commitlint, Husky, and GitHub Actions. Adopting these tools and practices can streamline your release management process, ensuring consistency, clarity, and efficiency in your software development workflow.
The key points covered include:
- The importance of conventional commits for clear and standardized commit messages.
- How Commitlint and Husky enforce these commit message standards. The role of GitHub Actions in automating the release process, leveraging the release-please action for versioning and changelog generation.
- Testing your setup to ensure the smooth functioning of your automated release workflow.
The benefits of adopting automatic releases are significant. They reduce manual errors, save time, and provide a clear history of changes through well-maintained changelogs. Moreover, they facilitate collaboration among team members and contribute to best practices in release management.
Further Reading
Check out these resources to better understand the concepts and tools discussed in this article:
- Learn about Conventional Commits.
- Understand Semantic Versioning (SemVer).
- Explore Commitlint’s official documentation.
- Get to know Husky.
- What is CHANGELOG?
Scale Seamlessly with OpenReplay Cloud
Maximize front-end efficiency with OpenReplay Cloud: Session replay, performance monitoring and issue resolution, all with the simplicity of a cloud-based service.
Start with Cloud