Build a Cloud-based project management app with Next.js
Use several AWS services to build and run your app


Efficient project management holds immense importance in today’s business landscape for achieving successful outcomes. Project Management Application empowers users with comprehensive oversight. This article will show you how to build such a NextJS app by taking advantage of various AWS services for a full cloud-based implementation.
The following is the architecture of the project management solution we will build.

The application uses the following AWS services:
-
AWS S3: For storing and retrieving assets like images and files.
-
AWS DynamoDB: As the
NoSQLdatabase for efficient data storage and retrieval. -
AWS Lambda: To create serverless functions for data manipulation and business logic implementation.
-
AWS API Gateway: For managing
APIsand enabling seamless communication between frontend and backend components. -
AWS Amplify for web application hosting.
These AWS services provide scalable storage, serverless computing, efficient API management, and a powerful frontend framework, resulting in a robust web development experience.
To fully grasp the concepts presented in this tutorial, the following are required:
- An AWS account – Sign up.
- AWS Identity and Access Management user with console access
- Basic understanding of JavaScript
- A GitHub account
Purpose of the project management application.
The Project Management Application aims to streamline and enhance project management processes, providing users with an efficient tool to track and maintain projects from start to finish, with a good user experience. By leveraging AWS services like S3, Lambda, DynamoDB, API Gateway, and Next.js, the application offers a scalable solution that caters to the diverse needs of project managers and teams.
Project management involves systematically planning, organizing, and executing projects to achieve specific goals within defined constraints. Key points regarding the benefits of project management include:
- Provides clear direction, structure, and efficient execution of projects.
- Fosters effective communication and collaboration among stakeholders.
- Enables proactive risk management and issue resolution.
- Optimizes resource allocation, improving productivity and cost-effectiveness.
- Ensures successful project outcomes, delivering high-quality results within set parameters.
Our project management application offers the following key features and functionalities:
- Create: Users can create new projects, tasks, and milestones within the application.
- Read: Users can view and access project details, task statuses, and progress.
- Update: Users can update project information, task assignments, and milestone dates.
- Delete: Users can delete projects, tasks, and milestones when necessary.
- Comprehensive project tracking and management capabilities.
- Integration with AWS services like
DynamoDB,S3,Lambda, andAPI Gateway. - User-friendly interface for easy navigation and usage.
Role and workflow of the AWS tools we’ll use
This tutorial shows you how to create a serverless API that performs CRUD operations on AWS services such as DynamoDB, S3, Lambda functions, and API Gateway. The workflow for building this API involves the following steps:
API Gateway: Configure an HTTP API in API Gateway to serve as an entry for client requests to every API endpoint. Define every API route and method (GET, POST, PUT, DELETE) for the desired CRUD operations.
Lambda Function: Create AWS Lambda functions that implement the business logic for each CRUD operation. For example, a Lambda function can handle a POST request to create an item, a GET request to retrieve an item, a PUT request to update an item, and a DELETE request to remove an item.
DynamoDB: Utilize DynamoDB as the NoSQL database for storing and retrieving data. The Lambda functions interact with DynamoDB to perform the necessary CRUD operations. For instance, when creating an item, the Lambda function writes the data to a DynamoDB table, and when retrieving an item, the Lambda function fetches the data from the table.
S3: Storage for assets like images or files. S3 provides a scalable and durable object storage service for storing and retrieving these assets.
Following this tutorial, you will build a serverless API that effectively performs CRUD operations using DynamoDB, S3, Lambda functions, and API Gateway.
Steps to set up the development environment for the application.
Here are the steps to set up the development environment for the application:
-
Create a
DynamoDBTable: you begin by configuring aDynamoDBtable (Project and Client Table) with the necessary attributes and primary key. -
Set Up AWS
S3for Assets Storage: Create anS3bucket to store and manage assets like images or files. -
Create a
Lambda Function:Develop a function (Project and Client Lambda functions) to handleCRUDoperations on theDynamoDBtable. -
Create an
HTTP API:Use theAPIGateway Console to create anHTTP APIfor Project and Client with endpoints forCRUDoperations. -
Create Routes: Define routes in the
API Gatewayfor Project and Client to match your application’s functionality. -
Create an Integration: Connect the
API Gatewayfor Project and Client to theLambda functionthrough an integration. -
Attach Your Integration to Routes: Associate the integration with the appropriate routes for Project and Client in the
API Gateway. -
Test Your
API: Use testing tools like theAPI Gatewayor Postman to validate theAPI’sfunctionality.
In the following sections, we’ll review all the needed steps to build and deploy this app.
Session Replay for Developers
Uncover frustrations, understand bugs and fix slowdowns like never before with OpenReplay — an open-source session replay tool for developers. Self-host it in minutes, and have complete control over your customer data. Check our GitHub repo and join the thousands of developers in our community.
Create a DynamoDB table
To store data for your API, you will utilize a DynamoDB table. Each item in the table will have a unique ID, which will serve as the partition key.
To create the Project DynamoDB table, follow these steps:
- Go to https://console.aws.amazon.com/dynamodb/ to access the DynamoDB console.
- Select the option to create a table.
- Enter
http-project-management-itemsas the table name. - Set id as the partition key.
- Proceed to create the table.
Next, create the Client’s DynamoDB table by following the same steps above but change the table name to http-client-management-items.
By following these steps, you will create a DynamoDB table to store data for your API, ensuring efficient and effective data management.
Create S3 Bucket
Amazon Simple Storage Service (Amazon S3) is a highly scalable and cost-effective storage service provided by AWS. It offers low-latency access to store a virtually unlimited number of objects.
To create S3 Bucket, follow these steps:
- Go to https://console.aws.amazon.com/S3/ to access the
S3console. - Select the option to create a bucket
- Enter
http-project-management-items-bucketas the bucket name. - Choose the AWS region closest to you or where you would like your data to reside. In this case, it is [US-east-1]
- In Block Public Access settings for this bucket category, Uncheck the BLOCK ALL PUBLIC ACCESS -In the Bucket Versioning category, choose Disabled.
- Click on the Create Bucket.
Upon successfully creating the bucket, you will receive a confirmation message at the top of the page.

Set S3 bucket permissions
- Open the Amazon
S3console. - Select the bucket you want to set permissions for.
- Edit the
Bucket Policytab and paste the code below:
{
 "Version": "2012-10-17",
 "Statement": [
   {
     "Sid": "PublicReadWriteAccess",
     "Effect": "Allow",
     "Principal": "*",
     "Action": [
       "s3:PutObject",
       "s3:DeleteObject",
       "s3:GetObject",
       "s3:ListBucket"
     ],
     "Resource": [
       "arn:aws:s3:::http-project-management-items-bucket",
       "arn:aws:s3:::http-project-management-items-bucket/*"
     ]
   }
 ]
}- Click on the Save changes
Create Lambda functions for the back end
You will create Lambda functions for the API backend to handle CRUD operations for the Project and Client details DynamoDB. The functions use API Gateway events to interact with DynamoDB, determining the appropriate actions.
To create a Lambda function for the Project details, follow these steps:
-
Sign in to the Lambda console at https://console.aws.amazon.com/lambda.
-
Choose Create function.
-
Enter
http-project-management-lambda-functionas the function name. -
Under Permissions, select Change default execution role.
-
Choose Create a new role from AWS policy templates.
-
Enter
http-crud-tutorial-roleas the role name. -
Choose Simple microservice permissions,
-
Choose Create function.
-
Open the console’s code editor and replace the contents of
index.mjswith the provided code. -
Choose Deploy to update your function.
import { DynamoDBClient } from "@aws-sdk/client-dynamodb";
import {
 DynamoDBDocumentClient,
 PutCommand,
 UpdateCommand,
 GetCommand,
 DeleteCommand,
 ScanCommand,
} from "@aws-sdk/lib-dynamodb";

const dynamoDBClient = new DynamoDBClient({});
const client = new DynamoDBClient({});
const dynamoDBDocumentClient = DynamoDBDocumentClient.from(dynamoDBClient);
const dynamo = DynamoDBDocumentClient.from(client);
const tableName = "http-project-management-items";

export const handler = async (event, context) => {
 let body;
 let statusCode = 200;
 const headers = {
   "Content-Type": "application/json",
 };
 try {
   switch (event.routeKey) {
     case "PUT /items":
       if (!event.body) {
         throw new Error("Request body is missing.");
       }
       const requestJSON = JSON.parse(event.body);
       await dynamoDBDocumentClient.send(
         new PutCommand({
           TableName: tableName,
           Item: {
             id: requestJSON.id,
             projectName: requestJSON.projectName,
             projectStatus: requestJSON.projectStatus,
           },
         })
       );
       body = "Item added successfully";
       break;

     case "PUT /items/{id}":
       if (!event.body) {
         throw new Error("Request body is missing.");
       }
       const id = event.pathParameters.id;
       const updateRequestJSON = JSON.parse(event.body);

       await dynamoDBDocumentClient.send(
         new UpdateCommand({
           TableName: tableName,
           Key: { id },
           UpdateExpression:
             "SET projectName = :projectName, projectStatus = :projectStatus",
           ExpressionAttributeValues: {
             ":projectName": updateRequestJSON.projectName,
             ":id": updateRequestJSON.id,
             ":projectStatus": updateRequestJSON.projectStatus,
           },
         })
       );

       body = "Item updated successfully";
       break;
     case "GET /items":
       body = await dynamo.send(new ScanCommand({ TableName: tableName }));
       body = body.Items;
       break;

     case "GET /items/{id}":
       body = await dynamo.send(
         new GetCommand({
           TableName: tableName,
           Key: {
             id: event.pathParameters.id,
           },
         })
       );
       body = body.Item;
       break;
     case "DELETE /items/{id}":
       await dynamo.send(
         new DeleteCommand({
           TableName: tableName,
           Key: {
             id: event.pathParameters.id,
           },
         })
       );
       body = `Deleted item ${event.pathParameters.id}`;
       break;
     default:
       throw new Error(`Unsupported route: "${event.routeKey}"`);
   }
 } catch (err) {
   statusCode = 400;
   body = err.message;
 } finally {
   if (typeof body !== "string") {
     body = JSON.stringify(body);
   }
 }
 return {
   statusCode,
   body,
   headers,
 };
};
Next, create a Lambda function for the Client’s details by following the same steps above but change the function name to http-client-management-lambda-function and use the Client’s table name you created above. Also, write the CRUD logic for PUT /clients, GET /clients, PUT /clients/{id}, and DELETE /clients/{id}.
Create an HTTP API
To create an HTTP API, follow these steps:
- Sign in to the
API Gatewayconsole at https://console.aws.amazon.com/apigateway. - Choose Create
APIand select Build forHTTP API. - Enter
http-project-management-apias theAPIname. - Proceed to the next step without configuring routes.
- Review the automatically created stage by
API Gatewayand proceed to the next step. - Choose
Createto create theHTTP API.
Next, create an HTTP API for the Client details by following the same steps above but change the API name to http-client-management-api
Create routes
To create routes for your API, follow these steps:
- Sign in to the
API Gatewayconsole at https://console.aws.amazon.com/apigateway. - Select your
APIfrom the available options. - Navigate to the Routes section.
- Choose Create to add a new route.
- For the method, select
GET. - Enter
/items/{id}as the path. The{id}is a path parameterAPIGateway extracts from the request path. - Click Create to create the route.
- Repeat steps 4-7 for the routes:
GET /items,DELETE /items/{id},andPUT /items.
Next, Follow the same steps to create routes for the Client’s API.

Create integrations for your API
To create integrations for your API routes, follow these steps:
- Sign in to the
API Gatewayconsole at https://console.aws.amazon.com/apigateway. - Select your
APIfrom the available options. - Go to the
Integrationssection. - Choose Manage integrations and Create to create a new integration.
- Skip the step to attach the integration to a route for now. You will complete that in a later step.
- For the integration type, select
Lambda function. - Enter
http-project-management-lambda-functionas the Lambda function. Click Create to create the integration.
Next, Follow the same steps to create Integrations for the Client’s API, but remember to use the correct function name you created earlier.
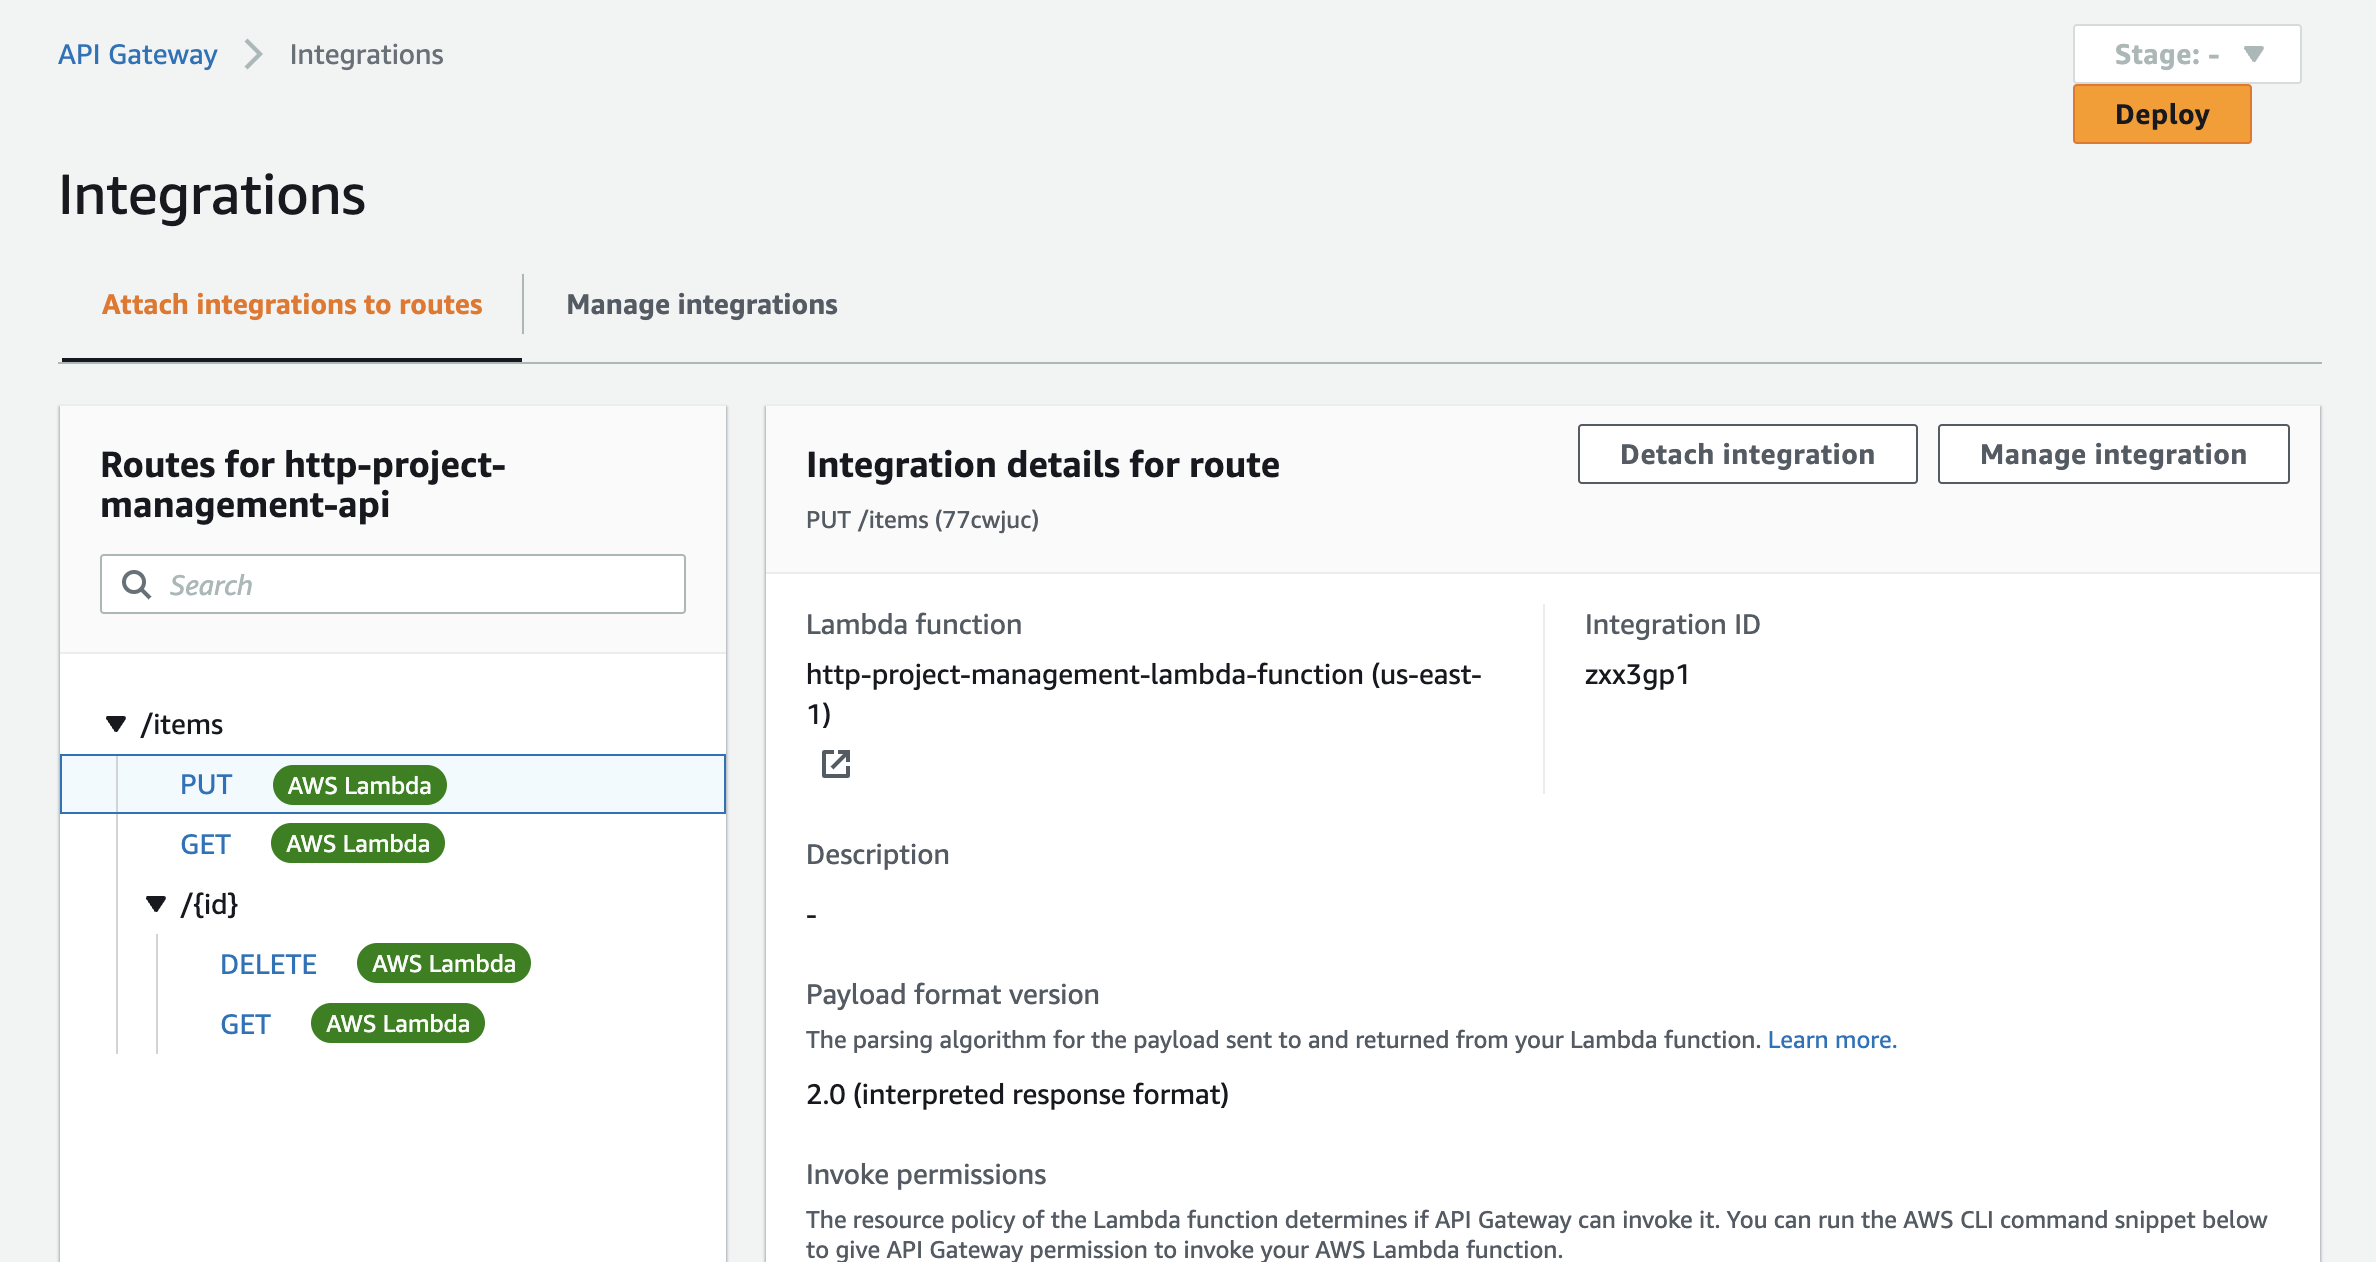
Attach your integration to routes
To attach integrations to your API routes, follow these steps:
- Sign in to the
API Gatewayconsole at https://console.aws.amazon.com/apigateway. - Select your
APIfrom the available options. - Go to the Integrations section.
- Choose a specific route you want to attach an integration to.
- Under Choose an existing integration, select
http-project-management-lambda-function. - Click Attach integration to link the integration to the route.
- Repeat steps 4-6 for all your `API routes.
- Verify that all routes indicate an attached
AWS Lambdaintegration.
Next, Follow the same steps to attach Integrations for the Client’s API, but remember to use the correct function name you created earlier.
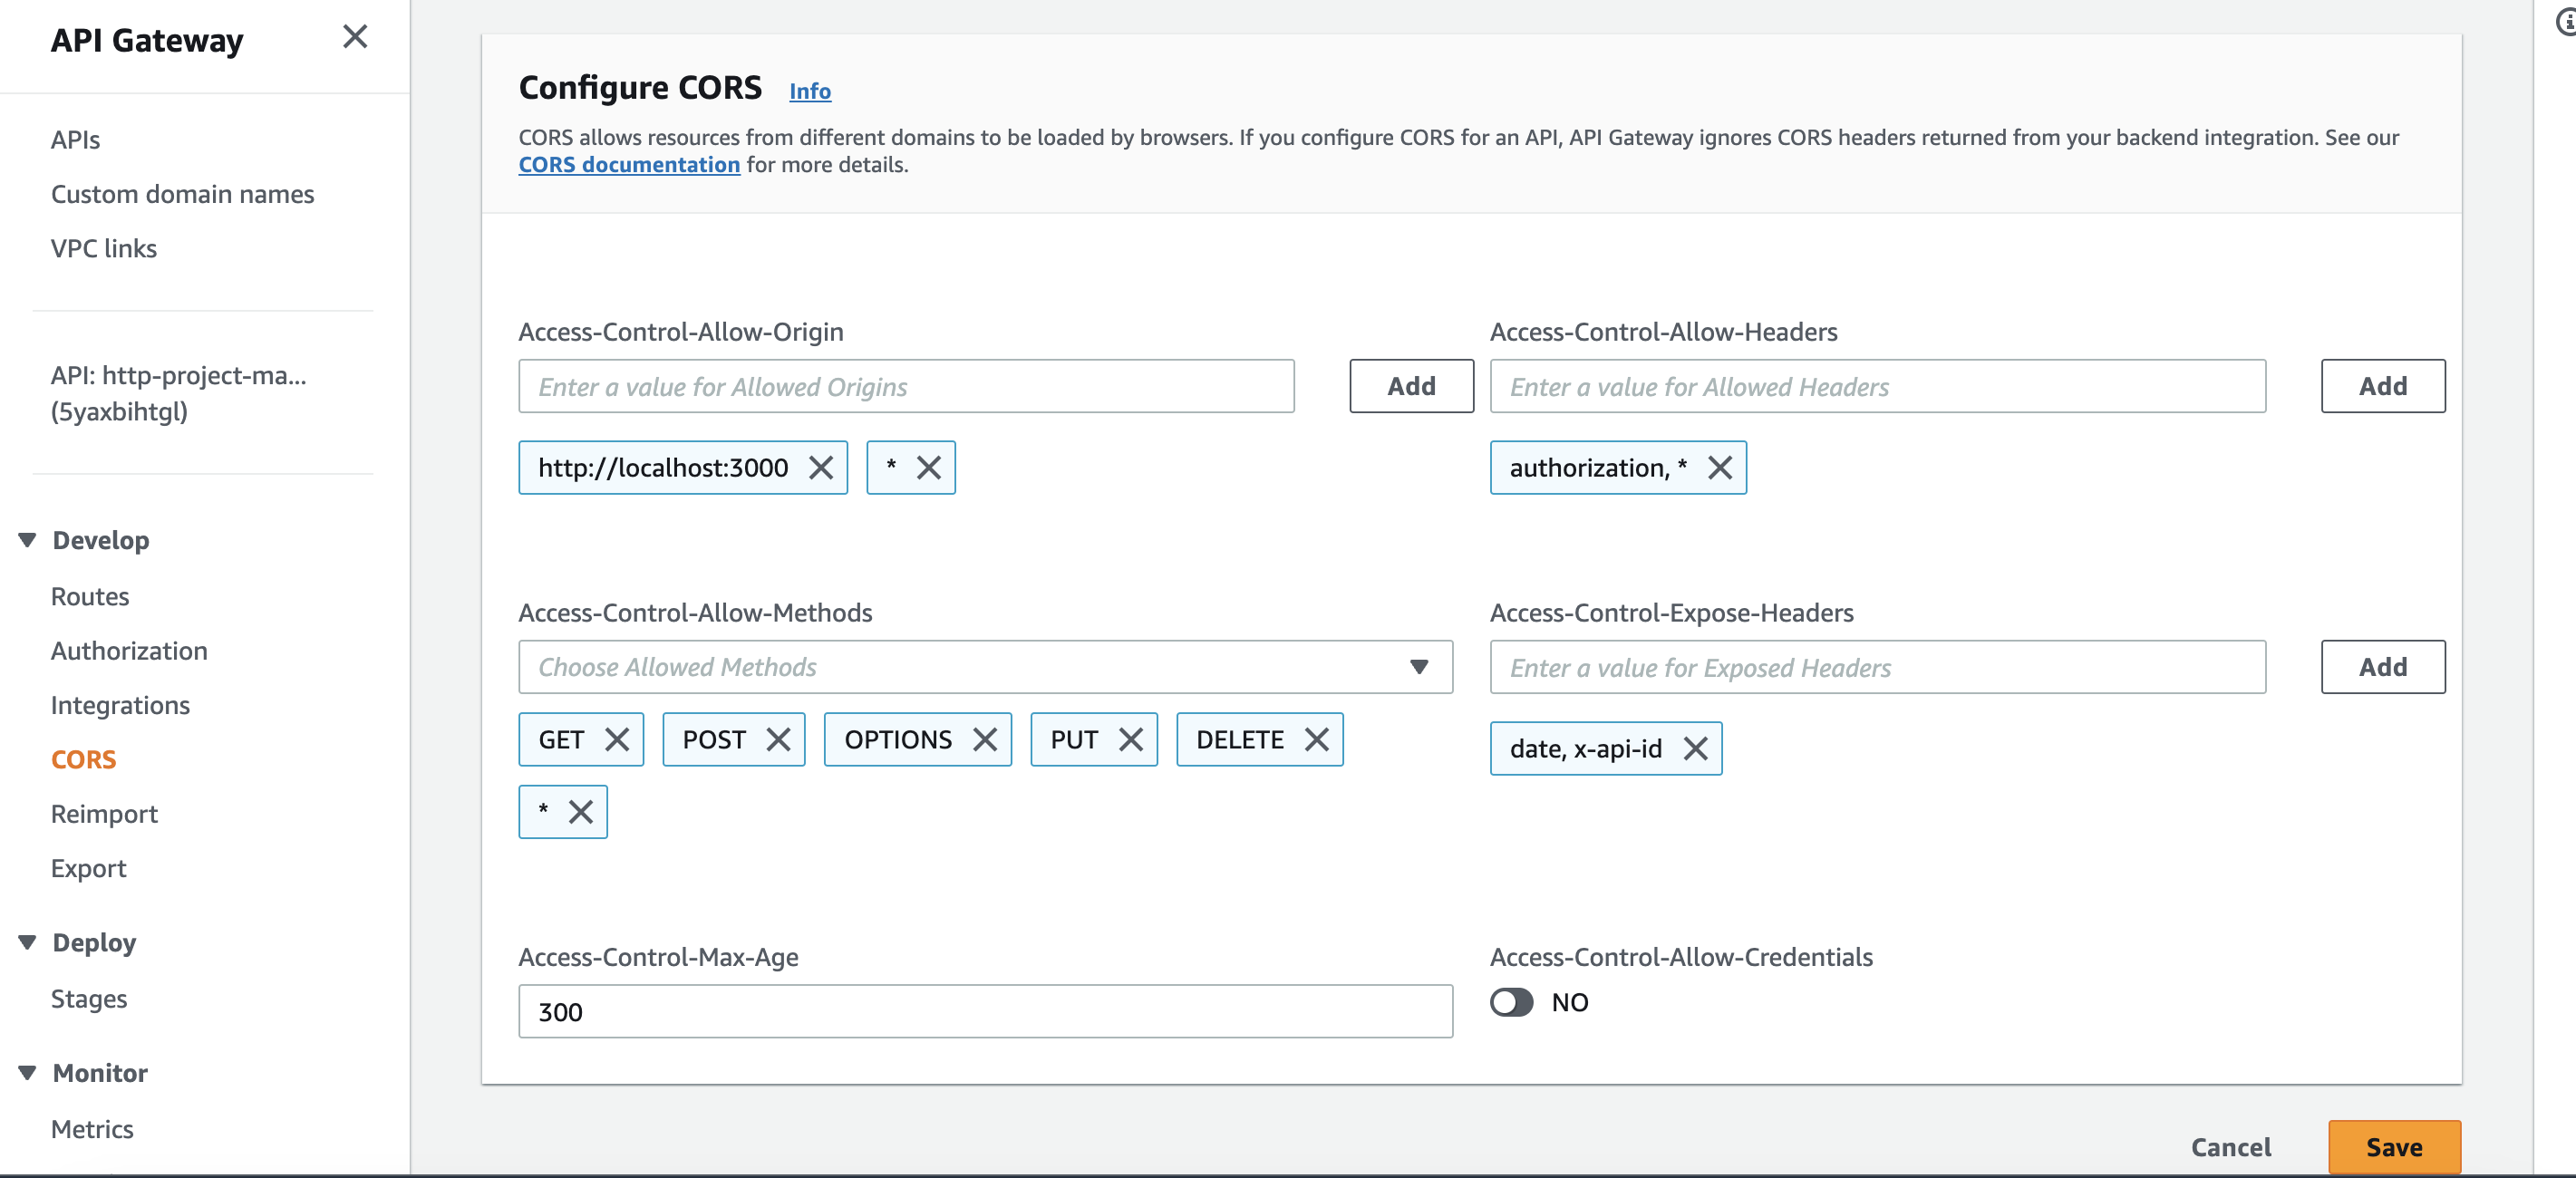
Deal with Cross-Origin Resource Sharing (CORS)
CORS allows resources from different domains to be loaded by browsers.
To configure CORS, follow these steps:
- Sign in to the
API Gatewayconsole at https://console.aws.amazon.com/apigateway. - Select your
APIfrom the available options. - Go to the
CORSsection. - Specify the following parameters in a
CORSconfiguration:
Access-Control-Allow-Origin: *, http://localhost:3000
Access-Control-Allow-Headers: Authorization, *
Access-Control-Allow-Methods: GET, POST, DELETE, PUT, *
Access-Control-Expose-Headers: Date, x-api-id
Access-Control-Max-Age: 300- Click Save to configure your
CORS.
Test your API
To ensure the functionality of your API, you can use the following steps:
-
Sign in to the API Gateway console at https://console.aws.amazon.com/apigateway.
-
Select your
APIfrom the available options. -
Note your API’s invoke URL, which can be found under
Invoke URLon the Details page. -
Copy the entire invoke URL, such as https://abcdef123.execute-api.us-east-2.amazonaws.com.
To create or update an item: Execute the following command to create or update an item. The command includes a request body that contains the item's ID, project name, client name, gender, client image, and project status.
curl --location --request PUT 'https://xxxxx.execute-api.us-east-1.amazonaws.com/items' \
--header 'Content-Type: application/json' \
--data '{
    "id": "1",
    "projectName": "Project one",
    "clientName": "Dami",
    "gender": "male",
    "ClientImage": "base_64_image",
    "projectStatus": "Pending"
}'
To get all items:
Use the following command to list all items.
curl --location 'https://xxxxx.execute-api.us-east-1.amazonaws.com/items' \
--data ''
To delete an item Use the following command to list all items.
curl --location --request DELETE 'https://xxxxx.execute-api.us-east-1.amazonaws.com/items/1' \
--data ''
Building the Application Frontend
To build the Application Frontend, we’ll use the NextJS framework; follow these steps:
- Navigate to the desired directory in your terminal.
- Run the following command to create a NextJS project:
npx create-next-app project-mgt-app && cd project-mgt-appThe command creates a project called project-mgt-app and navigates into the project directory.
Installing dependencies
React-icon is a powerful library that enables you to effortlessly incorporate icons from various icon libraries into your React application. To use it, run the command below in your terminal.
npm i react-iconsUtility Directory
Create a folder named ’ util ’ in the src/app directory. This directory will contain the functions to add client Projects and Client detail.
Adding and editing client functions
In the src/app/util directory, create the file src/app/util/Add&editClientfunctions.js and add the following code:
export const handleClientSubmit = async ({
 event,
 setFormData,
 formData,
 setAdd,
 attachment,
 router,
}) => {
 event.preventDefault();
 // ...

 fetch("/addclient", requestOptions)
   .then((response) => response.text())
   .then((result) => {
     setAdd(false);
     // ...
   })
   .catch((error) => console.log("error", error));
};

export const handleClientEdit = async ({
 event,
 setFormData,
 formData,
 setAdd,
 attachment,
 router,
 searchParams,
}) => {
 event.preventDefault();

 // ...

 fetch(`/editclient/${searchParams.get("cid")}`, requestOptions)
   .then((response) => response.text())
   .then((result) => {
     setAdd(false);
     // ...
   })
   .catch((error) => console.log("error", error));
};
This code above consists of two functions, handleClientSubmit and handleClientEdit. Client submission is handled by handleClientSubmit, and client editing is handled by handleClientEdit.
Adding and editing Project functions
In the src/app/util directory, create the file src/app/util/Add&editProjectfunction.js and add the following code:
export const handleProjectSubmit = async ({
 event,
 formData,
 setFormData,
 setAdd,
 router,
}) => {
 event.preventDefault();
 // ...

 fetch("/additem", requestOptions)
   .then((response) => response.text())
   .then((result) => {
     setAdd(false);
     // ...
   })
   .catch((error) => console.log("error", error));
};

export const handleProjectEdit = async ({
 event,
 formData,
 setFormData,
 router,
 setEdit,
}) => {
 event.preventDefault();
 // ...

 fetch(`/editproject`, requestOptions)
   .then((response) => response.text())
   .then((result) => {
     // ...
   })
   .catch((error) => console.log("error", error));
};
This code above consists of two functions, handleProjectSubmit and handleProjectEdit. Client submission is handled by handleProjectSubmit, and client editing is handled by handleProjectEdit.
Components Directory
Create a folder named ’ components ’ in the src/app directory. The directory will contain all the reusable components for the projects.
Form Component
In the src/app/Forms directory, create the file src/app/Forms/ClientForm.js and add the following code:
     {/* ... */}

     <form
       className="max-w-lg mx-auto"
       onSubmit={searchParams.get("q") ? handleEdit : handleSubmit}
     >
       <div className="grid grid-cols-1 gap-6 mt-4 sm:grid-cols-2">
         <div>
           <label
             htmlFor="emailAddress"
             className="text-gray-700 dark:text-gray-200"
           >
             Client Name
           </label>
           <input
             required
             id="clientName"
             type="text"
             name="clientName"
             value={formData.clientName}
             onChange={handleChange}
             className="block w-full px-4 py-2 mt-2 text-gray-700 bg-white border border-gray-200
                   rounded-md dark:bg-gray-800 "
           />
         </div>
         <div>
           <label
             htmlFor="clientimage"
             className="text-gray-700 dark:text-gray-200"
           >
             Client Logo
           </label>
           <input
             required
             id="clientimage"
             type="file"
             accept="image/*"
             name="clientImage"
             onChange={(e) => {
               convertToBase64(e.target.files[0]);
             }}
             className="block w-full px-4 py-2 mt-2 text-gray-700 bg-white border border-gray-200"
           />
         </div>

         <div className="mb-4">
           <label
             htmlFor="gender"
             className="block mb-2 text-gray-700 dark:text-gray-200"
           >
             Client Gender:
           </label>
           <div className="flex flex-wrap items-center">
             <label
               htmlFor="male"
               className="text-gray-700 dark:text-gray-200 mr-4 mb-2 sm:mb-0 sm:flex-grow"
             >
               <input
                 type="checkbox"
                 id="male"
                 name="gender"
                 value="male"
                 checked={formData.gender.includes("male")}
                 onChange={handleChange}
                 className="mr-2 text-blue-500"
               />{" "}
               Male
             </label>
             <label
               htmlFor="female"
               className="text-gray-700 dark:text-gray-200 sm:flex-grow"
             >
               <input
                 type="checkbox"
                 id="female"
                 name="gender"
                 value="female"
                 checked={formData.gender.includes("female")}
                 onChange={handleChange}
                 className="mr-2 text-blue-500"
               />{" "}
               Female
             </label>
           </div>
         </div>
         <div>
           <label
             htmlFor="clientId"
             className="text-gray-700 dark:text-gray-200"
           >
             Client ID
           </label>
           <input
             required
             id="clientId"
             type="number"
             name="clientId"
             value={
               searchParams.get("q")
                 ? Number(searchParams.get("cid"))
                 : formData.clientId
             }
             onChange={handleChange}
             className="block w-full px-4 py-2 mt-2 text-gray-700 bg-white border border-gray-200
                   rounded-md dark:bg-gray-800 "
           />
         </div>
       </div>
       <div className="flex justify-end mt-6">
         <button
           type="submit"
           className="flex items-center justify-center px-4 py-2 bg-blue-200 text-blue-800
                 rounded-md hover:bg-blue-300 focus:outline-none focus:bg-blue-300"
         >
           {searchParams.get("q")
             ? `${Edit ? "loading..." : "Update"}`
             : `${Add ? "loading..." : "Save"}`}
         </button>
       </div>
     </form>

     {/* ... */}
The code above is a component (ClientForm) that renders a form for adding or editing client information. It includes input fields for client name, logo, gender, and client ID and handles form submission using handleSubmit or handleEdit functions based on query parameters. It also displays a back button and loading state during the submit action.
Next, In the src/app/Forms directory, create the file src/app/Forms/ProjectForm.js and add the following code:
{/* /...  */}
     <form
       className="max-w-lg mx-auto"
       onSubmit={localStorage.getItem("id") ? handleEdit : handleSubmit}
     >
       <div className="grid grid-cols-1 gap-6 mt-4 sm:grid-cols-2">
         <div>
           <label
             htmlFor="username"
             className="text-gray-700 dark:text-gray-200"
           >
             Project Name
           </label>
           <input
             required
             id="username"
             type="text"
             name="projectName"
             value={formData?.projectName}
             onChange={handleChange}
             className="block w-full px-4 py-2 mt-2 text-gray-700 bg-white border border-gray-200 rounded-md dark:bg-gray-800 "
           />
         </div>

         <div className="mb-4">
           <label
             htmlFor="projectStatus"
             className="block mb-2 text-gray-700 dark:text-gray-200"
           >
             Project Status:
           </label>
           <div className="flex flex-wrap items-center">
             <label
               htmlFor="pending"
               className="text-gray-700 dark:text-gray-200 mr-4 mb-2 sm:mb-0 sm:flex-grow"
             >
               <input
                 type="checkbox"
                 id="pending"
                 name="projectStatus"
                 value="pending"
                 checked={formData.projectStatus.includes("pending")}
                 onChange={handleChange}
                 className="mr-2 text-blue-500"
               />
               Pending
             </label>
             <label
               htmlFor="active"
               className="text-gray-700 dark:text-gray-200 mr-4 mb-2 sm:mb-0 sm:flex-grow"
             >
               <input
                 type="checkbox"
                 id="active"
                 name="projectStatus"
                 value="active"
                 checked={formData.projectStatus.includes("active")}
                 onChange={handleChange}
                 className="mr-2 text-blue-500"
               />
               Active
             </label>
             <label
               htmlFor="completed"
               className="text-gray-700 dark:text-gray-200 sm:flex-grow"
             >
               <input
                 type="checkbox"
                 id="completed"
                 name="projectStatus"
                 value="completed"
                 checked={formData.projectStatus.includes("completed")}
                 onChange={handleChange}
                 className="mr-2 text-gray-700 dark:text-gray-200"
               />
               Completed
             </label>
           </div>
         </div>
         <div>
           <label
             htmlFor="projectid"
             className="text-gray-700 dark:text-gray-200"
           >
             Project ID
           </label>
           <input
             required
             id="projectid"
             type="number"
             name="projectId"
             value={
               localStorage.getItem("id") ? Number(id_) : formData.projectId
             }
             onChange={handleChange}
             className="block w-full px-4 py-2 mt-2 text-gray-700 bg-white border border-gray-200 rounded-md dark:bg-gray-800 "
           />
         </div>
       </div>
       <div className="flex justify-end mt-6">
         <button
           type="submit"
           className="flex items-center justify-center px-4 py-2 bg-blue-200 text-blue-800 rounded-md hover:bg-blue-300 focus:outline-none focus:bg-blue-300"
         >
           {localStorage.getItem("id")
             ? `${Edit ? "loading..." : "Update"}`
             : `${Add ? "loading..." : "Save"}`}
         </button>
       </div>
     </form>

     {/* /...  */}
The code above is a component (ProjectForm) that renders a form for adding or editing project information. It includes input fields for project name, status, and ID and handles form submission using handleSubmit or handleEdit functions based on the presence of a value in local storage.
Table Component
In the src/app directory, create the file src/app/components/Tables/TableBody.js and add the following code:
function TableBody({ data, handleDelete }) {
 return (
   <tbody className="bg-white divide-y divide-gray-200 dark:divide-gray-700 dark:bg-gray-900">
     {data?.map((item, id) => {
       return (
         <tr className="hover:bg-[#97D8C4]  hover:bg-blue-50 " key={id}>
           <td className="px-4 py-4 text-sm text-gray-500 dark:text-gray-300 whitespace-nowrap">
             {Number(item?.id)}
           </td>
           <td className="px-4 py-4 text-sm text-gray-500 dark:text-gray-300 whitespace-nowrap">
             {item?.projectName}
           </td>
           <td className="px-4 py-4 text-sm font-medium text-gray-700 whitespace-nowrap">
             <div className="flex items-center gap-x-2">
               <div>
                 <h2 className="font-medium text-gray-800 dark:text-white ">
                   {item?.clientName}
                 </h2>
                 <p className="text-sm font-normal text-gray-600 dark:text-gray-400">
                   @{item?.clientName?.replace(/\s/g, "")?.toLowerCase()}
                 </p>
               </div>
             </div>
           </td>
           <td className="px-4 py-4 text-sm font-medium text-gray-700 whitespace-nowrap">
             <div
               className={`inline-flex items-center px-3 py-1 rounded-full gap-x-2 ${
                 item.projectStatus === "Completed" ||
                 item.projectStatus === "completed"
                   ? "bg-emerald-100/60 dark:bg-gray-800"
                   : item.projectStatus === "Active" ||
                     item.projectStatus === "active"
                   ? "dark:bg-gray-800 bg-blue-100/60"
                   : "dark:bg-gray-800 bg-pink-100/60"
               }`}
             >
               <span
                 className={`h-1.5 w-1.5 rounded-full ${
                   item.projectStatus === "Completed" ||
                   item.projectStatus === "completed"
                     ? "bg-emerald-500"
                     : item.projectStatus === "Active" ||
                       item.projectStatus === "active"
                     ? "bg-blue-500 "
                     : " bg-pink-500 "
                 }  `}
               ></span>

               <h2
                 className={`text-sm font-normal ${
                   item.projectStatus === "Completed" ||
                   item.projectStatus === "completed"
                     ? "text-emerald-500"
                     : item.projectStatus === "Active" ||
                       item.projectStatus === "active"
                     ? "text-blue-500"
                     : "text-pink-500"
                 }`}
               >
                 {item?.projectStatus?.charAt(0)?.toUpperCase() +
                   item?.projectStatus?.slice(1)}
               </h2>
             </div>
           </td>

           <td className="px-4 py-4 text-sm text-gray-500 dark:text-gray-300 whitespace-nowrap">
             {item?.gender?.charAt(0)?.toUpperCase() + item?.gender?.slice(1)}
           </td>

           <td className="px-4 py-4 text-sm font-medium text-gray-700 whitespace-nowrap">
             <img
               className="object-cover w-10 h-10 rounded-full"
               src={`https://http-project-management-items-bucket.s3.amazonaws.com/${item?.ClientImage}`}
               alt=""
             />
           </td>

           <td className="px-4 py-4 text-sm whitespace-nowrap">
             <div className="flex items-center gap-x-6">
               <Link
                 href={{
                   pathname: "/newclient",
                   query: { q: `${item?.id}`, cid: `${item?.client_id}` },
                 }}
                 className="text-gray-500 transition-colors duration-200 dark:hover:text-yellow-500 dark:text-gray-300 hover:text-yellow-500 focus:outline-none"
               >
                 <LuEdit className="text-blue-700" />
               </Link>

               <button
                 onClick={() => handleDelete(item)}
                 className="text-gray-500 transition-colors duration-200 dark:hover:text-red-500 dark:text-gray-300 hover:text-red-500 focus:outline-none"
               >
                 <RiDeleteBin5Line className="text-blue-700" />
               </button>
             </div>
           </td>
         </tr>
       );
     })}
   </tbody>
 );
}
export default TableBody;
The code above is a TableBody component that renders a table’s body section. It receives data and a handleDelete function as props and maps over the data array to generate table rows with specific information. It includes editing and deleting buttons for each row.
Next, In the src/app directory, create the file src/app/components/Tables/TableComponent.js and add the following code:
import React from "react";
import TableBody from "./TableBody";

function TableComponent({ data, handleDelete }) {
 return (
   <div className="flex flex-col mt-6">
     <table className="min-w-full divide-y divide-gray-200 dark:divide-gray-700">
       <thead className="bg-gray-50 dark:bg-gray-800">
         <tr>
           <th
             scope="col"
             className="py-3.5 px-4 text-sm font-normal text-left rtl:text-right text-gray-500 "
           >
             <div className="flex items-center gap-x-3">
               <span>ID</span>
             </div>
           </th>

           <th
             scope="col"
             className="px-4 py-3.5 text-sm font-normal text-left rtl:text-right text-gray-500 "
           >
             Project Name
           </th>

           <th
             scope="col"
             className="py-3.5 px-4 text-sm font-normal text-left rtl:text-right text-gray-500 "
           >
             <div className="flex items-center gap-x-3">
               <span>Client Name</span>
             </div>
           </th>

           <th
             scope="col"
             className="px-6 py-3.5 text-sm font-normal text-left rtl:text-right text-gray-500 "
           >
             <button className="flex items-center gap-x-2">
               <span>Project Status</span>
             </button>
           </th>

           <th
             scope="col"
             className="px-4 py-3.5 text-sm font-normal text-left rtl:text-right text-gray-500 "
           >
             Gender
           </th>

           <th
             scope="col"
             className="py-3.5 px-4 text-sm font-normal text-left rtl:text-right text-gray-500 "
           >
             <div className="flex items-center gap-x-3">
               <span>Client Logo</span>
             </div>
           </th>

           <th scope="col" className="relative py-3.5 px-4">
             <span className="sr-only">Edit</span>
           </th>
         </tr>
       </thead>
       <TableBody data={data} handleDelete={handleDelete} />
     </table>
   </div>
 );
}

export default TableComponent;
The code above is a TableComponent that renders a table with a header and body section. It receives data and a handleDelete function as props. The table header includes columns for ID, Project Name, Client Name, Project Status, Gender, Client Logo, and an empty column for editing. The body section is rendered using the TableBody component, passing the data and handleDelete props.
Next, In the src/app directory, create the file src/app/components/Tables/Index.jsx and add the following code:
"use client";
import { RiAddLine } from "react-icons/ri";
import { useRouter } from "next/navigation";
import TableComponent from "./TableComponent";

function Table({ data }) {
 const router = useRouter();

 const handleClick = (e) => {
   e.preventDefault();
   router.push("/newclient");
 };
 const handleDelete = async (data) => {
   try {
     const requestOptions = {
       method: "DELETE",
       redirect: "follow",
     };

     const deleteProjectPromise = fetch(
       `/deleteproject/${data?.id}`,
       requestOptions
     );
     const deleteClientPromise = fetch(
       `/deleteclient/${data?.client_id}`,
       requestOptions
     );
     await Promise.all([deleteProjectPromise, deleteClientPromise]);

     window.location.reload();
   } catch (error) {
     console.log("error", error);
   }
 };

 return (
   <div>
     <section className="container px-4 mx-auto  ">
       <div className="flex justify-between items-center ">
         <div className="flex items-center gap-x-3">
           <h2 className="text-lg font-medium text-gray-800 dark:text-white">
             Total projects
           </h2>

           <span className="px-3 py-1 text-xs text-blue-600 bg-blue-100 rounded-full dark:bg-gray-800 dark:text-blue-400">
             {data?.length}
           </span>
         </div>

         <div>
           <button
             onClick={handleClick}
             className="flex items-center justify-center px-4 py-2 bg-blue-200 text-blue-800
             rounded-md hover:bg-blue-300 focus:outline-none focus:bg-blue-300"
           >
             <RiAddLine className="mr-2" />
             New Project
           </button>
         </div>
       </div>

       <TableComponent handleDelete={handleDelete} data={data} />
     </section>
   </div>
 );
}

export default Table;
The Table component renders a table section with project data. It provides functionality to add new projects and delete existing ones. It also causes the TableComponent component to pass the handleDelete function and the data array as props.
Add a project
In the src/app directory, create a folder named newproject. The folder will contain the page to add a new project.
In the src/app/addproject directory, create the file src/app/addproject/page.js and add the following code:
"use client";
import React, { useState } from "react";
import { useSearchParams } from "next/navigation";
import { useRouter } from "next/navigation";
import ProjectForm from "../../components/Forms/ProjectForm";
import {
handleProjectSubmit,
handleProjectEdit,
} from "../../util/Add&editProjectfunction";
function Index() {
const router = useRouter();
const searchParams = useSearchParams();
const [attachment, setattachment] = useState("");
const [add, setAdd] = useState(false);
const [edit, setEdit] = useState(false);
const [file, setfile] = useState("");
const [formData, setFormData] = useState({
projectName: "",
projectStatus: [],
projectId: 0,
});
const handleChange = (event) => {
const { name, value, type, checked } = event.target;
if (type === "checkbox") {
const updatedValues = [...formData[name]];
if (checked) {
updatedValues.push(value);
} else {
const index = updatedValues.indexOf(value);
if (index > -1) {
updatedValues.splice(index, 1);
}
}
setFormData((prevData) => ({ ...prevData, [name]: updatedValues }));
} else if (type === "file") {
const file = event.target.files[0];
setFormData((prevData) => ({ ...prevData, [name]: file }));
} else {
setFormData((prevData) => ({ ...prevData, [name]: value }));
}
};
const convert_to_base64 = async (file) => {
setfile(file);
const file_reader = new FileReader();
file_reader.readAsDataURL(file);
file_reader.onload = () => {
setattachment(file_reader?.result?.split(",")[1]);
};
};
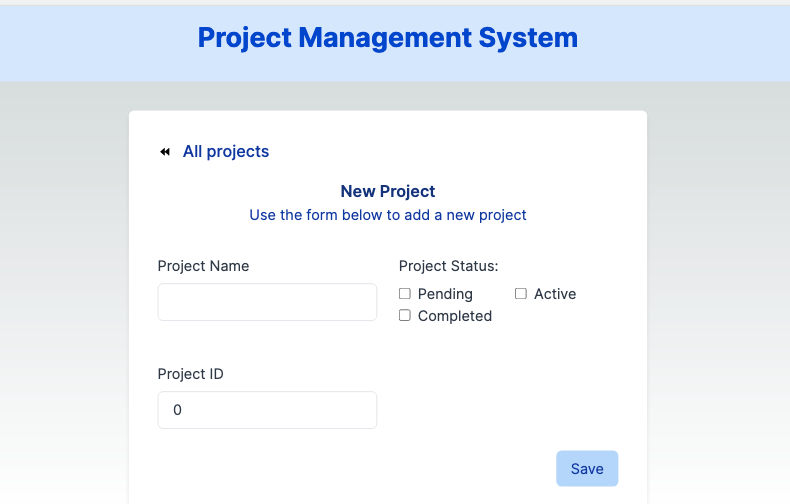
return (
<>
<div className="text-center mb-8 bg-[#DBEAFE] py-4">
<h1 className="text-3xl font-bold text-blue-700 mb-4">
Project Management System
</h1>
</div>
<ProjectForm
id_={localStorage.getItem("id")}
searchParams={searchParams}
handleEdit={(event) =>
handleProjectEdit({
event,
setEdit,
setFormData,
formData,
setAdd,
attachment,
router,
})
}
handleChange={handleChange}
handleSubmit={(event) =>
handleProjectSubmit({
event,
setFormData,
formData,
setAdd,
attachment,
router,
})
}
Add={add}
formData={formData}
convertToBase64={convert_to_base64}
Edit={edit}
Router={() => router.back()}
/>
</>
);
}
export default Index;
The Index component represents the main page of a Project Management System. It includes a project form for adding and editing projects and functionality for handling form submissions and file attachments.
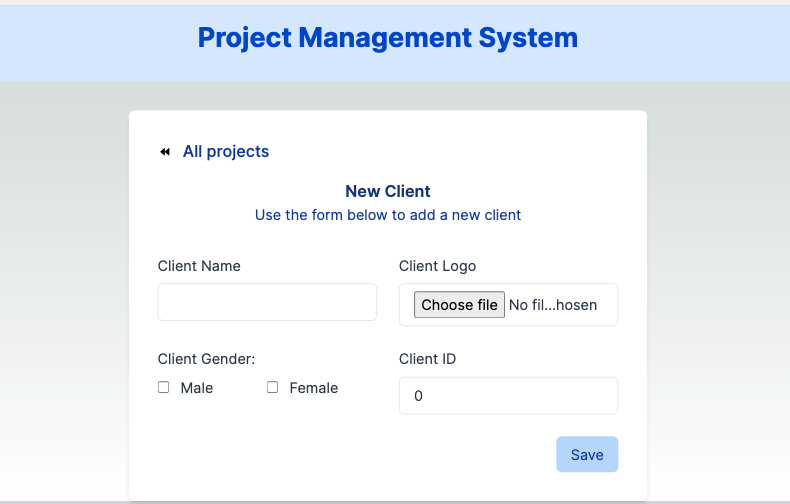
Add client page
In the src/app/newclient directory, create the file src/app/newclient/page.js and add the following code:
"use client";

import React, { useState } from "react";
import { useSearchParams } from "next/navigation";
import { useRouter } from "next/navigation";
import ClientForm from "../../components/Forms/ClientForm";
import {
 handleClientSubmit,
 handleClientEdit,
} from "../../util/Add&editClientfunctions";

function NewClient() {
 const router = useRouter();
 const searchParams = useSearchParams();
 const [attachment, setattachment] = useState("");
 const [add, setAdd] = useState(false);
 const [file, setfile] = useState("");

 const [formData, setFormData] = useState({
   clientName: "",
   gender: [],
   clientId: 0,
   clientImage: null,
 });

 const handleChange = (event) => {
   const { name, value, type, checked } = event.target;

   if (type === "checkbox") {
     const updatedValues = [...formData[name]];
     if (checked) {
       updatedValues.push(value);
     } else {
       const index = updatedValues.indexOf(value);
       if (index > -1) {
         updatedValues.splice(index, 1);
       }
     }
     setFormData((prevData) => ({ ...prevData, [name]: updatedValues }));
   } else if (type === "file") {
     const file = event.target.files[0];
     setFormData((prevData) => ({ ...prevData, [name]: file }));
   } else {
     setFormData((prevData) => ({ ...prevData, [name]: value }));
   }
 };

 const convert_to_base64 = async (file) => {
   setfile(file);
   const file_reader = new FileReader();
   file_reader.readAsDataURL(file);
   file_reader.onload = () => {
     setattachment(file_reader?.result?.split(",")[1]);
   };
 };

 return (
   <>
     <div className="text-center mb-8 bg-[#DBEAFE] py-4">
       <h1 className="text-3xl font-bold text-blue-700 mb-4">
         Project Management System
       </h1>
     </div>
     <ClientForm
       searchParams={searchParams}
       handleEdit={() =>
         handleClientEdit({
           event,
           setFormData,
           formData,
           setAdd,
           attachment,
           router,
           searchParams,
         })
       }
       Edit={add}
       handleChange={handleChange}
       handleSubmit={(event) =>
         handleClientSubmit({
           event,
           setFormData,
           formData,
           setAdd,
           attachment,
           router,
         })
       }
       Add={add}
       formData={formData}
       convertToBase64={convert_to_base64}
       Router={() => router.back()}
     />
   </>
 );
}

export default NewClient;
URL Rewrites for API Integration
In the next.config.js file, add the following code:
module.exports = () => {
 const rewrites = () => {
   return [
     {
       source: "/additem",
       destination:
         "https://xxxxx.execute-api.us-east-1.amazonaws.com/items",
     },
     {
       source: "/getproject",
       destination:
         "https://xxxxx.execute-api.us-east-1.amazonaws.com/items",
     },
     {
       source: "/editproject",
       destination:
         "https://xxxxx.execute-api.us-east-1.amazonaws.com/items",
     },
     {
       source: "/deleteproject/:id",
       destination:
         "https://xxxxx.execute-api.us-east-1.amazonaws.com/items/:id",
     },
     {
       source: "/deleteclient/:id",
       destination:
         "https://xxxxx.execute-api.us-east-1.amazonaws.com/clients/:id",
     },
     {
       source: "/addclient",
       destination:
         "https://xxxxx.execute-api.us-east-1.amazonaws.com/clients",
     },
     {
       source: "/editclient/:id",
       destination:
         "https://xxxxx.execute-api.us-east-1.amazonaws.com/clients/:id",
     },
     {
       source: "/getclient",
       destination:
         "https://xxxxx.execute-api.us-east-1.amazonaws.com/clients",
     },
   ];
 };

 return {
   rewrites,
 };
};Note: Be sure to use your actual endpoint in the destination.
The provided code above snippet showcases a solution for handling Cross-Origin Resource Sharing (CORS) in a Next.js application. CORS is a security mechanism that restricts cross-origin HTTP requests. By configuring URL rewrites, the code enables communication with an external API by rewriting the request URLs and addressing the CORS issue.
Home Page
In the src/app/page.js file, add the following code:
"use client";

import React, { useState, useEffect } from "react";
import Table from "./components/Tables/Index";

export default function page() {
 const [data, setData] = useState(null);
 const [loading, setLoading] = useState(true);

 useEffect(() => {
   localStorage.clear();

   const fetchData = async () => {
     try {
       const response1 = await fetch("/getproject", { method: "GET" });
       const response2 = await fetch("/getclient", { method: "GET" });
       if (!response1.ok || !response2.ok) {
         throw new Error("Failed to fetch data");
       }
       const data1 = await response1.json();
       const data2 = await response2.json();

       const combinedData = data1.map((item1, index) => {
         const item2 = data2[index];

         return {
           projectName: item1?.projectName,
           projectStatus: item1?.projectStatus,
           id: item1?.id,
           clientName: item2?.clientName,
           ClientImage: item2?.ClientImage,
           gender: item2?.gender,
           client_id: item2?.id,
         };
       });
       setData(combinedData);

       setLoading(false);
     } catch (error) {
       console.error(error);
       setLoading(false);
     }
   };

   fetchData();
 }, []);

 return (
   <>
     <div className="text-center mb-8 bg-[#DBEAFE] py-4">
       <h1 className="text-3xl font-bold text-blue-700 mb-4">
         Project Management System
       </h1>
     </div>

     <main className="flex min-h-screen flex-col items-center justify-between p-24">
       {loading ? (
         <p>Loading...</p>
       ) : (
         <div>
           <Table data={data} />
         </div>
       )}
     </main>
   </>
 );
}
Testing and Deployment
Follow the steps below to test your Project Management Application:
Navigate into your project-mgt-app directory and run:
npm run devYour Project Management Application is now running at localhost:8000.
To view your homepage, visit localhost:8000 in your browser. You should see the homepage.
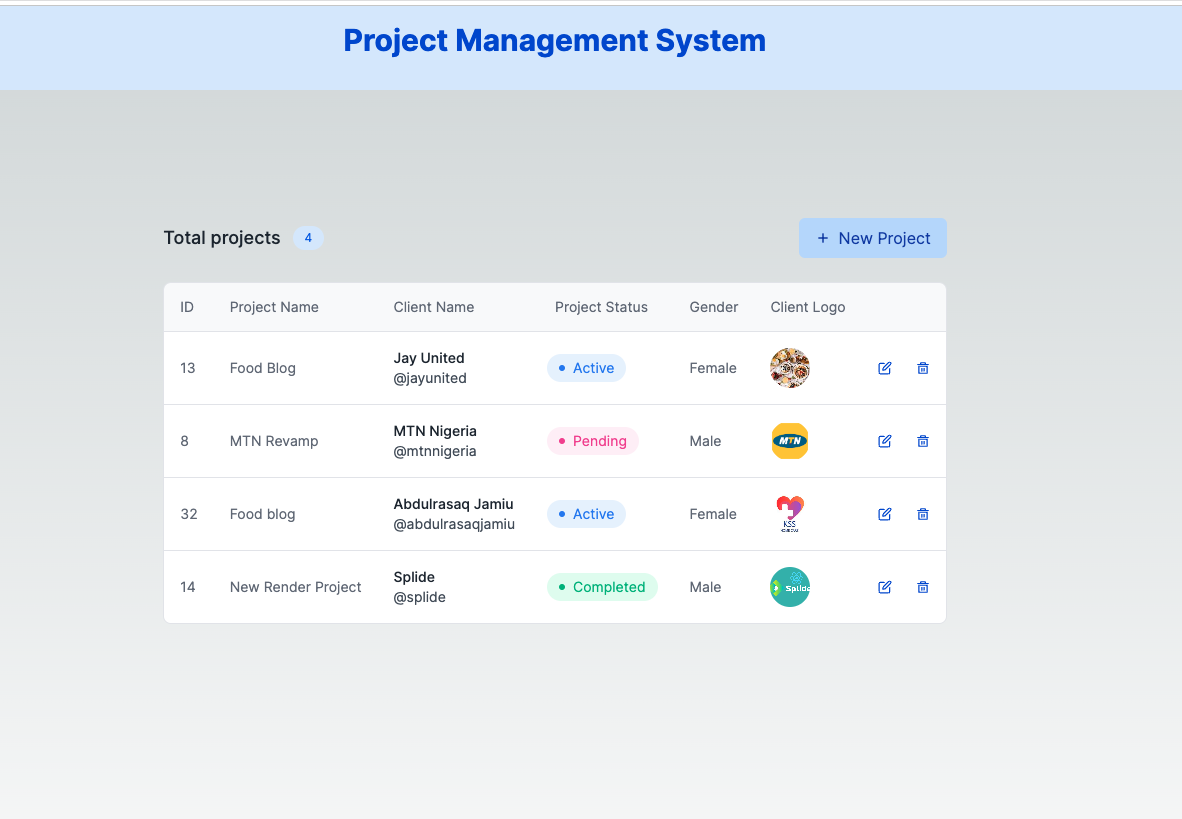
You can click on the New Client Button to add a new project.
Also, you can click on the edit and delete icons to make changes to your project.
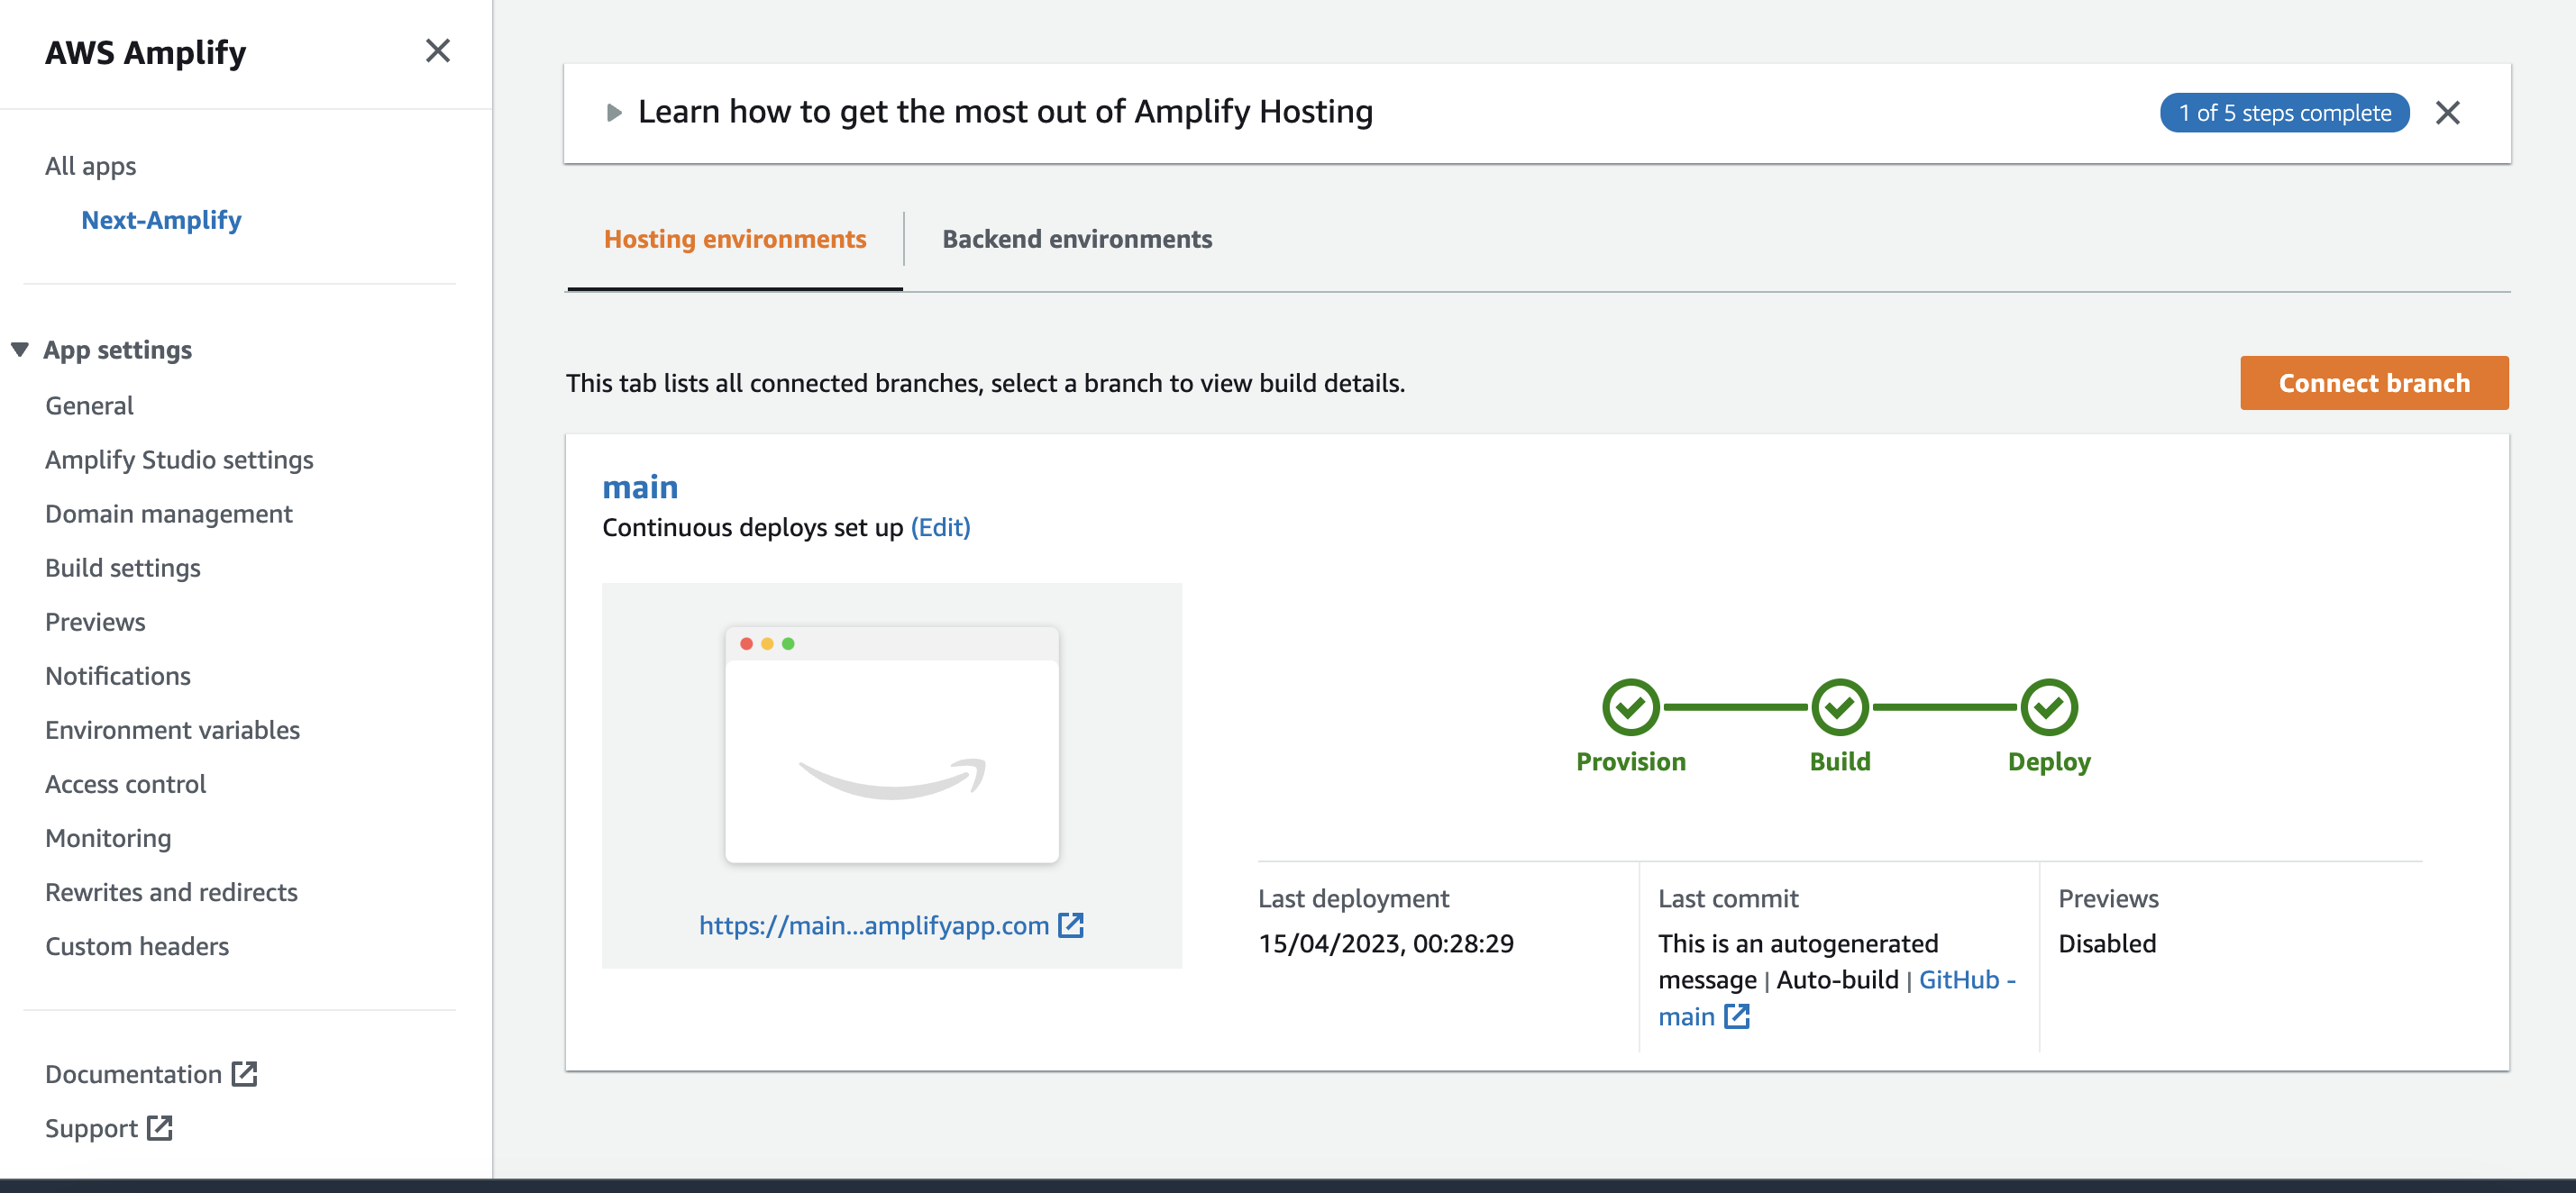
Deployment
To deploy your application, you will use AWS Amplify Hosting.
AWS Amplify Hosting - the ultimate solution for fast, secure, and scalable web app deployment. Whether you’re building a static or server-side rendered app, a mobile app landing page, or a web app, Amplify Hosting’s fully managed Continuous Integration and Continuous Deployment (CI/CD) service has everything you need.
You can quickly deploy web content with support for modern web frameworks like React, Angular, Vue, Next.js, Gatsby, Hugo, Jekyll, and more.
Follow the steps below to deploy your Project Management Application:
- Push your React app to a
Gitprovider - In the AWS Amplify Hosting, click the Host web app button
- Choose your Git provider (in this case, Github) and click on the
Connect branchbutton. - Authorize and install AWS Amplify to access your repositories.
- Click the
Nextbutton to redirect you to a page where you can configure your build settings. - Click on Next. On the
Reviewpage, select Save and deploy
Your app will be created, and you will be taken to the app’s page in the Amplify Console.
After the deployment phase is marked complete, you can now view your app.
Conclusion
Serverless applications have gained popularity due to their appealing benefits:
- No server management is required.
- Automatic scalability and high availability.
- Cost optimization by paying only for utilized resources and usage duration.
In this tutorial, you learned how to use AWS's API Gateway and Lambda functions to build a REST API that performs CRUD operations on an AWS DynamoDB database and utilizes AWS S3 Storage. Furthermore, you discovered how to host the API on AWS Amplify Hosting.
If you find AWS fascinating, there are other captivating projects you can explore, such as:
- Implementing user authentication with
Amazon Cognito. - Simplifying the management and deployment of serverless applications using frameworks like Serverless or services like
AWS CloudFormation.
References
Gain Debugging Superpowers
Unleash the power of session replay to reproduce bugs and track user frustrations. Get complete visibility into your frontend with OpenReplay, the most advanced open-source session replay tool for developers.