Build a Text Translator using React and Swagger UI


For this tutorial, we will create a language translator that looks similar to the Google translator we all know and will possess most of the features of Google Translate. The text translator would have two text inputs, one to receive a text in any language of your choice and the other to output the result of the translation. There will also be a list of languages in the dropdown menu for selection. To Achieve the Translation Process to various languages, we will use a public API from a list of public APIs provided by Swagger UI. The text translator app will look like this:
To better understand everything written in this article, you would need to understand the fundamentals of React.js, how to use Axios, and some back-end basics. We will focus solely on our application functionalities and performance and not on the styling or designs. Feel free to challenge yourself to style the application of your choice. Still, if you seem to have difficulty styling the application, you can click on the link or look at the article below to get the styles from my Github repository.
So then, let’s get to it!
Setting up our React folder
We are going to start up by creating a new react folder and starting the application. Open a new terminal in your code editor and type the following :
//to create a new react folder
npm create-react-app text-translator
//after loading type the below to run the app
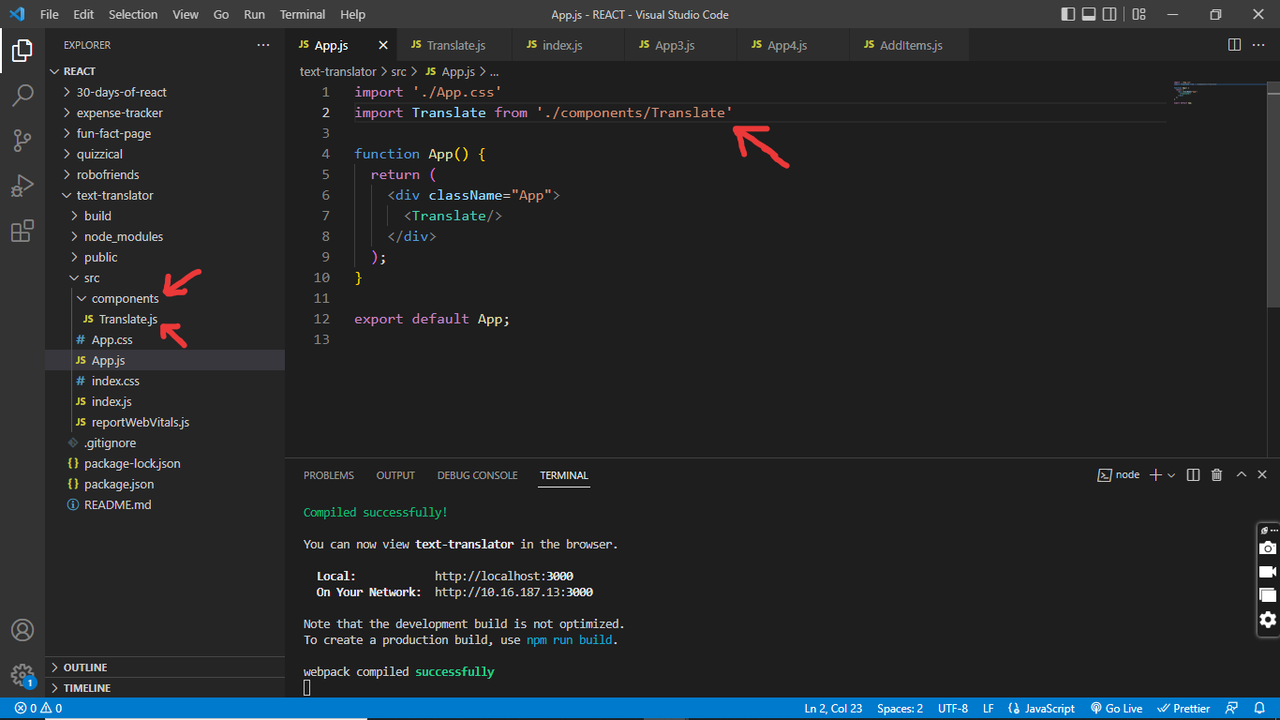
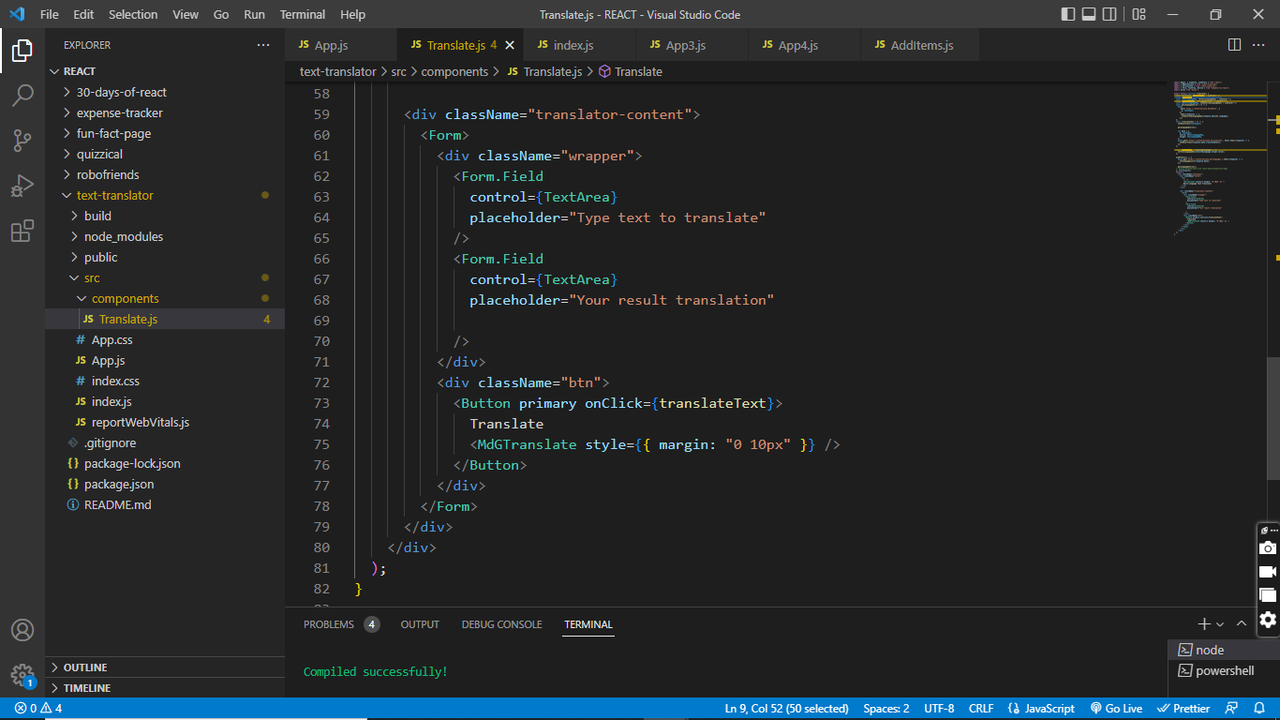
npm startOnce the app is up and running, we will create a component folder and create a component file in that folder. Then import the component file into the app.js file and set up the component file. Give it a name and manually set up the form designs using the semantic-UI CSS library. The form should contain two text areas and a button.
Adding Input and Output boxes
Once we are done with the styling and design of the application, the next thing is to set the input boxes to get the data we type in. To achieve that, we need to create a new state object and name the initial state as (textInput) or any name of your choice and the state function as (setTextInput), then set the initial state to be an empty string. Then head to the input text area and add an onChange event containing the setTextInput function we will use to target the content value. It is always good practice to frequently test your code along the way. That said, we will create a function, log the textInput, and then add a click event to the button to see the results.
import React, { useState, useEffect } from 'react';
import { MdGTranslate } from 'react-icons/md';
import {RiTranslate} from 'react-icons/ri';
import {
    Form,
    TextArea,
    Button,
} from 'semantic-ui-react';
export default function Translate() {
    //state and function to input text content
    const [textInput, setTextInput] = useState('');
    const translateText = () => {
            console.log(textInput)
        }
    return (
        <div className="container">
    <div className="title">
      //translator title
      <h2> <RiTranslate style={{margin: "0 10px"}}/>Multi-Language Text Translator</h2>
    </div>
    <div className="translator-content">
      <Form>
        </div>
        <div className="wrapper">
          //translator input text area
          <Form.Field
            control={TextArea}
            placeholder="Type text to translate"
            //adding a function to an onChange event to target the content value
            onChange = {(e)=> setInputText(e.target.value)}
          />
          //translator output text area
          <Form.Field
            control={TextArea}
            placeholder= "Your result translation"
          />
        </div>
        <div className="btn">
        //add an onClick event to kickstart the translateText function
          <Button primary onClick={translateText}>
            Translate
            <MdGTranslate style={{margin: "0 10px"}}/>
            </Button>
        </div>
      </Form>
    </div>
  </div>
    )
}
If you go into the web browser and type anything inside the input box, you should get the results in the console terminal. We will also need to create another state for the result text and then replace the console log with the result text function.
export default function Translate() {
  //state and function to input and output text content
  const [textInput, setTextInput] = useState("");
  //state and function to output text content
  const [resultText, setResultText] = useState("");
  const translateText = () => {
    //replace the console log with below:
    setResultText(textInput);
  };
}
Now go inside the result/output text area and add the result text initial state as a value attribute as seen below:
//translator output text area
<Form.Field
    control={TextArea}
    placeholder= "Your result translation"
    value={resultText}
  />
</div>
At the moment, if you retype anything inside the input box in your web browser, it will now output the text results inside the output/results box instead of the console terminal.
Creating a language list menu
The focus now would be to add a dropdown option. To do that, we would need to add a select tag manually and style it, then place it above the input boxes. Then create a state that would hold a list of languages provided from an API and set the initial state to be an empty array. Head to the Swagger UI website, click on the get languages request, and copy the link provided.
We will now need to add the useEffect hook to handle the API calling and then use it to call the language list API using Axios. If you don’t already have Axios, you can simply install it and import it at the top of your project file.
//importing the react hooks and Axios
import React, { useState, useEffect } from "react";
import axios from "axios";
export default function Translate() {
//state and function for the input text content
const [inputText, setInputText] = useState("");
//state and function for the output text content
const [resultText, setResultText] = useState("");
//state and function that holds the list of language
const [languagesList, setLanguagesList] = useState([]);
const translateText = () => {
//outputs the result text
setResultText(textInput);
};
//handling the API call with the useEffect hook
useEffect(() => {
axios.get(`https://libretranslate.de/languages`).then((response) => {
console.log(response.data);
});
});
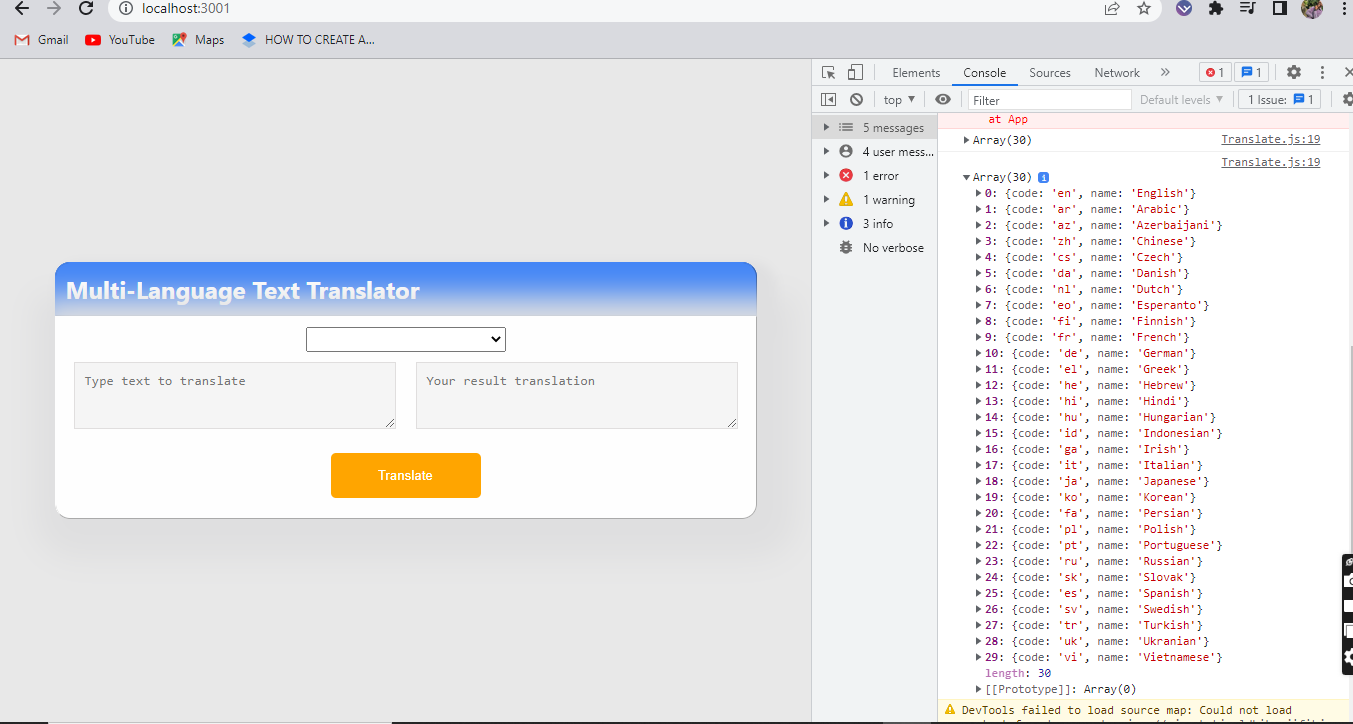
}When you log the response data inside the useEffect hook as seen above and go into the browser console, you will see an array provided by the API containing a list of different languages with their respective codes, keys, and names below.
Now we would need to map through the data seen above. Replace the console log with (setLanguagesList), head to your select tag, and map through the language list. Then return the option tag, targeting the language and the above name in the array.
<div className="translator-content">
  <form>
    <div className="select-lang">
      //creating the select tag and mapping through the API array
      <select className="select">
        {languagesList.map((language) => { return
        <option>{language.name}</option>
        ; })}
      </select>
    </div>
  </form>
</div>
If you now go back to the browser and click on the dropdown menu, you will get a list of different languages to make selections from.
Open Source Session Replay
OpenReplay is an open-source, session replay suite that lets you see what users do on your web app, helping you troubleshoot issues faster. OpenReplay is self-hosted for full control over your data.

Start enjoying your debugging experience - start using OpenReplay for free.
Detecting the language selected
The next thing to do is to send the language’s key to a state to determine the selected language. To achieve this, add a value attribute to the select tag and target language code so the key will also be selected whenever you select any language. Also, add an onChange event to the select tag.
<div className="select-lang">
  <select className="select" onChange="{languageKey}">
    <option>Select a Language</option>
    {languagesList.map((language) => { return
    <option value="{language.code}">{language.name}</option>
    ; })}
  </select>
</div>
Then, move up and create a function, add a parameter to the function, and target the select tag value. Also, insert the function name in the onChange event, as seen above.
//function that targets the select tag value
const languageKey = (selectedLanguage) => {
console.log(selectedLanguage.target.value);
};
//handling the API call with the useEffect hook
useEffect(() => {
axios.get(`https://libretranslate.de/languages`).then((response) => {
setLanguagesList(response.data);
});
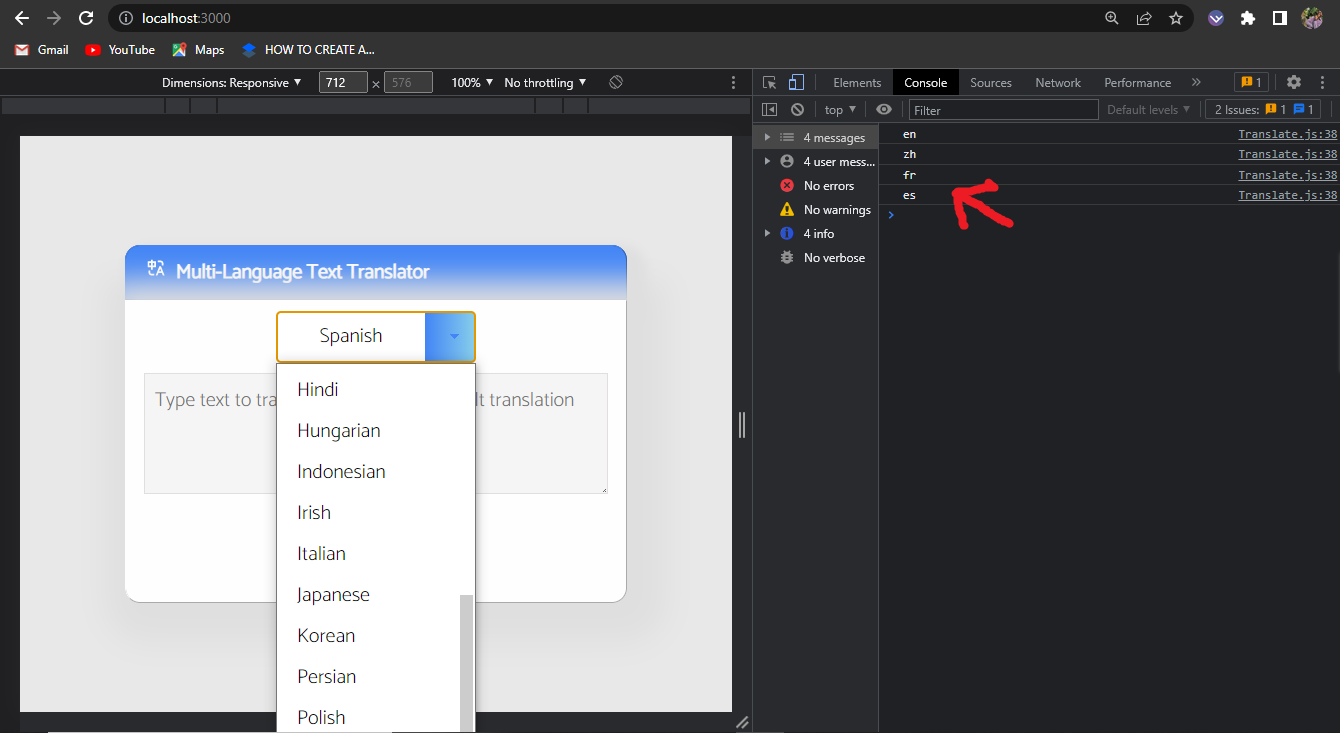
});Observe that whenever you select a language from the list, you’d get the keys in the console.
Now, create a state to store the language key and replace the console log with the language key function.
export default function Translate() {
  //input state and function
  const [textInput, setTextInput] = useState("");
  //output state and function
  const [resultText, setResultText] = useState("");
  //state and function to store language keys
  const [textLanguageKey, setTextLanguageKey] = useState("");
  //language list state and function
  const [languagesList, setLanguagesList] = useState([]);

  const translateText = () => {
    setResultText(textInput);
  };

  const languageKey = (selectedLanguage) => {
    //replace console log with below:
    setTextLanguageKey(selectedLanguage.target.value);
  };
}
Identifying and Translating Inputted Text
We will now add the translation API from Swagger UI, a post request inside the translateText function we created earlier, and then create a data variable that will take in an object. In the object, there will be some properties like q (the text to translate), source (the detected language), which we haven’t created yet, and target (the language key). We would now need to create a source. To get the source: Create a function and add the detect language API, a post request inside this function. Send the text input, which is q as data in curly braces. Call the function we created in the translateText function.
const [resultText, setResultText] = useState("");
const [textLanguageKey, setTextLanguageKey] = useState("");
const [languagesList, setLanguagesList] = useState([]);

//This function detects the language passed using the API
const getLanguageSource = () => {
  axios
    .post(`https://libretranslate.de/detect`, {
      q: inputText,
    })
    .then((response) => {
      console.log(response.data);
    });
};

//This function perform the Results translation process
const translateText = () => {
  setResultText(inputText);
  getLanguageSource();
  let data = {
    q: inputText,
    //comment the source for now
    //source:
    target: textLanguageKey,
  };
  axios.post(`https://libretranslate.de/translate`);
};

//This function gets the language key
const languageKey = (selectedLanguage) => {
  setTextLanguageKey(selectedLanguage.target.value);
};

//Sends language list data to the select tag
useEffect(() => {
  axios.get(`https://libretranslate.de/languages`).then((response) => {
    setLanguagesList(response.data);
  });
});

return (
  <div className="container">
    <div className="title">
      <h2>
        <RiTranslate style={{ margin: "0 10px" }} /> Multi-Language Text
        Translator
      </h2>
    </div>
    <div className="translator-content">
      <form>
        <div className="select-lang">
          //After updating, your select tag should look like below
          <select className="select" onChange="{languageKey}">
            {languagesList.map((language) => { return
            <option value="{language.code}">{language.name}</option>
            ; })}
          </select>
        </div>
      </form>
    </div>
  </div>)
We have console logged the data in the getLanguageSource function as seen above. Head into your browser console and check the network. You should get an array whenever you click on the translate button and the detect option in the network bar. The array contains an object with confidence and language properties, as seen below.
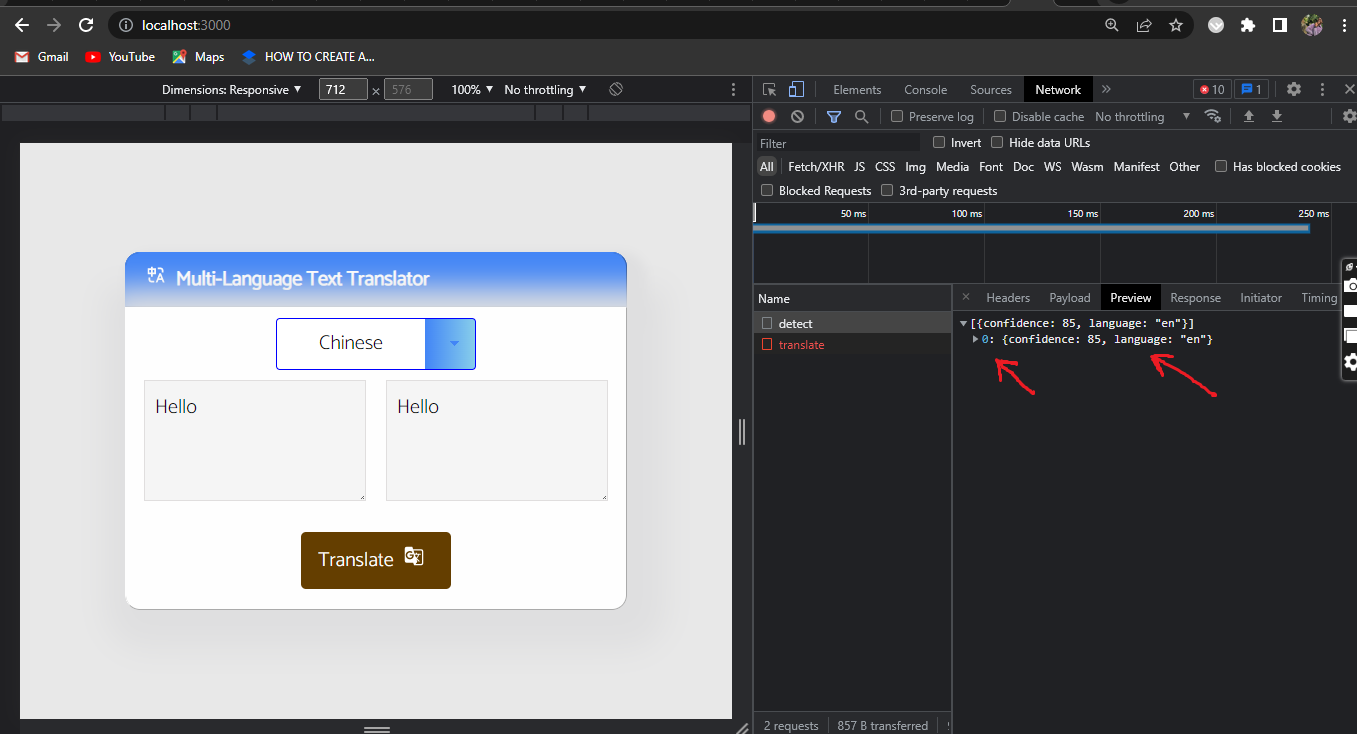
As seen in the picture above, we now need to grab the language property from the array object indexed 0. After that, create a new state to hold the language key we extracted from the array object above and replace the console log with the state’s function. Then add the initial state, which now contains the keys as the source in the data object alongside the target and q.
const [resultText, setResultText] = useState("");
const [textLanguageKey, setTextLanguageKey] = useState("");
const [languagesList, setLanguagesList] = useState([]);
//state to store the detected languages key
const [detectLanguageKey, setdetectedLanguageKey] = useState("");
const getLanguageSource = () => {
  axios
    .post(`https://libretranslate.de/detect`, {
      q: textInput,
    })
    .then((response) => {
      //replace console log with below:
      setdetectedLanguageKey(response.data[0].language);
    });
};
//This function perform the Results translation process
const translateText = () => {
  setResultText(inputText);
  getLanguageSource();
  let data = {
    q: inputText,
    //uncomment and add initial state
    source: detectLanguageKey,
    target: textLanguageKey,
  };
  //Adding the translation API and sending the output to the result input box
  axios.post(`https://libretranslate.de/translate`, data).then((response) => {
    console.log(response.data.translatedText);
  });
};
Below the target in the translation API we called earlier, we can now send the data and log the response as seen above to see if our text will be translated on click of the translate button.
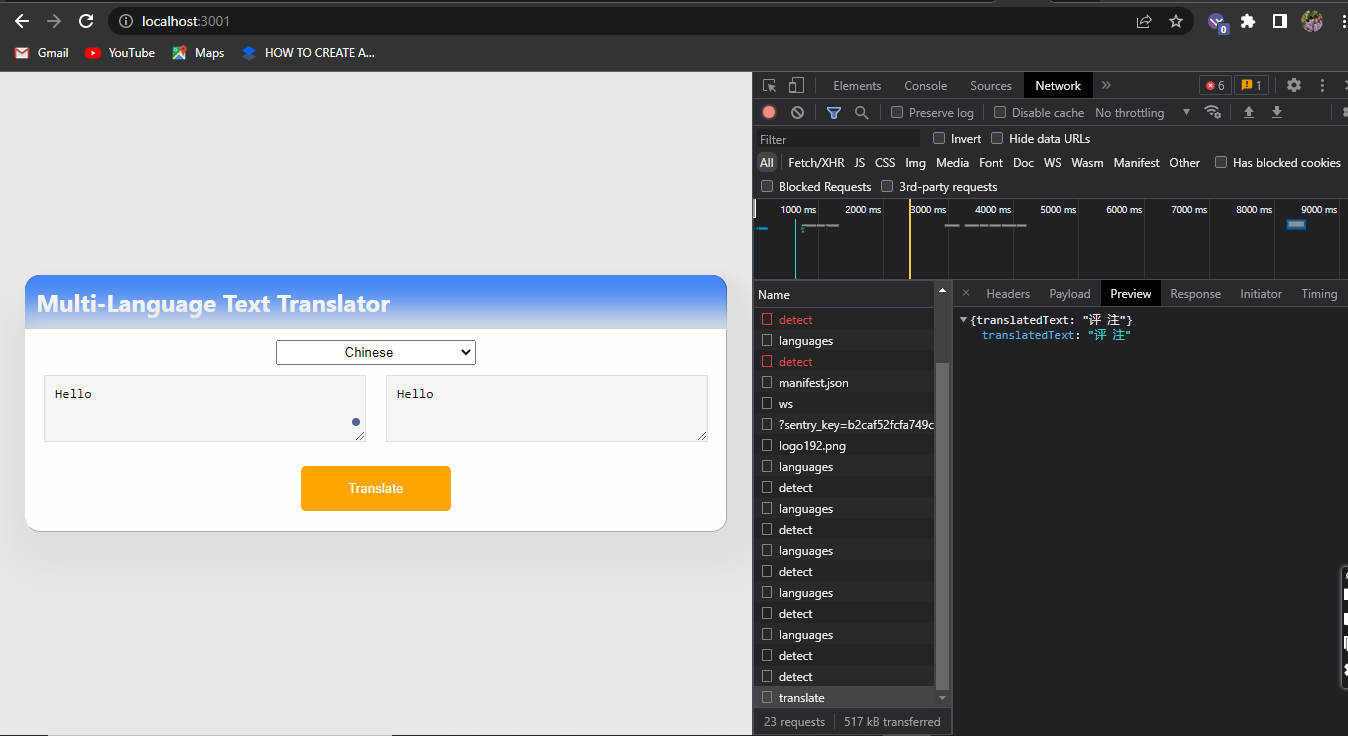
It’s working fine. After clicking on the translate button, go to your network bar in your browser console and click on translate and then go to preview as seen above to see the results. If you look closely at the image, you will observe that the translation result comes in an object, we will need to target (translatedText) shown in the preview bar, and it should now return only the translated text. We can now replace the console log with the result state function you created earlier, so the translated text will be shown in the results text area.
//state to store the detected languages key
const [detectLanguageKey, setdetectedLanguageKey] = useState("");
const getLanguageSource = () => {
  axios
    .post(`https://libretranslate.de/detect`, {
      q: textInput,
    })
    .then((response) => {
      setdetectedLanguageKey(response.data[0].language);
    });
};
const translateText = () => {
  setResultText(inputText);
  getLanguageSource();
  let data = {
    q: textIput,
    source: detectLanguageKey,
    target: textLanguageKey,
  };
  //Adding the translation API and sending the output to the result input box
  axios.post(`https://libretranslate.de/translate`, data).then((response) => {
    //replace the console log with below:
    setResultText(response.data.translatedText);
  });
};
Then add the result initial state as a value attribute in the result input text area. If you are trying to translate a text in your browser, it should be translating, but there is a slight problem. If you input a text, select a language and click on translate, it shows the inputted language in the result box. This is because we are not reading the language list first before outputting the results. To resolve this, we will need to add the getLanguageSource function to the useEffect hook and then add the input text as a dependency array at the end of the useEffect hook, as seen below.
useEffect(() => {
  axios.get(`https://libretranslate.de/languages`).then((response) => {
    setLanguagesList(response.data);
  });
  //Add function below to read the language list first
  getLanguageSource();
  // Setting input text as a dependency array
}, [inputText]);
return (
  <div className="container">
    <div className="title">
      <h2>
        {" "} <RiTranslate style={{ margin: "0 10px" }} /> Multi-Language Text
        Translator
      </h2>
    </div>
    <div className="translator-content">
      <form>
        <div className="select-lang">
          <select className="select" onChange="{languageKey}">
            {languagesList.map((language) => { return
            <option value="{language.code}">{language.name}</option>
            ; })}
          </select>
        </div>
        <div className="wrapper">
          <Form.Field control={TextArea} placeholder="Type text to translate"
          onChange={(e) => setTextInput(e.target.value)} /> <Form.Field
          control={TextArea} placeholder="Your result translation" //Adding the
          resultText to thr Result text area value={resultText} />
        </div>
      </form>
    </div>
  </div>
)
Now, if you head back into your browser and input a text in any language of your choice, select a language from the dropdown menu and click on the translate button, you should get the text translations. Also, if you change the language or add some more text in the input box and click on the translate button, you will still get the translation result in the results text area.
Conclusion
In the above article, I have successfully shown you how to create a text translator app with React.js, using a public API from a list of public APIs and also how to use Swagger UI API and Axios. Feel free to look deeper into this project and add newer features of your choice to help improve you.
Github repo:- https://github.com/christofa/Multi-language-text-translator-.git
A TIP FROM THE EDITOR: For another application of translations, don’t miss our Translate Subtitles using the LibreTranslate API article.