
In this tutorial, we will walk through the steps involved in creating a simple weather app that displays the current weather data for a given location. We will be using vanilla JavaScript which means we will not be relying on any external libraries or frameworks. By the end of this tutorial, we will have a fully functional weather app using the OpenWeatherMap API.

The goal of this tutorial is to show how you can create a functional weather app with vanilla JavaScript which makes it easily usable as a standalone page or with any framework you choose.
Here is what we will have built by the end of this tutorial
below is the final result on pc
below is the final result on mobile
Prerequisites
-
An OpenWeatherMap
APIkey: go to https://openweathermap.org/api and signup to have yourAPIkey sent to the email address you provide -
Tailwind CSS framework: go to https://www.unpkg.com/browse/tailwindcss@0.7.4/dist/ and click on
tailwind.min.css -
Font Awesome icons and css files: go to https://fontawesome.com/download and download the zip file you choose
-
Go to https://fonts.google.com/download?family=Fredoka to download the fredoka font-family; convert the bold
font-facefromttftowoff2and rename it asfredoka.woff2as will be shown in the directory tree below -
A code editor such as VS Code. Alternatively, you can use your Chrome, Brave, or Edge developer tools as an editor by going to the sources tab and dragging your desired folder containing an HTML file into it, and clicking allow.
Overview of The OpenWeatherMap API
The API has a free tier that allows 60 calls in one minute and one million calls monthly that we can use with an API key as long as we stay within its limits.
To make our app load the API response very fast, we will only make requests to the https://api.openweathermap.org/data/2.5/weather endpoint which returns sufficient but not too much data about the current weather about any city or country available in the API
https://api.openweathermap.org/data/2.5/weather?q={city or country name}&appid={API key}&mode=xml- the
qvariable stores the city or country name to be requested, - the
appidvariable stores the uniqueAPIkey provided by you, - the
modevariable makes your request for a response type formatted asXMLorJSON, it defaults toJSON
For unavailable or non-existent cities, the API returns a string similar to
{
  "cod": "404",
  "message": "city not found"
}
which, when parsed as JSON, can be used to notify users of unavailability.
The general API has a lot of features such as data for forecasts, and agriculture among others that you can learn about on their website.
Creating an OpenWeatherMap Account
In this section, I will shortly discuss how to create or open an OpenWeatherMap account which is required for an API key.
- Go to https://openweathermap.org/api and signup or sign in to create your account and get your API key
- Click on the
APIsection to get your key - they offer both paid and free services.
Designing the App Interface
In this section, I will show us all the necessary process that applies in developing the application from using vanilla JS to the UI/UX which is done with the tailwind CSS framework, and how to set up the web fonts folder below;
1. Creating the files folder:
Make a folder with any name you wish (say, parent-folder) with a similar directory tree as below:
parent-folder
├── fredoka.woff2
├── index.html
├── css
│   └── tailwind.min.css
│   └── all.min.css
|   └── css.css
└── js
|   └── page.js
└── webfonts
Both the webfonts folder and the all.min.css file are present in the zip file downloaded at the Font Awesome website; go to https://fontawesome.com/docs/web/setup/host-yourself/webfonts for more info.
Note: you can structure your folder the way you deem fit.
Both the all.min.css file and the webfonts folder are gotten from the zip file downloaded from the Font Awesome website.
It is imperative that you set up your directory tree as above with the empty files created in their respective folders before you proceed.
2. The HTML Code
The HTML code features:
- A form with an input field for text and a button to submit the entered city or country name to the OpenWeatherMap
API
 form with submit button
- An input field for your unique OpenWeatherMap API key which receives focus if it is empty when you click on the submit button.
 input field for your
 API key
- Text alongside animated icon fonts that notify the user when the data is either in transit or has been received.
 status of the data in transit
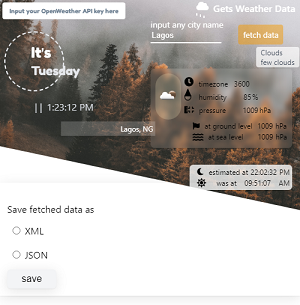
- Tells the current day of the week and time in real time. The timer shown in the image below can be paused or resumed.
 current time and day
- The data sent by the
APIgets displayed as illustrated in the images below

if you submitted the form while offline
 default text before any data is sent or received

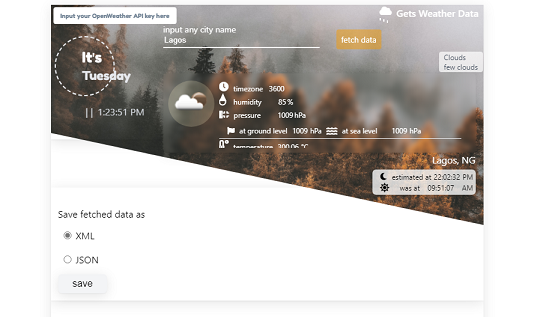
displaying received data for Abu Dhabi
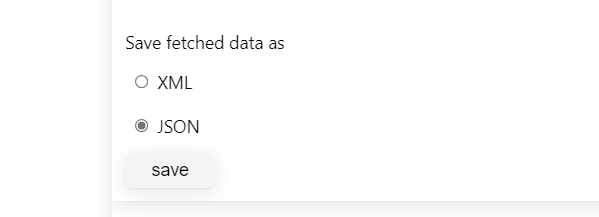
- After receiving the data, you can choose to download it as either
XMLorJSONas shown in the image below
3. Placing The Files In Their Required Folders:
Make sure the tailwind.min.css, css.css, all.min.css (from the fontawesome zip file), fredoka.woff2 files and the webfonts folder are present as designated in the directory tree above and the page will render as shown above when viewed in a browser.
The links to the files required for the final results shown in the images above are given below;
Place them in your folder as shown in the directory tree shown above and the index.html file will render when opened in the browser as expected.
Session Replay for Developers
Uncover frustrations, understand bugs and fix slowdowns like never before with OpenReplay — an open-source session replay tool for developers. Self-host it in minutes, and have complete control over your customer data. Check our GitHub repo and join the thousands of developers in our community.
Adding Interactivity To The Page Via JavaScript
Writing The Code That Goes Into The Script Block In The index.html File
It is imperative that you paste the code below into the script block present at the bottom of the
index.htmlfile.
The beginTimer function above is called when the page loads as shown in the code below.
The global variables defined in the page.js file are initialized below.
w.addEventListener('DOMContentLoaded', function () {
  animations.addRippleAnimations(),
    today = (time_of_day = (main = document.querySelector('article.inset-0')).getElementsByTagName('button')[0]).previousElementSibling,
    time_of_day.firstChild.data = '| |';
  /* begins the incremental update to the time of day */
  beginTimer(time_of_day.lastElementChild, today)

  apiKey = main.querySelector('.api-key'),
    notifyUser = main.querySelector('.notify-user').lastChild,
    sentStatus = main.querySelector('.status');
});
Defining Variables
All the global variables used in the entire context of the program are defined below. The checkObj function makes accessing both defined and undefined properties of any object straightforward. In its implementation below, '[absent]' is hardcoded as a fallback back return value for non-existent object properties.
const promisify = cb => new Promise(resolve => setTimeout(_ => resolve(cb()))),
  _json = new XMLHttpRequest(),
  _xml = new XMLHttpRequest(),
  blobs = {},
  w = window;
let main, time_of_day, today, apiKey, notifyUser, sentStatus, buttons, verifyAPI, days = {
    'Mon': 'Monday',
    'Tue': 'Tuesday',
    'Wed': 'Wednesday',
    'Thu': 'Thursday',
    'Fri': 'Friday',
    'Sat': 'Saturday',
    'Sun': 'Sunday'
  },
  _toString = Object.prototype.toString,
  checkObj = function(json) {
    return function(prop, sendBack) {
      let split = prop.split('.'),
        results = [],
        previous, notArray, result;
      for (let i = 0, val, j; i++ < split.length;) {
        j = split[i - 1]; //done because i is automatically 1 at the start of the loop: needed for the heuristics below
        if (notArray = split.length === 1) {
          val = json[j],
            results[i - 1] = result = val ? val : '[absent]';
          break;
        }
        i === 1 ? val = previous = json[j] : val = (previous && = previous[j]);
        j = split.slice(0, i).join('.');
        if (!notArray) results[i - 1] = result = val ? val : '[absent]';
      }
      return sendBack ? result : void 0;
    }
  },
  verifyAPI;
Defining The Function That Takes Custom City Or Country Names
When the button in the form in the HTML code above is clicked, it calls the sendRequestedData function which is defined as shown below;
The sendRequestedData appropriately notifies the user when either the API responds with no info for the requested data or when the user is offline
function sendRequestedData() {
  if(navigator.onLine) {
    let input  = this.previousElementSibling.firstElementChild;
    if(apiKey.textContent) {
      send(`https://api.openweathermap.org/data/2.5/weather?q=${input.value}&appid=${apiKey.textContent}`)
      /*this function sends two AJAX requests
        to the openweathermap API endpoint
      */
    } else {
      apiKey.focus()
      /*
      apiKey represents the input field where you will input your API key
      */
    }
  } else {
    notifyUser.data = 'You are offline'
  }
}
Writing Code That Actually Sends The Data
The senRequestedData function defined above calls the send function which then makes two simultaneous GET requests via _xml and _json as shown below:
The second argument of the _xml.open method appends &mode=xml to the API URL. This makes the API send the weather data as xml to the _xml.onload callback as will be seen below.
The updateStatus function notifies the user whether the has been received or requested based on the value of its argument
//this function is the main entry into this entire program
function send(query) {
  _xml.open("GET", query + "&mode=xml"),
    _json.open("GET", query),
    _xml.send(),
    _json.send();
  updateStatus(false);
}
/*notifies the user that the data is either
 * in transit or has been received
 * by changing "Gets Weather Data" to
 * "Getting Weather Data" and vice-versa
 */
function updateStatus(flag) {
  let text, prop;
  text = flag
    ? ((prop = "remove"), "Gets Weather Data")
    : ((prop = "add"), "Getting Weather Data...");

  (sentStatus.lastChild.data = text),
    sentStatus.firstElementChild.lastElementChild.classList[prop]("animate");
}
Handling The Data Received From The API
Below is the definition for _json.onload that gets called when the API responds with the requested data. The functions used in the code block below are all defined and explained in the code blocks after.
The verifyAPI function expression below uses a closure to close over the json argument passed to checkObj which returns an anonymous function to verifyAPI that is then used to check the properties on res - the API response string parsed into an object - json, as will be seen in the body of the screenAndProcessAPI function.
/* To detect whether the API returned an error,
 * the response string is checked for the presence
 * "cod:200" as is in the return statement
 * of the function below
 */
function isError(string) {
  string = string.replace(/\{|\}|"|'/g, "").split(",")[0];
  string = string.split(":");
  return string[0] === "cod" && string[1] !== "200";
}
_xml.onload = function(evt) {
  let res = evt.target.response;
  if (isError(res)) {
    notifyUser.parentNode.classList.remove('invisible'), notifyUser.data = JSON.parse(res).message, updateStatus(false);
    return;
  }
  updateStatus(true)
  blobs['XML'] = new Blob([res],{
    type: 'application/xml'
  })
}
_json.onload = function (evt) {
  let res = evt.target.response;
  if (isError(res)) {
    let next;
    /* notify the user of the particular error message returned by the API */
    (next = notifyUser.parentNode).classList.remove("invisible"),
      (notifyUser.data = JSON.parse(res).message);
    (next = next.nextElementSibling), next && next.remove(), updateStatus(true);
    return;
  }
Explaining further about handling the data received in the JSON
/* makeAwait makes the synchronous JSON.parse asynchronous,
   * screenAndProcessApi is where the heavy lifting occurs
   */
  makeAwait(JSON.parse(res)).then((json) => {
    updateStatus(true);
    screenAndProcessAPI(json);
  }),
    /* stores a blob of each API response for JSON and XML
     * which can then be downloaded as a link as will be seen
     */
    blobs["JSON"] = new Blob([res], {
      type: "application/json",
    });
};
Defining Utility Functions
The functions below are required as utilities that are independent where they are defined or called:
/* @param entity can be of any data type
 * @param type: an optional string that you want to assert to be true to the type of entity. It is case-insensitive
 * it urns the data type of entity if type is not defined otherwise, it returns a boolean
 */
function Is(entity, type) {
  let a =
    entity == void 0
      ? _toString(entity).replace(/\[object |\]/g, "")
      : entity.constructor.name;
  return type ? type === a || a.toUpperCase() === type.toUpperCase() : a;
}

/* takes any statement or function and makes it
 * asynchronous.
 * returns a promise
 */
async function makeAwait(entity) {
  return (await Is(entity, "Function")) ? entity() : entity;
}
Displaying The Parsed And Formatted Data On The Page
The screenAndProcessAPI function, defined below, is such that it accepts an object as its argument which must define the properties it expects. The fallback string - [absent] is substituted for the properties that are undefined on the said object.
This function generates a template string which is then made the innerHTML of a node to be appended to the DOM, the node and its children have been tested and stylized using classes with media query breakpoints for responsiveness as well as with icon fonts prior to their being used in code as a template string.
Subsequent calls to the screenAndProcessAPI function, akin to subsequent requests for the API data, simply removes the currently appended node and append new ones for each new data.
function screenAndProcessApi(json) {
  let avail = notifyUser.parentElement.nextElementSibling,
    main = document.createElement("main"),
    fragment = document.createDocumentFragment(),
    fallback = "img/fallback.avif";

  main.className = "p-2 h-full w-full flex space-x-px sm:space-x-1";
  avail && avail.remove();
  main.innerHTML = `
    <section class="sm:space-y-1 w-1/5 sm:w-auto mr-1">
      <p class="md:right-0 md:text-base text-xs w-2/3 sm:truncate sm:w-auto sm:relative md:absolute md:top-full absolute transform text-right sm:translate-x-0 -translate-x-full top-2/3 sm:top-0 text-white sm:bg-transparent sm:p-0 p-1 bg-gray-100" style="--tw-bg-opacity: 0.2;">
       ${verifyAPI("name", !0)}, ${verifyAPI("sys.country", !0)}
      </p>
      <img style="--tw-bg-opacity: 0.2;" class='bg-yellow-100 object-contain sm:h-2/3 h-2/3 bg-white rounded-full p-1' src="http://openweathermap.org/img/w/${verifyAPI(
        "weather.0.icon",
        !0
      )}.png"/>
    </section>
    <section class="w-4/5 mr-2 flex relative flex-col space-y-1 fa-xs h-full overflow-y-scroll overflow-hidden pt-2">
      <div class="flex">
        <i class="fa fa-clock fa-lg mr-2"></i>timezone
        <div class="ml-2.5 mr-1">${verifyAPI("timezone", !0)}</div>
      </div>
To show more of the parsed and formatted weather data on the page
there are section codes provided that have the relative data for the humidity, temperature, time zone, wind speed, etc.
<div class="flex">
        <div class="mr-3"><i class="dew-drop relative"></i><i class="fa fa-circle-notch"></i></div>
        humidity
        <div class="mr-0.5 ml-7">${verifyAPI("main.humidity", !0)}</div>%
      </div>
<div class="flex">
        <div class="mr-2 flex no-wrap items-center"><i class="fa fa-ruler-vertical"></i><i class="fa fa-compress"></i></div>
        pressure
        <div class="ml-7 mr-0.5">${verifyAPI("main.pressure", !0)}</div>hPa
      </div>
      </div>
    </section>
    </div>
    <div class="absolute right-0 top-full mt-7 text-xs flex flex-col space-y-0.5 text-black bg-gray-50 p-1 rounded-md" style="--tw-bg-opacity: 0.8;">
      <div class='flex justify-between items-center'><i class="fa fa-moon mx-2"></i><p>estimated at</p><time class="mx-1">${date_time(
        verifyAPI("sys.sunrise", !0) * 1000,
        "time"
      )}</time> PM</div>
      <div class='flex justify-between items-center'><i class="fa fa-sun text-base mx-2"></i>was at<time class="mx-1">${date_time(
        verifyAPI("sys.sunset", !0) * 1000,
        "time"
      )}</time> AM</div>
    </div>`;

  fragment.appendChild(main).querySelector("img").onerror = function () {
    this.src = fallback;
  };
  notifyUser.parentNode.classList.add("invisible"),
    notifyUser.parentNode.after(main);
}
Defining The Function That Formats Numbers To Dates
The date_time function used in the code block above is important for getting human-readable days, weeks, months, and years from
milliseconds or Date objects.
function date_time(date, which, split) {
  typeof date === "string" && (date = +date);
  if (date) {
    !Is(date, "Date") && (date = new Date(date));
    let time = (date += "").match(/[0-9]{2}:[0-9]{2}:[0-9]{2}/g)[0],
      value;
    date = date.match(/[0-9]{2}:[0-9]{2}:[0-9]{2}|^([^]+)\s+[0-9]+:/)[1];
    split && (date = date.split(" "));
    switch ((which &&= which.toLowerCase())) {
      case "date":
        value = date;
        break;
      case "time":
        value = time;
        break;
      default:
        value = [date, time];
    }
    return value;
  }
}
Defining The Function That Handles Downloading Of The API Data
Finally, the code to save the fetched data as a chosen file type is as follows:
function handleDownloadingOfFiles() {
  let notify = this.parentNode.nextElementSibling,
    selected = this.parentNode.querySelector("input:checked");
  if (selected && Object.keys(blobs).length) {
    let picked = blobs[selected.id];
    picked
      ? save(picked)
      : save(new Blob([blobs["JSON"]], { type: "text/plain" }));
  } else {
    clearTimeout(this.timeout),
      notify.classList.remove("invisible"),
      (this.timeout = setTimeout(
        (_) => notify.classList.add("invisible"),
        1300
      ));
  }
}
Actual Download Of The API Data As XML Or JSON
The actual download is made possible by the save function in the code block above.
This save function takes a blob of data and constructs an URL.createObjectUrl(blob) which is then set as the href of an anchor tag. There are also fallbacks in the function body for when this approach does not work as seen below:
function save(blob, name) {
  name = name || "download";

  // Use native saveAs in IE10+
  if (typeof navigator !== "undefined") {
    if (/MSIE [1-9]\./.test(navigator.userAgent)) {
      alert("IE is unsupported before IE10");
      return;
    }
    if (navigator.msSaveOrOpenBlob) {
      // https://msdn.microsoft.com/en-us/library/hh772332(v=vs.85).aspx
      alert("will download using IE10+ msSaveOrOpenBlob");
      navigator.msSaveOrOpenBlob(blob, name);
      return;
    }
  }

  // Construct URL object from blob
  var win_url = window.URL || window.webkitURL || window;
  var url = win_url.createObjectURL(blob);

  // Use a.download in HTML5
  var a = document.createElementNS("http://www.w3.org/1999/xhtml", "a");
  if ("download" in a) {
    a.href = url;
    a.download = name;
    a.dispatchEvent(new MouseEvent("click"));
    // Don't revoke immediately, as it may prevent DL in some browsers
    setTimeout(function () {
      win_url.revokeObjectURL(url);
    }, 500);
    return;
  }

  // Use object URL directly
  window.location.href = url;
  // Don't revoke immediately, as it may prevent DL in some browsers
  setTimeout(function () {
    win_url.revokeObjectURL(url);
  }, 500);
}
You can read more about this approach of downloading files in the browser here
Defining The Function That Displays The Current Day Of The Week And Time
The beginTimer function below makes it possible to efficiently update the current time of the day via requestAnimationFrame which lets us call a callback whenever the browser is ready to paint the page.
It also determines the current day of the week.
More info about requestAnimationFrame can be found here: https://developer.mozilla.org/en-US/docs/Web/API/window/requestAnimationFrame.
The timely timer on the page is made possible by the code below. It even offers the ability to be paused and resumed.
function beginTimer(node, to_day) {
  // Source: http://www.paulirish.com/2011/requestanimationframe-for-smart-animating/
  // shim layer with setTimeout fallback
  window.requestAnimFrame = (function () {
    return (
      window.requestAnimationFrame ||
      window.webkitRequestAnimationFrame ||
      window.mozRequestAnimationFrame ||
      function (callback) {
        window.setTimeout(callback, 1000 / 60);
      }
    );
  })();
  window.cancelAnimFrame =
    window.cancelAnimationFrame ||
    window.webkitCancelAnimationFrame ||
    window.mozCancelAnimationFrame ||
    window.clearInterval;

  var lastTime = new Date().getTime();

  (beginTimer.resume = function timer() {
    beginTimer.__frame = requestAnimFrame(timer);
    let date = new Date();
    var currentTime = date.getTime();

    if (currentTime - lastTime >= 1000) {
      lastTime = currentTime;
      (node.textContent = date.toLocaleString().split(",")[1]),
        (to_day.textContent = days[date.toDateString().split(" ").shift()]);
    }
  })();
  beginTimer.stop = (_) => {
    cancelAnimFrame(beginTimer.__frame);
  };
}
Summary of The Code Logic
The send function is the entry point of the program, it is called by the sendRequestedData function which was called by the click event of the button in the form
when submitted to the API via the _xml and _json variables
The response is parsed by JSON.parse which is made asynchronous by using the makeAwait function which returns a promise that exposes the parsed string as an object.
The screenAndProcessAPI function is called when the json response is fetched and parsed, without errors, into an object.
It builds a DOM node that displays the required info accessed from the json response on the page. Each concerned property on the object is checked for availability by the verifyAPI function expression which uses a fallback string - [absent] if it is not available
To allow options for saving as either XML or JSON, the responses for the simultaneous requests made by _xml and _json are stored in the blobs object.
Each stored response is downloaded as a file when, chosen by the radio button, the save button is clicked - an action which calls the handleDownloadingOfFiles function that then calls the save function with an argument of the blob representing the selected radio, after which the chosen file type is downloaded.
The save function downloads files by using the new Blob constructor to make a blob of a file and URL.createObjectURL to make a URL representing the aforementioned blob in memory, which is then linked to via an anchor tag’s href attribute.
The anchor tag must have an HTML5 attribute: download for the browser to download the file the anchor tag links to instead of viewing it.
Connecting the App with the OpenWeatherMap API
The connection to the API is simply made by making GET requests via AJAX to the endpoint below:
https://api.openweathermap.org/data/2.5/weather?q={city or country}&appid={API key}.The value for q is supplied by the custom value of the input field present in the app.
Below is a typical response parsed into JSON for valid and available cities sent by the API for “Ondo” - the city requested:
{
  "coord": {
    "lon": 4.8333,
    "lat": 7.1
  },
  "weather": [
    {
      "id": 803,
      "main": "Clouds",
      "description": "broken clouds",
      "icon": "04n"
    }
  ],
  "base": "stations",
  "main": {
    "temp": 295.05,
    "feels_like": 295.75,
    "temp_min": 295.05,
    "temp_max": 295.05,
    "pressure": 1011,
    "humidity": 94,
    "sea_level": 1011,
    "grnd_level": 981
  },
  "visibility": 10000,
  "wind": {
    "speed": 0.96,
    "deg": 273,
    "gust": 1.24
  },
  "clouds": {
    "all": 51
  },
  "dt": 1674258362,
  "sys": {
    "country": "NG",
    "sunrise": 1674280709,
    "sunset": 1674323091
  },
  "timezone": 3600,
  "id": 2326171,
  "name": "Ondo",
  "cod": 200
}
And here is the response for non-existent cities:
{
  "cod": "404",
  "message": "city not found"
}
which the isError function above uses to know whether an error occurred or not.
Conclusion
You can head over to the OpenWeatherMap website to look up multiple APIs that they offer for free.
The various API calls available on the OpenWeatherMap website have differences in the ranges of time of their usage depending on the plan you are subscribed to.
Therefore, it is advisable to know what you need from the API before you start.
Gain Debugging Superpowers
Unleash the power of session replay to reproduce bugs and track user frustrations. Get complete visibility into your frontend with OpenReplay, the most advanced open-source session replay tool for developers.