Building an Object Detector with TensorFlow
Add AI and Data Science to your website to detect objects


Object detection has emerged as a core innovation with applications in various domains, ranging from computer vision, security and authentication measures, crime detection, transportation, real-time image analysis, etc. By leveraging the capabilities of TensorFlow in a web application, we can achieve efficient object detection using Tensor models. This article aims to provide insight into object detection and a practical example of steps to integrate object detection into a web application.

Discover how at OpenReplay.com.
The importance of object detection in various fields cannot be overstated, as it offers numerous benefits:
- AI-driven vehicles: By implementing object detection models, self-driven cars can easily detect and correctly identify street signs, traffic lights, people, and other locomotives, facilitating better navigation and decision-making while driving.
- Security and surveillance: Object detection greatly enhances security systems, enabling surveillance systems to track and identify people and objects, monitor behaviors, and enhance security in public places such as airports.
- Healthcare: As an application in the medical field, trained models can identify diseases and abnormalities in scans. These models allow such abnormalities to be detected timely and remedied.
- Enhanced visual understanding and data representation: Using object detection, a computer system can understand and interpret graphical data and represent this information in a form its users can quickly assimilate.
What is object detection?
Object detection is an element of computer vision that uses Artificial Intelligence (AI) to derive meaningful information from images, videos, and visual inputs to the system. An object detection model detects, categorizes, and outlines objects in the visual input (often within a bounding box) and executes or recommends actions defined by that model.
Object detection models are primarily categorized by two key components: visual input localization and object classification. Visual input localization deals with locating objects in the input and assigning a bounding box around the detected objects. These boxes consider the detected object’s width, height, and position (x and y coordinates). Object classification assigns labels to detected objects, providing context as to what they are.
What is Tensorflow?
According to its docs, TensorFlow is an open-source machine learning framework developed by Google to provide a variety of tools and resources for machine learning-related tasks such as computer vision, deep learning, and natural language processing. It supports various programming languages, including popular languages such as Python and C++, making it accessible to broader users. With TensorFlow, users can create machine learning models that run on any platform, i.e., desktop, mobile, web, and cloud applications.
Setting up the development environment
For this article, we will be working with React.js and TensorFlow. To begin, carry out the steps below:
- Set up a React app on your local machine, open up your project directory, and proceed with the next step to add the TensorFlow dependency.
- Open up a shell window in your project root directory and install the TensorFlow dependencies with the following command:
npm i @tensorflow/tsfjs-backend-cpu @tensorflow/tfjs-backend-webgl @tensorflow/tfjs-converter @tensorflow/tfjs-core @tensorflow-models/coco-ssdWe will develop a web application that can detect objects using two methods. The first detects objects in an uploaded image, while the second detects objects from a camera source.
Object detection with image uploads
In this section, we will create an object detector that operates on uploaded images to identify objects present in them. First, create a component folder and a new file, ImageDetector.js. In this file, add the code below:
"use client";
import React, { useRef, useState } from "react";
import * as cocoSsd from "@tensorflow-models/coco-ssd";
import "@tensorflow/tfjs-backend-webgl";
import "@tensorflow/tfjs-backend-cpu";

const ImageDetector = () => {
 // We are going to use useRef to handle image selects
 const ImageSelectRef = useRef();

 // Image state data
 const [imageData, setImageData] = useState(null);

 // Function to open image selector
 const openImageSelector = () => {
   if (ImageSelectRef.current) {
     ImageSelectRef.current.click();
   }
 };

 // Read the converted image
 const readImage = (file) => {
   return new Promise((resolve, reject) => {
     const reader = new FileReader();
     reader.addEventListener("load", (e) => resolve(e.target.result));
     reader.addEventListener("error", reject);
     reader.readAsDataURL(file);
   });
 };

 // To display the selected image
 const onImageSelect = async (e) => {
   // Convert the selected image to base64
   const file = e.target.files[0];
   if (file && file.type.substr(0, 5) === "image") {
     console.log("image selected");
   } else {
     console.log("not an image");
   }

   const image = await readImage(file);
   // Set the image data
   setImageData(image);
 };

 return (
   <div
     style={{
       display: "flex",
       height: "100vh",
       justifyContent: "center",
       alignItems: "center",
       gap: "25px",
       flexDirection: "column",
     }}
   >
     <div
       style={{
         border: "1px solid black",
         minWidth: "50%",
         position: "relative"
       }}
     >
       {/* Display uploaded image here */}
       {
         //   If image data is null then display a text
         !imageData ? (
           <p
             style={{
               textAlign: "center",
               padding: "250px 0",
               fontSize: "20px",
             }}
           >
             Upload an image
           </p>
         ) : (
           <img
             src={imageData}
             alt="uploaded image"
           />
         )
       }
     </div>
     {/* Input image file */}
     <input
       style={{
         display: "none",
       }}
       type="file"
       ref={ImageSelectRef}
       onChange={onImageSelect}
     />
     <div
       style={{
         padding: "10px 15px",
         background: "blue",
         color: "#fff",
         fontSize: "48px",
         hover: {
           cursor: "pointer",
         },
       }}
     >
       {/* Upload image button */}
       <button onClick={() => openImageSelector()}>Select an Image</button>
     </div>
   </div>
 );
};

export default ImageDetector;
In the code snippet above, we use useRef and FileReader to handle image selection. When the “Select an Image” button is clicked, the hidden file input is triggered, and the file selection window opens. The selected image is converted to base64 and read using the JavaScript FileReader in an asynchronous function. When this happens, the imageData state is updated to contain the selected image, and a ternary operator displays the image.
To mount this component, we can add and render it in the project directory primary app/page.jsx:
import ImageDetector from "@/components/imagedetector";

export default function Home() {
 return (
   <div>
     <ImageDetector />
   </div>
 );
}
If we run the application, we will get the following result:
Creating the image object detector
To handle object detection in the selected image, we will create a new function that uses the TensorFlow Coco-ssd object detection model we earlier installed:
//...
// Function to detect objects in the image
const handleObjectDetection = async (imageElement) => {
 // load the model
 const model = await cocoSsd.load();
 // Detect objects in the image
 const predictions = await model.detect(imageElement, 5);
 console.log("Predictions: ", predictions);
};
The code above uses the cocoSsd package to handle object detection. We have also limited the number of detections to 5, as running many detections on the browser can sometimes result in slower results if the system it is being run on doesn’t possess sufficient GPU and CPU memory.
To create imageElement, we will create an element within the onImageSelect function and pass the data for the selected image to it.
// Within the onImageSelect function
//...
// Create an image element
const imageElement = document.createElement("img");
imageElement.src = image;
imageElement.onload = async () => {
 handleObjectDetection(imageElement);
};
The predictions returned by the handleObjectDetection function classify objects in the selected image and provide information on their position. Using this information, we will construct a bounding box. For example, we can add a picture of a dog and a cat and get the following results:
 The image below shows the logged predictions in the browser console:
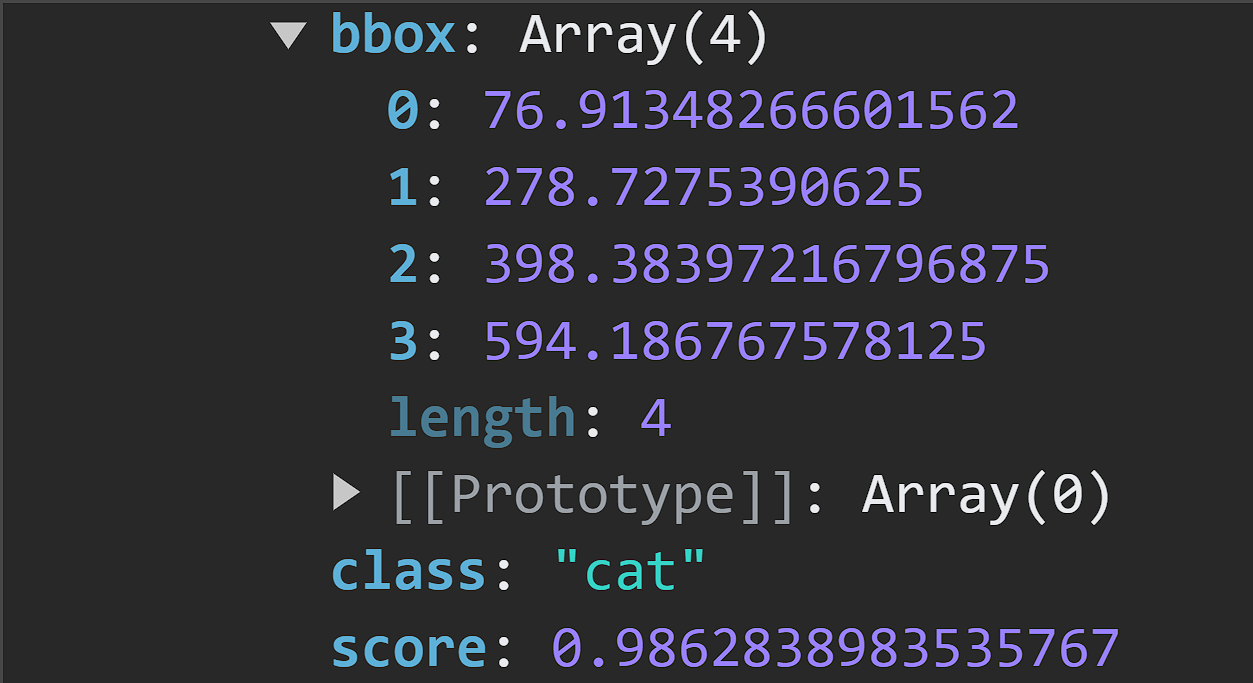 Upon closer inspection, we can see the predictions generated by the object detection model.
- bbox: This provides information on the bounding box position and sizes.
- class: This is a classification of objects in the image.
- score: An estimate on the accuracy of the prediction. The closer this value is to 1, the more accurate the prediction is.
Constructing bounding box for predicted objects
For the predictions, we will create a state object which will be updated with the prediction data returned by the model.
// Handle predictions
const [predictionsData, setPredictionsData] = useState([]);
To update this state with the prediction data, make the following changes to handleObjectDetection:
// Set the predictions data
setPredictionsData(predictions);
Using the predictionsData array, we will create a function that generates a bounding box for each element in the image. To create bounding boxes of unique colors, we will first create an array of colors and a function to shuffle the array and provide a unique color section:
// An array of bounding box colors
const colors = ["blue", "green", "red", "purple", "orange"];

// Shuffle the array to randomize the color selection
function shuffleArray(array) {
 for (let i = array.length - 1; i > 0; i--) {
   const j = Math.floor(Math.random() * (i + 1));
   [array[i], array[j]] = [array[j], array[i]];
 }
}

shuffleArray(colors);
Finally, we can create and display the bounding box with the following lines of code:
{/* Create bounding box */}
{
 // If predictions data is not null then display the bounding box
 // Each box has a unique color
 predictionsData.length > 0 &&
   predictionsData.map((prediction, index) => {
     const selectedColor = colors.pop(); // Get the last color from the array and remove it
     return (
       <div
         key={index}
         style={{
           position: "absolute",
           top: prediction.bbox[1],
           left: prediction.bbox[0],
           width: prediction.bbox[2],
           height: prediction.bbox[3],
           border: `2px solid ${selectedColor}`,
           display: "flex",
           justifyContent: "center",
           alignItems: "center",
           flexDirection: "column",
         }}
       >
         <p
           style={{
             background: selectedColor,
             color: "#fff",
             padding: "10px 15px",
             fontSize: "20px",
             textTransform: "capitalize",
           }}
         >
           {prediction.class}
         </p>
         <p
           style={{
             background: selectedColor,
             color: "#fff",
             padding: "10px 15px",
             fontSize: "20px",
             textTransform: "capitalize",
           }}
         >
           {Math.round(parseFloat(prediction.score) * 100)}%
         </p>
       </div>
     );
   })
}
{/* Display uploaded image here */}
//... Other code below
In the browser, we now have the following results:
Running object detector model on a camera
In this section, we will create a component that runs object detection using visual data from a camera. To access the system webcam, we will install a new dependency, React-webcam:
npm i react-webcamAccessing visual data with React-webcam
To access the system webcam with the React-webcam package, In the components directory, create a new file CameraObjectDetector.jsx and add the following code to it:
"use client";
import React, { useRef, useState, useEffect } from "react";
import * as cocoSsd from "@tensorflow-models/coco-ssd";
import Webcam from "react-webcam";

const CameraObjectDetector = () => {
 // Use useRef to handle webcam
 const webcamRef = useRef(null);
 // Use useRef to draw canvas
 const canvasRef = useRef(null);

 // Handle predictions
 const [predictionsData, setPredictionsData] = useState([]);

 //   Intialize cocoSsd
 const initCocoSsd = async () => {
   const model = await cocoSsd.load();
   setInterval(() => {
     detectCam(model);
   }, 5);
 };

 // Function to use webcam
 const detectCam = async (model) => {
   if (
     webcamRef.current !== undefined &&
     webcamRef.current !== null &&
     webcamRef.current.video.readyState === 4
   ) {
     // Get video properties
     const video = webcamRef.current.video;
     const videoWidth = webcamRef.current.video.videoWidth;
     const videoHeight = webcamRef.current.video.videoHeight;

     // Set video width and height
     webcamRef.current.video.width = videoWidth;
     webcamRef.current.video.height = videoHeight;

     // Set the canvas width and height
     canvasRef.current.width = videoWidth;
     canvasRef.current.height = videoHeight;

     // Detect objects in the image
     const predictions = await model.detect(video);
     console.log(predictions);

     // Draw canvas
     const ctx = canvasRef.current.getContext("2d");
   }
 };

 // useEffect to handle cocoSsd
 useEffect(() => {
   initCocoSsd();
 }, []);
 return (
   <div
     style={{
       height: "100vh",
       display: "flex",
       alignItems: "center",
       justifyContent: "center",
     }}
   >
     <Webcam
       ref={webcamRef}
       style={{
         position: "relative",
         marginLeft: "auto",
         marginRight: "auto",
         left: 0,
         right: 0,
         textAlign: "center",
         zindex: 9,
         width: 640,
         height: 480,
       }}
     />
     <canvas
       ref={canvasRef}
       style={{
         position: "absolute",
         marginLeft: "auto",
         marginRight: "auto",
         left: 0,
         right: 0,
         textAlign: "center",
         zindex: 9,
         width: 640,
         height: 480,
       }}
     />
   </div>
 );
};

export default CameraObjectDetector;
In the code block above, we have integrated React-webcam to return video footage captured by the detected system webcam. We are also passing this footage on to the cocoSsd model and logging predictions based on it. In the subsequent section, we will use this prediction data to create bounding boxes in the canvas element. To mount the component, make the following change to app/page.jsx:
import CameraObjectDetector from "@/components/CameraObjectDetector";
import ImageDetector from "@/components/imagedetector";
export default function Home() {
return (
<div>
{/* <ImageDetector /> */}
<CameraObjectDetector />
</div>
);
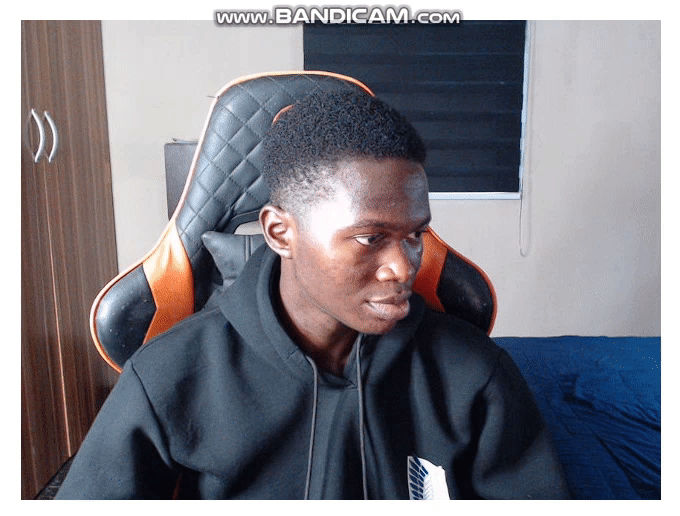
}Now, if we run the application, we will get the following result in the browser:
 In the console, we can see the
 cocoSsd predictions:
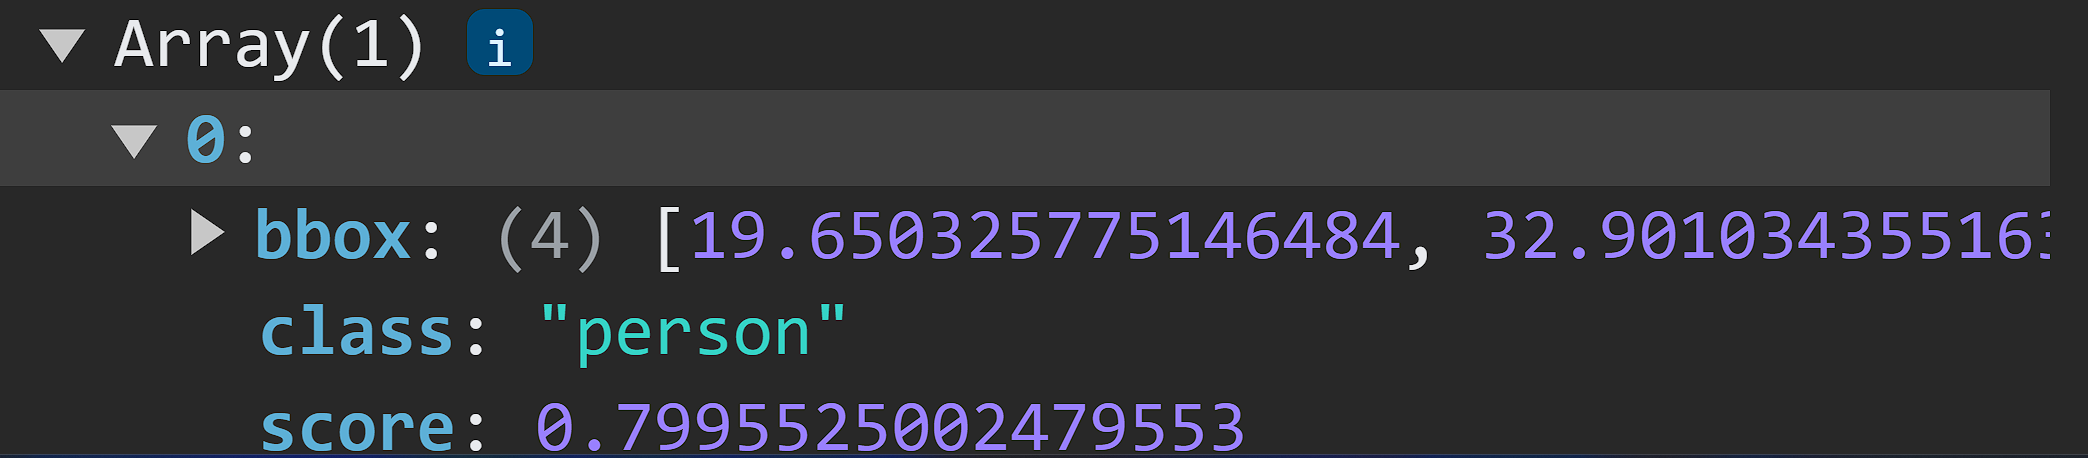 In the image above, the logged predictions contain the
 bbox, class, and the score value.
Drawing bounding boxes
To draw bounding boxes, we will create a function, drawBoundingBox, which takes in the predictions and constructs rectangles on objects in the video using the data.
// An array of bounding box colors
const colors = ["blue", "green", "red", "purple", "orange"];

// Shuffle the array to randomize the color selection
function shuffleArray(array) {
 for (let i = array.length - 1; i > 0; i--) {
   const j = Math.floor(Math.random() * (i + 1));
   [array[i], array[j]] = [array[j], array[i]];
 }
}

shuffleArray(colors);

// Counter to keep track of the next color to use
let colorCounter = 0;

// Draw bounding boxes
const drawBoundingBox = (predictions, ctx) => {
 predictions.forEach((prediction) => {
   const selectedColor = colors[colorCounter]; // Use the next color from the array
   colorCounter = (colorCounter + 1) % colors.length; // Increment the counter
   // Get prediction results
   const [x, y, width, height] = prediction.bbox;
   const text = prediction.class;

   // Set styling
   ctx.strokeStyle = selectedColor;
   ctx.font = "40px Montserrat";
   ctx.fillStyle = selectedColor;

   // Draw rectangle and text
   ctx.beginPath();
   ctx.fillText(text, x, y);
   ctx.rect(x, y, width, height);
   ctx.stroke();
 });
};
In the code block above, we created an array of colors that we would use for the bounding boxes. Using the predictions state, we can access the bbox property for the object’s dimensions and the class property to classify the displayed object. Next, we use the canvas prop ctx to draw the rectangle and text for the bounding box.
For the final step, we will pass on the canvas property and predictions to the drawBoundingBox function in detectCam:
const detectCam = async (model) => {
if (
webcamRef.current !== undefined &&
webcamRef.current !== null &&
webcamRef.current.video.readyState === 4
){
//... Former code here
// Draw canvas
const ctx = canvasRef.current.getContext("2d");
drawBoundingBox(predictions, ctx);
}
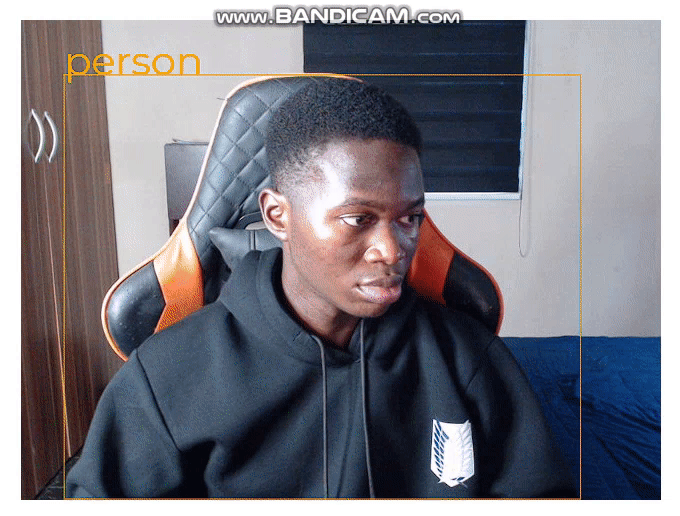
};Now, we get the bounding boxes on the video when we run the application:
Conclusion
This article explored the integration of object detection capabilities in a web application. We began by introducing the concept of object detection and domains where its applications are beneficial, and we finally created an implementation of object detection on the web using React.js and Tensorflow.
The capabilities presented by object detection using Tensorflow are limitless. Its other custom models can further explore them, creating interactions and applications for real-world scenarios such as surveillance, augmented reality systems, etc.