Building CRUD Apps with NextJs


When building full-stack web applications, the ability to create, read, update and delete items is crucial. For example, blog sites need dynamic content management for productivity. With CRUD functionality, we can carry out these functions in our application. We will be using Next.js as our case study to look at how CRUD implementation works.
What is a CRUD application?
A CRUD application refers to an app that can perform four simple functions: Creating, Reading, Updating, and Deleting data. If you have developed programs using databases, you would have likely performed CRUD operations. Applications that keep track of data would require data storage and organization in ways that can be easily accessed, searched, or modified. Hence the need for CRUD functionality in modern-day applications.
How do CRUD operations work?
The user in a database can store the data required by an application. The database may provide an authorization key to allow modifications to the data in storage. CRUD, as mentioned earlier, is made up of four functions: Create, Read, Update, and Delete.
-
Create functionality: This operation inserts new records into the database, adding new data to pre-existing ones stored in the database. For instance, we can add new users to an application to a pre-existing database of the application’s users.
-
Read functionality: This function handles the fetching of data from the database for use by the user. A user can fetch the entire or a particular data set using this operation. It will simply retrieve the resources and display the results. These results can be viewed or have modifications performed on them.
-
Update Functionality: This function lets us modify existing records in the database. All that will be required is information about the position of the data you wish to change in the database.
-
Delete functionality: We use the Delete functionality to remove a record stored in the database. With this, a user can delete one or multiple records.
Benefits of CRUD Application
Developers use CRUD for applications requiring managing data in a database structure. With all the functions offered by CRUD apps, there are some merits to using them. Here are a few:
- It facilitates the design of the application making it more scalable and straightforward. With CRUD, you can manage and handle data in complex application structures, making it easier to build large applications.
- Users may choose to secure data by requesting access credentials for authorization to perform CRUD operations on data stored in an application. Direct access from browsers is restricted, and only authorized users can modify the database.
When should we implement CRUD functionality?
Without CRUD, websites providing e-commerce, blogs, and social media (to name a few examples) would be impossible to build and maintain. It would be best if you used CRUD operations when there is data mutability involved in the business logic of your application. Examples of this are:
- Interactive user sites with mutable data like e-learning platforms and social media.
- Sites requiring frequent updating of information, such as news or e-commerce websites.
- Creation and management of dynamic content for a website.
- When a site requires requests to create data to be made on the client’s side and validations to be carried out on the request before the server sends a corresponding response to allow that operation.
Types of databases, differences, pros, and cons
There are primarily two major types of database structures:
- Server query Language (SQL) database
- No-Server Query Language (NoSQL) database
SQL Database
An SQL database is a table-based relational data structure that defines and manipulates data using pre-defined schemas to determine its structure. All data to be worked on within the database must follow this pre-determined structure. Examples include Oracle, MySQL, Microsoft SQL Server, and PostgreSQL.
Pros
- Are best suited for handling complex queries.
- Follows ACID (atomicity, consistency, isolation, and durability) property which makes them capable of performing different tasks as a single logical operation. ACID refers to a collection of properties of database transactions intended to guarantee the validity of an operation in the event of errors.
- It has support from vendors for large-scale deployment.
- Have been around much longer than NoSQL databases and have more tools for database management.
Cons
- SQL databases are less suitable for frequently changing data compared to NoSQL, and are more suited for handling complex queries. New data to be added to SQL databases will usually require some alterations to the schema, unlike NoSQL databases, where a user can easily add data without any prior step.
- It isn’t easy to scale when there is a large amount of data to handle as the size of the application increases.
- Due to its rigid pre-determined structure, it is not flexible as changes in its structure would be both difficult and disruptive.
NoSQL Databases
No SQL database is a non-relational data structure where data is stored in non-relational tables. NoSQL databases include pure document databases (such as JSON documents), key-value stores where data is stored alongside key values to reference them, wide-column databases, and graph databases.
Pros
- Unlike SQL databases, NoSQL databases offer flexible schemas. It does not follow the rigid structure of SQL and can be easily modified to suit new changes in the data structure. You can create documents without having to pre-define their structures.
- Can handle storage of structured and semi-structured data due to its non-tabular form.
- Support large numbers of user access, making it suitable for large-scale applications.
- NoSQL databases are cheaper to scale compared to SQL databases. SQL databases are vertically scalable and require increasing the hardware capacity on a single server. In contrast, NoSQL databases are horizontally scalable and can be scaled by adding more servers to manage the load.
- No SQL databases offer the creation of multiple databases with different structures and syntax.
Cons
- They have been around for a lesser period than SQL databases and are less popular. SQL databases have been around for about 40 years, are more popular, and easier to get support and add-ons to integrate with other services.
How can you use CRUD operations?
With all these fantastic features possible with CRUD, how can one use it within an application? The first thing a developer will require for the application is a database to store data. You may choose an SQL database if you will be handling structured data. On the other hand, you may select NoSQL if the data does not require a pre-defined schema and requires flexibility or scaling as development progresses. After choosing your preferred database type, the next step is to connect your database to your application and set up your user schema to access the database. Finally, build the app’s backend with the four essential functions of creating, reading, updating, and deleting your data.
With this out of the way, what stack can one use in building a flexible and scalable CRUD application? In this tutorial, we will be using the Next.js framework as a use case for CRUD applications.
CRUD with Next.js for front-end
With diverse Javascript frameworks out there, what makes Next.js stand out? With Next.js, you can effortlessly build your front-end, connect your web app to your database, and set up CRUD applications easily using Next.js provisions for API routes. With this, you can create and manage your endpoints for CRUD operations on your database data.
Tools for building CRUD applications in Next.js
There are two approaches to setting up API endpoints for your CRUD operations:
- Hardcode API routes for your CRUD app in the API directory provided by Next.js. Here you can create API endpoints with access schema to enable access to the database.
- Use a helper dependency such as Next.js dependency called Next Crud. Next-Crud is a helper library that can be integrated to make the creation of API routes easier by using a model built with Prisma.
Creating a Basic NextJs Todo App
In this section, we will build a basic to-do app with NextJs to demonstrate CRUD operations. We will be using the FaunaDB database along with NextJs for this.
First, we will be installing these dependencies in CLI with the following commands:
npx create-next-app todoappThe above command creates a Next application called Todo in your working directory. Next, we will install the FaunaDB dependency. To do this, we first open the project directory with:
cd todoappThen install the dependency:
npm install --save faunadbWith this installed, we can proceed with building our app. First, we will design the Layout of our application with hard-coded data, and then we will set up our Fauna database and link it to our application and perform CRUD operations with it.
In the working directory, create a new folder called components. This folder will contain the various building blocks for our application. In this folder, create two files called Todo.js and TodoItem.js. The first will contain our app layout, while the latter will contain a list of tasks for the application.
In Todo.js, we have the following:
import { React, useEffect, useState } from "react";
import styles from "../../styles/Home.module.css";
import TodoItem from "./TodoItem";
function Todo() {
const [newtodo, setnewtodo] = useState("");
const handleinput = (e) => {
setnewtodo(e.target.value);
};
const HandleSubmit = (e) => {
console.log(newtodo);
};
return (
<div className={styles.maincont}>
<h1>Todo App</h1>
<div className={styles.newtodo}>
<h3>Add new todo</h3>
<div className={styles.semi}>
<input
type="text"
value={newtodo}
onChange={(e) => handleinput(e)}
></input>
<button onClick={() => HandleSubmit()}>
Add Todo
</button>
</div>
</div>
<div>
<TodoItem />
</div>
</div>
);
}
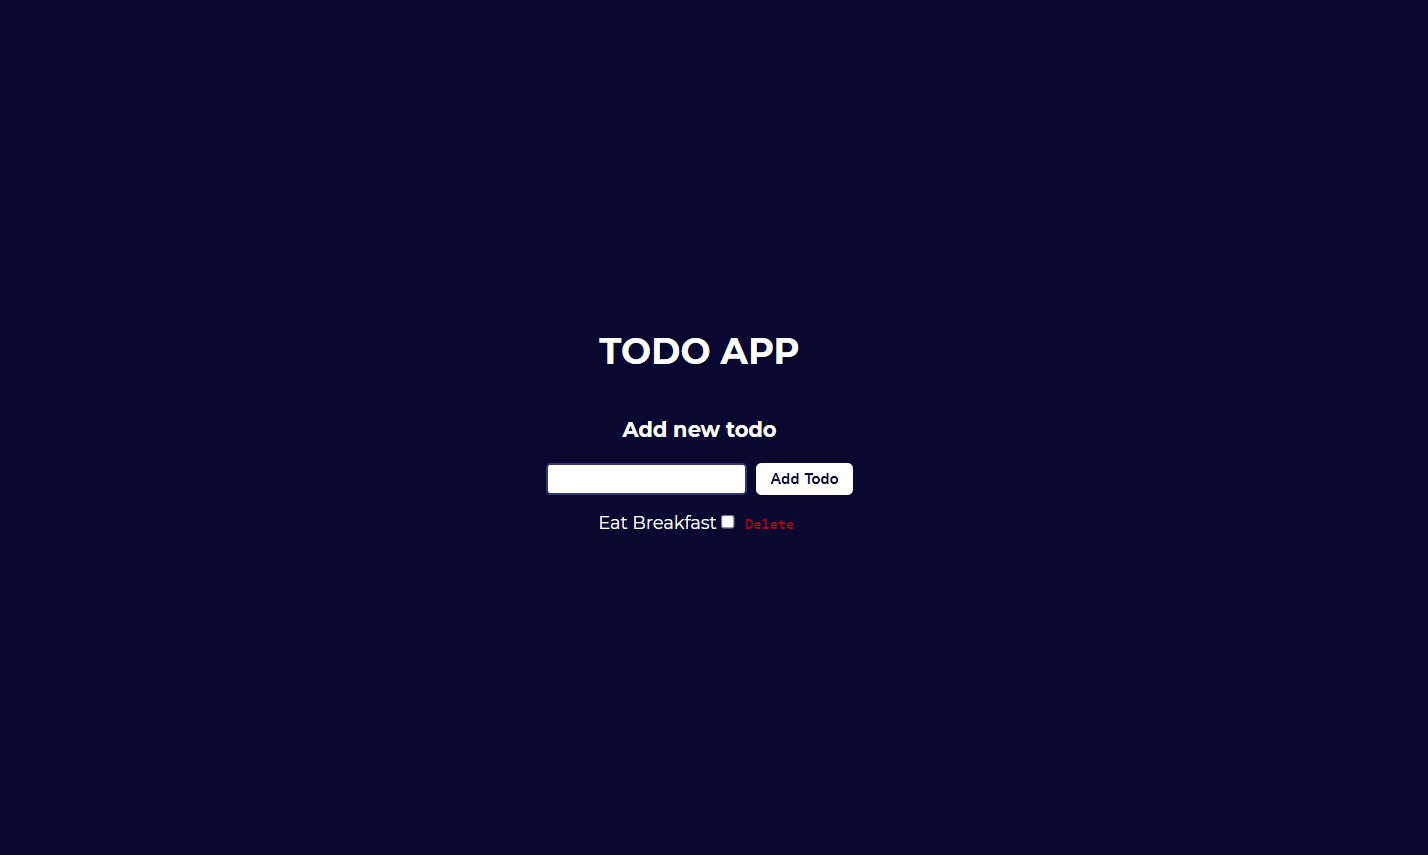
export default Todo;The component above contains an input field and button, which we will use to add new Todo Items to our app. It also has the TodoItem component for our tasks. In the TodoItem component, we can define the structure of the tasks:
    import { React, useState } from "react";
    import styles from "../../styles/Home.module.css";

    function TodoItem() {
      const [isChecked, setIsChecked] = useState(false);

    const handleDelete = () => {
      };

      const handlecheck = async () => {
      };

      return (
        <div>
          <span className={styles.eachtodo}>
            <p className={styles.text}>Eat Breakfast</p>
            <div>
              <input
                type="checkbox"
                className={styles.toggle}
                defaultChecked= {false}
                onChange={handlecheck}
                onClick={() => setIsChecked(!isChecked)}
              />
              <button onClick={handleDelete}>Delete</button>
            </div>
          </span>
        </div>
      );
    }
    export default TodoItem;
Above, we have a task, “Eat Breakfast,” along with a checkbox and a button to delete the task. We will add all these functionalities as we progress.
For the app to be rendered, we will add the Todo component to our index.js file:
import Head from "next/head";
import styles from "../styles/Home.module.css";
import Todo from "./components/Todo";

export default function Home() {
  return (
    <div className={styles.container}>
      <Head>
        <title>Create Next App</title>
        <meta
          name="description"
          content="Generated by create next app"
        />
        <link rel="icon" href="/favicon.ico" />
      </Head>
      <Todo />
    </div>
  );
}
To style our app, we will add some CSS to the Home.module.css file:
.container {
	padding: 0;
}

.maincont {
	background: rgb(8, 8, 49);
	width: 100%;
	min-height: 100vh;
	display: flex;
	justify-content: center;
	align-items: center;
	flex-direction: column;
	font-family: Montserrat;
	color: #fff;
}

.maincont h1 {
	text-transform: uppercase;
}

.newtodo h3 {
	text-align: center;
}

.newtodo .semi {
	display: flex;
	gap: 8px;
}

.semi input {
	padding: 5px 7px;
	border: 2px solid rgb(52, 52, 114);
	outline: none;
	border-radius: 4px;
}

.semi button {
	border: none;
	padding: 5px 13px;
	background: #fff;
	color: rgb(8, 8, 49);
	border-radius: 5px;
	font-weight: bold;
}

.eachtodo {
	display: flex;
	flex-direction: row;
	align-items: center;
	justify-content: space-between;
}

.eachtodo div button {
	color: red;
	background: none;
	border: none;
	opacity: 70%;
	font-family: monospace;
	font-weight: 600;
}

.maincont button:hover {
	cursor: pointer;
}

.text {
	max-width: 350px;
}
This concludes the basic structure of our application. We can run our app using the npm run dev command in CLI and navigate in our browser to localhost:3000 to view the results.
Open Source Session Replay
OpenReplay is an open-source, session replay suite that lets you see what users do on your web app, helping you troubleshoot issues faster. OpenReplay is self-hosted for full control over your data.

Start enjoying your debugging experience - start using OpenReplay for free.
Creating a Fauna database
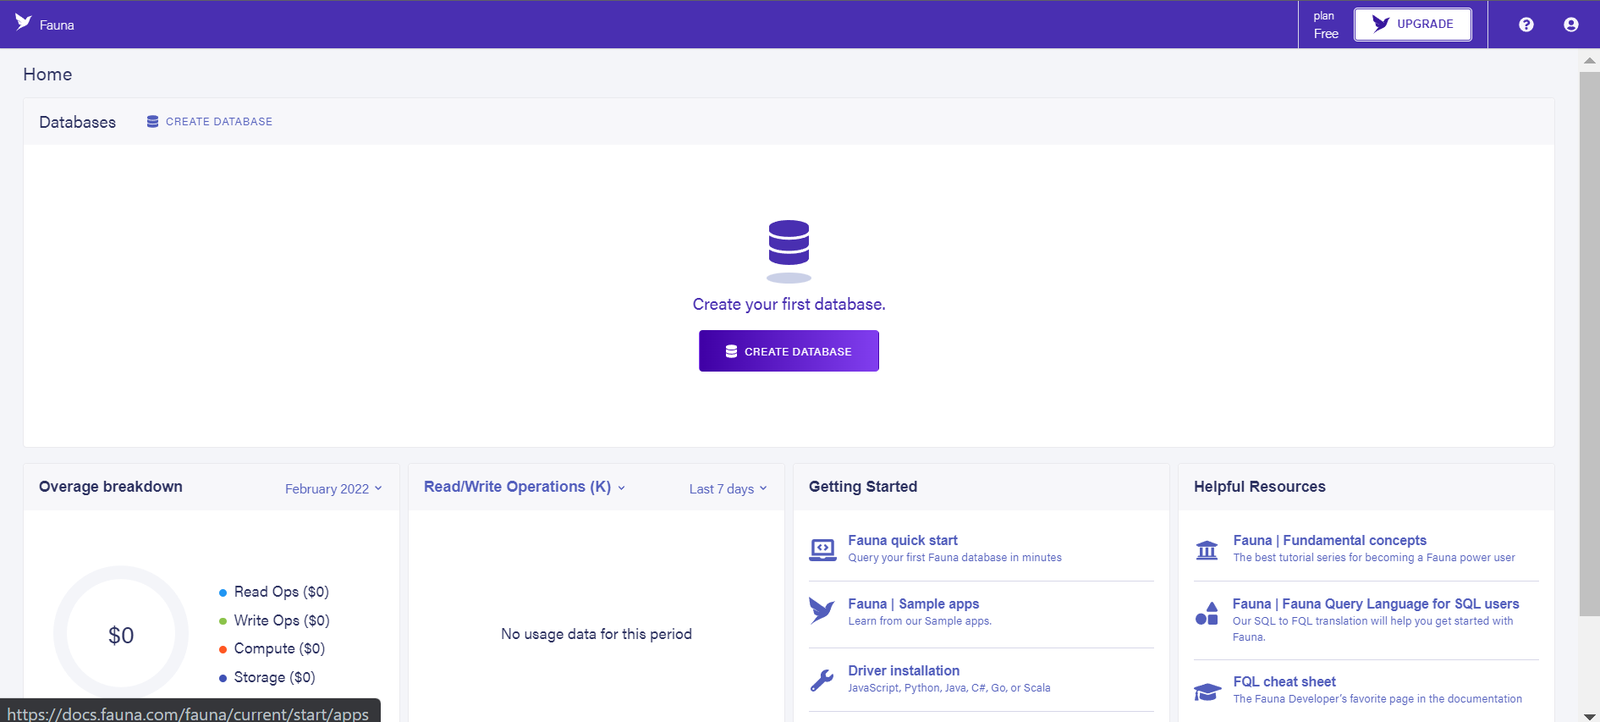
Navigate in your browser to the Fauna webpage and click on sign up and create a user account, or log in if you already have an existing account. After signing in, click on Create a Database on the dashboard.
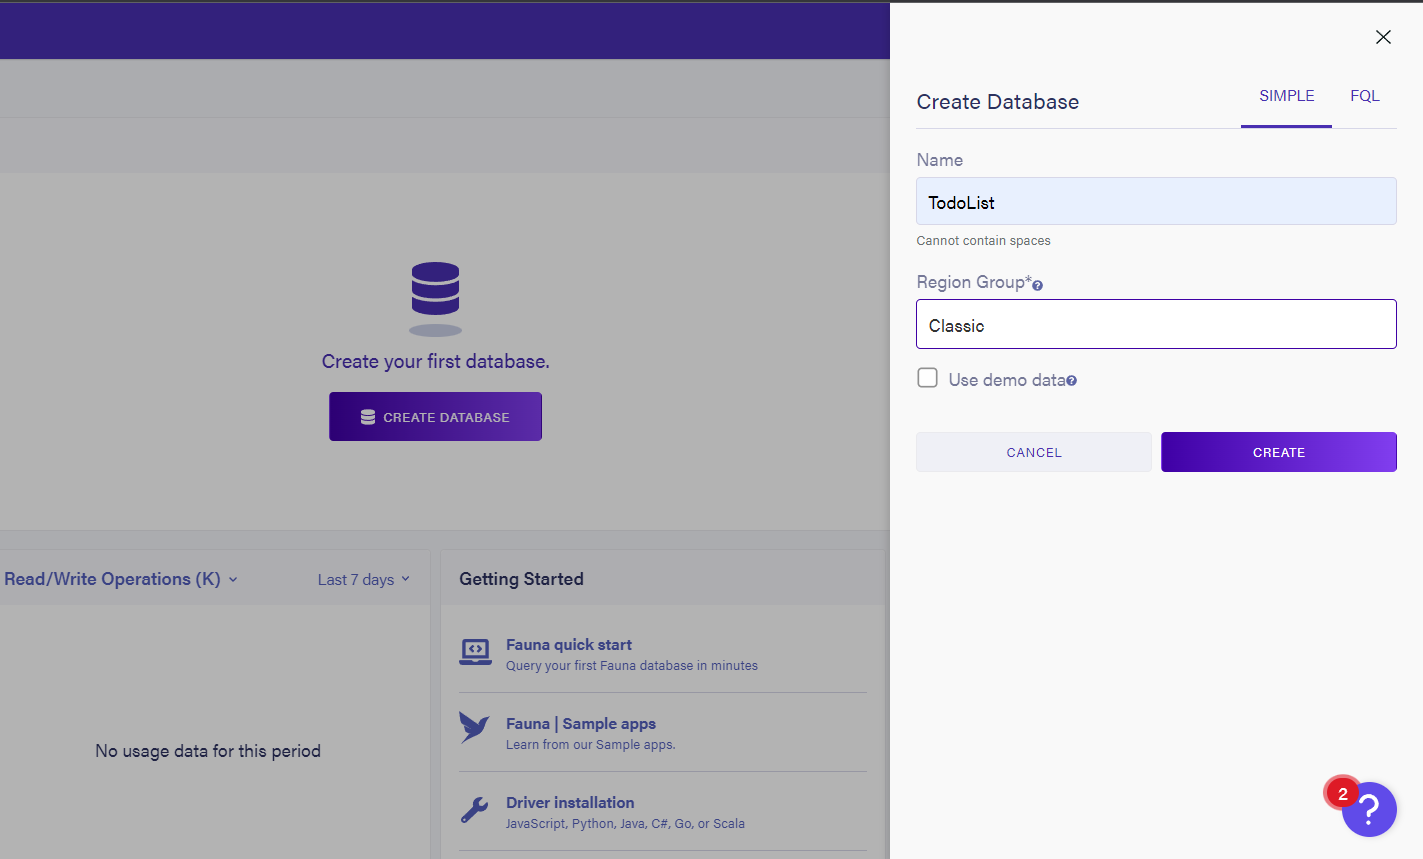
Enter the database name in the sidebar that pops out and click on Create
On the page that opens up, click on Create a new collection and create a ‘todos’ collection.
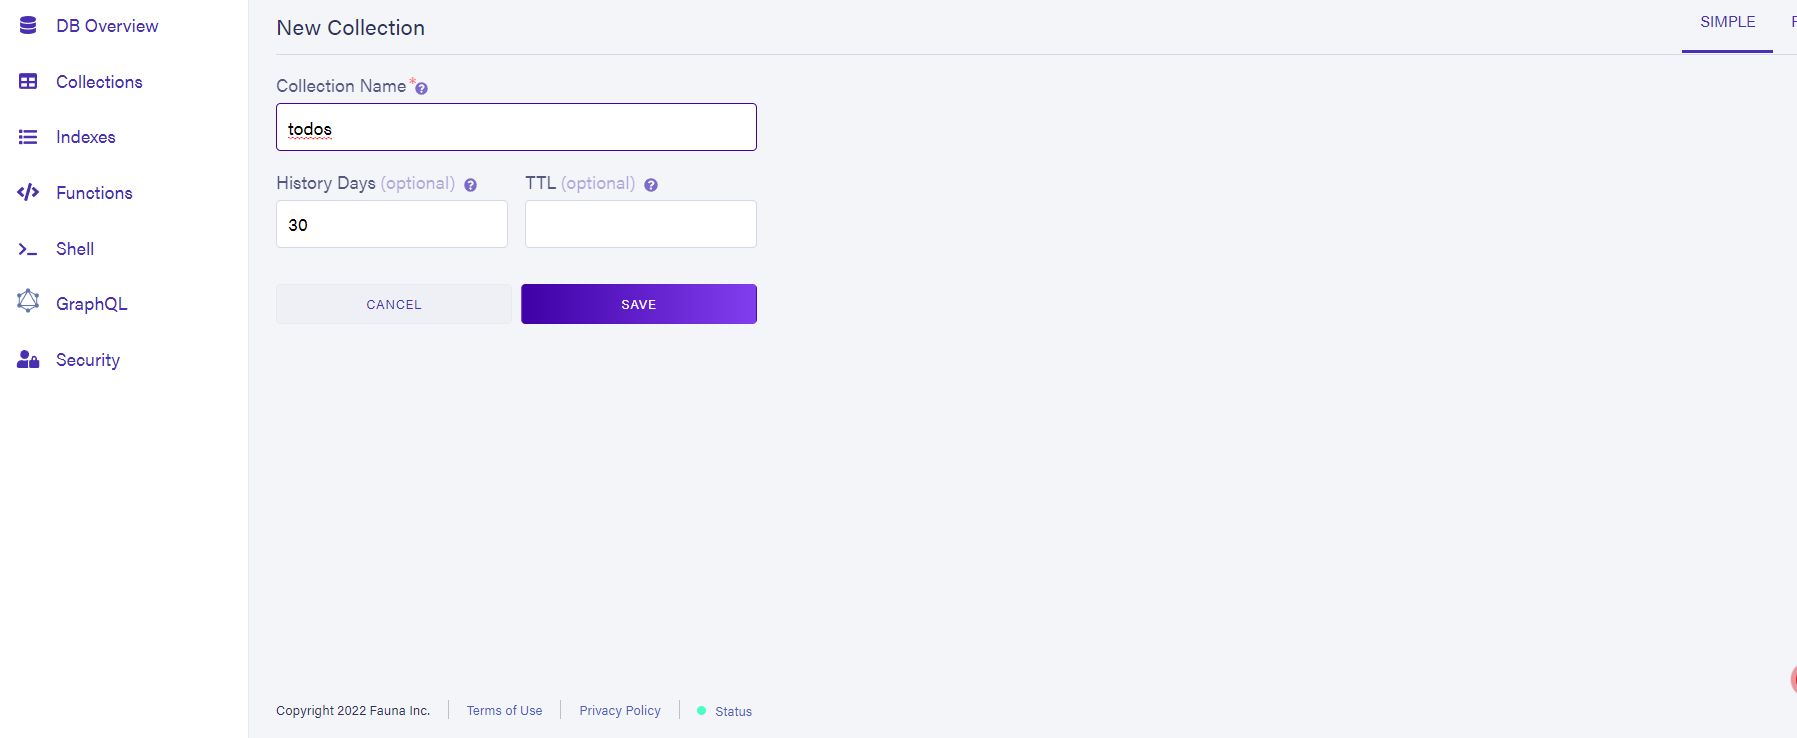
Click on Save to create this collection. With this, we have our database set up complete. We can add data to this by clicking on the new Document button and defining the todo item as follows:
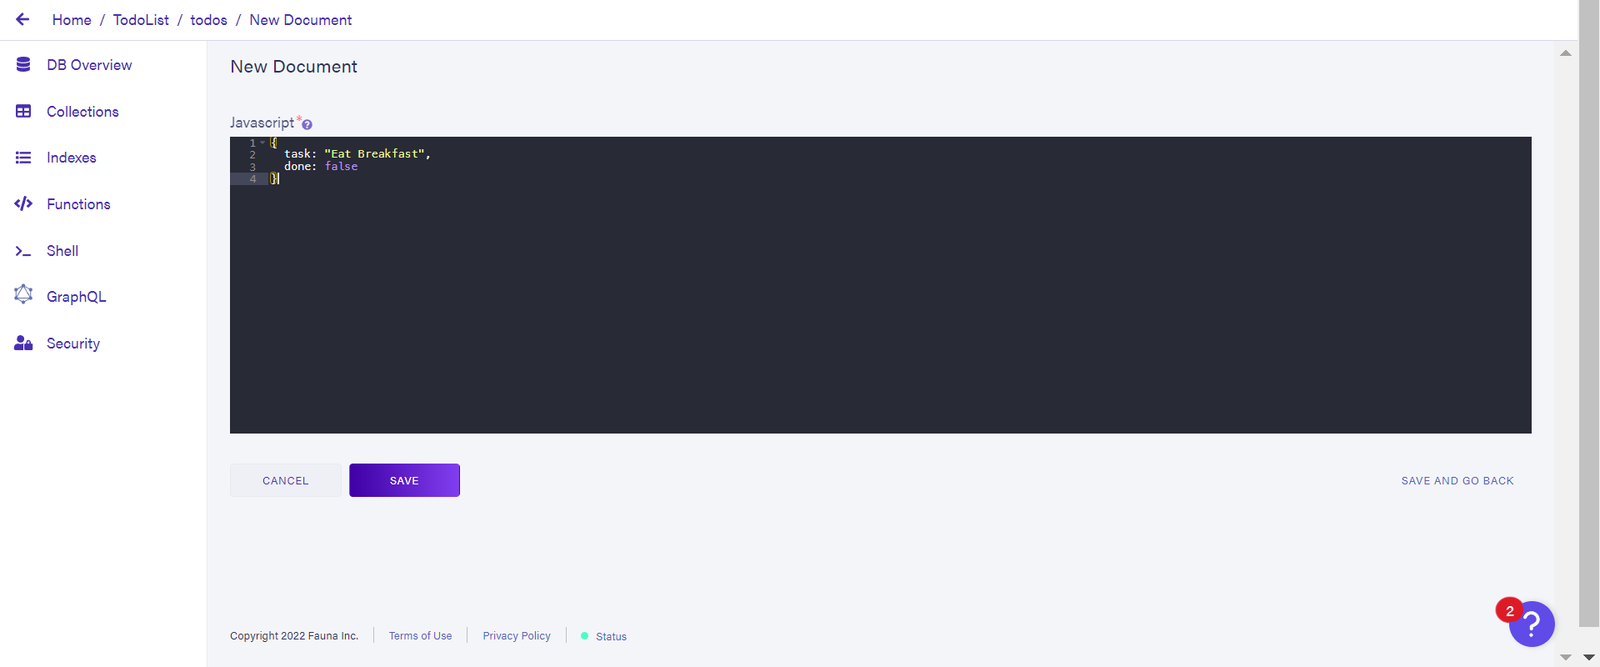
The task contains the to-do item, while done will contain the value of our checkbox to determine if a task has been completed. Click on Save to add this to the todos collection.
Fetching data from FaunaDB
To be able to access the data stored on FaunaDB, we will first need to create access credentials. To do this, click on Security on the left navigation pane, then click on the new Key button, and finally click on Save to generate the key. Save the generated key as we will be using it in our application.
Back in our project folder, within the api folder, create a folder called getData and a file index.js in it. This file will contain our Read method to fetch data from FaunaDB. By default, Next.js treats all files within the api directory as API end-points.
const { Ref } = require("faunadb");
const faunadb = require("faunadb");
const secret = "your app secret";
const q = faunadb.query;
const client = new faunadb.Client({
  secret,
  domain: "db.fauna.com",
});
module.exports = async (req, res) => {
  try {
    const dbs = await client.query(
      q.Map(
        q.Paginate(q.Documents(q.Collection("todos"))),
        q.Lambda("doc", q.Get(q.Var("doc")))
      )
    );

    res.status(200).json(dbs.data);
  } catch (error) {
    res.status(500).json({ error: error.message });
  }
};
The code above initializes the FaunaDB client and uses the key to access the todos collection. This data is then stored in the dbs variable. If we run our application and run the above via http://localhost:3000/api/getData, we get a result similar to the image below:

To show this in the application, add the following code to Todo.js
const [data, setData] = useState([]);

async function fetchData() {
  const res = await fetch("../api/getData");
  const newData = await res.json();
  setData(newData);
}
useEffect(() => {
  fetchData();
}, [newtodo]);
Next, we will pass this to our TodoItem component and render it.
{
  data &&
    data.map((todo) => (
      <TodoItem key={todo.ref["@ref"].id} todo={todo} />
    ));
}
Then in TodoItem component
function TodoItem({ todo }) {
  // ...
  return (
    <div>
      <span className={styles.eachtodo}>
        <p className={styles.text}>{todo.data.task}</p>
        <div>
          <input
            type="checkbox"
            className={styles.toggle}
            defaultChecked={todo.data.done}
            onChange={handlecheck}
            onClick={() => setIsChecked(!isChecked)}
          />
          <button onClick={handleDelete}>Delete</button>
        </div>
      </span>
    </div>
  );
}
With this, we get the results from our FaunaDB as our task. Also, the value of the done property is assigned to the checkbox as the default value.
Next, we will create API endpoints for the Create, Update and Delete functionalities. For this, we will create three new folders in the api directory, namely newData, deleteData, and updateData, and create an index.js file in each of these new folders. For our newData endpoint, we have the following code:
const { Ref } = require("faunadb");
const faunadb = require("faunadb");
const secret = "Your app secret";
const q = faunadb.query;
const client = new faunadb.Client({ secret });
module.exports = async (req, res) => {
  const inputData = req.body.data;
  try {
    const dbs = await client.query(
      q.Create(q.Collection("todos"), {
        data: {
          task: inputData.newtodo,
          done: false,
        },
      })
    );
    res.status(200).json(dbs.data);
  } catch (error) {
    res.status(500).json({ error: error.message });
  }
};
This will take the input field’s value from our app and pass a default value of false for the task completion. This value will then be sent to our Fauna database.
Then in Todo.js, we can bind this to the input as follows:
import newData from "../api/newData";

// ...

const [inputData, setInputData] = useState({});
const requestParams = {
  method: "POST",
  headers: { "Content-Type": "application/json" },
  body: JSON.stringify({ data: inputData }),
};

// ...

const handleinput = (e) => {
  setnewtodo(e.target.value);
  setInputData({
    ...inputData,
    newtodo: e.target.value,
  });
};

const HandleSubmit = (e) => {
  console.log(newtodo);
  addTodoItem();
  setnewtodo("");
};

async function addTodoItem() {
  await fetch("../api/newData", requestParams)
    .then(() => newData())
    .catch((e) => console.log(e));
}
The handleinput function is used to assign the input field’s value to the new todo property of inputData. The new new todo is added to the previous ones using the spread operator. When the submit button is clicked, it is passed to Fauna via the newData API endpoint.
We can now set up the updateData functionality:
const { Ref } = require("faunadb");
const faunadb = require("faunadb");
const secret = "Your Secret Key";
const q = faunadb.query;
const client = new faunadb.Client({ secret });

module.exports = async (req, res) => {
  const id = req.body.id;
  const inputData = req.body.data;
  try {
    const dbs = await client.query(
      q.Update(q.Ref(q.Collection("todos"), id), {
        data: { done: inputData.done },
      })
    );
    res.status(200).json(dbs.data);
  } catch (error) {
    res.status(500).json({ error: error.message });
  }
};
This references the selected todo by id and updates the chosen task as either completed or not based on the value of the checkbox.
For the deleteData functionality, we have
const { Ref } = require("faunadb");
const faunadb = require("faunadb");
const secret = "Your App Secret";
const q = faunadb.query;
const client = new faunadb.Client({ secret });

module.exports = async (req, res) => {
  const id = req.body.id;
  try {
    const dbs = await client.query(
      q.Delete(q.Ref(q.Collection("todos"), id))
    );
    res.status(200).json(dbs.data);
  } catch (error) {
    res.status(500).json({ error: error.message });
  }
};
Above, the selected task is referenced by its id, and a method is passed to delete it from the Fauna Database.
We can bind the update functionality to the checkbox and the delete functionality to the delete button in the TodoItem component.
import deleteData from "../api/deleteData";

// ...

const [isChecked, setIsChecked] = useState(false);
const [done, isDone] = useState(true);
const [aDelete, isDeleted] = useState("");
const [inputData, setInputData] = useState({});
let d = "";

const handlecheck = async () => {
  isDone(!todo.data.done);
  let c = !todo.data.done;
  isDeleted(todo.ref["@ref"].id);
  d = todo.ref["@ref"].id;
  let g = {
    ...inputData,
    done: c,
  };
  await fetch("../api/updateData", {
    method: "PUT",
    headers: { "Content-Type": "application/json" },

    body: JSON.stringify({ data: g, id: d }),
  })
    .then(() => deleteData())
    .catch((e) => console.log(e));
};

const handleDelete = () => {
  d = todo.ref["@ref"].id;
  isDeleted(todo.ref["@ref"].id);
  deleteItem();
};

async function deleteItem() {
  await fetch("../api/deleteData", {
    method: "DELETE",
    headers: { "Content-Type": "application/json" },

    body: JSON.stringify({ id: d }),
  })
    .then(() => deleteData())
    .catch((e) => console.log(e));
}
When the value of the checkbox is changed, the opposite value of the previous data is sent to the database to update the task relating to the particular id. This is also applicable to the delete button; when it is clicked, the id is passed to the API endpoint, and the corresponding record is deleted from the database collection.
Conclusion
CRUD functionalities are essential in modern-day applications, and the ability to properly utilize their usage provides better app performance and user experience for your web application. Here we learned how to set up CRUD operations in an application using an example To-do app to demonstrate CRUD functionalities.
Resources
If you are wondering or need a live demonstration of how CRUD operates, here is an example demo using a Todo application built with Next.js on CodeSandbox