Building Interactive Dashboards with Gridstack.js
Use this package to enable highly interactive screens


Dashboards that allow drag-and-drop interaction provide a more personalized engagement, an intuitive user interface, and real-time control. It is always nice if users of a dashboard can drag the components around to suit their individual needs better. This is because different people interact with things in different ways. Drag-and-drop is a strategy to allow this customized interaction. This article is a guide on how to use GridStack.js to create a drag-and-drop interface in a dashboard.

Discover how at OpenReplay.com.
A Dashboard is an excellent feature to add to applications. It is any user interface that allows for quick visualization of important information or reports users of an application need. Many applications include a dashboard page where their users see key data summaries and future projections.
It is also important for a dashboard to be aesthetically appealing, and for its users to find whatever information they need easily. When proper planning does not go into the arrangement of a dashboard, it might offer valuable information but would be a pain to interact with. This might force users to abandon it.
Dashboards that allow drag-and-drop interaction provide a more personalized engagement, an intuitive user interface, and real-time control. It is always nice if users of a dashboard can drag the components around to suit their individual needs better. This is because different people interact with things in different ways. Drag-and-drop is a strategy to allow this customized interaction.
This article is a guide on how to use GridStack.js to create a drag-and-drop interface in a dashboard. It starts by explaining what GridStack.js is and the features of the library.
The article would also explain how to install Gridstack.js, how you can use the library to build a functional dashboard, and would detail a comparison between GridStack.js and Muuri.js—a similar library. Finally, the article outlines some drawbacks of using GridStack.js.
To follow along with this tutorial, you need to know the basics of HTML, CSS, and JavaScript.
With all of that mentioned, let us get started.
What is GridStack.js
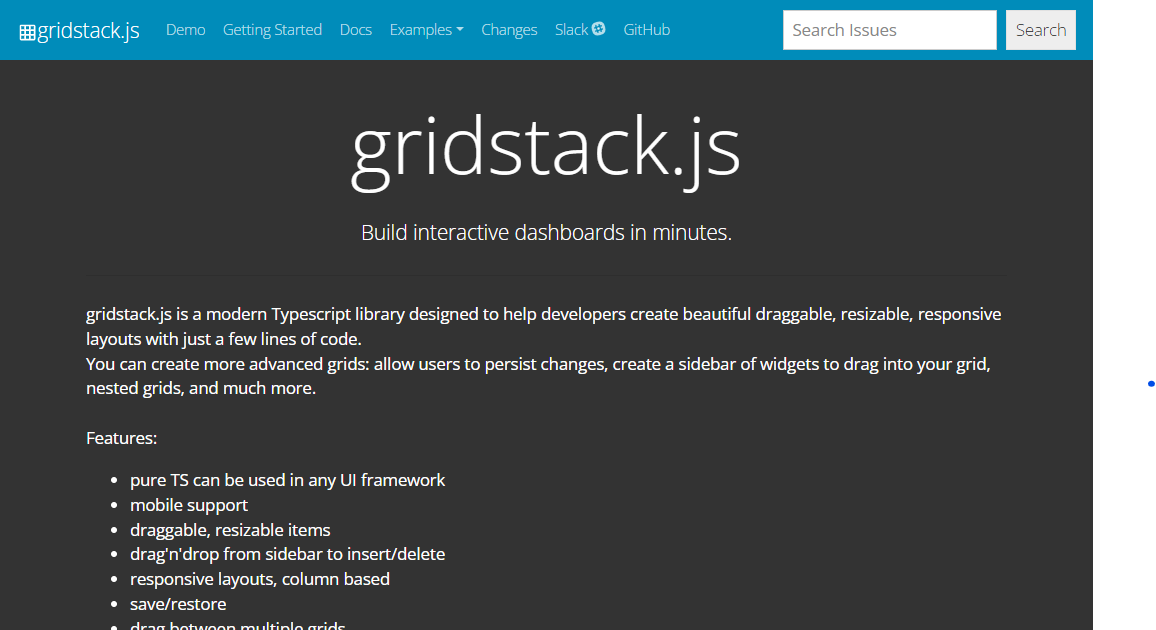
GridStack.js is a TypeScript library used to create draggable, resizable, and responsive components for Dashboards. Another library inspired it—Gridster.js—a jQuery plugin. Unlike the jQuery plugin though, GridStack.js works with vanilla JavaScript (although it also comes with native Angular support).
GridStack.js manages the layout of components (also known as widgets or items) using a 12-column grid system by default, which is similar to Bootstrap. With this grid system, it can resize components accordingly and be more versatile with possible displays the users might desire.
GridStack.js is an excellent choice to build out widgets in dashboards that make drag-and-drop interaction easy. It has served many dashboard developers’ needs and is frequently maintained.
Features of GridStack.js
GridStack.js has some features that make it stand out as a library. This section of the article would look into some of them.
Support for Angular and other frameworks
As mentioned earlier, GridStack.js has native Angular support. But that is not the only framework it supports. You can use GridStack.js in React, Ember, Knockout, Vue, Aurelia, and more. It has support for the most popular technologies developers use to build web applications today.
Note however that this tutorial does not use a framework, it teaches GridStack.js with vanilla JavaScript. You can decide to translate this information to whichever framework you prefer.
Mobile Friendly and Responsive Layout
GridStack.js ensures components created with it are responsive. It does this by reducing the size of its components as the user’s device gets smaller. It also makes the layout use one column only in a device where a 12-column grid would not give the best results. GridStack.js is efficient for applications that will run on mobile devices.
Drag and Drop functionality
This is the most popular feature of GridStack.js. The library makes it possible for users of an application to drag and drop dashboard widgets. Also, as the article mentions earlier, this feature gives dashboards a more intuitive and dynamic user interface.
Resizable Components
Apart from adding drag-and-drop functionality to components, GridStack.js also makes components resizable. The user of a dashboard might find a component more important than the rest and want it to be bigger, or a particular performance insight might need a bigger widget to display its details properly. Whatever the case is, because of GridStack.js users can now resize components to fit their needs.
Saving Layouts
After rearranging components using drag and drop, or resizing components, GridStack.js can save these changes. When a user comes to visit the dashboard again, their changes will stand. This is an ability of the library a developer can initiate if they want to. It is an excellent feature for dashboard users who want their custom screen to be consistent whenever they log in.
How to install GridStack.js
There are two different steps to take to install GridStack.js. This section of the article would outline those steps.
Add the library to your project
The first step to take is to import the library as an addition to your project. In the terminal, navigate to your project’s folder and run the command below:
npm install gridstack --saveThis command would add the library to your node_modules/ folder.
Add the CSS and JavaScript Files
The next step after importing the module is to add both the CSS and JavaScript files to the <head> tag in your index.html. Adding this ensures your components use the appropriate styling for GridStack.js, and also have access to all the functionalities the library provides. Below is an example of what this looks like.
<head>
 ...
 <link href="node_modules/gridstack/dist/gridstack.min.css" rel="stylesheet"/>
 <script src="node_modules/gridstack/dist/gridstack-all.js"></script>
</head>
With this, you have installed GridStack.js, and it is now ready for use. You would not see any display just yet on the screen, because you have not created a GridStack component or item. That is what this next section of the article would teach.
How to create a GridStack.js Component
After installing GridStack in your project, the next step to take is to create a GridStack.js component. There are three different possible ways of doing this, you can either create the components in your HTML file, create them dynamically using JavaScript commands, or create them from a JavaScript array. Let us see how to do each of them.
Creating components using HTML
To create components directly inside your HTML file, start by adding a <div> tag with the class name grid-stack inside the<body> tag. This will serve as the container for your GridStack components.
<div class="grid-stack"></div>Inside the div with class grid-stack, create individual GridStack components by adding <div> tags with the class name grid-stack-item.
<div class="grid-stack">
 <div class="grid-stack-item"></div>
 <div class="grid-stack-item"></div>
</div>
Finally, add content to each GridStack item using <div> tags with the class name grid-stack-item-content.
<div class="grid-stack">
 <div class="grid-stack-item">
   <div class="grid-stack-item-content">Item 1</div>
 </div>
 <div class="grid-stack-item">
   <div class="grid-stack-item-content">Item 2</div>
 </div>
</div>
After creating the items, initialize GridStack in your project using JavaScript. Without this, the library will not work. Put the following code inside your JavaScript file.
GridStack.init();This command initializes GridStack with its built-in default configuration settings. The library has a vast array of configuration settings you can change, but this works for now.
The final step to take is to add some styling to your components so that they look good. You need to style the .grid-stack container and .grid-stack-item-content, to distinguish them from each other. Add something similar to this to your project’s CSS file.
.grid-stack {
 background-color: #f0f8ff;
}

.grid-stack-item-content {
 background-color: #0000ff;
 text-align: center;
 font-family: Arial, Helvetica, sans-serif;
}
The output should look like the illustration below.

With that, you have created resizable and draggable components inside your HTML file.
Creating Components Dynamically
To create components dynamically, or ‘on-demand’, there are a few steps to take.
Create a <div> tag with a class of grid-stack inside your HTML file.
<div class="grid-stack"></div>Add some styling to your CSS file (you can repeat the one above). After that, write a JavaScript instruction that will create a new component inside the HTML file.
const grid = GridStack.init();
grid.addWidget({ content: "Item 1" });
grid.addWidget({ content: "Item 2" });
grid.addWidget({ content: "Item 3" });
You should have a display similar to this.
Creating widgets dynamically can be useful in web applications where the application needs to generate the components based on a user’s prompt.
Creating Components from an Array
The third way to create components with GridStack.js is to do it with a JavaScript array.
The first step is to create a <div> tag inside the body of your HTML file with a class of grid-stack.
<div class="grid-stack"></div>After that, write some styles into your CSS file for the GridStack container and item content.
The next step is to create an array that contains widgets inside your JavaScript file.
const componentArray = [
 { content: "Item 1" },
 { content: "Item 2" },
 { content: "Item 3" },
];
Finally, in that same JavaScript file, initialize GridStack.js, and load the components to the Document Object Model (DOM).
const grid = GridStack.init();

grid.load(componentArray);
The output will be similar to that of the creating components dynamically in this article.
Building a Dashboard with GridStack.js
To build a dashboard with GridStack.js, you need to place the GridStack.js items on the page where the users would use them. You also need to set up the default layout of the dashboard, and color theme. Finally, you need to display relevant dashboard data inside the components.
This section is a step-by-step guide to building a functional dashboard layout using GridStack.js. The source code for the project is also available here.
Creating the HTML Components
First of all, install GridStack using NPM, following the earlier stated instruction.
After that, create an HTML page that includes all the GridStack items. It also includes the content of all the items. Make sure to save the file as index.html.
<!--index.html-->

<!doctype html>
<html lang="en">
 <head>
   <meta charset="UTF-8" />
   <title>GridStack.js Example</title>
   <meta name="viewport" content="width=device-width, initial-scale=1.0" />
   <link rel="stylesheet" href="style.css" />
   <link
     rel="stylesheet"
     href="node_modules/gridstack/dist/gridstack.min.css"
   />
   <link
     href="https://unpkg.com/boxicons@2.1.4/css/boxicons.min.css"
     rel="stylesheet"
   />
   <script src="node_modules/gridstack/dist/gridstack-all.js"></script>
 </head>
 <body>
   <div class="body-content">
     <aside>
       <h1 class="app-name">Dashboard</h1>
       <ul>
         <li class="active">
           <i class="bx bxs-dashboard active"></i> Overview
         </li>
         <li><i class="bx bx-money"></i> Expenses</li>
         <li><i class="bx bxs-wallet"></i> Budget</li>
       </ul>
       <div class="logout-bar"><i class="bx bx-log-out"></i> Logout</div>
     </aside>
     <div class="overview">
       <header>
         <div><span class="avatar">A</span> Admin</div>
       </header>
       <main>
         <h2>Overview</h2>
         <div class="grid-stack">
           <div
             class="grid-stack-item"
             gs-x="0"
             gs-y="0"
             gs-w="4"
             gs-min-w="2"
           >
             <div class="grid-stack-item-content revenue">
               <p class="description">Revenue this month</p>
               <p class="metric-value">$10,018.00</p>
             </div>
           </div>
           <div
             class="grid-stack-item"
             gs-x="4"
             gs-y="0"
             gs-w="4"
             gs-min-w="2"
           >
             <div class="grid-stack-item-content customer-overview">
               <p class="description">Total Customers</p>
               <p class="metric-value">5,133</p>
             </div>
           </div>
           <div
             class="grid-stack-item"
             gs-x="8"
             gs-y="0"
             gs-w="4"
             gs-min-w="2"
           >
             <div class="grid-stack-item-content growth">
               <p class="description">Monthly Growth</p>
               <p class="metric-value profit">
                 <i class="bx bxs-up-arrow-circle"></i> 20.8%
               </p>
             </div>
           </div>
           <div
             class="grid-stack-item"
             gs-x="0"
             gs-y="1"
             gs-w="7"
             gs-h="2"
             gs-min-w="5"
             gs-min-h="2"
           >
             <div class="grid-stack-item-content transactions-overview">
               <p class="description">Latest Transactions</p>
               <table class="transaction-table">
                 <thead>
                   <tr>
                     <th>Name</th>
                     <th>Email</th>
                     <th>Amount</th>
                     <th>Time</th>
                   </tr>
                 </thead>
                 <tbody>
                   <tr>
                     <td>Elijah Yusuf</td>
                     <td>placeholder@mail.com</td>
                     <td>$50</td>
                     <td>1 hour ago</td>
                   </tr>
                   <tr>
                     <td>Elijah Yusuf</td>
                     <td>placeholder@mail.com</td>
                     <td>$50</td>
                     <td>1 hour ago</td>
                   </tr>
                   <tr>
                     <td>Elijah Yusuf</td>
                     <td>placeholder@mail.com</td>
                     <td>$50</td>
                     <td>1 hour ago</td>
                   </tr>
                   <tr>
                     <td>Elijah Yusuf</td>
                     <td>placeholder@mail.com</td>
                     <td>$50</td>
                     <td>1 hour ago</td>
                   </tr>
                   <tr>
                     <td>Elijah Yusuf</td>
                     <td>placeholder@mail.com</td>
                     <td>$50</td>
                     <td>1 hour ago</td>
                   </tr>
                 </tbody>
               </table>
             </div>
           </div>
           <div
             class="grid-stack-item"
             gs-x="7"
             gs-y="1"
             gs-w="5"
             gs-min-w="2"
           >
             <div class="grid-stack-item-content top-customers">
               <p class="description">Top Paying Customers</p>
               <ul class="customers">
                 <li class="customer">
                   Majeed Johnson
                   <i class="bx bxs-badge-check"></i>
                 </li>
                 <li class="customer">
                   Uzo Onyekachi
                   <i class="bx bxs-badge-check"></i>
                 </li>
                 <li class="customer">
                   Liz Schmidt
                   <i class="bx bxs-badge-check"></i>
                 </li>
               </ul>
             </div>
           </div>
         </div>
       </main>
     </div>
   </div>
   <script src="script.js"></script>
 </body>
</html>
This HTML file contains five different GridStack items, each with its default position already predetermined. The user of the application however can change these positions to how they see fit.
Styling the Dashboard
The next step to take is to style the dashboard. Remember that aesthetically appealing dashboards are more effective than those that are not. Create a file named style.css, and place your styles there.
/* style.css */

* {
 margin: 0;
 padding: 0;
 box-sizing: border-box;
 font-family: Arial, Helvetica, sans-serif;
}

.body-content {
 display: flex;
 background-color: #f7f7f7;
}

aside {
 width: 15rem;
 height: 100vh;
 display: flex;
 flex-direction: column;
}

aside .logout-bar {
 margin-top: auto;
 padding: 1rem;
 border-top: 1px solid #e6e6e6;
}

aside ul {
 padding: 0.5rem;
 list-style: none;
}

aside ul li {
 margin: 0.5rem 0;
 padding: 1rem 1.5rem;
}

aside ul li.active {
 border-radius: 0.5rem;
 color: #e6e6e6;
 background-color: black;
}

.app-name {
 font-size: 1.5rem;
 font-weight: bold;
 padding: 1rem;
 color: #0b5e85;
}

header {
 padding: 1rem;
 display: flex;
 justify-content: flex-end;
}

.avatar {
 font-size: 0.7rem;
 text-align: center;
 display: inline-block;
 width: 1.2rem;
 height: 1.2rem;
 line-height: 1.2rem;
 border-radius: 50%;
 background-color: #0b5e85;
 color: #f7f7f7;
}

.overview {
 flex-grow: 1;
 display: flex;
 flex-direction: column;
}

main {
 background-color: #e6e6e6;
 border-top-left-radius: 2rem;
 padding: 2rem;
 flex-grow: 1;
}

h2 {
 margin-bottom: 2rem;
}

.grid-stack-item-content {
 cursor: grab;
 display: flex;
 flex-direction: column;
 justify-content: center;
 background-color: #f7f7f7;
 border-radius: 0.5rem;
 padding: 1rem;
 box-shadow:
   0 1px 3px #0000001f,
   0 1px 2px #0000003d;
}

.revenue {
 color: #fbfbff;
 background-color: #1023cc;
}

.customer-overview {
 color: #660f7c;
}

.growth {
 background-color: #e3eeea;
 color: #008000;
}

.description {
 text-align: center;
 margin: 1rem 0 0.3rem;
}

.metric-value {
 font-size: 2.2rem;
 text-align: center;
}

.metric-value.profit i {
 color: #008000;
}

.transactions-overview {
 color: #660f7c;
}

table {
 margin: 1rem 0;
 width: 100%;
 border-collapse: collapse;
}

th,
td {
 padding: 0.4rem 0;
 border-bottom: 1px solid #e6e6e6;
}

tr:nth-child(even) {
 background-color: #eeeef7;
}

thead th {
 font-weight: normal;
 text-align: left;
}

.top-customers ul {
 list-style: none;
}

.top-customers ul li {
 text-align: center;
 margin: 0.2rem 0;
}

.top-customers ul li i {
 color: #daa520;
}
Configure GridStack Display
Finally, you need to initialize GridStack.js with either the default settings or your configuration settings. This project uses a few changes in the default options for a better display. Create a file named script.js and put your JavaScript settings in there.
// script.js
const options = {
cellHeight: '11rem',
maxRow: 3
}
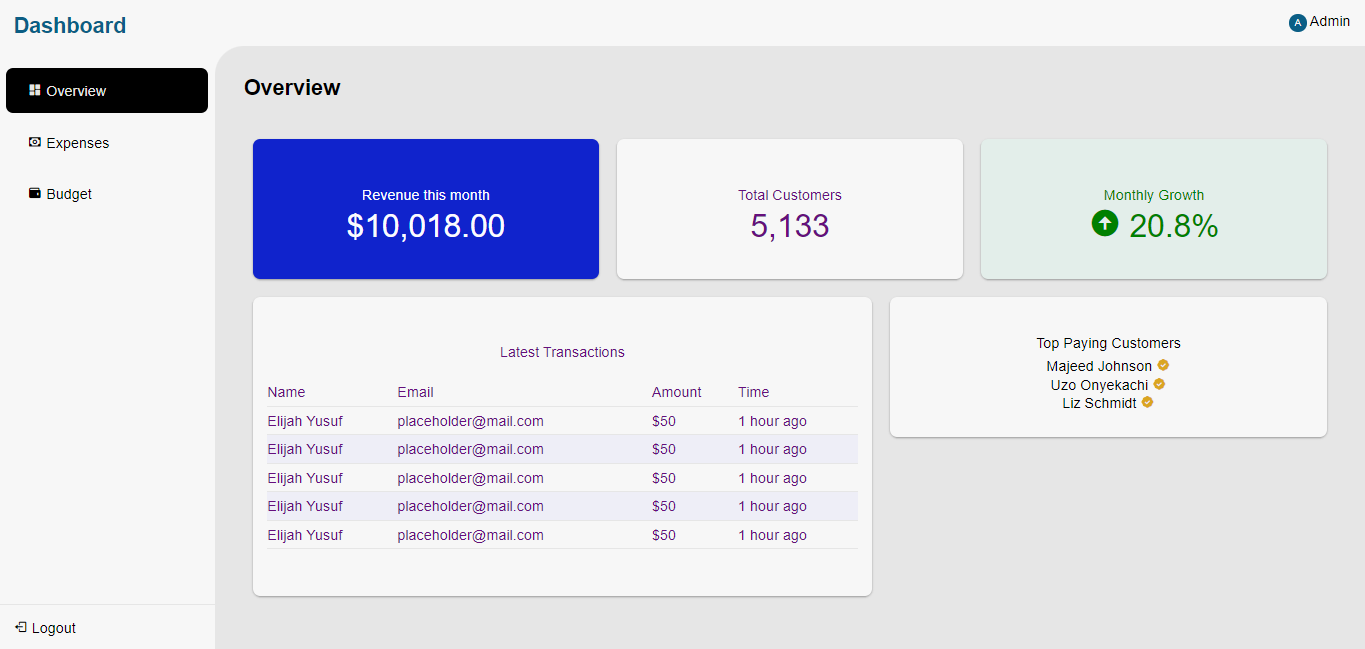
GridStack.init(options)In the configuration above, the height of each item is set to 11rem, and the dashboard can only allow three rows or less of items. Here is the final display of the dashboard.
Comparing GridStack.js to Muuri.js
Muuri.js is extremely similar to GridStack.js. It is a JavaScript Library used to build responsive, sortable, filterable, and draggable components. It is an excellent layout engine to use, not only for dashboards but for any other application that needs draggable components.
Muuri.js has a lot of features that make it stand out. It allows you to change the positions of any element you want. You can also filter the components and hide the ones that do not match. Muuri.js also has sorting capabilities where you can order the elements based on a certain criterion.
GridStack.js and Muuri.js are interesting comparisons to make because they are two libraries that achieve a similar thing in different ways. The table below summarizes the key differences between the two libraries.
| Features | GridStack.js | Muuri.js |
|---|---|---|
| Platform Support | GridStack.js has some binding libraries for Front-End Frameworks like Angular, AngularJS, Ember, Aurelia, and others. | Muuri.js has just a few special binding libraries for Front-End frameworks. It is not as extensive and versatile as GridStack.js |
| Animations | GridStack.js uses minimal animation implementations like CSS transitions. | Muuri.js uses the JavaScript Web Animation API to ensure speed with DOM operations. |
| Grid System | Uses a default 12-grid system that is customizable. | Muuri.js does not have any default number of columns in its grid system |
| Sortable Components | Does not have a feature for sorting components. | Includes sorting capabilities. |
| Filterable Components | GridStack.js does not have any feature for filtering components. | Muuri.js includes filtering capabilities for components. |
| Resizable Components | GridStack.js makes it possible to resize all components in its layout engine. | Muuri.js does not have the default capability of resizing components. It only allows a user to reposition them. |
| GitHub Stars | 5.1K | 10.5K |
Limitations of GridStack.js
Even with all the awesome features GridStack.js offers, it still has a few limitations. This section of the article outlines some of those features.
Limited Responsive Support
GridStack.js indeed promises responsive components which it tries to deliver, but it is still lacking in responsive capabilities. Muuri.js is far superior to GridStack.js when it comes to this aspect. GridStack.js cannot change the positions of elements as the screen shrinks. It only makes them smaller and smaller.
If you are going to build a project with GridStack.js, you would have to be proactive about how you want the responsiveness of your dashboard to be.
Unoptimized Animations
While GridStack.js has fair and decent animations, it is not the most brilliant. Repositioning and resizing animations can be intensive on the DOM. In GridStack.js, there is no optimized way to handle animations, like Muuri.js which does this more effectively and asynchronously.
Unfilterable Components
No method allows the filtering of items in the library. In GridStack.js, you would have to write some custom code to be able to do that. GridStack.js is not the most effective for this type of use case.
Documentation
GridStack.js has a lot of configuration options, item options, methods, and events. All these features require proper documentation. While the current documentation of GridStack.js is sufficient to build a project with the library, there is room for improvement in the description of these documented options.
Conclusion
This article was a dive into GridStack.js, from how to install it to how to use it. The article also featured a comparison between GridStack and Muuri.js, and a few cons GridStack.js has.
Despite the aforementioned downsides, GridStack.js is still one of the best tools to have as a web developer building a dashboard. It makes development easier and faster, and It has gotten maintenance for a long time in the community. This shows just how useful developers find the tool.
Further Reading
Truly understand users experience
See every user interaction, feel every frustration and track all hesitations with OpenReplay — the open-source digital experience platform. It can be self-hosted in minutes, giving you complete control over your customer data.
Star on GitHub12k