Create Incredible Web Presentations with Reveal.js
Use this free, open HTML framework to create attractive presentations.


Reveal.js is an open-source HTML presentation framework. Anyone with a web browser can use it to make attractive presentations for free. The program allows anyone with a web browser to create fully-featured and interactive presentations that support CSS 3D transforms, nested slides, and a variety of other capabilities. It is recommended for those interested in programmable techniques and web technology.
It has lots of benefits. Some of these consist of the following:
- Responsive design: Reveal.js presentations scale to fit the user’s screen, making them compatible with a wide range of devices.
- Interactive elements: Reveal.js supports these elements, which can improve user experience and make presentations more interesting. Interactive elements include links, images, and videos.
- Themes can be readily modified to reflect the user’s brand or tastes to make a presentation look more attractive when the theme matches the content in a slide.
- Simple and intuitive user interface: Reveal.js enables users to build and edit presentations with minimal technical expertise.
- Open-source: Reveal.js is free to use, and its source code is available for users to examine and edit.
React Reveal vs. Reveal.js: what’s the difference?
The distinction between React Reveal and Reveal.js will be demonstrated in this section:
- HTML, CSS, and JavaScript are the foundations on which Reveal.js is constructed, but React Reveal requires React.
- Reveal.js is the way to go if you want to make static presentations and need to deal with a vanilla JavaScript-based project. React Reveal is the greatest option for creating interactive presentations if you are working with React.
- You can make interactive slides with Reveal.js, which has a number of features like slides and transitions. You can also make interactive slides with React Reveal, but you can also do so while using React components.
- Additional capabilities offered by React Reveal include a higher degree of customization and support for animations.
Alternatives to Reveal.js
Many Reveal.js alternatives may be utilized to make engaging presentations with eye-catching visuals. Several well-liked choices include:
- Impress.js, a JavaScript library that enables the creation of 3D presentations with a range of transitional effects.
- Prezi: An online presentation tool that lets users zoom in and out of slides to make dynamic, interactive presentations.
- PhotoSwipe: An open-source JavaScript picture gallery and lightbox, PhotoSwipe. It is modular, independent of frameworks, and made for desktop and mobile devices.
- Owl Carousel 2: Owl Carousel 2 is a jQuery carousel plugin with full customization and touch and drag functionality.
- FlexSlider is a fantastic, totally responsive jQuery slider plugin. It offers designers and developers a quick way to launch a slideshow, carousel, or image slider.
- Keynote: Apple’s PowerPoint-like presentation software for Mac and iOS devices.
- Haiku Deck: A web-based application that enables users to design minimalistic presentations with spectacular visual effects.
Getting Started
In this session, we’ll use Reveal.js to create spectacular presentations by utilizing JavaScript. In this section, we’ll learn everything we need to know to get Reveal.js running on our project. To write code to create stunning presentations, let’s first understand the basic setup and installations before using Reveal.
Installations
The best way to install Reveal.js is to clone the source code on GitHub. Utilizing this is extremely simple for you. Just use the code below in your terminal to clone the GitHub repository.
git clone https://github.com/hakimel/reveal.js.gitRun the following command to install all the necessary packages and start Reveal.js after you’ve cloned the repository for it in your working directory.
npm installFurthermore, once Reveal.js has been successfully installed in your project, you must start the Reveal.js server on port 8000 (the default port) by executing the following code:
npm startPlease use the code below if you decide to run the Reveal.js server on a different port:
npm start --port=8001You can easily install Reveal.js manually using npm or yarn if you don’t want to clone the GitHub repository:
npm install reveal.js
## or
yarn add reveal.js
You may easily include the Reveal.js file as an ES6 module once it has been installed in your front-end framework, such as React:
import Reveal from "reveal.js";
import Markdown from "reveal.js/plugin/markdown/markdown.esm.js";

let deck = new Reveal({
  plugins: [Markdown],
});
deck.initialize();
Folder Structure
This section will go over Reveal.js’ folder structure. When changes are made, the folder structure might change, but this won’t affect how Reveal.js is utilized in our project.
Since we are not the original developers, we won’t be explaining every file in Reveal.js. I’ll go over the most significant directories and files first:
CSS filesthat describe how a presentation should appear and be organized are stored in the CSS folder.- The
JSfolder houses the JS files that provide interaction and other functionality. - The presentation begins with a file called
index.htmlthat also contains the HTML markup for the slides. - A
reveal.js filecontains reveal.js’ setup parameters.
Reveal.js’s folder structure is shown in the image below:
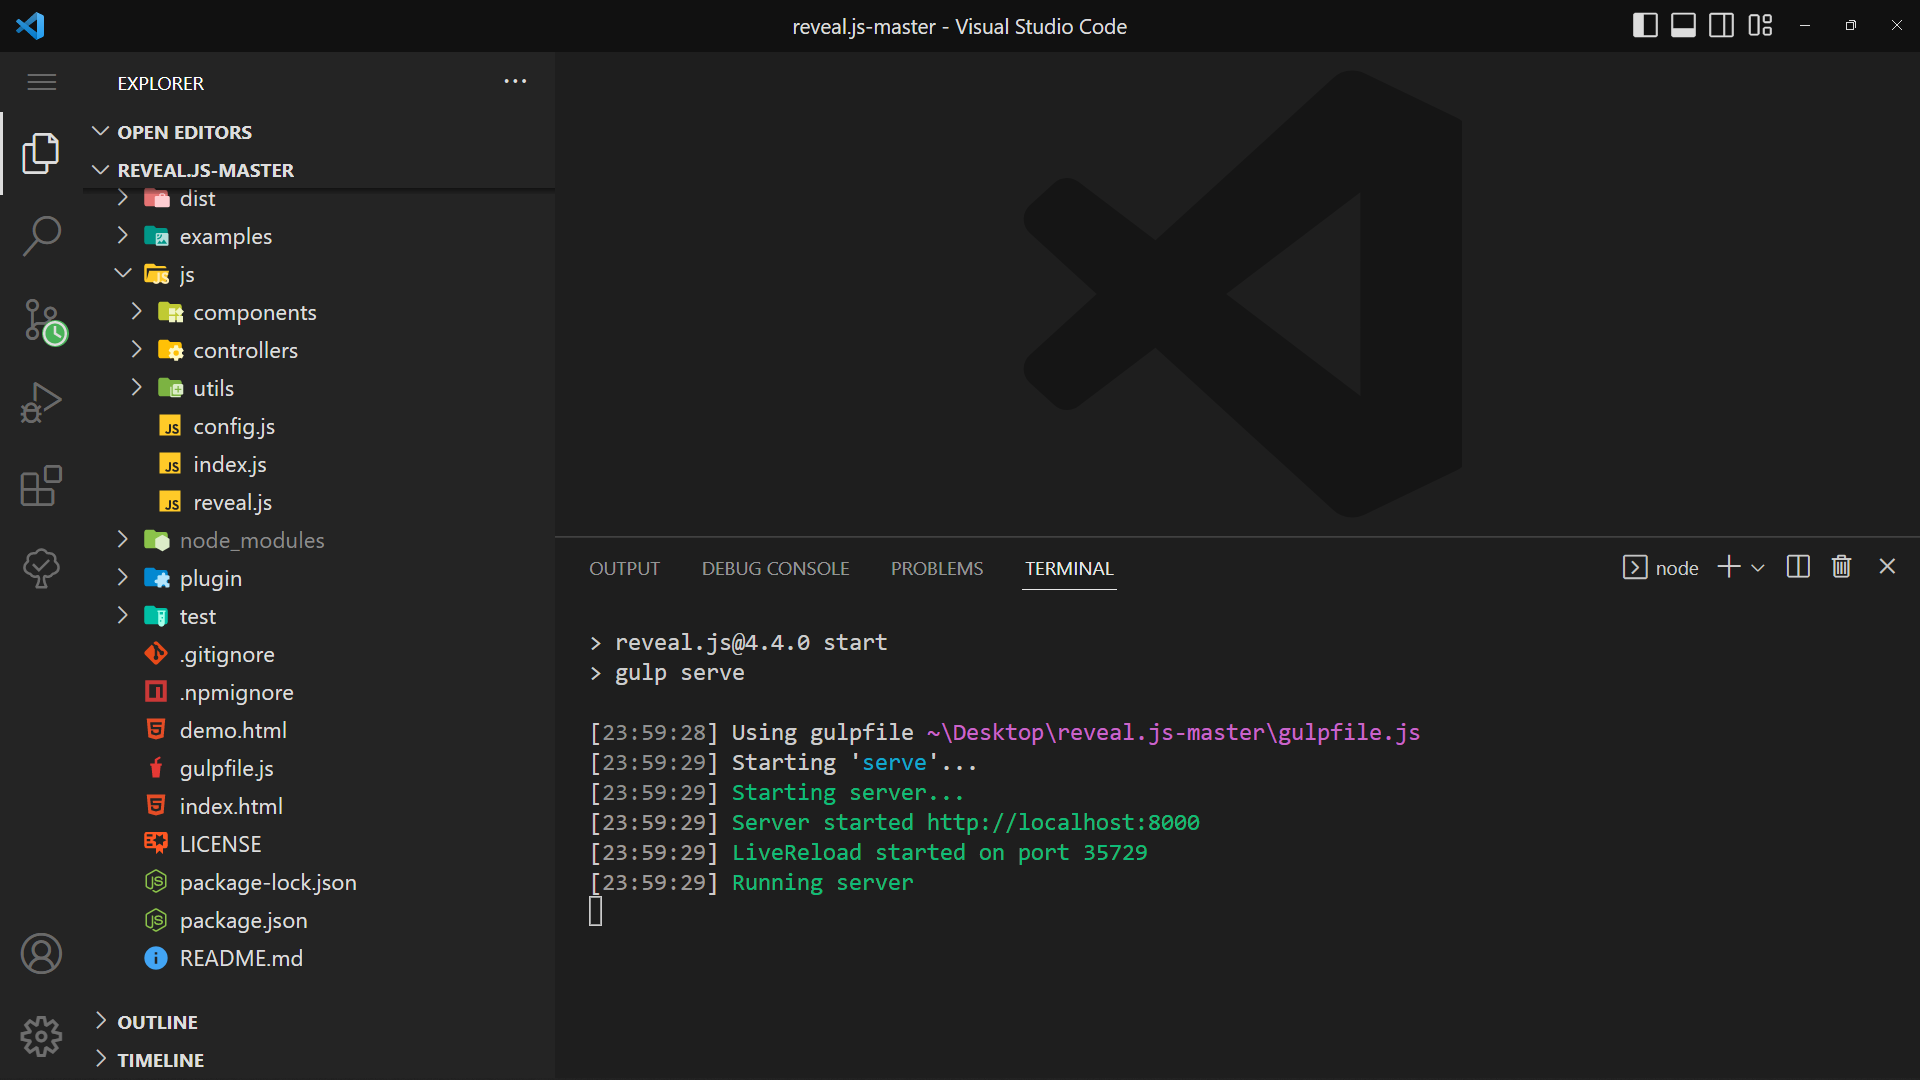
As you can see in the screenshot above, I installed Reveal.js in the opened terminal and launched it by typing npm start.
Starter Template
The starter template is just what is loaded in the index.html page of the Reveal.js folder structure, which we mentioned in the section labeled “Folder Structure” above.
<!DOCTYPE html>
<html>
  <head>
    <meta charset="utf-8" />
    <meta
      name="viewport"
      content="width=device-width, initial-scale=1.0, maximum-scale=1.0, user-scalable=no"
    />
    <title>reveal.js</title>
    <link rel="stylesheet" href="dist/reset.css" />
    <link rel="stylesheet" href="dist/reveal.css" />
    <link rel="stylesheet" href="dist/theme/black.css" />
    <!-- Theme used for syntax highlighted code -->
    <link rel="stylesheet" href="plugin/highlight/monokai.css" />
  </head>
  <body>
    <div class="reveal">
      <div class="slides">
        <section>Slide 1</section>
        <section>Slide 2</section>
        <section>Slide 2</section>
        <section>Slide 2</section>
        <section>Slide 2</section>
        <section>Slide 2</section>
      </div>
    </div>
    <script src="dist/reveal.js"></script>
    <script src="plugin/notes/notes.js"></script>
    <script src="plugin/markdown/markdown.js"></script>
    <script src="plugin/highlight/highlight.js"></script>
    <script>
      // More info about initialization & config:
      // - https://revealjs.com/initialization/
      // - https://revealjs.com/config/
      Reveal.initialize({
        hash: true,
        // Learn about plugins: https://revealjs.com/plugins/
        plugins: [RevealMarkdown, RevealHighlight, RevealNotes],
      });
    </script>
  </body>
</html>
Launch your browser and navigate to the following URLs: http://localhost:8000 The link takes you to the active running page where our presentations will appear in the browser:
Content
This section will concentrate on the contents of Reveal.js. On Reveal Web Presentation, the contents are the components of a responsive presentation. We can use Reveal.js on any project once we have worked with all the components that go into making responsive, stunning presentations, covering Markup, Markdown, Backgrounds, Media, Code Math, Fragments, Links, and Layout.
Markup
Markup is the first step in getting started with Reveal.js, and you must use the section element to build markups in Reveal.js.
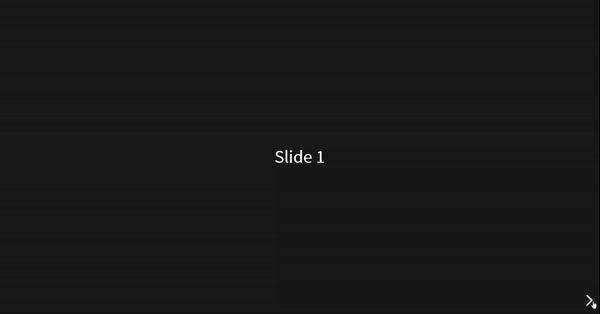
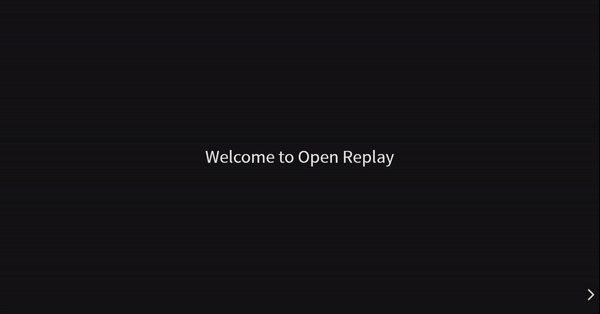
Please remember that the parent class will have the class name .reveal, and the reveal class div will have a child element with the class name.slide. If you place the section element line by line, as in the code below, you will have a slider that moves horizontally.
Code:
<div class="reveal">
  <div class="slides">
    <section>Welcome to Open Replay</section>
    <section>Our Blog</section>
    <section>About</section>
    <section>Services</section>
    <section>GitHub</section>
  </div>
</div>
Output:
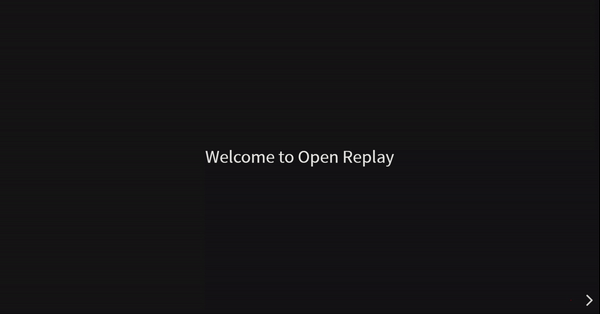
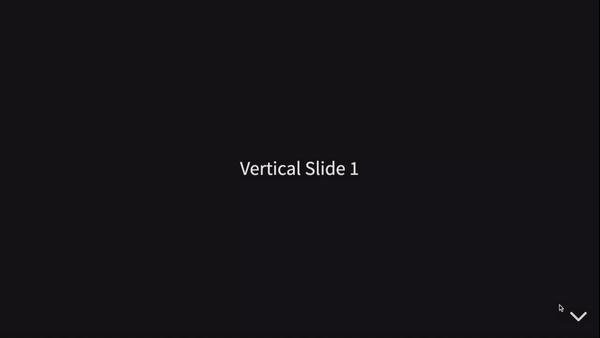
To make a vertically moving slide, add sections within a section; this is a simple technique; see the code below:
<div class="reveal">
  <div class="slides">
    <section>
      <section>Vertical Slide 1</section>
      <section>Vertical Slide 2</section>
    </section>
  </div>
</div>
Just use the up and down arrows to view the previous and next slides.
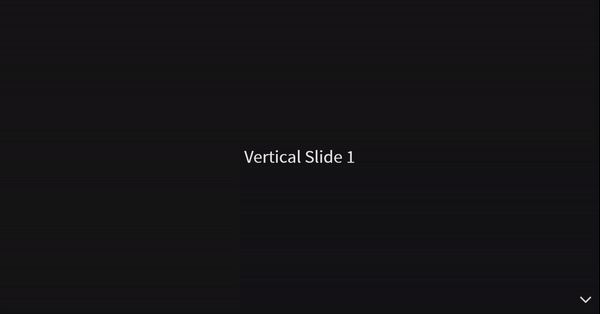
Please use the code below to add a horizontal and vertical sliding format. It’s really simple; the horizontal section of our code will stand alone and not be inside of any section; however, the vertical section will have sections inside of a section.
Code:
<div class="reveal">
  <div class="slides">
    <section>Welcome to Open Replay</section>
    <section>
      <section>Our Blog</section>
      <section>About</section>
      <section>Services</section>
      <section>GitHub</section>
    </section>
  </div>
</div>
Output:
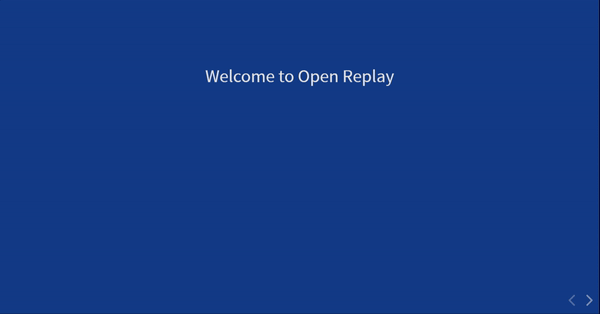
Backgrounds
It’s simple to add a background color to a slider in Reveal.js; all you have to do is include an attribute that initializes the color for a specific area.
You can use the data-background-color attribute to add a background color to a section and specify the value to any color name you choose.
View a responsible slider with background colors by referring to the code and outputs below.
Code:
<div class="reveal">
  <div class="slides">
    <section data-background-color="cornflowerblue">
      <h2>Welcome to Open Replay</h2>
    </section>
    <section data-background-color="rgb(70, 70, 255)">
      <h2>🍰</h2>
    </section>
  </div>
</div>
Output:

Click here to read more about background colors in Reveal.js.
Media
In Reveal.js, media can be used as a presentation. We’ll be showing a video as a presentation in this section. The data-autoplay autoplay attribute must be included in the video tag as an attribute to make the video play when its slide section is open.
Code:
<div class="reveal">
  <div class="slides">
    <section data-background-color="cornflowerblue">
      <video
        data-autoplay
        autoplay
        src="https://player.vimeo.com/external/579586838.sd.mp4?s=7609637f223c38ac893f3164d8c3f7cd2446d9b0&profile_id=164&oauth2_token_id=57447761"
      ></video>
    </section>
    <section>Thanks for watching 😊</section>
  </div>
</div>
Output:

Code
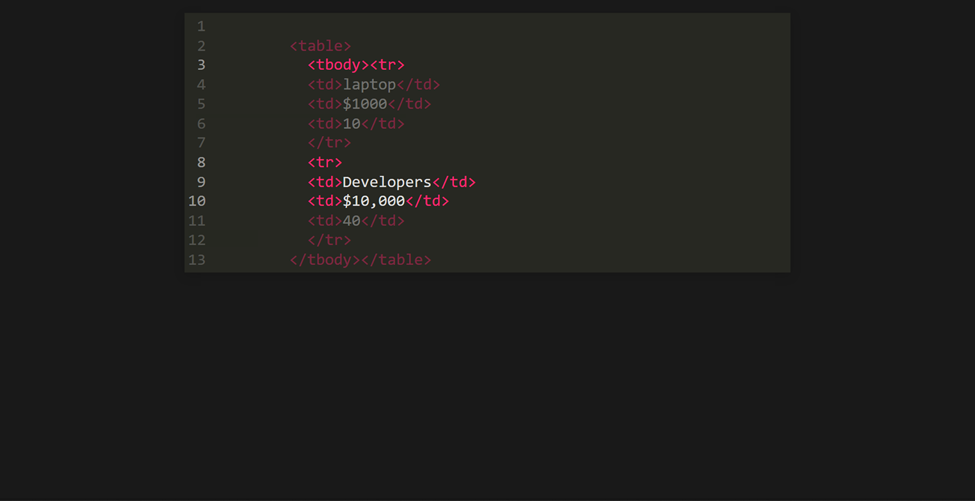
You can present codes on the slide and have the code highlighted using Reveal.js. Highlight.js is the only thing that powers the code highlight.
You will always use the <code> element when presenting code in Reveal.js, and all you need to do to make HTML escape the default behavior and treat the content as genuine code. Add the data-line-numbers attribute to the <code> element and specify values that will represent the line of code that will be highlighted, as shown below.
Code:
<div class="reveal">
  <div class="slides">
    <pre>
      <code data-line-numbers="3,8-10">
        <table>
          <tr>
            <td>laptop</td>
            <td>$1000</td>
            <td>10</td>
          </tr>
          <tr>
            <td>Developers</td>
            <td>$10,000</td>
            <td>40</td>
          </tr>
        </table>
      </code>
    </pre>
  </div>
</div>
Output:
Math
In Reveal.js, mathematical expressions can be displayed. To use math in your presentation, you must include the RevealMath.KaTeX plugin, which will reflect the math in your presentation.
Config:
<script src="plugin/math/math.js"></script>
<script>
  Reveal.initialize({
    hash: true,
    plugins: [RevealMath.KaTeX],
  });
</script>
Let’s run The Lorenz Equations as a presentation:
<div class="reveal">
<div class="slides">
<section>
<h2>The Lorenz Equations</h2>
\[\begin{aligned} \dot{x} & = \sigma(y-x) \\ \dot{y} & = \rho x -
y - xz \\ \dot{z} & = -\beta z + xy \end{aligned} \]
</section>
<section>
<h2>The Lorenz Equations</h2>
\[\begin{aligned} \dot{x} & = \sigma(y-x) \\ \dot{y} & = \rho x -
y - xz \\ \dot{z} & = -\beta z + xy \end{aligned} \]
</section>
<section>THE END</section>
</div>
</div>Output:
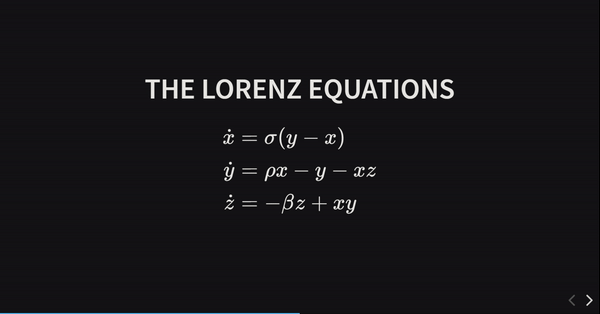
The Lorenz equations are a set of partial differential equations that describe two-dimensional fluid flow. Please click here to learn more.
Fragments
On a slide, fragments are utilized to draw attention to or gradually reveal specific parts. Before moving on to the next slide, each element with the class fragment will be stepped through.
Please include the data-fragment-index attribute and set its value to a number if you wish to use fragments. The number value indexed 1 will appear first, followed by the number 2, in that order.
Code:
<div class="reveal">
  <div class="slides">
    <section data-background-color="cornflowerblue">
      <p class="fragment" data-fragment-index="1">Welcome to Open Replay</p>
      <p class="fragment" data-fragment-index="2">Developer Tools</p>
      <p class="fragment" data-fragment-index="3">Performance Monitoring</p>
      <p class="fragment" data-fragment-index="4">Session Replay</p>
      <p class="fragment" data-fragment-index="5">Customer Support</p>
      <p class="fragment" data-fragment-index="6">Product Analytics</p>
    </section>
  </div>
</div>
Output:
Session Replay for Developers
Uncover frustrations, understand bugs and fix slowdowns like never before with OpenReplay — an open-source session replay tool for developers. Self-host it in minutes, and have complete control over your customer data. Check our GitHub repo and join the thousands of developers in our community.
Links
While watching slides, Reveal.js also simplified things for us. The following slide in a presentation can be easily reached by clicking a link, and the previous slide can likewise be reached by doing the same.
If you want to navigate to a slider, be sure that the portion of the slider you are visiting has an Id that matches the value of the “href” attribute on the HTML anchor element that is now being clicked.
Code:
<div class="reveal">
  <div class="slides">
    <section>
      <h1>Welcome to Open Replay</h1>
      <a href="#/login">Click to learn more</a>
    </section>
    <section data-background-color="cornflowerblue">
      <h2>Blog</h2>
      <p>Some random JavaScript Blog posts</p>
    </section>
    <section id="login">
      <h2>About</h2>
      <h5>
        See everything users do on your web app, down to the smallest detail.
      </h5>
      <a href="#/0">Back to the first slide</a>
    </section>
  </div>
</div>
Output:

To instantly navigate to the first page of the slide without passing through any intermediary sections, add ”#/0” (0 == first-slide) to the clickable link that will take you to the first page of the slide.
Layout
This section will go over the layout in Reveal.js. You can change the text size, and you can also construct a slide by showing an item on top of the previous item; this is known as staking.
Let’s practice stacking by simply laying images on top of one another.
Code:
<div class="reveal">
  <div class="slides">
    <section>
      <div class="r-stack">
        <img
          class="fragment fade-out"
          data-fragment-index="0"
          src="https://images.pexels.com/photos/14444036/pexels-photo-14444036.jpeg?auto=compress&cs=tinysrgb&w=800&lazy=load"
          width="450"
          height="300"
        />
        <img
          class="fragment current-visible"
          data-fragment-index="3"
          src="https://images.pexels.com/photos/15190699/pexels-photo-15190699.jpeg?auto=compress&cs=tinysrgb&w=800&lazy=load"
          width="300"
          height="450"
        />
        <img
          class="fragment"
          src="https://images.pexels.com/photos/15113967/pexels-photo-15113967.jpeg?auto=compress&cs=tinysrgb&w=800&lazy=load"
          width="400"
          height="400"
        />
      </div>
    </section>
  </div>
</div>
Output:

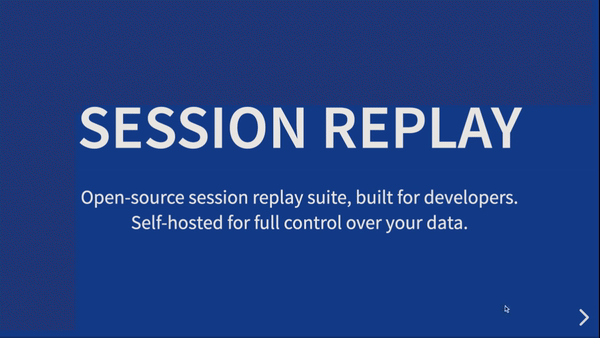
Now that we understand how stacking works, let’s spend some time working with FIT TEXT. We’ll display some text in a responsive large format in this part under layout by simply utilizing the class name r-fit-text. Below is a code sample of big text applied to Session Replay:
<div class="reveal">
  <div class="slides">
    <section data-background-color="cornflowerblue">
      <h2 class="r-fit-text">Session Replay</h2>
      <p>
        Open-source session replay suite, built for developers. Self-hosted for
        full control over your data.
      </p>
    </section>

    <section data-background-color="cornflowerblue">
      <h2 class="r-fit-text">Self-Host or Cloud</h2>
      <p>
        Host your session replay tool yourself and stop sending data to third
        parties. Not a big fan of self-deployments? Use our Cloud and get
        started in minutes.
      </p>
    </section>
  </div>
</div>
Output:
Please note that you can move forward and backward with the arrow keys.
Customization
In this section, we’ll customize some of Reveal.js’s presentations, focusing on Themes and Transitions, the two most significant things to consider while working with Reveal.js.
Themes
Theming is essential for creating anything on the internet. In Reveal.js, you can integrate some theme collections supplied by Reveal.js developers.
To use a theme of your choice, import the theme’s CSS styles into your project. The default theme is black when you install reveal.js or clone the Reveal.js repository. A line of code for incorporating a theme into your project is provided below:
<link rel="stylesheet" href="dist/theme/theme-name.css">Look closely at the code above; you can see where I wrote theme-name; please replace it with any of the theme names listed below:
- Blood
- Sky
- Dracula
- Solarized
- Simple
- Serif
- Night
- Beige
- League
- White
- Black (default)
Below, I used a theme name titled sky on a slide:

Utilizing the dracula theme produces the theme below:

Now that we’ve learned more about theming, I’d like you to experiment with different theme names to see how they look on your web presentation slide.
Transitions
Reveal.js provides us with some amazing transition effects to use while making a presentation on the web. It is quite simple to use these transition effects, and some of these transition effects include:

To use these effects, insert a data-transition attribute into your HTML element and set the attribute’s value to the name of the transition effect listed above.
Code:
<div class="reveal">
  <div class="slides">
    <section data-transition="zoom" data-background-color="hotpink">
      <h2>Open Replay</h2>
      <p>Transition in zoom state</p>
    </section>

    <section data-transition="fade" data-background-color="hotpink">
      <h2>Session Replay</h2>
      <p>Transition in fade state</p>
    </section>

    <section data-transition="convex" data-background-color="hotpink">
      <h2>Blog</h2>
      <p>Convex Transition</p>
    </section>
    <section data-transition-speed="fast" data-background-color="hotpink">
      <h2>GitHub</h2>
      <p>Transition duration is fast</p>
    </section>
  </div>
</div>
Output:

That’s all for transitions in this section; if you want to learn more about Reveal.js transitions, please click here.
Features
We’ll go through presentation features in Reveal.js, such as vertical slides and auto-slide in this section, and since we’ve already covered the implementation largely on vertical slides, we’ll go over more in depth. Let’s get started.
Vertical Slides
Moving between slides by default employs a horizontal sliding transition. These horizontal slides are the main or top-level slides in your presentation. We can’t rely on just one direction in a presentation, and the usage of presenting on slide vertically is critical. We learned how to design a slide that uses vertical direction earlier in this article.
Below is a code sample on utilizing vertical slides:
<div class="reveal">
  <div class="slides">
    <section>
      <section>Vertical Slide 1</section>
      <section>Vertical Slide 2</section>
      <section>Vertical Slide 3</section>
      <section>Vertical Slide 4</section>
      <section>Vertical Slide 5</section>
      <section>Vertical Slide 6</section>
      <section>Vertical Slide 7</section>
      <section>Vertical Slide 8</section>
      <section>Vertical Slide 9</section>
      <section>Vertical Slide 10</section>
      <section>Vertical Slide 11</section>
      <section>Vertical Slide 12</section>
    </section>
  </div>
</div>
Output:
Auto-Animate
Reveal.js supports auto animation. The auto animate plays a vital role in web presentation. Auto animation applies smooth transition to a slide content, which is noticeable when viewing a presentation. For example, when you set margin-top: 40px to a section, you will see the smooth animation on how the second section comes down slowly. We’ll be implementing some examples here in this section.
To initiate the auto-animate to a section, add the data-auto-animate attribute to the two or multiple sections you want to integrate the auto-animate effect.
Example:
<div class="reveal">
  <div class="slides">
    <section data-auto-animate>
      <h1 style="color: cornflowerblue">Session Replay</h1>
    </section>
    <section data-auto-animate>
      <h1 style="margin-top: 100px; color: red">Session Replay</h1>
    </section>
  </div>
</div>
Output:

The code output above shows that we added margin-top: 100px to the section child (h1) using data-auto-animate, and you can see the effect applied smoothly and removing the default slide horizontal direction to a slightly vertical direction. Please remember that the element in this example is internally hidden but moved using the margin-top attribute. JavaScript will use a CSS transform to achieve fluid movement. Most CSS attributes may be animated and transitioned using the same technique, allowing you to modify positions, font-size, line-height, color, padding, and margin.
Auto-Slide
We’ll be working on auto-slide in a slide in this section. This is relatively straightforward to accomplish; simply look at our JavaScript code at the bottom of our HTML page and add the autoSlide duration as an integer and set the Boolean value of a loop to true:
JavaScript:
<script>
  Reveal.initialize({
    hash: true,
    autoSlide: 5000,
    loop: true,
  });
</script>
Output:

A play/pause icon can be found in the bottom left corner of the slide, as shown in the output above. A round loader describes the progress of the timing function in the icon. The following code is for the output presentation:
<div class="reveal">
  <div class="slides">
    <section data-background-color="blue">
      <h1>Welcome to Open Replay</h1>
    </section>
    <section>
      <h1>Session Replay</h1>
    </section>
    <section>
      <section><h1>Create an account</h1></section>
      <section><h1>Login to get Started</h1></section>
      <section><h1>Stars on GitHub</h1></section>
    </section>
  </div>
</div>
Slide Numbers
Numbering is important in slides, and you may add a slider number in two ways: obtain the current slide number and get the slide number and the overall slide count (X/X).
Set slideNumber to true in the config section at the bottom of the HTML page to obtain the real slide number.
JavaScript:
Reveal.initialize({ slideNumber: true });Slide Code:
<div class="reveal">
  <div class="slides">
    <section data-background-color="tan">
      <h1>PAGE 1</h1>
      <p>Horizontal Slide</p>
    </section>
    <section data-background-color="tan">
      <h1>PAGE 2</h1>
      <p>Horizontal Slide</p>
    </section>
    <section>
      <section>
        <h1>PAGE 3</h1>
        <p>Vertical Slide</p>
      </section>
      <section>
        <h1>PAGE 4</h1>
        <p>Vertical Slide</p>
      </section>
      <section>
        <h1>PAGE 5</h1>
        <p>Vertical Slide</p>
      </section>
    </section>
  </div>
</div>
Output:

If you look closely at the output above, you will notice a page number counter in the bottom right corner of the screen. When I reached the vertical part while sliding horizontally, the counter format changed to 3.1, which indicates 3 represents the last horizontal slide page and 1 represents the first vertical slide.
To set a slide number in (X/X) format, set your config to the code below:
Reveal.initialize({ slideNumber: 'c/t' })Output:

Please look closely at the bottom right corner of the screen; you will see the page numbering in X/X format. See the code for the output below:
<div class="reveal">
  <div class="slides">
    <section data-background-color="tan">
      <h1>PAGE 1</h1>
      <p>Horizontal Slide</p>
    </section>
    <section data-background-color="tan">
      <h1>PAGE 2</h1>
      <p>Horizontal Slide</p>
    </section>
    <section>
      <section>
        <h1>PAGE 3</h1>
        <p>Vertical Slide</p>
      </section>
      <section>
        <h1>PAGE 4</h1>
        <p>Vertical Slide</p>
      </section>
      <section>
        <h1>PAGE 5</h1>
        <p>Vertical Slide</p>
      </section>
    </section>
  </div>
</div>
Please, click here to learn more about slide numbers.
Useful hints and guidelines for Reveal.js
In this section, we’ll discover valuable hints and guidelines for working with Reveal.js, which will greatly improve our experience working with Reveal.js for presentation:
- Use keyboard shortcuts to navigate through slides: Use arrow keys or the space bar to move ahead and back through slides.
- Personalize the appearance and feel of your presentation: You can alter the theme, font, and background color of your slides with Reveal.js.
- To add background images to presentations, use the
data-backgroundattribute: You can change a slide’s background image by adding thedata-backgroundattribute to the slide’ element. - To set the transition effect between slides, use the
data-transitionattribute: Transition effects such as ‘slide,’ ‘fade,’ ‘convex,’ and ‘concave’ are available.
Conclusion
I hope you enjoyed this article; we covered everything we needed to know to get started with Reveal.js. We also learned about how to use Reveal.js in our project. There are many more features in Reveal.js, and you can learn more by visiting Reveal’s official website. You may also begin integrating presentations into client’s projects or your project by using Reveal.js; this will help you grow your experience utilizing Reveal.js.
Gain Debugging Superpowers
Unleash the power of session replay to reproduce bugs and track user frustrations. Get complete visibility into your frontend with OpenReplay, the most advanced open-source session replay tool for developers.