WordPress has emerged as the go-to content management system for developers and non-developers who want to create stunning websites quickly. When employing a headless approach like WordPress, businesses have more exact control over the back end of the content management system. They may also utilize any front end of their choice, like Angular, React, or Vue. The purpose of this post is to explain headless WordPress in great depth, including what it is, when to use it, and why. The last section will cover the setup of a headless WordPress environment and the use of Vue.js to create the front end.
What is WordPress?
Knowing that WordPress is considered a “monolithic” CMS assumes that you have worked in the CMS sector for some time. As a result, you’d have a robust back end where you could go to generate and maintain content while still keeping the front-end experience in mind. WordPress uses themes and plugins to integrate display functions, connecting the front and back ends.
WordPress is a fantastic content management system. Using the REST API that WordPress provides will allow you to extend your control over material outside your theme.
It is obvious how Headless WordPress is different from the present version of the platform, which is more proactive and pushes or delivers material to primarily browser-based websites. When using Headless WordPress, you may still use the platform’s back-end features. Still, they will shift into a reactive system, meaning the content will alter automatically depending on the front-end browser’s features to view the website.
What is VueJs?
Vue is a framework for developing progressive user interfaces. Vue is intended to be adopted gradually, in contrast to previous unitary frameworks. Integrating the core library with other libraries or existing projects is simple because it just concentrates on the display layer. On the other hand, when combined with modern tools and auxiliary libraries like WordPress, Vue is perfectly capable of driving complex single-page applications.
Why use a headless CMS?
- Instead of establishing multiple, simultaneous content management system instances, for example, to support web and mobile channels, a single headless CMS instance may handle an unlimited number of digital channels.
- Code and content are separated in a headless CMS, making it easier for content authors to disregard the code and focus entirely on the content under their control.
- Developers can use all the most recent tools and frameworks to develop content experiences on any modern platform instead of being constrained by a proprietary language or other characteristics of a specific content management system.
- Developers may use all the newest tools and frameworks to create content experiences for any modern platform without being restricted by a proprietary language or other limitations of a certain content management system.
Integrate WordPress Site With VueJs
Setting up a WordPress site is the first thing we must accomplish because it will be the primary data source for all of the front-end technologies we employ. Programmers can communicate with cross-technology interfaces using the Rest API, provided both sides can speak JSON. The data generated by the Rest API is in JSON format. By default, Rest API will be enabled. However, you can limit Rest API access if you’d like. For this project, we won’t change that.
Prerequisites
- An active WordPress installed/running
- knowledge of Vue basics
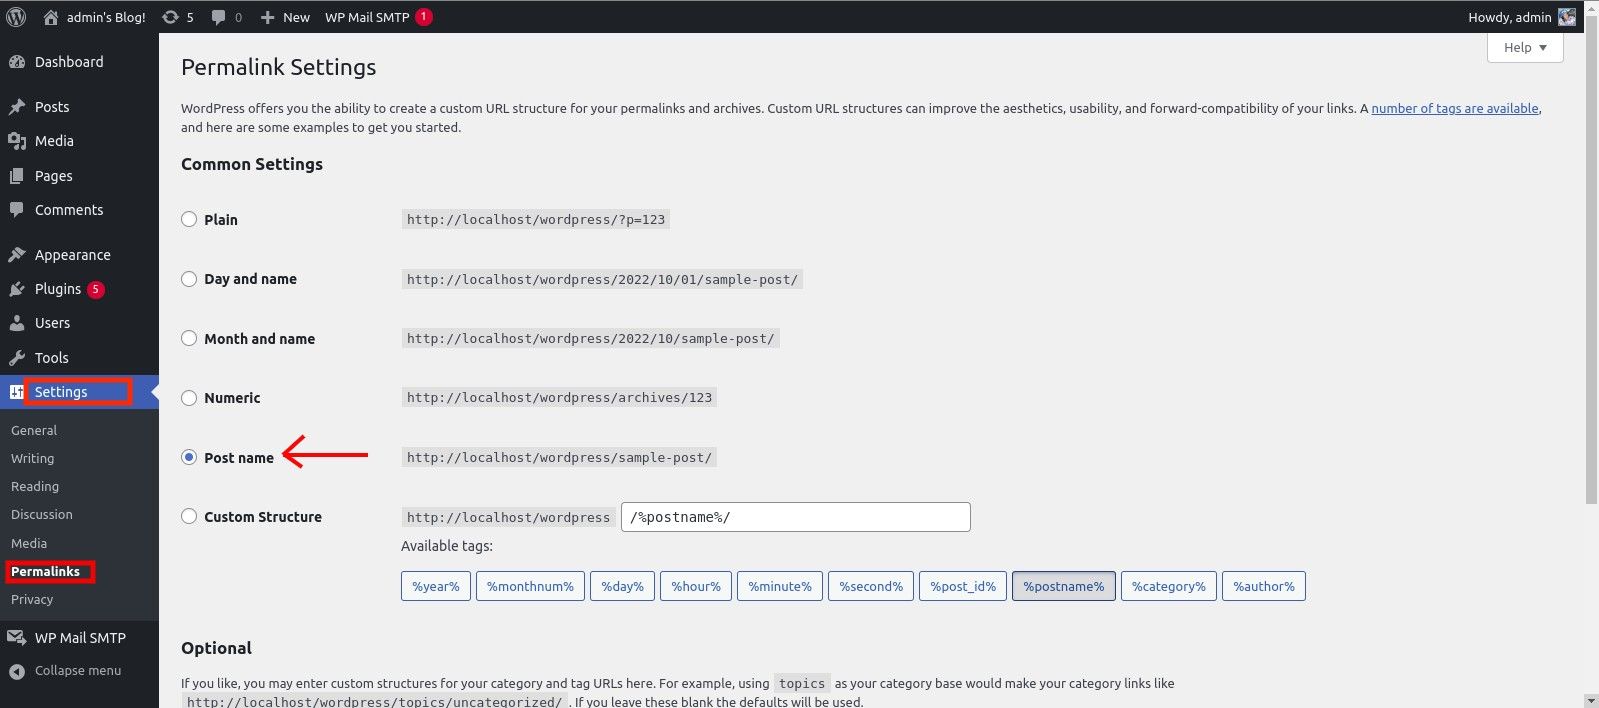
On your WordPress blog Dashboard, go to Settings, select Permalinks, and tick either Post name or Custom Structure. I’ll be going with Post name.
You will have to download the Postman Chrome extension now that we are using API calls. Having done so, open the Postman extension and enter the URL using the guidelines below.
https://example.com/wp-json/wp/v2/postsBut if you are running on localhost, as I’m doing, then input the URL below on your Postman Desktop Agent (not the Chrome extension this time).
http://localhost/wordpress/wp-json/wp/v2/postsThe posts data on your WordPress site will be fetched using the aforementioned URL.
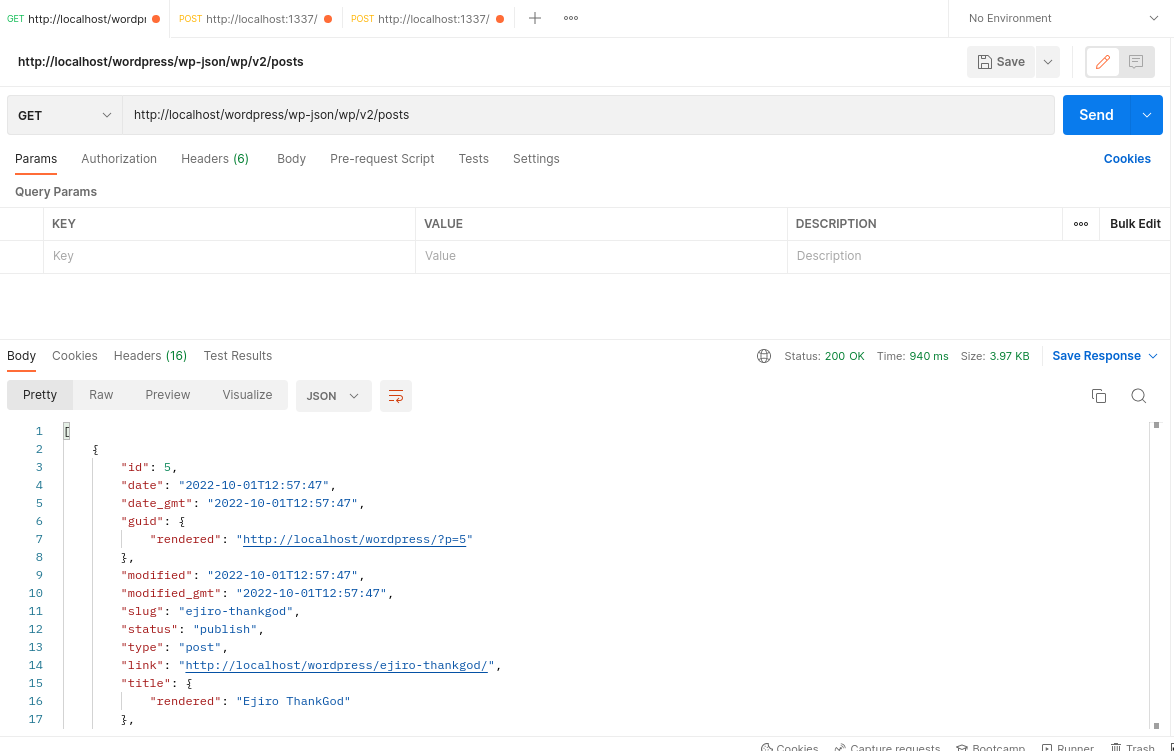
Above, we have our data from our REST API in JSON format. Here’s the structure you should see after a GET request:
{
      "id": 5,
      "date": "2022-10-01T12:57:47",
      "date_gmt": "2022-10-01T12:57:47",
      "guid": {
          "rendered": "http://localhost/wordpress/?p=5"
      },
      "modified": "2022-10-01T15:19:58",
      "modified_gmt": "2022-10-01T15:19:58",
      "slug": "ejiro-thankgod",
      "status": "publish",
      "type": "post",
      "link": "http://localhost/wordpress/ejiro-thankgod/",
      "title": {
          "rendered": "Ejiro ThankGod"
      },
      "content": {
          "rendered": "\nHello! just trying things out alright\n",
          "protected": false
      },
      "excerpt": {
          "rendered": "<p>Hello! just trying things out alright</p>\n",
          "protected": false
      },
      "author": 1,
      "featured_media": 0,
      "comment_status": "open",
      "ping_status": "open",
      "sticky": false,
      "template":"  ",
      "format": "standard",
      "meta": [],
      "categories": [
          1
      ],
}
As you may have noticed, we have the content we’ll set up on our VueJs website, along with the id, slug, date, and title.
Session Replay for Developers
Uncover frustrations, understand bugs and fix slowdowns like never before with OpenReplay — an open-source session replay tool for developers. Self-host it in minutes, and have complete control over your customer data. Check our GitHub repo and join the thousands of developers in our community.
Configuring Vue Front
The project’s entire back-end content management will be handled by WordPress, while VueJs will handle the front-end presentation of our material.
Prerequisites
- NodeJS & NPM
- Vue CLI
- Text Editor
Run the following command in the terminal and then follow the prompts to create a VueJs app after configuring the environment with the Vue command line.
vue create <app name>Once the project has been created, use the following command to view the vue js app project output at http://localhost:8080.
npm run serveNext, open the project’s source code in your preferred code editor; this is where we’ll begin writing code.
Your App.vue file should now include the following code:
<template>
<div>
<ul v-for=" post in posts" v-bind:key=" post.id">
<li>
<h2>{{ post.title.rendered }}</h2>
</li>
<p>{{ post.content.rendered }}</p>
</ul>
</div>
</template>
<script>
export default {
data() {
return {
posts: [],
};
},
methods: {
async getData() {
try {
let response = await fetch(
"http://localhost/wordpress/wp-json/wp/v2/posts"
);
this.posts = await response.json();
} catch (error) {
console.log(error);
}
},
},
created() {
this.getData();
},
};
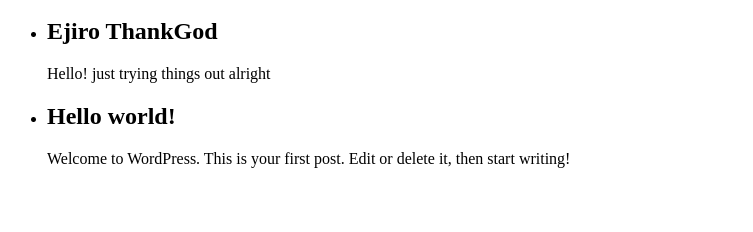
</script>We can now see the post we published from the WordPress site if we check our VueJs front. In essence, all we need to do is enhance our front-end website and increase the number of API calls.
Conclusion
All the advantages of a platform for editing rich material like WordPress plus the advantages of VueJs in terms of performance and security. You can create your own app with the aid of a modern JavaScript framework and the growing ecosystem now that content generation is separated from your development stack. Thanks to the back-end functionality in WordPress and the front-end functionality in Vue, you will have access to all the capabilities required for your website to grow.
Resources
A TIP FROM THE EDITOR: For a different approach to using WordPress, check out Building An Astro Website With WordPress As A Headless CMS.
Gain Debugging Superpowers
Unleash the power of session replay to reproduce bugs and track user frustrations. Get complete visibility into your frontend with OpenReplay, the most advanced open-source session replay tool for developers.