Knex.js and MySQL are essential components commonly used in modern web development for managing and interacting with databases. Knex.js, a JavaScript query builder, simplifies database management, while MySQL, a widely-used relational database management system, allows for efficient data storage and retrieval. This technical article will explore the process of creating a Node API using Knex.js and MySQL, and you will discover how to build complex SQL queries for selecting, inserting, updating, and deleting data.
Getting started
Before you can use MySQL, you have to create a MySQL database. You can create the database locally by installing MySQL on your system. Alternatively, you can create a MySQL database online using services like db4free.
After setting up your MySQL database, create a new project and cd into it by running the command below:
mkdir mysql-knex && cd mysql-knexNext, initialize npm with all its defaults by running the command below:
npm init -yNext, install Knex and the MySQL database driver by running the command below:
npm install knex mysqlTo create an express server and manage your environmental variables, run the command below:
npm install express dotemvThen, create a .env file in your project’s root directory and store your database credentials.
For example:
DB_HOST =
DB_USER =
DB_PASSWORD =
DB_NAME =
Setting up an Express Server
This tutorial will feature a Bookstore API to demonstrate combining Knex and MySQL with Node.js.
To create an Express server, first, create an index.js file in your project’s root directory and add the code block below to it:
//index.js
const express = require("express");
const app = express();
const port = 3000;

app.use(express.json());

app.listen(port, () => {
  console.log(`App listening on port:${port}`);
});
The code block above creates a simple express server. It listens on port 3000 and uses the express.json() middleware to parse incoming JSON requests.
Configuring Knex with MySQL
Knex requires a knexfile containing configuration options for connecting to a database, such as a database type, host, port, username, password, and other configuration options.
Run the command below to create a knexfile:
knex initThis command above will create a knexfile.js file in your project’s root directory. By default, the generated knexfile.js file will have sqlite3 as its development database.
To configure Knex to use MySQL, replace the contents of your knexfile.js file with the code block below:
require("dotenv").config()

/**
 * @type { Object.<string, import("knex").Knex.Config> }
 */
module.exports = {
  development: {
    client: "mysql",
    connection: {
      host: process.env.DB_HOST,
      user: process.env.DB_USER,
      password: process.env.DB_PASSWORD,
      database: process.env.DB_NAME,
    },
    migrations: {
      directory: "./db/migrations",
    }
  }
};
The code block above configures Knex to use MySQL as its database driver and specifies the file path where the migration files will be stored.
Next, create a db folder in your project directory by running the command below:
mkdir dbThen, create a db.js file in your db folder and import knex and your knexFile.js file.
Like so:
//db/db.js
const knex = require("knex");
const knexFile = require("../knexfile.js");
Next, add the code block below to your db.js file:
//db/db.js
const environment = process.env.NODE_ENV || "development";

module.exports = knex(knexFile[environment]);
The code block above sets the environment variable to either the NODE_ENV environment variable or development if NODE_ENV is not set. This lets you specify different configurations for different environments, such as development, production, or testing.
Creating Migration Files
Migration files are files you can use to manage changes to the database schema. When you create a new table, modify an existing table, or add new columns, you must modify the database schema to reflect these changes.
Your Bookstore API will have three database tables: Books, Authors, and Genres. Thus, you will need three migration files.
Run the command below to create your books migration file:
knex migrate:make booksRun the command below to create your authors migration file:
knex migrate:make authorsRun the command below to create your genres migration file:
knex migrate:make genresRunning the commands above will create three migration files in your knexfile.js specified file path.
Writing Migrations
The migration files generated by Knex contain boilerplate code with no connection to the type of application you are building.
Open your authors migration file and replace the up function with the code block below:
exports.up = function(knex) {
  return knex.schema.createTable("authors", (table) => {
    table.increments("id").primary();
    table.string("name").notNullable();
    table.timestamps(true, true);
  })
};
The code block above, when executed, creates an “authors” table in your database with the tables specified above.
Next, replace the down function with the code block below:
exports.down = function(knex) {
  return knex.schema.dropTableIfExists("authors");
};
The code block above, when executed, drops the “authors” table in your database, which is the opposite of what the up function does.
Next, open your genres migration file and replace the up function with the code block below:
exports.up = function (knex) {
  return knex.schema.createTable("genres", (table) => {
    table.increments("id").primary();
    table.string("name").notNullable();
    table.timestamps(true, true);
  });
};
The code block above, when executed, creates a “genres” table in your database with the tables specified above.
Next, replace the down function with the code block below:
exports.down = function (knex) {
  return knex.schema.dropTableIfExists("genres");
};
The code block above, when executed, drops the “genres” table in your database, which is the opposite of what the up function does.
Next, open your books migration file and replace the up function with the code block below:
exports.up = function(knex) {
  return knex.schema.createTable("books", (table) => {
    table.increments("id").primary();
    table.string("title").notNullable();
    table.integer('author_id').unsigned().notNullable();
    table.integer('genre_id').unsigned().notNullable();
    table.foreign('author_id').references('authors.id');
    table.foreign('genre_id').references('genres.id');
    table.timestamps(true, true);
  })
};
The code block above, when executed, creates a “books” table in your database with the tables specified above. It also defines a many-to-one relationship between genres, authors, and books.
Next, replace the down function with the code block below:
exports.down = function(knex) {
  return knex.schema.dropTableIfExists("books");
};
The code block above, when executed, drops the “books” table in your database, which is the opposite of what the up function does.
To run the migrations, run the command below on your terminal:
knex migrate:latestThe command above goes through all your migration files and runs the up function.
To undo the migrations, run the command below:
knex migrate:rollbackThe command above goes through all your migration files and runs the down function.
The Books table has two rows that depend on the Genres and Authors tables, respectively. So you have to create the Authors and Genres table before you create the Books table.
Alternatively, you can run the migrations in the sequence Authors → Genres → Books by running the command below:
knex migrate:up <migration_filename>Session Replay for Developers
Uncover frustrations, understand bugs and fix slowdowns like never before with OpenReplay — an open-source session replay tool for developers. Self-host it in minutes, and have complete control over your customer data. Check our GitHub repo and join the thousands of developers in our community.
Seeding Databases with Data
Seeding refers to populating your database with initial data that you can use for development or testing.
To seed your database with initial data, you must create seed files using Knex.
Run the command below to create a seed file for your author table:
knex seed:make authorsThe command above generates an “authors” seed file in your knexfile.js specified file path.
Next, replace the generated boilerplate code with the code block below:
//authors.js
exports.seed = async function(knex) {
  // Deletes ALL existing entries
  await knex('authors').del()
  await knex('authors').insert([
    {id: 1, name: 'Jane Austen'},
    {id: 2, name: 'Ernest Hemingway'},
    {id: 3, name: 'Agatha Christie'}
  ]);
};
The code block above, when executed, deletes all existing entries from the authors table and inserts the specified entries in the table.
Run the command below to create a seed file for your genres table:
knex seed:make genresThe command above generates a “genres” seed file in your knexfile.js specified file path.
Next, replace the generated boilerplate code with the code block below:
//genres.js
exports.seed = async function (knex) {
  // Deletes ALL existing entries
  await knex("genres").del();
  await knex("genres").insert([
    { id: 1, name: "Romance" },
    { id: 2, name: "Mystery" },
    { id: 3, name: "Thriller" },
    { id: 4, name: "Science Fiction" },
  ]);
};
Run the command below to create a seed file for your books table:
knex seed:make booksNext, replace the generated boilerplate code with the code block below:
//books.js
exports.seed = async function (knex) {
  // Deletes ALL existing entries
  await knex("books").del();
  await knex("books").insert([
    {
      id: 1,
      title: "Pride and Prejudice",
      description: "A novel of manners by Jane Austen",
      author_id: 1,
      genre_id: 1,
    },
    {
      id: 2,
      title: "The Old Man and the Sea",
      description: "A short novel by Ernest Hemingway",
      author_id: 2,
      genre_id: 3,
    },
    {
      id: 3,
      title: "Murder on the Orient Express",
      description: "A detective novel by Agatha Christie",
      author_id: 3,
      genre_id: 2,
    },
    {
      id: 4,
      title: "Emma",
      description: "A novel by Jane Austen",
      author_id: 1,
      genre_id: 1,
    },
    {
      id: 5,
      title: "The Sun Also Rises",
      description: "A novel by Ernest Hemingway",
      author_id: 2,
      genre_id: 1,
    },
  ]);
};
Like the migrations files, you must run the seed files in the order of Authors → Genres, → Books.
You can execute a seed file by running the command below:
knex seed:run --specific=<file_name>Querying your Database
Create a routes folder in your project’s root directory and create a bookStore.js file in it. You are going to implement route handlers that:
- Fetch all the books in the database.
- Fetch books based on their genre.
- Fetch books based on their author.
To implement these routes, import Express, your Knex instance, and set up the Express router.
Like so:
const express = require("express");
const router = express.Router();
const db = require("../db/db.js");
Next, add the code block below to implement the route handler that fetches all the books in the database:
router.get("/books", async (req, res) => {
  try {
    const books = await db("books");
    res.json(books);
  } catch (err) {
    console.error(err);
    res.status(500).send("Internal Server Error");
  }
});
Next, add the code block below to implement the route handler that fetches books based on their genre:
router.get("/genres/:id/books", async (req, res) => {
  try {
    const genreID = req.params.id;
    const books = await db("books").where("genre_id", genreID);
    const genre = await db("genres").where("id", genreID);

    res.json({ genre: genre[0].name, books });
  } catch (err) {
    console.error(err);
    res.status(500).send("Internal Server Error");
  }
});
Next, add the code block below to implement the route handler that fetches books based on their author:
router.get("/authors/:id/books", async (req, res) => {
  try {
    const authorID = req.params.id;
    const books = await db("books").where("author_id", authorID);
    const author = await db("authors").where("id", authorID);
    res.json({ author: author[0].name, books });
  } catch (err) {
    console.error(err);
    res.status(500).send("Internal Server Error");
  }
});
Next, export your Express router. Like so:
module.exports = router;Finally, import your router instance into your index.js file and use it as middleware. Like so:
const bookRouter = require("./routes/bookStore.js");

app.use("/api", bookRouter);
Testing your Database
To test your application, you can use tools such as Postman to make HTTP requests to your API and verify that it returns the expected results. Alternatively, you can use your browser.
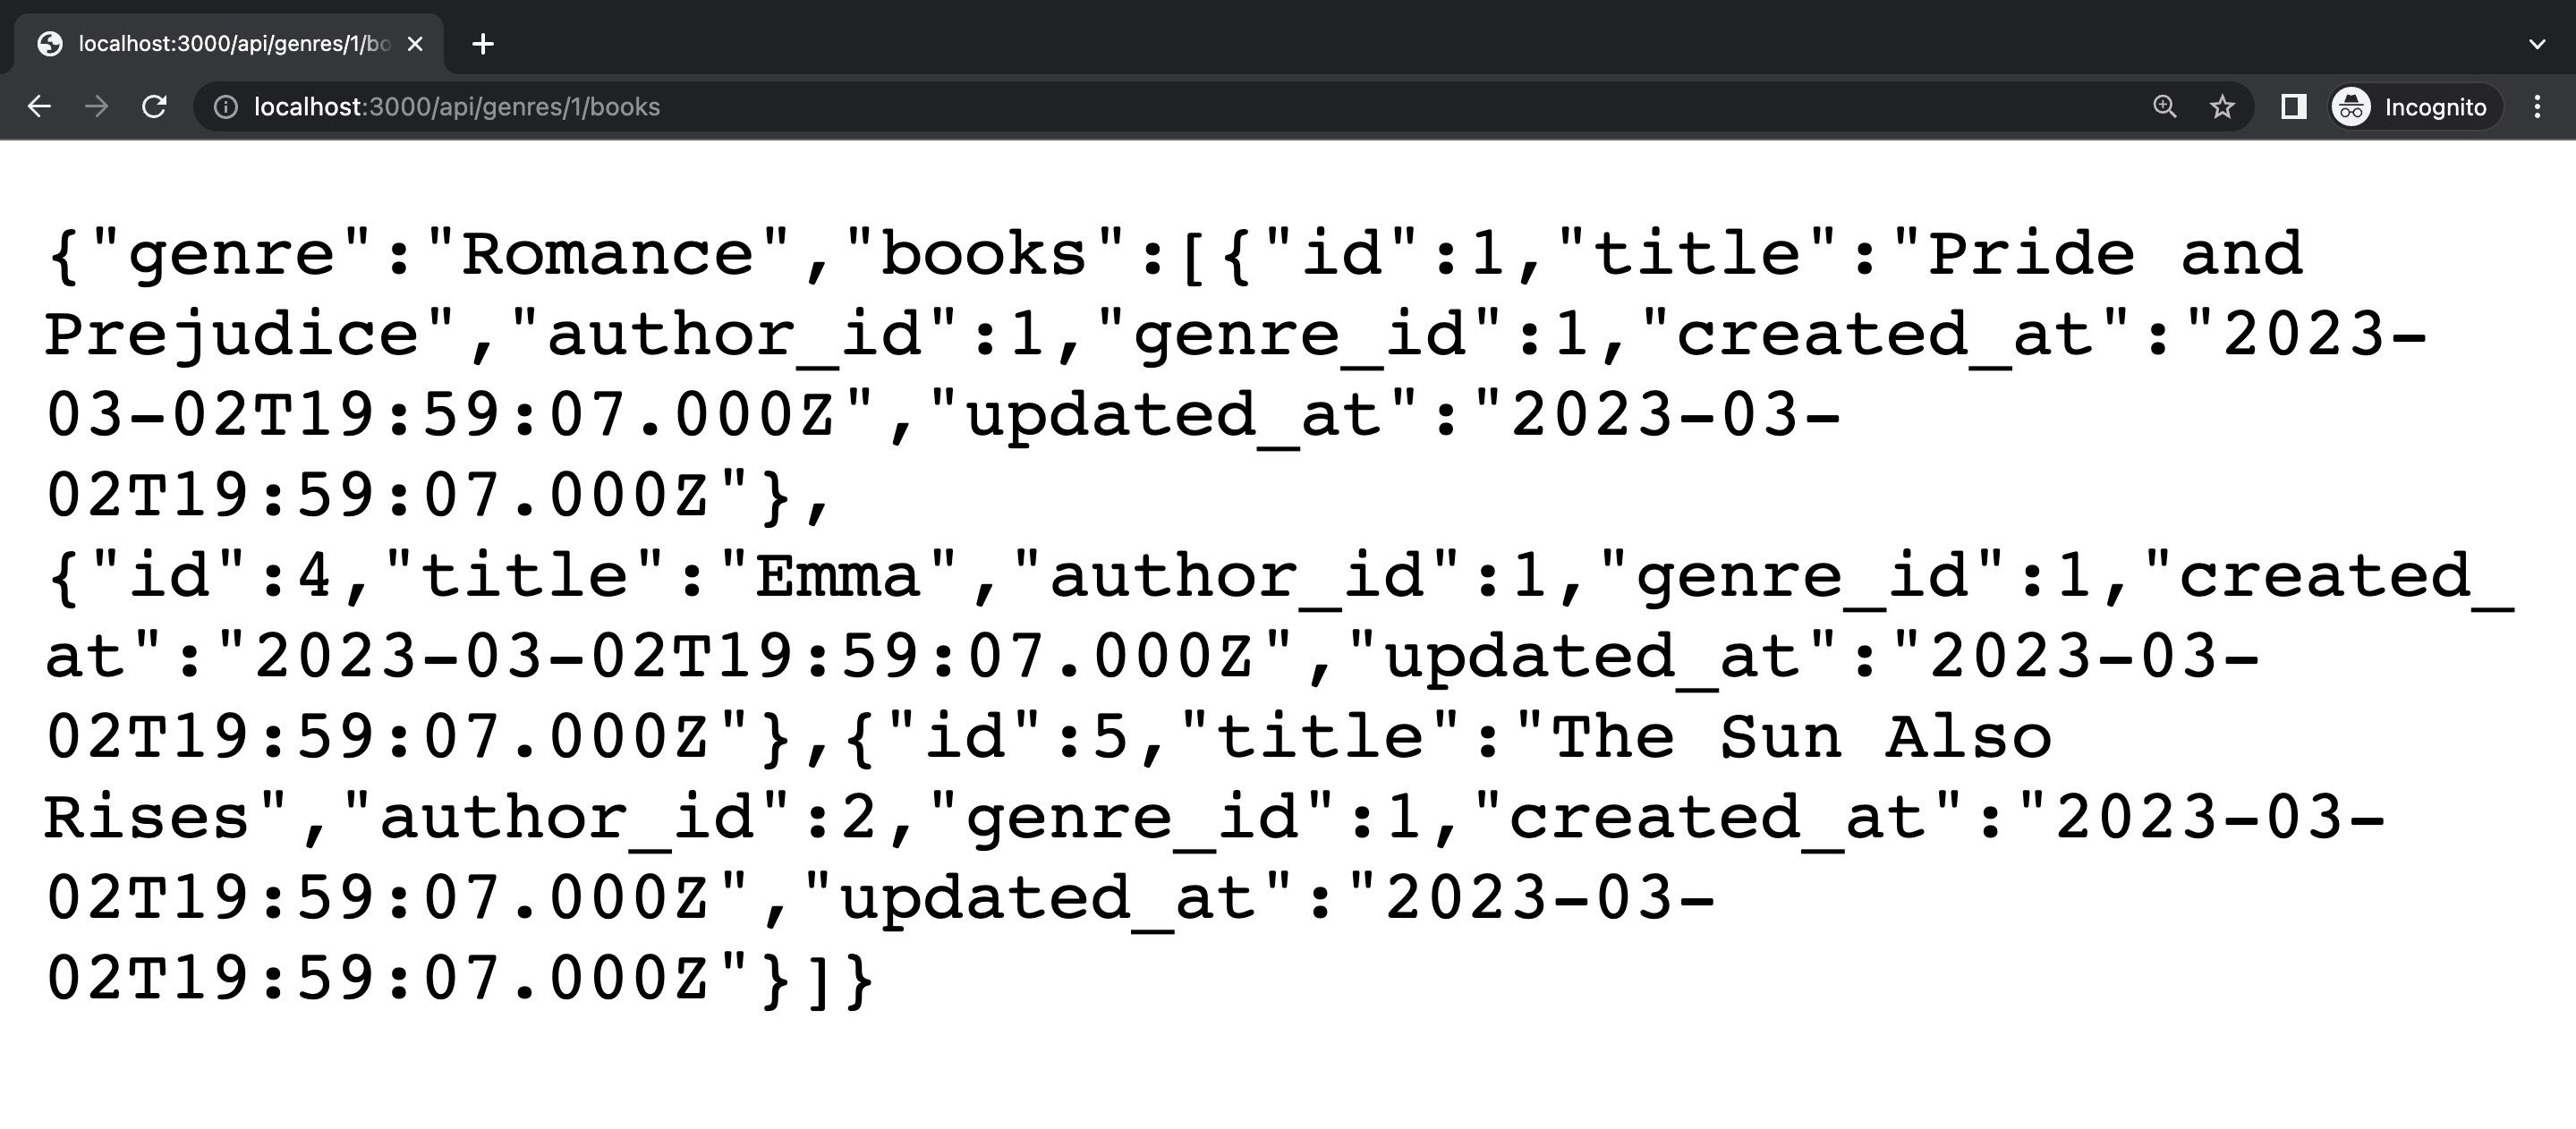
For example, you can request a GET to http://localhost:3000/api/genres/1/books by pasting the URL on your browser’s search bar and hitting ENTER. Your results should be similar to the image below.
Conclusion
In this article, you learned how to use Knex.js with MySQL to build a Node.js Bookstore API. You also learned how to configure Knex to use MySQL as its database client, connect to a PostgreSQL database locally and remotely, seed the database, create migrations, and make queries using Knex.
With the knowledge gained in this article, you can now build robust and scalable Node.js applications that leverage the power of MySQL and the simplicity of Knex.js.
Gain Debugging Superpowers
Unleash the power of session replay to reproduce bugs and track user frustrations. Get complete visibility into your frontend with OpenReplay, the most advanced open-source session replay tool for developers.