

Building web applications involves converting HTML, CSS, and JavaScript source code into executable production code for web browsers. The build process can include tasks such as transpiling, bundling, minifying or compressing code files, etc. Therefore, it is essential to have an optimal build process as it can significantly improve the user experience and performance of web applications.
Webpack actively optimizes build processes by serving as a JavaScript module bundler. Using Webpack, you can automate the process of transpiling, compressing, and bundling code.
This article will cover best practices for Webpack builds and customizing Webpack configurations for frameworks such as React and Vue.
Limitations of pre-configured setups
Webpack automates the build process for web applications by using pre-configured setups, which can have numerous advantages and is a convenient way to get started with a new project. However, this also makes the build process less flexible.
There are limitations to the pre-configured Webpack setups. Some of these limitations include the following:
- Less flexibility: An automated build process reduces flexibility and makes it challenging to adjust configurations to meet changing requirements. The pre-configured setups may provide too much or too little of what you need for the application.
- Compatibility: Specific versions of Webpack are designed to work with the pre-configured setups. That means a setup for Webpack version 3.8 may not work with version 5.0 because it comes with its dependencies. If the project changes in the future, it will cause compatibility issues.
- Complexity: Pre-configured setups contain a large number of plugins which can be challenging to maintain and understand, particularly for developers new to Webpack.
When you understand the limitations of pre-configured setups, you can make informed decisions about configuring and optimizing your Webpack build process.
Best practices for optimizing Webpack builds
The Webpack build process can be improved in several ways. However, we will discuss two ways: optimizing the final build size and the build process speed.
Optimizing the build size involves removing unnecessary code, such as unused modules, and compressing code to reduce its size. Using code splitting and tree shaking, Webpack can reduce the time it takes to generate the final build.
Reducing the size of the final build results in more performant websites. Additionally, it has several advantages, such as faster deployment, better ranking in search engine results, and better mobile performance.
Reducing the build size
You can use the following techniques to reduce the final build size using Webpack:
Minification
This technique removes unnecessary elements such as white spaces, comments, and line breaks from code without affecting its functionality. It is a technique used to reduce the size of HTML, CSS, and JavaScript files. Minification leads to faster load times and improved performance for the end user.
Minification doesn’t happen when you install Webpack, as you need plugins such as babel-minify-webpack-plugin to use this feature.
To use this plugin, you must install it as a dependency and configure it in your Webpack configuration file. You can use the following steps to add babel-minify-webpack-plugin to your application:
- Add the
babel-minify-webpack-pluginas a dev dependency using NPM.
npm install --save-dev babel-minify-webpack-plugin- Add
babelas a dev dependency.
npm i -D babel-loader @babel/core @babel/preset-env- Create a
.babelrcfile and add the code below to set minify as a preset.
{
 "presets": ["minify"]
}- Create a
webpack.config.jsfile and add the following lines of code to import the plugin.
const BabelMinifyPlugin = require("babel-minify-webpack-plugin");

module.exports = {
  entry: "./index.js",

  mode: "development",

  plugins: [new BabelMinifyPlugin()],

  module: {
    rules: [
      {
        loader: "babel-loader",
      },
    ],
  },
};- In your
package.jsonfile, add the following code under the scripts.
"build": "webpack -w"- Execute the build script to minify your code.
npm run buildThe build process will create a dist folder containing the minified Javascript inside the main.js file.
Compression
The compression technique is similar to minification. However, the difference is that it reduces the final build size by using a compression algorithm. It uses a compression algorithm such as Gzip.
Unlike minification, when file compression happens, decompression has to occur before its execution.
You can use a compression plugin like the compression-Webpack-plugin to compress files. To add the compression plugin to your application, use the following lines of code:
- Install the compression plugin.
npm install --save-dev compression-webpack-plugin- To import the plugin, add the following lines of code to the
webpack.config.jsfile.
const CompressionPlugin = require("compression-webpack-plugin");

module.exports = {
  entry: "./index.js",

  mode: "development",

  plugins: [new CompressionPlugin()],

  module: {
    rules: [
      {
        loader: "babel-loader",
      },
    ],
  },
};- Execute the build script.
npm run buildAgain, the build process will create a dist folder, but this time, with a main.js.gz file containing the compressed version of the JavaScript file.
Note: You can set the kind of algorithm to use for your file compression. Read the compression plugin Webpack documentation on how to set an algorithm.
Build process speed
It is common to make frequent changes during the development phase of any application. Therefore, you need optimal build process time to see changes as quickly as possible.
You can utilize the following techniques to increase the build process time when using Webpack.
Code splitting
Code splitting is a technique that breaks up code into smaller, more manageable pieces that can be executed on demand rather than bundled into a single file.
By loading only the necessary portions of your code as needed, rather than the entire file, you can reduce the amount of JavaScript required during the initial page load.
This technique can help improve performance, decrease load times, and improve overall user experience.
Multiple ways to split code in Webpack include entry points, the splitchunks plugin, and dynamic imports.
To split code using the entry points method, use the following steps below:
- Add the following lines of code to your
webpack.config.jsfile.
const path = require("path");

module.exports = {
  mode: "development",

  entry: {
    index: "./src/index.js",
    example: "./src/example-module.js",
  },

  output: {
    filename: "[name].bundle.js",
    path: path.resolve(__dirname, "dist"),
  },
};- Create a utility file called
example-module.jsand add the following lines of code to importlodash.
import _ from "lodash";

console.log(_.join(["Another", "module", "loaded!"], " "));- Run the build script.
npm run buildThe execution of the build script will create a dist folder with two bundled files, index.bundle.js and example.bundle.js. You can confirm this in the figure below.
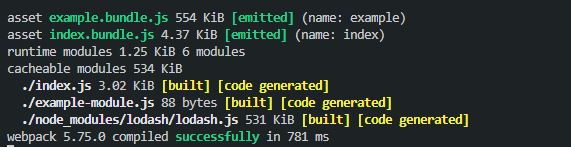 Figure 1. Bundled files
Note: This method will allow duplicates in each bundle; you need the splitchunks plugin to correct that. You can read more about it here.
Tree shaking
Utilizing this technique helps to remove unused modules from your application. It is also known as dead code elimination. As a result, load time is faster, and performance is improved.
To use the tree-shaking technique, follow the instructions below:
- Add the following lines of code to the
webpack.config.jsfile.
const path = require("path");

module.exports = {
  entry: "./index.js",

  output: {
    path: path.resolve(__dirname, "dist"),
    filename: "bundle.js",
  },

  module: {
    rules: [
      {
        test: /\.js$/,

        use: [
          {
            loader: "babel-loader",

            options: {
              presets: ["@babel/preset-env"],
            },
          },
        ],
      },
    ],
  },
};- Create a utility file
unused.jsat the project’s root and add the following lines of code.
export const unUsed = () => {
  console.log("I am not used");
};- In the index.js file, add the following code, which imports the
unUsedfunction from theunused.jsfile.
import { unUsed } from "./unused.js";

export const used = () => {
  console.log("I am used");
};
The unUsed function in the code sample above isn’t used in the used.js file. We will run the build script to ensure that it is not included in the final build of our code.
Once you do, view the bundle.js file and notice that the unUsed code is still part of the final build under the unused harmony export comment. To change that, we need side effects.
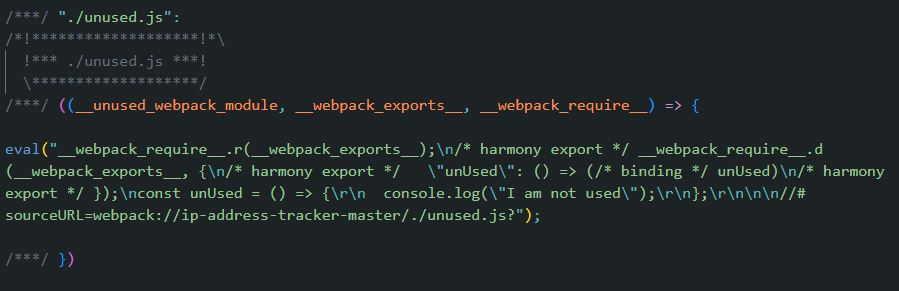 Figure 2. Unused code
To add side effects to the package.json file, use the following code:
"sideEffects": false,Eliminate unused code by rerunning the build. Confirm from the bundle.js file.
Note: The example code used doesn’t have any side effects. If they did, you would add the files containing side effects in an array.
Session Replay for Developers
Uncover frustrations, understand bugs and fix slowdowns like never before with OpenReplay — an open-source session replay tool for developers. Self-host it in minutes, and have complete control over your customer data. Check our GitHub repo and join the thousands of developers in our community.
Optimizing Webpack builds for JavaScript frameworks
Users of frameworks like React and Vue can actively participate in configuring and optimizing Webpack builds. They must have optimal Webpack builds as it directly affects the performance of their web applications.
Tools such as create-react-app in React or vue CLI in Vue create a basic configuration of Webpack which may not necessarily match the needs of your application. You can further optimize the configurations generated by these tools to increase build speed, reduce the final build size, etc.
Common challenges and solutions for React and Vue users
-
Slow build time: This issue is a significant challenge for Vue and React users. As the application increases, the build time becomes slower and more frustrating. Other factors leading to a slow build time include increased lines of code, inefficient processing, etc. To have optimal build time, utilize techniques such as code splitting, tree shaking, etc.
-
Optimizing the production build: One of the most commonly encountered challenges for React and Vue users is the large size of the production build. The reason is that the production build generated by default is usually massive, containing code that you might not need for the final application and unoptimized code. This results in slow load times and a less responsive interface. Applying techniques discussed earlier in this article, such as tree shaking, minification, and compression, is essential to overcome this challenge.
-
Debugging issues: Utilizing tools such as Webpack can be a daunting task. It is especially true when using frameworks such as React and Vue, as debugging code might become an issue as the code base grows. The difficulty starts to arise in detecting and fixing errors in the code. Common errors include build errors, unexpected behavior of outputted code, etc. Therefore, it is advisable to have a basic understanding of how Webpack works for debugging issues - by utilizing a tool such as Webpack bundle analyzer. This debugging tool can help you understand and optimize your Webpack configuration.
To address some challenges discussed earlier, I will demonstrate how to customize the webpack.config.js file in a React or Vue project to add code splitting. For React, use the following steps below:
- Create a
webpack.config.jsfile and add the following lines of code:
const path = require("path");

const webpack = require("webpack");

module.exports = {
  entry: {
    main: "./src/index.js",
  },

  output: {
    filename: "[name].bundle.js",
    path: path.resolve(__dirname, "dist"),
  },

  optimization: {
    splitChunks: {
      chunks: "all",
    },
  },
};- In your project file, add the following lines of code:
import React, { lazy, Suspense } from "react";

const MyComponent = React.lazy(() => import("./MyComponent"));

function App() {
  return (
    <div>
      <Suspense fallback={<div>Loading...</div>}>
        <MyComponent />
      </Suspense>
    </div>
  );
}

export default App;
In this code example, we implement the code-splitting technique using the React.lazy() method. React.lazy() allows you to render a dynamic import as a regular component. You must include the suspense component to see a loading indicator while waiting for the lazy component to load.
Note: To implement code splitting, you must write your code in a modular pattern with dynamic imports to load bits of your code on demand.
To implement code splitting in Vue, follow the steps below:
-
Add the same code from the React implementation to the
webpack.config.jsfile. -
Create a
vue.config.jsfile and add the following lines of code.
const path = require("path");

const webpack = require("webpack");

module.exports = {
  configureWebpack: {
    optimization: {
      splitChunks: {
        chunks: "all",
      },
    },
  },
};
This file allows you to perform SplitChunks optimizations in a Vue project.
- Create a utility file in your project and paste the code below.
<template>
  <div><component is="currentComponent" /> </div>
</template>

<script>
export default {
  data() {
    return {
      currentComponent: null,
    };
  },

  mounted() {
    import("./MyComponent.vue").then(({ default: MyComponent }) => {
      this.currentComponent = MyComponent;
    });
  },
};
</script>
This method uses dynamic imports, which indicate to Webpack that this part of the code should be a separate bundle.
Customizing Webpack for React and Vue is relatively easy. You have to understand how Webpack works and how to apply the technique you desire.
Conclusion
In conclusion, Webpack is essential for building and optimizing JavaScript applications. By understanding the limitations of pre-configured setups, developers can make the most of their projects by customizing the Webpack configuration to their specific needs.
Developers can build their applications quickly, efficiently, and with optimal results by following best practices and focusing on performance. By mastering the art of Webpack optimization, developers can take their projects to the next level and deliver world-class applications that meet the needs of their users.
Gain Debugging Superpowers
Unleash the power of session replay to reproduce bugs and track user frustrations. Get complete visibility into your frontend with OpenReplay, the most advanced open-source session replay tool for developers.