As a developer, have you ever felt like your CSS styling was a wild jungle, where one change led to an unexpected ripple effect across your entire design? This makes us resort to specificity hacks or using the
!importantdeclaration to override styles, leading to messy and difficult-to-maintain code. This article will discuss CSS cascade layers, which play a huge role in style arrangement by letting you explicitly define layers of styles, allowing you to prioritize styles in a more organized and maintainable way.

Discover how at OpenReplay.com.
CSS Cascade Layers is one approach to organizing and styling CSS to prioritize certain styles. CSS cascade layers form a hierarchy, which defines the order in which styles should be applied to an element. This allows for fine management of styles within cascade layers and, in turn, helps prevent unintended style conflicts.
Cascade Layers offers a structured method that changes how styles are organized and applied. They act as a roadmap, delineating the hierarchy of styles, thereby ensuring greater predictability and control over how elements are visually rendered on a web page.
Moreover, cascade layers become invaluable in the context of collaborative web development. They facilitate team collaboration by providing a standardized style organization and implementation approach. This fosters better teamwork, reduces conflicts, and streamlines the process of integrating various design elements from different team members.
Furthermore, the layers serve as a safeguard against unintended style changes. By compartmentalizing styles within specific layers, developers can alter one layer without causing a chaotic ripple effect across the entire stylesheet. This enhances maintainability, making updating and modifying styles easier without inadvertently impacting unrelated elements.
Why Cascade Layers Are Useful
Cascade Layers in CSS is very useful as it provides a structured approach that streamlines styling processes and empowers developers in numerous ways. Here are some of the major uses of cascade layers:
-
Control and Predictability: They provide a structured system that helps developers gain greater control over style application. With clearly defined layers, predicting how styles will interact and which ones will take precedence is easier, fostering a more intuitive and controlled styling environment.
-
Conflict Resolution: Cascade Layers are a potent tool for resolving conflicts. By compartmentalizing styles into layers, developers can pinpoint conflicting styles more efficiently and prioritize them without disrupting the entire stylesheet. This significantly reduces the hassle of debugging and rectifying style conflicts.
-
Maintainability and Scalability: They enhance code maintainability by allowing developers to organize styles logically. This organized structure not only eases maintenance but also scales well, particularly in larger projects or teams, ensuring consistency and coherence across the board.
-
Collaboration and Workflow Efficiency: When multiple developers or teams work on a project, Cascade Layers act as a unified framework, offering a standardized approach to styling. This fosters better collaboration, streamlines workflows, and minimizes the chances of overlapping or conflicting styles among contributors.
-
Modularity and Flexibility: By compartmentalizing styles into layers, developers can create modular, reusable style sets that can be easily modified or extended. This modularity enhances flexibility, allowing quicker adjustments or updates without causing widespread disruptions.
How Cascade Layers differ from traditional cascading in CSS
In traditional CSS cascading, styles are applied globally, often leading to unintended consequences and conflicts across a website. This approach lacks isolation, making it challenging to manage styles efficiently. However, with cascade layers, encapsulating styles into distinct layers is possible. This encapsulation creates a structured framework where styles within each layer operate independently, minimizing the risk of unintended side effects on other elements.
Unlike traditional cascading, cascade layers establish an explicit hierarchy, defining priorities among layers. This hierarchical structure simplifies conflict resolution by providing a predefined order for styles to take precedence, reducing the ambiguity that often arises from specificity and source order.
Moreover, while traditional cascading can inadvertently affect multiple elements, cascade layers offer a more scoped and predictable approach. Styles within a layer only impact elements within that specific layer, ensuring cleaner, more maintainable code.
Working with Cascade Layers
When working with cascade layers, there are a few things we need to know to fully understand how cascade layers work. What are cascade layers? How are they ordered? And how are styles assigned to cascade layers?
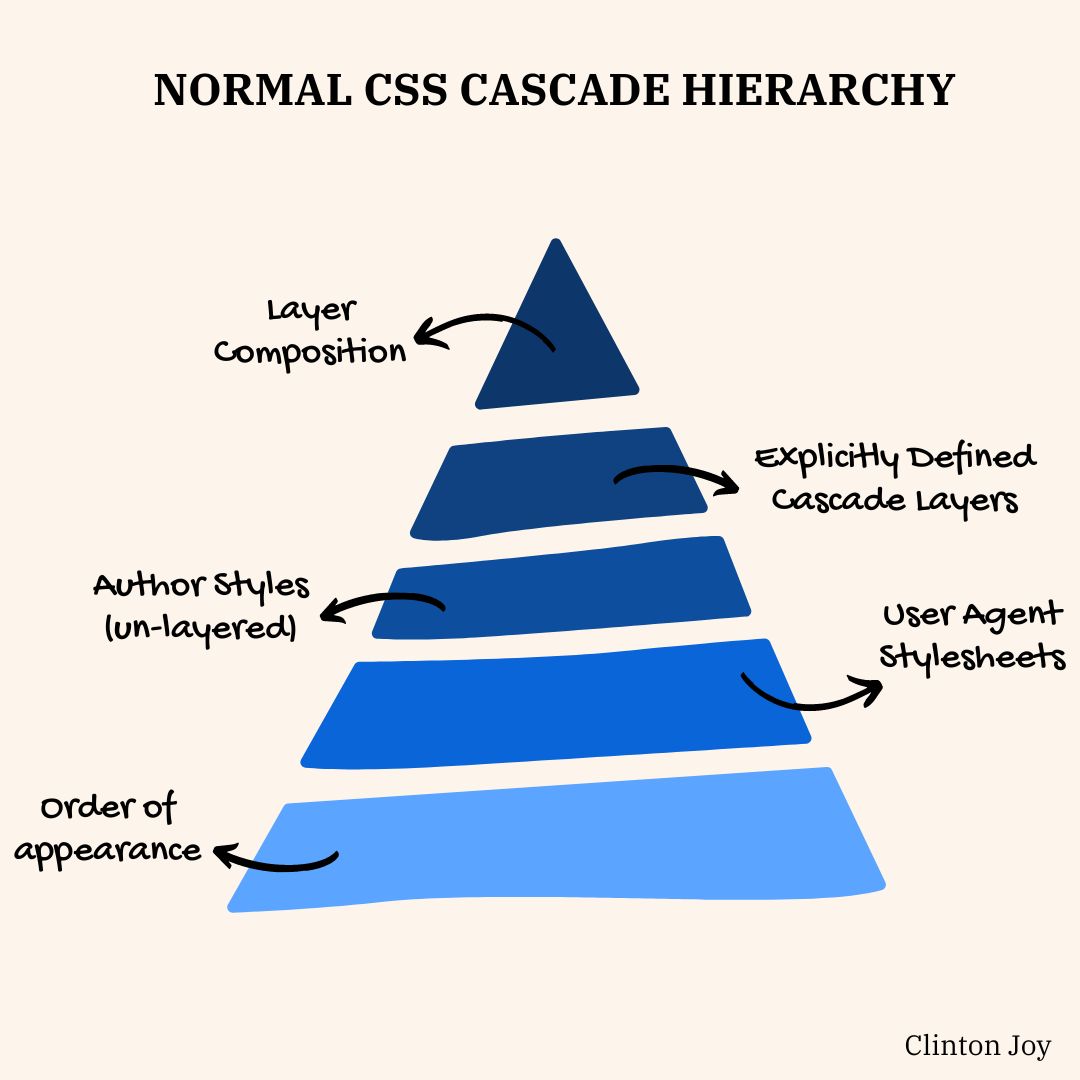
Normal CSS cascade hierarchy
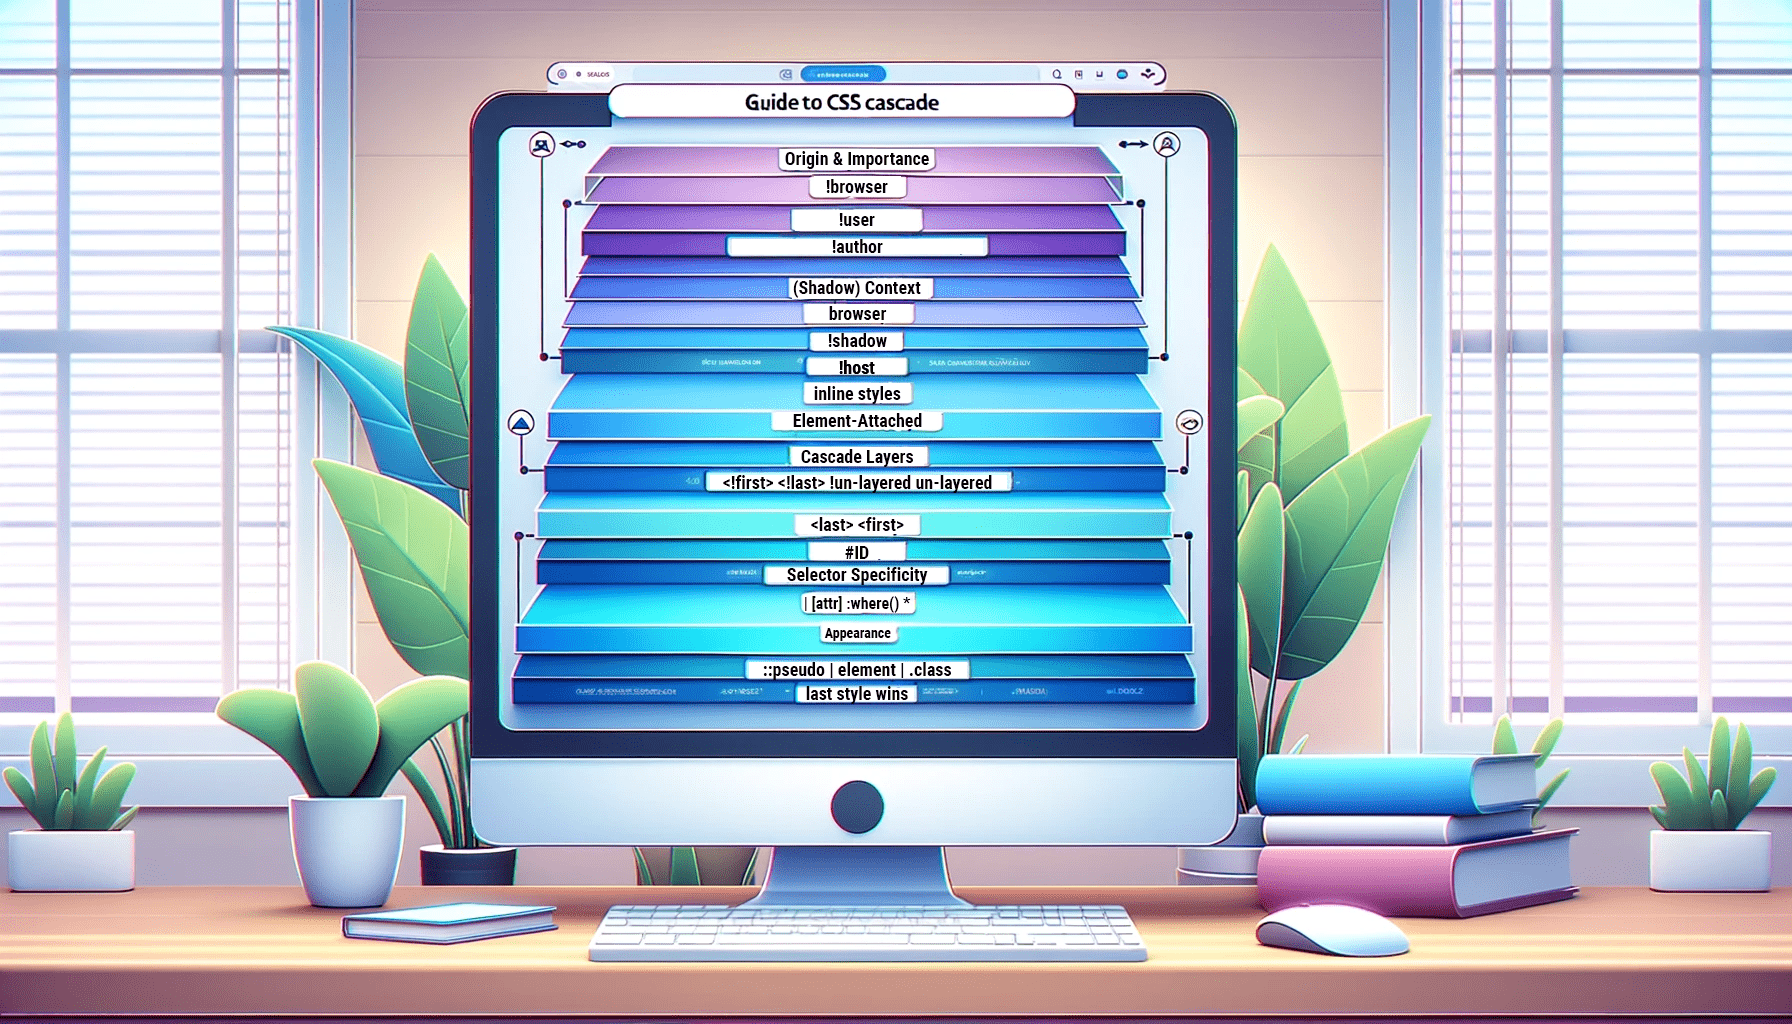
The normal CSS cascade hierarchy orchestrates styles by parsing stylesheets from top to bottom, prioritizing declarations appearing later in the document. This structure empowers later declarations to override earlier ones for the same element and property.
Selector specificity also plays a pivotal role, where more specific selectors hold precedence over less specific ones. For instance, an ID selector (#element) outweighs a class selector (.element) in determining which style applies to an element. Inline styles, directly applied to HTML elements via the style attribute, reign supreme, challenging to override due to their highest precedence in the cascade.
-
Order of appearance: This is simply the sequence in which styles are written within a CSS file or stylesheet.
-
User Agent Stylesheets: These are the default styles the browser provides. They form the foundational layer upon which all other styles are built. User Agent Stylesheets include default styling for HTML elements, establishing their basic appearance.
-
Author Styles (un-layered): Before the introduction of Cascade Layers, this was the primary layer for author-defined styles. It consists of styles defined traditionally, without specifying layers using
@layer. These styles exist in a flat hierarchy and have the least specificity compared to layered styles. -
Explicitly Defined cascade layers: When developers utilize
@layerrules to categorize styles into specific layers, they introduce an explicit layering structure. Layers are ordered based on their appearance in the stylesheet, with styles in higher layers taking precedence over styles in lower layers.] -
Layer Composition: The normal cascade rules apply within a specific layer. Styles within the same layer are resolved based on specificity, importance, and source order, following traditional cascading principles. If conflicts arise within a layer, the normal CSS cascade rules determine which style takes precedence.
The advent of cascade layers through @layer rules introduces a structured hierarchy, dictating the precedence of styles within defined layers. This organized layering system follows the order set by @layer declarations, influencing which styles take priority based on their placement within the stylesheet.
Furthermore, styles originating from user agents, author stylesheets, user stylesheets, or inline declarations collectively contribute to the cascade, with the !important declaration holding ultimate authority by superseding other declarations, irrespective of specificity, order, or origin.
Layer Hierarchy and Ordering
Previously, we mentioned that cascade layer is that CSS feature that lets us group styles in the order of their priority. This layering order is crucial in resolving conflicts and establishing a clear hierarchy of styles. Here’s how cascade layers are ordered:
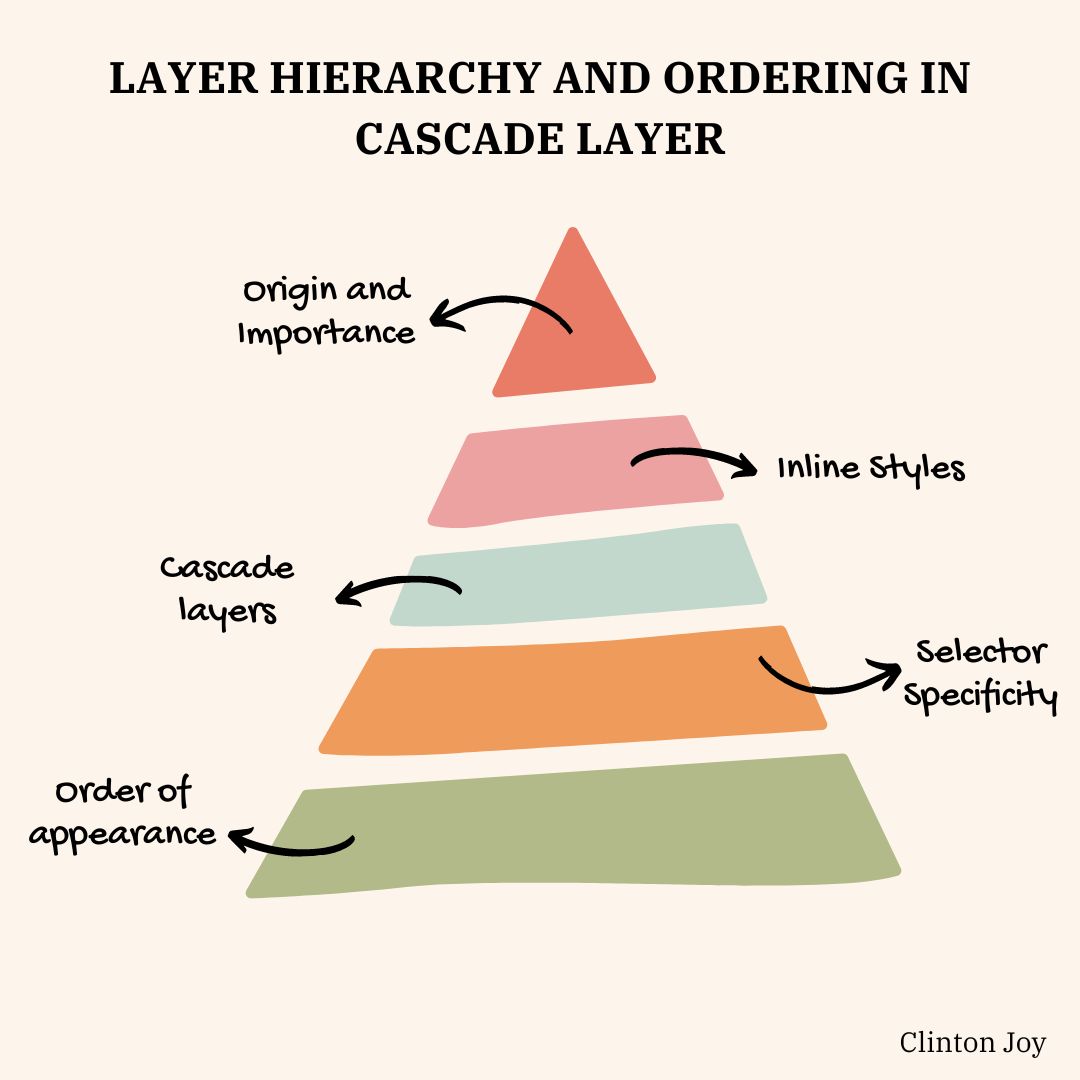
In cascade layers, Order of Appearance is the bottom of the layer hierarchy; it signifies the sequence in which styles are written within a CSS file or stylesheet. Selector specificity determines which style rules will be applied to an element and has a higher priority than the order of appearance.
Cascade layers introduced through @layer rules provide a structured approach to organizing styles. The explicit layering order influences the priority of styles within the cascade layer style.
Inline styles are directly applied to individual HTML elements using the style attribute. Inline styles hold the highest specificity, often overriding styles defined in external stylesheets. Finally, considering the ‘Origin and Importance’ of styles becomes pivotal, as styles from different sources carry varying levels of significance, influencing their position and dominance within the cascade.
Syntax and implementation of Cascade Layers
Implementing cascade layers in your CSS isn’t as hard as you might think; it’s more like giving your styles a structured hierarchy. To start, you’ll use the @layer rule, the conductor of this symphony of styles.
The syntax starts with @layer, followed by the layer’s name in curly braces. For instance, imagine creating a layer for foundational styles like this:
@layer base {
  /* Your foundational styles go here */
}
Next, let’s say you want to craft a layer specifically for buttons. Easy peasy:
@layer buttons {
  /* Styles for your buttons live here */
}
Now, the beauty of Cascade Layers shines when you attach styles to these layers. You simply nest them within the corresponding @layer block. So, those base styles you defined earlier? They’ll seamlessly fall into the “base” layer:
@layer base {
  /* Your foundational styles */
  body {
    /* Body styles go here */
  }
  /* More foundational styles */
}
And the button styles would naturally belong in the “buttons” layer:
@layer buttons {
  /* Your button styles */
  .btn {
    /* Button styles go here */
  }
  /* More button styles */
}
Remember, these layers work harmoniously, stacking on top of each other while maintaining their individuality. It’s like neatly organizing your clothes in different drawers; they’re all part of the closet, but each has its own designated space.
Calling them into action is a breeze once you’ve set up your layers. Simply ensure your styles are within the scope of the appropriate layer, and voilà! Your styles are now neatly organized and ready to work.
Practical example of CSS Cascade layers in use
We have seen how CSS cascade layers work and the order in which they prioritize style. We have also shown the code syntax used when working with cascade layers. For this section, we will build a simple form using CSS cascade layers to define and prioritize style.
For this illustration, it will be stated that we all already have the basic knowledge of HTML and CSS and how to set up a project, so let’s dive right into our CSS code.
HTML
<html lang="en">
  <head>
    <meta charset="UTF-8" />
    <title>Styled Form with Cascade Layers</title>
    <link rel="stylesheet" href="./style.css" />
  </head>
  <body>
    <form class="form">
      <h2>Sign Up</h2>
      <p>Please provide your name, email, and phone number.</p>

      <div class="field">
        <label for="name">Name </label>
        <input type="name" id="name" required placeholder="e.g. Clinton Joy" />
      </div>

      <div class="field">
        <label for="email">Email Address </label>
        <input
          type="email"
          id="email"
          required
          placeholder="e.g. clinton@gmail.com"
        />
      </div>

      <div class="field">
        <label for="number">Phone number </label>
        <input
          type="number"
          id="number"
          required
          placeholder="+1 893 389 938"
        />
      </div>

      <div>
        <button>Submit</button>
      </div>

      <p>
        Already have an account?
        <a class="sign-in" href="https://openreplay.com/">
          Sign In
        </a>
      </p>
    </form>
  </body>
</html>;
The HTML is a simple markup for our form; it consists of an h2 tag, a single paragraph of text, divs containing a label, and an input for our form.
Here is a browser preview of our HTML:

CSS
@import url("https://fonts.googleapis.com/css2?family=Nunito+Sans:opsz,wght@6..12,400;6..12,700&display=swap");
/* Base Layer */
@layer base {
  body {
    font-family: "Nunito Sans", sans-serif;
    margin: 0;
    padding: 0;
    background-color: #f0f0f0;
    color: #333;
  }
  label {
    display: block;
    margin-bottom: 5px;
  }
  input,
  button {
    width: 80%;
    padding: 20px;
    margin-bottom: 20px;
    border: 1px solid #ccc;
    border-radius: 5px;
    font-family: sans-serif, "Nunito Sans";
    box-sizing: content-box;
  }
  button {
    background-color: #00801a;
    color: #fff;
    cursor: pointer;
  }
  button: hover {
    background-color: #0a0066;
  }
}

/* Form Structure Layer */
@layer form-structure {
  .form {
    max-width: 400px;
    margin: 50px auto;
    padding: 20px 40px;
    background-color: #fff;
    box-shadow: 0 0 10px rgba(0, 0, 0, 0.1);
    border-radius: 5px;
  }
  h2 {
    margin-bottom: 10px;
    color: #008080;
  }
  p {
    margin-bottom: 20px;
  }
  .field {
    margin-bottom: 15px;
  }
  .sign-in {
    color: #008080;
    text-decoration: none;
  }
  .sign-in:hover {
    text-decoration: underline;
  }
}

/* Form Input Styling Layer */
@layer form-inputs {
  input,
  button {
    width: 100%;
    padding: 10px;
    margin-bottom: 10px;
    border: 1px solid #ccc;
    border-radius: 5px;
    box-sizing: border-box;
    font-family: "Nunito Sans", sans-serif;
  }
  button {
    background-color: #008080;
    color: #fff;
    border: none;
    border-radius: 5px;
    cursor: pointer;
  }
  button:hover {
    background-color: #006666;
  }
}

/* Form Text Styling Layer */
@layer form-text {
  h2 {
    margin-bottom: 10px;
    color: #008080;
  }
  p {
    margin-bottom: 20px;
  }
  .sign-in {
    color: #008080;
    text-decoration: none;
  }
  .sign-in:hover {
    text-decoration: underline;
  }
}
From the CSS code above, you can see four @layer in use.
@layerbase contains basic styles for the body, labels, inputs, and buttons.@layerform-structure includes styles for the form structure like margins, padding, and background.@layerform-inputs contains styles specific to form inputs such as width, padding, and border.@layerform-text includes styles for text elements within the form, like headings, paragraphs, and links.
As seen in the code, these layers separate different aspects of the form, allowing for better organization, maintenance, and scalability of styles. Also, due to the order of appearance of the code style, some styles that appeared in the later part of our code will overshadow others.
Here is our browser output:

Managing Style Conflicts with Cascade Layers
Resolving conflicting styles through Cascade Layers is like having a referee mediate between conflicting teams, ensuring a fair and harmonious resolution. Here’s a step-by-step approach to tackling conflicts using layers:
-
Identify Conflicting Styles: Begin by pinpointing the conflicting styles within your project. Identifying the conflicting styles is crucial for resolution, whether it’s due to specificity, source order, or unintentional clashes.
-
Layer Priority: cascade layers operate based on a defined hierarchy. Assign priorities to your layers, ensuring that layers with more critical styles or those needing precedence are positioned higher in the hierarchy.
-
Layer Reorganization: If conflicting styles exist within the same layer, reconsider the organization of your layers. Perhaps certain styles should be segregated into distinct layers to avoid conflicts or to give higher priority to crucial styles.
-
Override Conflicting Styles: Within a single layer, utilize specificity or selector targeting to override conflicting styles. Leverage CSS techniques like using more specific selectors,
!importantdeclarations (sparingly), or restructuring your styles to avoid clashes. -
Utilize Layer Hierarchy: When conflicts arise between layers, cascade layers utilize their predefined hierarchy for resolution. The styles within higher-priority layers will take precedence over those in lower-priority layers, simplifying conflict resolution.
-
Test and Iterate: After making adjustments, thoroughly test your styles to ensure the conflicts have been resolved as intended. Iteration might be necessary to fine-tune the layers and styles until achieving the desired outcome.
-
Documentation and Best Practices: Document your conflict resolution methods and establish best practices for your team. This helps maintain consistency and guides future development, ensuring conflicts are minimized and easily resolved.
Best practices for maintaining style hierarchy within layers
Maintaining a well-defined style hierarchy within Cascade Layers ensures consistency, clarity, and ease of maintenance across projects. Here are some best practices to uphold an efficient style hierarchy:
-
Establish Clear Layer Definitions: Define the purpose and scope of each layer explicitly. Whether it’s typography, layout, components, or themes, each layer should serve a distinct purpose. This clarity prevents ambiguity and aids in organizing styles more efficiently.
-
Consistent Naming Conventions: Adopt consistent and intuitive naming conventions for your layers. Clear and descriptive names make it easier for team members to understand the purpose and order of layers, fostering collaboration and ensuring uniformity across projects.
-
Follow a Logical Order: Arrange layers logically based on their importance and impact. Foundational styles like resets or base styles should reside in lower layers, followed by more specific or application-specific styles in higher layers.
-
Avoid Overlapping Responsibilities: Ensure each layer has a defined and non-overlapping set of responsibilities. Avoid duplicating styles across layers to prevent confusion and conflicts, maintaining a clear separation of concerns.
-
Keep Layers Modular and Scalable: Aim for modularity within layers, allowing easy updates and extensions. Maintain a balance between specificity and flexibility to accommodate future changes without disrupting the entire hierarchy.
-
Documentation and Communication: Document the rationale behind the layer hierarchy and share this documentation with the team. Encourage communication and collaboration to ensure everyone understands and adheres to the established style hierarchy.
-
Adaptability and Flexibility: Remain open to adaptations based on project requirements. The style hierarchy should be flexible enough to accommodate changes without compromising its integrity or creating undue complexity.
Advanced Techniques and Tips
When working with CSS layers, there are some advanced techniques you must be accustomed to be a pro in using CSS layers. In this section, we will be discussing some of these techniques I can use to level up our CSS layers game.
Conditional Styling and Feature Queries
This demonstrates how Cascade Layers can be combined with CSS feature queries to conditionally apply styles based on browser capabilities or specific conditions. This allows for more targeted and efficient styling for different scenarios. Let us illustrate this by considering this example.
<!DOCTYPE html>
<html lang="en">
  <head>
    <meta charset="UTF-8" />
    <title>Cascade Layers Example</title>
    <style>
      /* Layer activation based on media query */

      @layer base {
        body {
          text-align: center;
        }
        button {
          border: none;
          padding: 10px 30px;
          font-size: 1.5rem;
          color: white;
        }
      }
      @media screen and (max-width: 700px) {
        @layer site;
      }

      /* Layer: page */
      @layer page {
        button {
          background-color: red;
          box-shadow: 5px 5px 5px rgb(83, 83, 83);
        }
      }

      /* Layer: site */
      @layer site {
        button {
          background-color: green;
        }
      }
    </style>
  </head>
  <body>
    <h1>Open Replay</h1>
    <button>Login</button>
  </body>
</html>
From the code above, you can see we Initially set the base layer styles we applied to the body and button elements.
When the viewport width is 700px or less, the site layer is activated, changing the background color of buttons to green. If the viewport width is wider than 700px, the page layer takes precedence, changing the button background color to red and adding a box-shadow effect. This setup showcases how Cascade Layers can be used with media queries to create responsive styling, adjusting button styles based on different screen widths without duplicating the base styles.
Brower output
Optimizing Performance
When working with CSS Layer, we want to make sure that we ensure fast loading, and efficiency of web pages. There are a couple of ways this can be done, and in this section, we will be looking at some of them. Here are some techniques and tips to optimize performance:
-
Reduce Redundancy and Specificity: Minimize redundant styles and excessive specificity within layers. Unnecessary or overly specific styles can bloat the stylesheet, increasing load times. Aim for concise and targeted styles to reduce file size and improve rendering speed.
-
Use Shorthand and Efficient Selectors: Employ shorthand properties and efficient selectors to streamline your styles. Shorter CSS rules minimize the file size and optimize parsing speed, enhancing performance. Additionally, prefer class-based selectors over complex element or descendant selectors for faster matching and rendering.
-
Tree Shaking and Unused Styles Removal: Utilize tools or build processes that enable “tree shaking” to remove unused styles from your stylesheet. This optimization technique eliminates styles that are not applied to any elements, reducing the overall size of your CSS file.
-
Avoid Excessive
!important: While occasionally useful, overusing the!importantdeclaration can lead to increased specificity and hinder the flexibility of styles. Use it sparingly and prioritize restructuring layers instead. -
Simplify Layer Structure: Keep the layer structure as simple as possible without sacrificing organization. Too many layers might introduce unnecessary complexity and potentially impact performance.
Fine-tuning Layer Priorities
Fine-tuning layer priorities within Cascade Layers involves dynamically adjusting the order in which styles are applied, ensuring that the most important styles take precedence while maintaining flexibility for different situations.
This process includes dynamically modifying layer priorities based on various conditions like user interactions, device characteristics, or contextual cues. It might involve using JavaScript to adapt styles in response to user actions or changes in the environment.
Another aspect is considering the context in which styles are applied. For instance, within specific components or sections of a webpage, adjusting layer priorities ensures that local styles have more influence than global ones. This contextual prioritization maintains consistency within particular areas of the design.
Potential CSS cascade layer pitfalls and how to avoid them
Cascade layers in CSS are undeniably advantageous, yet they come with their own set of challenges. Let’s delve into the potential pitfalls and ways to navigate them when working with Cascade Layers in CSS.
One major challenge is the risk of overcomplicating the layer hierarchy. Creating an excessively intricate layering system often results in confusion and unnecessary conflicts in specificity. Simplifying the hierarchy by consolidating layers where feasible helps maintain a clear and understandable structure.
Another concern is layer mismanagement, leading to styles bleeding into unintended areas or failing to apply as intended. Establishing consistent and logical layer definitions while avoiding overlap between layers is crucial to prevent unexpected style interactions. Moreover, excessive specificity within layers can make styles rigid and difficult to maintain.
Finding a balance between specificity and flexibility is key, using specific selectors only when essential to avoid overly complex styles. Additionally, inadequate documentation of the layer hierarchy and its rationale can impede collaboration and understanding within the team. Properly documenting the layer structure, naming conventions, and their purposes is essential for clarity and effective communication.
Lastly, neglecting browser compatibility issues related to Cascade Layers can result in styling inconsistencies across different browsers. Testing and ensuring compatibility with major browsers while implementing fallbacks or alternative approaches where necessary is vital for a seamless user experience.
Conclusion
In conclusion, in our exploration of CSS Cascade Layers, it’s evident that this organizational tool is not just an addition to the styling landscape but a vital necessity in modern web development.
From resolving the chaos of cascading styles to offering a structured framework that improves efficiency, they empower developers to craft cleaner, more maintainable codebases while providing the flexibility needed to adapt to every design requirement.
As we embrace these techniques and best practices outlined in our blog, from understanding the fundamentals to mastering advanced techniques, we equip ourselves with modern web design skills. Happy Coding.
Truly understand users experience
See every user interaction, feel every frustration and track all hesitations with OpenReplay — the open-source digital experience platform. It can be self-hosted in minutes, giving you complete control over your customer data.
Star on GitHub12k