Data visualization and business intelligence with Dash -- Part 2
Adding interactivity with callbacks and state.


Part 2: Handling interactivity using Dash callbacks and Dash state
In the first tutorial, we covered one of the core concepts in Dash, layout. It is used for handling the presentation side of a Dash web app. While pretty amazing, it would not be very useful without interactivity. Dash callbacks and Dash state provide a mechanism for processing events and managing app data to provide interactivity and functionality expected in a data viz or BI web app.
Dash callbacks
Callbacks are used to handle interactivity in a Dash app. This typically involves getting input from the user or some other source, e.g., a real-time datastore, and changing the presentational layer with its output. Thus, the layout components handle the presentation, while the callbacks handle logic.
To create a callback, we define a Python function/method with the annotation @app.callback. Each callback should only have one output (dash.dependencies.Output) but can have multiple inputs (dash.dependencies.Input).
Furthermore, callbacks should not modify any variables out of their scope. This is due to the distributed nature of the front end (multiple users and user sessions) and the back end (multiple workers for increased parallelism). This is achieved via strategies including Dash state, covered briefly in the next session and in-depth later.
Single input callbacks
Single-input callbacks handle a single input and provide one output. One example is shown below, and the code is explained in the following paragraphs. It is used to square any given number provided by a user.
dasher5.py#import required libraries
import dash
from dash import html, dcc
from dash.dependencies import Input, Output
app = dash.Dash() #instantiate dash app
app.layout = html.Div(children=[ #root div element
html.H3('Squarer', style={'text-align':'center'}), #centered h3 heading element
html.Div(style={'text-align': 'center'}, children=[ #center div container element
html.Label('Number:'), #label element for input
dcc.Input(id='num', type='text', value=''), #text input element
html.P(id='ans') #paragraph element to show the answer
])
])
#callback declaration
@app.callback(
Output(component_id='ans', component_property='children'), #component to be used for output
[
Input(component_id='num', component_property='value') #component to be used for input
]
)
#function used by the callback that accepts one input and returns one output
def squarer(n):
if len(n)==0: return ''
n = int(n)
return 'Square: {}'.format(str(n*n))
#run the web app server
app.run_server(debug=True)The output is as shown:
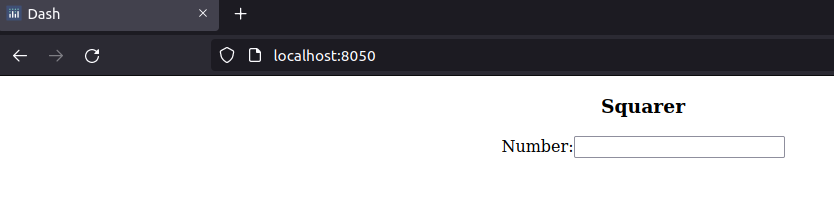
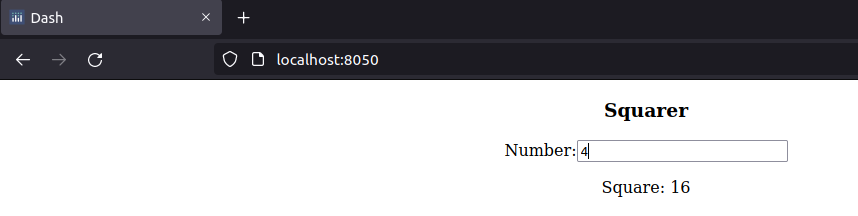
The code above creates an HTML layout with a Dash input core component Input used to collect a user-provided number and a Dash HTML component P (paragraph) used for the Output.
We then define the method to handle the logic and decorate it with the @app.callback annotation. Inside the annotation, we instantiate an Output variable, providing it with the id of the component to be used for output and the property of the component where the changes are to be applied.
We also do the same for the Input variable, providing the id and the component’s property to be used for input. Note the square brackets around the callback’s Input, meaning we pass a list of Input objects. This means we can pass multiple dash.dependencies.Input objects. Keep in mind the difference between html.Input (layout) and dash.dependencies.Input (callbacks).
The decorated method squarer parameters should match the number of Input objects in the decorator. Now, whenever the value of our number changes, the square of the number is calculated and updated automatically.
Multiple input callbacks
There are situations where you need more than a single input to handle the logic of your web app. As pointed out above, the input to our @app.callback annotation expects the inputs to be provided as a list. The code below creates a calculator app, prompting the user for the two operands and the operator to display the answer.
dasher6.py
#import required libraries
import dash
from dash import html, dcc
from dash.dependencies import Input, Output

#create the web app and run it
app = dash.Dash()
app.layout = html.Div(children= [ #root html Div component
 html.Label('Calculator'),
 html.Br(),
 dcc.Input(id = 'num1', type='text', value='10'), #input core component
 html.Br(),
 dcc.Input(id = 'num2', type='text', value='30'), #input core component
 html.Br(),
 html.Span(children=[ #html span component
 html.Label('Operation:'),
 dcc.Dropdown(id='op', style={'display':'inline-block'}, options=[ #dropdown core component
   {'label':'+','value':'plus'},
   {'label':'-','value':'minus'},
   {'label':'X','value':'multi'},
   {'label':'/','value':'div'},
  ], value='plus'
 )]),
 html.Br(),
 html.Span(id='sumSpan') #html span component
])

@app.callback( #create a callback for the calculate function below with 3 inputs and 1 output
 Output(component_id='sumSpan', component_property='children'), #bind the sumSpan copmonent with calculate's output
 [ #list of input components' bindings
 Input(component_id='op', component_property='value'),
  Input(component_id='num1', component_property='value'),
  Input(component_id='num2', component_property='value')
 ]
)
def calculate(op,n1,n2):
    if len(n1)==0: n1 = '0'#validate num1's component input
    if len(n2)==0: n2 = '0' #validate num2's component input
    n3 = 0 #the answer of the arithmetic operation

    if op=='plus':
        n3 = float(n1)+float(n2)
    elif op=='minus':
        n3 = float(n1)-float(n2)
    elif op=='multi':
        n3 = float(n1)*float(n2)
    else:
        if float(n2)==0:
            return 'Error. Division by zero' #prevent division by zero error
        else:
            n3 = float(n1)/float(n2)

    return 'Answer: {}'.format(n3) #return the answer to be used as sumSpan's output

app.run_server(debug=True) #start the web app
The output is as shown:
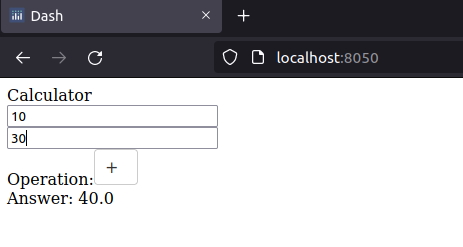
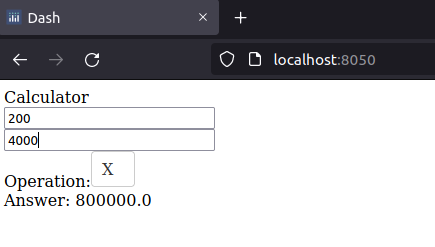
The code above creates an HTML layout with two Dash input core component Input used to collect user-provided numbers, a dropdown core component for selecting the operator, and a Dash HTML Span component used for the Output in addition to Dash HTML components for presentation (label and br).
We then define the function to handle the logic (calculate), which has three inputs and one output. We decorate it with the @app.callback annotation, so the web app knows to call it when required. Inside the annotation, we instantiate an Output variable, providing it with the id of the component to be used for output (span) and the property of the component where the changes are to be applied (children).
We do the same for the Input variables, providing a list of Input objects. Whenever one of the input variable’s value changes, the method is automatically called and the correct operation carried out. We handle input validation, in this case, inside the method used for the callback. The answer to the arithmetic operation is then updated automatically on the output component.
There are times when you might require more output components to be updated. A single method is impossible, as each method can only have a single Output component. If multiple components need to be updated, a function must be created for each of the targeted Output components, or they can be grouped into a container element like a span or div. Future versions of Dash will address and remove the restriction.
Furthermore, each Output component can only be bound to a single callback. This might be desirable for loose coupling in the system, e.g., when their business logic is distinct between the two inputs. This is easy to overcome using various strategies covered later.
Session Replay for Developers
Uncover frustrations, understand bugs and fix slowdowns like never before with OpenReplay — an open-source session replay tool for developers. Self-host it in minutes, and have complete control over your customer data. Check our GitHub repo and join the thousands of developers in our community.
Dash state
Dash state provides a way to safely manage and use state in a Dash web app. Some use cases of state are collecting data from input elements without automatically triggering callbacks and sharing state between callbacks. Dash state is provided in dash.dependencies.State. The example below is another implementation of the calculator code above, but instead of automatically determining the answer on value changes, a user has to explicitly click the calculate button to carry out the operation.
dasher7.py
#import required libraries
import dash
from dash import html, dcc
from dash.dependencies import Input, Output, State

#create the web app and run it
app = dash.Dash()
app.layout = html.Div(children= [ #root html Div component
 html.Label('Calculator'),
 html.Br(),
 dcc.Input(id = 'num1', type='text', value='10'), #input core component
 html.Br(),
 dcc.Input(id = 'num2', type='text', value='30'), #input core component
 html.Br(),
 html.Span(children=[ #html span component
 html.Label('Operation:'),
 dcc.Dropdown(id='op', style={'display':'inline-block'}, options=[ #dropdown core component
   {'label':'+','value':'plus'},
   {'label':'-','value':'minus'},
   {'label':'X','value':'multi'},
   {'label':'/','value':'div'},
  ], value='plus'
 )]),
 html.Br(),
 html.Span(id='sumSpan'), #html span component
 html.Br(),
 html.Button(id='btnCalc',children='Calculate')
])

@app.callback( #create a callback for the calculate function below with 3 inputs and 1 output
 Output(component_id='sumSpan', component_property='children'), #bind the sumSpan component with calculate's output
 [ #list of input components' bindings
  Input(component_id='btnCalc', component_property='n_clicks'),
  State(component_id='op', component_property='value'),
  State(component_id='num1', component_property='value'),
  State(component_id='num2', component_property='value')
 ]
)
def calculate(clicks,op,n1,n2):
    if len(n1)==0: n1 = '0'#validate num1's component input
    if len(n2)==0: n2 = '0' #validate num2's component input
    n3 = 0 #the answer of the arithmetic operation

if op=='plus':
    n3 = float(n1)+float(n2)
elif op=='minus':
    n3 = float(n1)-float(n2)
elif op=='multi':
    n3 = float(n1)*float(n2)
else:
    if float(n2)==0:
        return 'Error. Division by zero' #prevent division by zero error
    else:
        n3 = float(n1)/float(n2)

return 'Answer: {}'.format(n3) #return the answer to be used as sumSpan's output

app.run_server(debug=True) #start the web app
The output is as shown:
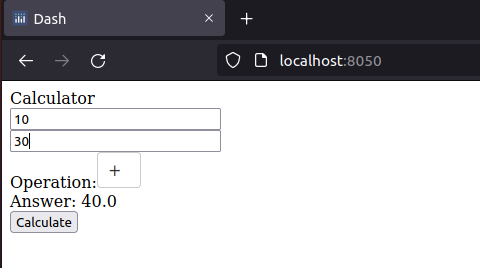
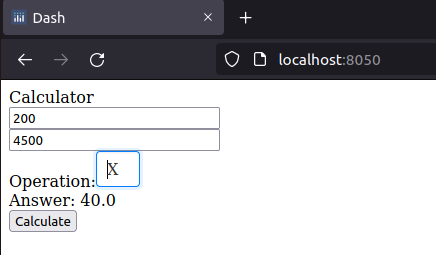
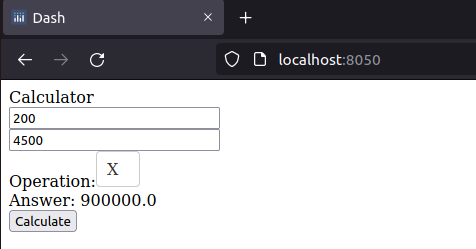
The code above creates an HTML layout with two Dash input core component Input used to collect user-provided numbers, a dropdown core component for selecting the operator, an HTML button component to input user submission, and a Dash HTML Span component used for the Output in addition to Dash HTML components for presentation (label and br).
We then define the function to handle the logic (calculate), which has four inputs and one output. We decorate it with the @app.callback annotation, so the web app knows to call it when required. Inside the annotation, we instantiate an Output variable, providing it with the id of the component to be used for output (span), as well as the property of the component where the changes are to be applied (children).
We do the same for the Input variables, providing a list of Input objects. We create an Input object bound to the HTML button n_clicks property, which contains the number of times a Dash HTML component has been clicked. We create three Input objects for @app.callback and bind them to the dropdown and two core Input components.
By binding the components to State, their values are stored in the Dash state and available to the calculate method. The method will take four arguments matching the number of clicks of the button btnCalc (not used except to let us know the button has been clicked), the dropdown, and the two input core components values.
Since the callback is bound only to the button using Input, it will only be triggered when we click it. Once the button is clicked, the arithmetic operation is carried out, and the appropriate answer is updated in the Output component.
Summary
In this tutorial, we have looked at adding interactivity to our Dash data viz and BI web apps using callbacks and state. Dash callbacks provide interactivity and are provided by the @app.callback annotation. Binding between our logic and Dash components is via Input, Output, and State classes in dash.dependencies. A callback method can only have a single output component bound to it.
Dash state provides us with a way to safely manage the app state of our Dash web app. This handles use cases where we wish to store data over a given user’s session. Two of the commonest uses of Dash state are to control the triggering of callbacks and share state between callbacks in a web app.
We have learned the fundamentals of handling Dash interactivity and state. In the next tutorial, we get more snazzy when we look at plotly, the library used by Dash for plotting. See you soon.
Gain Debugging Superpowers
Unleash the power of session replay to reproduce bugs and track user frustrations. Get complete visibility into your frontend with OpenReplay, the most advanced open-source session replay tool for developers.