
Document your API with Swagger


Not only can Swagger be used to document APIs, but it also makes integration easier by bringing them to life and producing smooth, interactive documentation that speaks the language of developers. Say goodbye to challenging documentation tasks and welcome to a flexible, entertaining, and educational API experience. Elevate your API development with next-generation documentation tools and unlock new levels of effectiveness.

Discover how at OpenReplay.com.
The API documentation provides a complete how-to manual for integrating and using APIs (Application Programming Interfaces). For developers, it is a vital resource that provides the guidance and knowledge required to utilize the API successfully. Here is why it’s important to have API documentation:
Ease of Use: Clear instructions and examples provided by well-written documentation enable developers to quickly integrate the API with their applications. Learning Curve: Detailed documentation makes it easier for new users to get started and avoids the need for extensive support. Fewer Support Requests: Clear documentation leads to fewer support requests, which frees up supplies and reduces expenses.
Introduction to Swagger as a popular documentation tool
Thanks to its accurate features and easy-to-use interface, this tool is well valued and is the preferred choice for API documentation. Developers and organizations love it because, at its heart, it simplifies the process of designing, documenting , and visualizing APIs. With this tool, developers can effortlessly communicate essential API details, including endpoints, request/response formats, authentication methods, and more, clearly and consistently.
Simple layout and support for many programming languages and frameworks reduce the time and effort needed for documentation. Therefore, it is recognized for its efficiency and visually pleasing API documentation, allowing developers to clearly and simply display their APIs. This tool is the industry standard for API documentation despite your level of experience as a developer.
Below is an image showing this API tool’s interface
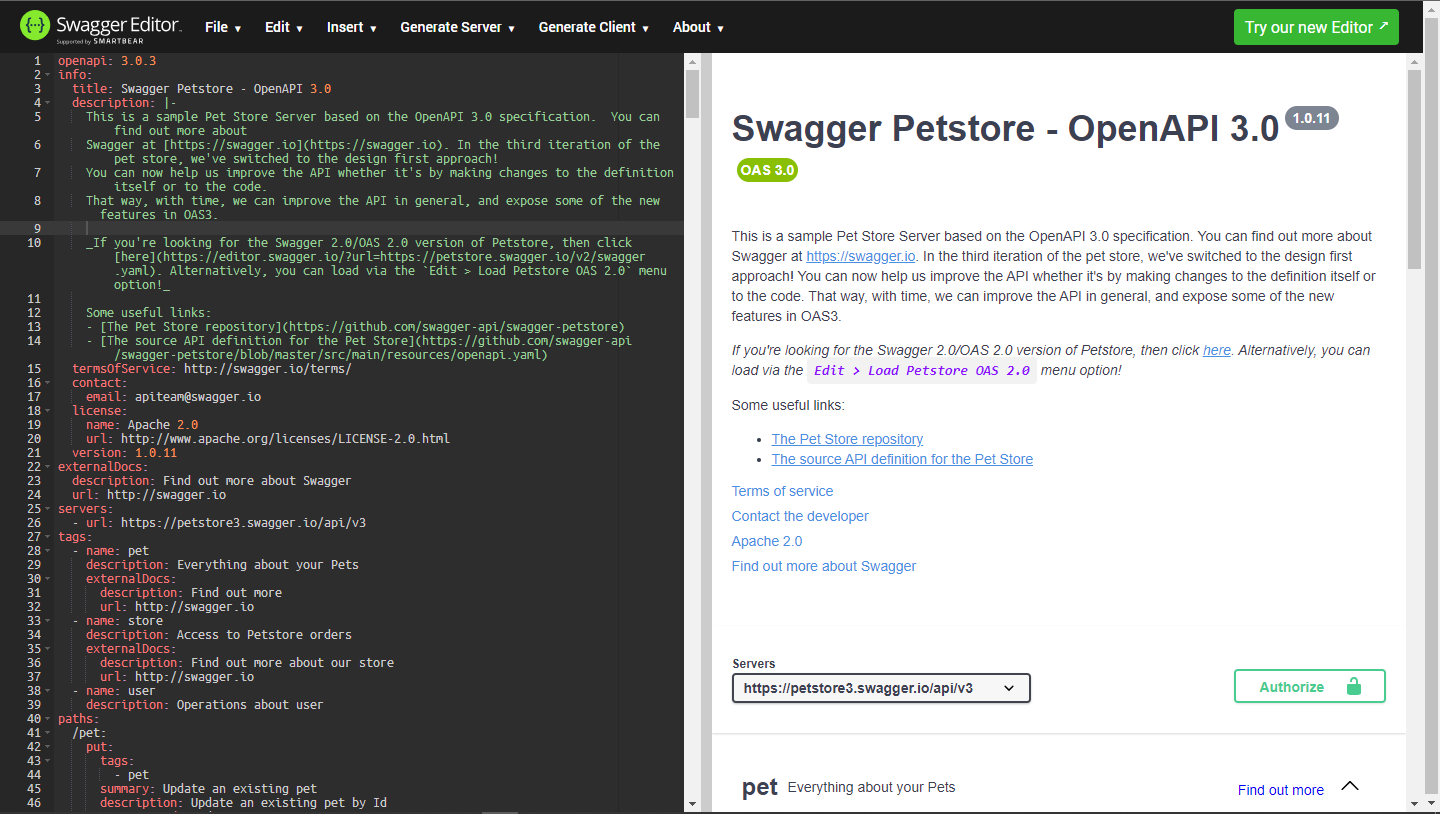
The Power of OpenAPI Specification
The OpenAPI Specification is changing API development. Through its standardized format, such as the following code snippet from an OAS document:
openapi: 3.0.0
info:
  title: Example API
  version: 1.0.0
paths:
  /users:
    get:
      summary: Retrieve a list of users
      responses:
        '200':
          description: A list of users retrieved successfully
In the above code snippet:
- “Example API” is the definition of the API title, and “1.0.0” is the version number.
- A GET action is specified for the
/usersendpoint in order to retrieve a list of users. - The goal of the operation is briefly described in the
{summary}column. - A single response is defined for the status code ‘200’, denoting a successful retrieval. The
responsescolumn lists this operation’s possible HTTP responses. - “A list of users retrieved successfully” is the response description that is shown.
Overall, this code outlines a simple API endpoint for retrieving a list of users.
To help developers work together, the OpenAPI Specification (OAS) provides a standard technique for expressing RESTful APIs. Because of its user-friendly, machine-readable interface, developers can easily explore API complexities. While OAS supports interaction, APIs can flourish in a variety of environments. It transforms API development and engagement by combining clarity and teamwork.
Explanation of OpenAPI Specification (OAS) as Swagger’s foundation
This industry-leading API documentation tool is built upon the OpenAPI Specification (OAS). OAS serves as a blueprint that defines interactions, behavior and API structure. For developers, it acts as a universal language, promoting smooth teamwork and communication across various projects.
OAS sets a universal format for RESTful APIs, covering endpoints, parameters, responses, and authentication. This standard ensures clear, consistent API design and documentation across languages and frameworks. By utilizing OAS, developers gain access to a comprehensive toolkit for API design, documentation, and testing. Embracing OAS enables interactive, user-friendly API documentation, enhancing the developer experience. OAS evolves continuously, incorporating community feedback and industry best practices to keep its tools up-to-date, changing evolving needs.
Briefly describe OAS key aspects (endpoints, parameters, responses)
The OpenAPI Specification (OAS) has transformed API definition, providing a standardized method that simplifies development and documentation. It covers crucial API elements like endpoints, parameters, and responses.
- The routes or URLs that users rely on to access certain features or resources are known as endpoints, and they serve as the entry points to an API. OAS gives developers a structured overview of the API’s capabilities by enabling them to clearly specify these endpoints and the
HTTPmethods (likeGET,POST,PUT, andDELETE) that each endpoint supports. - Parameters further enhance the flexibility and usability of APIs by allowing clients to customize requests. OAS enables developers to specify various types of parameters, including path parameters (embedded in the endpoint URL), query parameters (appended to the URL), header parameters (included in the request headers), and request body parameters (sent in the request payload). Developers guarantee consistency and clarity in client-API interactions by specifying parameters in the API definition.
- Any API connection begins and ends with responses describing the information or actions the server returns to the client in response to their requests. OAS gives developers the ability to specify the format and content of API responses, such as headers, status codes and response bodies. Developers give clients essential advice on how to properly analyze and handle API responses by providing response formats and examples.
Getting Started with Swagger
With this tool, you can easily define, document , and display APIs, therefore improving the understanding and installation process for both internal and external developers. Now, let’s get started and explore how to simplify web development with this tool.
Outline options for using Swagger (online tools, local installations)
Developers have many choices for API documentation. One common strategy is using internet resources like SwaggerHub. These cloud-based platforms facilitate the design, documentation , and deployment of APIs in a convenient and easily accessible environment. Online tools improve team cooperation and streamline documentation with features like version control and collaborative editing.
Developers have the option to install tools such as the OpenAPI Editor and UI locally, providing more control and customization. For individuals who prefer local development environments or have privacy and regulation concerns that demand offline solutions, this open-source suite offers offline access.
Guide readers on choosing the appropriate option
Developers who prefer to work offline or live in places with poor internet connections might greatly benefit from local installations that give them more control and offline access. They allow them to customize and fit the environment to certain requirements. Depending on the project’s requirements, teamwork, and workflow, one can choose between local installation and online tools. While some people choose local installation for control and customization, others prefer online tools for ease of use.
Developers have two options for working with API documentation tools:
- Online Tools: Team members can work together thanks to platforms like the API management tool.
- Local Installations: More customization and offline access are provided by tools like the OpenAPI Editor.
This increases developer productivity for the development of excellent APIs by enabling them to easily produce and manage API documentation.
Creating Your First API Documentation
Creating your first set of API documentation is a great first step toward bringing your product into the public domain. Regardless of your experience as a developer, having clear and understandable documentation is important for others to fully understand and successfully connect with your API.
To start, outline your API’s key features and endpoints. These form the foundation for developer interaction. Then, thoroughly document each endpoint, covering request/response structures, authentication, and error handling. Use simple language and clear examples. Include interactive examples and code samples to aid understanding. Cover questions and challenges newcomers might face, and address these in your documentation to make it user-friendly and valuable for developers.
Introducing core elements for creating API definitions using Swagger Editor
Creating strong and well-defined APIs is necessary for smooth communication between applications. By providing a standard method for defining endpoints, parameters, answers , and authentication techniques, API design techniques speed up this process. Its standout feature is the ability to write API definitions with OpenAPI Specification (OAS), previously known as the Swagger standard.
Now, let’s delve into some of the core elements for creating API definitions using its editing tool:
- Paths and Operations: Paths represent API endpoints, while operations define actions like
GET,POST,PUT,DELETE, etc. You can effectively set the path, operation, and arguments for each endpoint with this API Design Editor. - Parameter: These enable the transfer of data between API endpoints, such as request bodies, path parameters, headers, and query parameters. Parameters for operations such as necessary status and data types can be defined.
- Responses: Describe the information the API provides in response to a request. It provides clear documentation on the anticipated output for each endpoint and allows you to set response codes and formats.
- Security Definitions: With the use of this editing tool, security protocols such as API keys, OAuth, or JWT tokens can be defined.. You can set security requirements at the API or operation level, ensuring authorized access to endpoints.
Getting Started
In this section, we’ll be setting up the UI for our server and the processes for this setup are very easy to implement, let dive into the installation process.
Installation / Configuration
To begin, API documentation interface and docs. Just execute the provided code in your project’s root terminal to start the installation process.
npm i swagger-ui-express swagger-jsdocAfter installing, you have to clone the server project in GitHub.
Once you’ve installed the code, you can go to the server.js file where you’ll find a portion of the code demonstrating the implementation, which we’ll explain in detail shortly.
Importing it’s Libraries:
const swaggerJsdoc = require("swagger-jsdoc");
const swaggerUi = require("swagger-ui-express");
In this section, we are bringing in two libraries named swagger-jsdoc and swagger-ui-express. These libraries assist us in utilizing this tool designed for API documentation.
Configuration:
const options = {
  definition: {
    openapi: "3.0.0",
    info: {
      title: "OpenReplay Swagger Example API",
      version: "1.0.0",
      description: "A simple API to demonstrate Swagger",
 },
    servers: [
 {
        url: "http://localhost:3001",
 },
 ],
 },
  apis: ["./routes/*.js"], // Path to the API routes
};
In this section, we provide specific information such as the version of OpenAPI we’re utilizing (openapi: "3.0.0"), details about our API, including its title, version, and description, and the URL of the server hosting our API. Additionally, we define a wildcard path (./routes/*.js) for the tool to search for our API routes.
Generating API Specifications:
const specs = swaggerJsdoc(options);In this step, we’re creating the specifications using the settings we set up previously. The specs variable will contain all the necessary details that are required to generate the documentation for our API.
Setting Up the UI Endpoint:
app.use("/api-docs", swaggerUi.serve, swaggerUi.setup(specs));This code creates a route called /api-docs within our Express application. When we go to this route in a web browser, the UI will be displayed, presenting the documentation for our API generated from the specifications we made earlier.
Including API Routes:
app.use(require("./routes/users"));This line includes the API routes that are specified in the users.js file found in the routes directory. These routes will be documented according to the specifications we’ve given.
Handling 404 Error:
app.get("*", (req, res) => {
  res.status(404).send(JSON.stringify("404"));
});
This section deals with requests to routes that haven’t been defined. It sends back a 404 error code along with the message “404.”
Defining the API endpoints
In the closed server project, you’ll discover a routes folder that holds a file named users.js. This file contains the server’s endpoints and code for showcasing the UI component for each endpoint. Below, you’ll find the complete code, along with explanations.
GET /users Route:
/**
 * @swagger
 * /users:
 *   get:
 *     summary: Get all users
 *     description: Retrieve a list of all users
 *     responses:
 *       '200':
 *         description: A list of users
 */
router.get("/users", (req, res) => {
  // Your logic to get all users
  res.send([
 {
      username: "Mike John",
      age: 20,
      email: "mike@gmail.com",
 },
 {
      username: "Jane Smith",
      age: 50,
      email: "jane@gmail.com",
 },
 ]);
});
This piece of code establishes a GET route located at /users. The annotations serve to document this endpoint:
- Summary: Offers a brief overview of what the endpoint does.
- Description: Provides a more elaborate explanation of what the endpoint accomplishes.
- Responses: Details the potential responses that the endpoint may provide, including status codes and descriptions.
POST /create-new-users Route:
/**
 * @swagger
 * /create-new-users:
 *   post:
 *     summary: Create a new user
 *     description: Create a new user with the provided data
 *     requestBody:
 *       required: true
 *       content:
 *         application/json:
 *           schema:
 *             type: object
 *             properties:
 *               username:
 *                 type: string
 *               email:
 *                 type: string
 *               age:
 *                 type: number
 *     responses:
 *       '200':
 *         description: User created successfully
 *       '400':
 *         description: Bad request
 */
router.post("/create-new-user", (req, res) => {
  // Your logic to create a new user
  res.send({
    message: "User created successfully",
 });
});
A POST route is created at /create-new-users by this section of the code. Additionally, comments are included to clarify the endpoint:
summary: A brief overview of the endpoint’s abilities.description: More detailed information about the endpoint’s function.requestBody: Explains the format that should be used for this endpoint in the request body.responses: Contains information about the possible answers the endpoint could provide, such as status codes and explanations.
Below is the output of its UI displaying the GET and POST endpoints:
Walk through defining an endpoint (method, URL, parameters, responses)
Creating an endpoint establishes the foundation for every step that follows in the development process, much like constructing a building. Let’s look into the method, URL, parameters and responses to establish a reliable and functional endpoint in this important phase.
The first thing we do is identify the HTTP method, which controls what the endpoint does. Choosing the right method is crucial, whether it’s a GET for data retrieval, POST for resource creation, PUT for modifying already-existing resources, or DELETE for their removal.
Next, we craft the URL, the address that uniquely identifies the endpoint. This URL should be descriptive, concise, and follow RESTful principles, making it simple for developers to understand its purpose and usage.
Next are the parameters, which offer more details required to run the endpoint. Depending on the type of endpoint, these could be query parameters, request headers, or request body parameters. A detailed review of the parameters guarantees that the endpoint is flexible and suitable for a range of use cases.
Lastly, we define response, which describes the contents that the endpoint returns following a successful execution. This involves sending the response body with relevant data or error messages, as well as the HTTP status codes, such as 200 for success or 404 for not found.
Utilizing Swagger UI
Its user-friendly interface makes API creation and documentation easier. It is simple to explore, test, and understand APIs thanks to its interactive layout and real-time feedback. Developers are able to execute operations straight from the browser, inspect payloads, and navigate using endpoints. By simplifying the development process, this technology increases output and supports creativity.
Swagger UI’s purpose and functionality
This application provides a user-friendly interface for interacting with and visualizing APIs, making it a powerful asset in the creation of APIs. Its primary objective is to provide developers with a smooth, setup-free method for exploring and testing APIs. Developers are provided the ability to quickly understand an API’s function and experiment with requests and responses by improving their understanding of API endpoints, parameters, formats, and authentication techniques.
This toolkit gives developers a consistent and straightforward view of APIs, which encourages teamwork. It simplifies API documentation and discovery by supporting a variety of programming languages and frameworks and offering customizable themes to meet the demands of a wide range of developers. This increases software project productivity, innovation, and the effectiveness of API development.
Describing how it generates documentation from an OAS definition
Clear and brief documentation of APIs is made possible by the OpenAPI Specification (OAS), which simplifies complex API definitions. Documentation may be generated by OAS with ease once your API has been defined, including endpoints, parameters, request/response formats, and authentication techniques. It reduces human labor, guarantees accuracy and consistency, and transforms raw data into user-friendly documentation. OAS has become widely used, so your documentation is automatically compatible with a wide range of tools and platforms, saving developers time and giving users access to clear, understandable documentation.
Customization options for Swagger UI
Its UI is unique due to how customizable it is. Developers may easily modify the documentation to fit their own requirements and style preferences.
To make sure that the documentation fits the organization’s brand identity and style, a wide range of customization options are available, from selecting color schemes and themes to adjusting the layout and structure. To create a unified and visually appealing documentation experience, developers can easily incorporate custom CSS, branding components, and logos.
Additionally, this tool enables the addition of other data, such as interactive icons, code snippets, and usage examples, giving developers a thorough understanding of the functionality and use of the API. This improves documentation usability and encourages developers to understand and use the API more effectively.
In addition to customization options for the visual appearance, it also provides flexibility in terms of functionality. Based on their needs, developers can enable or disable features like parameter exploration, response validation, and authentication, ensuring that the documentation accomplishes its original objectives.
Advanced Features
API documentation becomes extremely effective with advanced features. The ability to automatically generate interactive documentation is one important feature. In addition to providing parameters and endpoints, this tool creates documentation continuously so that users may explore and engage with the API in real time. This improves understanding and usability, saves time and improves the user experience.
With the help of this tool’s advanced code generation features, developers can quickly produce server stubs and client libraries in several types of programming languages. By doing this, work is faster, and time can be made for creativity rather than battling setup issues. Strong authentication and authorization support is another feature of this tool; it supports a range of authentication methods, from simple authentication to OAuth 2.0 and OpenID Connect. Limiting access to authorized users and ensuring implementation simplicity guarantees API security.
It also makes API testing easier by allowing it to be done directly from its user interface. Developers can send queries, monitor responses, and debug their APIs in real-time, all within the familiar environment, thanks to built-in support for API testing. Developers can quickly find and fix problems thanks to this improved testing process, which increases the stability and reliability of their APIs.
Exploring advanced features of Swagger UI (code generation, testing, and collaboration)
Using advanced techniques in API development will help you take your projects from good to outstanding. Let’s explore some of these cutting-edge features that will improve teamwork and streamline productivity.
Now, let’s discuss code generation. You may automatically produce client-specific libraries and SDKs with advanced API tools. Time is saved, and stability between platforms and languages is guaranteed. Your API may be easily integrated by developers into their projects, which will accelerate development and reduce the learning curve.
Providing effective APIs requires powerful APIs. Advanced testing frameworks make testing procedures easier, check endpoints, and simulate various scenarios. Features like mock servers and automated test suites make it easier to find and address problems quickly, which results in stronger and reliable APIs.
This is not to be overlooked; let’s discuss cooperation. Collaboration technologies that are incorporated into platforms for developing APIs allow developers, testers, and other users to work together and communicate easily. Team members can work together more effectively and exchange ideas to speed up the development process because of features like version control, real-time editing, and feedback.
Encourage exploring the official documentation for details
Understanding the API documentation is important. Although summaries provide useful information, official documentation such as API docs has additional information. It’s a helpful tool that offers thorough explanations, examples, and recommended procedures. Developers can fully utilize it by fully understanding it, which involves defining API requirements and putting security measures in place. Finding solutions, resolving issues, and staying current on features and upgrades can all be accomplished by reading the official documentation.
Conclusion
In summary, this is a ground-breaking tool for API documentation that addresses the issues developers face through its flexible and efficient approach. Its user-friendly interface and extensive feature set revolutionize the documentation process by making it easy for developers to define, document, and deliver APIs. With the help of this application, developers can facilitate easy communication between people in addition to sharing technical details. This tool continues to be a representation of efficiency and clarity as we advance in the development of APIs, leading the way toward a more creative and connected future.
Scale Seamlessly with OpenReplay Cloud
Maximize front-end efficiency with OpenReplay Cloud: Session replay, performance monitoring and issue resolution, all with the simplicity of a cloud-based service.
