
Dynamic List Transitions in Vue


Vue.js is a powerful JavaScript framework that enables developers to easily create dynamic list transitions. This article will review the various types of Vue.js list transitions and how to use them in your applications. We’ll also go over some best practices for creating smooth and efficient list transitions. By the end of this article, you’ll better understand how to use Vue.js to create dynamic list transitions.
Displaying a dynamic list in Vue.js
In Vue.js, displaying a dynamic list entails creating a data object containing a list of items and then rendering the list with the v-for directive. The data object can be written as an array of objects, each containing data for a single item. This could be a list of names and ages, for example:
let data = [
{name: 'John', age: 21},
{name: 'Jane', age: 27},
{name: 'Bob', age: 32},
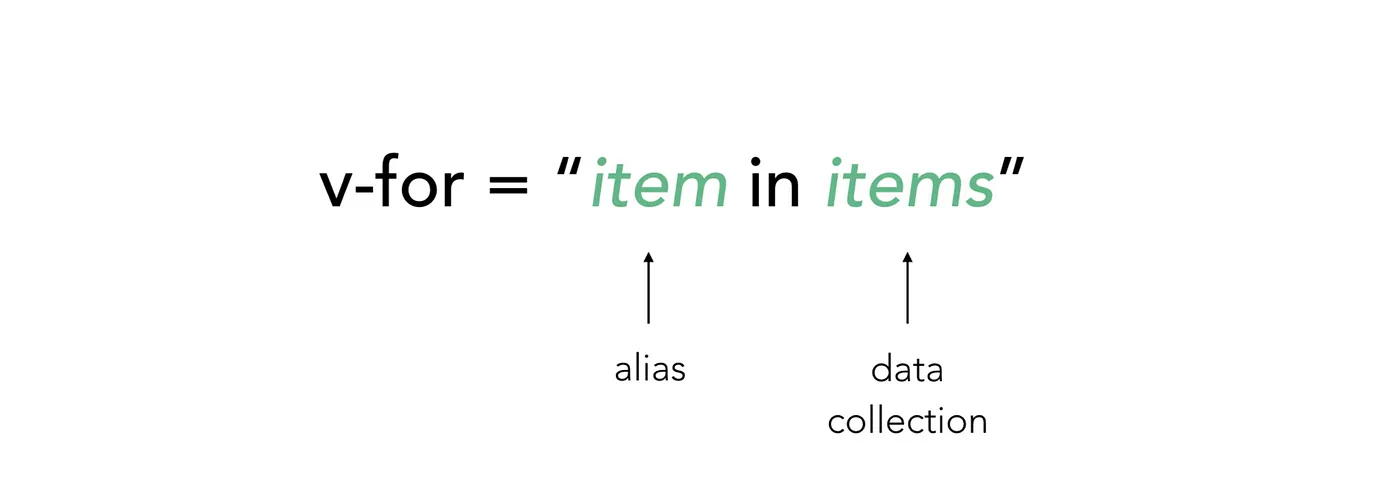
]The v-for directive is then used to render the list. This directive enables developers to iterate over a data set and dynamically render a list of items. This can be used to generate an array of items or to display data from an API. The directive can be applied to a template element and requires a specific syntax like this:

Image Credit
For example, if we have an array of names, we can iterate over the array and generate a list of names and corresponding ages using the v-for directive:
<ul>
<li v-for="item in data" class='list-styling'>
{ item.name } - { item.age }
</li>
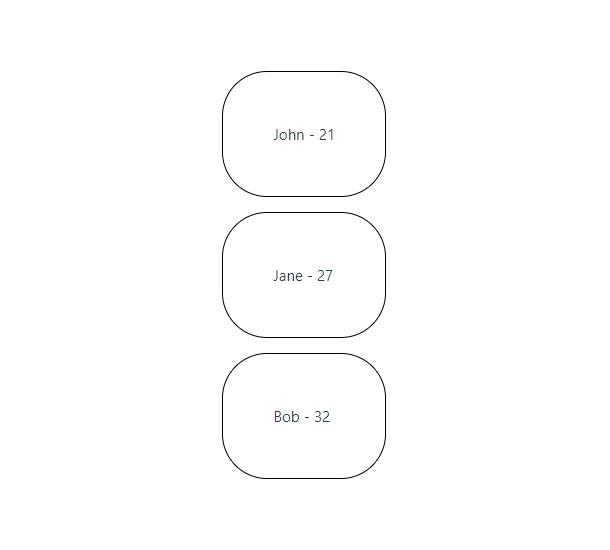
</ul>This would then generate a list of three items, each containing the name and age of a data object item. The :key attribute is used to set a unique key for each item, which Vue needs to keep track of each item.
Here’s the result:
The dynamic list can be further customized by adding items to the data object.
Adding transition effects to the dynamic list
When building a dynamic list in Vue.js, it is often desirable to add some visual transition effects when elements are added, updated, or removed. This not only enhances the overall user experience but also provides visual cues that help the user understand the changes that are happening on the screen. Vue.js makes creating dynamic list transitions simple, allowing you to add and remove elements from a list without manually updating the page. It also includes several built-in list transitions, such as the TransitionGroup component, which makes it simple to create transitions like fade-in, slide-in, and zoom-in.
Here are the steps you need to add transition effects to a dynamic list in Vue.js.
Using the transition component
In Vue.js, You can use the Transition component to wrap the list elements that need to be animated. A special Vue component provides a simple way to apply CSS transitions and animations to elements.
Import the transition component into your project’s directory like this:
import { Transition } from 'vue'Then, create a new component that wraps the list items with a transition element:
const listTransition = {
  template: `<transition-group name="list">
      <slot></slot>
    </transition-group>`,
  compositions: { Transitions },
};
Add this to your components object so it can be referenced later in your app like this:
components:{ListTransition};Now, when adding an item to the list, we can wrap each list item within our newly created listTransiton Component like this:
<listTransition v-for="(item, index) in items" :key="index">
{item}
</listTranstion>
Adding CSS transitions or animations
After wrapping the list in the transition component, you can then add CSS transition or animation stylings to the transition component. You can achieve this by adding the appropriate CSS classes to the transition component. The CSS classes can be created to control the animation properties such as duration, easing, and delay. For example, if you want to animate the list elements using a fade-in effect, you can create a CSS class like this:
.fade-enter-active {
    transition: opacity .5s;
    }
    .fade-enter-from {
    opacity: 0;
    }
    .fade-enter-to {
    opacity: 1;
}
Then, in the transition component, you can specify the CSS classes to be used like this:
<transition enter-class="fade-enter-from" enter-active-class="fade-enter-active" enter-to-class="fade-enter-to">
    <ul>
        <li v-for="item in data" class='list-styling'>
          {{ item.name }} - {{ item.age }}
        </li>
    </ul>
</transition>
Examples of dynamic list transitions
Dynamic list transitions in Vue.js is a powerful feature that provides a visual and smooth way of rendering data. This can improve the overall user experience and provide a more interactive feel to your application. Here are some examples of dynamic list transitions in Vue.js:
- Fade in/out transition: This type of transition causes newly added list items to gradually appear (fade in) or disappear (fade out) from view rather than simply appearing or disappearing abruptly. This creates a smooth, visually appealing effect.
Here’s a sample code on how to apply a fade in/out transition to a dynamic list in Vue.js:
<template>
    <div>
      <button v-on:click="show = !show" class="button">Toggle</button>
      <transition-group name="fade" tag="ul">
        <li v-if="show" class="list-item">
          <img src="./assets/corvette.jpg" />
        </li>
        <li v-if="show" class="list-item">
          <img src="./assets/lamborghini.jpg" />
        </li>
        <li v-if="show" class="list-item">
          <img src="./assets/ferrari.jpg" />
        </li>
      </transition-group>
    </div>
 </template>
 <style>
    .fade-enter-active,
    .fade-leave-active {
      transition: opacity 0.5s;
    }
    .fade-enter,
    .fade-leave-to {
      opacity: 0;
    }
 </style>
 <script>
    export default {
      data() {
        return {
          items: [],
          show: true,
        };
      },
    };
</script>
In the code above, we created a transition-group component with the name attribute set to fade. This will apply the fade transition to all elements inside the transition-group. We’ve also set the tag attribute to ul so that the transition-group will be rendered as an unordered list.
Next, we used the v-for directive to loop through the items array and display each item as a li element. We also set the key attribute to index so Vue can track each item in the array.
The fade transition is defined in the CSS section of the code. The fade-enter-active and fade-leave-active classes are applied during the transition, while the fade-enter and fade-leave-to classes are applied when the element enters or leaves the list.
Here’s the result:
- Slide up/down transition: This type of transition involves list items sliding up or down on the screen when added or removed. This gives the appearance of items being pushed out of the way to make room for new items or vice versa.
Here is an example of a slide up/down transition in Vue.js for dynamic list transitions:
<template>
    <div>
    <button v-on:click="show = !show" class='button'>
      Toggle
    </button>
      <transition-group name="slide-down" tag="ul">

        <li  v-if="show" class="list-item">
        <img src="./assets/corvette.jpg" />
        </li>
        <li v-if="show" class="list-item">
        <img src="./assets/lamborghini.jpg" />
        </li>
        <li v-if="show" class="list-item">
        <img src="./assets/ferrari.jpg" />
        </li>
      </transition-group>
    </div>
  </template>
  <style>
  .slide-down-enter-active,
  .slide-down-leave-active {
    transition: all 0.9s ease;
  }
  .slide-down-enter,
  .slide-down-leave-to {
    transform: translateY(-10px);
    opacity: 0;
  }
  </style>
  <script>
  export default {
    data() {
      return {
        items: [],
        show: true
      };
    },
  };
  </script>
In the above example, we use the transition-group component with the name slide-down to wrap a list of items.
The .slide-down-enter-active and .slide-down-leave-active classes define the transition duration and easing for entering and leaving items.
The .slide-down-enter and .slide-down-leave-to classes set the initial state of entering and leaving items with a vertical translate and zero opacity.
Here’s the result:
- Rotate in/out transition: This type of transition involves list items rotating in or out of view when added or removed. This can add a playful, dynamic touch to your interface and can be especially effective when used in conjunction with other animations.
Here’s an illustration:
<template>
    <div>
    <button v-on:click="show = !show" class='button'>
      Toggle
    </button>
      <transition-group name="rotate" tag="ul">

        <li  v-if="show" class="list-item">
        <img src="./assets/corvette.jpg" />
        </li>
        <li v-if="show" class="list-item">
        <img src="./assets/lamborghini.jpg" />
        </li>
        <li v-if="show" class="list-item">
        <img src="./assets/ferrari.jpg" />
        </li>
      </transition-group>
    </div>
  </template>
  <style>
  .rotate-enter-active, .rotate-leave-active {
    transition: all 1s;
  }
  .rotate-enter, .rotate-leave-to {
    transform: rotate(180deg);
    opacity: 0;
  }
  </style>
  <script>
  export default {
    data() {
      return {
        items: [],
        show: true
      };
    },
  };
  </script>
In this example, a transition component is used to wrap the element that needs to be animated. The name attribute is set to rotate, corresponding to the CSS class names. The v-if directive is used to toggle the visibility of the element.
The .rotate-enter-active and .rotate-leave-active classes define the transition properties in the CSS. The .rotate-enter and .rotate-leave-to classes specify the styles for the entering and leaving elements, respectively. In this case, the element will rotate 180 degrees and fade out.
Here’s the result:
Session Replay for Developers
Uncover frustrations, understand bugs and fix slowdowns like never before with OpenReplay — an open-source session replay tool for developers. Self-host it in minutes, and have complete control over your customer data. Check our GitHub repo and join the thousands of developers in our community.
Exploring a simple use case
In the following example, we will translate a list of programming languages and include a shuffle button that, when clicked, activates a shuffle action in the list. Here’s the code
<script>
    import shuffle from "shuffle-array";
    export default {
    data() {
            return {
            languages: [
                "Java",
                "C++",
                "Python 3",
                "Javascript"
        ],
            };
    },
    methods: {
            shuffleList(listIndex) {
            this.languages = shuffle(this.languages);
            },
    },
    };
    </script>

   <template>
    <div style="margin: auto; width: max-content">
        <h1>Programming Languages</h1>
          <center>
           <button @click="shuffleList()" class='button' >
          Shuffle
           </button>
          </center>
   <TransitionGroup tag="ul" style="list-style-type: none" name="list">
        <li v-for="lang in languages" :key="lang"
        class='list-styling'>
          { lang }
        </li>
    </TransitionGroup>
    </div>
    </template>

    <style>
    .button {
      background: #FF0000;
      color: #fff;
      outline: none;
      border: none;
      border-radius: 1rem;
      padding: 15px 25px;
      cursor: pointer;
      }
    .button:hover {
      background: #FFCCCB;
      color: #000;
    }
    .list-styling {
      border: 1px solid #000;
      list-style-type: none;
      padding: 30px;
      border-radius: 3em;
      margin-top: 1em;
    }
    .list-move,
    .list-enter-active,
    .list-leave-active {
            transition: all 1s cubic-bezier(0.075, 0.82, 0.165, 1);
    }
    .list-enter-from,
    .list-leave-to {
            opacity: 0;
            transform: translateX(-2rem);
    }
    .list-leave-active {
            position: absolute;
    }
    </style>
Here’s the result:
Conclusion
Creating dynamic list transitions in Vue.js involves several steps, including setting up the component, defining the transition, and applying the animation. It’s important to remember tips for customizing and optimizing the transition effects, such as using CSS transitions or animations and creating reusable transitions. For those wanting to learn more about Vue.js and dynamic transitions, numerous resources are available, including the official Vue.js documentation, online tutorials, and forums. In conclusion, adding transition effects to the dynamic list in Vue.js is a simple process that involves wrapping the list in the transition component and adding CSS transitions or animations to the transition component. This will enhance the overall user experience and provide visual cues that help the user understand the changes happening on the screen. I hope this article becomes valuable to you Happy coding!
Gain Debugging Superpowers
Unleash the power of session replay to reproduce bugs and track user frustrations. Get complete visibility into your frontend with OpenReplay, the most advanced open-source session replay tool for developers.
