
Dynamic Styling with JIT Mode


Discover how at OpenReplay.com.
We can all agree that website slow loading times are annoying, but then again, they are brought on by the overwhelming number of styles it processes. You’ll be glad to know that Tailwind CSS’s Just-In-Time (JIT) mode has arrived to ease these issues. This function shows tremendous performance, production improvement, and a fresh approach to applying styles. JIT mode actively creates just the CSS styles needed at runtime, therefore simplifying and accelerating development. Changing the construction of webpages improves the user experience for developers and website designers equally. Only the necessary styles will be produced from the whole set. This guarantees that your website will load fast and have outstanding quality.
We shall go into great detail about JIT mode in this article. We will review how it operates, benefits, serves, and enhances your productivity. Get ready to discover how you might simplify the creation of your websites even more.
Understanding JIT Mode
Tailwind’s JIT mode is based on a straightforward idea. Here, like with regular Tailwind CSS, the JIT mode works with a straightforward but more deliberate technique of generating styles as needed during build time, as opposed to creating a massive stylesheet up front. It functions similarly to a code analyzer, looking through your website’s code compilation to identify the precise Tailwind classes being used.
The custom stylesheet created by JIT mode consists of just the basic CSS guidelines. Two significant benefits of this focus on used styles are:
- Faster Websites: Without the trouble of several pointless designs, your website will load fast and keep people interested.
- Smaller Stylesheets: JIT mode generates just the required styles. Hence, the stylesheet of your website stays basic and efficient generally.
Not only that, but the JIT mode also features a handy function called Dynamic Class Generation, which allows you to construct custom classes at build time without using any further setup configurations. We shall dig further into this aspect later on in this part.
JIT Mode in Action
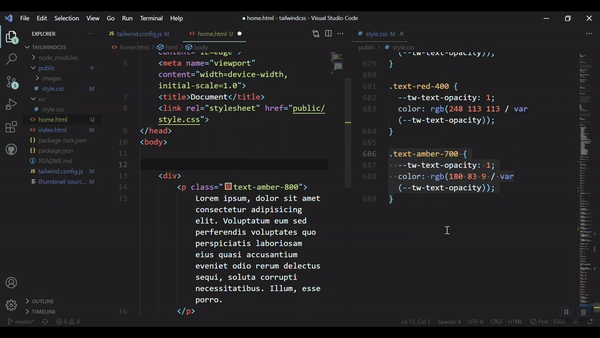
The GIF and sample of code below demonstrate how JIT mode creates our styles during the build process. We have a class called text-amber-800 on a paragraph like this for this example:
<div>
  <p class="text-amber-800">
 Lorem ipsum, dolor sit amet consectetur adipisicing elit. Voluptatum eum sed
 perferendis voluptates quo perspiciatis laboriosam eius quasi accusantium
 eveniet odio rerum delectus sequi, soluta corrupti necessitatibus.
  </p>
</div>;
And the JIT mode will automatically generate a style for it, as shown in the GIF below.
Setting Up JIT Mode
Starting JIT mode calls for a lot of boilerplate code. Here is a systematic walkthrough:
- If you do not already have a project, start by opening your terminal and establishing a fresh folder and file for your work.
mkdir my-tailwind-jit-project
cd my-tailwind-jit-project- Next, initialize
NPMto access theNPMpackages by running the script below.
npm init -y- Tailwind Version 2.1.0 or above is required for JIT mode; use the installation command in the code block below to install Tailwind and its peer dependencies.
npm install -D tailwindcss postcss autoprefixerThe @latest tag allows you to update to the most current version if you are working on an already-existing project with a previous Tailwind version.
npm install -D tailwindcss@latest postcss@latest autoprefixer@latest- Usually found under
tailwind.config.js, change your Tailwind CSS configuration file to activate JIT mode and maximize your bundle size. Here’s how:
module.exports = {
  mode: "jit",
  purge: {
    content: ["./components/**/*.{html,js}", "./pages/**/*.{html,js}"],
    defaultExtractor: (content) => content.match(/[\w-/:]+(?<!:)/g) || [],
 },
};
Tailwind is directed by the purge option to examine HTML files for your project and eliminate unneeded styles from the resultant CSS bundle. This increases performance and helps to keep your bundle size lean. The given setup instructs Tailwind to search all files, including the extensions .html and .js inside the components and pages directories for class names.
- Making a CSS file whereby you will incorporate Tailwind’s foundation, components, and utility styles comes next. We will create a file called
src/styles/tailwind.cssfor this guide.
/* src/styles/tailwind.css */
@tailwind base;
@tailwind components;
@tailwind utilities;- Once Tailwind has been configured, you should search for a
PostCSSconfiguration file calledpostcss.config.js. Should it not exist, generate the file and include the following configurable option.
// postcss.config.js
module.exports = {
  plugins: {
    tailwindcss: {},
    autoprefixer: {},
 },
};- Add the scripts below to your
package.jsonfile to simplify viewing and creating your CSS files with customNPMcommands.
{
  ("scripts");
  {
    ("build:css");
    "postcss src/styles/tailwind.css -o build.css", "watch:css";
    ("TAILWIND_MODE=watch postcss src/styles/tailwind.css -o build.css --watch");
 }
}
- Execute the watch command: At this stage, the fundamental configuration is at last finished. You can run the watch command below right at the terminal. Every update you make to your
tailwind.cssfile builds the stylesheetbuild.css.
npm run watch:css- Once you have at last acquired the appropriate CSS styling for your website, you may now proceed to perform the build command on the terminal before you release your application into production. This runs once to gather the best version of your CSS styles into the
build.cssfile for the production environment.
npm run build:cssAnd there’s it! Keep in mind that you should substitute build.css and tailwind.css with your chosen file names. Now that JIT mode is turned on, you may easily include it in your projects and gain from its advantages.
Dynamic Class Generation with JIT Mode
This feature was mentioned briefly earlier in the article as one of the most notable features of JIT mode. Now let us take some more time to discuss it in detail. Dynamic Class Generation with JIT mode is its ability to generate custom CSS utility classes at build time without adding any extra configuration options. This means that, depending on the requirements of your project, you can build unique styles on demand rather than being constrained to a fixed collection.
Under the conventional Tailwind CSS process, you had to write ahead and guess all the custom styles you would need. This could lead to slower website speed and plenty of extra code.
Custom values let you easily provide styles straight in your markup utilizing JIT mode. JIT mode then dynamically creates the matching CSS rules by analyzing these values. Consider applying a custom width of 12rem to a container element. As the code fragment below shows, we define such a class utilizing JIT mode by just using the class prefix followed by a square bracket within which the custom value is defined.
<div class="w-[12rem]"></div>;JIT mode will create the necessary CSS rule for a width of 12rem.
This method has various advantages:
- Flexibility: You are not limited to already defined courses. Specifically, do you need a margin or padding value? Just put it straight on your markup; JIT mode handles the rest.
- Efficiency: Time lost in designing pointless classes is no more JIT mode simplifies your development process by emphasizing creating the styles you need.
Exploring Other Possibilities
The width example perfectly demonstrates JIT mode’s flexibility in creating custom classes, but to get a better grasp on the concept of how JIT Mode makes our workflow easier, let’s compare some code examples of custom styles with and without JIT Mode:
- Adding a Custom Width
Using JIT mode, setting a custom width of
12remis so straightforward it just requires a few lettersw-[12rem]like in the past example.
<div class="w-[12rem]"></div>;Before we apply the custom class defined in the tailwind.config.js file to our code, we must declare it in non-JIT mode (standard compilation). Giving the custom classes unique names requires caution to avoid altering current custom or default usage patterns.
// tailwind.config.js
module.exports = {
  theme: {
    extend: {
      width: {
        "12rem": "12rem",
 },
 },
 },
};
<!-- Must define this class in the Tailwind config file -->
<div class="custom-width-12rem"></div>;- Applying Custom Colors
It’s as easy as seen below; we add a custom
background-colorwith just a few letters. Using JIT mode, we can easily follow the procedure for adding the custom width to incorporate any hue we may conceive to personalize our website.
<div class="bg-[#1a73e8] text-[#ff6600]">
 Custom background and text colors.
</div>;
Using the standard compilation mode.
First, we establish the two custom colors in our tailwind.config.js file before we can use them in our markup using the usual compilation mode, therefore reproducing the custom `background-color.
// tailwind.config.js
module.exports = {
  theme: {
    extend: {
      colors: {
        "custom-blue": "#1a73e8",
        "custom-orange": "#ff6600",
 },
 },
 },
};
<!-- Must define these classes in the Tailwind config file -->
<div class="bg-custom-blue text-custom-orange"></div>;- Custom Typography
The same approach described in the previous two examples applies to almost all other tailwind features, from spacing to text sizes and fonts. Here is a final example of adding some custom typographic styles for
line-heightandfont-size.
Using JIT Mode
<h1 class="text-[2.5rem] leading-[3rem]"></h1>;Using the standard compilation mode.
// tailwind.config.js
module.exports = {
  theme: {
    extend: {
      fontSize: {
        "custom-size": "2.5rem",
 },
      lineHeight: {
        "custom-leading": "3rem",
 },
 },
 },
};
<!-- Must define these classes in the Tailwind config file -->
<h1 class="text-custom-size leading-custom-leading"></h1>;The comparisons above highlight the flexibility and efficiency JIT mode offers by allowing you to define styles directly in your markup, avoiding the need to pre-define every class in your configuration file.
JIT Mode Optimization
JIT mode achieves optimal performance through a combination of various techniques. These techniques all aim to make the bundle size as small as possible while retaining the flexibility the JIT Mode offers. The best practices to further optimize JIT-compiled CSS for highly performance-driven applications are also briefly discussed below.
-
JIT Compilation: JIT mode’s core feature is Just-In-Time compilation, which generates CSS styles only when they are needed. Unlike traditional methods that gather all accessible styles in preparation, JIT Mode dynamically compiles styles as they are utilized in your project. By guaranteeing that the final stylesheet only comprises the styles needed for the present state of the application, this on-demand compilation helps to improve load speeds and minimize needless CSS. This method improves application performance and development efficiency equally.
-
Bundle Size Reduction: JIT mode greatly lowers the total bundle size by producing only the actively utilized styles in the project. Faster page loads and improved performance follow from smaller CSS bundles; this is especially crucial for performance-driven apps. The smaller bundles not only speed up the first load time but also help to improve the general user experience since later pages and components load faster.
-
Tree Shaking: Tree Shaking is a method that removes unneeded styles from the final construction, thereby maximizing the CSS. JIT mode removes any superfluous styles not in use by analyzing the codebase of the project to find which styles are truly being used. This produces a free from needless bloat, leaner, more efficient stylesheet. Tree Shaking guarantees the CSS bundle is as compact as feasible, a condition essential for preserving the best performance in manufacturing settings.
-
Incremental Builds: By recompiling just the CSS components that have changed rather than recreating the whole stylesheet from scratch, incremental builds facilitate fast development cycles. This method lets developers see the effects of their changes practically immediately by streamlining processes and accelerating style updates. Especially helpful during active development, when frequent updates and improvements are typical, are incremental builds. By cutting construction times and hence limiting disruptions, they help to ensure a more effective development process.
-
Best Practices for Optimization: best practices in CSS optimization help one to maximize the advantages of JIT mode. This entails giving top priority to including vital utility classes and reducing pointless styles to guarantee ideal speed as well as applying minification, compression, and browser caching and CDNs further contribute to optimizing CSS delivery and enhancing user experience.
JIT Mode vs. Standard Build: Picking the Perfect Path
The main advantage of JIT mode is a just-in-time compilation, which creates exactly desired CSS styles. JIT Mode dynamically compiles styles as they are used in your project, unlike conventional systems that accumulate all available styles in advance.
JIT Mode: The New Way
Providing several important advantages, JIT mode shines in fast-paced development settings. Faster development is one of the main benefits. On-demand class generation eliminates the requirement for pre-defined classes, therefore expediting the development process. Smaller bundles also help websites become leaner and faster to load by adding only the styles that are utilized in the final CSS. Because faster load times and a better user experience follow from the reduced CSS bloat, this efficiency results in enhanced performance.
Furthermore, JIT mode gives flexibility using dynamic class generation, thereby enabling more control and style customizing depending on particular project needs. Particularly suited for dynamic and changing projects, JIT Mode combines speed, efficiency, and adaptability.
Still, there are factors to weigh:
- Initial Setup: Comparatively to the regular builds, enabling and configuring JIT mode may demand more boilerplate code work.
- Runtime Compilation Overhead: Especially in large applications, creating styles on demand can cause small overhead during development. In manufacturing settings, this overhead is usually small.
- Possibility of abstraction: Using dynamic classes extensively could complicate code reading. One must balance clarity with adaptability.
Standard Build: The Familiar Way
The standard build approach offers a comfortable workflow for developers accustomed to pre-defined classes. Developers used to these pre-defined classes may find the standard build method more intuitive. Additionally, build times are generally consistent, especially for projects with a well-defined set of styles. Teams working on projects with known design systems and a clear set of criteria might find great benefit from this predictability. This method does, however, also have certain drawbacks, like producing more bundles and needing hand involvement for style tweaks outside of the available choices.
This strategy, nonetheless, also has several drawbacks:
- Greater Bundle Sizes: Although they are not used, the usual build generates all conceivable utility classes, hence possibly causing bloated stylesheets.
- Limited Flexibility: Customizing styles outside of pre-defined classes calls for either extra configuration or hand involvement.
- Slower Iteration Cycles: Style changes often call for rewriting the whole stylesheet, which might affect the development pace.
Which, then, is the strategy we should use? Every developer has efficiency as their battle cry; yet, how can one style their project in line with this? Deciding between JIT mode and the standard build approach, as previously said, depends on your project’s specific needs. Here’s how to choose:
Do you prioritize Speed and Flexibility? If yes, then JIT mode might be a better option. If your project is not too large, emphasizes a quick development process, the ability to make frequent style changes on the fly, and top-notch performance, then work with JIT mode. It excels in these areas.
If familiarity and predictability are key, Perhaps the conventional building method is a better fit. Standard builds can be a better fit for projects with a well-established design system where consistent build times and a known workflow are vital. It provides dependability and a well-traveled road.
In the end, your team’s tastes and the needs of your project will determine the best course forward. Try both approaches without hesitation to find which fits your development style most naturally.
Conclusion
For web development, Tailwind CSS JIT mode is a great instrument. It lets you design styles during the build, therefore accelerating development and producing better websites. JIT Mode increases performance and helps maintain the leanness of your website by producing just the styles you require.
The advantages of JIT mode are obvious, even if there are a few factors to take into account, such as more boilerplate and possible runtime compilation overhead. JIT mode offers a contemporary, flexible, and efficient method of creating websites. As the function develops, it can perhaps bring even more advantages and possibilities.
Tailwind CSS JIT mode is very worth looking at if you want to create gorgeous websites faster and with less effort!
References
- Tailwind CSS
- Tailwind CSS’s Just-In-Time (JIT)
- CDNs
- Font Size - Tailwind
- Width - Tailwind
- Line Height - Tailwind
- Background Color - Tailwind
- Text Color - Tailwind
Gain Debugging Superpowers
Unleash the power of session replay to reproduce bugs, track slowdowns and uncover frustrations in your app. Get complete visibility into your frontend with OpenReplay — the most advanced open-source session replay tool for developers. Check our GitHub repo and join the thousands of developers in our community.
