
Enhancing Search Experience with React and Typesense


Creating such a robust search feature from the ground up requires significant time, energy, and resources, not to mention the challenges in protecting the search functionality against cyber threats, but this article will show you how to get there quickly.

Discover how at OpenReplay.com.
User-friendly search experience in web applications is essential for improving user interaction, satisfaction, and site effectiveness. Allowing users to quickly and easily look up the information or products they seek, a well-designed search interface reduces exasperation and improves readability. This attribute not only retains current users but also attracts new clients, boosting the success and reach of a web application.
Typesense is a free and open-sourced search engine designed for instant, search-as-you-type interaction. This diminishes the need for developers to build a search engine of that capacity for a web application from scratch, significantly boosting developer productivity. It also features typo tolerance, ensuring that minor user input errors don’t lead to incorrect search results. It also offers impressive speed during search queries, enhancing its utility.
Setting up an Account
To integrate Typesense with our React application, we’ll start by setting up an account. There are two methods for this, but we’ll use Typesense Cloud for this tutorial because it simplifies the connection process.
Create an Account
Typesense allows easy account creation via GitHub or email. Visit the website to create your account and obtain your API keys.

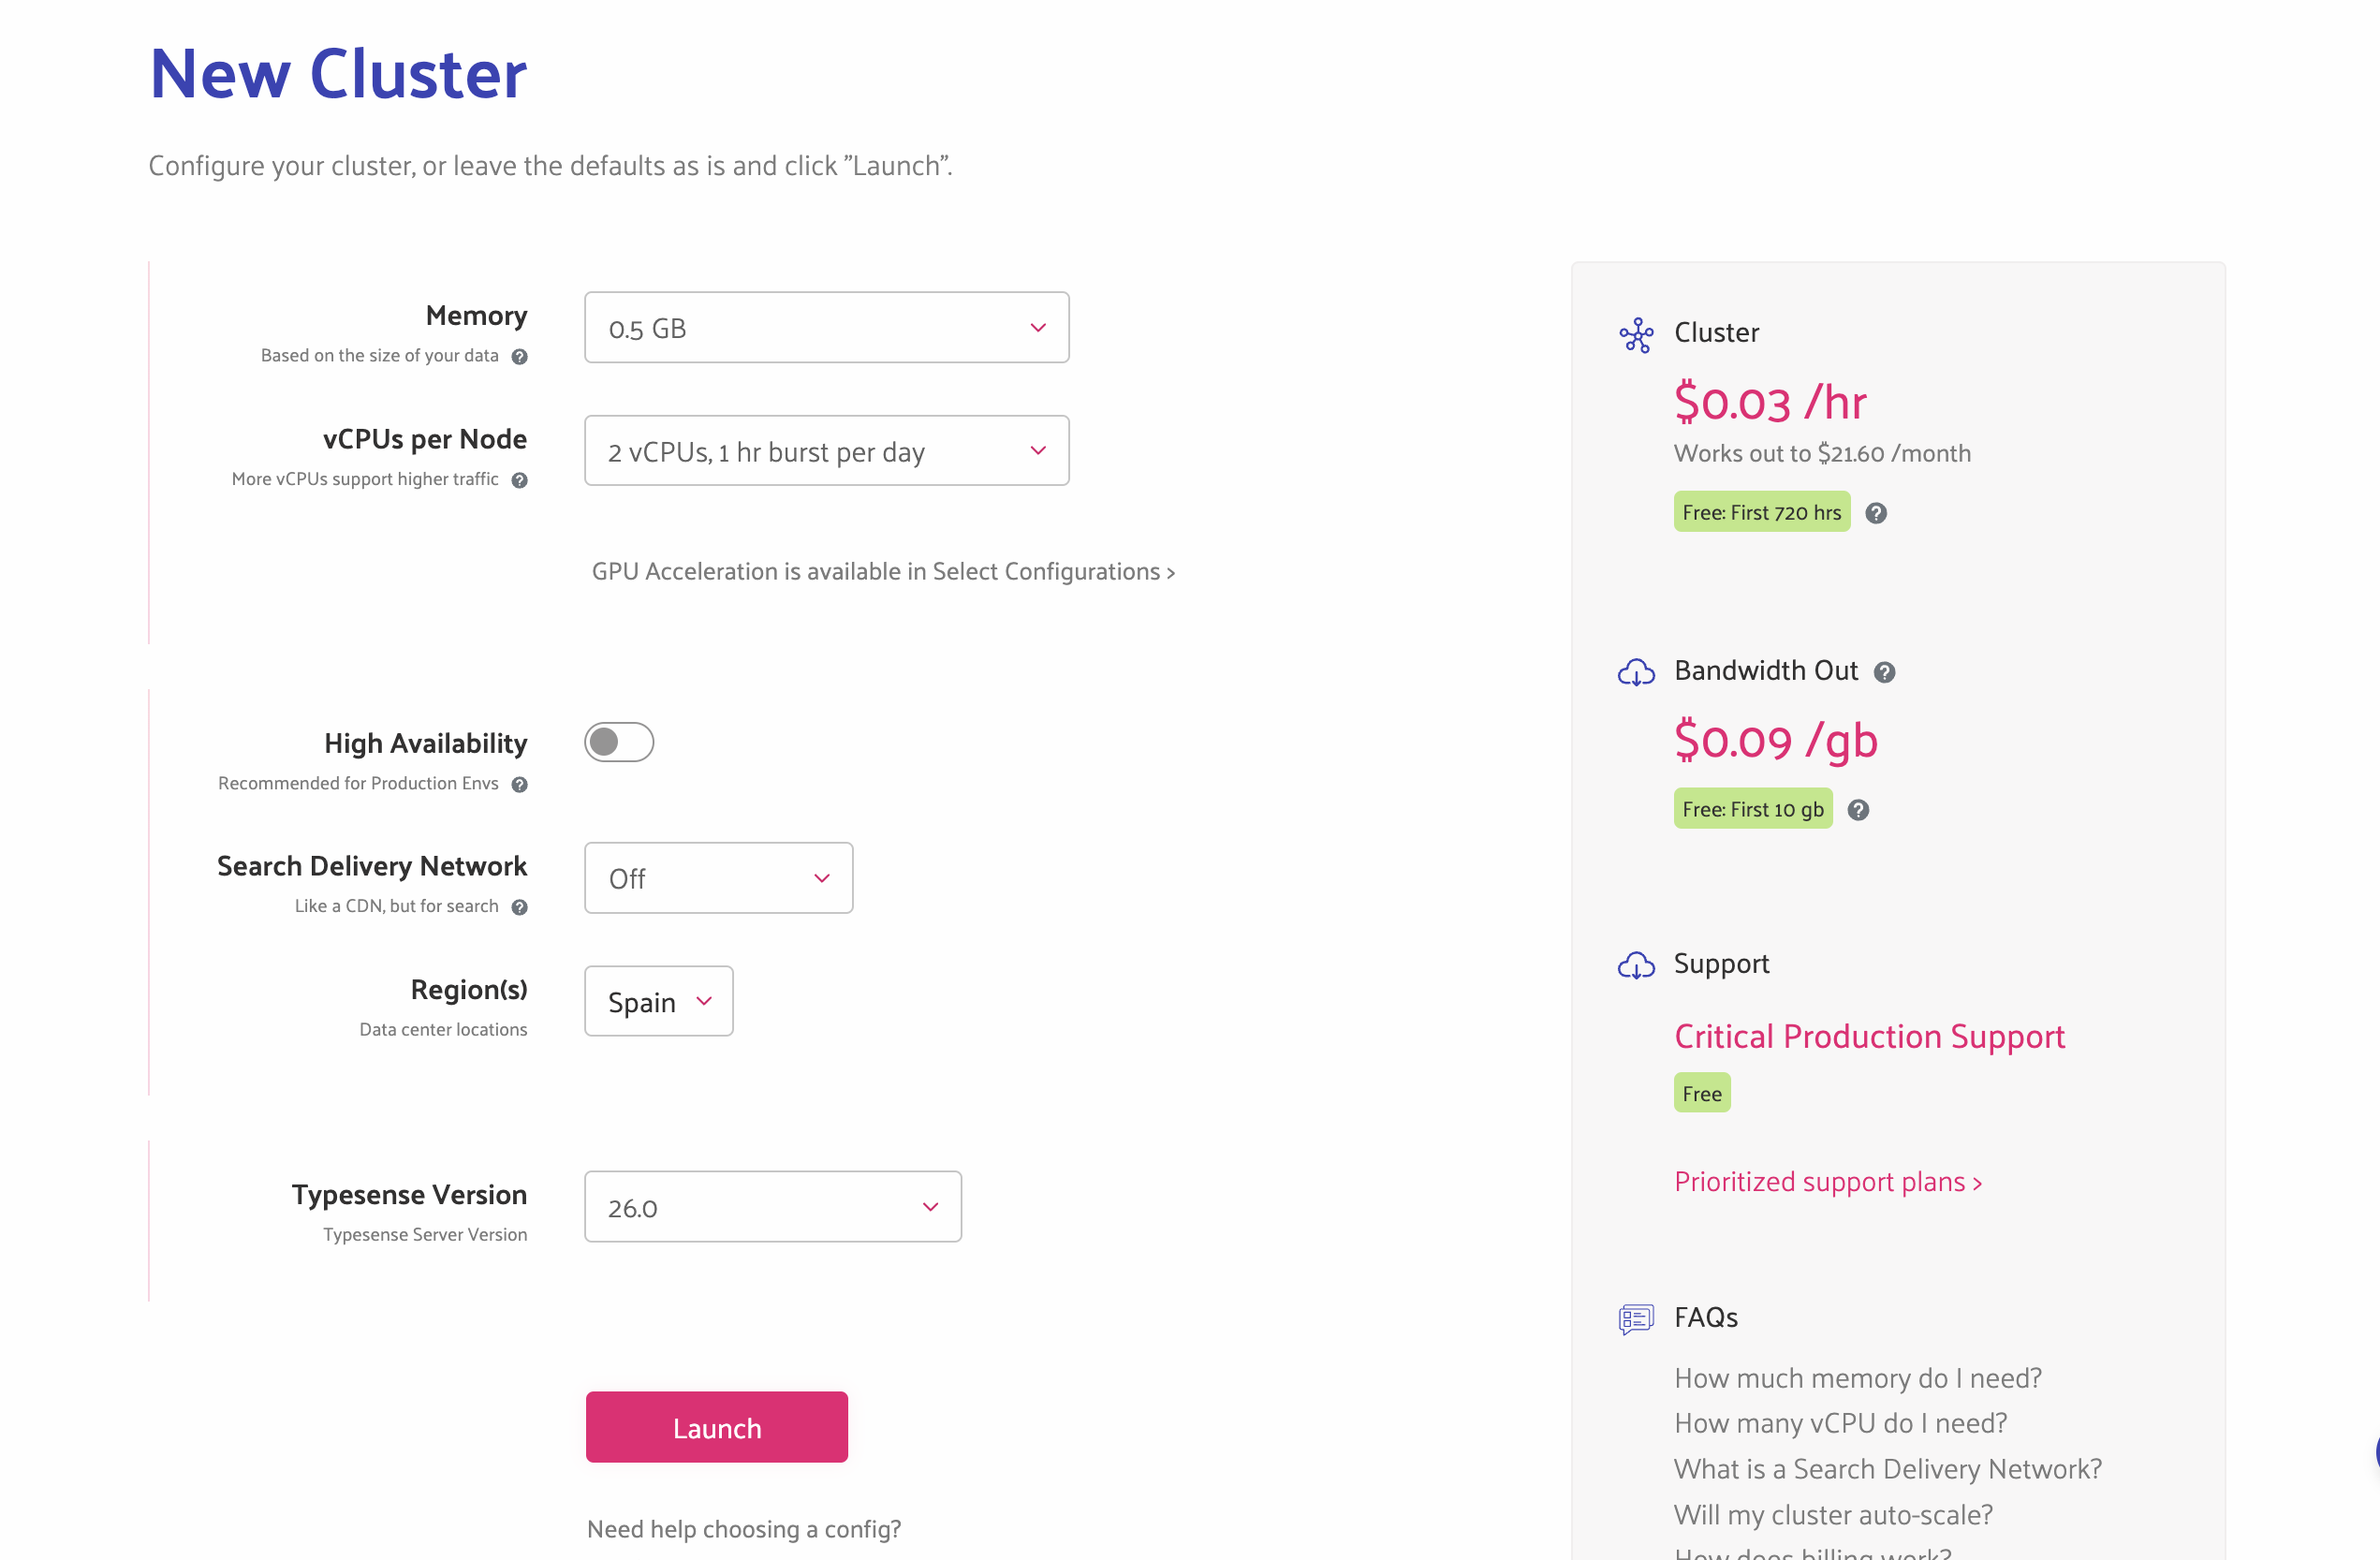
Create a New Cluster
After your account is set up, the next step is creating a cluster to manage your data collections.

Leave the default settings and click the ‘Launch’ button to initiate the cluster creation.
This process might take a few minutes, as shown below.

After the cluster is ready, you can create your API key and obtain your hostname. This information is crucial for connecting your application to Typesense.
Get API Keys
Generate your API keys by clicking the ‘Generate API keys’ button, which will download a .txt file containing all necessary connection information, including the API keys, hostname, and port number.
Note: For this tutorial, we’ll use the ‘Search only’ API key.
Adding New Collections and Documents to the Cloud Database
After setting up your server and obtaining your API keys, the next step is to create collections and index documents, which form the basis of your searchable data.
Create a New Collection
A collection in Typesense is akin to a table in a traditional database, defined by a schema that specifies the fields documents can contain.
- Navigate to the dashboard and select ‘Collections’.
- Click on ‘Create Collection’. Define your schema. If you are creating a movie catalog, your schema might look like this:
{
  "name": "movies",
  "fields": [
    { "name": "title", "type": "string" },
    { "name": "director", "type": "string", "facet": true },
    { "name": "genre", "type": "string", "facet": true },
    { "name": "year", "type": "int32"},
    { "name": "rating", "type": "float" }
  ],
  "default_sorting_field": "rating"
}
The schema above indicates that each of our movies in the catalog will have a title, director, genre, year of release, and rating, respectively. Adding "facet": true to the director and genre fields prompts the schema to allow users to filter through the lists of movies by these fields. The facet attribute is important for faceted search.
Add Documents to the Collection
Once your collection is ready, you can begin adding documents. Each document represents a single movie entry.
- Go to the collection you just created and click on ‘Add Document’.
- Enter the details of the movie. Here’s an example of how to add a movie:
{
  "title": "Inception",
  "director": "Christopher Nolan",
  "genre": "Science Fiction",
  "year": 2010,
  "rating": 8.8
}- Repeat this process for all the movies or data entries you want to include in your search.
Indexing and Searching
Typesense automatically indexes the documents as they are added, making them immediately searchable. You can test the search functionality directly from the dashboard by using the search bar provided in the collection view.
Automating Document Uploads
Consider automating the process using Typesense’s API for bulk uploads or regular updates. You can script the document uploads using curl commands or any programming language that can make HTTP requests. For example, to add a movie via the API, you might use a curl command like this:
curl "http://<hostname>:8108/collections/movies/documents" \
      -X POST \
      -H "Content-Type: application/json" \
      -H "X-TYPESENSE-API-KEY: ${API_KEY}" \
      -d '{
          "title": "Inception",
          "director": "Christopher Nolan",
          "genre": "Science Fiction",
          "year": 2010,
          "rating": 8.8
        }'
This step is vital for keeping your application’s data current and ensuring that your search functionality accurately reflects the latest data.
Setting up Typesense with the Application
For our React project, instead of building search UIs from scratch, we’ll consider using Instantsearch.js, an open-source library that offers a collection of pre-built UI components that streamline the development process. These components are compatible with various popular frameworks, such as React, allowing you to choose the one that best suits your project.
We begin by setting up our environment using the Instantsearch template, which is tailored for use with Typesense. Open your terminal and run the following command:
npx create-instantsearch-app typesense-search-appThis script sets up a new InstantSearch.js application. Choose the following options during setup:
- InstantSearch template: InstantSearch.js
- InstantSearch.js version: Default or latest
- Application ID: Use a placeholder; this will be replaced.
- Search API key: Use a placeholder; this will be replaced with your API key.
- Index name:
movies - Attributes to display: Unselect all options to customize them for your movie data.
Next, we’ll install the Typesense-instantsearch-adapter developed by the Typesense team. The adapter extends this capability by allowing InstantSearch.js widgets to seamlessly communicate with the backend. This integration translates API requests from InstantSearch.js into queries that Typesense can process, harnessing its fast search capabilities. Run the following command:
npm install --save typesense-instantsearch-adapterConfiguring the InstantSearch Adapter
Modify the InstantSearch initialization in your src/app.js to use Typesense as the database.
Import and set up the adapter. Replace the existing search client setup with the following code:
//app.js//
import TypesenseInstantSearchAdapter from "typesense-instantsearch-adapter";

const typesenseInstantSearchAdapter = new TypesenseInstantSearchAdapter({
  server: {
    apiKey: "your-search-only-api-key", // Use the search-only API key from Typesense
    nodes: [
      {
        host: "your-typesense-server.com",
        port: 8108,
        protocol: "https",
      },
    ],
  },
  additionalSearchParameters: {
    query_by: "title,director,genre",
  },
});

const searchClient = typesenseInstantSearchAdapter.searchClient;

const search = instantsearch({
  searchClient,
  indexName: "movies",
});
The code snippet sets up an environment where InstantSearch.js can use Typesense to search a movie collection. It specifies which fields to search in and how to connect to the server via API.
Configuring the Adapter
By configuring the adapter, we’ll replace the host, port, and apikey with those credentials we downloaded earlier. This enables the app to connect with the cloud and make a request via the API. This is how your code block should appear:
//app.js//
const typesenseInstantSearchAdapter = new TypesenseInstantSearchAdapter({
  server: {
    apiKey: "A9WwNDoqb25********tDi4X66RO", // Use the search-only API key from Typesense
    nodes: [
      {
        host: "oml******nrp-1.a1.typesense.net",
        port: 443,
        protocol: "https",
      },
    ],
  },
  additionalSearchParameters: {
    query_by: "title,director,genre",
  },
});
Adding Search Widgets
We’ll incorporate search widgets to enable searching within the movie catalog. Add a search box and a hits widget to display search results:
//app.js//
search.addWidgets([
instantsearch.widgets.searchBox({
container: "#searchbox",
placeholder: "Search for movies...",
}),
instantsearch.widgets.hits({
container: "#hits",
templates: {
item: `
<div>
<div class="hit-title">
{{#helpers.highlight}}{ "attribute": "title" }{{/helpers.highlight}}
</div>
<div class="hit-director">
Directed by: {{#helpers.highlight}}{ "attribute": "director" }{{/helpers.highlight}}
</div>
<div class="hit-genre">
Genre: {{#helpers.highlight}}{ "attribute": "genre" }{{/helpers.highlight}}
</div>
<div class="hit-year">
Year: {{ year }}
</div>
</div>
`,
},
}),
]);
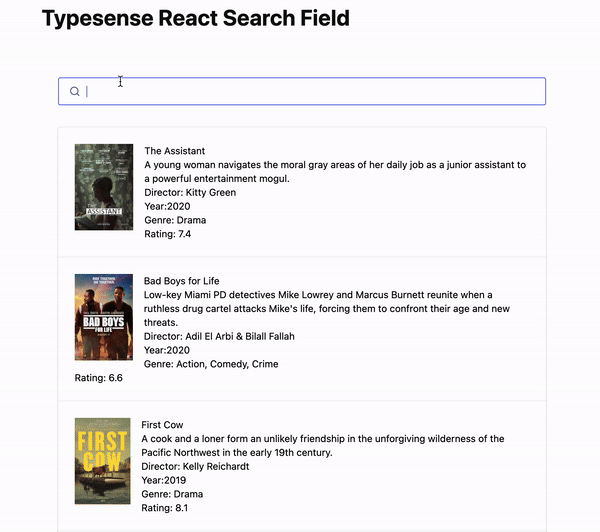
search.start();This setup creates a comprehensive search UI, allowing users to type search queries and view highlighted results in an organized format. The integration of these widgets provides a fluid and intuitive search experience, essential for sites with extensive content like a movie database.
Inside the index.html file, the searchbox, and hits elements(already created during installation) are placeholders for InstantSearch.js widgets, all we have to do is modify them with the code below.
<header class="header">
  <h1 class="title">Typesense React Search Field</h1>
</header>
<div class="container">
  <div class="search-panel"></div>
  <div class="search-panel__results">
    <div id="searchbox"></div>
    <div id="hits"></div>
  </div>
</div>
These placeholders for InstantSearch.js widgets handle user input and display search results, respectively.
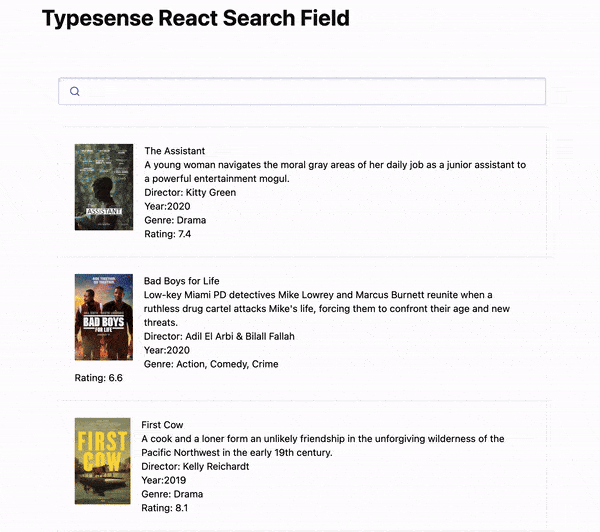
Now, after running npm start, your development server will launch a functional instant search interface. This setup showcases a search box with live results displaying movie titles, directors, genres, and release years, updating as you type.
N/B: In case you encounter the error “Browser scripts cannot have imports or exports,” just like below:
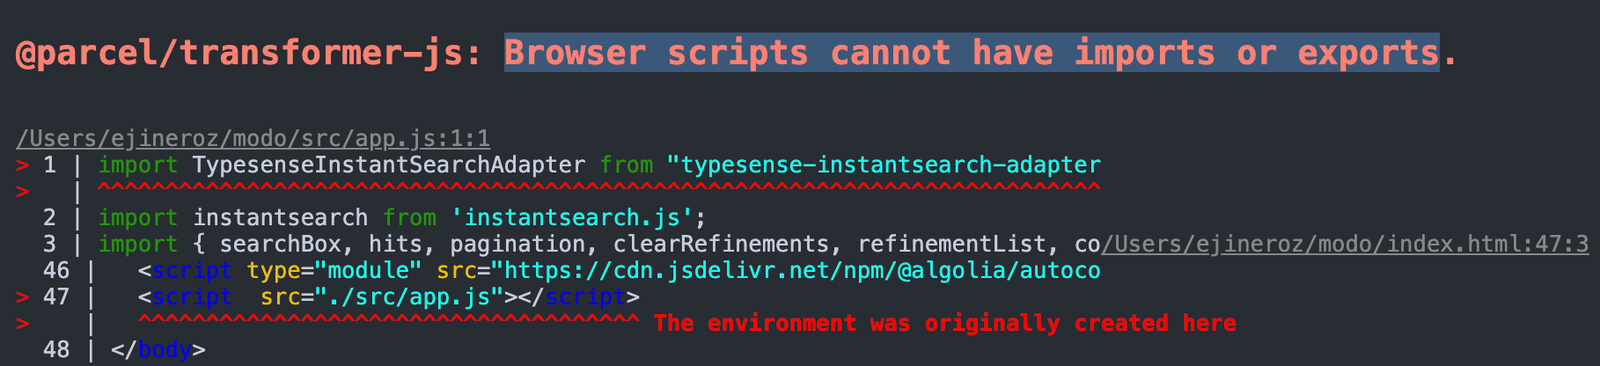
All you have to do is locate your *index.html* file and add the *type="module"* attribute to the aforementioned *<script>* tag.
Enhancing Search Experience
To further enhance the search experience, we’ll carry out the implementation of filters and facets to help users refine search results based on specific parameters. Incorporate pagination to manage and navigate through large sets of results effectively.
Pagination
Pagination helps users navigate through large sets of search results. The Pagination widget allows users to navigate through different pages of search results requested from the cloud.
pagination({
  container: "#pagination",
});
Set up your HTML to include specific containers where the pagination will be displayed, in this case, at the bottom of the container. Here’s a basic structure:
<div id="pagination"></div>;With the help of pagination, Whenever we perform some searches, it allows us to navigate through different pages as seen below.
Implementing pagination is crucial for improving user experience in applications with large datasets, but what if we can make user navigation easier and more interactive by adding filters and facets.
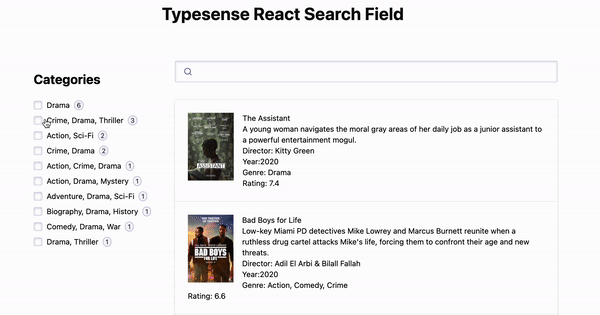
Refinements List
Refinement list is useful for allowing users to filter search results based on facets, such as categories or tags.
refinementList({
  container: "#genre-list",
  attribute: "genre",
});
Ensure the HTML includes elements with IDs corresponding to the containers specified in your JavaScript.
<div class="left-panel">
  <h2>Categories</h2>
  <div id="genre-list"></div>
</div>;
If we run the application and test the functionality of the refinement list we can see that it allows users to filter search results effectively as seen below.
Conclusion
Integrating Typesense with React to build efficient and responsive search functionalities significantly enhances the user experience of web applications. By following the guidelines and implementing the features discussed, developers can create sophisticated search interfaces that are both user-friendly and performant.
Resources
Understand every bug
Uncover frustrations, understand bugs and fix slowdowns like never before with OpenReplay — the open-source session replay tool for developers. Self-host it in minutes, and have complete control over your customer data. Check our GitHub repo and join the thousands of developers in our community.
