

Effective error management is vital in constructing resilient and user-friendly React applications. When your application encounters an unexpected error, it’s essential to provide a graceful way of handling and presenting these errors to users while maintaining its functionality. React’s Error Boundaries offer a powerful mechanism for achieving this, and this article will explore what they are, how to implement them, and best practices for them.

Discover how at OpenReplay.com.
React Error Boundaries act like safety nets for your app. When an error occurs in any component within their tree, these boundaries catch it, preventing the entire app from crashing. They allow you to handle errors more gracefully by providing a way to display a fallback UI and log the error details. It’s a neat tool to enhance user experience and help developers identify and address issues without disrupting the entire application. Incorporating Error Boundaries is a savvy move for frontend stability.
Why are Error Boundaries Important for React Applications?
Without Error Boundaries, a single error in a component could potentially bring down the entire application, leading to a frustrating user experience and making it challenging for developers to pinpoint the root cause. Error boundaries are important for React applications for several reasons:
- Prevent Application Crashes: Error boundaries catch errors within their component tree and prevent them from propagating up the component hierarchy, causing the entire application to crash. This ensures a more stable and responsive user experience, even when errors occur.
- Improve User Experience: Instead of abruptly crashing the application, error boundaries display a fallback UI that informs the user of the error and provides a more controlled response. This prevents frustration and allows users to continue interacting with the application.
- Isolate Errors: Error boundaries help isolate errors to specific components, making it easier to identify and debug the source of the issue. This streamlines the development process and reduces debugging time, as developers can focus on the specific component where the error occurred.
- Log Errors: Error boundaries can be used to log errors to external services or analytics platforms. This provides valuable insights into application behavior and potential issues, helping developers identify patterns, track error occurrences, and prioritize debugging efforts.
- Maintainable Code: Error boundaries promote maintainable code by encapsulating error-handling logic within specific components. This makes it easier to understand and modify error-handling behavior without affecting other parts of the application.
- Graceful Error Handling: Error boundaries enable graceful error handling, allowing developers to provide meaningful feedback to users and maintain a consistent user experience even when errors occur. This enhances the overall user experience and builds trust in the application.
Overall, error boundaries play a crucial role in ensuring the stability and usability of React applications. They prevent unexpected crashes, improve user experience, streamline debugging, and provide valuable insights into application behavior.
Practical Implementation of Error Boundaries in React Application
In this section, we’ll delve deep into the workings of error boundaries, breaking down complexities into simple segments. We’ll construct a React application, creating an Error Boundary component. By wrapping our components with this protective layer, we fortify our app against errors, ensuring a smoother user experience.
How to Create an Error Boundary Component
An error boundary component is a special React component that can catch errors occurring within its child components. This allows you to display a fallback UI instead of crashing the entire application. Error boundaries must be class components in React because they rely on two specific lifecycle methods only available to class components. Note that Functional components cannot use these lifecycle methods, so they cannot be error boundaries.
To create an error boundary component, you need to create a class component that implements either or both of the following lifecycle methods:
static getDerivedStateFromError(): This method renders a fallback UI after an error has been thrown.componentDidCatch(): This method logs the error information to a console or error reporting service.
Start by creating a new component, ErrorBoundary.js, that will act as your error boundary. This component needs to define the lifecycle methods: static getDerivedStateFromError() and componentDidCatch().
import React, { Component } from 'react';

class ErrorBoundary extends Component {
  constructor(props) {
    super(props);
    this.state = { hasError: false };
  }

  static getDerivedStateFromError(error) {
    return { hasError: true };
  }

  componentDidCatch(error, errorInfo) {
    // You can log the error
    console.error('Error:', error);
    console.error('Error Info:', errorInfo);
  }

  render() {
    if (this.state.hasError) {
      return (
        <div>
          <h2>Something went wrong. Please try again later.</h2>
        </div>
      );
    }
    return this.props.children;
  }
}

export default ErrorBoundary;
The above code defines a React component called ErrorBoundary, designed to catch errors within its child components. Let’s break down the code:
- Import Statements:
import React, { Component } from 'react';This line imports the React object and the Component class from the react library. The Component class is needed to create class components in React.
- Class Definition:
class ErrorBoundary extends Component {Here, a class named ErrorBoundary is defined, extending the Component class. This means that ErrorBoundary is a React class component.
- Constructor:
constructor(props) {
  super(props);
  this.state = { hasError: false };
}
The constructor method is used to initialize the state of the component. In this case, it sets the initial state with hasError and the property to false. The super(props) call is necessary to call the parent class’s constructor (Component).
- Static Method -
getDerivedStateFromError:
static getDerivedStateFromError(error) {
  return { hasError: true };
}
This static method is a lifecycle method introduced in React 16. It is called when an error is thrown during rendering, and its purpose is to update the component state based on the occurrence of an error. In this case, it sets hasError to true.
- Method - componentDidCatch:
componentDidCatch(error, errorInfo) {
  console.error('Error:', error);
  console.error('Error Info:', errorInfo);
}
componentDidCatch is another lifecycle method that is called after an error has been thrown during rendering. It provides an opportunity to log the error details. In this example, it logs the error and error information to the console.
- Render Method:
render() {
  if (this.state.hasError) {
    return (
      <div>
        <h2>Something went wrong. Please try again later.</h2>
      </div>
    );
  }
  return this.props.children;
}
The render method is responsible for rendering the component. If hasError is true, it returns a fallback UI indicating something went wrong. Otherwise, it renders the child components (this.props.children), allowing the normal rendering of the component’s children when there are no errors.
- Export Statement:
export default ErrorBoundary;This line exports the ErrorBoundary component, making it available for use in other application parts.
In summary, this ErrorBoundary component will be used as a wrapper around other components. If any error occurs within the wrapped components, the ErrorBoundary will catch the error, update its state, log the error details, and render a fallback UI to inform the user that something went wrong.
How to Use an Error Boundary Component
To use this error boundary component, wrap it around the components where you want to catch errors. Before that, we will update the fallback UI in the Error Boundary component to present a more appropriate message.
// ErrorBoundary.js
import React, { Component } from "react";
class ErrorBoundary extends Component {
  constructor(props) {
    super(props);
    this.state = { hasError: false };
  }
  static getDerivedStateFromError(error) {
    return { hasError: true };
  }
  componentDidCatch(error, errorInfo) {
    this.setState({
      error: error,
      errorInfo: errorInfo,
      hasError: true,
    });
  }
  render() {
    if (this.state.hasError) {
      return (
        <div className="bg-red-100 border-l-4 border-red-500 text-red-700 p-4">
          <p className="font-bold">Oops! Something went wrong.</p>
          <p>This is not a car.</p>
        </div>
      );
    }
    return this.props.children;
  }
}
export default ErrorBoundary;
If any error occurs within the ErrorBoundary, it will catch the error, update the state, and render a user-friendly message instead of crashing the entire app.
Now, we will create a component and call it Carsection. In the CarSection component, we will use the throw new Error statement to generate an error under a specific condition. In this case, if the carName prop passed to the component is equal to Airbus, it triggers the error with the message not a car
import React from 'react';
const CarSection = ({carName}) => {
  if (carName === 'Airbus') {
    throw new Error('not a car')
  }
  return (
    <div >
      {carName}
    </div>
  );
};
export default CarSection;
In essence, the CarSection component is designed to conditionally throw an error based on the value of the carName prop, demonstrating how error boundaries can be implemented to manage errors in React applications.
The next step is to wrap the component or code that might throw an error with the ErrorBoundary component in the App.js component.
import React from "react";
import CarSection from "./CarSection";
import ErrorBoundary from "./ErrorBoundary";
function App() {
return (
<div className="container mx-auto p-4">
<ErrorBoundary>
<CarSection carName={"Toyota"} />
</ErrorBoundary>
<ErrorBoundary>
<CarSection carName={"Honda"} />
</ErrorBoundary>
<ErrorBoundary>
<CarSection carName={"Ford"} />
</ErrorBoundary>
<ErrorBoundary>
<CarSection carName={"Airbus"} />
</ErrorBoundary>
</div>
);
}
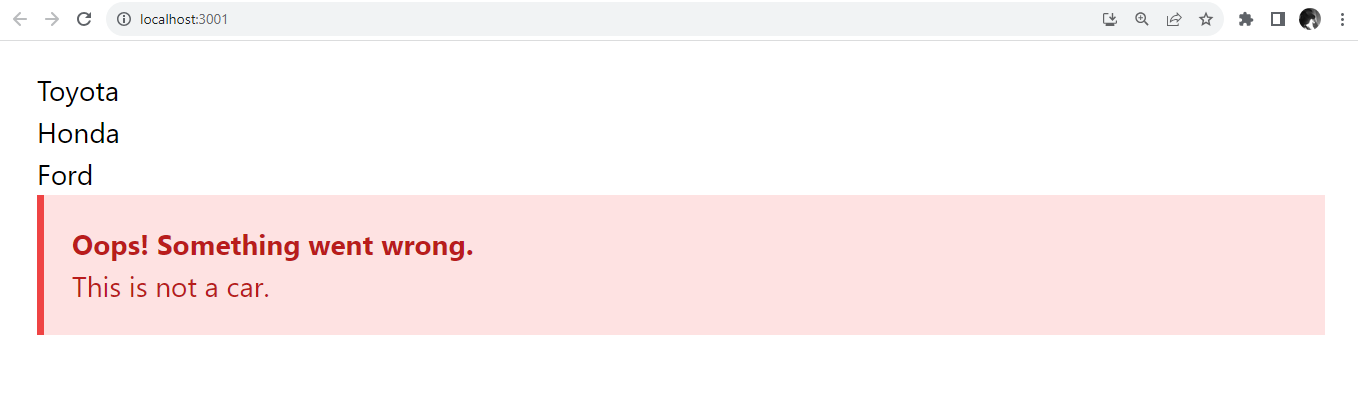
export default App;When the CarSection component receives the prop carName with the value “Airbus,” it triggers an error using throw new Error('not a car'). The ErrorBoundary component then catches this error, and it displays a message specified in its errorMessage prop.
In this case, the ErrorBoundary is set to display “Not a car” as the error message. So, when the CarSection component receives "Airbus", the UI will show an error message saying “Not a car”.
Limitations of Error Boundaries
While error boundaries in React are a powerful tool for handling errors in components, there are some limitations and considerations to be aware of:
- Asynchronous Code: Errors in asynchronous code, such as
setTimeoutor network requests, won’t be caught by the Error Boundary since they happen outside the regular component lifecycle. - Cannot Catch Errors in Event Handlers: Error Boundaries work during the render phase, so they won’t catch errors that occur in event handlers or asynchronous code.
- Errors in the Error Boundary Itself: If an error occurs within its own
render,componentDidCatch, or constructor methods, the Error Boundary won’t catch those errors. This can lead to a situation where the error boundary itself fails. - Server-Side Rendering: Error boundaries are not designed to catch errors that happen during server-side rendering. They work best in client-side React applications.
Despite these limitations, Error Boundaries are still a valuable tool for improving the robustness of your application by preventing crashes and providing a better user experience when errors occur.
Conclusion
In this guide, we explored the concept of Error Boundaries in React, understanding their role in catching errors during the render phase and lifecycle methods of class components. We delved into their usage, setting them up to create fallback UIs and discussed their limitations.
Error Boundaries offer a powerful mechanism to prevent the dreaded white screen of death and enhance the resilience of React applications. By strategically placing them in the component hierarchy, developers can intercept errors, display user-friendly messages, and maintain a smoother user experience.
In conclusion, mastering the implementation of Error Boundaries empowers React developers to create more robust applications that gracefully handle errors, ensuring a more resilient and user-friendly web experience.
Gain Debugging Superpowers
Unleash the power of session replay to reproduce bugs, track slowdowns and uncover frustrations in your app. Get complete visibility into your frontend with OpenReplay — the most advanced open-source session replay tool for developers.
Star on GitHub12k