

In React, creating forms can be a tedious and repetitive task. Furthermore, as the number of input fields and validations grows, the situation becomes more complicated. Form libraries are available to aid in this situation, and this article will discuss the problems a form library should try to address.
What is this package, and why use it?
React Hook Form is a compact React module that enables form validation without needing additional dependencies. It requires less coding than other form frameworks and is easy to use.
Its advantages include:
- Built-in validation: React Hook Form has the option to pass in a validation schema and provides local validation.
- Performance: Utilizing hooks, React hook form destroys Formik and Redux forms’ rivalry.
- Integration with custom components and third-party libraries.
- Extremely minimal and independent.
Scaffolding a new React project with Typescript
It’s pretty simple to get started using React with a Typescript template. React projects can be created by using the React project creation tool. It will scaffold a new project with some example files to get you started. Create a new React project by running the following command from the terminal:
yarn create react-app react-hook-form --template typescriptOnce the project is created, remove the unnecessary files from the src folder after the project has been created.
Run the following command from the terminal to install the form library:
yarn add react-hook-formDefining types for form data
To begin, we must import the library for React Hook Form in any component that will use it.
import { useForm } from "react-hook-form";We would have to define a type alias above the body of our component FormValues—and send it into useForm as a generic type to obtain tightly typed forms:
type InputTypes = {
  lastName: string;
  surname: string;
  telePhone: number;
  image: string;
  birthDate: string;
  male: boolean;
  female: boolean;
  language: string;
};
The Hook should then be used as follows inside our component:
const { register, handleSubmit } = useForm<InputTypes>();The type parameters for each input field’s permitted types are contained in this alias. FormValues now serves as a kind of schema by being sent into useForm, ensuring that the names of the input fields match keys in the alias and that the values submitted into the input fields adhere to the type criteria.
Examining various inputs with React Hook Form
Let’s start by building a basic form with a few input fields.
function App() {
  const {
    register,
    handleSubmit,
    watch,
    setValue,
    formState: { errors },
  } = useForm<InputsTypes>();
  return (
    <div className={styles.appContainer}>
      <form className={styles.innerContainer}>
        <h2>Register</h2>
        <div className={styles.inputContainer}>
          <label>Lastname</label>
          <input
            placeholder= "Jon"
            autoComplete="off"
            className={styles.nameInput}
            {...register("lastName")}
          />
          <label>Surname</label>
          <input
            placeholder="Doe"
            className={styles.nameInput}
            autoComplete="off"
            {...register("surname")}
          />
          <label>Phone</label>
          <input
            placeholder="012345678"
            autoComplete="off"
            {...register("telePhone")}
            className={styles.nameInput}
            type="tel"
          />
          <label>Image</label>
          <input
            className={styles.nameInput}
            type="file"
            {...register("image")}
          />
          <label>D.O.B</label>
          <input
            className={styles.nameInput}
            type="date"
            {...register("birthDate")}
          />
          <label>Gender</label>
          <div>
            <label>Male</label>
            <input
              className={styles.checkGender}
              type="radio"
              value="male"
              {...register("male")}
            />
            <label>Female</label>
            <input
              className={styles.checkGender}
              type="radio"
              value="female"
              {...register("female")}
            />
          </div>
          <label>Language</label>
          <select id="lang" {...register("language")}>
            <option selected value="English">
              English
            </option>
            <option value="Deutsch">German</option>
            <option value="Spanish">Spanish</option>
            <option value="Urdu">Urdu</option>
            <option value="Hindi">Hindi</option>
            <option value="Greek">Greek</option>
            <option value="French">French</option>
            <option value="Zulu">Zulu</option>
          </select>
        </div>
        <div className={styles.buttonContainer}>
          <button>Submit</button>
        </div>
      </form>
    </div>
  );
}
The result of our code is seen here.
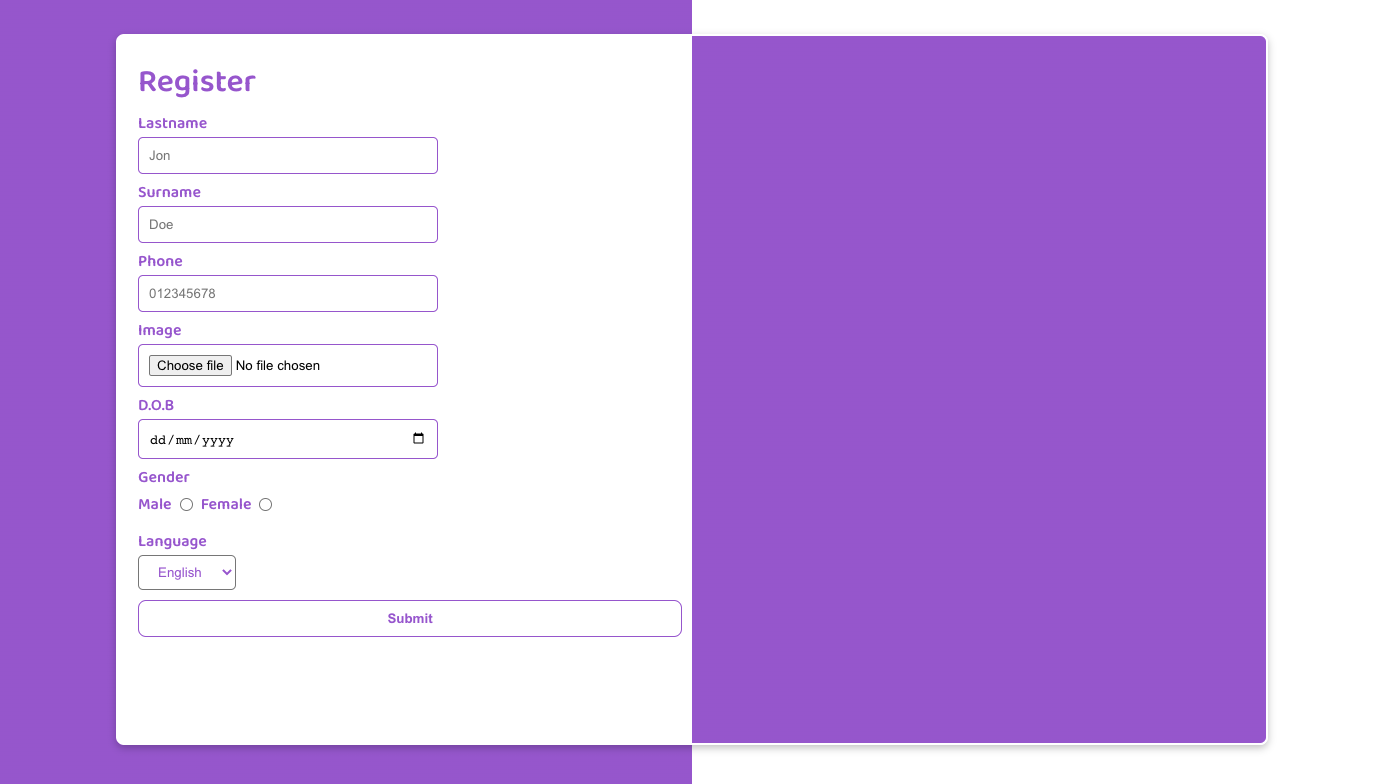
It’s important to note that each input field has a register function. You can add a select or input element to a React Hook Form and set validation rules using this function. Although there is potential for alternative validation methods, all validation rules are based on the HTML standard. For the React Hook Form to follow the changing data, notice that each input has a unique name that must be provided in the register function, which also matches the FormValues mentioned earlier.
What good is a form without a submit button, as we all know? The handleSubmit method controls form submission, as its name implies. It must be supplied as the value for the form component’s onSubmit prop. Now that you have a good understanding of the useForm Hook’s fundamental use, let’s look at a more practical illustration:
const submitHandler: SubmitHandler<InputsTypes> = (data) => {
    console.log(data);
  };

<form onSubmit={handleSubmit(submitHandler)}>
  {/* ... */}
</form>
Open Source Session Replay
OpenReplay is an open-source, session replay suite that lets you see what users do on your web app, helping you troubleshoot issues faster. OpenReplay is self-hosted for full control over your data.

Start enjoying your debugging experience - start using OpenReplay for free.
Validating forms with the React useForm Hook
You can supply validation parameters to the register method to apply validations to a field.
The features listed below are among these validation criteria:
required: The input field is unnecessary when set to false and necessary when otherwise.pattern: Regex (regular expression) pattern used for input.minandmax: This specifies a numerical value’s lowest and maximum values.minlengthandmaxlength: This sets the input string’s minimum and maximum lengths.
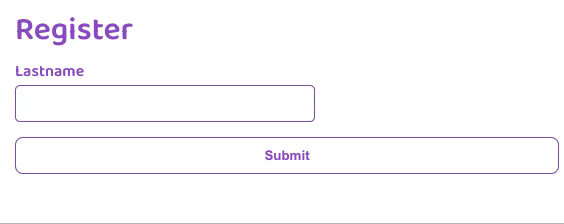
Making an input required using the React useForm Hook is as simple as this:
<input
    className={styles.nameInput}
    type="lastName"
    {...register("lastName", {
    required: "Field is required",
    maxLength: 10,
    pattern: {
          value: /^[A-Za-z]+$/i,
          message: "No spaces allowed",
        },
    })}
      />
  {<p> {errors.lastName && errors.lastName.message}</p>}
The input field in the above code is mandatory. If the input value’s length exceeds the specified maximum length property and the match pattern doesn’t match the input value, it will be an error.
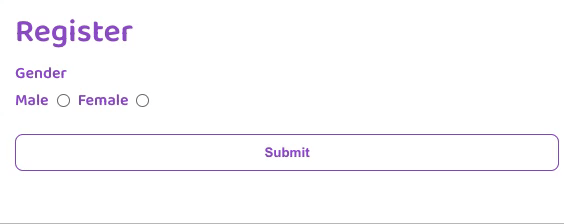
Handling multiple radio buttons
Let’s examine how to handle multiple mandatory React checkboxes, particularly in situations when we want at least one checkbox to be selected. The React Hook Form also provides a watch function that will track the values of the supplied inputs and return them. When rendering input values, choosing what to render based on conditions is helpful.
const { register, handleSubmit, watch, setValue } = useForm<InputTypes>();Observe that the useForm Hook returns another function called setValue which allows you to dynamically set a registered field’s value and validate and update the form’s state. It also makes an effort to prevent needless rerender.
const App = () => {
const gender = watch();
useEffect(() => {
  if (gender.male) {
    setValue("female", false);
  }
}, [gender.male, setValue]);
useEffect(() => {
  if (gender.female) {
    setValue("male", false);
  }
}, [gender.female, setValue]);

return (
  <div>
<label>Male</label>
  <input
    className={styles.checkGender}
    type="radio"
    value="male"
    {...register("male", {
    required: !gender.female && !gender.male ,
    })}
  />

<input
  className={styles.checkGender}
  type="radio"
  value="female"
  {...register("female", { required: !gender.male && !gender.female })}
/>
      {errors.female && errors.male && <p>Field is required</p>}
  </div>
)}
Handling Errors in React Hook Form
An errors object is provided by React Hook Form to display the form’s errors. Given the restrictions of validation, the error type will be returned. The example that follows illustrates a necessary validation rule.
const { register, handleSubmit, formState: { errors } } = useForm<InputTypes>();We can display errors using the useForm Hook like this :
<label>D.O.B</label>
<input
  className={styles.nameInput}
  type="date"
  {...register("birthDate",{required: true})}
/>
{errors.lastName && <p>Field is required</p>}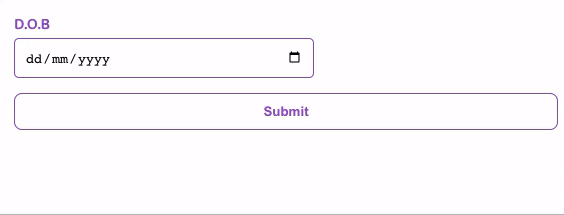
Conclusion
A wonderful contribution to the React open source community is React Hook Form. For developers, it has made building and maintaining forms considerably simpler. The most admirable feature of this library is how flexible it is to use and how much it emphasizes the developer experience. You can check out the full code and reference here. Cheers ✌️
A TIP FROM THE EDITOR: For an alternative package to use for validating forms, take a look at our Better Form Validation in React with Formik article.