
Testing an application is a crucial aspect of software engineering and every other field, ensuring that components function as expected in isolation without any glitches. This guide explores a step-by-step walkthrough of unit testing in Blazor, utilizing the strengths of both xUnit and BUnit testing frameworks to make the application work as expected.

Discover how at OpenReplay.com.
Who releases software without testing?
We will focus on Blazor, a framework for building interactive web applications, which uses C# and runs both on the client and server side.
This guide explores a step-by-step walkthrough of unit testing in Blazor, utilizing the strengths of both xUnit and BUnit testing frameworks to make the application work and return what is expected.
We will dive into setting up our workspace, writing our first unit test, exploring the ins and outs of a unit test, and scaling through any hurdle.
At the end of this guide, you’ll have the know-how to handle Blazor unit testing with bUnit and xUnit, and you’ll be leveling up the reliability of your application.
The Importance of Testing in Blazor Application
Testing stands as a guard against bugs and ensures the smooth functionality of applications. Blazor, a powerful and flexible web framework, is no exception.
Testing in Blazor is not just a best practice. It is a necessity to build robust, secure, and maintainable applications.
Below are some of the benefits of testing a Blazor application;
- Code quality: Through testing, you can maintain and enhance the quality of your code. Well-tested code is generally more maintainable, readable, and easier to understand, making collaboration among developers smoother.
- Scalability support: As your Blazor application grows, testing becomes increasingly important. It ensures that new features and updates integrate seamlessly with existing functionalities, maintaining high-level performance and user satisfaction.
- Ease of debugging: Testing allows you to identify and fix bugs early in development. This proactive approach helps prevent critical issues in the later stages of application development.
- Reliability assurance: Testing ensures that your Blazor applications perform consistently and reliably. It helps catch and rectify potential issues, ensuring users have a smooth experience.
- User satisfaction: Testing contributes to a positive user experience. You can create a more reliable and enjoyable application by identifying and addressing potential problems before they reach end-users.
Why Unit Testing?
Unit testing stands as a bedrock when building applications; it is specifically designed to isolate and validate the smallest units of code, which are individual components in the case of Blazor.
This critical practice involves testing these components in isolation to detect errors early in the development process, ensuring each component functions as intended. Some subtle errors hide and may become difficult to debug when testing an application. But with the implementation of unit tests, everything will be detected.
Also, unit testing is a fundamental aspect of software testing that revolves around isolating and validating individual components or units of code. Its role is paramount for several reasons:
- Error Detection: By focusing on individual components, unit testing allows early identification of subtle errors, preventing the escalation of issues.
- Enhanced Software Quality: Through the validation of individual components, unit testing contributes to the overall quality of the software by identifying and rectifying issues early in development.
- Granular Issue Resolution: Unit testing enables developers to pinpoint and address issues at a granular level, contributing to the stability and robustness of the codebase.
- Functionality Assurance: Implementing unit testing guarantees that each component functions as intended, providing a level of confidence in the overall functionality of the application.
- Maintaining Component Integrity: Unit testing is essential for preserving the integrity of components in Blazor applications. It ensures that each unit operates as expected, contributing to the overall reliability of the application.
Setting the Tone
We will break down the unit testing process in Blazor, ensuring that it becomes straightforward and accessible. We will start our journey with the basic concepts, progressively advancing into more advanced aspects.
This guide is tailored for anybody who wants to secure their Blazor application and take a systematic, step-by-step approach to introduce unit testing in the Blazor application. Beginning with the fundamentals, we will gradually explore and apply more sophisticated use cases.
By the end of this guide, you will possess the knowledge and confidence required to proficiently execute unit tests within your Blazor application.
Here, you will be introduced to the unit testing frameworks we will be using in this guide. This includes insights into its functionalities and features, providing guidance on how to tailor your preference and project requirements.
Overview of Unit Testing Tools
The unit testing frameworks we will be using in this guide are the xUnit and bUnit.
What is xUnit and bUnit?
-
xUnit is a versatile testing framework widely used in the .NET ecosystem. xUnit is used to test for non-user-interface (UI) experience or any code that doesn’t rely on the Blazor rendering process. For example, testing validation logic.
-
bUnit is built on top of xUnit, so it needs xUnit to run. bUnit is designed to test Blazor components. bUnit checks if a Blazor UI component is being rendered correctly. For example, verifying that a custom Blazor component updates its UI when data changes.
This combination allows for comprehensive testing of the entire application, covering both the business logic and the user interface.
To get started, if you haven’t, you need to install a couple of tools on your machine, so we can achieve the same result. Below is the list of tools to install:
Creating a Simple Blazor Component
By now, I assume you have all the tools required installed on your machine. This guide will work you through everything from how to start a new project to writing your unit tests.
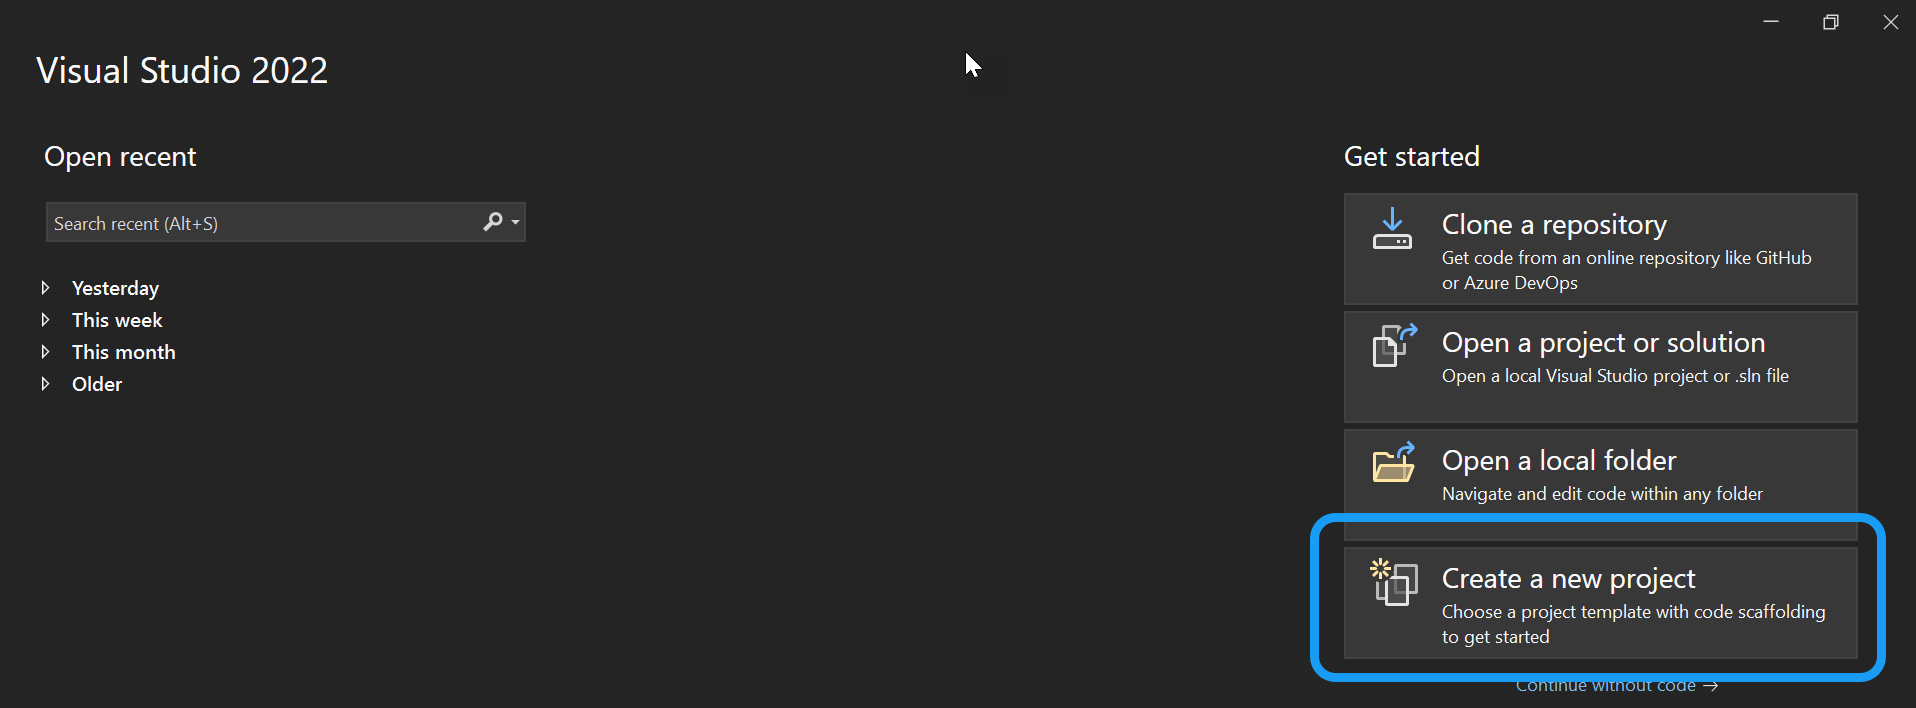
- STEP 1: Create a New Project
Click the marked area in the image below to start creating a new Blazor project.
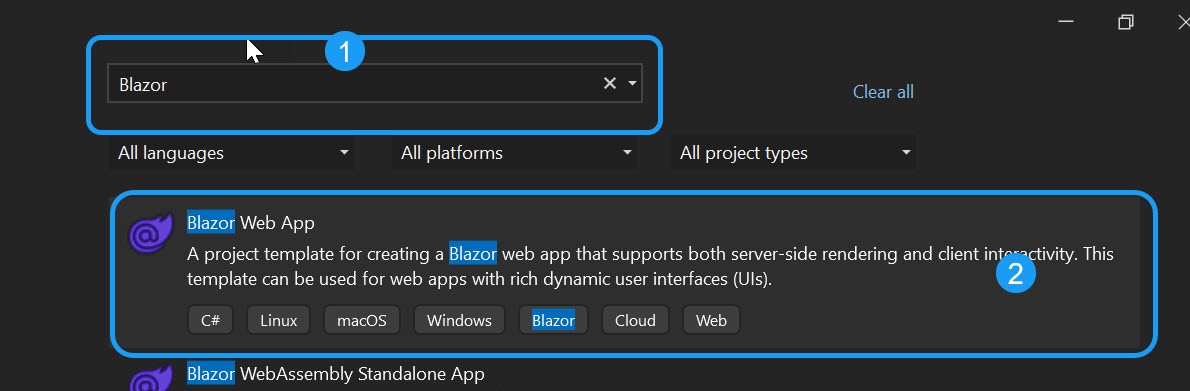
- STEP 2: Select the Blazor Template
After selecting the marked button above, select the Blazor Web App and click Next as shown below;
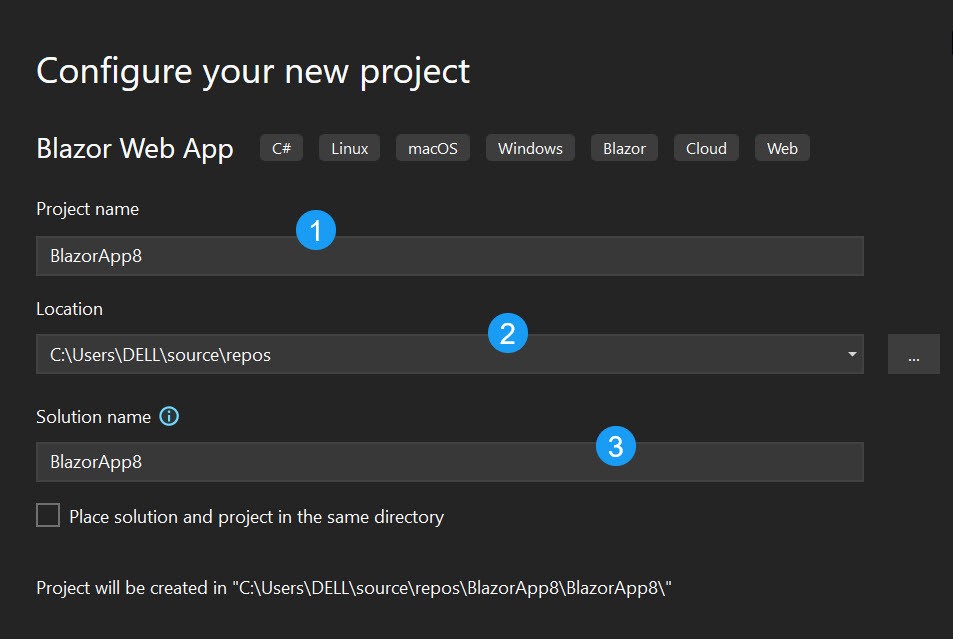
- STEP 3: Configure Project
You can leave this by the default value or change it to whatever suits your project requirement. We will use the default configurations. Once you are done, click Next;
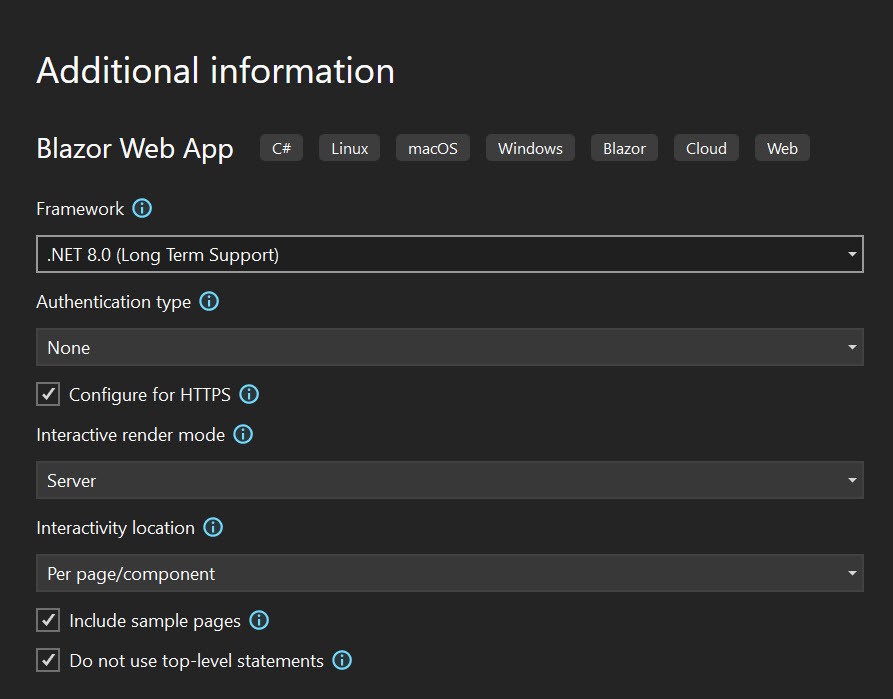
- STEP 4: Set Additional Information
We will be using the .NET 8 framework. This guide will work with .NET 6 and later. You can change the settings below as you see fit, but we will work with the default settings. Click on Create to continue;
- STEP 5: Load the Application
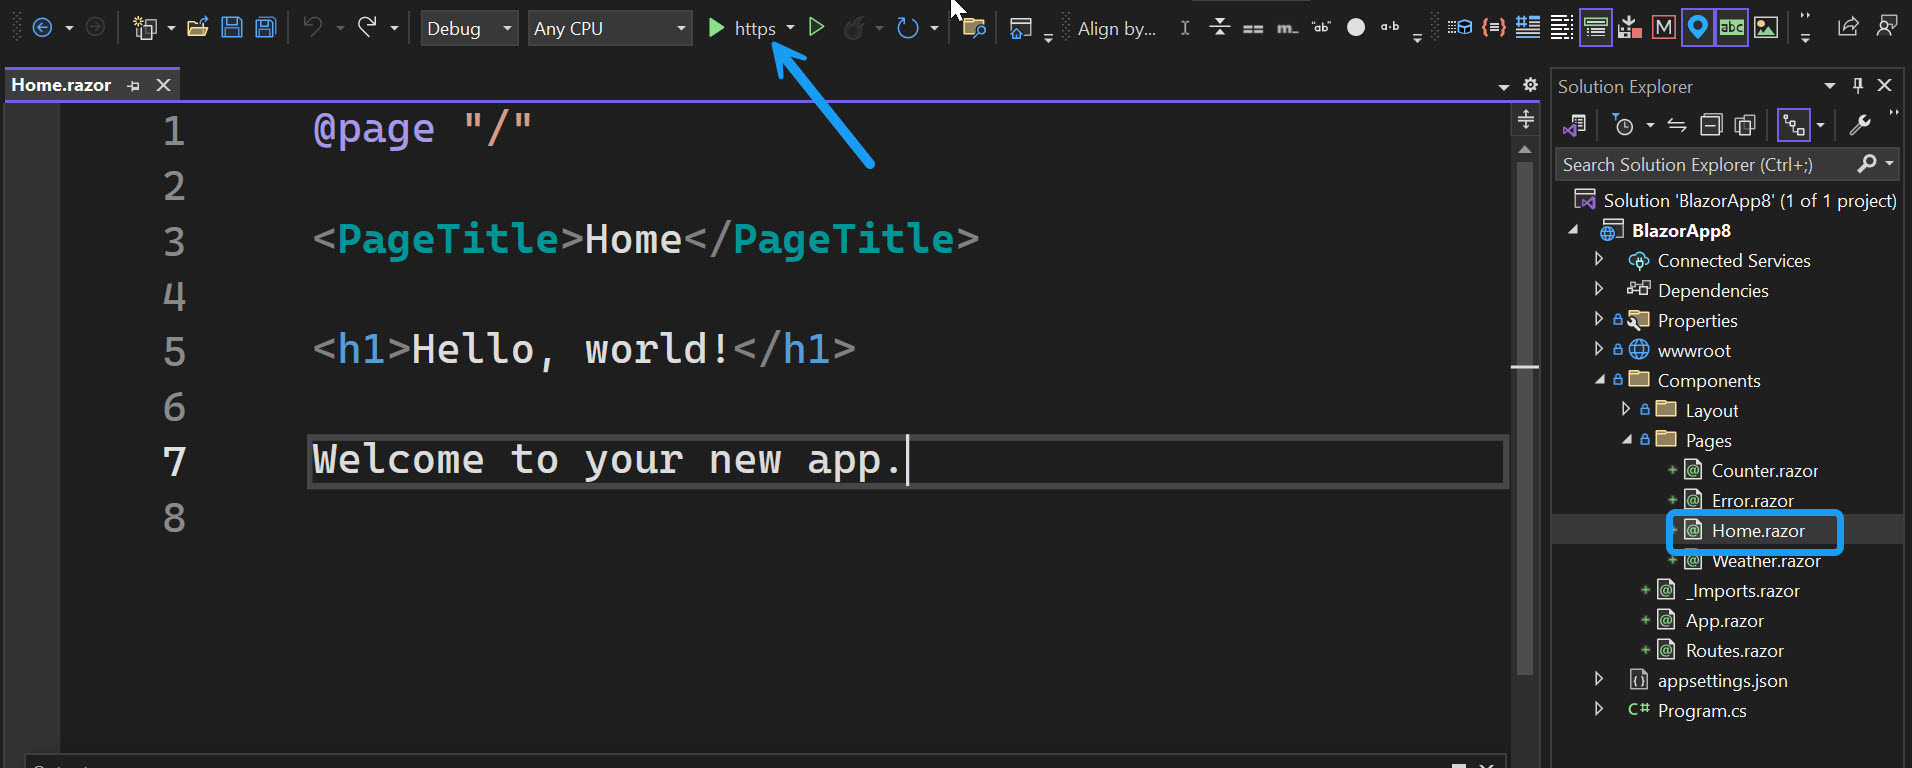
The code snippet below is an example of a Blazor component;
@page "/"

<PageTitle>Home</PageTitle>

<h1>Hello, world!</h1>

Welcome to your new app.
Now, you have created your first Blazor component.
Click the button that the arrow points to, as shown below, to load the project and see the user interface on the browser.
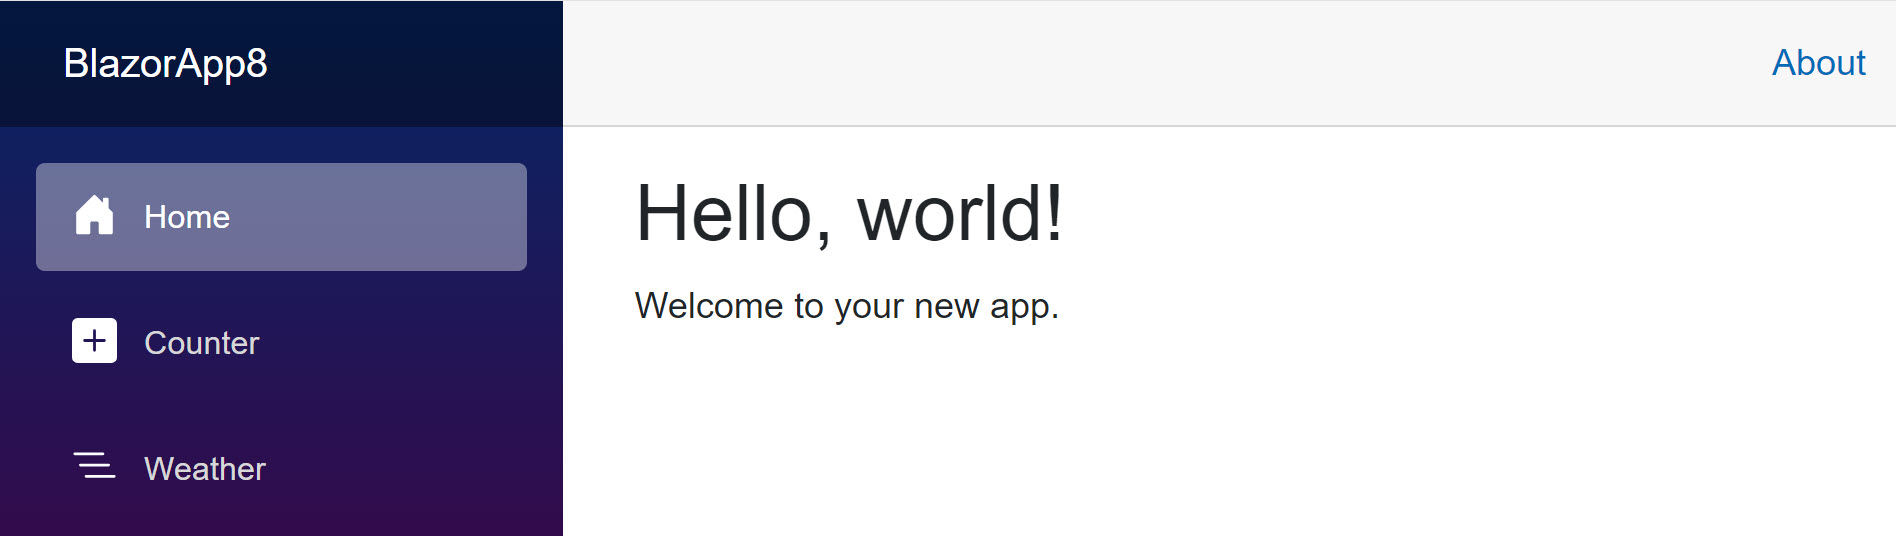
The output of the above should look like the image below;
Best Practices for Organizing Unit Tests
Before embarking on writing unit tests, it is considered a best practice to create a dedicated project within the same solution to house these tests. This separation of concerns allows for a more organized and modular structure in your software development environment.
Having the tests in a separate project provides several advantages:
- Isolation: The test project operates independently of the main project, ensuring that the testing logic does not interfere with the application code. This isolation helps maintain the integrity of both the tests and the production code.
- Clarity and Readability: Keeping tests in a distinct project enhances the clarity and readability of your solution. It distinguishes between the production code and the testing infrastructure, making it easier for developers to navigate and understand the project structure.
- Maintenance Ease: A separate test project facilitates easier maintenance. Developers can update, add, or remove tests without directly impacting the primary application. This separation streamlines the testing process and simplifies future modifications.
- Build and Deployment Efficiency: By having tests in a dedicated project, you can selectively include or exclude them during the build and deployment processes. This selective approach enables faster build times for the production code, as tests do not need to be included in every build.
NOTE: This project should reference the main project, enabling the tests to interact with the application code while maintaining a clear separation.
Don’t understand what I mean? Don’t worry, we will do it together.
Create a New Test Project From a Solution
I will walk you through how to create a new test project from an existing solution;
-
STEP 1: Right-click on the
Solution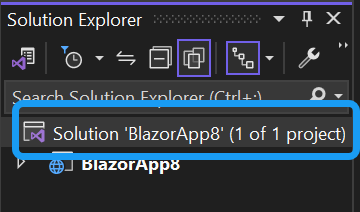
-
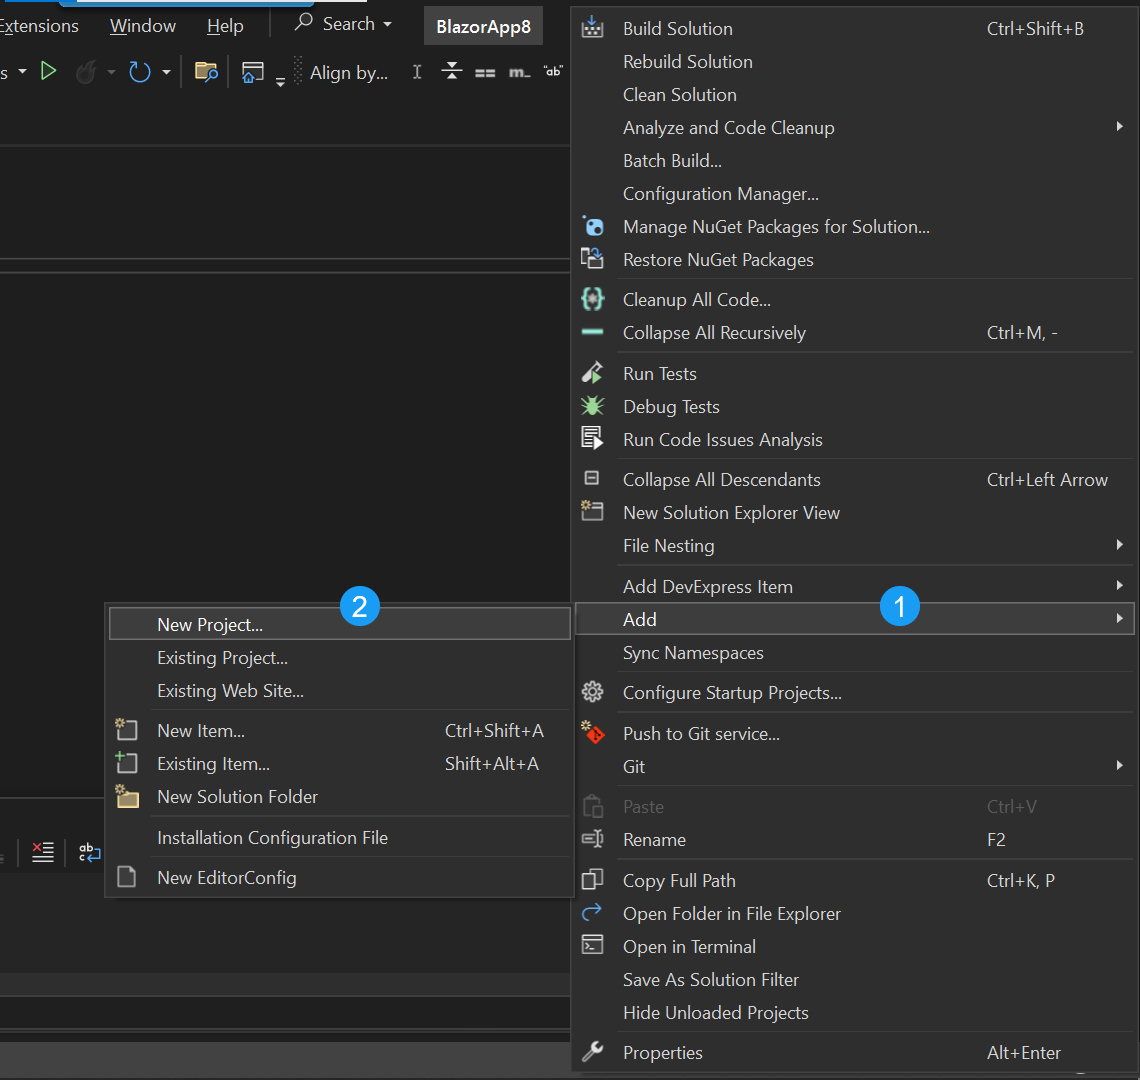
STEP 2: Select the
Addoption and selectNew Projectjust like the image below;
- STEP 3: Search for
xUnitand select the marked test project template below, then clickNext;

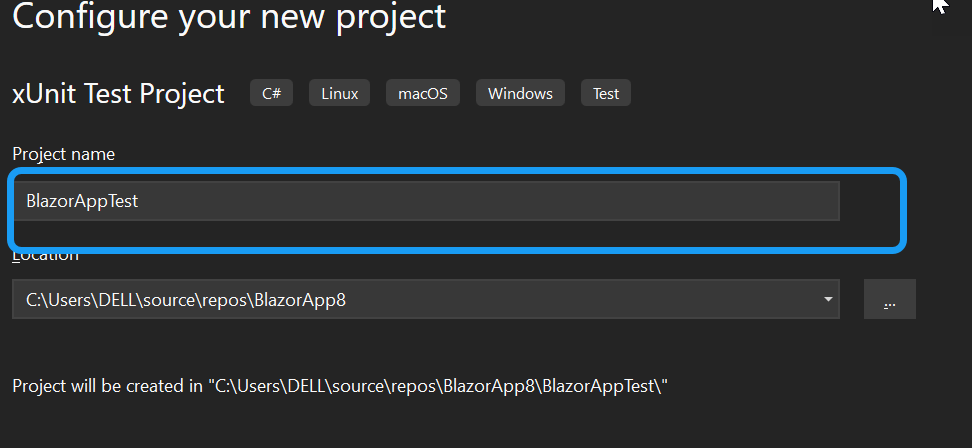
- STEP 4: Here, you choose the name of the project; you can leave it as the default or give it your project name, just like the image below;
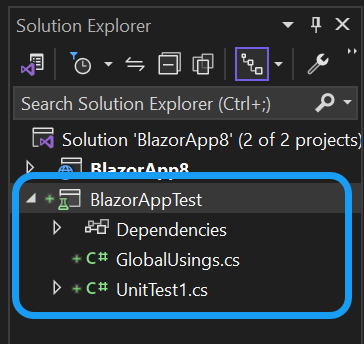
Now you should have the test project in your solution;
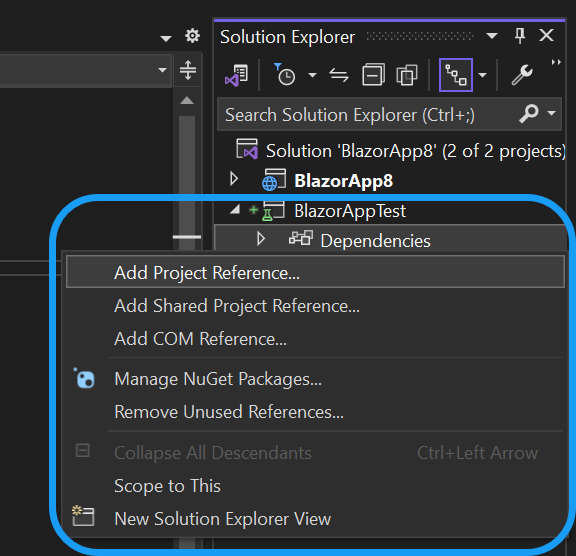
- STEP 5: The
BlazorAppTestproject needs a way to interact with the components we will be creating in theBlazorApp8project. To achieve this, all you need to do is right-click on theDependenciesand selectAdd Project Reference, then select the project you want to reference;
Writing your First Unit Test
In unit testing, a well-structured test typically follows the Arrange-Act-Assert (AAA) pattern, which helps organize the various stages of the testing process. Here’s a breakdown of each phase:
- Arrange: In this phase, you set up the preconditions for your test. This involves creating instances of objects, initializing variables, and configuring the environment to simulate a specific scenario.
- Act: This involves invoking the specific behavior or functionality you want to test. This usually means calling a method or triggering an action you want to evaluate.
- Assert: In this phase, you verify that the outcome of the Act phase aligns with your expectations. Assertions are used to check whether the actual results match the expected results.
For example, see the snippet below;
public class MyTestClass
{
    [Fact]
    public void MyTestMethod()
    {
        // Arrange
        // ... (setup code)

        // Act
        // ... (action code)

        // Assert
        // ... (assertion code)
    }
}
The [Fact] attribute in the code above is applied to a method to mark it as a fact, indicating that it’s a test method. This annotation informs the testing framework that the method should be executed as part of the test suite.
The above instructions should always be followed properly to get appropriate test results.
Unit Testing with xUnit
xUnit is a versatile testing framework widely used in the .NET ecosystem. Let’s start by writing a simple xUnit test for a non-UI component in our Blazor application.
Suppose we have a service that performs basic arithmetic operations. Create a new class, CalculatorService.cs in the Blazor project:
    public class CalculatorService
    {
        public int Add(int a, int b) => a + b;
    }
The code above is a service that takes two numbers and returns their sum.
Create a new file called CalculatorServiceTests in the test project and add the following code.;
using BlazorApp8.Components;

namespace BlazorAppTest
{
    public class CalculatorServiceTests
    {
        [Fact]
        public void Add_ShouldReturnCorrectSum()
        {
            // Arrange
            var calculatorService = new CalculatorService();

            // Act
            var result = calculatorService.Add(3, 4);

            // Assert
            Assert.Equal(7, result);
        }
    }
}-
From the snippet above, you can see
using BlazorApp8.Componentsis the project name of theCalculatorService()service. WithoutBlazorApp8being referenced in the test project, this will flag an error. So it is a must to reference the project whose service you will call. -
You can see the
[Fact]attribute on theAdd_ShouldReturnCorrectSummethod, which indicates that it should run as a test. -
The
calculatorServiceholds the service being called, then we get the particular method and pass its required arguments (arguments are the required data passed to a method) inresult, and theAssertstatements validate whether the calculated results match the expected values.
The test above can run in two ways;
-
Using the Terminal by running the command
dotnet runto run the tests. The output of the test will look like the image below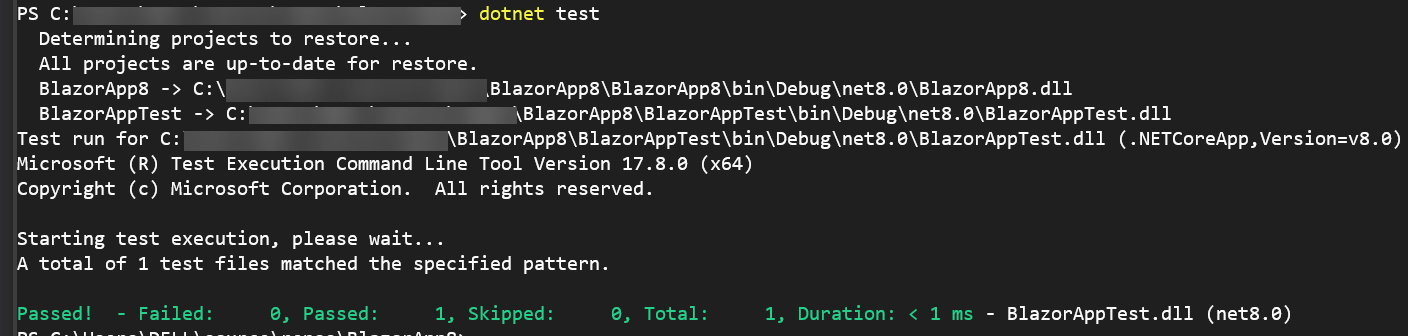
-
Using a visual studio tool just like the image below.

From the images above, you can see that the test passed.
Unit Testing Blazor Components with BUnit
While xUnit excels at testing non-UI components, BUnit is specifically designed for testing Blazor components. Let’s explore how to use BUnit to test a simple Blazor component.
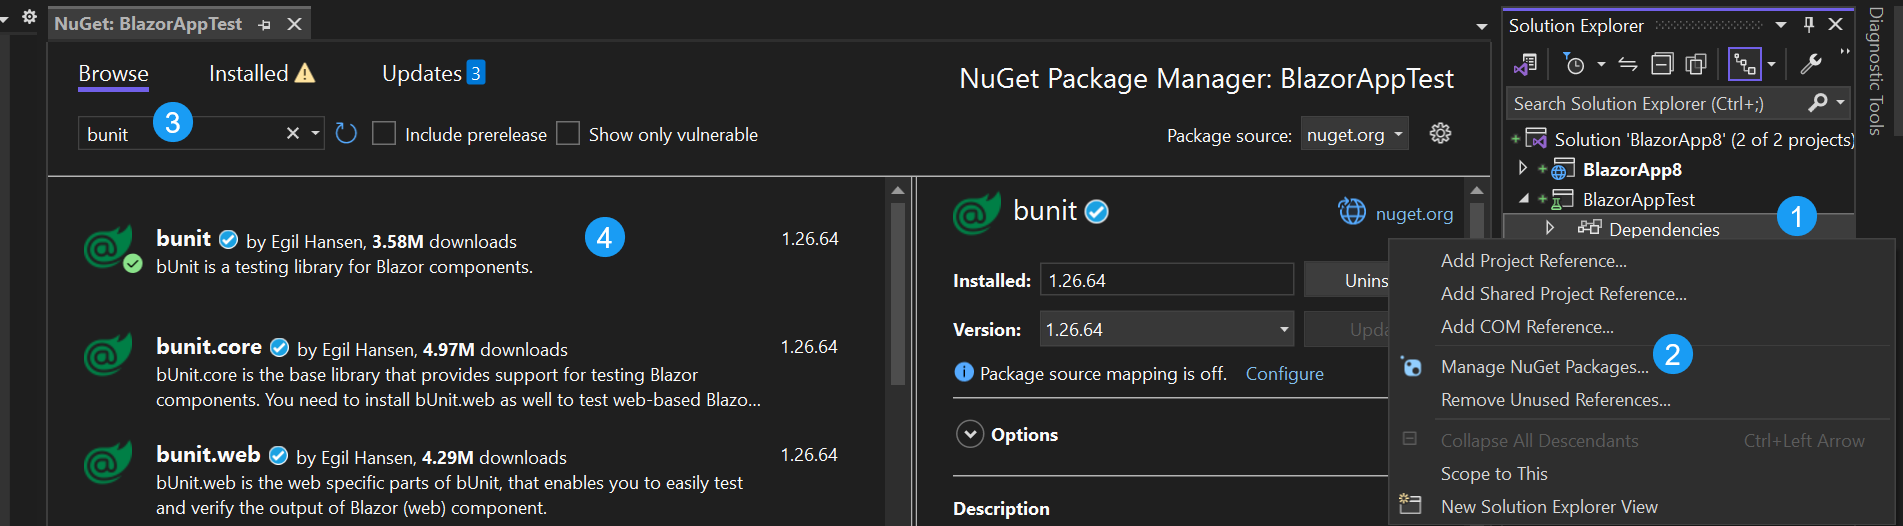
We will start by adding bUnit to the test project. The image below shows how that can be done;
Create a new Blazor component, Counter.razor:
@page "/counter"

<h1>Current Count: @currentCount</h1>

<button @onclick="IncrementCount">Increment</button>

@code {
    private int currentCount = 0;

    private void IncrementCount() => currentCount += 5;
}
Now, let’s write a BUnit test for this component. In the Tests project, add a class, CounterTests.cs:
using BlazorApp8.Components.Pages;
using Bunit;
using Xunit;

namespace BlazorAppTest
{
    public class CounterTests : TestContext
    {
        [Fact]
        public void IncrementButton_ShouldIncrementCounter()
        {
            // Arrange
            var cut = RenderComponent<Counter>();;

            // Act
            cut.Find("button").Click();

            // Assert (Check after Increment)
            cut.Find("h1").MarkupMatches("<h1>Current Count: 5</h1>");
        }
    }
}-
In this example, we use the
bUnitTestContextclass to render theCountercomponent and simulate a button click. -
The
MarkupMatchesassertion verifies that the renderedHTMLmatches the expected result after the button click.
Use any of the methods stated above to run the test. Either way, your result should look like this;
Unit Testing with Blazor Pages and Navigation
Navigation plays a crucial role in creating seamless and dynamic user experiences. This set of code snippets exemplifies the integration of navigation features within a Blazor component, along with a corresponding testing scenario.
The primary Blazor component, OldPage, features a straightforward UI with a welcoming message and a button that triggers a navigation event.
The component utilizes the NavigationManager service to seamlessly navigate the user to another page within the application.
@page "/oldpage"
@using Microsoft.AspNetCore.Components

@inject NavigationManager NavigationManager

<h3>OldPage</h3>

<button @onclick="NavigateToNewPage">Go to Another Page</button>

@code {
    private void NavigateToNewPage()
    {
        NavigationManager.NavigateTo("/newpage");
    }
}
The code snippet above creates a page OldPage with a button. When the button is clicked, it fires the NavigateToNewPage method; then it takes you to another page, /new page, using the NavigationManager.
using BlazorApp8.Components.Pages;
using Bunit;
using Microsoft.AspNetCore.Components;
using Microsoft.Extensions.DependencyInjection;

namespace BlazorAppTest
{
    public class OldPageTest : TestContext
    {
        [Fact]
        public void NavigateToNewPage_ShouldRedirectToAnotherPage()
        {
            // Arrange
            var cut = RenderComponent<OldPage>();

            // Act
            cut.Find("button").Click();

            // Assert
            var expectedUrl = "http://localhost/newpage";
            Assert.Equal(expectedUrl, cut.Services.GetRequiredService<NavigationManager>().Uri);
        }
    }
}-
The testing process begins by rendering the
OldPagecomponent using thebUnittesting library (TestContext) through the lineRenderComponent<OldPage>. This operation simulates the component’s lifecycle, allowing interaction with its rendered output. -
Subsequently, the line
cut.Find("button").Click()mimics a user clicking on the button within the rendered component. This action triggers the associated button click event as if a real user interacted with the page. -
To validate the correctness of the navigation, an expected URL is set with
var expectedUrl = "http://localhost/newpage";. This URL is formulated assuming the application is running locally on"http://localhost/". -
The final step involves an
assertionto ensure the actual URL after the button click matches the expected URL. The lineAssert.Equal(expectedUrl, cut.Services.GetRequiredService<NavigationManager>().Uri)checks whether the navigation is successful, verifying that the URL is updated to the expected value.
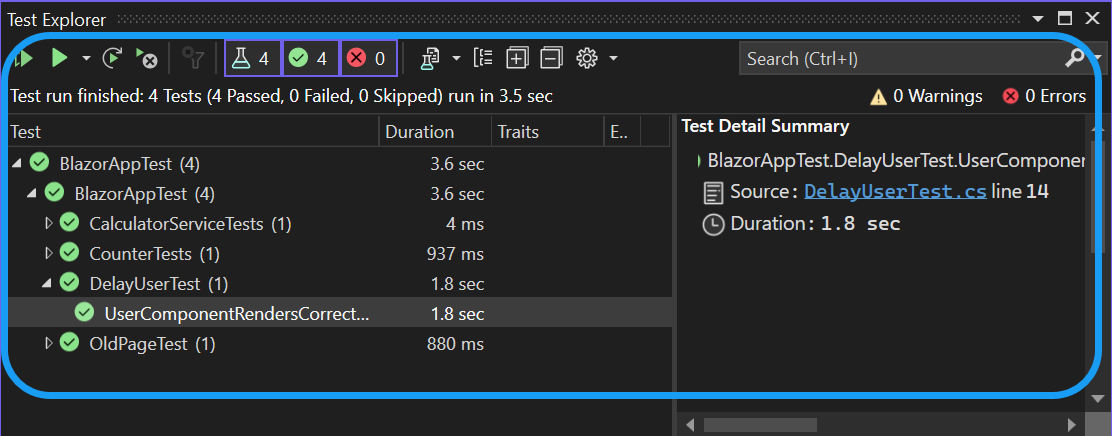
Running the test above should pass if all steps are being followed, just like in the image below.
Handling Asynchronous Operations
Users expect applications to load and render content swiftly, providing a seamless interaction.
Asynchronous operations are crucial in achieving this responsiveness, ensuring that the user interface remains interactive while data is being fetched or processed.
@page "/delayuser"

@if (isLoading)
{
    <p>Loading...</p>
}
<h1>Hello @UserName</h1>

@code {

    [Parameter]
    public string UserName { get; set; }

    private bool isLoading;

    public async Task FetchLoadingStatus()
    {
        isLoading = true;

        await Task.Delay(1000);

        isLoading = false;
    }
}
The code snippet above is an asynchronous operation; it gets called when the FetchLoadingStatus method is invoked.
It displays Loading... (because isLoading is set to true by default) for 1000ms before the text assigned to the UserName parameter is displayed to the user. Then isLoading is false.
using BlazorApp8.Components.Pages;
using Bunit;

namespace BlazorAppTest
{
    public class DelayUserTest
    {
        [Fact]
        public async Task UserComponentRendersCorrectlyAsync()
        {
            // Arrange
            using var ctx = new TestContext();

            // Act
            var cut = ctx.RenderComponent<DelayUser>(parameters => parameters
                .Add(p => p.UserName, "Blazor Test Application"));

            await cut.Instance.FetchLoadingStatus();

            // Assert
            cut.Find("h1").MarkupMatches("<h1>Hello Blazor Test Application</h1>");
        }
    }
}
I will explain the code below;
- The test method above,
UserComponentRendersCorrectlyAsync,is asynchronous and checks that theDelayUserBlazor component renders correctly under specific conditions. - It renders the component, sets parameters, simulates asynchronous data loading, and then asserts that the rendered markup matches the expected
HTML. - This test ensures the component behaves as expected and renders the correct content when loaded with the provided parameters.

Mock Testing with BUnit and xUnit
Mock testing is a very important concept in software engineering, particularly in unit testing. It involves creating simulated objects (mocks) that imitate the behavior of real objects.
This enables developers to isolate the component under test and verify its behavior in a controlled environment. Testing with mocks is particularly valuable for components that rely on external services, APIs, or data sources.
Importance of Mock Testing
- Isolation of Components: By replacing real dependencies with mocks, developers can isolate the tested unit of code. This isolation ensures that failures or unexpected behavior are confined to the specific component under test, making diagnosing and fixing issues easier.
- Improved Test Stability: Real dependencies, such as databases, network services, or external APIs, can introduce variability and instability into unit tests. Mocks provide predictable behavior, allowing tests to run consistently regardless of external factors.
- Speed and Efficiency: Testing with mocks is typically faster than testing with real dependencies, as mocks can respond instantly without requiring network calls, database queries, or other time-consuming operations.
Mocking a Service Dependency
Suppose we have a Blazor component that depends on a service for data retrieval. Here’s how we can mock the service dependency using BUnit and xUnit:
using System.Threading.Tasks;

public interface IDataService
{
    Task<string> GetData();
}
The IDataService.cs class above is an interface for the DataService class. The class inheriting this interface (a contract) must implement the GetData method.
using System.Threading.Tasks;

public class DataService : IDataService
{
    public async Task<string> GetData()
    {
        await Task.Delay(1000);

        return "Testing the component";
    }
}
The DataService.cs class above inherits the IDataService, performs an asynchronous operation, and returns a string after some seconds.
@page "/fetchdata"

@inject IDataService DataService

<h3>Data from Service: @Data</h3>

@code {
    private string Data { get; set; }

    protected override async Task OnInitializedAsync()
    {
        Data = await DataService.GetData();
    }
}
The code above (FetchData.razor) fetches data from a service during initialization and displays it in the UI (User Interface). The injected DataService is responsible for fetching the data, and the OnInitializedAsync() lifecycle method triggers the data fetching process when the component is initialized.
using Bunit;
using Moq;
using Xunit;

public class FetchDataTest : TestContext
{
    [Fact]
    public async Task FetchData_LoadsDataSuccessfully()
    {
        // Arrange
        var dataServiceMock = new Mock<IDataService>();
        dataServiceMock.Setup(x => x.GetData()).ReturnsAsync("This is the result");

        var cut = RenderComponent<FetchData>(
            builder => builder.Add(p => p.DataService, dataServiceMock.Object)
        );

        // Act
        await cut.WaitForState(() => cut.Markup.Contains("This is the result"));

        // Assert
        Assert.Contains("This is the result", cut.Markup);
    }
}
In this test, we use Moq to create a mock IDataService object and configure it to return a specific data value when its GetData method is called. We then render the FetchData with the mock IDataService injected, wait for it to load, and Assert that the expected data is displayed in the component.

Conclusion
Incorporating rigorous testing practices for your Blazor application components is essential to software engineering. Throughout this guide, we have discussed the importance of testing within the Blazor development ecosystem and the pivotal role unit testing assumes in ensuring product reliability.
We have looked at the relationship between xUnit and bUnit, emphasizing their combined efficacy in orchestrating a seamless unit testing workflow, thereby fortifying the application’s reliability and security.
It is strongly encouraged to apply the principles and techniques talked about in this guide to your development endeavors, thereby fostering robust and secure Blazor applications.