
In web development, as we know it, we often encounter a lot of frameworks and libraries, each with its own strengths, nuances, and philosophies. React, a “juggernaut” in this domain, has firmly established itself as the go-to choice for building interactive UIs. But what happens when we want to incorporate the elegance and simplicity of another emerging star—Svelte—into our existing React-based applications? Can these two powerhouses coexist harmoniously within the same codebase? The answer is a resounding “yes,” and this article aims to show you how.

Discover how at OpenReplay.com.
If you love dynamic web apps, Svelte is a framework you would love to use if you aren’t already familiar with it. Svelte is a modern JavaScript framework designed to create fast, lightweight static web applications, providing an enjoyable experience for developers and users. It allows you to construct individual, reusable components for diverse projects, including larger applications built with Angular, React, Vue, or other frameworks. Alternatively, you can use Svelte to develop entire web applications.
In most comparisons with other frameworks, Svelte stands out due to its ability to generate smaller code bundles, resulting in faster browser performance than Angular or React. This efficiency is a significant aspect of Svelte’s appeal. More importantly, developers find working with Svelte highly satisfying, as building components and applications with it feels akin to using pure JavaScript.
Why use Svelte in a React App?
Incorporating Svelte into a React app can offer several advantages, enhancing the development process and user experience. Here are a few reasons why you might consider using Svelte within the React application:
-
Performance: Svelte is renowned for its small bundle size and efficient runtime, leading to faster loading times and improved performance. Integrating Svelte components into a React app can enhance overall speed and responsiveness.
-
Simplicity: Svelte’s intuitive syntax and simplicity make it attractive, especially for developers who find React’s learning curve steep. Svelte’s approach to reactive programming and component-based architecture simplifies complex UI tasks, making the development process more straightforward.
-
Ease of Learning: If your team is already familiar with React, introducing Svelte can be relatively seamless. Svelte’s similarity to vanilla JavaScript and its minimalistic approach make it easy for React developers to grasp and adopt.
-
Reduced Boilerplate Code: Svelte requires less boilerplate code than React. This reduced code overhead can lead to more concise and readable components, improving maintainability and reducing the chance of errors.
-
Reactivity: Svelte’s reactivity system allows developers to create highly responsive user interfaces without complex state management libraries. This can simplify state handling within your React application, making it easier to manage and debug.
-
Animation and Transitions: Svelte provides a straightforward way to implement animations and transitions, making creating visually appealing user interfaces easier. Integrating Svelte components into your React app can enhance the user experience through smooth animations and transitions.
-
Community and Ecosystem: While React has a vast and established ecosystem, Svelte’s community is growing rapidly. By combining both frameworks, you can leverage the strengths of both communities, accessing a wider range of libraries, tools, and resources.
-
Micro Frontends: Svelte can be a great choice for building micro frontends within a React application. Its lightweight nature and ease of integration make it suitable for creating self-contained, independent components that can be seamlessly incorporated into a larger React-based project.
By incorporating Svelte into your React app, you can capitalize on the strengths of both frameworks, leading to a more performant, efficient, and visually appealing user interface while simplifying the development process for your team.
Integrating Svelte Into React
To get started with our project, we are going to use pnpm to create a Vite application by running this command on your terminal:
pnpm create vite svelte-inside-react --templateAfter running the command, you will get the following framework options shown below:
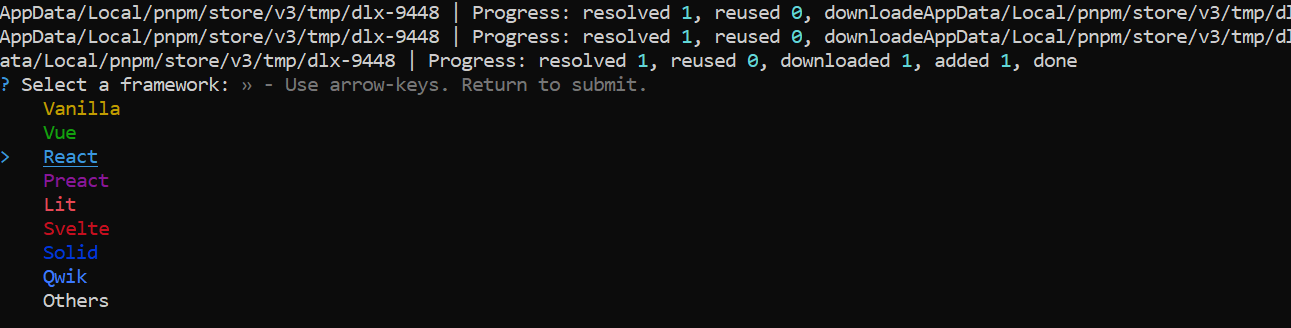
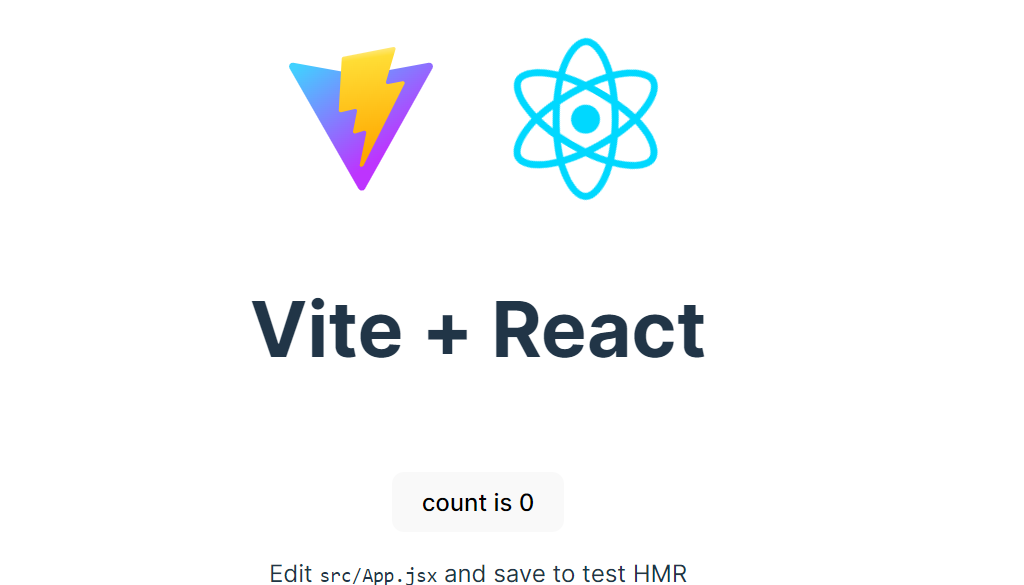
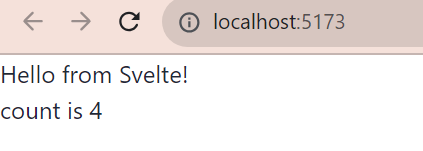
Select React and JavaScript as the main languages used in the project. After installation, run the pnpm run dev command. This is what it looks like on the browser:
Our src folder looks like this:
📦src ┣ 📂assets ┃ ┗ 📜react.svg ┣ 📜App.css ┣ 📜App.jsx ┣ 📜index.css ┗ 📜main.jsx
Next, let’s clear out the default code in the App.css and index.css files and edit the App.jsx file to look like this:
import { useState } from "react";
import reactLogo from "./assets/react.svg";
import viteLogo from "/vite.svg";
import "./App.css";
function App() {
  const [count, setCount] = useState(0);
  return (
    <div className="card">
      <button onClick={() => setCount((count) => count + 1)}>
        count is {count}
      </button>
    </div>
  );
}
export default App;
Now for the exciting moment: integrating Svelte into our React app. To do this, head over to your code editor terminal and install the Vite plugin for Svelte using the following command:
pnpm add @sveltejs/vite-plugin-svelte -DNext, we want to install Svelte by running the following command:
pnpm add svelteWe need to configure it. To do this, go to the vite.config.js file at the bottom of the directory and edit it to look like this:
import { defineConfig } from 'vite'
import react from '@vitejs/plugin-react'
import { svelte } from "@sveltejs/vite-plugin-svelte";
// https://vitejs.dev/config/
export default defineConfig({
  plugins: [react(), svelte()],
});
Here, we imported our Svelte plugin and included the code svelte(). To create our first Svelte component, navigate to the src folder and create a Hello.svelte file, then write a simple HTML code inside the file. In our case, we created a simple div tag with a “Hello from Svelte” greeting like this:
<div>
    Hello from Svelte!
</div>
In our App.jsx file, we imported it like this:
import { useState } from "react";
import Hello from "./Hello.svelte";
Now, to make it work properly, we need to first define an element where we will mount our Svelte component. Inside the App.jsx file, let’s edit the code to look like this:
import { useState, useRef, useLayoutEffect } from "react";
import Hello from "./Hello.svelte";

function App() {
  const [count, setCount] = useState(0);
  const svelteRef = useRef();
  useLayoutEffect(() => {
    while (svelteRef.current?.firstChild) {
      svelteRef.current?.firstChild?.remove();
    }
    new Hello({
      target: svelteRef.current,
    });
  }, []);
  return (
    <div>
      <div ref={svelteRef}></div>
      <button onClick={() => setCount((count) => count + 1)}>
        count is {count}
      </button>
    </div>
  );
}
export default App;
In the code snippet above, the React functional component App utilizes useState to manage a simple counter state, useRef to create a reference to a DOM element, and useLayoutEffect for imperative DOM manipulations essential for embedding the Svelte component Hello.
We strategically employed the useLayoutEffect to clear any existing children of the referenced DOM element and then mount the Svelte component, ensuring smooth integration and avoiding conflicts in DOM management. The code also features a button that, when clicked, increments the counter, demonstrating basic React state management.
We also created a div tag to reference our HTML component by using use. In this case, svelteRef.current references the HTML div element. Before this worked, we mounted the app using the useLayoutEffect hook.
When we run our app on the browser, this is what it looks like:
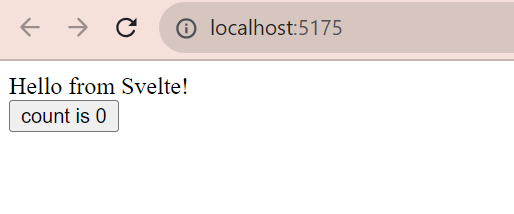
Congratulations! Your Svelte has been successfully integrated into your React App. Let’s build out the rest of our demo app using Svelte in React.
Shared CSS (Tailwind and Daisy UI) between React and Svelte
In this section, we will look at how to perform shared CSS between React and Svelte. For our CSS, we will be using Tailwind and Daisy UI.
To get started, head to your code editor terminal and run the following command:
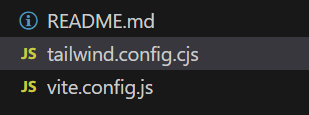
pnpm add autoprefixer postcss tailwindcss daisyui -DNext, let’s create a tailwind.config.cjs file in our directory like this:
Here we bring in our tailwind configuration:
/** @type {import('tailwindcss').Config} */
module.exports = {
  content: ["./index.html", "./src/**/*.{js,ts,jsx,tsx,svelte}"],
  theme: {
    extend: {},
  },
  plugins: [require("daisyui")],
};
Above is the stock React tailwind configuration. Daisy UI is included here, as well as Svelte. The next thing we need to do is create a postcss.config file and include the following code:
module.exports = {
  plugins: {
    tailwindcss: {},
    autoprefixer: {},
  },
};
In our index.css file, we can then bring in tailwind CSS :
@tailwind base;
@tailwind components;
@tailwind utilities;
If you rerun the project, this is what you see:
This indicates that the project is now running on tailwind CSS. In our App.jsx file, let’s edit the code to create a button. The code should look like this:
<div>
<div ref={svelteRef}></div>
<button
className="btn btn-success"
onClick={() => setCount((count) => count + 1)}
>
count is {count}
</button>
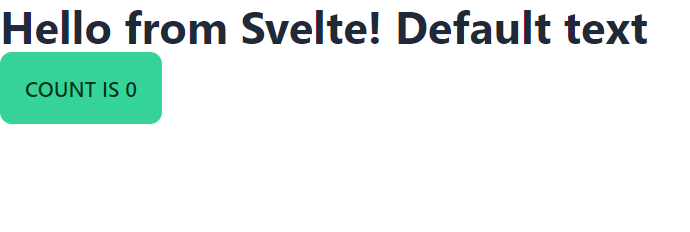
</div>Then, in our Hello.svelte file, let’s enlarge the text by writing the following code:
<div class="text-3xl font-bold">
    Hello from Svelte!
</div>
Here’s what our demo should look like after running the app on the browser:

Sending properties to our Svelte Components in React
In this section, you will learn how to send properties to our Svelte components. This starts with knowing how to define properties in Svelte. To do this, go to the Hello.svelte file and include the following code:
<script>
    export let extraText = "Default text";
</script>
<div class="text-3xl font-bold">
    Hello from Svelte! {extraText}
</div>
We first brought in a script tag, then we defined a property using the export let variable and gave it a value of “default text.” This is what it looks like on the browser:
Now, let’s go over to our App.jsx and edit the code to look like this:
new Hello({
      target: svelteRef.current,
      props: {
        extraText: "Text from React",
      },
    });
The code creates a new instance of a Svelte component Hello and mounts it within a React component, using a reference svelteRef.current to a DOM element. This setup allows for the passage of props from the React parent to the Svelte child, exemplified by the extraText prop carrying the string “Text from React.” This technique can be particularly useful when specific Svelte features are needed in a React project or during a transition phase from Svelte to React.
It should look like this on the browser:
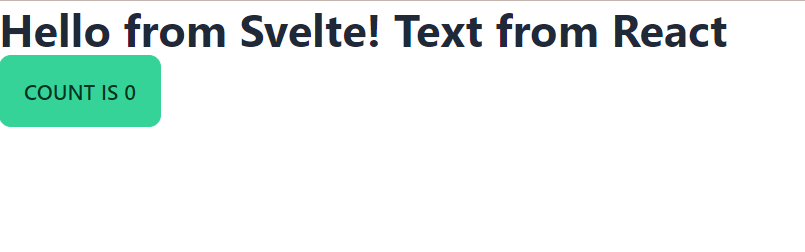
You are probably wondering what happened to the “default text” value. In our code above, we specified props and extraText in new Hello. Now, we have a property going to the Svelte component.
We can even use this for callbacks. So, in our App.jsx file, edit the code like this:
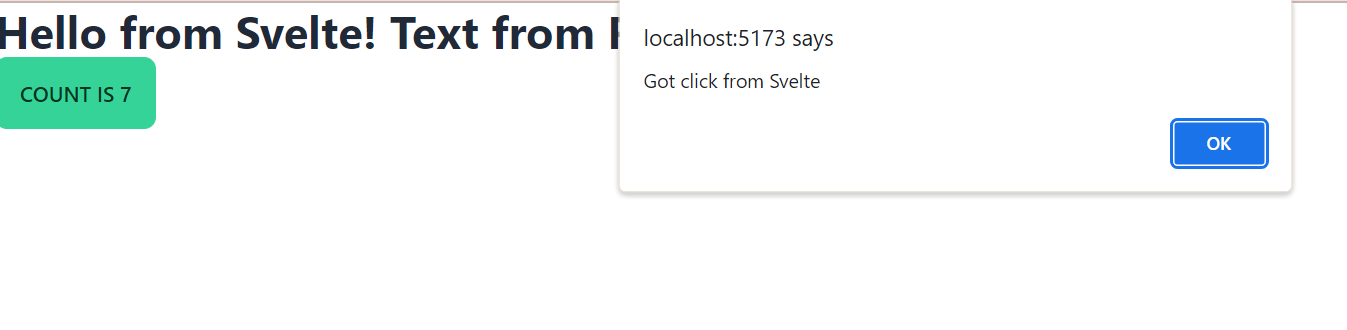
new Hello({
      target: svelteRef.current,
      props: {
        extraText: "Text from React",
        onClick: () => alert("Got click from Svelte"),
      },
    });
In the Hello.svelte file, edit it to look like this:
<script>
    export let extraText = "Default text";
    export let onClick = () => {};
</script>
<div class="text-3xl font-bold" on:click={onClick}>
    Hello from Svelte! {extraText}
</div>
When you click on the text on our app, you get this notification:
How cool is that? 🙂
Creating a Svelte Wrap in our React App
You may be wondering, “how do we make this generic so we can do this for any Svelte component? ” To answer this, what we have to do is create a Svelte wrapper function. Navigate to your App.jsx file and paste it into the following code:
import { useState, useRef, useLayoutEffect } from "react";
import Hello from "./Hello.svelte";
import { svelte } from "@sveltejs/vite-plugin-svelte";
function SvelteWrapper(Component) {
return (props) => {
const svelteRef = useRef();
useLayoutEffect(() => {
while (svelteRef.current?.firstChild) {
svelteRef.current?.firstChild?.remove();
}
new Component({
target: svelteRef.current,
props,
});
}, []);
return <div ref={svelteRef}></div>;
};
}
const SvelteHello = SvelteWrapper(Hello);
function App() {
const [count, setCount] = useState(0);
return (
<div>
<SvelteHello
extraText="This is a prop passed from React to Svelte"
onClick={() => setCount((count) => count + 1)}
/>
<button className="btn btn-success" onClick={(count) => count + 1}>
count is {count}
</button>
</div>
);
}
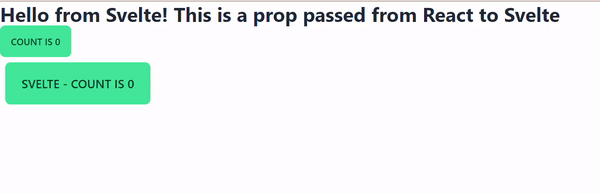
export default App;We created a SveleteWrapper function. Its job is to take a Svelte component and return a React component. This is what it looks like on the browser:

As shown in the image above, the “This is a prop passed from React to Svelte” text was gotten from React.
Shared Global State between Svelte and React
This section shows you how to do shared global states between Svelte and React. We will use Zustand, authored by Daishi Kato for this.
To get started, go to your terminal and run this command:
pnpm add zustandNext, we will create a store.js file in our src folder and include the following code:
import { create } from "zustand";
import { readable } from "svelte/store";
const useStore = create((set) => ({
  count: 0,
  increment: () => set((state) => ({ count: state.count + 1 })),
}));
export const counter = readable(useStore.getState(), (set) => {
  const unsubscribe = useStore.subscribe(set);
  return () => unsubscribe();
});
export default useStore;
In your App.jsx file, edit the code to look like this:
import { useState, useRef, useLayoutEffect } from "react";
import Hello from "./Hello.svelte";
import Counter from "./Counter.svelte";
import useStore from "./store";

function SvelteWrapper(Component) {
  return (props) => {
    const svelteRef = useRef();
    useLayoutEffect(() => {
      while (svelteRef.current?.firstChild) {
        svelteRef.current?.firstChild?.remove();
      }
      new Component({
        target: svelteRef.current,
        props,
      });
    }, []);
    return <div ref={svelteRef}></div>;
  };
}
const SvelteHello = SvelteWrapper(Hello);
const SvelteCounter = SvelteWrapper(Counter);

function App() {
  const { count, increment } = useStore();
  return (
    <div>
      <SvelteHello
        extraText="This is a prop passed from React to Svelte"
        onClick={increment}
      />
      <button className="btn btn-success" onClick={increment}>
        count is {count}
      </button>
      <SvelteCounter />
    </div>
  );
}
export default App;
In our store.js code, we started by bringing in the create function from Zustand. The create function creates a global React hook. With this, we created our useState counter.
In our App.jsx file, we imported useStore. Instead of setCount, we used increment.
Back in our store.js file, we created a readable Svelte store, invoked it, and exported it as our counter. We also wrote an initialization function that takes in set. Then we subscribe to our store. When our app fires up, it will call set. To do that, we have to create a Counter.svelte file and include the following code:
<script>
  import {counter} from "./store.js";
</script>
<button
  type="button"
  class="btn btn-success btn-lg m-2"
  on:click={$counter.increment}
>
  Svelte - Count is {$counter.count}
</button>
Here, we started by bringing in our counter. We also created a button where onClick calls the increment function we get from the store, and then we display the count. Let’s see the outcome in the GIF below:
We have shared states currently running between our React and Svelte app.
Conclusion
In conclusion, the seamless integration of Svelte into a React application, as described in this article, underscores the flexibility and interoperability of modern web frameworks. It demonstrates how the streamlined syntax and performance advantages of Svelte can complement the robustness and extensive ecosystem of React.
This integration leverages the best of both worlds—enhancing performance with Svelte’s smaller bundle sizes and simplified reactivity system while capitalizing on React’s established practices and community support. By following the steps outlined—from setting up the environment to sharing CSS and global states—developers can create a powerful combination of these technologies to build dynamic, efficient, and visually stunning web applications.
Here is the GitHub code for our project. Happy coding!!
Gain Debugging Superpowers
Unleash the power of session replay to reproduce bugs, track slowdowns and uncover frustrations in your app. Get complete visibility into your frontend with OpenReplay — the most advanced open-source session replay tool for developers.
Star on GitHub12k