Achieve Better SEO Results for your Next.JS Site
Use the Metadata API to enhance your SEO results


In this era of technology and intense competition, the prosperity of businesses and applications heavily relies on their online presence, and having a website is no longer enough; it must also be easily discoverable. For this, you must optimize your website for search engines, and this article will explore the capabilities and practical usage of the Metadata API, providing valuable insights on improving your application’s SEO rankings.

Discover how at OpenReplay.com.
Earlier this year, the Next.js team released version 13.2, which shipped with built-in support for SEO by using a new API called the Metadata API. It was built for usage with the App Router to enhance how our applications optimize for search engines by using a simple and composable API to define the metadata elements of a web page.
The Metadata API is an excellent tool for adding metadata to your application. It offers two ways of configuring metadata: static metadata and dynamic metadata. Static metadata involves exporting a metadata config object, while dynamic metadata involves using a function to generate the metadata configuration required for the page. With either type of metadata, Next.js will automatically create the necessary <meta> and <link> tags in the HTML <head> element. However, it’s important to note that only pages that are Server Components can take advantage of this API.
The type of metadata we discussed so far is referred to as config-based metadata. Another way you can add metadata to your application is through file-based metadata. With file-based metadata, you can add useful files for SEO optimization, like sitemaps, open graph images, robots.txt, etc., and Next.js will automatically generate the appropriate HTML tags in the <head> element.
How does it compare to the Head component?
Before the release of the Metadata API, adding HTML tags to the <head> element was typically done by including them in the Head component. Let’s see how the Head component can be used to include a page’s title and description in the following code:
import Head from 'next/head'

function HomePage() {
  return (
    <div>
      <Head>
        <title>My page title</title>
        <meta name="description" content="My page description">
      </Head>
      <p>Hello world!</p>
    </div>
  )
}

export default HomePage
Using the Metadata API, the same result can be achieved with the following code:
export const metadata = {
  title: "My page title",
  description: "My page description"
}

function HomePage() {
  return (
    <div>
      <p>Hello world!</p>
    </div>
  )
}

export default HomePage
From the code snippet above, we can see how this new approach provides a cleaner way to modify a page’s metadata without mixing it up with the UI code, like in the previous code snippet. Also, the Metadata API provides more flexibility and ease of use than the Head component, which requires manual configuration for each page. Both options have pros and cons and should be used depending on the specific needs of your application.
Getting started with the Metadata API
We have covered the basic functionalities and capabilities of the Metadata API. Let’s explore how we can utilize some of these features. While we’ll be using a demo online store website project as our example, our primary focus is to guide you through the essential steps of optimizing your website’s SEO using the Metadata API.
Project Setup
Open your terminal and run the following command to clone the starter project from the GitHub repository:
git clone https://github.com/josephden16/metadata-api-demo.git
cd ./metadata-api-demo
git checkout start-here
Next, you’ll need to install the project’s dependencies using npm. Run the following command:
npm installAfter the dependencies are installed, you can start the development server by running:
npm run devOpen your web browser and navigate to http://localhost:3000 to access the project.
Defining default metadata in app/layout.tsx
The layout.tsx file is a special file used to define the UI of a particular child segment and its children. Since the app/layout.tsx file will serve as the root layout that’ll be applied to all route segments in the application, it is best to define some default metadata that will appear on all pages without including them on all pages.
Go to the src/app/layout.tsx file and add the following code :
// src/app/layout.tsx

export const metadata = {
  title: "Online Store",
  description: "The best online store on the internet.",
  openGraph: {
    title: "Online Store",
    description: "The best online store on the internet.",
    url: "https://example.com",
    siteName: "Online Store",
    type: "website",
    images: [
      {
        url: "https://example.com/og-img.jpg",
      },
    ],
  },
};
Let’s review some of the properties we’ve defined in the exported metadata object:
title: This is the web page’s title, which usually appears in the browser’s title bar or tab. In this case, it’s set to “Online Store.”description: This is a brief description of the web page’s content. Search engines and social media often use it to summarize the page. It’s set to “The best online store on the internet.”openGraph: This object contains metadata specifically formatted for sharing on social media platforms like Facebook. It helps control how the page appears when shared on these platforms.title: The Open Graph title is also set to “Online Store.”description: The Open Graph description is set to the same value as the page description.url: The URL of the web page, which is set to “https://online-store.com.”siteName: The name of the website or application, which is, again, set to “Online Store.”type: This specifies the type of content; in this case, it’s a “website,” indicating it’s a general website.images: An array containing one or more images to be used as a preview when the page is shared on social media. In this code, there’s a single image specified with its URL.
These defaults include essential properties like the page title, description, and Open Graph settings for social media sharing. This saves you from redundant code and provides a basis for effective SEO and social media sharing. Remember that you can always override these defaults with metadata defined in later route segments to tailor specific pages.
Generating dynamic metadata in product pages
The Metadata API provides support for generating dynamic metadata. This means that the metadata of your web pages can be adjusted and changed dynamically based on the specific page. For instance, every product page must have unique metadata in online stores, including titles, descriptions, and images. This approach helps provide users personalized information, particularly when they share it on social media or when search engines index your page to improve SEO.
To achieve this, you’ll need to export an asynchronous function called generateMetadata that’ll handle the data fetching required for the metadata of that particular page. Let’s use a practical example to see how this works.
Go to src/app/products/[id]/page.tsx and include the following code:
// src/app/products/[id]/page.tsx

export async function generateMetadata({
  params,
}: {
  params: { id: string };
}): Promise<Metadata> {
  const product = await getProduct(params.id);
  return {
    title: product.title,
    description: product.description,
    openGraph: {
      title: product.title,
      description: product.description,
      images: [
        {
          url: product.image,
        },
      ],
    },
  };
}
From the code above, the generateMetadata function retrieves the product information through an API call using the product’s id from the route params. After obtaining the product details, a metadata object is generated, similar to the one in app/layout.tsx.
We use the’ fetch’ API to request the same endpoint in the generateMetadata function and the Page component. Although this should result in two separate API calls, React automatically memoizes requests made to the same API endpoint within the same component tree. This means that only one API call is made, and you, as a developer, don’t have to worry about the performance considerations of making several requests for the same data in your components. It’s also worth noting that Next.js won’t render your page until the generateMetadata function is complete to ensure the first part of a streamed response includes <head> tags.
This is a preview of the deployed project at https://metadata-api-demo.vercel.app/products/3 on metatags.io to show that the metatags we defined are working as expected.

Generating dynamic sitemaps with the Metadata API
Sitemaps are a structured list of web pages on a website that provide valuable information to search engines about the site’s organization, structure, and content. They serve as a roadmap for search engine crawlers, helping them navigate and index the website efficiently.
Adding a sitemap to your application can be a seamless process with the Metadata API. You have two options for creating a sitemap. The first option is to create a static sitemap.xml file within the app directory that lists all web pages. The second option is to include a sitemap.js / sitemap.ts file containing code to dynamically generate your sitemap.
Let’s create a dynamic sitemap for the online store app by adding a sitemap.ts file to the app directory with the following code:
// src/app/sitemap.ts
import { MetadataRoute } from "next";
async function fetchProducts() {
const res = await fetch("https://fakestoreapi.com/products");
const data = await res.json();
return data;
}
export default async function sitemap(): Promise<MetadataRoute.Sitemap> {
const products = await fetchProducts();
return [
{
url: "https://example.com",
lastModified: new Date(),
changeFrequency: "yearly",
priority: 1,
},
{
url: "https://example.com/products",
lastModified: new Date(),
changeFrequency: "weekly",
priority: 0.5,
},
...products.map((product: any) => ({
url: `https://example.com/products/${product.id}`,
lastModified: new Date(),
changeFrequency: "weekly",
priority: 0.5,
})),
];
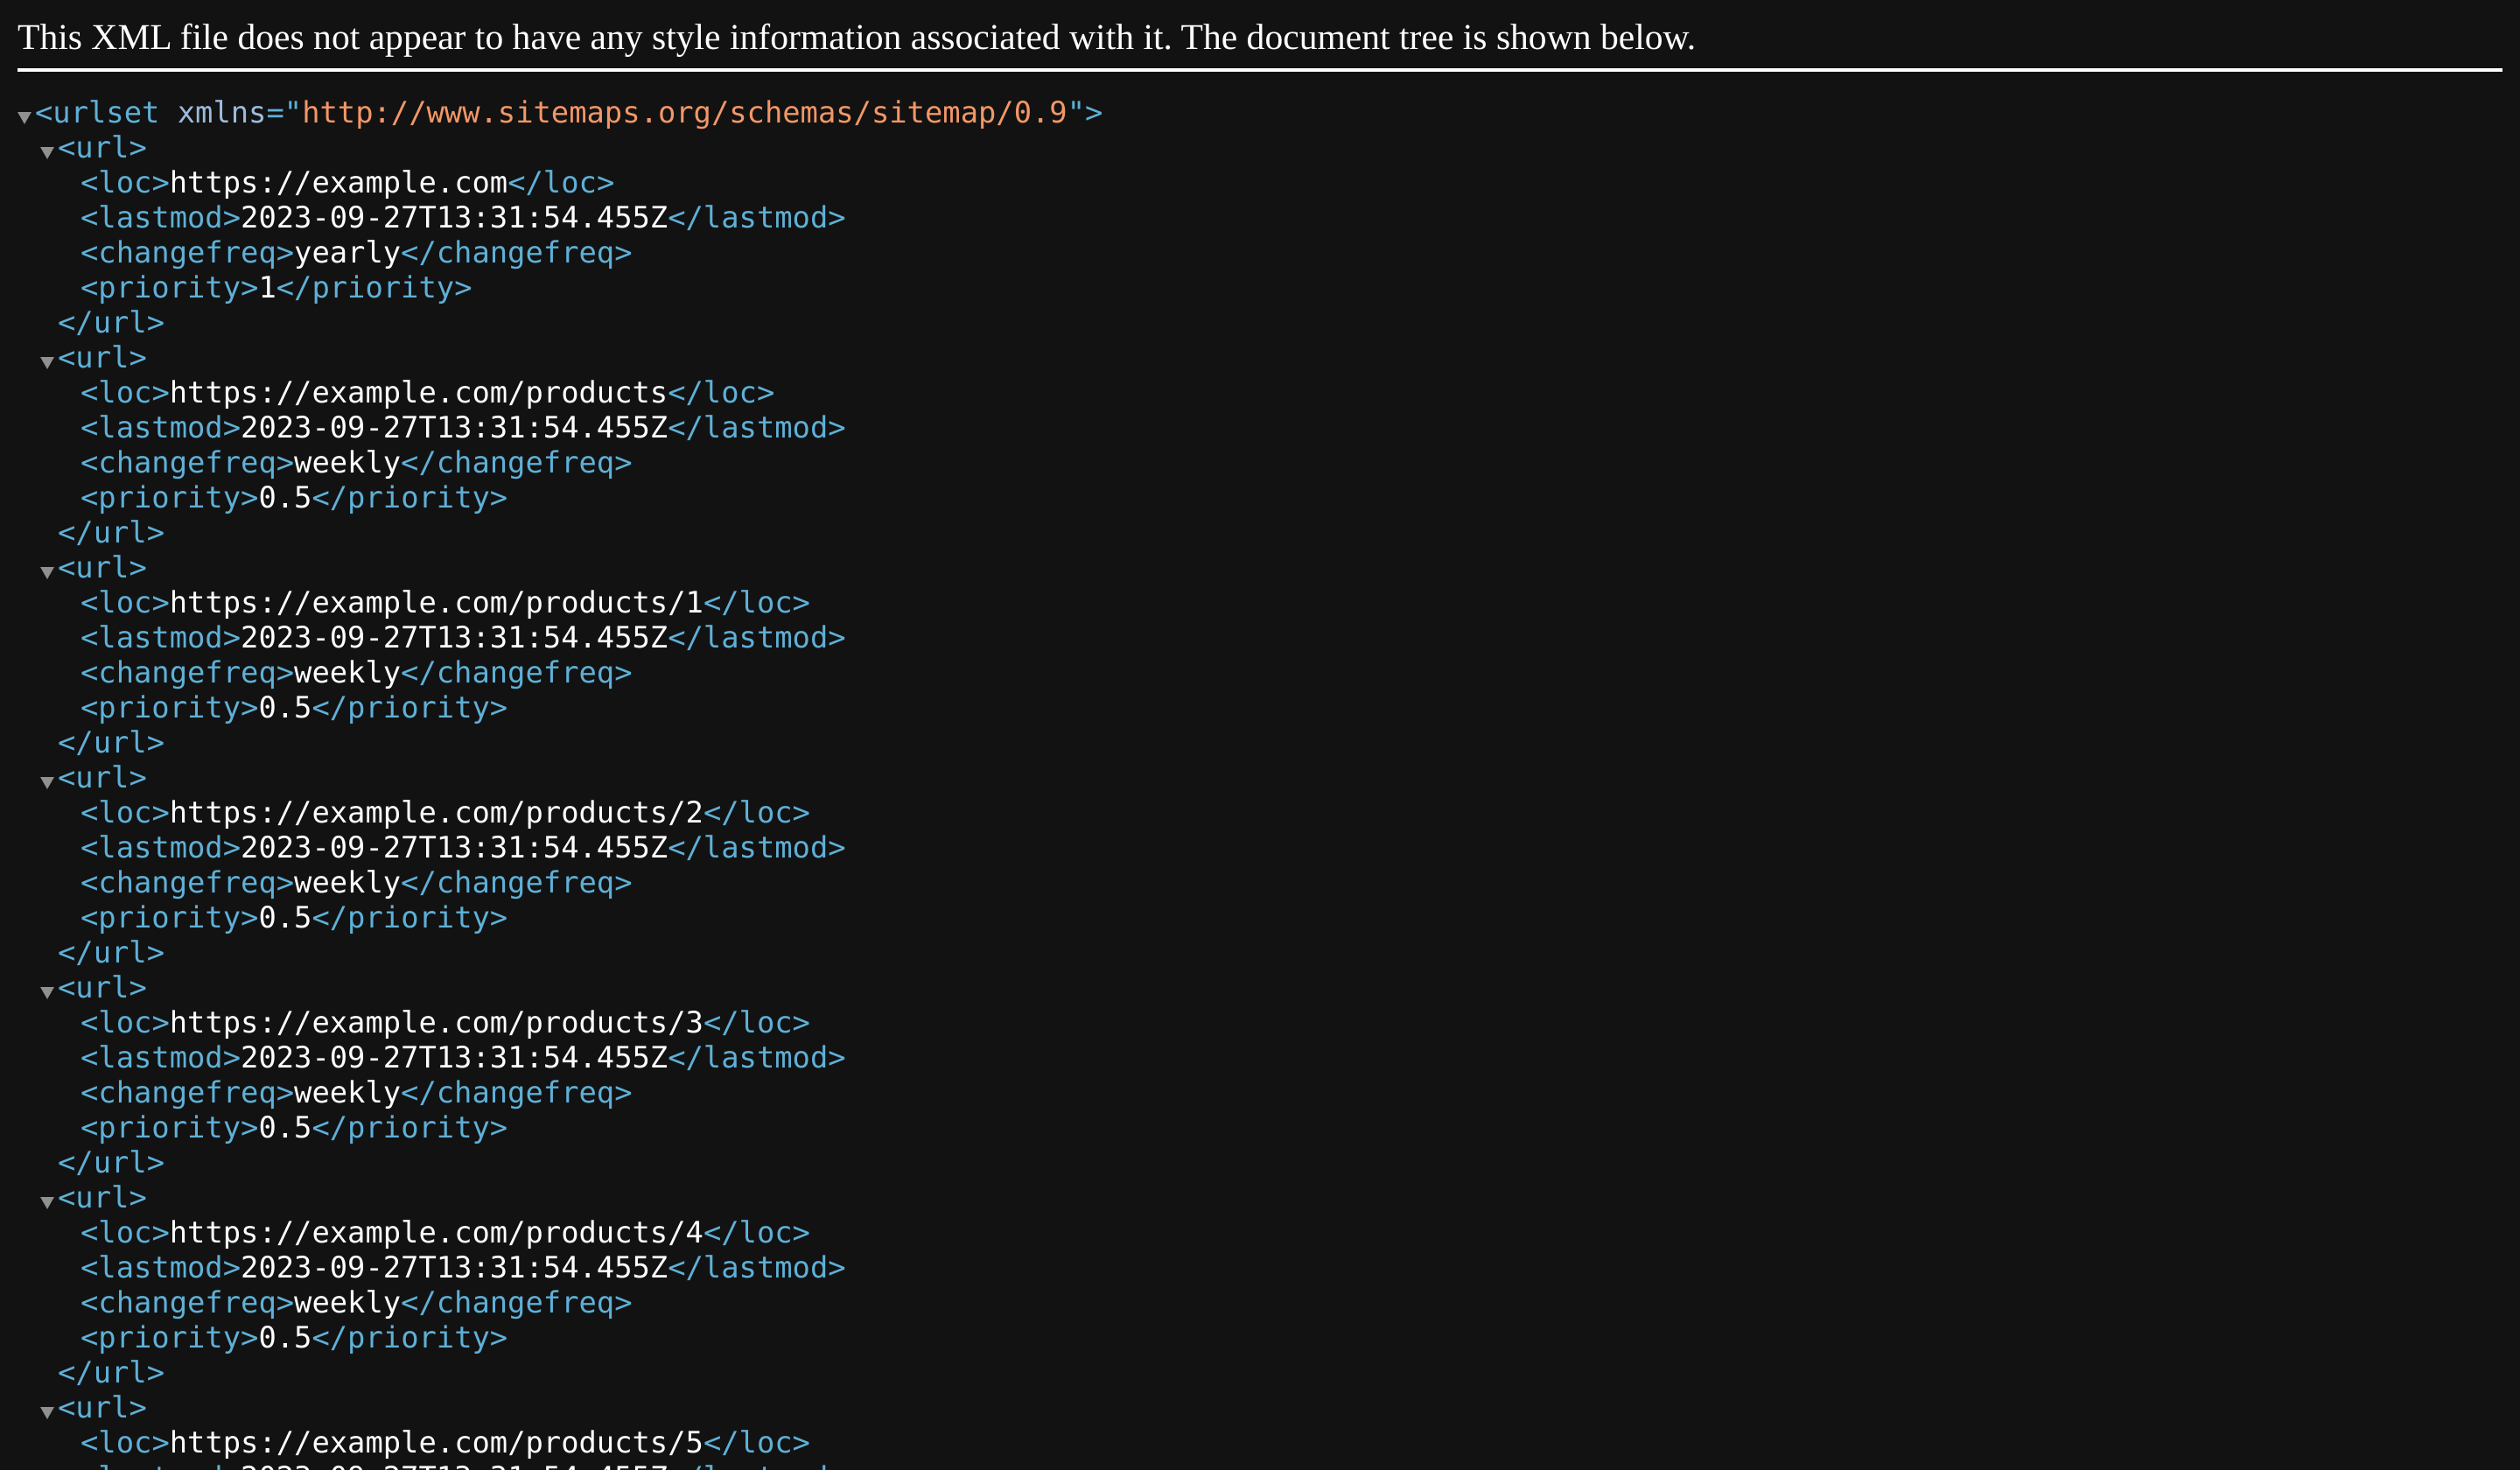
}The sitemap() function creates the application’s sitemap. It retrieves a list of products from an external API and generates an array of objects that represent URLs. Each URL object contains important metadata, such as the last modification date, change frequency, and priority. The sitemap includes the homepage, a products page, and individual product pages. The array of objects returned by the sitemap() function is used by Next.js to create the sitemap.xml file.
If you go to http://localhost:3000/sitemap.xml, you will see a sitemap file, as shown in the image below.
Pros and Cons of the Metadata API
The Metadata API offers some improvements for managing metadata in your Next.js application, particularly when it comes to enhancing your website’s search engine optimization and its ability to be shared on the internet. Now, let’s explore the pros and cons of the Metadata API. The former are:
- Simplified Metadata Management: With the Metadata API, you can now easily define metadata directly within your page or layout. This streamlines the metadata management process, making it more straightforward and intuitive.
- Dynamic Metadata Generation: The Metadata API supports dynamically generating metadata. This means you can create metadata based on dynamic data or specific conditions. This is handy for generating titles, descriptions, or other metadata elements based on your application’s content.
- File-Based Metadata Customization: The Metadata API introduces new file conventions that make it convenient to customize your pages for better SEO and sharing online. For instance, you can utilize file-based metadata to incorporate a favicon or an open graph image for specific pages.
The latter include:
- Migration Effort: If you’re using a different method to manage metadata in your existing Next.js application, switching to the Metadata API might require extra work. You’ll need to update your code to implement the new API and refactor any existing code for managing your application’s metadata.
- Limited Compatibility: The Metadata API is limited to projects that run on Next.js 13.2 and above. If you have an existing Next.js project that doesn’t incorporate these features, you won’t be able to leverage the benefits of this new API.
The Metadata API provides several benefits that will significantly improve your search engine optimization efforts. Still, the decision to migrate should be made with an understanding of the associated effort and consideration of your project’s compatibility.
Conclusion
In this article, we have covered the fundamental aspects of the Metadata API, demonstrated practical implementations, and analyzed its advantages and disadvantages. When working on SEO with Next.js, it is worth considering the Metadata API to facilitate SEO optimization.
We’d love to hear about your experiences with the Next.js Metadata API and any strategies you’ve taken to boost SEO on your web applications. Have questions or insights to share? Feel free to share your thoughts in the comment section, as we’re excited to learn from your experiences and continue this engaging discussion.
Resources
Gain Debugging Superpowers
Unleash the power of session replay to reproduce bugs, track slowdowns and uncover frustrations in your app. Get complete visibility into your frontend with OpenReplay — the most advanced open-source session replay tool for developers.
Star on GitHub12k