How To Use PrimeVue With Vue3
Using the PrimeVue library of components for Vue3 development

Vuejs is a well-known JavaScript framework. It is used to develop front-end web applications and native mobile apps. Vuejs is also known for its straightforward data binding and syntax.
Vuejs supports a variety of Ul components, including BootstrapVue, Bootstrap, TailwindCss, PrimeVue, and others. However, the focus of this article will be on how to use PrimeVue in a Vue3 application.
What is PrimeVue?
PrimeVue is a new open-source UI component in the Prime family. It is a UI framework for Vue3 and it’s a sibling of the popular PrimedNG framework. It was developed by the PrimeTek Informatics company. It is a company with years of experience in creating open-source UI solutions such as PrimeFaces, PrimeNG, PrimeReact, etc.
Why use it?
- It has excellent documentation.
- It has a large number of UI components.
- There are many predefined themes to choose from.
- It has first-class support for responsive design.
- It has support for Typescript with types and tooling help.
- It increases productivity by allowing you to do more in less time.
Installation of PrimeVue
There are two ways in which you can add PrimeVue to your Vuejs project. You can either use the NPM method or the CDN method, but don’t worry; I’ll go over both approaches here.
Step One: Install PrimeVue using the NPM method.
Add PrimeVue to your current Vuejs project by using the NPM command. Start your terminal and type the following command.
npm install primevue@^3.15.0 --save
npm install primeicons --save
Step Two: Using the CDN method.
Copy the code below and paste it inside your index.html to add PrimeVue to your existing Vuejs project using the CDN function.
<!-- Inside the head -->
<link href="https://unpkg.com/primevue/resources/themes/lara-light-indigo/theme.css" rel="stylesheet">
<link href="https://unpkg.com/primevue/resources/primevue.min.css" rel="stylesheet">
<link href="https://unpkg.com/primeicons/primeicons.css" rel="stylesheet">

<!-- Inside the Body -->
<script src="https://unpkg.com/primevue/core/core.min.js"></script>
<script src="https://unpkg.com/primevue/slider/slider.min.js"></script>
Setting up PrimeVue configuration
After you’ve added PrimeVue to your project using either of the methods described above. The next step is to configure PrimeVue.
Open your main.ts file and import PrimeVue from primeVue/config as seen below.
Vue TypeScript is what I’m using.
import { createApp } from "vue";
import App from "./App.vue";

import PrimeVue from 'primevue/config'; // here

import router from "./router";
import store from "./store";

createApp(App)
  .use(store)
  .use(router)
  .use(PrimeVue)
  .mount("#app");
Importing PrimeVue CSS
Still, inside your main.ts file, you will import the code below.
import "primevue/resources/themes/saga-blue/theme.css"; //theme
import "primevue/resources/primevue.min.css"; //core CSS
import "primeicons/primeicons.css"; //icons
The first importation in the above code is the saga-blue theme. The theme is the PrimeVue theme, but you may alter it to any of the PrimeVue themes you desire.
The second import is the PrimeVue CSS, and the last is the PrimeIcon if you want to use their icon library.
Registering a global component
Now that you’ve configured PrimeVue in your Vuejs project. The next step is to register a global component. The goal is to ensure that our configuration and installation are working.
Import the PrimeVue dialog component as shown below in the main.ts file.
import Dialog from "primevue/dialog";The dialog must be registered as a global component after importing it, as shown below.
createApp(App).use(store).use(router).use(PrimeVue).component("Dialog", Dialog).mount("#app");The dialog can now be used in your project as a global component after being registered, as shown below.
<template>
  <div class="About">

    <Dialog></Dialog>

  </div>
</template>

<script lang="ts">
import { defineComponent } from "vue";

export default defineComponent({
  name: "About",
});
</script>
Registering a local component
You’ll also want to look at registering a PrimeVue component as a local component.
Let’s say you have a section in your code that requires a button with the text “Click To Get Started”.
You want to make the button a local component because it will be used once across the project.
You also don’t want to stress creating a component for this button.
You’ll want to use PrimeVue buttons to achieve it.
To import the PrimVue button into your file, follow these steps.
<template>
  <div class="hore__secton"> </div>
</template>

<script lang="ts">
import { defineComponent } from "vue";

import Button from 'primevue/button';

export default defineComponent({
  name: "hero-section"
});
</script>
Once the import button is ready, you must add it to the Vue component instance as a component. Otherwise, Vue won’t identify it as a component.
<template>
  <div class="hore__secton"></div>
</template>

<script lang="ts">
import { defineComponent } from "vue";
import Button from 'primevue/button';

export default defineComponent({
  name: "Home",
  components: {
    Button
  },
});
</script>
You can now use the button within your template, as shown below.
<template>
  <div class="hore__secton">
    <Button label="Click To Get Started" icon="pi pi-check" iconPos="right"/>
  </div>
</template>

<script lang="ts">
import { defineComponent } from "vue";
import Button from 'primevue/button';

export default defineComponent({
  name: "Home",
  components: {
    Button
  },
});
</script>
PrimeVue buttons are an extension of standard buttons. It has a lot of built-in properties, including:
-
Label: The text you want the buttons to have.
-
Icons: The names of the icons you want to apply to the button.
-
IconPos: The position where you want the icon on the button to be, e.g. ( “left,” “right,” “bottom,” and “top.”)
-
Badge: The badge is a small status indicator for a button.
There are still more inbuilt properties that can be used, which I did not cover in this article. You can learn more about them in the documentation.
You can test the configuration by serving your project to see if it’s working.

And then for the modal:

You can confirm the installation is functioning by looking at the images above.
The creation of components and configurations both work. Feel free to start over if you didn’t come to the same conclusion.
Pay close attention to spot any potential errors or omissions.
Session Replay for Developers
Uncover frustrations, understand bugs and fix slowdowns like never before with OpenReplay — an open-source session replay tool for developers. Self-host it in minutes, and have complete control over your customer data. Check our GitHub repo and join the thousands of developers in our community.
Build A Profile Card
Creating a profile card helps us to utilize the PrimeVue component and utility classes.
It will also assist us in becoming more familiar with the documentation.
Create a folder called profile inside the views folder of your project.
Inside the profile folder, create the profile.html, profile.css, and profile.vue files.
Your HTML code will be in Profile.html, your CSS code will be in Profile.css, and your TypeScript or JavaScript code will be in profile.vue.
<template src="./profile.html"></template>
<style src="./profile.css" lang="css" scoped></style>
In the preceding code, I imported my profile.css and profile.html files inside the profile.vue file.
Copy the code below and paste it inside your profile.html file.
<div class="bg-gray-300 h-screen">
  <div class="flex flex-row w-full align-items-center h-screen w-10 m-auto">
    <div class="flex text-left font-bold w-4 h-30rem border-round-left">
      <img src="../../assets/profile.jpg" class="border-round-left" />
    </div>
    <div
      class="flex flex-row align-items-center border-round-right font-bold w-8 h-30rem px-4 bg-white"
    >
      <div class="w-full">
        <h3 class="m-0 p-0">Actor</h3>
        <h1 class="m-0 p-0">Robert Downey Jr.</h1>
        <div
          class="flex align-items-start justify-content-start w-full text-color-secondary"
        >
          <div class="flex flex-column text-justify font-bold w-6 pr-5">
            <small>ABOUT</small>
            <p>
              Robert Downey Jr. is an American actor known for roles in a wide
              variety of films
            </p>
            <span>"Iron Man"</span>
            <span>"The Avengers"</span>
            <span>"Sherlock Holmes"</span>
          </div>
          <div class="flex flex-column text-justify font-bold w-6">
            <small>QUOTES</small>
            <p>Sometimes you gotta run before you can walk</p>
            <span>- Sherlock Holmes</span>
          </div>
        </div>
        <div class="mt-5">
          <i class="pi pi-facebook mr-4 cursor-pointer"></i>
          <i class="pi pi-twitter mr-4 cursor-pointer"></i>
          <i class="pi pi-instagram mr-4 cursor-pointer"></i>
          <i class="pi pi-linkedin cursor-pointer"></i>
        </div>
      </div>
    </div>
  </div>
</div>
In the code above, I created a parent div and specified the screen height and background color for the div using inline style.
Next, inside the parent div is another div I gave flex. Flex is not a class I define myself; it is one of the PrimeFlex utility classes.
To be able to use Flex in your PrimeVue application, you must install PrimeFlex.
PrimeFlex is a CSS utility package for PrimeFace. This library has a lot of CSS utility classes, such as grid systems, flexboxes, spacing, elevation, and more.
Although it is not required to install it, it is highly recommended to add it because you are likely to need it when developing applications.
PrimeFlex is not limited to PrimeVue;; it is a stand-alone library that is used within the Prime family.
To install PrimeFlex, run the command below:
npm install primeflex --saveOnce the dependency has been installed, copy the following code and paste it into your main.ts file.
import "/node_modules/primeflex/primeflex.css";PrimeFlex also supports the CDN approach. Copy the code below and put it into your HTML head tag.
<link rel="stylesheet" href="https://unpkg.com/primeflex@3.1.2/primeflex.css">After you might have added PrimeFlex using any of the approaches, the next thing is to serve your application.
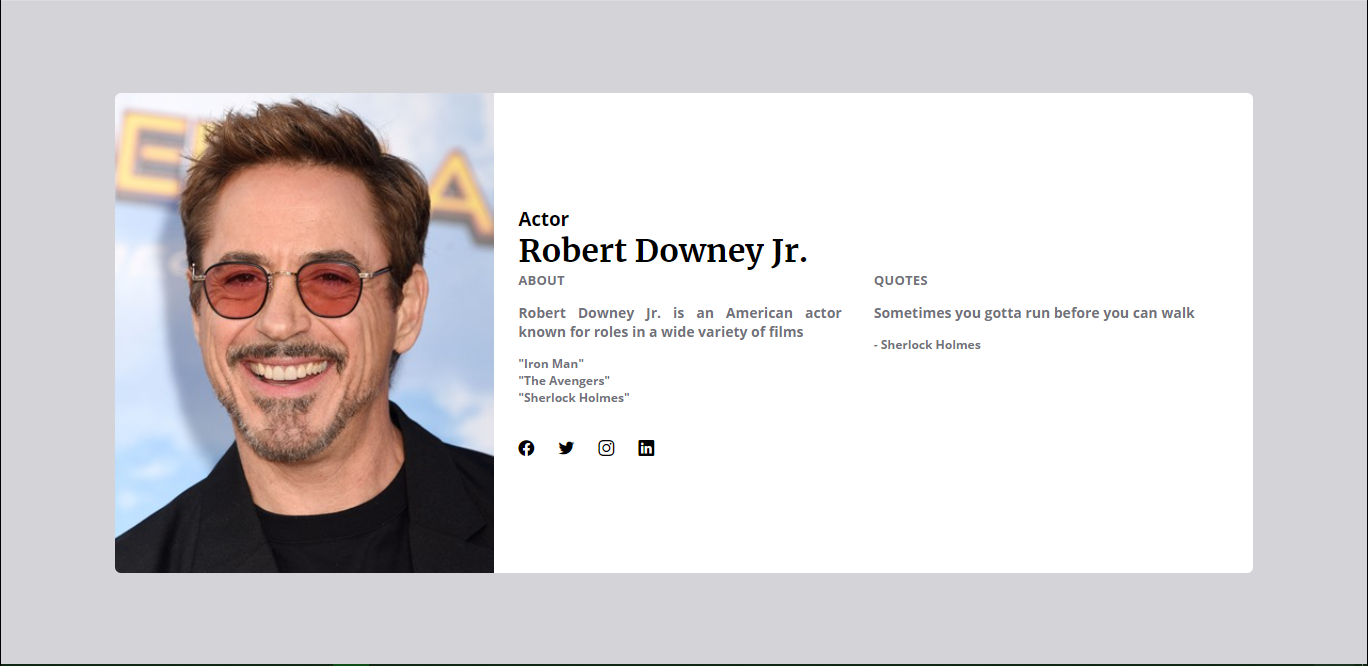
Once you’ve served your app, you should see something like the image below.
Conclusion
If you are getting started with Vue.js, PrimeVue is the best UI library for you.
PrimeVue supports a variety of Vue application choices and options such as the browser source APIs, option APIs, and Vue composition APIs.
Please like and share this article if you find it useful.
A TIP FROM THE EDITOR: Learning Vue3? Then don’t miss our Vue 3 - The Evolution Of Vue and Learn The Fundamentals Of Vue With Vue 3 articles, among many related to Vue!
Gain Debugging Superpowers
Unleash the power of session replay to reproduce bugs and track user frustrations. Get complete visibility into your frontend with OpenReplay, the most advanced open-source session replay tool for developers.